Tài liệu The Photoshop Lightroom Workbook- P7 doc
Bạn đang xem bản rút gọn của tài liệu. Xem và tải ngay bản đầy đủ của tài liệu tại đây (4.23 MB, 50 trang )
The Photoshop Lightroom Workbook
282
Let’s export some les for our Indian Creek job into a job folder. For
our work ow in this job, we are going to create a set of dng les,
a set of small jpg les for the copyright o ce and four full-size tif
les of our client’s selects from the web gallery that we had already
posted for their review.
STEPS FOR EXPORT
1. Select all your images in the Library Grid Mode (you don’t have
to select them all unless you want to process them all – this all
depends on your work ow).
2. Click on the Export button (left of the toolbar).
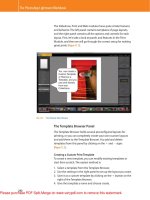
3. The Export dialog box will pop up.
4. Export Location: We are choosing Export To: Speci c folder.
Choose your hard drive where your job folders are located (we
have a hard-drive setup dedicated to holding all our job folders)
( Figure 13.22 ).
5. Create a new job folder on that drive by clicking on New folder
( Figure 13.23 ).
6. Name the folder with the le naming convention for the job.
Our job folder name is 20080616_indiancreek_job.
7. After you name the folder, choose Create ( Figure 13.24 ).
8. Then click Choose back in the directory window. You will be
brought back to the Export dialog box.
9. Check Put in Subfolder: Give the subfolder the le naming
convention for your job and le type you are creating. We will
create DNGs for our rst type of le for this job. Our subfolder is
20080616_indiancreek_dng. For our work ow, we do NOT click
on Add to This Catalog or Stack with Original ( Figure 13.25 ).
FIG 13.22 Export Dialog Box
Please purchase PDF Split-Merge on www.verypdf.com to remove this watermark.
D-65’s Lightroom Workflow
283
FIG 13.25 Exporting DNG les to Job Drive
FIG 13.23 Job Drive
FIG 13.24 Job Folder on Job Drive
10. Existing Files: Choose Ask what to do. There should not be any
existing les in this job folder, but we keep this selected as a
precaution.
11. File Naming: Under the Template drop-down menu, choose
Filename. This preserves the lename that we already have
given to our les. If you wanted to rename your les to a
Please purchase PDF Split-Merge on www.verypdf.com to remove this watermark.
The Photoshop Lightroom Workbook
284
di erent naming convention for your client’s needs, this is
where you can do it ( Figure 13.26 ).
FIG 13.26 Filename for DNG les
FIG 13.27 DNG Preview Options
12. File Settings: This is where you choose what type of le you
will be exporting. Choose the format, and then you will get
di erent options for each type of format. Under Format choose
DNG. The DNG options that we choose are:
●
JPG Preview: Medium Size
●
Image Conversion Method: Preserve Raw Image
●
Options: Check Compressed (lossless) ( Figure 13.27 ).
13. Image Sizing: This is where you can upres/downres and resize
your les if needed. Since DNG les are raw, we cannot check
any of these options. We would choose our parameters in this
section for any jpg, psd or ti les.
14. Output Sharpening: Lightroom allows output sharpening
for Screen or Print, using algorithms based on Pixel Genius’s
Photokit Sharpener. Since we are creating DNGs, there is no
output sharpening, but we would use this feature for our
processed les.
15. Metadata: There are three choices under Metadata. You can
minimize the embedded Metatdata, (which only includes the
copyright) which D-65 does not recommend. We do choose
Write Keywords as Lightroom Hierarchy option so that the
hierarchial order of the keywords is visible in your processed
les. We do not Add Copyright Watermarks on our les, but it is
a great idea for proofs for wedding photographers.
Please purchase PDF Split-Merge on www.verypdf.com to remove this watermark.
D-65’s Lightroom Workflow
285
16. Post-Processing: We might or might not do any post-processing
from export depending upon the job. Check the advanced
Chapter 16 for more information on Post-Processing on Export .
17. Click on Export. Your RAW les will be converted to DNG and
wind up in a DNG subfolder of the job folder in your job folder
hard drive (
Figure 13.28 ).
(A)
FIG 13.28 Exporting DNG’s to Job Folder
(B)
Please purchase PDF Split-Merge on www.verypdf.com to remove this watermark.
The Photoshop Lightroom Workbook
286
We will repeat the same Export steps for JPGs (or whatever type of
le you may need for the job).
EXPORTING JPEGs: The following specs are for jpg les for the
copyright o ce. We send small jpg and not high-resolution les
because there have been cases of theft at the copyright o ce
since it is a public place.
1. All the images are selected in the Library Grid Mode.
2. Choose Export. The Export dialog box will pop up.
3. Change the subfolder name to 20080616_indiancreek_jpg.
4. Under File Naming Template, keep Filename.
5. Under File Settings: Format will be JPG. Quality is 80. Color
Space sRGB.
6. Under Image Sizing: Check Resize to Fit and drop down to
Width and Height. Width is 600 and height is 600 pixels.
Resolution is 72 pixels per inch.
7. Output Sharpening: Check Sharpen For Screen. Amount
Standard. Sharpening is not critical for the copyright o ce, but
if we are going to the extent to produce these les, we might
as well sharpen them for screen use.
8. Metadata: Choose Write Keywords as Lightroom Hierarchy.
9. Post-Processing: After Export, click on Do nothing.
10. Click on Export. Your RAW les will be converted to JPGs and
wind up in a JPG subfolder of the job folder in your job folder
hard drive ( Figure 13.29 ).
EXPORTING TIFs FOR THE CLIENT: We are delivering these TIFFs
in ColorMatch RGB. Ideally we would deliver in CMYK for print use,
but we only deliver in CMYK if we get complete cooperation from
the client. When we deliver in RGB, we like to deliver in ColorMatch
RGB because it is very close to CMYK. Delivering in Adobe98 is like
saying ‘ See all of this color, well you can’t have it. ’ When delivering
in ColorMatch, the client can see and have all of the color.
1. We select the four images our client chose in the Library Grid
Mode.
2. Click on Export.
3. The Export dialog box will pop up. Change the subfolder name
to 20080616_indiancreek_cf.
4. Under File Naming Template, keep Filename.
5. Under File Settings
Format: TIFF
Compression: None
Please purchase PDF Split-Merge on www.verypdf.com to remove this watermark.
D-65’s Lightroom Workflow
287
FIG 13.29 JPG options for Export to Job Folder
Please purchase PDF Split-Merge on www.verypdf.com to remove this watermark.
The Photoshop Lightroom Workbook
288
FIG 13.30 Color Pro les for Ti le Export
Color Space: Choose Other. The Choose Pro les dialog box will
appear, check Include Display Pro les at the bottom left. Then
check ColorMatch RGB. Choose OK ( Figure 13.30 ).
6. Under Image Sizing: Do not check Resize to Fit. We are sending
full-size les to the client. Resolution is 266 ppi, which is two
times the line screen of 133 for the press the client is using.
7. Output Sharpening: Lightroom’s Output Sharpening is for
Screen and InkJet Printing. For web press printing, we would
opt for the third-party plug-in Pixel Genius Photokit Sharpener,
or leave output sharpening up to the client.
8. Metadata: Choose Write Keywords as Lightroom Hierarchy.
9. Post-Processing: After Export, click on Do nothing.
Please purchase PDF Split-Merge on www.verypdf.com to remove this watermark.
D-65’s Lightroom Workflow
289
FIG 13.31 Ti options for Export to job Folder
10. Click on Export. The four RAW les that the client selected will
be converted to TIFFs and wind up in a TIFF subfolder of the
job folder in your job folder hard drive.
11. Click on Export ( Figure 13.31 ).
The beauty of this is that you can export all of these at the same
time. You do not have to wait until one group is done to xport
another group. It is being done in the background. On the top left
Please purchase PDF Split-Merge on www.verypdf.com to remove this watermark.
The Photoshop Lightroom Workbook
290
This is an example of a job folder
after the images have been
exported into the three different
subfolders. The job folder will be
archived on at least two external
‘job folder’ hard drives.
FIG 13.32 Job Folder with DNG, JPG and Ti les
of the Library, Lightroom will show you that three operations are in
progress. If you wanted to cancel one of the operations, just click
on the X key. In Figure 13.32 below shows Job Folder with DNG, JPG
and Ti les.
UPRESING ON EXPORT
Lightroom does an excellent job with upresing as well. The upres
is done with a proprietary algorithm similar to bi-cubic smoother.
We demonstrated going down in size to create smaller jpg les for
the copyright o ce, but you can also create larger les very easily.
Follow the same steps as above, and then under Image Sizing, put
in the width and height either in inches, pixels or centimeters as
per your le requirements. If you wanted to make a 13 ϫ 19 print,
put in those numbers. It’s that easy
THE WORKFLOW CONTINUES DEPENDING UPON YOUR NEEDS.
Your and your client’s needs for export may be quite di erent,
but can be accomplished exactly the same way, using job
folders for organization .
Please purchase PDF Split-Merge on www.verypdf.com to remove this watermark.
291
CHAPTER 14
Archiving
B
ackup is important, but backup is not preservation. The goal
of D-65 is to have an EXACT DUPLICATE of our catalog and all
of our image les on multiple media in multiple locations.
An archive should be made regularly because computers are not
100% reliable. Hard disks malfunction, viruses and worms corrupt
data, and people can make simple mistakes like deleting when
they didn’t mean to. Having an archive means you can recover
from such things, with little if any data lost.
As Hurricane Wilma passed over Miami Beach, we watched and
took photographs from our 17th- oor apartment, which faces
the Atlantic Ocean on the front side and the intercoastal on the
backside. We live on a very narrow section of Miami Beach, which
is roughly one foot above sea level. Our building ooded, our
docks were destroyed, and as the storm intensi ed we watched
the roof come o of the building next store. As we looked out
Please purchase PDF Split-Merge on www.verypdf.com to remove this watermark.
The Photoshop Lightroom Workbook
292
at the raging storm, we realized that our building was actually
swaying a few degrees in this class 3 hurricane. We were lucky, but
countless others weren’t so lucky (
Figures 14.1 and 14.2 ) .
FIG 14.2 Damage from Class 3
hurricane in Miami Beach
FIG 14.1 Damage from Class 3
hurricane in Miami Beach
Please purchase PDF Split-Merge on www.verypdf.com to remove this watermark.
Archiving
293
Hurricanes, typhoons, tornados, res, volcanoes, blizzards and
even tsunamis are a fact of life and they wreck lives and destroy
property. After each of these events you can usually nd a news
clip where a reporter asks someone if they were able to save or
salvage any of their belongings. You know the scenario because you
have seen it hundreds of times. There is a man or woman crying at
the scene of what was once their house devastated, because they
lost everything. When they can salvage items, they typically grab
the memories such as wedding pictures, baby pictures or family
pictures. While having little nancial value, these items contain
tremendous personal value and are irreplaceable. Did you ever stop
and think what would happen to your image collection even if it
were on multiple media, but all stored in only one location?
If you are a digital photographer, your data are the heart of your
business. Not having an archive strategy in place means that a single
malfunction can leave your business without any data, thus placing
the future of the business in jeopardy. We also suggest having a place
that is safe for the computer in the event that one has to evacuate.
We wrap all of drives and computers in hefty garbage bags and put
them in the bathtub at the approach of a hurricane. The bathtub will
hopefully drain if there is water and most bathrooms have doors to
o er extra protection. Ideally, a bathroom on an upper oor would
be a wiser choice than one in the basement.
Duplicate Backups in Multiple Places
While basic computer backups are a good start, a backup is not
necessarily an archive and does little good if your home or o ce is
destroyed. Not only do you need backups, but it is critical to have
multiple backups both o -site and on-site and in the case of an
emergency. Redundancy, redundancy, redundancy … You simply
can’t have too much.
An archive should be made to separate media that you can pick
up and take with you. This way, copies of your data can be kept
o -site, such as in another building. This helps protect against
disasters, which may obliterate the building where your computer
is held.
Backups
Ideally the copies made onto backup media should be performed
with a system that veri es the data. This is fundamental di erence
Please purchase PDF Split-Merge on www.verypdf.com to remove this watermark.
The Photoshop Lightroom Workbook
294
between a backup and an archive. Most folks simply perform
a nder copy, better known as drag and drop. These are very
unreliable and permissions, preferences and other needed les
may or may not copy this way. We personally like Retrospect
from Dantz but there are other products as well. These products
perform a bit for bit duplication and then verify that the data has
been duplicated correctly.
The frequency of your ‘ backups ’ should be dictated by how much
data you would like to lose if there is a problem on your machine.
For example, if you enter a signi cant amount of data every day,
you should be backing up every day. If you rarely enter new data,
then backups once per week might be okay.
‘ Backups ’ should be tested. Make sure that you can read the
backup you just wrote. Nothing is worse than having a disaster and
discovering that your backups are unreadable for some reason or
another. If you are burning CDs or DVDs, it is usually su cient to
have the burner program ‘ verify ’ the disk after it is written.
Of course, if you don’t have a computer or power, you won’t
be able to access the data, but just knowing your personal and
business documents are safe is reassuring. A good battery backup
system is always a wise idea, but if power is out for an extended
period of time even this will fail.
Emergency Power
In case of an emergency, you may or may not have access to
power, phone service or the Internet, and the need for power is
the foundation of maintaining communication. Power alternatives
include extra batteries, conversion battery kits, power cords that
hook up to a cigarette lighter, solar packs and manual power
generators.
Preparation is the best defense against nature and other unforeseen
disasters. While a personal bomb shelter might help you rest easily
at night, there are more practical ways to protect your personal
treasures. In the event of a catastrophe, take care of your family,
friends, property and community. Knowing that you’re prepared
will let you do just that. Personal safety is always rst, of course. But
after that, it’s insurance companies and state and federal agencies
that bear the burden of helping families rebuild and replace material
possessions.
Please purchase PDF Split-Merge on www.verypdf.com to remove this watermark.
Archiving
295
Archiving Lightroom
Archiving is di erent than backing up during processing or in
the eld. An archive is duplicated bit for bit, veri ed for integrity
duplicated for both on-site and o -site storage.
There are several backups available within Lightroom, but it
is important to understand exactly what they do and more
importantly what they don’t do. When we rst import les into
Lightroom, the import dialog box o ers a backup.
Import Backup
This backup causes confusion to many photographers. They assume
that they have a full backup of the imported les, but in fact this
backup only provides a backup of the exact structure of the les on
the memory card with their original camera-generated names. So
if you rename in the import dialog box, apply a metadata preset,
or any develop preset or keywords, none of this will be available in
the backup. This is really just a temporary insurance plan, should
something go wrong with the import ( Figure 14.3 ) .
Backup of images exactly like
they appear on the memory
card.
FIG 14.3
Please purchase PDF Split-Merge on www.verypdf.com to remove this watermark.
The Photoshop Lightroom Workbook
296
The Catalog Backup
The Catalog Backup in Lightroom’s Catalog Preferences is a backup
of the Catalog. While the preferences clearly say Catalog Backup,
most photographers fail to recognize exactly what this means.
It means exactly what it says. It is a backup of the Catalog. It is not
backing up any of the images associated with the catalog. So
if you have your catalog and your images on drive A and you have
chosen to backup to drive B, the only backup occurring is a backup
of the catalog, not the images. If drive A fails and this is where you
had your images, you would have just lost all your images.
Additionally, there are choices for when to perform this Catalog
Backup. They are all for time periods when Lightroom starts.
Typically, when we are ready to use Lightroom we want to start
using it. The last thing we want is to have to wait for a complete
backup of the catalog, which could take hours. A better choice
here would have been to perform a backup when the catalog is
closed. We don’t have Lightroom backup our catalog. We do the
backup ourselves daily ( Figure 14.4 ).
FIG 14.4 Catalog Backup
The D-65 Archive
We want to duplicate and backup our Images and our Lightroom
Catalog. As we said earlier, the Lightroom Library and Catalog are held
Please purchase PDF Split-Merge on www.verypdf.com to remove this watermark.
Archiving
297
on an internal terabyte drive with nothing else on it. We duplicate the
Lightroom Library and Catalog on a second internal terabyte drive as
well as two external drives, one of which goes o -site.
Media Choice for Archive
D-65 chooses hard drives as our main means of archiving for
many reasons. Do you remember SyQuest drives? Eventually, they
became obsolete. The same happened with the Zip format, optical
drives and on and on. The only standard that has been around to
stand the test of time is the hard drive. When a newer and faster
drive comes out, it is easy to simply duplicate an entire drive.
Many people make their main archive on CD, but there are many
problems with CD. The average CD may only last for 3–10 years
and that is a potential disaster for archiving. Further, if one has
20 gigs of data per photo shoot, there could easily be 50 CDs or
more per shoot.
D-65 Drive Structure
As discussed in Chapter 4, D-65 chooses to have a large internal
drive holding our images (Lightroom Library) and our Catalog. The
structure of that drive looks like Figure 14.5 .
One Terabyte internal hard
drive that holds images and
the Lightroom_Catalog.
The drive is named
Lightroom_Library.
Folders of images and .xmp
files are organized by
yyyymmdd_jobname in each
calendar year.
The Lightroom_Catalog and
Previews are held in the
catalog folder on the
Lightroom_Library drive.
FIG 14.5 D65 Lightroom_Library drive structure
Please purchase PDF Split-Merge on www.verypdf.com to remove this watermark.
The Photoshop Lightroom Workbook
298
The folders are organized by
yyyymmdd_jobname. These
folders contain the raw files
and the .xmp sidecar files.
The files themselves inside the
folder structure.
FIG 14.6
The Catalog Folder has two
files, Lightroom_Catalog.
Previews. Irdata and
Lightroom_Catalog.lrcat files
FIG 14.7
In each year folders are folders for each job named yyyymmdd_
jobname, and in each job folder are the raw les and
corresponding .xmp les as in
Figure 14.6 .
The Lightroom_Catalog folder contains two les, the Lightroom_
CatalogPreviews.lrdata and the Lightroom_Catalog.lrcat les
(
Figures 14.7 and 8 ) .
Please purchase PDF Split-Merge on www.verypdf.com to remove this watermark.
Archiving
299
Making the Backups
The Lightroom_Library gets duplicated to a second internal drive
called Lightroom_Library_bk and that drive gets duplicated to a
drobo. Even the Drobo gets duplicated to a second Drobo that gets
stored o -site . For detailed information on drobo see: http://www.
Datarobotics.com .
As we said earlier, we do not use drag and drop of nder copies
as they are not very accurate. Instead, we use software speci cally
designed for archiving. We use Retrospect. For detailed information
on Retrospect see:
When we use Retrospect, we choose Duplicate and not Backup.
The backup is proprietary. The duplicate choice is a bit for bit
duplication with full veri cation of the data at the end. To use we
simply choose a source and a destination ( Figure 14.9 ).
FIG 14.8 Internal Backup and Backup
to a Drobo
FIG 14.9 Using Retrospect for Backup
Please purchase PDF Split-Merge on www.verypdf.com to remove this watermark.
The Photoshop Lightroom Workbook
300
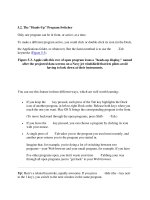
Summary
Backup is important, but backup is not preservation. The goal of
D-65 is to have an EXACT DUPLICATE of our catalog and all of our
image les on multiple media in multiple locations. ARCHIVES
should be made regularly because computers are not 100%
reliable. Hard disks malfunction, viruses and worms corrupt data,
and people can make simple mistakes such as deleting when they
didn’t mean to. Having an archive means you can recover from
such things, with little if any data lost.
If you are a digital photographer, your data is the heart of your
business. Not having an archive strategy in place means that a
single malfunction can leave your business without any data, thus
placing the future of the business in jeopardy.
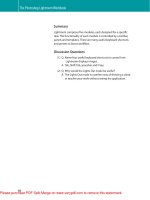
Discussion Questions
(1) Q. Why have on-site and o -site backups of your data?
A. While basic computer backups are a good start, a
backup is not necessarily an archive and does little
good if your home or o ce is destroyed. Not only do
you need backups but it is critical to have multiple
backups both o -site and on-site and in the case of an
emergency.
(2) Q. Why is it important to have at least one backup on
portable media?
A. An archive should be made to separate media that you
can pick up and take with you. This way, copies of your
data can be kept o -site, such as in another building. This
helps protect against disasters, which may obliterate the
building where your computer is.
(3) Q. What are nder copies and what is the problem with
them?
A. Most folks perform a nder copy, better known as drag
and drop. These are very unreliable and permissions,
preferences and other needed les may or may not copy
this way. We personally like software called Retrospect
from Dantz, but there are other products as well. These
products perform a bit for bit duplication and then verify
that the data has been duplicated correctly.
Please purchase PDF Split-Merge on www.verypdf.com to remove this watermark.
Archiving
301
(4) Q. How often should you backup?
A. The frequency of your ‘ backups ’ should be dictated
by how much data you would like to lose if there is a
problem on your machine. For example, if you enter
a signi cant amount of data every day, you should be
backing up every day. If you rarely enter new data, then
backups once per week might be okay.
(5) Q. What is backed in Lightroom if you choose backup on
import?
A. This backup only provides a backup of the exact structure
of the les on the memory card with their original
camera-generated names. So if you rename in the import
dialog box, apply a metadata preset, or any develop
preset or keywords, none of this will be available in the
backup. This is really just a temporary insurance plan
should something go wrong with the import.
(6) Q. What is backed up if you choose backup in Lightroom’s
Catalog Preferences?
A. It is only backing up the catalog itself. It is not backing
up any of the images associated with the catalog. So if
you have your catalog and your images on drive A and
you have chosen to backup to drive B, the only backup
occurring is a backup of the catalog not the images. If
drive A fails and this is where you had your images, you
would have just lost all your images.
(7) Q. A complete backup of Lightroom would include backing
up what?
A. An exact duplication of the Lightroom Catalog and all the
image les associated with the catalog.
Please purchase PDF Split-Merge on www.verypdf.com to remove this watermark.
This page intentionally left blank
Please purchase PDF Split-Merge on www.verypdf.com to remove this watermark.
303
CHAPTER 15
Importing and Exporting
Catalogs and Synchronizing
Your Laptop and Desktop
The question is:
I use a Laptop in the eld when shooting and a desktop at the
studio/home for processing and management in Lightroom. If the
‘ main ’ Library and Catalog live on my ‘ main ’ computer’s external
drive in the studio/home, how do I sync the Catalog on my laptop
or other computers with the ‘ main ’ Library and Catalog?
There are several ways to do this, and we will review them
here. Most of them are rather confusing, but D-65 has found
work-around solutions that work e ortlessly and awlessly.
Your methodology for accomplishing this needed task will be
dependent upon what you need to do on your les in the eld.
Please purchase PDF Split-Merge on www.verypdf.com to remove this watermark.
The Photoshop Lightroom Workbook
304
D-65 Concepts for Syncing
Concept One
You maintain your archive on your studio or home desktop
computer. You have a shoot on location, so you will be bringing a
laptop and external hard drive on location with you. You may do
some work on the les you capture in the eld, but your main goal
is simply to take the images you captured in the eld and bring
them back to the studio, placing the images from the eld into the
studio/home machine.
In this scenario, you don’t need to bring or care about bringing
your entire archive of images with you on your shoot.
Solution for Concept One
(1) The easiest and most reliable way to accomplish this is to
bring a laptop and a hard drive on location. For absolute
protection, we like to bring two or three external drives on
location, duplicating the contents to all three drives just to
protect against drive failure or theft or any other unforeseen
circumstance.
(2) Ideally reformat the hard drive before the trip. We usually take
LaCie Rugged drives or SmartDiskFireLite drives, but any
decent portable drive will do.
(3) Before we leave, we create a new Lightroom catalog on the
freshly reformatted drive. We name the catalog yyyymmdd_
Lightroom_Catalog. Refer to Chapter 4, for creating a new
catalog.
(4) We shoot the job(s) on location and import to the portable
drive into a folder named yyyymmdd_jobname. Our external
drive will then have a Lightroom catalog and a folder of
images from that job.
(5) We tweak our les in the eld and apply metadata and
keywords, edit out ones we don’t want, rank and essentially
accomplish as much as we can.
(6) Verify that, in Lightroom’s Catalog Settings & gt;Metadata,
you have checked Automatically Write Changes into XMP. If
you don’t have that checked in your Catalog Settings, after
you are done tweaking all your les, select them all in the
Library Module grid mode and choose Save Metadata to File
(Command S).
(7) We return home and plug the external drive into our main
computer at the studio or at home.
Please purchase PDF Split-Merge on www.verypdf.com to remove this watermark.
Importing and Exporting Catalogs and Synchronizing Your Laptop and Desktop
305
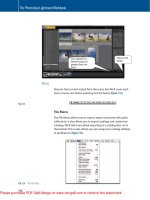
(8) We start Lightroom on the main computer and choose Import
from the lower left-hand corner of the Library Module. We
select the folder to import.
(9) The Import Photos dialog box will pop up (
Figure 15.1 ) .
FIG 15.1 Import Dialog Box
●
File Handling: Choose Copy photos to a new location and
add to catalog.
●
C o p y t o : The location that all of our image les reside, our
Lightroom_Library hard drive on our main computer. In our
case, it will be /Volumes/Lightroom_Library/2008.
●
Organize: By original folders.
●
Don’t reimport suspected duplicates.
●
File Naming: Template Filename – because we named the
les in the eld.
●
Information to Apply: None, because we have applied
Develop Settings, Metadata and Keywords in the eld.
●
Choose 1:1 Initial Previews because we always want 1:1
previews.
(10) The les are imported, and all material is now on our main
drive. The portable drive can be reformatted and readied for
the next location shoot.
Concept Two
You maintain your archive on your studio or home desktop. You
are leaving for a location shoot and want to bring your entire
Please purchase PDF Split-Merge on www.verypdf.com to remove this watermark.
The Photoshop Lightroom Workbook
306
catalog and images from studio/home with you. You do not plan
on working on any old images, but you want the material with you
just in case. You have a shoot on location, so you will be bringing
a laptop and external hard drive with you. You may do some work
on the les you capture in the eld, and your goal is to add these
images to your existing catalog that you took with you in the eld.
When you return to the home or o ce, you want to update the
catalog at home with the material you captured in the eld.
Solution for Concept Two
(1) The easiest and most reliable way to accomplish this is to
bring a laptop and an external hard drive that is large enough
to hold the entire Lightroom catalog and image les and
can be reformatted on location. For absolute protection, we
like to bring two or three drives on location, duplicating the
contents to all three drives just to protect against drive failure,
theft or any other unforeseen circumstance.
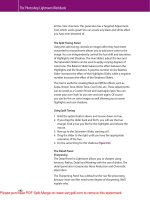
(2) Ideally reformat the hard drive you are bringing on location
before the trip. We usually take use a large 750-GB Seagate
or 1-TB Seagate external drive. This drive is reformatted so
that there is nothing on it, and it is given the same name as
our main drive at home. We color code them di erently. We
do this so that le paths will be exactly the same. If we had
di erent named drives for location, our les could lose their
paths, and rather than pointing each folder to the right drive,
this is an easier solution (
Figure 15.2 ).
The drive for location is given a
different icon, but the name of
the drive is exactly the same
name as that of the main drive.
FIG 15.2
Please purchase PDF Split-Merge on www.verypdf.com to remove this watermark.