Tài liệu Beginning SQL Server Modeling- P8 doc
Bạn đang xem bản rút gọn của tài liệu. Xem và tải ngay bản đầy đủ của tài liệu tại đây (1.54 MB, 20 trang )
CH APTER 6 SQL SERVER MODELING SERVICES – THE FOLDER PATTERN
141
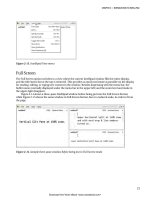
How do you modify this code to add a folder value? Folders are provided by the Repository.Item
model, so you’ll add an import directive for Repository.Item. Next you’ll add a Folder value to the
CarComponent type definition, ascribed to the FoldersTable type: This is shown in Figure 6-2.
Figure 6-2. Adding the Folder value, showing two reference errors
But there’s a hitch: The M compiler is unable to resolve the Repository.Item model and
FoldersTable type references. You need to specifically add a reference to the Repository.Item model,
which, as it turns out, is contained in the Repository.dll file. Adding a reference to the Repository.dll file
must be done in the context of a Visual Studio project, and Intellipad provides a way of doing this:
1. Expand the Intellipad window horizontally to make room for a split window by
dragging the right edge of the window to the right (see Figure 6-3).
2. Click on the View tab of the Intellipad window.
3. Select the Split Vertically option. This will split the Intellipad window vertically
into two M mode panes, each with the same M code as appeared before the
split.
Download from Wow! eBook <www.wowebook.com>
Download from Wow! eBook
<www.wowebook.com>
CHAPTER 6 SQL SERVER MODELING SERVICES – THE FOLDER PATTERN
142
Figure 6-3. Splitting the Intellipad window vertically to allow room for opening a new project
Now you can add the new project:
1. Click the File tab of the Intellipad window.
2. Select the New Project option (as shown in Figure 6-4).
3. A Save Project As dialog box will pop up to allow you to name the new project
file to be saved. Enter a project filename of CarModelWithFolder (see Figure
6-5). This will display a new project template in the right pane (see Figure 6-6).
Figure 6-4. Adding a new project. (Right pane has focus.)
Download from Wow! eBook <www.wowebook.com>
CH APTER 6 SQL SERVER MODELING SERVICES – THE FOLDER PATTERN
143
Figure 6-5. Saving the new project file as CarModelWithFolder.csproj
Figure 6-6. New project (right pane)
The new project file is based on a generic template, and includes a single generic M file (Model.m
under the MCompile section) and a number of models under the Reference section. These are all models
provided in the SSMod Services Base Domain Library (BDL). I’ll say more about the BDL in the next
chapter.
Note that the Reference section doesn’t include a reference to Repository, and the
CarModelWithFolder.m file is not included in the MCompile section. So the project is initialized as a
generic project from a template, and has nothing to do with the model you are working with. Model.m is
a placeholder code file, which could be used to flesh out the code you actually want for the domain
Download from Wow! eBook <www.wowebook.com>
CHAPTER 6 SQL SERVER MODELING SERVICES – THE FOLDER PATTERN
144
model definition file. Figure 6-7 shows the generic Model.m code after being created as a result of setting
up the new project.
Figure 6-7. Generic Model.m file created with the new project file
Note that the module is named the same as the M code file that was loaded in Intellipad at the time
you created the project, but it doesn’t reflect the code in that file. If you had started by creating the
project file first, then using the Model.m file as the starting point for building the model code, this would
have worked just as well. Intellipad, however, currently provides no facility for renaming the M file
within the project file.
If you’ve been following along with this example by executing the steps in Intellipad, you may have
noticed that the configuration text in the project file is read-only and can’t be modified in this view. You
can, however, add the CarModelWithFolder.m file to the project file by clicking the Project menu and
selecting the Add Project File option, as shown in Figure 6-8.
Figure 6-8. Setting up to add the CarModelWithFolder.m file to the MCompile section of the project file
This will bring up an Open file dialog box, as shown in Figure 6-9. Select CarModelWithFolder.m
and click the Open button.
Download from Wow! eBook <www.wowebook.com>
CH APTER 6 SQL SERVER MODELING SERVICES – THE FOLDER PATTERN
145
Figure 6-9. Selecting the CarModelWithFolder.m file to add to the MCompile section of the project file
This will add the M file under the MCompile section of the project (see Figure 6-10).
Figure 6-10. CarModelWithFolder.m file added to the MCompile section of the project file
Although you now have the desired CarModelWithFolder.m included in the project, you also still
have the unwanted baggage of the Model.m file in this section. Here are the steps you can take to
remove it:
1. Click on the Project menu and select Toggle Project View.
2. This displays the project file in XML format. Unlike the read-only Project view,
the XML view can be edited.
Download from Wow! eBook <www.wowebook.com>
CHAPTER 6 SQL SERVER MODELING SERVICES – THE FOLDER PATTERN
146
3. Figure 6-11 is the result. I’ve highlighted the line for Model.m under the
<ItemGroup> tag.
4. Highlight and delete this line.
5. Toggle again to the normal Project Mode view.
6. Save the project file with Ctrl+S, or by using the File
Save menu option.
Figure 6-11. Project mode in XML with Model.m line highlighted
Figure 6-12 shows the result.
Figure 6-12. CarModelWithFolder project with the updated MCompile section (bottom of right pane)
You can see that the resolution errors for Repository.Item and Folders.Table are still occurring, so
what’s been done so far hasn’t fixed this situation. You want to add a reference for the Repository.Item
Download from Wow! eBook <www.wowebook.com>
CH APTER 6 SQL SERVER MODELING SERVICES – THE FOLDER PATTERN
147
model under the Reference section of the project definition. Repository.Item (and other SSMod Services
models) is defined in the Repository.dll file. This file resides in the bin folder where the SQL Server
Modeling framework is installed on your computer. The default path for this file, assuming a standard
installation for the SSMod software, is normally C:\Program Files\Microsoft Oslo\1.0\bin\Repository.dll.
(If your instance of SQL Server Modeling was installed to a different path, you will need to make the
appropriate adjustment in what follows to point to the folder where Repository.dll resides.)
To add this reference, click again on the Project menu, and select the Add Project Reference option
(see Figure 6-13).
Figure 6-13. Adding the project reference for Repository.dll
Navigate to the location of the Repository.dll file, select that file, and click the Open button (shown
in Figure 6-14).
Figure 6-14. Adding the reference to C:\Program Files\Microsoft Oslo\1.0\bin\Repository.dll in the Open
dialog box
Download from Wow! eBook <www.wowebook.com>
CHAPTER 6 SQL SERVER MODELING SERVICES – THE FOLDER PATTERN
148
The result is shown in Figure 6-15: Repository.dll has been added in the Reference section of the
project listing, and the resolution errors have disappeared in the M Mode view of the model M file (left
pane).
Figure 6-15. Adding Repository.dll as a reference in the project file fixes the resolution errors.
Now that Repository.Item and FoldersTable can be resolved in the M code, make sure the cursor is
in the right pane and use Ctrl+S to save the project file again. (This should save it as the
CarModelWithFolder.csproj in the same folder where the CarModelWithFolder.m M code file is located.)
The next step is to deploy the model to SQL Server. This time you’ll use Visual Studio 2010, rather
than Quadrant, to deploy. Start by opening SQL Server, and select Open Project (see Figure 6-16).
Figure 6-16. Opening the project in Visual Studio 2010
Download from Wow! eBook <www.wowebook.com>
CH APTER 6 SQL SERVER MODELING SERVICES – THE FOLDER PATTERN
149
Browse to the folder where CarModelWithFolder.csproj was just saved, and select this file (shown in
Figure 6-17). Select the file in the Open Project dialog box.
Figure 6-17. Opening the project file in Visual Studio 2010
The title bar of the Visual Studio window should indicate the name of the project. In case the
Solution Explorer is not already open in Visual Studio, select the View
Solution Explorer menu option
to open it (see Figure 6-18).
Figure 6-18. Opening the Solution Explorer in Visual Studio
Figure 6-19 shows the Visual Studio window with the Solutions Explorer pane.
Download from Wow! eBook <www.wowebook.com>
CHAPTER 6 SQL SERVER MODELING SERVICES – THE FOLDER PATTERN
150
Figure 6-19. Visual Studio with Solution Explorer open
After the Solution Explorer is opened, expand the References section to make sure everything is in
order (you want to see that the reference to Repository.dll is still there), and double-click
CarModelWithFolder.m to display the M code (as shown in Figure 6-20). Verify that no error indications
appear in the M code pane.
Figure 6-20. CarModelWithFolder.m code (left pane)
Download from Wow! eBook <www.wowebook.com>
CH APTER 6 SQL SERVER MODELING SERVICES – THE FOLDER PATTERN
151
Now you should be ready to use the M Deployment facility in Visual studio to deploy the model to
SQL Server. Right-click on the project name in the Solution Explorer pane (top line), and select
Properties from the context menu that appears (see Figure 6-21).
Figure 6-21. Opening the project properties pane in Solution Explorer
Select the M Deployment section in the project Properties pane on the left (see Figure 6-22).
Figure 6-22. Selecting the M Deployment section in project properties
Download from Wow! eBook <www.wowebook.com>
CHAPTER 6 SQL SERVER MODELING SERVICES – THE FOLDER PATTERN
152
Verify that everything is in order in the Database Connection String. It should look exactly the same
as displayed in Figure 6-22, unless you are connecting to a remote database or running with other than
Windows security.
Now right-click again on the Project name in Solution Explorer and select Deploy, as shown in
Figure 6.23.
Figure 6-23. Selecting the Deploy option for the CarModelWithFolderProject
Once the deployment has executed, you should see a Deploy Succeeded indication in the lower left
of the Visual Studio window (shown in Figure 6-24). If you get a Deploy Failed indication, check the
Database Connection String field in the M Deployment pane.
Download from Wow! eBook <www.wowebook.com>
CH APTER 6 SQL SERVER MODELING SERVICES – THE FOLDER PATTERN
153
Figure 6-24. Deploy Succeeded indication (lower-left corner)
If everything is correct, you’re finished with Visual Studio, and you can go ahead and close it.
To verify that the model has been deployed to SQL Server, open Quadrant and click on View
Explorer
Repository on the menu (see Figure 6-25).
Figure 6-25. Opening an Explorer on the Repository in Quadrant
In the Repository Explorer, expand the CarModel database by clicking the triangle icon to the left of
the label, then left-click and drag the CarComponents table onto the Quadrant canvas, as shown in
Figure 6-26.
Download from Wow! eBook <www.wowebook.com>
CHAPTER 6 SQL SERVER MODELING SERVICES – THE FOLDER PATTERN
154
Figure 6-26. Dragging the CarModel.CarComponents table onto the Quadrant canvas
This should open a view of the empty CarComponents table, as shown in Figure 6-27. The
important thing to check here is that there is a Folder column included in the table column headings.
Figure 6-27. Checking that a Folder column is included in the CarComponents table
Download from Wow! eBook <www.wowebook.com>
CH APTER 6 SQL SERVER MODELING SERVICES – THE FOLDER PATTERN
155
Next, you need to set up the QC folders in the Repository, since these have not been created yet. To
do this, start by opening SQL Server Management Studio. Connect to the database where the Repository
is defined. This should be the default (local) connection, unless you have been working with a different
database connection.
Expand the Databases section (click on the + sign) in the Object Explorer pane, then the Repository,
then the Views section (as shown in Figure 6-28). Always use the Views section of the Repository to
create and manage folders, not the Tables section. This is important because using the Tables section to
create or manage folders can cause inconsistencies or integrity problems within the Repository’s folders
setup. Correcting such problems can be difficult.
Figure 6-28. Expanding the Repository database and preparing to expand the Views section
After expanding Views, scroll down through the Views listing and right-click on the
Repository.Item.Folders view (see Figure 6-29). Select the Edit Top 200 Rows option.
Download from Wow! eBook <www.wowebook.com>
CHAPTER 6 SQL SERVER MODELING SERVICES – THE FOLDER PATTERN
156
Figure 6-29. Right-click the Repository.Item.Folders view and select Edit Top 200 Rows in the context
menu.
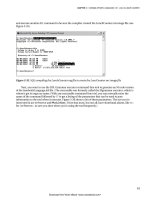
This should bring up a table view of Repository.Item.Folders in the right pane of SQL Server
Management Studio, as shown in Figure 6-30. The view will show all folders defined under the
Repository and is updatable. New folders are added simply by entering the Id, folder name, and parent
folder Id in the bottom row of the view (the one with all NULL entries). If the folder is to be a top-level
folder, leave the Folder value as NULL. The red exclamation point icon
indicates that the row has
been changed, but not yet committed.
Download from Wow! eBook <www.wowebook.com>
CH APTER 6 SQL SERVER MODELING SERVICES – THE FOLDER PATTERN
157
Figure 6-30. Adding the parent QC Level folder in the Repository.Item.Folder table view
Clicking in the left cell of the bottom row (the one with all NULL entries) commits the changes just
made to the QC Level folder row above. In this bottom row, enter 510 for the next Id, QC Critical for the
Name value, and 500 for the parent Folder Id value. Figure 6-31 shows these changes before the row has
been committed. After this row is committed, enter and commit the next two folders, with the following
values:
• Id: 520; Name: QC High; Folder: 500
• Id: 530; Name: QC Standard; Folder: 500
Download from Wow! eBook <www.wowebook.com>
CHAPTER 6 SQL SERVER MODELING SERVICES – THE FOLDER PATTERN
158
Figure 6-31. Adding a new Folder row in the Repository.Item.Folders table view
Figure 6-32 shows the four QC folders in the Repository.Item.Folders table after adding and
committing.
Figure 6-32. Repository.Item.Folders table view after the QC Level folders have been added and committed
Download from Wow! eBook <www.wowebook.com>
CH APTER 6 SQL SERVER MODELING SERVICES – THE FOLDER PATTERN
159
Returning to the CarComponents Explorer in Quadrant (see Figure 6-33), you can begin filling out
your model by entering new component instances (just as you did in Chapter 4, using Data
Insert
Item or Ctrl+I), but this time specifying the QC Level of each component by selecting the QC Folder
name.
Figure 6-33. Adding new CarComponents values and specifying the QC Level for each
In Figure 6-33, I’ve defined four CarComponent values with their associated QC Level values. You
can see that there are two components with a QC Level of High (the Top Level Car system, and the Drive
Train), and two with a QC Level of Critical (Wheel Assembly and Disk Brake). So, theoretically, you
should be able to take a look in the QC Level folders and see if the contained component values
correspond to this model as it’s been configured so far.
If you go back to the Repository Explorer, you can see the top QC Level folder. Expanding the parent
QC Level folder (by clicking on the triangle icon on the left), you see the three QC Level child folders:
Critical, High, and Standard (shown in Figure 6-34).
Download from Wow! eBook <www.wowebook.com>
CHAPTER 6 SQL SERVER MODELING SERVICES – THE FOLDER PATTERN
160
Figure 6-34. Repository Explorer with the QC Level folder expanded
If you drag the QC Level folder onto the Quadrant canvas, this will open a separate Explorer just on
the QC folders. Figure 6-35 shows this explorer, and you see exactly what you might have anticipated:
two CarComponents with a QC Critical level, and two with a QC High level. The QC Standard folder is
showing null, since you haven’t yet assigned any CarComponents to that QC level.
Figure 6-35. Quadrant Explorer showing the QC Level folders and their contained values
If you had defined other types (and their extents) in the application that you wanted to include in
the QC system, then those extents (tables) could also be reflected within the QC Level folders. Say that
Download from Wow! eBook <www.wowebook.com>