Tài liệu Using Samba-2. Installing Samba on a Unix System-P2 pdf
Bạn đang xem bản rút gọn của tài liệu. Xem và tải ngay bản đầy đủ của tài liệu tại đây (90.18 KB, 21 trang )
Table 2.2: Samba Installation Directories
Directory Description
/usr/local/samba/swat
SWAT files
/usr/local/samba/var
Samba log files, lock files, browse list info, shared
memory files, process ID files
Throughout the remainder of the book, we occasionally refer to the location
of the main tree as samba_dir. In most configurations, this is the base
directory of the installed Samba package: /usr/local/samba .
WARNING: Watch out if you've made /usr a read-only partition. You will
want to put the logs, locks, and password files somewhere else.
Here is the installation that we performed on our machine. You can see that
we used /usr/local/samba as the base directory for the distribution (e.g.,
samba_dir):
#
make install
Using FLAGS = -O -Iinclude -I./include -I./ubiqx -
I./smbwrapper -
DSMBLOGFILE="/usr/local/samba/var/log.smb" -
DNMBLOGFILE="/usr/local/samba/var/log.nmb" -
DCONFIGFILE="/usr/local/samba/lib/smb.conf" -
(content omitted)
The binaries are installed. You may restore the old
binaries
(if there were any) using the command "make
revert". You may
uninstall the binaries using the command "make
uninstallbin"
or "make uninstall" to uninstall binaries, man
pages and shell
scripts.
(content omitted)
===================================================
=========
The SWAT files have been installed. Remember to
read the
README for information on enabling and using SWAT.
===================================================
=========
If the last message is about SWAT, you've successfully installed all the files.
Congratulations! You now have Samba on your system!
2.3.1 Final Installation Steps
There are a couple of final steps to perform. Specifically, add the Samba
Web Administration Tool (SWAT) to the /etc/services and /etc/inetd.conf
configuration files. SWAT runs as a daemon under inetd and provides a
forms-based editor in your web browser for creating and modifying SMB
configuration files.
1. To add SWAT, add the following line to the end of the /etc/services
file:
swat 901/tcp
2. Add these lines to /etc/inetd.conf. (Check your inetd.conf manual page
to see the exact format of the inetd.conf file if it differs from the
following example.) Don't forget to change the path to the SWAT
binary if you installed it in a different location from the default
/usr/local/samba.
swat stream tcp nowait.400 root
/usr/local/samba/bin/swat swat
And that's pretty much it for the installation. Before you can start up Samba,
however, you need to create a configuration file for it.
2.4 A Basic Samba Configuration File
The key to configuring Samba is its lone configuration file: smb.conf. This
configuration file can be very simple or extremely complex, and the rest of
this book is devoted to helping you get deeply personal with this file. For
now, however, we'll show you how to set up a single file service, which will
allow you to fire up the Samba daemons and see that everything is running
as it should be. In later chapters, you will see how to configure Samba for
more complicated and interesting tasks.
The installation process does not automatically create an smb.conf
configuration file, although several example files are included in the Samba
distribution. To test the server software, though, we'll use the following file.
It should be named smb.conf and placed in the /usr/local/samba/lib
directory.[ 5
]
[5] If you did not compile Samba, but instead downloaded a binary, check
with the documentation for the package to find out where it expects the
smb.conf file. If Samba came preinstalled with your Unix system, there is
probably already an smb.conf file somewhere on your system.
[global]
workgroup = SIMPLE
[test]
comment = For testing only, please
path = /export/samba/test
read only = no
guest ok = yes
This brief configuration file tells the Samba server to offer the directory
/export/samba/test on the server as an SMB/CIFS share called test. The
server also becomes part of the named workgroup SIMPLE, which each of
the clients must also be a part of. (Use your own workgroup here if you
already know what it is.) We'll use the [test] share in the next chapter to
set up the Windows clients. For now, you can complete the setup by
performing the following commands as root on your Unix server:
#
mkdir /export/samba/test
#
chmod 777 /export/samba/test
We should point out that in terms of system security, this is the worst setup
possible. For the moment, however, we only wish to test Samba, so we'll
leave security out of the picture. In addition, there are some encrypted
password issues that we will encounter with Windows clients later on, so
this setup will afford us the least amount of headaches.
If you are using Windows 98 or Windows NT Service Pack 3 or above, you
must add the following entry to the [global] section of the Samba
configuration file: encrypt passwords = yes. In addition, you must
use the smbpassword program (typically located in /usr/local/samba/bin/ ) to
reenter the username/password combinations of those users on the Unix
server who should be able to access shares into Samba's encrypted client
database. For example, if you wanted to allow Unix user steve to access
shares from an SMB client, you could type: smbpassword -a steve.
The first time a user is added, the program will output an error saying that
the encrypted password database does not exist. Don't worry, it will then
create the database for you. Make sure that the username/password
combinations that you add to the encrypted database match the usernames
and passwords that you intend to use on the Windows client side.
2.4.1 Using SWAT
With Samba 2.0, creating a configuration file is even easier than writing a
configuration file by hand. You can use your browser to connect to
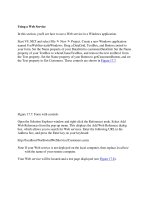
http://localhost:901, and log on as the root account, as shown in Figure 2.1
.
Figure 2.1: SWAT login
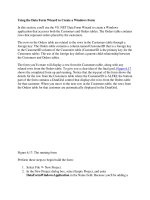
After logging in, press the GLOBALS button at the top of the screen. You
should see the Global Variables page shown in Figure 2.2
.
Figure 2.2: SWAT Global Variables page
In this example, set the workgroup field to SIMPLE and the security field to
USER. The only other option you need to change from the menu is one
determining which system on the LAN resolves NetBIOS addresses; this
system is called the WINS server. At the very bottom of the page, set the
wins support field to Yes, unless you already have a WINS server on your
network. If you do, put the WINS server's IP address in the wins server field
instead. Then return to the top and press the Commit Changes button to
write the changes out to the smb.conf file.
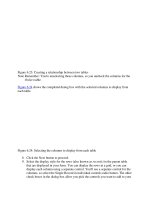
Figure 2.3: SWAT Share Creation screen
Next, press the Shares icon. You should see a page similar to Figure 2.3
.
Choose Test in the field beside the Choose Share button. You will see the
Share Parameters screen, as shown in Figure 2.4
. We added a comment to
remind us that this is a test share in the smb.conf file. SWAT has copies of
all that information here.
Figure 2.4: SWAT Share Parameters screen
If you press the View button, SWAT shows you the following smb.conf file:
# Samba config file created using SWAT
# from localhost (127.0.0.1)
# Date: 1998/11/27 15:42:40
# Global parameters
workgroup = SIMPLE
[test]
comment = For testing only, please
path = /export/samba/test
read only = no
guest ok = yes
Once this configuration file is completed, you can skip the next step because
the output of SWAT is guaranteed to be syntactically correct.
2.4.2 Testing the Configuration File
If you didn't use SWAT to create your configuration file, you should
probably test it to ensure that it is syntactically correct. It may seem silly to
run a test program against an eight-line configuration file, but it's good
practice for the real ones that we'll be writing later on.
The test parser, testparm, examines an smb.conf file for syntax errors and
reports any it finds along with a list of the services enabled on your machine.
An example follows; you'll notice that in our haste to get the server running
we mistyped workgroup as workgrp (the output is often lengthy, so we
recommend capturing the last parts with the tee command):
Load smb config files from smb.conf
Unknown parameter encountered: "workgrp"
Ignoring unknown parameter "workgrp"
Processing section "[test]"
Loaded services file OK.
Press enter to see a dump of your service
definitions
# Global parameters
[global]
workgroup = WORKGROUP
netbios name =
netbios aliases =
server string = Samba 2.0.5a
interfaces =
bind interfaces only = No
(content omitted)
[test]
comment = For testing only, please
path = /export/samba/test
read only = No
guest ok = Yes
The interesting parts are at the top and bottom. The top of the output will
flag any syntax errors that you may have made, and the bottom lists the
services that the server thinks it should offer. A word of advice: make sure
that you and the server have the same expectations.
If everything looks good, then you are ready to fire up the server daemons!
2.5 Starting the Samba Daemons
There are two Samba processes, smbd and nmbd, that need to be running for
Samba to work correctly. There are three ways to start:
• By hand
• As stand-alone daemons
• From inetd
2.5.1 Starting the Daemons by Hand
If you're in a hurry, you can start the Samba daemons by hand. As root,
simply enter the following commands:
#
/usr/local/samba/bin/smbd -D
#
/usr/local/samba/bin/nmbd -D
At this point, Samba will be running on your system and will be ready to
accept connections.
2.5.2 Stand-alone Daemons
To run the Samba processes as stand-alone daemons, you need to add the
commands listed in the previous section to your standard Unix startup
scripts. This varies depending on whether you have a BSD-style Unix
system or a System V Unix.
2.5.2.1 BSD Unix
WIth a BSD-style Unix, you need to append the following code to the
rc.local file, which is typically found in the /etc or /etc/rc.d directories:
if [ -x /usr/local/samba/bin/smbd]; then
echo "Starting smbd "
/usr/local/samba/bin/smbd -D
echo "Starting nmbd "
/usr/local/samba/bin/nmbd -D
fi
This code is very simple; it checks to see if the smbd file has execute
permissions on it, and if it does, it starts up each of the Samba daemons on
system boot.
2.5.2.2 System V Unix
With System V, things can get a little more complex. System V typically
uses scripts to start and stop daemons on the system. Hence, you need to
instruct Samba how to operate when it starts and when it stops. You can
modify the contents of the /etc/rc.local directory and add something similar
to the following program entitled smb :
#!/bin/sh
# Contains the "killproc" function on Red Hat Linux
./etc/rc.d/init.d/functions
PATH="/usr/local/samba/bin:$PATH"
case $1 in
'start')
echo "Starting smbd "
smbd -D
echo "Starting nmbd "
nmbd -D
;;
'stop')
echo "Stopping smbd and nmbd "
killproc smbd
killproc nmbd
rm -f
/usr/local/samba/var/locks/smbd.pid
rm -f
/usr/local/samba/var/locks/nmbd.pid
;;
*)
echo "usage: smb {start|stop}"
;;
esac
With this script, you can start and stop the SMB service with the following
commands:
# /etc/rc.local/smb start
Starting smbd
Starting nmbd
# /etc/rc.local/smb stop
Stopping smbd and nmbd
2.5.3 Starting From Inetd
The inetd daemon is a Unix system's Internet "super daemon." It listens on
TCP ports defined in /etc/services and executes the appropriate program for
each port, which is defined in /etc/inetd.conf. The advantage of this scheme
is that you can have a large number of daemons ready to answer queries, but
they don't all have to be running. Instead, the inetd daemon listens in places
of all the others. The penalty is a small overhead cost of creating a new
daemon process, and the fact that you need to edit two files rather than one
to set things up. This is handy if you have only one or two users or your
machine has too many daemons already. It's also easier to perform an
upgrade without disturbing an existing connection.
If you wish to start from inetd, first open /etc/services in your text editor. If
you don't already have them defined, add the following two lines:
netbios-ssn 139/tcp
netbios-ns 137/udp
Next, edit /etc/inetd.conf. Look for the following two lines and add them if
they don't exist. If you already have smbd and nmbd lines in the file, edit
them to point at the new smbd and nmbd you've installed. Your brand of
Unix may use a slightly different syntax in this file; use the existing entries
and the inetd.conf manual page as a guide:
netbios-ssn stream tcp nowait root
/usr/local/samba/bin/smbd smbd
netbios-ns dgram udp wait root
/usr/local/samba/bin/nmbd nmbd
Finally, kill any smbd or nmbd processes and send the inetd process a
hangup (HUP) signal. (The inetd daemon rereads its configuration file on a
HUP signal.) To do this, use the ps command to find its process ID, then
signal it with the following command:
#
kill -HUP process_id
After that, Samba should be up and running.
2.6 Testing the Samba Daemons
It's hard to believe, but we're nearly done with the Samba server setup. All
that's left to do is to make sure that everything is working as we think it
should. A convenient way to do this is to use the smbclient program to
examine what the server is offering to the network. If everything is set up
properly, you should be able to do the following:
# smbclient -U% -L localhost
Added interface ip=192.168.220.100
bcast=192.168.220.255 nmask=255.255.255.0
Domain=[SIMPLE] OS=[Unix] Server=[Samba 2.0.5a]
Sharename Type Comment
test Disk For testing only,
please
IPC$ IPC IPC Service (Samba
2.0.5a)
Server Comment
HYDRA Samba 2.0.5a
Workgroup Master
SIMPLE HYDRA
If there is a problem, don't panic! Try to start the daemons manually, and
check the system output or the debug files at /usr/local/samba/var/log.smb to
see if you can determine what happened. If you think it may be a more
serious problem, skip to Chapter 7, Printing and Name Resolution, for
help on troubleshooting the Samba daemons.
If it worked, congratulations! You now have successfully set up the Samba
server with a disk share. It's a simple one, but we can use it to set up and test
the Windows 95 and NT clients in the next chapter. Then we will start
making it more interesting by adding services such as home directories,
printers, and security, and seeing how to integrate the server into a larger
Windows domain.