Tài liệu Web and FTP Services pdf
Bạn đang xem bản rút gọn của tài liệu. Xem và tải ngay bản đầy đủ của tài liệu tại đây (449.01 KB, 42 trang )
Web and FTP
Services
T
his chapter covers configuring and managing an Internet
or intranet server for HTTP, FTP, SMTP, and NNTP ser-
vices and security. You’ll learn how to set up a Windows 2000-
based Web server to host Web and FTP sites, act as an e-mail
server, and host newsgroups.
Overview of Web and FTP Server
Administration
Windows NT provided an extensive range of services for con-
figuring and managing an Internet or intranet server based on
Windows NT. Windows 2000 Server expands those services,
making Windows 2000 an even better platform for distributing
Web-based content. This chapter explains each of the services
and also examines global issues such as building a manage-
ment team to manage your servers and the services they
provide.
Because designing and implementing an Internet or
intranet server is a complex task that would take its own
book to cover in depth, this chapter can’t cover every facet
of IIS. Instead, you’ll examine the most common issues
and learn the procedures you should follow in order to
accomplish various tasks. In some cases, we’ll refer you to
other sources of information where you can get more
details if you need them.
Note
24
24
CHAPTER
✦✦✦✦
In This Chapter
Overview of Internet
and Intranet Server
Administration
Installing IIS 5.0
Configuring and
Managing HTTP
Services
FrontPage Server
Extensions
Configuring and
Managing FTP
Services
Configuring and
Managing SMTP
Services
Configuring and
Managing NNTP
Services
✦✦✦✦
4667-8 ch24.f.qc 5/15/00 2:19 PM Page 871
872
Part VI ✦ File, Print, and Web Services
Web-Related Services
Windows 2000 Server incorporates several services geared toward Internet and
intranet clients, collectively know as Internet Information Services (IIS):
✦ World Wide Web Server: This service enables you to configure Windows 2000
to function as an HTTP server for the World Wide Web (WWW). Through this
service, a Windows 2000 Server computer can host multiple Web sites. The
World Wide Web Server is also required by certain other services, primarily
to provide remote administrative access to the server and those dependent
services.
✦ File Transfer Protocol (FTP) Server: The FTP protocol provides for file trans-
fer between computers. Although many sites now provide their file distribu-
tion efforts with the HTTP server, FTP is still the most widely used mechanism
for serving files for upload and download via the Internet or an intranet.
Through the FTP service, a Windows 2000 Server computer can host multiple
FTP sites.
✦ Simple Mail Transport Protocol (SMTP) Service: The SMTP protocol and ser-
vice enable you to configure a Windows 2000 Server as an SMTP e-mail server.
✦ Network News Transfer Protocol (NNTP) Service: The NNTP protocol and
service enable you to configure a Windows 2000 Server to act as a news
server. You can host public, private, read-only, moderated, and authenticated
newsgroups, and take news feeds from other NNTP servers on the Internet to
create a public news server.
✦ FrontPage Server Extensions: FrontPage Server Extensions enable the HTTP
service in Windows 2000 Server to support FrontPage Webs, which are Web
sites developed with Microsoft FrontPage. In general, the FrontPage Server
Extensions allow for remote authoring and management of FrontPage sites.
✦ Visual InterDev RAD Remote Deployment Support: This service enables
developers using Visual InterDev RAD (a development environment authored
by Microsoft) to publish and manage sites created with that development
platform.
If you are building a public Web server to provide extensive client support, e-com-
merce, and other Internet services (if you’re an ISP, for example), you’ll probably
want to look at solutions other than just the services built into Windows 2000 Server.
For example, Microsoft Commercial Internet Server brings together all the services
mentioned so far plus additional ones (SQL Server, Site Server) to enable you to cre-
ate a full-service Web server. However, the services included with Windows 2000
Server offer a solid platform for developing an intranet server or a public Internet
server geared toward hosting your own company or organization site.
4667-8 ch24.f.qc 5/15/00 2:19 PM Page 872
873
Chapter 24 ✦ Web and FTP Services
Web Services Checklist
Before beginning the process of installing and configuring IIS and related services,
you should plan the server implementation and make sure the server is ready for
IIS. The following serves as a checklist for planning and preparing for IIS installation
and configuration:
✦ Define the server mission: By knowing what you expect the server to provide
to clients, you can determine which IIS services and related services are
required for installation. The role the server will play has a bearing on the
server’s hardware and connection requirements, as well as how you configure
security. Know ahead of time exactly what functions you want the server to
perform and whether those functions will be made available to anonymous
users or restricted to specific groups or individuals. If you’re setting up a Web
server to host several sites for your company or for your clients, for example,
you’ll probably want to invest in a high-performance server with RAID, high-
capacity backup hardware, and at a minimum a T1 Internet connection.
✦ Establish the Internet connection for a public server and acquire IP
addresses: If your server will be connected to the Internet, contact your ISP to
establish the connection (if one isn’t already in place) and acquire the neces-
sary IP addresses for the server to support its mission.
✦ Implement network protection: If your server will be or is connected to the
Internet, implement a firewall (or at the very least a proxy server) to secure
the server and its content against malicious attacks.
✦ Prepare the hardware, OS, and file system: Based on the server’s mission,
determine the type of hardware required to adequately support the mission.
Install Windows 2000 Server and test the server. Then, determine where you
will store IIS services and content and convert those volumes to NTFS (not
required but highly recommended for security).
✦ Secure the server’s non-IIS services and files: Review the server’s other ser-
vices and files and secure them with object permissions and account restric-
tions to prevent unauthorized access to these services and files.
✦ Install and configure TCP/IP: IIS services require TCP/IP whether you are
installing an Internet or intranet server. Install TCP/IP and configure the server’s
settings according to the server’s mission. If the server will host multiple sites,
bind multiple IP addresses (as many as required) to the TCP/IP protocol.
See Chapter 12 for detailed information on installing and configuring TCP/IP.
Note
4667-8 ch24.f.qc 5/15/00 2:19 PM Page 873
874
Part VI ✦ File, Print, and Web Services
✦ Install and configure DNS to support your domain(s): If you are providing your
own Domain Name Service (DNS) namespace resolution, set up and configure
the DNS service, either on the IIS server or on a different server. Create the ini-
tial zones to be hosted by the IIS server and create resource records as needed.
If an ISP or other organization will be providing DNS services, ensure that those
services are in place and the necessary zones and records are ready.
✦ Install IIS services: Install the IIS services necessary to support the server’s
mission.
✦ Secure directories and develop user access permissions and policies: After
setting up the IIS services, review the object permissions for content folders
and for user accounts and groups to ensure adequate security for the server
and its content.
✦ Create and test sites: Create sites that support the server’s mission, then test
those sites for functionality. Configure the sites to accommodate specific
resource needs, such as throttling bandwidth or limiting connections.
The process described in the preceding checklist can take several weeks of careful
study, planning, and implementation. Each step is critical to successful implementa-
tion of an IIS server. Many of these topics are covered elsewhere in this book. Part
IV, for example, covers TCP/IP configuration, DNS, DHCP, remote access, and related
topics. See Chapter 3 for a discussion of local and network security issues relevant
to IIS. See chapter 22 for information on how to use object permissions to restrict
access to files and folders, which will help control IIS content access.
Installing IIS 5.0
It’s a relatively simple process to install IIS through the Add/Remove Programs
wizard in the Control Panel. Follow these steps to install IIS:
1. Install, configure, and test any required non-IIS services according to the
server function (DHCP, DNS, TCP/IP, Index Server, and so on).
2. Open the Control Panel and double-click the Add/Remove Programs icon.
3. In the wizard, click Add/Remove Windows Components.
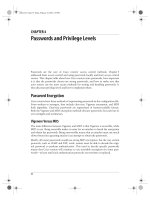
4. After Windows 2000 scans the server for installed components, it displays a
component list (Figure 24-1). To install all IIS services, select the check box
beside the Internet Information Services (IIS) item. Or, click an item and click
Details to select an individual IIS component.
5. After selecting the desired services, click OK. Follow the remaining prompts
to complete the installation process. Windows 2000 should require no addi-
tional input other than you providing the Windows 2000 Server CD for Setup
to copy the required files to the system.
6. Reboot the server after installation is complete.
4667-8 ch24.f.qc 5/15/00 2:19 PM Page 874
875
Chapter 24 ✦ Web and FTP Services
Figure 24-1: Use
Add/Remove Programs to
add IIS service components
to the server.
Configuring and Managing HTTP Services
The World Wide Web Server component of IIS enables a Windows 2000 Server com-
puter to function as a Web server for HTTP content. The Web service offers several
features that provide considerable control over content, security, and bandwidth,
making IIS a good option for Windows 2000 Server-based Web servers. The follow-
ing sections explain the Web service’s features and how to configure and manage
Web sites under IIS.
The Default Site
When you install the Web service, IIS creates a default Web site shown in the
Internet Information Services MMC console. This default site provides certain
underlying services that the server performs through the following functions:
✦ IIS administration: The default site provides a means of managing the Web
server through a browser. Administrative content is placed by default in the
virtual folder
IISAdmin, which you can access in a browser with the URL
http://localhost/iisadmin. (See the following section for a discussion of
virtual folders.) IIS administration through HTML is restricted by default to
localhost. You can, however, configure the
IISAdmin virtual directory to allow
access from other IPs, including those on the LAN as well as on the Internet.
For more information on configuring remote administration, see the section
“Remote Administration” later in this chapter.
✦ IIS Help: The
IISHelp virtual folder contains documents in HTML format that
provide detailed information about IIS and its services. View the documents
by pointing your browser on the server to
http://localhost/iishelp.
✦ IIS Samples: This virtual folder contains several sample scripts in Java and
Visual Basic for administration and in Active Server Pages for several different
task categories.
4667-8 ch24.f.qc 5/15/00 2:19 PM Page 875
876
Part VI ✦ File, Print, and Web Services
✦ Internet-based printing: IIS Setup creates a Printers virtual folder and popu-
lates it with the files necessary to support Internet Printing Protocol (IPP),
which enables clients to print to the server across the Internet.
See Chapter 23 for a detailed discussion of IPP and how to configure Windows
2000 Server to support IPP printing from Internet and intranet clients.
The default site is bound to all unassigned IP addresses. This means that the site
responds to all IP addresses bound to the server that are not assigned to other
sites. The default site has other implications, particularly on a server hosting multi-
ple sites. For example, assume that all sites on the server use the same IP address
and employ host headers to direct incoming client requests to a specific site. If a
particular site is not available (because it is stopped, for example), IIS serves the
default site to the client. So, you should take the time to develop a default Web site
that accommodates situations in which a client will “accidentally” be directed to
the site. Think of the default as your “error handler” for incoming Web requests.
Design the default site to redirect the clients back to the correct site.
Configuring Web Sites
Setting up a Web site under IIS is not a difficult task, but it takes several steps
to accomplish it. This section explains how to set up new sites and configure
existing sites.
Preparing the server
The first step in setting up a site is to prepare the site’s folders. Often, the simplest
approach is to place all of a site’s files within a single physical folder structure with
all content residing in that folder and its physical subfolders. However, IIS doesn’t
impose a single folder structure. You can create a virtual structure using a folder on
the local server, a share on another server, and virtual folders. All of these appear as
a single, logical folder structure to the client and function accordingly within the site
content. At this stage, determine how you will store the site files, whether they’ll be
on a single server or multiple servers, and what NTFS permissions you need to apply
to the folders to control access if not using anonymous access or using a combina-
tion of anonymous and authenticated access. Create the folders on the target com-
puter(s) and configure permissions as required.
Next, verify that you have the necessary IP address bound to the server. If the
server will only host one site, you only need one IP address. You’ll need to bind
multiple IP addresses to the server, use multiple TCP ports, or use host headers to
host multiple sites (explained in the following section). Use the TCP/IP protocol
properties in the network connection’s settings to view and add IP addresses.
Finally, verify that the necessary DNS zone is created for the domain on the site’s
designated name server(s) and that the zone is populated with the appropriate
resource records. For example, assume you’re setting up a Web and FTP server for
the
mcity.org domain. Create a DNS zone on your DNS server for mcity.org with
the appropriate Start of Authority (SOA) and Name Server (NS) records for the
Note
4667-8 ch24.f.qc 5/15/00 2:19 PM Page 876
877
Chapter 24 ✦ Web and FTP Services
zone. Then, create A records (or CNAME records) for www and ftp that point to the
appropriate IP addresses for those services on your IIS server. Lastly, make sure
that the domain is registered with the root servers and that the root servers’
records point to your DNS server for name resolution.
See Chapter 14 for detailed information on configuring DNS zones and records.
Creating and configuring the site in IIS
There are several steps to create and configure a Web site in IIS, although the pro-
cess of simply putting up a site is relatively simple. Applying advanced properties
can take a little longer if you have special needs for the site or want to provide addi-
tional customization of properties or behavior. The first step is to run the Web Site
creation Wizard.
Running the site wizard
To add a site, open the IIS console (Start➪ Programs➪ Administrative Tools➪
Internet Services Manager). Right-click the server where you want to add the site
and choose New➪ Web Site to start the Web Site Creation Wizard. The wizard
prompts you for the following information:
✦ Description: This is the description that appears in the IIS console to identify
the site.
✦ IP Address: Select the IP address for the site from the drop-down list. Each
site needs a unique IP address unless you use host headers, as described
shortly.
✦ TCP port: The default HTTP port is 80, but you can specify any valid port that
doesn’t conflict with other services on the server. Specifying a non-default
port adds a bit of security because the clients will need to know the port num-
ber to connect and specify it in the URL, as in
:8080,
using port 8080 as an example. See
/>assignments/port-numbers
for an up-to-date list of registered well-known
TCP port numbers.
✦ Host Header: The host header is the domain name requested by the client’s
URL, such as
support.mcity.org in the URL />contacts
. The host name is passed by the client’s browser to the server, and
IIS can use that host name to determine which site to serve up on a multi-site
server. See the section “Configuring Multiple Sites with a Single IP” later in this
chapter for more information.
✦ SSL port: If you are using Secure Socket Layer (SSL) to create a secure Web
site, specify the SSL port number. The default port number is 443.
✦ Path to the home directory: Type or browse to the path that will serve as the
site’s primary folder. You can specify a local folder, network share, or URL.
✦ Allow anonymous access: Select this option to allow anonymous connections
to the site. Deselect this option to use Windows 2000 accounts to authenticate
within the site.
Note
4667-8 ch24.f.qc 5/15/00 2:19 PM Page 877
878
Part VI ✦ File, Print, and Web Services
✦ Access permissions: Configure the type of access permissions you want
clients to have to the site. Available options include the following:
• Read: Enable clients to read the site’s content.
• Run Scripts: Allow clients to run scripts such as ASP, Java, and so on.
• Execute: Allow clients to execute applications such as ISAPI, CGI,
and so on.
• Write: Allow clients to post content to the site.
• Browse: Allow clients to browse the directory structure for the site.
After you create the site through the wizard, you need to set some additional prop-
erties to define the site’s content, permissions, and so on. The following sections
explain these steps.
Configuring default documents
Most sites incorporate at least one default document. This is the HTML or ASP docu-
ment presented to the client if no document is submitted in the URL. For example,
browsing to
would display whatever default document is
configured for the
www.mcity.org site (such as default.htm, or default.asp).
However, the client could also request a specific document, such as
http://
www.mcity.org/contacts.htm
. In this case, IIS would serve up the document
Contacts.htm, assuming it existed within the site’s root folder.
You can configure multiple default documents. If one specified in the list is not
available, IIS serves the next document in the list. You configure the document pri-
ority when you assign the default documents. To do so, open the IIS console, right-
click the Web site you want to modify, and choose Properties. On the Documents
property page, select Enable Default Document, then either verify that you’re using
one of the default document names (
Default.htm or Default.asp) for the pri-
mary document in the target folder, or click Add to add the document name you
want to use. After adding all appropriate names, use the up and down arrows to
change document order.
Configuring the Home Directory
When you add the site through the wizard, you specify the local folder, network
share, or URL to serve as the home directory for the site. Another step in config-
uring the site is to fine-tune the home directory properties. To do so, right-click
the site in the IIS console, choose Properties, and click the Home Directory tab
to display the Home Directory page shown in Figure 24-2.
As Figure 24-2 illustrates, you can change the home directory location if needed.
Use the check boxes on the dialog box to define access permissions and enable log-
ging and indexing. You also can apply a fine degree of control over application exe-
cution and debugging through the Application Settings group of controls. Fine-tune
the settings based on the site’s function, intended clients, and your security needs.
4667-8 ch24.f.qc 5/15/00 2:19 PM Page 878
879
Chapter 24 ✦ Web and FTP Services
Figure 24-2: Use the Home
Directory page to fine-tune
permissions or redirect the site
to a different home directory.
Configuring security
A site’s Directory Security property page enables you to configure access and secu-
rity for the site. Through the Directory Security page, you can enable or disable
anonymous access and specify authentication options (clear text, digest authenti-
cation, or integrated Windows authentication). You also can specify a range of IP
addresses that will be either granted or denied access, giving you a means of
restricting access to a specific subnet. This is particularly useful for allowing access
only to intranet users in a specific physical location, such as a department or
throughout the entire organization (to prevent outside connections to the site).
You also can use the Directory Security page to configure certificates and enable
SSL. See the section “Enabling Secure Sockets Layer” later in this chapter for more
information.
Configuring other site settings
You can get most sites up and running through the tasks and options covered to
this point. However, each site provides several other property pages you can use to
configure a wide variety of site properties to control performance, configure addi-
tional security options, and so on. While this chapter can’t cover them all in detail,
the following list summarizes the types of tasks you can accomplish through each
of the other property pages:
✦ Operators: Use the Operators page to specify users and groups that have
operator privileges to the site. Operators have limited administrative privi-
leges over the site. Operators can configure and modify a site but can’t con-
trol site aspects such as anonymous user name and password, bandwidth
throttling, virtual directory creation, path changes, or certain other tasks that
are limited to the Administrator.
4667-8 ch24.f.qc 5/15/00 2:19 PM Page 879
880
Part VI ✦ File, Print, and Web Services
✦ Performance: The Performance page provides a means for controlling site
performance. You can set the site priority by specifying a range of the number
of hits expected per day. The Performance page also lets you enable and con-
figure bandwidth and CPU throttling, which limit the load on the server
imposed by the site.
✦ ISAPI Filters: ISAPI filters respond to events during processing of HTTP
requests and can provide background processing for site traffic. Use the ISAPI
Filters page to install and enable or disable ISAPI filters.
✦ HTTP Headers: This property page controls several features related to HTTP
headers for the site, including the following:
• Content expiration: Use this feature to specify when content expires to
enable clients and scripts that test for content expiration and automati-
cally refresh content from the site.
• Custom HTTP headers: Add custom HTTP headers to the site to enable
custom processing within scripts/browsers.
• Content rating: Enable and configure the site’s content rating to enable
rating filters to identify and potentially block the content from the client
based on its rating values.
• MIME mapping for the site: Configure new file type associations for con-
tent on the site.
✦ Custom Errors: Defines the error messages received by clients, such as the
page that appears when the client requests a page that doesn’t exist (the Not
Found error). The error pages by default are stored in
systemroot\help\
iishelp\common
. You can edit the files with any HTML or text editor to
customize the pages.
✦ Server Extensions: The Server Extensions page enables you to configure
Server Extensions (also referred to as FrontPage Server Extensions), which
control options for Web authoring through FrontPage and related applica-
tions. See the section “Configuring Server Extensions” later in this chapter
for additional information.
Configuring multiple sites with a single IP address
Although you can configure multiple Web sites on a single server using unique IP
addresses for each one, this can pose a problem in cases where only a limited num-
ber of addresses are available (if your ISP only gave you a small subnet, for exam-
ple). The IP address is just one of three properties that define the site. The other
two are the TCP port and host header. The TCP port is the port through which the
site communicates, and the host header is (usually) the site’s domain name. Our
example
mcity.org main site uses an internal address of 192.168.0.3, the default
TCP port 80, and the host header
www.mcity.org. The support site could use
4667-8 ch24.f.qc 5/15/00 2:19 PM Page 880
881
Chapter 24 ✦ Web and FTP Services
192.168.0.3, port 80, and a host header of support.mcity.org. Sites on the same
server can share any two of these properties, but one must be different. In this
case, the host header for each site is unique.
Host headers enable you to share an IP address with multiple sites because most
browsers (Internet Explorer 3.0 and Netscape 2.0 and later) support the use of host
headers. These browsers pass the host header information to the server, and the
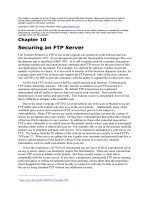
server directs traffic to the appropriate site based on that header. Figure 24-3 illus-
trates how host headers help direct traffic to the correct site.
Browsers that support HTTP 1.1 support host headers. Certain other older
browsers also support host headers even though they don’t support HTTP 1.1. In
addition, sites configured for SSL cannot use host headers, since the header infor-
mation is encrypted. SSL sites must use a unique IP address.
Figure 24-3: Host headers direct traffic to the appropriate site when a
single IP is used for multiple sites.
www.mcity.org
Client request for
support.mcity.org
mcity.org Web Server
Client
TCP port 80
support.mcity.org
IIS interprets
host header
sales.mcity.org
service.mcity.org
Domains hosted on
192.168.0.10
www2.mcity.org
Note
4667-8 ch24.f.qc 5/15/00 2:19 PM Page 881
882
Part VI ✦ File, Print, and Web Services
To configure the host header for a site, right-click the site in the IIS console and
choose Properties. Click Advanced on the Web Site property page. In the Advanced
Multiple Web Site Configuration dialog box, select the site identity you want to
modify and click Edit. Specify the domain portion of the site’s URL (
www.mcity.org
or support.mcity.org, for example) as the host header, then close the site’s prop-
erty sheet. Finally, make sure you modify the DNS records for each domain to point
the host (
www, support) to the appropriate IP address.
Although you can direct traffic to a specific site with a non-unique IP address by
specifying a different port number for each site, that typically requires that the
client know the port number ahead of time. You can develop a primary site using
port 80 that serves as a jumping-off point to these other non-default port sites, but
you would need to incorporate the appropriate port value in all hyperlinks within
each site. The better, cleaner solution is to use host headers.
You have two options for supporting client browsers that do not support host head-
ers: cookies or URL-munging (embedding the host name in the URL). Because these
topics apply in a limited number of situations (most browsers in use support host
headers), they are not covered in this chapter. See the topic “Supporting Host
Header Names in Older Browsers” in the IIS online Help documentation to learn
how to enable support for browsers that don’t support host headers.
Configuring server extensions
Microsoft FrontPage is an HTTP publishing application that lets you create, modify,
and publish Web sites to a server that supports FrontPage Server Extensions. While
few Web development companies consider FrontPage a viable tool for professional
Web development, many companies or organizations use it to enable end-users to
create and update their own areas of a site or departmental sites. This section cov-
ers the FrontPage Server Extensions in the event you need to install them on a Web
server to allow users to manage sites on the server.
Installing FrontPage Server Extensions is really a two-step process. First, you need
to install the extensions on the server. Then you install the extensions to each Web
site that requires them. To install FrontPage Server Extensions on the server, open
the Control Panel and run the Add/Remove Programs object. Click Add/Remove
Windows Components, double-click Internet Information Services, and select
FrontPage 2000 Server Extensions. Click OK and follow the prompts to complete
the installation to the server.
Next, you need to install Server Extensions on each site for which FrontPage is used.
You do so through the IIS console. Open the IIS console, right-click the site, and
choose All Tasks➪ Configure Server Extensions. IIS starts the Server Extensions
Configuration Wizard, which prompts you for the following information:
Note
4667-8 ch24.f.qc 5/15/00 2:19 PM Page 882
883
Chapter 24 ✦ Web and FTP Services
✦ Create local machine groups: Select this option to have Windows 2000 auto-
matically create local groups for management purposes. These groups include
Admins, Authors, and Browsers. Deselect this option if you already have one
or more groups created for grouping site managers.
✦ Begin the Group names with this distinguishing label: If creating local
machine groups, you can specify a unique label to begin each group name. If
you specify Mcity, for example, IIS creates three groups named Mcity Admins,
Mcity Authors, and Mcity Browsers. Omit the label to create the groups
Admins, Authors, and Browsers.
✦ Group or user account to be Web Administrator for the site: Specify the
account that will serve as the administrator for the site.
✦ Mail server settings: Specify the mail settings for the site, including author for
outgoing mail, contact address, and SMTP mail server.
After you configure server extensions on a site, you can manage extension settings
through the site’s property sheet. Right-click the site, choose Properties, and then
click Server Extensions to display the Server Extensions page shown in Figure 24-4.
Figure 24-4: FrontPage extension
options on the Server Extensions
page
The Enable Authoring group of controls determines whether authors can use
FrontPage to access and modify the content of the root web for the selected site.
Controls in this group configure version control, performance (caching), and
scripting options. The Options group lets you configure e-mail settings and Office
Collaboration features (which are available only if Office Web Server—OWS—is
installed on the server). Use the Don’t Inherit Security Settings option and associated
4667-8 ch24.f.qc 5/15/00 2:19 PM Page 883
884
Part VI ✦ File, Print, and Web Services
controls to determine whether or not the site inherits global security settings from
IIS. Deselect this option to override global settings with individual settings to config-
ure the site differently from other sites on the server.
Enabling secure socket layer
IIS fully supports Secure Socket Layer (SSL) connections to provide secured trans-
actions between the client browser and the server. SSL is typically used to provide
secure credit card transactions and other e-commerce functions, but SSL can be
used in any situation in which you want the traffic flowing between the client and
server to be encrypted and secure from outside tampering or hijackers. For exam-
ple, you might want to use SSL for site authoring.
Enabling SSL requires several steps:
1. Obtain a certificate from a Certificate Authority (CA) for the server. If you
have Certificate Services installed on a Windows 2000 Server in your enter-
prise, you can obtain a certificate from that CA. Otherwise, you’ll need to
obtain a certificate from another CA, such as Thawte or VeriSign. See Chapter
3 for additional information on certificates and CAs. The following steps
assume you’re using a Windows 2000 Server running Certificate Services
either on the local computer or a computer in your enterprise to generate
certificates for you.
2. Open the IIS console, then open the properties for the site for which you want
to obtain a certificate to enable SSL. Open the Directory Security page.
3. Click Server Certificate to start the Web Server Certificate Wizard. Within
the wizard, select the option to create a new certificate. (You have the option
of assigning an existing certificate and importing a certificate from a Key
Manager backup file, but this procedure assumes you’re requesting a new
certificate.)
4. Complete the wizard to create the request. You can submit the request imme-
diately if an Enterprise CA is available on the network. IIS will not recognize a
standalone CA server on the same computer or detect one on the network. In
this situation, you need to create the request using the wizard, which creates
an encrypted text file. You then run the wizard again to submit the encrypted
request to the CA. The remaining steps assume you’ll be creating the file and
submitting later. Use the following list as a guide to respond to the wizard’s
prompts:
• Prepare the request now, but send it later: Use this option if you have no
enterprise CA in your enterprise, or wish to submit to a standalone CA.
• Send the request immediately to an online certification authority:
Use this option to submit the request immediately to an enterprise CA
(dimmed if IIS doesn’t detect an available CA).
4667-8 ch24.f.qc 5/15/00 2:19 PM Page 884
885
Chapter 24 ✦ Web and FTP Services
• Name: Friendly name for the certificate.
• Bit length: A longer bit length increases security but can decrease per-
formance. The default is 512.
• Server Gated Cryptography certificate: Select this option to request an
SGC certificate.
• Organization: Specify the name of your organization (typically, the busi-
ness name).
• Organizational Unit: Specify a department or other OU to further define
the certificate.
• Common name: Specify the domain name (such as
www.mcity.org) for
a site hosted on the Internet. You can specify a DNS name or NetBIOS
name for a site hosted on your intranet.
• Regional information: Specify country, state, city, or other regional
information for your organization.
• File name: Specify a file name under which the certificate request will be
saved.
5. With a Web browser, connect to the CA using
http://ServerCA/CertSrv,
where
ServerCA is the DNS name or IP address of the certification server.
Choose Request a certificate and click Next.
6. Select Advanced Request and click Next.
7. Choose Submit a certificate request using a base64 encoded PKCS #10 file,
then click Next.
8. Click Browse and browse for the file created in Step 4, then click Read to read
the file into the form. Or, open Notepad and then open the certificate request
created in step 4. Copy the text from the file and paste the text into the Saved
Request text box on the form. Make sure to select Web Server from the
Certificate Template drop-down list. Then click Submit.
9. Follow the prompts provided by the CA to complete the request. Depending
on how the certificate server is configured, you’ll either be granted the certifi-
cate immediately or will have to return to the page after an Administrator has
issued the certificate. In either case, you’ll have the option of downloading the
certificate in DER or Base 64 encoded formats. Either format is acceptable.
10. Open the IIS console and open the property sheet for the site, then open the
Directory Security page. Click Server Certificate to run the wizard again,
which will recognize that a certificate request is pending for the site. Through
the wizard, specify the location of the certificate file provided by the CA in
step 9 and then complete the wizard to install the certificate.
4667-8 ch24.f.qc 5/15/00 2:19 PM Page 885
886
Part VI ✦ File, Print, and Web Services
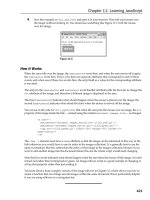
11. On the Directory Security page, click Edit to display the Secure Communications
page (Figure 24-5). Configure options based on the following list, then close the
property sheet and stop/start the site in preparation for testing the site:
• Require Secure Channel: Select this option to require the client to use
SSL to connect to the site. Deselect the option to allow unencrypted
access to the site.
• Require 128-bit encryption: Select this option to require the client to
use 128-bit encryption.
• Client certificates: Specify how client certificates are treated. For a
public Web site, choose Ignore client certificates. Select Accept client
certificates to allow clients to optionally use client-side certificates to
authenticate on the site. Select Require client certificates to force clients
to use a certificate.
• Enable client certificate mapping: Use this option to allow clients to use
their client-side certificates to authenticate against user accounts on the
server. This enables you to integrate client logon with your Windows
2000 user accounts and groups.
• Enable certificate trust list: Select this option and use the associated
controls to define a list of CAs that are trusted for the site.
Figure 24-5: The Secure Communications page
After you configure the site, you should test it to make sure it functions properly.
Open a browser on another system and connect to
https://site name, where
site name is the Web site’s DNS name or the NetBIOS server name (intranet). If
you receive an error that the site can’t be displayed, open the Directory Security
properties for the site and view the certificate. Make sure the Issued To field for the
4667-8 ch24.f.qc 5/15/00 2:19 PM Page 886
887
Chapter 24 ✦ Web and FTP Services
certificate matches the name of the site (www.mcity.org, for example) or the
NetBIOS name of the server (for an intranet site). If it does not, you need to remove
the certificate and request a new certificate with the correct name.
If the certificate’s Issued To field shows a user name or Administrator, you proba-
bly neglected to select Web Server from the Certificate Template drop-down list
when you requested the certificate. Resubmit the request with the correct
template.
Managing the Web Server
The Internet Information Services MMC console provides the primary means
through which you manage IIS Web sites. You can use the console to set site proper-
ties; stop, pause, and start a site; set properties on documents within a site; config-
ure FrontPage Server Extensions; define custom headers and error pages; and all
other management tasks.
You can use the IIS console to manage IIS services and sites locally or to connect to
other servers on your network. To connect to another server, right-click on Internet
Information Services in the console tree and chose Connect from the context menu.
Or, choose Action➪ Connect from the console menu. Specify the name of the com-
puter to manage and click OK. You also can connect to systems on a remote net-
work if you first establish a VPN connection to the network. After establishing the
VPN connection, connect with the IIS console to the remote server as you would for
a local server.
IIS also provides a means of managing Web sites remotely through a browser. The
Administration Web Site, which Setup creates automatically when you install IIS,
enables you to initially connect on the server locally with a browser to perform lim-
ited administration tasks on the default Web site. Connect to
http://localhost/
iisadmin
to manage the server locally through a browser.
You also can configure the
IISADMIN site to allow management from other computers,
including across the Internet. To do so, open the properties for the Administration
Web Site and click the Directory Security tab. Click Edit in the IP address and domain
name restrictions group, then specify the individual computers, group of computers,
or domain from which the server can be managed. If you prefer, you can grant all com-
puters access to the server, but this isn’t recommended for security reasons.
The
IISADMIN site lets you manage the Default Web Site, including setting its
properties and creating and deleting folders. You also can configure IIS to enable
browser-based management of other sites. To do so, add the
IISADMIN folder as a
virtual folder to those sites you wish to manage through a browser. Right-click the
site to which you want to add the folder and choose New➪ Virtual Directory. Create
a virtual directory with an alias of your choosing (such as admin) that points to
Tip
4667-8 ch24.f.qc 5/15/00 2:19 PM Page 887
888
Part VI ✦ File, Print, and Web Services
systemroot\System32\inetsrv\iisadmin. Configure the server and the new vir-
tual directory to allow access by the desired computers or domains, then point a
browser to
http://site/alias, where site is the DNS name or IP address of the
site and
alias is the alias you assigned to the IISADMIN folder.
Unfortunately, you can’t manage FTP, SMTP, or NNTP services through a browser. If
you need to administer these remotely, connect to the network with a VPN and use
the IIS console instead.
You can stop and start the WWW service remotely by connecting to the server
through a Telnet session and issuing the commands NET STOP W3SVC or NET
START W3SVC, respectively. This requires that the Telnet service be running and
configured to allow you to log on through Telnet.
Configuring and Managing FTP Services
FTP stands for File Transfer Protocol. FTP enables users to upload and download
files to and from the server. While HTTP is becoming more common as a means for
file transfer, FTP still serves an important role in providing file transfer services.
While HTTP restricts clients to a browser for uploading and downloading files, FTP
enables clients to use a browser, FTP command line, or third-party FTP utility to
transfer files. IIS provides the ability to restart failed FTP transfers, enabling a client
to reconnect to the server and restart the transfer from the point of failure rather
than transferring the entire file again.
Setting up an FTP site is much like setting up a Web site. The following section
explains the process.
Creating and Configuring FTP Sites
As with HTTP, IIS creates a Default FTP Site that responds to FTP requests on all
unassigned IP addresses. You can configure this site to use as your only FTP site, or
you might prefer to create other FTP sites, particularly if you are hosting multiple
domains on a particular server.
Either before or after setting up the FTP site on the server, make sure you create
the necessary DNS zone and records to accommodate the site. If you don’t already
have a DNS zone set up to accommodate the FTP site, create the zone on your DNS
server with the appropriate SOA and NS records. Then, create A or CNAME records
that define the host portion of the site name. For example, in the zone
mcity.org,
you might create an A or CNAME record for FTP that points to the IP address
assigned in IIS for the FTP site, enabling clients to connect to the site using the URL
. After you’ve configured the appropriate DNS records,
you’re ready to begin creating the site.
Tip
4667-8 ch24.f.qc 5/15/00 2:19 PM Page 888
889
Chapter 24 ✦ Web and FTP Services
Creating an FTP site
To create a new site, open the IIS console, right-click the server in the tree, and
choose New➪ FTP Site to start the FTP Site Creation Wizard. The wizard prompts
you for the following information:
✦ Description: This is the friendly name for the site that appears in the IIS
console.
✦ IP address: Specify the IP address for the FTP server or choose All Unassigned
to have the FTP server respond to all requests for which an IP is not specified
or not available.
✦ TCP port: Specify the TCP port to be used by the FTP site. The default is 21.
You can use a different port to increase security, but clients will have to know
beforehand what port to use to connect to the server.
✦ Path: Specify the path to the folder that will serve as the FTP site’s root folder.
✦ Read/Write: Choose Read to enable download and Write to enable upload
(subject to NTFS permissions you apply to the site’s folders, if applicable).
Configuring site properties
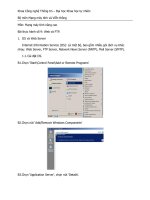
After you create a site, you can configure its properties to fine-tune its function.
Right-click the site in the IIS console and choose Properties to display its property
sheet (Figure 24-6). You’ll find that the properties for an FTP site are similar to
those for a Web site, although there are fewer properties.
Figure 24-6: The property sheet for an FTP site
4667-8 ch24.f.qc 5/15/00 2:19 PM Page 889
890
Part VI ✦ File, Print, and Web Services
The Connection group on the FTP Site page lets you configure the number of con-
current connections allowed to the site and the connection timeout period. You
might wish to limit the number of connections for sites with high traffic or low
bandwidth to improve performance for connected users. Increase the connection
timeout value if clients are experiencing difficulty in maintaining a connection dur-
ing large transfers or times when there is significant traffic on the site.
The Enable Logging option lets you turn on connection logging and specify the log
file format. Use the Current Sessions button to view a list of currently connected
users and, if desired, disconnect one or more users.
Setting security
The Security Accounts page of the FTP site’s properties lets you configure how IIS
grants access to the FTP site. The Allow Anonymous Connections option, when
selected, allows users to connect to the site with the user name anonymous. If you
deselect this option, users must specify a valid user account and password on the
server or within the domain in order to authenticate and log on to the FTP site.
When anonymous connections are enabled, IIS uses the user account and password
specified in the Username and Password fields of the Security Accounts page. By
default, the account is IUSR_server, where server is the name of the computer. In gen-
eral, you shouldn’t change this account, but you can if you prefer to make it more
difficult for hackers to guess the default anonymous account. If you specify a differ-
ent account, make sure you configure the account’s rights and permissions on fold-
ers accordingly to enable the account be used successfully for anonymous logon.
In order to log on for FTP, an account must have the right to log on locally. The IUSR
account by default has this right. To enable other user accounts to log on for FTP,
however, you need to grant those accounts the right to log on locally. Although you
can do this on an account-by-account basis, it’s best to create an FTP group, grant
the group the right to log on locally, and then place in the group any users who
need authenticated (non-anonymous) FTP access.
If a virtual folder with the same name as a user exists within the FTP site, IIS auto-
matically connects the user to that virtual folder when he or she logs on, making
the virtual folder the user’s home folder. For example, assume the site contains a
virtual folder by the name jboyce. When jboyce logs on to the FTP site, he or she is
automatically placed in the folder pointed to by the jboyce virtual folder. An added
benefit is that other users don’t see the virtual folders, regardless of their logon
accounts. They can, however, change to them manually if they know the virtual
folder name. Their access to the folder is subject to its NTFS permissions. See the
section “Configuring the Site’s Directory Structure” later in this chapter for addi-
tional information.
The FTP Site Operators control group on the Security Accounts page defines the
accounts or groups that are designated as site operators. A site operator has lim-
ited administrative privileges within the site and can configure properties that
Tip
4667-8 ch24.f.qc 5/15/00 2:19 PM Page 890
891
Chapter 24 ✦ Web and FTP Services
affect the site. Site operators do not have the ability to modify global IIS properties
or properties for other sites unless their accounts are designated within that site as
a site operator account or group.
Configuring logon and logoff messages
In most cases, you probably will want to define messages that appear when the
user logs on or off the FTP site or when the maximum number of connections is
reached for the site. You configure these messages through the Messages property
page for the site. In particular, consider posting a welcome message that adequately
addresses your company’s legal rights should the site be misused by unauthorized
personnel (typically applies to a private FTP site rather than a public site). The fol-
lowing is a sample of such a message, although you should consult with the com-
pany’s legal counsel to be certain the message addresses your needs:
WARNING: Access to this system by authorized personnel only. All users will be
monitored for security purposes and potential law enforcement. Unauthorized use
will be subject to criminal and civil prosecution and penalties.
Configuring the site’s directory structure
You define an FTP site’s home directory when you create the site, but you can mod-
ify the directory through the Home Directory page of the site’s properties in the IIS
console. The site’s home directory can be a folder on the local computer or a share
on the network. Subfolders of the home directory appear within the site’s folder
structure just as they do on the local computer or network share.
You can configure a site’s home directory for Read, Write, and Log Visits. Read
enables users to download from the site, and Write enables them to upload to the
site, subject to any NTFS permissions you might apply to the folder and its con-
tents. The Log Visits option turns on logging of access to the selected folder if
logging is enabled for the site in the FTP Site property page.
In addition to defining the home directory, you also can configure virtual folders for
the FTP site. A virtual folder functions as a part of the site’s directory structure but
is effectively hidden from users—it doesn’t show up when users browse the site or
issue a DIR command from an FTP prompt. However, users can connect to the folder
in one of two ways: specify the folder explicitly in the browser or FTP prompt, or
connect with a user account that matches the virtual folder’s alias name.
To create a new virtual folder, open the IIS console, right-click the FTP site where
you want to create the folder, and choose New➪ Virtual Directory. A wizard
prompts you for the folder’s alias name, path, and Read/Write properties. After you
create the folder, right-click the folder in the IIS console and choose Properties to
set its properties, which are similar to those for a home directory but more limited.
As with a home directory and its child objects, a virtual folder’s NTFS permissions
control access to the folder and its contents in conjunction with the Read and
Write properties you set for the folder when you create it in IIS.
Note
4667-8 ch24.f.qc 5/15/00 2:19 PM Page 891
892
Part VI ✦ File, Print, and Web Services
Configuring directory security
By default, all FTP users are granted access to all folders in a site. You can, how-
ever, restrict access to individual computers and groups of computers, just as you
can with a Web site’s folders. You configure access through the Directory Security
page of the site’s or folder’s property sheet, configuring them differently if needed.
Managing the FTP Server
The primary tool you’ll use to manage the FTP service is the IIS console. As with
Web sites, you can connect with a VPN to the network where the server is located
and use the IIS console remotely to administer FTP sites on the server. However,
you can’t use the HTML version of the Internet Services Manager to manage FTP
sites or services, because it restricts you to managing only the default Web site.
You can stop and start the FTP service from a command prompt (including
through a Telnet session to a server) using the NET STOP MSFTPSVC and NET
START MSFTPSVC commands from the command prompt.
FTP Client Access
Clients can connect to an FTP site using a Web browser, FTP command-line utility
(included with Windows 9x, Windows NT, Windows 2000, UNIX, and other plat-
forms), or third-party FTP utility. When connecting from Internet Explorer 5.0,
clients can specify the user account for the connection within the URL if using an
account other than anonymous to access the site. Enter the URL in the form
ftp://user@site, where user is the account name and site is the FTP site name.
Logging on as user jboyce to the site
ftp.mcity.org, for example, would require a
URL of
ftp:// Internet Explorer will prompt for the pass-
word. To log on using the anonymous account, specify anonymous in the URL or
choose File➪ Login As to display a login dialog box in which you can specify the
account to use.
For information on using the FTP command, open a console prompt and enter
ftp /? to view a description of the FTP command’s options. The advantage to using
a command prompt is its support for scripting and several other features not
offered by Internet Explorer.
Configuring and Managing SMTP Services
SMTP stands for Simple Mail Transport Protocol. SMTP is the primary protocol
for transferring e-mail on the Internet. The SMTP Service included with IIS doesn’t
turn a server running IIS into a full-blow e-mail server, but instead it provides a
means for you to create virtual e-mail servers that forward their mail to designated
Note
Tip
4667-8 ch24.f.qc 5/15/00 2:19 PM Page 892
893
Chapter 24 ✦ Web and FTP Services
full-featured e-mail servers that provide client support (POP3, for example). In
effect, the SMTP service is primarily a message-forwarding service. Its benefit is
that you can create multiple e-mail identities and servers to go along with each
domain hosted on the server. The SMTP service can handle mail coming in from
clients on the Internet or mail generated within a Web site.
The SMTP Service included with Windows 2000 offers several key features:
✦ Integrated Management: The SMTP service uses the same IIS console for
management as Web, FTP, and NNTP services, providing a single point for
management of all services. You also can use SNMP, the Windows 2000 event
logs (and Event Viewer), and SMTP transaction logs to monitor the service.
✦ Directed mail drop and delivery: The SMTP service can be configured to
drop all incoming mail into a drop directory on the server, enabling other
applications on the server to use the SMTP service as a mail receiver.
Applications also can use a pickup directory to send messages—properly for-
matted messages placed in the pickup directory are delivered automatically
by the SMTP service. Applications can also send messages via the SMTP
server’s TCP port(s).
✦ Ability to restrict messages: You can configure each SMTP server for a variety
of restrictions that limit message size, number of recipients, and so on. You
also can restrict message relay to prevent a server from being used as a relay
for spamming.
✦ Routing options: The SMTP Service provides several options to control mes-
sage routing and delivery. You can route messages directly, use a smart host
as an interim relay agent, and configure other settings to fine-tune message
routing.
✦ Secure transmission: The SMTP Service supports anonymous as well as
authenticated access to each virtual server, and it also supports Transport
Layer Security (TLS) for encryption of incoming messages.
✦ Transaction logging: You can perform extensive logging of SMTP transactions
for troubleshooting and tracking server usage.
Overview of the SMTP Service
The SMTP Service included with IIS enables a Windows 2000 Server computer to
function as an SMTP mail server (e-mail delivery agent). The SMTP service does not
provide for mailboxes on the server or client support for POP3, so it isn’t really
designed to function as a full-featured mail server like Microsoft Exchange or other
e-mail server applications. However, you can use the SMTP service to process mes-
sages coming from clients on the Internet, from the local LAN, or from applications
on the server itself.
4667-8 ch24.f.qc 5/15/00 2:19 PM Page 893
894
Part VI ✦ File, Print, and Web Services
The SMTP services work essentially as a file transfer agent. When you create a vir-
tual SMTP server, you define the server’s home directory. IIS creates the specified
folder and creates four subfolders by default:
✦ Badmail: This folder stores undeliverable messages that can’t be returned to
the sender.
✦ Drop: This folder stores all incoming messages for the domains handled by
the virtual server.
✦ Pickup: This folder stores all outgoing messages. The SMTP service monitors
the Pickup folder, and as soon as a properly formatted message is placed in
the folder, the service collects the message and attempts delivery.
✦ Queue: This folder holds messages waiting delivery. When a message can’t be
delivered because of a communications failure or other problem, it leaves the
message in the Queue folder for later delivery attempts based on the settings
configured for the server (explained in a later section).
Messages can come to the server from the Internet, the LAN, or from an application
on the server itself. These messages can arrive at the server through the virtual
server’s designated TCP port (25 by default), or in the case of LAN or local mes-
sages, can also be placed directly in the Pickup folder. The SMTP service processes
the message into the Queue folder and initiates delivery. The SMTP service places
the message in the Drop folder if the message is for a local recipient, or the service
relays the message to the appropriate server if the message is for a remote recipi-
ent. Figure 24-7 illustrates the process.
Figure 24-7: SMTP processing incoming messages
Local and Remote
Messages
Local E-Mail Client
TCP port 25
Queue
Folder
Drop
Folder
SMTP Virtual Server
Internet
SMTP Service
4667-8 ch24.f.qc 5/15/00 2:19 PM Page 894
895
Chapter 24 ✦ Web and FTP Services
For local recipients, delivery ends when the message is placed in the Drop folder.
The process for remote delivery is different. SMTP attempts to connect to the
receiving mail server, and if the server can’t be reached or a communications error
occurs, SMTP leaves the message in the queue for later delivery at intervals you
designate for the server in its Delivery property page (explained later). Once the
receiving server acknowledges the message receipt, SMTP removes the message
from the Queue folder, indicating a completed delivery.
SMTP supports Transport Layer Security (TLS) for remove delivery, providing
enhanced security by encrypting all outgoing messages. You can enable or disable
TLS for individual remote domains, giving you control over the remote domains for
which SMTP uses TLS.
If you prefer, you can route outgoing messages from a virtual server to a smart host,
which essentially serves as an intermediary and takes care of transmitting the mes-
sages to their destinations. The primary use of a smart host is to direct messages
through a connection that might be faster or less costly than the one the server
would otherwise use for a direct delivery. You can specify a smart host in one of
two places: for the entire virtual server or for each remote domain hosted on the
server. The domain setting overrides the server setting, enabling you to route all
outgoing messages through a single smart host except for specific domains, which
can be directed to other smart hosts. Figure 24-8 illustrates the use of smart hosts
for routing message delivery.
Figure 24-8: Smart hosts act as routing intermediaries.
SMTP offers support for several options for controlling security and connections
for both incoming and outgoing messages. For example, you can limit the number
Local E-Mail Client
TCP port 25
SMTP Virtual Server
Internet
SMTP Service
Smart Host
SMTP Service
Queue
Folder
Tip
4667-8 ch24.f.qc 5/15/00 2:19 PM Page 895