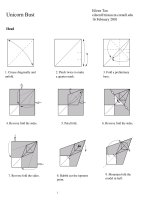
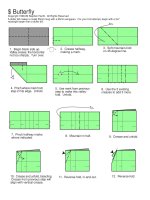
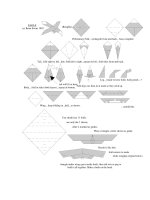
Tài liệu Nghệ thuật xếp hình Nhật Bản:KingCobra pdf
Bạn đang xem bản rút gọn của tài liệu. Xem và tải ngay bản đầy đủ của tài liệu tại đây (319.42 KB, 25 trang )
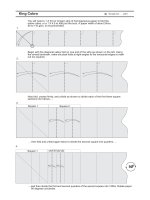
King Cobra
Ronald Koh - 2001
c
You will need a 1 X 30 (or longer) strip of homogeneous paper to fold the
entire cobra, or a 1 X 4.5 to fold just the bust. A paper width of about 24cm,
90 to 110 gsm, is recommended.
Begin with the diagonal valley fold on one end of the strip as shown on the left. Using
the circled landmark, make six pleat folds at right-angles to the horizontal edges to mark
out six squares.
2.
Now fold, crease firmly, and unfold as shown to divide each of the first three square
sections into halves,
then fold and unfold again twice to divide the second square into quarters,
4.
Square 1
1/8
3.
Square 1
Square 2
and then divide the first and second quarters of the second square into 1/8ths. Rotate paper
90 degrees clockwise.
90
o
1.
1/8
1/8
1/8
Valley fold the 5th square in half,
creae firmly, and unfold.
Fold the 5th square into
a waterbomb base.
5.
5th Square
6
1st Square
2nd Square 3rd Square 4th Square 5th Square
Valley fold vertically in half.
Note:
Please ignore the folds from Step
5 that involve folding the 5th
square and beyond, if you are
folding only the bust of the cobra.
Ignore the folding
instructions below this
section if you are folding
only the bust of the cobra.
1st Square
2nd Square 3rd Square 4th Square
7.
Valley fold one layer
in half,
then valley fold the inner
section on the left into
quarters.
8.
9.
10.
Repeat Steps 8 and 9 on the
other side, then unfold to the
position at the start of Step 7.
Repeat Steps 7 to 10 on the
right side.
12.
11.
13.
14.
Valley fold, marking the
midpoint as shown, then
unfold.
Valley fold again, crease
firmly, and unfold.
Open out the waterbomb
base completely.
15.
16.
Make four crease lines, using
the circled landmarks.
Collapse along the existing
crease lines as illustrated,
with the vertical mountain
and valley folds extending
all the way through squares
1 to 4,
17.
18.
like this, with the top of the
triangular section going
under the horizontal edge
immediately above,
until you get this.
Watch your position, now.
Valley fold twice as shown,
crease firmly, and unfold.
Repeat Step 19 at the
illustrated location.
20.
1st Square
2nd Square 3rd Square 4th Square
19.
1st Square
2nd Square 3rd Square 4th Square
21.
22.
23.
25.
Open out,
and make three more
crease lines as shown.
Collapse along the existing
crease lines as illustrated,
and like this. The paper on
the upper half of the
zigzagging, mountain fold
line a-b is to be folded 90
degrees to the back of the
rest of the paper.
Valley fold the two tabs in
the middle to each side.
26.
Turn over
24.
a. b.
then squash fold, with
three with three layers on
each side.
27.
32.
31.
28.
29.
Swivel the broad flap on the
right and the narrower piece
immediately behind it to the
left,
30.
then swivel the narrower piece
to the right, freeing it from the
triangular layer above,
like this, before swivelling the
broader piece back to the right.
Now swivel the broad flap on
the left and the narrower piece
immediately behind it to the
right, and repeat Steps 29 and
30 on this side.
Valley fold each of the vertical
edges to the centre, crease firmly,
and unfold.
34.
35.
33.
a.
b.
c.
Now bring the corners b and
c to the the apex at a,
then separate the
layers and squash
fold,
like this. Turn paper over.
36.
37.
38.
39.
40.
41.
42.
43.
Reverse fold.
Fold and unfold at the top,
creasing firmly.
The diamond shaped piece
in the middle will be used to
form the head. Valley fold both
sides as shown.
Squash fold both sides,
then valley fold all layers as
shown, crease firmly, and
unfold.
Hold the circled area firmly
and pull to each side to
open out the pleated layers.
Valley fold as shown, along the
crease lines made in Steps 38
and 39.
Pleat fold both sides to
close up again.
Now for the head
Valley fold both sides
again as illustrated.
44.
47.
46.
45.
48.
49. 50.
51.
52. 53.
Open up and flatten the
pleated layers.
Swivel the left half of the head
piece to the right,
then stick a finger in
between the layers
from beneath, all the
way to the corner,
and do a closed double sink;
i.e. mountain fold both layers
along the inner crease line,
and valley folding the same
layers along the outer crease
lines.
Swivel the piece left on
completion of Step 48,
and repeat Steps 47 to 49
on the right side of the head.
Turn over.
Fold and unfold as shown,
creasing the layer nearest
to you only.
Now bring the intersecting
point of the mountain fold - of
the first layer only - downwards
by pushing in the sides as
shown,
54.
55.
57.
58.
59.
while bringing down the whole
of the upper section,
like this.
Now valley fold between the
circled landmarks, crease
firmly, and unfold.
Valley fold the lower section
and twice at the top.
56.
Now valley fold the left corner
under the layer directly above it.
This is an enlarged view of the
top section. Reverse fold as
shown.
The two pointed pieces will
be the fangs. Mountain fold
to hide the excess paper.
60.
Draw the fangs slightly together, with
each positioned about 90 degrees
from the rest of the paper.
Valley fold,
61.
62.
63.
64.
65.
67.
Unfold, do a closed sink,
and repeat Steps 56, 57,
61 to 63 on the right.
Rabbits ear fold as
shown on both
pieces tp form the
forked tongue.
Fold the edges of each side to
stand at 90 degrees to the folding
surface.
Valley fold up, slightly below the
existing crease line as shown in the
diagram.
66.
69.
68.
Mountain both corners into the pockets
on each side of the the triangular tab
underneath,
Lift the headpiece and slot its triangular
base into the pocket underneath as
illustrated, to lock the jaws neatly in place.
70
.
This is how the king cobra should look at this
stage.
Turn paper over.
like this. Make a little crimp in the
centre of the eyeball and gently press
the layers at the front and back of the
eyeball together.
Note:
The eyeball may flatten as folding
progresses. Wetfolding helps keep it
rounded. A little ball of cotton inserted
(shhh ) behind the eyeball also
helps.
71.
73.
Swivel the left half of the headpiece
to the right,
then stick a finger under the first layer
as illustrated, all the way to round out
the eye on this side,
74.
72.
Swivel one flap to the left and repeat
Steps 71 to 73 on the right.
Mountain fold the excess corners of the
head uderneath as shown. Crease the
folded edges firmly.
75.
76.
77.
78.
3rd Square 4th Square
Mountain fold both sides as shown to
hold the layer with the eyes down.
Turn over
Pleat fold as shown, dividing each square
area horizontally into 1/16ths.
79.
3rd Square 4th Square
80.
Now do a series of crimp folds. The space between each
vally and mountain fold should be 1/32 of the the height
of each square area.
Now comes the tricky bit.
Hold the crimp folded areas together and collapse
the model along the existing crease lines on the
fifthe square like this,
81.
83.
82.
and this.
Now turn the paper over,
and the back of the circled are in
Step 81 should look like the.
Turn over again.
This is how the cobra should look at this
stage.
Turn model over.
87.
88.
86
Valley fold both sides
as shown,
85
then make two more valley folds between the circled
landmarks, drawing out the hidden layers until this part
of the model looks as in diagram 86.
Valley fold between the
circled landmarks.,
then valley fold the right
vertical edges to the
horizontal edges below.
84.
89.
90.
91.
92.
93.
94.
Fold down and crease firmly,
then swivel down each of the flaps.
Close sink each of the flaps before
valley folding the corner on the right,
like this. Turn paper over,
and this is how the other side should look.
Turn model over again
Repeat from Step 87 on each of the
overlapping layers on the right, then
repeat on the left.
We shall now work on the
body. Pleat at 45-degree
angles as shown.
To ensure that the pleats
are done at the required
angle, the length of the
body should be folded into
squared sections first, as
in Step 1.
95.
96.
Continue pleating as illustrated,
97.
1/16
1/16
1/16
1/16
1/16
1/16
1/16
1/16
1/16
1/16
1/16
1/16
1/16
1/16
1/16
1/16
98.
1/16
1/16
1/16
1/16
1/16
1/16
1/16
1/16
1/16
1/16
1/16
1/16
1/16
1/16
1/16
1/16
Here comes the really boring part.
Cross-pleat, crease firmly and unfold into
1/16th parts per square body sectionalong
the entire length of the body as illustrated.
More painfully boring stuff to go.
Having done that, do a 1/32nd pleat from left to
right. Take note that the valley line would be made
along a fresh path between two existing diagonal
crease lines, 1/16th of a square section of the body
apart.
Crease firmly.
99.
100.
Now pleat from right to left as shown, the
same way you did in Step 97. Be sure to
keep the pleated layers made in Step 97
firmly in its original position.
Pleate from left to right again as illustrated.
Continue with the alternating cross pleating along
the whole body length of the cobra,
like this, until you reach the last two
square sections of the body.
The overlapping, criss-cross pleating
will cause the paper to undulate a little,
as illustrated.
Turn the model over.
101.
102.
7/8
1/8
2/8
3/8
4/8
5/8
6/8
103.
7/8
1/8
2/8
3/8
4/8
5/8
6/8
Now we work on the tail, using the last
two square sections of the paper. Valley
fold between the illustrated landmarks on
the right,
then repeat on the left.
Valley fold again on the left,
using the circled landmarks
as your guides.
104.
Square 1 (From the Tail End) Square 2 (From the Tail End)
105.
Repeat Step 104 on the right,
turn the model over again,
and continue with the cross pleating
until you reach about half of a body
square from the tip of the tail.
106.
Mountain fold along the spine of the
cobra from the tip of the tail to the base
of the hooded area, such that the left
and right sides are about 90 degrees
to each other.
111.
109.
107.
108.
This is a closs up of the tip of the tail, folded in half.
Reverse fold as shown.
Reverse fold again as illustrated. The reverse fold should
be along a fresh path between two existing crease lines.
Repeat Steps 108 and 109 progressively towards the tip of the
tail. The number of reverse folds is not critical and will depend
on where you stopped cross pleating to form the scales.
110.
The tail end of the cobra should look like this, for now.
One major weakness of this cobra is that it would be
difficult to keep the head erect without some kind of
support. After all, it was originally designed to be folded
as a 100m monster cobra with a 2.3m hood spread -
with structural supports.
So, best of luck to hardcore origami purists. The rest
of us, please insert a wire between the layers as
indicated by the bold, broken lines.
That done, valley fold at the base of the hooded neck,
while mountain folding along a Y path from the corners
of the valley line and long the spine as illustrated, such
that the hooded neck stands about 90 degrees erect
from the rest of the body.
112.
113.
113a
Now mountain fold the excess paper
(and wire ) on each side within thebody.
Figure 113a, which provides a view of
this area before Step 112, shows the
extent of the excee paper to be mountain
folded.
Curve the neck of the cobra as shown by gently
pulling the pleated layers apart. At the lower section,
the layers should be parted very slightly at the front
To form a convex curve. To form the concave curve
at the upper section, the layers at the back should
be pulled slightly apart.
114.
115. 116.
117
If you plan to display the cobra with the
body in a spiral, you should pleat along
the inside of the entire length of the body
to allow it to curve gradually. This is boring,
but will make things a lot easier on you.
After you have placed the body in a spiral, ypu
should round off the body with a soft mountain
fold on each side, such that the surface areas
on each side of the mountain fold lies
approximately a 90 degrees to each other.
That done, mountain fold the edges on both
sides withing the body
continue with Step 116 along the entire length of the cobra, ending at the tail as above.
Done!
If you have come this far, you should
be at least 20 hours older than before
you started.
I hope it was worth it!