Tài liệu Thiết kế flash với flash cs5 part 46 pdf
Bạn đang xem bản rút gọn của tài liệu. Xem và tải ngay bản đầy đủ của tài liệu tại đây (389.44 KB, 5 trang )
ptg
Creating Masks
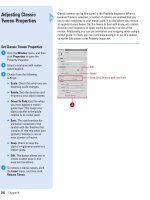
Introduction
You can create mask layers to show and hide parts o f y o u r
artwork on the Stage. A mask works like a window blocking
out everything but a certain area that you define. Any shape,
symbol or text object can be used as a mask. The shape you
place in a mask layer defines the area that will be visible in
the linked layers below it. You can animate a mask to reveal
the content on a layer in stages or animate the art in the
layer beneath the mask. It is useful for spotlighting and con-
trolling the shape of the viewable area. Masks are great tools
for keeping the boundaries of the art on your Stage neat and
controlled. They are also useful for cropping and experiment-
ing with different borders and layouts, because you don't
have to edit your art, you simply edit the mask. When creat-
ing a mask layer, it is important not to mix elements. For
example, don't use an editable shape and a group on the
same mask layer group everything together or break the
groups into editable shapes. For the most consistent results,
use ungrouped, editable shapes in the mask layer.
11
11
What You’ll Do
Understand Masks
Create a Mask Layer
Draw a Mask
Activate a Mask
Edit a Mask
Remove a Mask
Add Layers to a Mask
Animate a Mask Layer
295
From the Library of Wow! eBook
ptg
296
Chapter 11
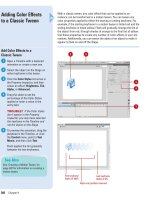
You use a mask in Flash to control what is
viewable on a layer. Whatever you paint or
draw onto a mask layer defines the viewable
area on any layer it is linked to. Essentially,
the shape you place on the mask layer acts
like a window to the layers linked beneath it.
To li n k a l a y e r, y o u si mp l y d r a g i t i n t o th e
linked set. When a layer is linked to a mask it
displays a tinted icon and is indented under-
neath the mask layer. Masks are useful for
cropping artwork on the Stage, and animated
masks can create interesting visual effects.
Understanding Masks
Linked layer
Draw any shape or shapes on
a mask layer to limit the visible
area of any layer linked to it.
Mask layer
From the Library of Wow! eBook
ptg
Chapter 11 Creating Masks
297
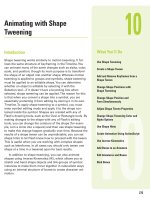
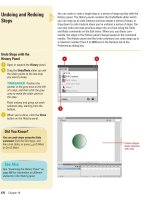
The mask layer and all linked layers
must be locked to activate the mask.
Shapes drawn on the
mask layer define the
visible area.
From the Library of Wow! eBook
ptg
298
Chapter 11
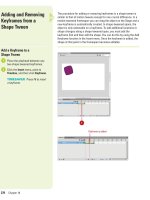
Any layer can be converted into a mask layer. A mask layer only affects
the linked layers beneath it, and there is no limit to the number of layers
that can be included. Once a mask layer is created, you can drag other
layers beneath it to link them. It is important to keep in mind that too
much masking can affect performance in the Flash Player, especially
when objects in the masked layers or the mask itself are animated.
Creating a Mask
Layer
Create a Mask Layer
Create a new Layer in the Timeline
or select an existing one.
The layer you select will be the
one converted into a mask. If you
want to mask the selected layer,
create a new layer above this
layer and select it.
Click the Modify menu, point to
Timeline, and then click Layer
Properties.
Click the Mask option from the
Layer Type list.
Click OK.
A blue masking icon appears on
the layer.
4
3
2
1
3
1
Layer 2 becomes a mask layer indicated by masking icon.
4
From the Library of Wow! eBook
ptg
Chapter 11 Creating Masks
299
Click the layer name of the layer
directly beneath the mask layer,
and then drag the layer slightly up
to link it to the mask.
TIMESAVER
Press
Control+click (Mac) or right-click
(Win) the Layer Name area of the
layer you want to convert into a
mask, and then click Mask. When
you use this method, Flash
converts the layer into a mask and
then automatically links it to the
layer directly beneath it.
5
Drag layer 1 slightly up until the gray bar
appears. This links it to the mask layer.
Layer is linked to the mask layer. It appears in the Timeline
indented under the mask layer with a tinted icon.
Mask layer
From the Library of Wow! eBook