Tài liệu The Photoshop Lightroom Workbook- P6 docx
Bạn đang xem bản rút gọn của tài liệu. Xem và tải ngay bản đầy đủ của tài liệu tại đây (3.85 MB, 50 trang )
The Photoshop Lightroom Workbook
232
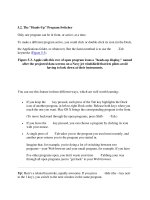
The Slideshow, Print and Web modules have quite similar features
and behavior. The left panel contains templates of page layouts,
and the right panel contains all the options and controls for each
layout. First, let’s take a look at panels and features in the Print
Module, and then we will go through the correct setup for making
great prints (
Figure 11.1 ) .
You can create a
Custom Template
or Remove a
Template, and you
can print directly
from your
Collections.
FIG 11.1
Print Module Main Window
The Template Browser Panel
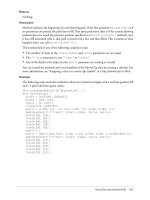
The Template Browser holds several precon gured layouts for
printing, or you can completely create your own custom layouts
and add them to the Template Browser. You add and delete
templates from this panel by clicking on the ϩ and Ϫ signs
( Figure 11.2 ) .
Creating a Custom Print Template
To create a new template, you can modify existing templates or
start from scratch. The easiest method is:
1. Select a template from the Template Browser.
2. Use the settings in the right panel to set up the layout you want.
3. Save it as a custom template by clicking on the ϩ button on the
right of the Template Browser.
4. Give the template a name and choose create.
Please purchase PDF Split-Merge on www.verypdf.com to remove this watermark.
The Print Module
233
5. The template will be saved in the User Templates folder of
Lightroom, as displayed in
Figure 11.3 .
The Collections Panel
You can make selections for the Print Module from the Library Module
or directly from your Collections, which appear in the Print Module.
You can also make print-speci c collections. Either choose the images
you want to print from the Library grid mode or choose a collection
from the Collections panel in the Print Module ( Figure 11.4 ) .
FIG 11.2
Print Template Panel
FIG 11.3
Print Template Panel
FIG 11.4
Print Collections Panel
Please purchase PDF Split-Merge on www.verypdf.com to remove this watermark.
The Photoshop Lightroom Workbook
234
Page Setup & Print Settings Buttons
On the lower left-hand corner of the Print Module are Page Setup
and Print Settings. Here is where you select your paper size,
orientation, color management and printer ( Figures 11.5A–C ).
FIG 11.5
A&B&C Print Page Setup &
Settings
(A)
(B)
(C)
The Layout Engine Panel
Moving over to the right side of the Print Module is the Layout
Engine. The Layout Engine contains the Contact Sheet/Grid layout
and Picture Package. Contact Sheet/Grid allows you to print
contact sheets of your selected images. Picture Package creates
multipage layouts for an individual image in several di erent sizes
( Figure 11.6A ) .
Please purchase PDF Split-Merge on www.verypdf.com to remove this watermark.
The Print Module
235
(A)
FIG 11.6
A&B Print Layout Engine
(B)
Picture Package allows you to create wallet size, 5 ϫ 7 and 8 ϫ 1 0
outputs, all at the same time. What is really neat is that Lightroom
sizes the images to the page. If they don’t t on a page, Lightroom
creates a new page. You can even create custom image sizes by
simply grabbing a border with the mouse and extending it as
displayed in
Figure 11.6B . You can shift click and drag to keep the
aspect ratio.
Please purchase PDF Split-Merge on www.verypdf.com to remove this watermark.
The Photoshop Lightroom Workbook
236
The Image Settings Panel
Image settings are used to rotate, crop and t images in a layout
(
Figure 11.7 ) .
●
Zoom to Fill frames: Fills the frame, cropping the edges as
necessary.
●
Auto-Rotate to Fit: Rotates images to produce the largest
image for the layout.
●
Repeat One Photo per Page: This option allows you to repeat a
photo multiple times on a page.
●
Stroke Border: You can add a color border to your image
to be printed by clicking on the color picker, choosing the
appropriate color and adjusting the width of the border
with the slider.
The Layout Panel
The Layout tools control margins, page grid, cell spacing
and cell sizes as well as showing page bleeds. The following
are the controls to use when creating custom templates
( Figure 11.8 ) :
●
Ruler Units: Sets the ruler to inches, centimeters, millimeters,
points or picas.
●
Margins: Sets the page margins. Changing the margin will move
the image in the Layout in real time.
●
Page Grid: Control over the number of cell rows and columns.
●
Cell Spacing: Controls the space between cells for rows and
columns.
●
Cell Size: Size of the image cells.
The Guides Panel
The Guides panel shows or hides rulers, page bleed, margins and
gutters and image cells. The guides can be turned on and o for
page bleed and layout purposes ( Figure 11.9 ).
The Overlays Panel
Lightroom provides the ability to print various metadata as an
overlay from the Photo Info dialog box, along with your identity
plate. Many photographers like to put their copyright or logo
FIG 11.7
FIG 11.8
FIG 11.9
Please purchase PDF Split-Merge on www.verypdf.com to remove this watermark.
The Print Module
237
on proof images, and this is the place to create those overlays
(
Figure 11.10 ) .
Identity Plate
If you have created an Identity Plate, you can choose to include
it in your printing by checking this option. You can rotate the
identity plate with the degree option on the right by clicking on
it and selecting rotate on screen 90, 180 or Ϫ 90 . To move the
identity plate, simply drag it to the desired location.
●
Opacity: Controls the opacity of the identity plate.
●
Scale: Controls the size of the identity plate.
●
Render behind image: The identity plate will appear behind the
photo.
●
Render on every image: The identity plate will appear centered
on every photo in a multiphoto layout. It can be further scaled
using the controls in the Overlays panel.
Page Options
●
Page Numbers: The page numbers will be printed on the
bottom right of each page.
●
Page Info: The sharpener setting, pro le setting and printer
name will be printed on the bottom of each page.
●
Crop Marks: Crop marks printed around a photo for use as a
cutting guide.
Photo Info
You can include the lename, title, keywords and caption
excerpted from the metadata printed below each image. Select
Photo Info and click the drop-down menu to the right.
●
Date: Prints the creation date of the photo.
●
Equipment: Prints camera information and lens information.
●
Exposure: Prints shutter speed and f/stop.
●
Filename: Prints the name of the image.
●
Sequence: Prints sequential numbers based on how many
images are printed, as in 1/4 2/4 3/4 4/4 for a sequence of 4
images.
●
Custom Text: Prints any custom text entered.
●
Edit: For editing Text Template Editor.
Font Size
You can set the size of the font chosen in points.
FIG 11.10
Print Overlays Panel
Please purchase PDF Split-Merge on www.verypdf.com to remove this watermark.
The Photoshop Lightroom Workbook
238
FIG 11.11
Image in Print Module
with identity plate, Page Options and
Custom Text
FIG 11.12
The Print Job Panel
I n Figure 11.11 , we have an example of an image that has an identity
plate, Page Options applied and photo information as Custom Text.
The Print Job Panel
This is really the control central for the Print Module. Color
management, print resolution, rendering intents and sharpening are
controlled in this panel. You decide on whether to print to a printer
or to output straight to JPEG and to attach a pro le. That means
that you can produce print packages for a client and allow the client
to print their own photos at their local lab. You can decide to allow
the printer to control color management (not recommended by
D-65) or choose a corresponding paper pro le and allow Lightroom
to control your color. On a Mac running OS X 10.5, you can even
output in 16 bits. D-65 suggests that you let Lightroom handle color
management. However, if you choose Draft Mode Printing, the
printer automatically handles color ( Figure 11.12 ) .
Draft Mode Printing
Draft Mode Printing is good for printing contact sheets and quick
prints. It is also very cool to print to PDF. You can select some or
all of the images in your library and print them fairly quickly to a
PDF contact sheet based on the preview resolution chosen in the
Catalog Preferences. In Draft Mode Printing, the cached preview is
used for the print. If you choose an image without a fully cached
preview, the thumbnail data is used and the prints may su er
from jaggies and artifacting. Sharpening and color management
controls aren’t available while using Draft Mode Printing. In Figures
11.13A and B , we rendered a 24-page PDF from raw les in a matter
of seconds, using Draft Mode Printing.
Please purchase PDF Split-Merge on www.verypdf.com to remove this watermark.
The Print Module
239
(A)
(B)
FIG 11.13A&B
Draft Mode Printing
Please purchase PDF Split-Merge on www.verypdf.com to remove this watermark.
The Photoshop Lightroom Workbook
240
Print Resolution
The print resolution de nes the dots per inch (dpi) – not to be
mistaken for pixels per inch (ppi) – for the printer. The default value
is 240 ppi. As a side note, the Epson print engine can handle any
resolution between 180 and 360 for matt papers and up to 480 for
glossy papers. The ideal resolution for an image is the one that has
the least change from the native resolution of the le.
Print Sharpening
Lightroom 2.0 includes output print sharpening based on PixelGenius
PhotoKit Sharpener algorithms. Output sharpening is accounting for
pixels being converted to dots on paper. You can choose the type of
paper you are printing to and the degree of sharpening. When Draft
Mode Printing is enabled, Print Sharpening is disabled.
16 Bit Output
Lightroom 2.0 includes the ability to output as 16-bit printing for
Mac OS X 10.5.
Color Management
P r o le: Other
If you have loaded paper pro les into your computer, they will be
available in Color Management under Pro le Ͼ Other. If you choose a
custom printer pro le, make sure that all color management is turned
o in the printer driver software. This is controlled in the Print Settings
button under Color Management ( Figure 11.14 ) .
Available
paper profiles
FIG 11.14
Color Pro les in Print
Module
Please purchase PDF Split-Merge on www.verypdf.com to remove this watermark.
The Print Module
241
Managed by Printer
If no pro les are installed in your computer, color will
automatically be managed by the printer. If you use Managed by
Printer, make sure to select ColorSync in the Color Management
settings (Mac OS) or enable ICM Method for Image Color
Management on PC. Depending on the printer driver software, you
can usually nd the color management settings below the Presets
menu after the Print dialog box opens on a Mac and the Print
Document dialog box opens at Setup\Properties\Advanced on a PC.
Rendering Intents
The printer’s color space is likely smaller than the color space of
the image to be printed. The rendering intent you choose will
compensate for these out-of-gamut colors. Perceptual is for strong
vibrant colors. Perceptual preserves the visual relationship between
colors. Colors that are in gamut may change as out-of-gamut colors
are shifted to reproducible colors. Relative Colormetric is for muted
colors. Relative Colormetric rendering preserves all in-gamut colors
and shifts out-of-gamut colors to the closest reproducible color. This
option preserves more of the original color and is a good choice
when you have few out-of-gamut colors.
The Print Button
Choose Print ( Figure 11.15 ) to con gure your print settings after you
have used all the tools in the panels and you will wind up with a
gorgeous print!
FIG 11.15
The Print Button
Please purchase PDF Split-Merge on www.verypdf.com to remove this watermark.
The Photoshop Lightroom Workbook
242
FIG 11.16
Making a Print
Making a Print
Printing seems to confuse a lot of folks, so we are going to do a
quick step-by-step tutorial, reviewing the areas that seem to cause
confusion. We are going to print a 13 ϫ 19 A3 print with the Epson
3800 using Epson Premium Luster Photo Paper.
Every printer manufacturer will yield a di erent response to color,
and changing inks and paper will also a ect how the print will
look. Lightroom’s working color space ProPhoto RGB is an
extremely wide and accommodating color space. The range of
colors that are possible with certain paper and ink combinations in
printers today may well exceed the gamut of Adobe98 . Epson K3
inks and papers, such as Epson Premium Glossy or Epson Premium
Luster, are capable of a gamut well beyond the boundaries of
Adobe98.
To achieve the best results and the widest gamut, it is critical to
have your monitor pro led so that you can rely on the colors you
see being the actual colors you are trying to print.
1. First, select an image from the Library, or if the image is part of a
collection, select the image from the Collections panel directly
in the Print Module ( Figure 11.16 ).
2. Next choose Page Setup from the bottom left of the Print
Module to con gure your paper size and choose your printer
Please purchase PDF Split-Merge on www.verypdf.com to remove this watermark.
The Print Module
243
( Figures 11.17A and B ). Select our Epson Stylus Pro 3800. Choose
your orientation and Scale at 100%. It is a good idea not to scale
images in the Page Setup dialog box.
(A)
(B)
FIG 11.17A&B
Page Setup
3. Using Image Settings and Layout, create a 5.0 pt black border
and 0.50 in margins all around ( Figure 11.18 ).
4. In order to determine the ideal resolution for printing on
Premium Luster Photo Paper to the Epson printer, we want to
pick a resolution between 180 and 360. The goal is to change the
native le resolution the least possible amount. Our original le
is 16.54 Љ ϫ 11.05 Љ , and the le is a 62.9 M le. If our resolution is
245.707, then we won’t change the native le size, and this will
produce the optimum result. We were able to determine this
by using Photoshop’s Image Size menu. Figure 11.19 , on page 244
demonstrates that, at this size, the le size is staying the same. We’ll
put the resolution in the Print Job panel in another couple of steps.
5. Now comes the confusion for many photographers. How to
handle color management and how to handle the print engine?
There are two choices when it comes to Color Management.
You can use a custom printer pro le, or turn over the color
management to your printer. D-65 chooses Application Color
Management, which basically means that the application
FIG 11.18
Print Image Settings and
Layout
Please purchase PDF Split-Merge on www.verypdf.com to remove this watermark.
The Photoshop Lightroom Workbook
244
(Lightroom) manages the color, doing the conversions and
handing that information over to the printer driver.
To utilize Application Color Management, you need an ICC
pro le associated with a particular paper/ink combination. You
can download excellent pro les from many printer and paper
companies. Epson has excellent free pro les on its website.
Adding Custom Pro les
To add custom printer pro les, place the pro le in your computer’s
ColorSync (Mac) or Color (Windows) folder. On the Mac, place the
ICC pro le in the ColorSync folder in the main Library folder. In
Windows, navigate to the Color folder in C:\Windows\System32\
Spool\Drivers\Color and drop the ICC pro le into the Color folder.
After placing the new pro le in the folder, restart Lightroom, and
select Other; your pro le list will appear.
Printer Manages Color
We don’t recommend it, but if you don’t have pro les, you have
no choice but to select Printer Manages Color. The printer driver
runs the show, and there can be many OS issues associated when
printing this way, as drivers are not always up to date with the OS.
The critical thing here is to select ColorSync (Mac) or ICM Color
Management (Windows) as a Color Correction option. Even with
FIG 11.19
Photoshop Image Size
Please purchase PDF Split-Merge on www.verypdf.com to remove this watermark.
The Print Module
245
these options, you may have di culty getting a print to look
exactly the way you expect.
6. To choose the paper pro le, click on Other (
Figure 11.20 ) next to
Color Management and select the paper pro le for the 3800
printer using Epson Premium Luster Photo Paper. The name for
that ICC pro le is Pro38PLPP.
7 . I n
Figure 11.21 , we have selected a print resolution of 246
(rounded up from 245.707). We want to apply a high degree of
sharpening to keep the subject who is moving crisp in print.
The Media Type is Glossy, and we are going to output in 16 bits,
which is possible with Mac OS X 10.5.The rendering intent for
this image is set to Perceptual as we have strong saturated color.
FIG 11.20
Applying Print pro les
FIG 11.21
Applying Print pro les
8. The last series of steps are the most confusing of all. You can
choose either Print Settings or Print. Print Settings will allow
you to save the settings while Print o ers the same settings
but does not allow you to save. D-65 suggests choosing Print
Settings so that you can save these nal steps to use over again
( Figure 11.22 ).
FIG 11.22
Please purchase PDF Split-Merge on www.verypdf.com to remove this watermark.
The Photoshop Lightroom Workbook
246
FIG 11.23
Print Settings
9. Choose Print Settings from the menu ( Figure 11.23 ). Again, this
is the most confusing part and one that is absolutely critical
to get right. It’s critical to keep this preset on Standard. There
is an OS limitation that causes Lightroom not to recognize the
settings if it is not on Standard.
10. In the Print Settings dialog box ( Figure 11.24 ), rst choose the
Media Type that matches your paper. We choose Premium
Luster Photo Paper.
11. Set Color Settings to O (No Color Adjustment). This option
is the single most important and the one that causes the
most confusion. This sets the printer driver to o and allows
Lightroom to hand o your color. This is the key element to
making a good print.
12. In Print Quality , we choose 1440 in part because it saves a
substantial amount of ink. 2880 vs. 1440 is debatable, as it is
impossible to see the di erence at a normal viewing distance.
FIG 11.24
Print Setting Choices
Please purchase PDF Split-Merge on www.verypdf.com to remove this watermark.
The Print Module
247
For the best quality print, it’s usually better to leave High
Speed o while choosing Finest Detail if it is available.
13. Before saving these settings, check that Color Settings are
indeed set to O (No Color Adjustment) ( Figure 11.25 ).
FIG 11.25
No Color Management
FIG 11.26
Save Settings
14. Click the Save button ( Figure 11.26 ) when all the options are
set correctly. This will ensure that the settings are stored and
ready for creating a print template.
15. We are almost home free. Select Print One or Print from the
lower right-hand panel of the Print Module. We choose to
select Print One as long as we are only printing one print. If
you select Print, you rst get the Print dialog box and will have
to choose Print on the lower right of the module ( Figure 11.27 ).
16. GO CHECK THE PRINTER AND SEE THE RESULTS. In Figure 11.28 ,
we have a print in front of the screen after doing the above
steps, and it is pretty darn good.
FIG 11.27
Print One
FIG 11.28
Print held up to screen
Please purchase PDF Split-Merge on www.verypdf.com to remove this watermark.
The Photoshop Lightroom Workbook
248
17. We will probably use these exact settings again in the future,
so let’s create a custom template. Choose the ϩ sign next
to the Template Browser on the left-hand side of the Print
Module. Name the New Template and choose Create
( Figure 11.29 ) .
Summary
Lightroom really makes printing a breeze, with all the features in
the Print Module. Lightroom 2.0 can place multisize images on a
single page and have multiple pages of multiple picture layouts.
Draft Mode Printing renders from the preview, enabling speedy
prints. Another plus is the ability to print straight to JPEG and to
attach a pro le. You can produce print packages for a client and
allow the client to print their own photos at their local lab. You can
also print more than one image at a time. In fact, you can actually
send your entire catalog to the printer or just one image at a
time. There are precon gured presets that provide many options
including contact sheets. You can also create your own custom
presets and save them for future use. Just as in the Slideshow and
Web modules, the left panel contains templates of page layouts
and collections, and the right panel contains all the options and
controls for each layout.
Discussion Questions
(1) Q. What is the di erence between printing to a printer and
printing to JPEG?
A. You decide on whether to print directly to your printer
or to output straight to JPEG and to attach a pro le. That
means that you can produce print packages for a client
FIG 11.29
Saving Print Template
Please purchase PDF Split-Merge on www.verypdf.com to remove this watermark.
The Print Module
249
and allow the client to print their own photos at their
local lab.
(2) Q. Does Lightroom 2.0 handle 16-bit printing?
A. Yes, but only on Mac OS X 10.5 or later.
(3) Q. What is Draft Mode Printing, and discuss one scenario
where you might want to use it?
A. Draft Mode Printing is good for printing contact sheets
and quick prints and very cool to print to PDF. In fact,
you could select all the images in your library and fairly
quickly print them all in a PDF contact sheet based on
the preview resolution chosen in the Catalog Preferences.
In Draft Mode Printing, the cached preview is used for
the print. If you choose an image without a fully cached
preview, the thumbnail data is used and the prints may
su er from jaggies and artifacting. Sharpening and color
management controls aren’t available while using Draft
Mode Printing.
(4) Q. For an Epson printer was is the ideal print resolution?
A. The print resolution de nes the dots per inch (dpi) – not
to be mistaken for pixels per inch (ppi) – for the printer.
The default value is 240 ppi. The Epson print engine
can handle any resolution between 180 and 360 for
matt papers and up to 480 for glossy papers. The ideal
resolution is one that has the least change from the
native resolution of the le.
(5) Q. What is the di erence between Relative Colormetric and
Perceptual?
A. This refers to how Lightroom converts the image into
a printing color space. Choosing Perceptual or Relative
Colormetric will determine how any out-of-gamut colors
are handled. Perceptual rendering is good when your
image has many out-of-gamut colors. Relative Colormetric
preserves all in-gamut colors and shifts out-of-gamut
colors to the closest reproducible color. This option
preserves more of the original color and is desirable when
you have few out-of-gamut colors. As a general rule,
Relative Colormetric works well with muted tones and
Perceptual works well with strong saturated colors.
(6) Q. If you have paper pro les loaded, where do you nd
them in the Print Module?
Please purchase PDF Split-Merge on www.verypdf.com to remove this watermark.
The Photoshop Lightroom Workbook
250
A. If you have loaded paper pro les into your computer,
they will be available in Color Management under
Pro le Ͼ Other.
(7) Q. What are the two options for handling Color
Management in the Print Module?
A. There are two choices when it comes to Color
Management. You can use a custom printer pro le or
turn over the color management to your printer.
(8) Q. What does application color management mean?
A. Application color management means that the
application (Lightroom) manages the color, doing the
conversions and handing that information over to the
printer driver.
(9) Q. What is the most important thing to do in the Print
Settings dialog box if you are using paper pro les and
application color management?
A. Set Color Settings to O (No Color Adjustment).
Please purchase PDF Split-Merge on www.verypdf.com to remove this watermark.
251
CHAPTER 12
The Web Module
L
ightroom’s Web Module allows you to create web galleries
directly from RAW images with very little e ort and no
knowledge of programming. The galleries can be previewed in
Lightroom, exported to a folder or uploaded to a web site. There
are a wide variety of templates to choose from or you can create
your own using Flash or html. There is also an array of third-party
templates available on the web. The Web Module is designed very
similarly to the Print and Slideshow Modules, with templates and
collections on the left-hand panels, and features on the right-side
panels. Web Galleries are an excellent way for clients to view your
images and you can use your tweaked raw les to create a gallery
for a fast streamlined work ow.
Web Module Features
You can add an Identity Plate with a web link and an e-mail
address. You can also choose from a wide array of metadata to
Please purchase PDF Split-Merge on www.verypdf.com to remove this watermark.