Tài liệu Windows Server 2008 Inside Out- P27 pdf
Bạn đang xem bản rút gọn của tài liệu. Xem và tải ngay bản đầy đủ của tài liệu tại đây (1.76 MB, 50 trang )
a computer. The results of the analysis will highlight areas in which the current settings
don’t match those in the template. This is useful to determine whether security settings
have changed over time.
You can access the security snap-ins by completing the following steps:
1. Click Start, type mmc into the Search box, and then press Enter.
2. In the Microsoft Management Console, choose File and then choose Add/Remove
Snap-In.
3. In the Add Or Remove Snap-Ins dialog box, select Security Templates and then
click Add.
4. Select Security Confi guration And Analysis and then click Add. Click OK.
5. By default, the Security Templates snap-in looks for security templates in the
%SystemDrive%\Users\%UserName%\Documents\Secur ity\Templates folder. To
add other search paths select New Template Search Path on the Action menu.
6. Select the template location to add from the Browse For Folder dialog box, such as
%SystemRoot%\Security\Templates. Click OK.
You can create a new template by following these steps:
1. In the Security Templates snap-in, right-click the search path where the template
should be created and then select New Template.
2. Type a name and description for the template in the text boxes provided.
3. Click OK to create the template. The template will have no settings confi gured, so
you will need to modify the settings carefully before the template is ready for use.
Applying Security Templates
You use the Security Templates snap-in to view existing templates or to create new tem-
plates. After you’ve created a template or determined that you want to use an existing
template, you can then confi gure and analyze the template by completing the following
steps:
1. Access the Security Confi guration And Analysis snap-in. Right-click the Security
Confi guration And Analysis node, and then select Open Database. This displays
the Open Database dialog box.
2. Type a new database name in the File Name fi eld, and then click Open. The
Import Template dialog box is displayed next. Select the security template that
you want to use, and then click Open.
3. Right-click the Security Confi guration And Analysis node, and then choose
Analyze Computer Now. When prompted to set the error log path, type a new
path or click OK to use the default path.
Applying Group Policy Through Security Templates 1267
Chapter 36
Please purchase PDF Split-Merge on www.verypdf.com to remove this watermark.
4. Wait for the snap-in to complete the analysis of the template. Afterward, review
the fi ndings and update the template as necessary. You can view the error log by
right-clicking the Security Confi guration And Analysis node and choosing View
Log File.
5. When you’re ready to apply the template, right-click the Security Confi guration
And Analysis node, and choose Confi gure Computer Now. When prompted to set
the error log path, click OK. The default path should be fi ne.
6. View the confi guration error log by right-clicking the Security Confi guration And
Analysis node and choosing View Log File. Note any problems and take action as
necessary.
Maintaining and Troubleshooting Group Policy
Most Group Policy maintenance and troubleshooting tasks have to do with determining
when policy is refreshed and applied and then changing the refresh options as appro-
priate to ensure that policy is applied as expected. Thus, maintaining and troubleshoot-
ing Group Policy requires a keen understanding of how Group Policy refresh works and
how it can be changed to meet your needs. You also need tools for modeling and view-
ing the GPOs that would be or have been applied to users and computers. The Group
Policy Management Console provides these tools through the Group Policy Modeling
and Group Policy Results Wizards, which can be used instead of the running the Resul-
tant Set Of Policy (RSoP) Wizard in logging mode or planning mode.
Group Policy Refresh
Computer policies are applied when a computer starts, and user policies are applied
when a user logs on. After they are applied, Group Policy settings are automatically
refreshed to ensure that they are current. The default refresh interval for domain con-
trollers is every 5 minutes. For all other computers, the default refresh interval is every
90 minutes with up to a 30-minute variation to avoid overloading the domain controller
with numerous client requests at the same time.
Change the Refresh Interval Through Group Policy
You can change the Group Policy refresh interval if desired. The related policies are
stored in the Computer Confi guration\Administrative Templates\System\Group Policy
folder. To set the refresh interval for domain controllers, confi gure the Group Policy
Refresh Interval For Domain Controllers policy. Select Enabled, set the refresh interval,
and then click OK. To set the refresh interval for all other computers, confi gure the Group
Policy Refresh Interval For Computers policy. Select Enabled, set the refresh interval and
random offset, and then click OK.
Chapter 36
1268 Chapter 36 Managing Group Policy
Please purchase PDF Split-Merge on www.verypdf.com to remove this watermark.
During Group Policy refresh, the client contacts an available domain controller in its
local site. If one or more of the GPOs defi ned in the domain have changed, the domain
controller provides a list of all the GPOs that apply to the computer and to the user
that is currently logged on, as appropriate. The domain controller does so regardless of
whether the version numbers on all the listed GPOs have changed.
By default, the computer processes the GPOs only if the version number of at least one
of the GPOs has changed. If any one of the related policies has changed, all of the poli-
cies have to be processed again. This is required because of inheritance and the inter-
dependencies within policies. Security Settings are a noted exception to the processing
rule. By default, Security Settings are refreshed every 16 hours (960 minutes) regardless
of whether GPOs contain changes. Additionally, if the client computer detects that it is
connecting over a slow network connection, it tells the domain controller this and only
the Security Settings and Administrative Templates are transferred over the network,
which means only the Security Settings and Administrative Templates are applied.
Modifying Group Policy Refresh
Group Policy refresh can be changed in several ways. First, client computers determine
that they are using a slow network connection by pinging the domain controller to
which they are connected with a zero-byte packet. If the response time from the domain
controller is more than 10 milliseconds, the computer then pings the domain controller
three times with a 2-kilobyte (KB) message packet to determine if it is on a slow net-
work. The computer uses the average response time to determine the network speed. By
default, if the connection speed is determined to be less than 500 kilobits per second
(Kbps), the computer interprets that as having a slow network connection, in which
case it notifi es the domain controller of this. As a result, only the Security Settings and
Administrative Templates in the applicable GPOs are sent by the domain controller.
You can confi gure slow link detection using the Group Policy Slow Link Detection
policy, which is stored in the Computer Confi guration\Administrative Templates\Sys-
tem\Group Policy folder. To confi gure this policy, follow these steps:
1. Start the Group Policy Object Editor. In the Group Policy Management Console,
right-click the Group Policy object you want to modify, and then select Edit.
2. Double-click the Group Policy Slow Link Detection policy in the Computer
Confi guration\Administrative Templates\System\Group Policy folder.
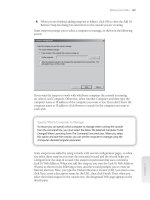
3. Defi ne the policy by selecting Enabled, as shown in Figure 36-15, and then
use the Connection Speed combo box to specify the speed that should be used
to determine whether a computer is on a slow link. For example, if you want
connections less than 128 Kbps to be deemed “slow connections,” you’d type
128. If you want to disable slow link detection, you’d type 0 in the Connection
Speed box.
Maintaining and Troubleshooting Group Policy 1269
Chapter 36
Please purchase PDF Split-Merge on www.verypdf.com to remove this watermark.
Figure 36-15 Configure slow link detection as necessary.
4. Click OK. This policy is supported by all computers running Windows 2000 or
later.
If there is any area of Group Policy for which you want to confi gure refresh, you can do
this in the Group Policy Object Editor. The related policies are stored in the Computer
Confi guration\Administrative Templates\System\Group Policy folder and include
Applications Policy Processing, Data Sources Policy Processing, Devices Policy Process-
ing, Disk Quota Policy Processing, Drive Maps Policy Processing, EFS Recovery Policy
Processing, Environment Policy Processing, and several dozen other specifi c areas of
policy processing.
Note
You use Registry Policy Processing to control the processing of all other Registry-based
extensions.
To confi gure the refresh of an extension, follow these steps:
1. Start the Group Policy Object Editor. In the Group Policy Management Console,
right-click the Group Policy object you want to modify, and then select Edit.
2. Double-click the policy in the Computer Confi guration\Administrative
Templates\System\Group Policy folder.
Note
You use Registry Policy Processing to control the processing of all other Registry-based
extensions.
Chapter 36
1270 Chapter 36 Managing Group Policy
Please purchase PDF Split-Merge on www.verypdf.com to remove this watermark.
3. Defi ne the policy by selecting Enabled, as shown in Figure 36-16. The options you
have differ slightly depending on the policy selected and include the following:
Allow Processing Across A Slow Network Connection—Select this option to
ensure that the extension settings are processed even on a slow network.
Do Not Apply During Periodic Background Processing—Select this option to
override refresh when extension settings change after startup or logon.
Process Even If The Group Policy Objects Have Not Changed—Select this
option to force the client computer to process the extension settings during
refresh even if the settings haven’t changed.
Background Priority—Determines when background processing occurs. If
you select Idle, background processing of related policy occurs only when
the computer is idle. Other processing options are for lowest activity levels,
below normal activity levels, or normal activity levels.
Figure 36-16 Change the way refresh works as necessary.
4. Click OK.
Viewing Applicable GPOs and Last Refresh
In the Group Policy Management Console, you can view all of the GPOs that apply to a
computer as well as the user logged on to that computer. You can also view the last time
the applicable GPOs were processed (refreshed). To do this, you run the Group Policy
Results Wizard.
Maintaining and Troubleshooting Group Policy 1271
Chapter 36
Please purchase PDF Split-Merge on www.verypdf.com to remove this watermark.
To start the Group Policy Results Wizard and view applicable GPOs and the last
refresh, follow these steps:
1. Start the Group Policy Management Console. Right-click Group Policy Results,
and then select Group Policy Results Wizard.
2. When the Group Policy Results Wizard starts, click Next. On the Computer
Selection page shown in Figure 36-17, select This Computer to view information
for the local computer. If you want to view information for a remote computer,
select Another Computer and then click Browse. In the Select Computer dialog
box, type the name of the computer, and then click Check Names. After the
correct computer account is selected, click OK.
Figure 36-17 Select the computer to work with.
3. In the Group Policy Results Wizard, click Next. On the User Selection page,
shown in Figure 36-18, select the user whose policy information you want to view.
You can view policy information for any user who has logged on to the computer.
Chapter 36
1272 Chapter 36 Managing Group Policy
Please purchase PDF Split-Merge on www.verypdf.com to remove this watermark.
Figure 36-18 Select the user whose policy information you want to view.
4. Click Next twice, and then after the wizard gathers the policy information, click
Finish. The wizard then generates a report, the results of which are displayed in
the details pane as shown in Figure 36-19.
Figure 36-19 Use the report to view policy information.
5. On the report, click Show All to display all of the policy information that was
gathered.
Maintaining and Troubleshooting Group Policy 1273
Chapter 36
Please purchase PDF Split-Merge on www.verypdf.com to remove this watermark.
Computer and user policy information is listed separately. Computer policy informa-
tion is listed under Computer Confi guration Summary, as follows:
To view the last time the computer policy was refreshed, look under Computer
Confi guration Summary, General for the Last Time Group Policy Was Processed
entry.
To view all applicable GPOs, look under Computer Confi guration Summary,
Group Policy Objects.
User policy information is listed under User Confi guration Summary, as follows:
To view the last time the user policy was refreshed, look under User Confi gura-
tion Summary, General for the Last Time Group Policy Was Processed entry.
To view all applicable GPOs, look under User Confi guration Summary, Group
Policy Objects.
The Applied GPOs entry shows all GPOs that have been applied. The Denied GPOs
entry shows all GPOs that should have been applied but weren’t processed for some
reason, such as because they were empty or did not contain any computer policy set-
tings. The GPO also might not have been processed because inheritance was blocked. If
so, the Reason Denied is Blocked Scope of Management (SOM).
Modeling GPOs for Planning
In the Group Policy Management Console, you can test different scenarios for modify-
ing Computer Confi guration and User Confi guration settings. For example, you can
model the effect of a slow link or the use of loopback processing. You can also model
the effect of moving a user or computer to another container in Active Directory or add-
ing the user or computer to an additional security group. To do this, you run the Group
Policy Modeling Wizard.
To start the Group Policy Modeling Wizard and test various scenarios, follow these
steps:
1. Start the Group Policy Management Console. Right-click Group Policy Modeling,
and then select Group Policy Modeling Wizard.
2. When the Group Policy Modeling Wizard starts, click Next. On the Domain
Controller Selection page, as shown in Figure 36-20, under Show Domain
Controllers In This Domain, select the domain for which you want to model
results. Next, select either Any Available Domain Controller or This Domain
Controller, and then choose a specifi c domain controller. Click Next.
Chapter 36
1274 Chapter 36 Managing Group Policy
Please purchase PDF Split-Merge on www.verypdf.com to remove this watermark.
Figure 36-20 Select the domain controller to work with.
3. On the User And Computer Selection page, shown in Figure 36-21, select the
modeling options for users and computers.
Figure 36-21 Select the modeling options for users and computers.
Maintaining and Troubleshooting Group Policy 1275
Chapter 36
Please purchase PDF Split-Merge on www.verypdf.com to remove this watermark.
Typically, you’ll want to model policy for a specifi c container using user and com-
puter information. In this case, the following would apply:
Under User Information, select Container, and then click Browse to display
the Choose User Container dialog box, which you can use to choose any of
the available user containers in the selected domain.
Under Computer Information, select Container, and then click Browse to
display the Choose Computer Container dialog box, which you can use to
choose any of the available computer containers in the selected domain.
4. Click Next. On the Advanced Simulation Options page, as shown in Figure 36-22,
select any advanced options for slow network connections, loopback processing,
and sites as necessary, and then click Next.
Figure 36-22 Select advanced options as necessary.
5. On the User Security Groups page, shown in Figure 36-23, you can simulate
changes to security group membership to model the results on Group Policy.
Any changes you make to group membership affect the previously selected user
container. For example, if you want to see what would happen if a user in the
designated user container is a member of the Domain Admins group, you could
add this group to the Security Groups list. Click Next to continue.
Chapter 36
1276 Chapter 36 Managing Group Policy
Please purchase PDF Split-Merge on www.verypdf.com to remove this watermark.
Figure 36-23 Simulate changes to security groups for users.
6. On the Computer Security Groups page, you can simulate changes to security
group membership to model the results on Group Policy. Any changes you make
to group membership affect the previously selected computer container. For
example, if you want to see what would happen if a computer in the designated
computer container is a member of the Domain Controllers group, you could add
this group to the Security Groups list. Click Next to continue.
7. WMI fi lters can be linked to GPOs. By default, it is assumed that the selected
users and computers meet all the WMI fi lter requirements, which is what you
want in most cases for modeling, so click Next twice to skip past the WMI Filters
For Users and WMI Filters For Computers pages.
8. To complete the modeling, click Next, and then click Finish. The wizard then
generates a report, the results of which are displayed in the details pane.
9. The name of the modeling report is generated based on the containers you chose
and highlighted for editing. Type a new name as required, and then press Tab.
On the report, click Show All to display all of the policy information that was
modeled. Figure 36-24 shows an example.
Maintaining and Troubleshooting Group Policy 1277
Chapter 36
Please purchase PDF Split-Merge on www.verypdf.com to remove this watermark.
Figure 36-24 Use the report to examine the Group Policy model.
Refreshing Group Policy Manually
You can refresh Group Policy manually using the Gpupdate command-line utility.
Gpupdate replaces the Secedit /refreshpolicy tool provided in Windows 2000. If you
type gpupdate at a command prompt, both the Computer Confi guration settings and
the User Confi guration settings in Group Policy are refreshed on the local computer.
You can also selectively refresh Group Policy. If you want to refresh only Computer Con-
fi guration settings, you type gpupdate /target:computer at the command prompt. If
you want to refresh only User Confi guration settings, you type gpupdate /target:user at
the command prompt. By default, only policy settings that have changed are processed
and applied. You can change this behavior using the /Force parameter. This parameter
forces a refresh of all policy settings.
Gpupdate can also be used to log off a user or restart a computer after Group Policy
is refreshed. This is useful because some Group Policy objects are applied only when
a user logs on or when a computer starts up. To log off a user after a refresh, add the
/Logoff parameter. To restart a computer after a refresh, add the /Boot parameter.
Backing Up GPOs
In the Group Policy Management Console, you can back up GPOs so that you can
restore them at a later time to recover Group Policy to the state it was in when the
backup was performed. The ability to back up and restore GPOs is one of the reasons
why the Group Policy Management Console is more useful than the older Group Policy
tools that come with Windows Server 2008. It is also important to add that you can
back up and restore GPOs only when you have installed the Group Policy Management
Console.
Chapter 36
1278 Chapter 36 Managing Group Policy
Please purchase PDF Split-Merge on www.verypdf.com to remove this watermark.
You can either back up an individual GPO in a domain or all GPOs in a domain by com-
pleting the following steps:
1. Start the Group Policy Management Console. Expand the forest, the Domains
node, and the Group Policy Objects node.
2. If you want to back up all GPOs in the domain, right-click the Group Policy
Objects node, and then select Back Up All.
3. If you want to back up a specifi c GPO in the domain, right-click the GPO, and
then select Back Up.
4. In the Back Up Group Policy Object dialog box, shown in Figure 36-25, click
Browse, and then use the Browse For Folder dialog box to set the location in
which the GPO backup should be stored.
Figure 36-25 Set the backup location and description.
5. In the Description fi eld, type a clear description of the contents of the backup.
6. Click Back Up to start the backup process. The Backup dialog box, shown in
Figure 36-26, shows the progress and status of the backup. If a backup fails,
check the permissions on the GPO and the folder to which you are writing the
backup. You need Read permission on a GPO and Write permission on the
backup folder to create a backup. By Default, members of the Domain Admins
and Enterprise Admins groups should have these permissions.
Maintaining and Troubleshooting Group Policy 1279
Chapter 36
Please purchase PDF Split-Merge on www.verypdf.com to remove this watermark.
Figure 36-26 The Backup dialog box shows the backup progress and status.
Restoring GPOs
Using the Group Policy Management Console, you can restore a GPO to the state it was
in when it was backed up. The Group Policy Management Console tracks the backup of
each GPO separately, even if you back up all GPOs at once. Because version information
is also tracked according to the backup time stamp and description, you can restore the
last version of each GPO or a particular version of any GPO.
You can restore a GPO by completing the following steps:
1. Start the Group Policy Management Console. Expand the forest, the Domains
node, and then the Group Policy Objects node.
2. If you want to restore all GPOs in the domain, right-click the Group Policy
Objects node, and then select Manage Backups. This displays the Manage
Backups dialog box (see Figure 36-27).
3. In the Backup Location fi eld, type the folder path to the backup or click Browse to
use the Browse For Folder dialog box to fi nd the folder.
4. All GPO backups in the designated folder are listed under Backed Up GPOs. To
show only the latest version of the GPOs according to the time stamp, select the
Show Only The Latest Version Of Each GPO check box.
5. Select the GPO you want to restore. If you want to confi rm its settings, click View
Settings, and then verify that the settings are as expected using Internet Explorer.
When you are ready to continue, click Restore. Confi rm that you want to restore
the selected GPO by clicking OK.
Chapter 36
1280 Chapter 36 Managing Group Policy
Please purchase PDF Split-Merge on www.verypdf.com to remove this watermark.
Figure 36-27 Use the Manage Backups dialog box to restore a GPO.
6. The Restore dialog box, shown in Figure 36-28, shows the progress and status
of the restore. If a restore fails, check the permissions on the GPO and the
folder from which you are reading the backup. To restore a GPO, you need Edit,
Delete, and Modify permissions on the GPO and Read permission on the folder
containing the GPO backup. By default, members of the Domain Admins and
Enterprise Admins groups should have these permissions.
Figure 36-28 The Restore dialog box shows the restore progress and status.
7. Click OK, and then either restore additional GPOs as necessary or click Close.
Maintaining and Troubleshooting Group Policy 1281
Chapter 36
Please purchase PDF Split-Merge on www.verypdf.com to remove this watermark.
Fixing Default Group Policy
The Default Domain Policy and Default Domain Controllers Policy GPOs are vital to
the health of Active Directory in a domain. If for some reason these policies become
corrupted, Group Policy will not function properly. To resolve this, you must run the
Dcgpofi x utility. This utility restores the default GPOs to their original, default state,
meaning the state they are in when you fi rst install Active Directory in a new domain.
You must be a member of Domain Admins or Enterprise Admins to run Dcgpofi x.
By default, when you run Dcgpofi x, both the Default Domain Policy and Default
Domain Controllers Policy GPOs are restored and you will lose any base changes made
to these GPOs. The only exceptions are for the following extension settings: Remote
Installation Services (RIS), Security Settings, and Encrypting File System (EFS). These
extension settings are maintained separately and will not be lost. Non-default Security
Settings are not maintained, however. All other extensions settings are restored to their
default postinstallation state, and any changes you’ve made are lost.
To run Dcgpofi x, log on to a domain controller in the domain in which you want to fi x
default Group Policy, and then type dcgpofi x at the command prompt. Dcgpofi x checks
the Active Directory schema version number to ensure compatibility between the ver-
sion of Dcgpofi x you are using and the Active Directory schema confi guration. If the
versions are not compatible, Dcgpofi x exits without fi xing the default Group Policy. By
specifying the /Ignoreschema parameter, you can enable Dcgpofi x to work with differ-
ent versions of Active Directory. However, default policy objects might not be restored
to their original state. Because of this, you should always be sure to use the version of
Dcgpofi x that is installed with the current operating system.
You also have the option of fi xing only the Default Domain Policy or the Default
Domain Controllers Policy GPO. If you want to fi x only the Default Domain Policy, type
dcgpofi x /target: domain. If you want to fi x only the Default Domain Controllers Policy,
type dcgpofi x /target: dc.
Chapter 36
1282 Chapter 36 Managing Group Policy
Please purchase PDF Split-Merge on www.verypdf.com to remove this watermark.
I
n this chapter, I discuss administration of sites, subnets, site links, and related com-
ponents. Active Directory sites are used to control directory replication traffi c and iso-
late logon authentication traffi c between physical network locations. Every site has one
or more subnets associated with it. Ideally, each subnet that is part of a site should be
connected by reliable, high-speed links. Any physical location connected over slow or
unreliable links should be part of a separate site, and these individual sites are linked to
other sites using site links.
Managing Sites and Subnets
When you install the Active Directory directory service in a new forest, a new site called
the Default-First-Site-Name is created. As you add additional domains and domain
controllers to the forest, these domains and domain controllers are added to this site as
they are installed unless you have confi gured other sites and associated subnets with
those sites as necessary.
Administration of sites and subnets involves determining the sites and subnets you
need and creating those sites and subnets. All sites have one or more subnets associ-
ated with them. It is in fact the subnet assignment that tells Active Directory where the
site boundaries are established. As you create additional sites, you might also need to
specify which domain controllers are a part of the sites. You do this by moving domain
controllers to the site containers with which they should be associated. Thus, the most
common administrative tasks for sites involve the following:
Creating sites
Creating subnets and associating them with sites
Moving domain controllers between sites
Creating an Active Directory Site
As part of Active Directory design, discussed in Chapter 32, “Confi guring Active Direc-
tory Sites and Replication,” you must consider whether separate sites are needed. If your
organization has multiple locations with limited bandwidth or unreliable connections
between locations, you will typically want to create additional sites. In some cases you
Managing Sites and Subnets . . . . . . . . . . . . . . . . . . . . 1283
Managing Site Links and Intersite Replication . . . . . . 1287
Monitoring and Troubleshooting Replication . . . . . . . 1302
CHAPTER 37
Active Directory Site Administration
1283
Please purchase PDF Split-Merge on www.verypdf.com to remove this watermark.
might also want to create additional sites to separate network segments even if they are
connected with high-speed links; the reason for doing this is to control logon authenti-
cation traffi c between the network segments.
To create an additional site, follow these steps:
1. Start Active Directory Sites And Services by clicking Start, Administrative Tools,
and Active Directory Sites And Services.
Connect to the Forest You Want to Work With
Active Directory Sites And Services is used to view a single forest. If your organization
has multiple forests, you might need to connect to another forest. To do this, right-click
the Active Directory Sites And Services node in the console tree, and then select Change
Forest. In the Change Forest dialog box, type the name of the root domain in the forest
to which you want to connect, and then click OK.
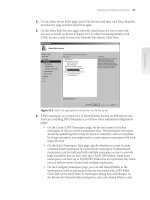
2. Right-click the Sites container in the console tree, and select New Site. This
displays the New Object–Site dialog box, as shown in Figure 37-1.
Figure 37-1 Use the New Object–Site dialog box to create a new site.
3. In the New Object–Site dialog box, type a descriptive name for the site. The site
name serves as a point of reference for administrators and should clearly depict
the purpose or physical location of the site.
4. Choose which site link will be used to connect this site to other sites. If the site
link you want to use doesn’t exist, that’s okay—the site must exist before you can
Connect to the Forest You Want to Work With
Active Directory Sites And Services is used to view a single forest. If your organization
has multiple forests, you might need to connect to another forest. To do this, right-click
the Active Directory Sites And Services node in the console tree, and then select Change
Forest. In the Change Forest dialog box, type the name of the root domain in the forest
to which you want to connect, and then click OK.
Chapter 37
1284 Chapter 37 Active Directory Site Administration
Please purchase PDF Split-Merge on www.verypdf.com to remove this watermark.
create links to it. Select the default site link DEFAULTIPSITELINK for now, and
change the site link settings after you’ve created the necessary site link or links.
5. When you are ready to continue, click OK. A prompt is displayed detailing the
steps you must complete to fi nish the site confi guration. Click OK again. As the
prompt details, you should do the following:
lEnsure the links to this site are appropriate by creating the necessary site
links. The catch in this is that both endpoints in a site link—the sites you
want to link—must exist before you can create a site link.
Create subnets and associate them with the site. This tells Active Directory
the network addresses that belong to a site.
Each site should have one or more domain controllers. Ideally, at least one of these
domain controllers should also be a global catalog server. Because of this, you should
install one or more domain controllers in the site or move existing domain controllers
into the site.
Creating a Subnet and Associating It with a Site
You create subnets and associate them with sites to allow Active Directory to determine
the network segments that belong to the site. Any computer with an Internet Protocol
(IP) address on a network segment associated with a site is considered to be located in
the site. A site can have one or more subnets associated with it. Each subnet, however,
can be associated with only one site.
You can create a subnet and associate it with a site by completing the following steps:
1. Start Active Directory Sites And Services by clicking Start, Administrative Tools,
and Active Directory Sites And Services.
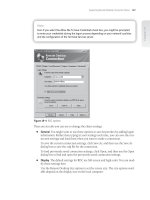
2. Right-click the Subnets container in the console tree, and select New Subnet. This
displays the New Object–Subnet dialog box, as shown in Figure 37-2.
3. In the Prefi x fi eld, type the address prefi x for the subnet. As discussed in
“Network Prefi x Notation” on page 640, the address prefi x for a network address
consists of the network ID address followed by a forward slash followed by the
number of bits in the network ID. Typically, the subnet address ends with a 0,
such as 192.168.1.0, except when subnetting is used. For example, if the network
address is 192.168.1.0 and the subnet mask is 255.255.255.0, you should enter the
address prefi x as 192.168.1.0/24.
4. Select the site with which the subnet should be associated, and then click OK. If you
ever need to change the site association for the subnet, double-click the subnet
in the Subnets folder and then, on the General tab, use the Site Selection list to
change the site association.
Managing Sites and Subnets 1285
Chapter 37
Please purchase PDF Split-Merge on www.verypdf.com to remove this watermark.
Figure 37-2 Use the New Object–Subnet dialog box to create a new subnet.
Associating Domain Controllers with a Site
After you associate subnets with a site, any domain controllers you install will automati-
cally be located in the site where the IP address subnet matches the domain controller’s
IP address. Any future domain controllers installed before you established the site and
associated subnets with it will not be moved to the site automatically. You must manu-
ally move existing domain controllers if necessary. In addition, if you associate a subnet
with a different site, you might need to move domain controllers in that subnet to the
new site.
Before you can move a domain controller from one site to another, you must determine
in which site the domain controller is currently located. One way to do this would be to
examine the Servers nodes for each site in Active Directory Sites And Services. You can
also do this by typing the following command at a command prompt:
dsquery server -s DomainControllerName | dsget server -site
where DomainControllerName is the fully qualifi ed domain name of the domain control-
ler, such as:
dsquery server -s corpserver92.cpandl.com | dsget server -site
The output of this command is the name of the site in which the designated domain
controller is located.
You can move a domain controller to a site by completing the following steps:
1. Start Active Directory Sites And Services by clicking Start, Administrative Tools,
and Active Directory Sites And Services.
Chapter 37
1286 Chapter 37 Active Directory Site Administration
Please purchase PDF Split-Merge on www.verypdf.com to remove this watermark.