Tài liệu RHCE Prerequisites ppt
Bạn đang xem bản rút gọn của tài liệu. Xem và tải ngay bản đầy đủ của tài liệu tại đây (467.68 KB, 52 trang )
1
RHCE
Prerequisites
CERTIFICATION OBJECTIVES
1.01 Basic Linux Knowledge
1.02 Linux Filesystem Hierarchy
and Structure
1.03 Basic Commands
1.04 Printing
1.05 The Linux/Unix Shell
1.06 Basic Security
1.07 Linux/Unix System Administration
1.08 Basic TCP/IP Networking
1.09 Standard Network Services
1.10 Basic Network Security
✓
Two-Minute Drill
Q&A
Self Test
CertPrs8 / RHCE Red Hat Certified Engineer Linux Study Guide / Jang / 222485-1 / Chapter 1
Blind Folio 1:1
D:\omh\CertPrs8\485-1\ch01.vp
Wednesday, September 18, 2002 10:11:24 AM
Color profile: Generic CMYK printer profile
Composite Default screen
2
Chapter 1: RHCE Prerequisites
CertPrs8 / RHCE Red Hat Certified Engineer Linux Study Guide / Jang / 222485-1 / Chapter 1
T
he Red Hat Certified Engineer exam is an advanced challenge. As the RHCE course
has a number of prerequisites, this book assumes that you know some basics about
Linux. This chapter covers each of these prerequisite topics in a minimum of detail,
with references to other books and sources for more information. Unlike in other chapters
and other books in this series, the Questions include a number of “zingers” that go beyond this
chapter’s content. That is the only way to see if you have the prerequisite skills necessary for
remaining chapters.
The prerequisites are quite broad; it is okay if you do not feel comfortable with a
small number of topics in this chapter. It’s in fact quite natural that many experienced
Linux administrators don’t use every one of the prerequisite topics in their everyday
work. Many candidates are successfully able to fill in the “gaps” in their knowledge
with some self-study and lots of practice.
Unfortunately, it is not possible to condense all of the prerequisite lessons into one
chapter, at least in a way that can be understood by newcomers to Linux and other
Unix-based operating systems. If after reading this chapter, you find gaps in your
knowledge, please refer to one of the following guides:
■
Red Hat Linux: The Complete Reference, Second Edition, by Richard Petersen
(McGraw-Hill/Osborne, 2001), provides a detailed step-by-step guide to every
part of this operating system. After reading this book, if you want additional
exercises in Red Hat Linux, this is the book.
■
Hacking Linux Exposed: Linux Security Secrets & Solutions by Hatch, Lee, and
Kurtz (McGraw-Hill/Osborne, 2001), gives you a detailed look at how you
can secure your Linux system and networks in every possible way.
■
Linux Programming: A Beginner’s Guide, by Richard Petersen (McGraw-Hill/
Osborne, 2001), takes a fundamental look at the scripts you need to administer
Linux professionally, and customize tools such as the GNOME and KDE GUIs
for your users.
Critical to a Linux administrator is knowledge of one or more text editors to manage
the many configuration files on a Linux system. The Linux filesystem hierarchy
organizes hardware, drivers, directories, and of course, files. You need to master a
number of basic commands to manage Linux. Printer configuration can be a complex
topic. Shell scripts enable you to automate many everyday processes. Security is now
a huge issue that Linux can handle better than other operating systems; locally, and
on larger networks such as the Internet.
D:\omh\CertPrs8\485-1\ch01.vp
Wednesday, September 18, 2002 10:11:24 AM
Color profile: Generic CMYK printer profile
Composite Default screen
As an administrator, you need a good knowledge of basic system administration
commands, TCP/IP configuration requirements, and standard network services. The
basic hardware knowledge associated with RHCE prerequisites is covered in Chapter 2.
This is not a book for beginners to Linux/Unix-type operating systems. Some of
what you read in this chapter may be unfamiliar. Use this chapter to create a list of
topics that you may need to study further. In some cases, you’ll be able to get up to
speed with the material in other chapters. But if you have less experience with Linux or
another Unix-type operating system, you may want to refer to the aforementioned books.
CERTIFICATION OBJECTIVE 1.01
Basic Linux Knowledge
Linux and Unix are managed through a series of text files. Linux administrators do
not normally use graphical editors to manage these configuration files. Editors such
as WordPerfect, StarOffice, and yes, even Microsoft Word normally save files in a
binary format that Linux can’t read. Popular text editors for Linux configuration files
include emacs, pico, joe, and vi.
The VIsual Editor
While emacs may be the most popular text editor in the world of Linux, every
administrator needs at least a basic knowledge of vi. While emacs may be more
popular and flexible, vi may help you save a broken system. If you ever have to
restore a critical configuration file using an emergency boot floppy, vi is probably
the only editor that you’ll have available.
You need to know how to restore your system from a rescue floppy, which does
not have enough room to carry any editor other than vi.
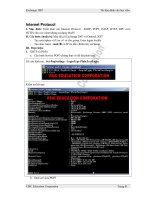
You should know how to use the two basic modes of vi: command and insert. When
you use vi to open a file, it opens in command mode. Some of the commands start
insert mode. Opening a file is easy; just use the vi filename command. By default,
this starts vi in command mode. An example of vi with the /etc/passwd file is shown
in Figure 1-1.
Basic Linux Knowledge
3
CertPrs8 / RHCE Red Hat Certified Engineer Linux Study Guide / Jang / 222485-1 / Chapter 1
D:\omh\CertPrs8\485-1\ch01.vp
Wednesday, September 18, 2002 10:11:24 AM
Color profile: Generic CMYK printer profile
Composite Default screen
The following is only the briefest of introductions to the vi editor. For more
information, there are a number of books available, as well as an extensive manual
formatted as a HOWTO available from the Linux Documentation Project at
www.tldp.org.
vi Command Mode
In command mode, you can do everything you need to a text file except edit it. The
options in command mode are broad and varied, and they are the subject of a number
of book-length texts. Using vi requires five critical command skills.
■
Search Start with a backslash, followed by the search term. Remember,
Linux is case sensitive, so if you’re searching for “Michael” in /etc/passwd,
use the /Michael (not /michael) command.
■
Write To save your changes, use the w command. You can combine
commands; for example, wq writes the file and exits vi.
■
Quit To leave vi, use the q command. If you want to abandon any changes
that you’ve made, use the q! command.
4
Chapter 1: RHCE Prerequisites
CertPrs8 / RHCE Red Hat Certified Engineer Linux Study Guide / Jang / 222485-1 / Chapter 1
FIGURE 1-1
The vi editor
D:\omh\CertPrs8\485-1\ch01.vp
Wednesday, September 18, 2002 10:11:25 AM
Color profile: Generic CMYK printer profile
Composite Default screen
■
Edit You can use a number of commands to edit files through vi, such as x,
which deletes the currently highlighted character, dw, which deletes the currently
highlighted word, and dd, which deletes the current line. Remember, p places
text from a buffer, and u restores text from a previous change.
■
Insert A number of commands allow you to start insert mode, including
i to start inserting text at the current position of the editor, and o to open up
a new line immediately below the current position of the cursor.
vi Insert Mode
In modern Linux systems, editing files with vi is easy. Just use the normal navigation
keys (arrow keys,
PAGE UP
, and
PAGE DOWN
), and then one of the basic commands
such as i or o to start vi’s insert mode, and type your changes directly into the file.
When you’re finished with insert mode, press the
ESC
key to return to command
mode. You can then save your changes, or abandon them and exit vi.
EXERCISE 1-1
Using vi to Create a New User
In this exercise, you’ll create a new user by editing the /etc/passwd file with the vi
text editor.
1.
Open a Linux command line interface. Go into root or superuser mode, and
type the vi /etc/passwd command.
2.
Navigate to the last line in the file. As you should already know, there are
several ways to do this in command mode, including the
DOWN ARROW
key,
the
PAGE DOWN
key, the G command, or even the
K
key.
3.
Make one copy of this line. If you’re already comfortable with vi, you should
know that you can copy an entire line to the buffer with the yy command. You
can then restore that line as many times as desired with the p command.
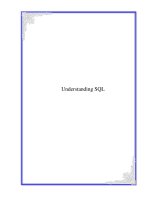
4.
Change the username, User ID, Group ID, user comment, and home directory
for the new user. Based on Figure 1-2, this corresponds to pm, 501, 501,
Tony Blair, and /home/pm. Make sure the username corresponds to the
home directory.
Basic Linux Knowledge
5
CertPrs8 / RHCE Red Hat Certified Engineer Linux Study Guide / Jang / 222485-1 / Chapter 1
D:\omh\CertPrs8\485-1\ch01.vp
Wednesday, September 18, 2002 10:11:25 AM
Color profile: Generic CMYK printer profile
Composite Default screen
6
Chapter 1: RHCE Prerequisites
CertPrs8 / RHCE Red Hat Certified Engineer Linux Study Guide / Jang / 222485-1 / Chapter 1
5.
Return to command mode by pressing the
ESC
key. Save the file with the wq
command.
6.
As the root user, run the passwd newuser command. Assign the password of
your choice to the new user.
CERTIFICATION OBJECTIVE 1.02
Linux/Unix Filesystem Hierarchy and Structure
Everything in Linux can be reduced to a file. Partitions are associated with files such
as /dev/hda1. Hardware components are associated with files such as /dev/modem.
Detected devices are documented as files in the /proc directory. The Filesystem
Hierarchy Standard (FHS) is the official way to organize files in Unix and Linux
directories. As with the other sections, this introduction provides only the most basic
FIGURE 1-2
Adding a new
user in
/etc/passwd
D:\omh\CertPrs8\485-1\ch01.vp
Wednesday, September 18, 2002 10:11:25 AM
Color profile: Generic CMYK printer profile
Composite Default screen
Linux/Unix Filesystem Hierarchy and Structure
7
CertPrs8 / RHCE Red Hat Certified Engineer Linux Study Guide / Jang / 222485-1 / Chapter 1
overview of the FHS. More information is available from the official FHS home page
at www.pathname.com/fhs.
Linux/Unix Filesystems and Directories
Several major directories are associated with all modern Unix/Linux operating systems.
These directories organize user files, drivers, kernels, logs, programs, utilities, and more
into different categories. The standardization of the FHS makes it easier for users of
other Unix-based operating systems to understand the basics of Linux.
Every FHS starts with the root directory, also known by its label, the single forward
slash (/). All of the other directories shown in Table 1-1 are subdirectories of the root
directory. Unless they are mounted separately, you can also find their files on the same
partition as the root directory.
A lot of names in Linux filesystems are used interchangeably. For example,
a filesystem can refer to the FHS, an individual partition, or a format such as
ext3. Mounted directories are often known as volumes, which can span multiple
partitions. However, while the root directory (/) is the top-level directory
in the FHS, the root user’s home directory (/root) is just a subdirectory.
Media Devices
Several basic types of media are accessible to most PCs, including IDE hard disks,
floppy drives, CD/DVD drives, and the various standards of SCSI devices. Other
media are accessible through other PC ports, including serial, parallel, USB, and
IEEE 1394. To some extent, Linux can manage all of these types of media.
Most media devices are detected automatically. Linux may require a bit of help for
some devices described in Chapter 2. But in the context of the Linux FHS, media
devices, like all others, are part of the /dev directory. Typical media devices are
described in Table 1-2.
Making Reference to Devices in /dev
Take a look at the files in the /dev directory. Use the ls -l /dev | more
command. Scroll through the long list for a while. Are you confused yet? Well,
there’s a method to this madness. Some devices are linked to others, and that actually
makes it easier to understand what is connected to what. For example, the virtual
device files /dev/mouse and /dev/modem are easier to identify than the true device files.
D:\omh\CertPrs8\485-1\ch01.vp
Wednesday, September 18, 2002 10:11:25 AM
Color profile: Generic CMYK printer profile
Composite Default screen
8
Chapter 1: RHCE Prerequisites
CertPrs8 / RHCE Red Hat Certified Engineer Linux Study Guide / Jang / 222485-1 / Chapter 1
Generally, these devices are automatically linked to the actual device files during Linux
installation. For example, the following shows the links between the mouse and
modem devices and the actual device files:
# ls -l /dev/mouse
lrwxrwxrwx 1 root root 5 Apr 18 12:17 /dev/mouse -> psaux
Directory Description
/ The root directory, the top-level directory in the FHS. All other directories are
subdirectories of root, which is always mounted on some partition. All directories that
are not mounted on a separate partition are included in the root directory’s partition.
/bin Essential command line utilities. Should not be mounted separately; otherwise, it could
be difficult to get to these utilities when using a rescue disk.
/boot Includes Linux startup files, including the Linux kernel. Can be small; 16MB is usually
adequate for a typical modular kernel. If you use multiple kernels, such as for testing
a kernel upgrade, increase the size of this partition accordingly.
/dev Hardware and software device drivers for everything from floppy drives to terminals.
Do not mount this directory on a separate partition.
/etc Most basic configuration files.
/home Home directories for almost every user.
/lib Program libraries for the kernel and various command line utilities. Do not mount this
directory on a separate partition.
/mnt The mount point for removable media, including floppy drives, CD-ROMs, and Zip disks.
/opt Applications such as WordPerfect or StarOffice.
/proc Currently running kernel-related processes, including device assignments such as IRQ ports,
I/O addresses, and DMA channels.
/root The home directory of the root user.
/sbin System administration commands. Don’t mount this directory separately.
/tmp Temporary files. By default, Red Hat Linux deletes all files in this directory periodically.
/usr Small programs accessible to all users. Includes many system administration commands
and utilities.
/var Variable data, including log files and printer spools.
TABLE 1-1
Basic Filesystem Hierarchy Standard Directories
D:\omh\CertPrs8\485-1\ch01.vp
Wednesday, September 18, 2002 10:11:25 AM
Color profile: Generic CMYK printer profile
Composite Default screen
Linux/Unix Filesystem Hierarchy and Structure
9
CertPrs8 / RHCE Red Hat Certified Engineer Linux Study Guide / Jang / 222485-1 / Chapter 1
# ls -l /dev/modem
lrwxrwxrwx 1 root root 5 Apr 18 12:17 /dev/modem -> /dev/ttyS0
The first output shows that /dev/mouse is linked directly to the PS/2 device driver
port, and that /dev/modem is linked directly to the first serial port, which corresponds
to COM1 in the Microsoft world.
Filesystem Formatting and Checking
Three basic tools are available to manage the filesystem on various partitions: fdisk,
mkfs, and fsck. They can help you configure partitions as well as create, and then
check and repair, different filesystems. As with the rest of this chapter, this section
covers only the very basics; for more information, see the man page associated with
each respective command tool.
Media Device Device File
Floppy drive First floppy (Microsoft A: drive) = /dev/fd0
Second floppy (Microsoft B: drive) = /dev/fd1
IDE hard drive
IDE CD/DVD drive
First IDE drive = /dev/ hda
Second IDE drive = /dev/hdb
Third IDE drive = /dev/hdc
Fourth IDE drive = /dev/hdd
SCSI hard drive
SCSI CD/DVD drive
First SCSI drive = /dev/sda
Second SCSI drive = /dev/sdb
…
Twenty-seventh SCSI drive = /dev/sdaa and so on
Parallel port drives First IDE drive = /dev/pd1
First tape drive: /dev/pt1
USB drives Varies widely
IEEE 1394 drives IEEE 1394 (aka FireWire, iLink) is actually a SCSI standard,
so these are controlled in Linux as SCSI devices
TABLE 1-2
Media Devices
D:\omh\CertPrs8\485-1\ch01.vp
Wednesday, September 18, 2002 10:11:25 AM
Color profile: Generic CMYK printer profile
Composite Default screen
fdisk
The Linux fdisk utility is a lot more versatile than its Microsoft counterpart. But
to open it, you need to know the device file associated with the hard drive that you
want to change. Identifying the hard disk device file is covered in Chapter 2. Assuming
you want to manage the partitions on the first SCSI hard disk, enter /sbin/fdisk
/dev/sda. As you can see in Figure 1-3, the fdisk utility is flexible.
Some key fdisk commands are described in Table 1-3.
mkfs
To format a Linux partition, apply the mkfs command. It allows you to format a
partition to a number of different filesystems. To format a typical partition such as
/dev/hda2 to the current Red Hat standard, the third extended filesystem, run the
following command:
# mkfs -t ext3 /dev/hda2
10
Chapter 1: RHCE Prerequisites
CertPrs8 / RHCE Red Hat Certified Engineer Linux Study Guide / Jang / 222485-1 / Chapter 1
FIGURE 1-3
Linux fdisk
commands; p
returns the
partition table
D:\omh\CertPrs8\485-1\ch01.vp
Wednesday, September 18, 2002 10:11:25 AM
Color profile: Generic CMYK printer profile
Composite Default screen
Linux/Unix Filesystem Hierarchy and Structure
11
CertPrs8 / RHCE Red Hat Certified Engineer Linux Study Guide / Jang / 222485-1 / Chapter 1
The mkfs command also serves as a “front-end,” depending on the filesystem format.
For example, if you’re formatting a Red Hat standard ext3 filesystem, mkfs by itself
automatically calls the mkfs.ext3 command. Therefore, if you’re reformatting an
ext3 filesystem, the following command is sufficient:
# mkfs /dev/hda2
Be careful with mkfs. First, back up any data on the subject partition and
computer. This command erases all data on the specified partition.
fsck
The fsck command is analogous to the Microsoft chkdsk command. It performs an
analysis of the specified filesystem and performs repairs as required. Assume you’re
having problems with files in the /var directory, which happens to be mounted on
/dev/hda7. If you want to run fsck, unmount that filesystem first. In some cases, you
may need to go into single-user mode with the init 1 command before you can
unmount a filesystem. To unmount, analyze, then remount the filesystem noted in
this section, run the following commands:
# umount /var
# fsck -t ext3 /dev/hda7
# mount /dev/hda7 /var
The fsck command also serves as a “front-end,” depending on the filesystem format.
For example, if you’re formatting an ext2 or ext3 filesystem, fsck by itself automatically
calls the e2fsck command (which works for both filesystems). Therefore, if you’re
checking an ext3 filesystem, the following command is sufficient:
# fsck /dev/hda7
fdisk Command Description
a Allows you to specify the bootable Linux partition (with /boot).
l Lists known partition types; fdisk can create partitions that conform to any
of these filesystems.
n Adds a new partition; works only if there is unpartitioned space on the disk.
q Quits without saving any changes.
t Changes the partition filesystem.
TABLE 1-3
Important fdisk Options
D:\omh\CertPrs8\485-1\ch01.vp
Wednesday, September 18, 2002 10:11:25 AM
Color profile: Generic CMYK printer profile
Composite Default screen
Multiple Partitions with One Filesystem
The Logical Volume Manager (LVM) enables you to set up one filesystem on
multiple partitions. For example, assume you’re adding more users and are running
out of room in your /home directory. You don’t have any unpartitioned space available
on your current hard disk.
With the LVM, all you need to do is add another hard disk, configure some
partitions, back up /home, and use the LVM tools to combine the new partition and
the one used by /home into a volume set. You may need to install the LVM rpm. Once it
is installed, the steps are fairly straightforward:
1.
Add a new hard disk.
2.
Create new partitions. Assign the Linux LVM filesystem to one or more
of these partitions. This can be easily done with the Linux fdisk utility.
3.
Back up /home. Assign the LVM filesystem to that partition.
4.
Scan for Linux LVM filesystems with the /sbin/vgscan utility, to create
a database for other LVM commands.
5.
Create volumes for the set with the /sbin/pvcreate /dev/partition command.
6.
Add the desired volumes to a specific volume group with the /sbin/vgcreate
groupname /dev/partition1 /dev/partition2 … command.
7.
Finally, you can create a logical volume. Use the /sbin/lvcreate -L xyM -n
volname groupname command, where xy is the size of the volume in MB,
and the groupname is the volume group name from the previous step.
8.
Now you can format the logical volume with the mkfs command for the
desired filesystem (usually ext2 or ext3), using the device name returned
by the lvcreate command.
As of this writing, the LVM code is new to Red Hat and may not be fully
supported. Before using LVM on Red Hat Linux, consult with Red Hat,
possibly through one of the Red Hat sponsored mailing lists.
A detailed discussion of this procedure is available in the LVM-HOWTO, available
from the Linux Documentation Project.
12
Chapter 1: RHCE Prerequisites
CertPrs8 / RHCE Red Hat Certified Engineer Linux Study Guide / Jang / 222485-1 / Chapter 1
D:\omh\CertPrs8\485-1\ch01.vp
Wednesday, September 18, 2002 10:11:26 AM
Color profile: Generic CMYK printer profile
Composite Default screen
Basic Commands
13
CertPrs8 / RHCE Red Hat Certified Engineer Linux Study Guide / Jang / 222485-1 / Chapter 1
Mounting Partitions
The mount command can be used to attach local and network partitions to specified
directories. Mount points are not fixed; you can mount a CD drive or even a Samba
share to any empty directory where you have appropriate permissions.
There are standard mount points based on the FHS. The following commands
mount a floppy with the VFAT filesystem, a CD formatted to the ISO 9660 filesystem,
and a Zip drive. The devices may be different on your system; if in doubt, look though
the startup messages with dmesg | less.
# mount -t vfat /dev/fd0 /mnt/floppy
# mount -t iso9660 /dev/cdrom /mnt/cdrom
# mount /dev/sdc
CERTIFICATION OBJECTIVE 1.03
Basic Commands
Linux was developed as a clone of Unix, which means that it has the same functionality
with different source code. And the essence of both operating systems is at the command
line. Basic commands for file manipulation and filters are available to help you do more
with a file.
This section covers only the most basic of commands that you can use in Linux.
Expect to know considerably more about commands for the RHCE exam. Only a
few are addressed in later chapters.
Basic File Operations
Two basic groups of commands are used to manage Linux files. One group helps you
get around Linux files and directories. The other group actually does something creative
with the files. Remember, in any Linux file operation, you can take advantage of the
HISTORY (this is capitalized because it’s a standard Environment variable) of previous
commands, as well as the characteristics of command completion, which allow you
to use the
TAB
key almost as a wildcard to complete a command or a filename, or
give you the options available in terms of the absolute path.
Almost all Linux commands include switches, options that allow you to do more.
Few are covered in this chapter. Especially if you’re less familiar with any of these
D:\omh\CertPrs8\485-1\ch01.vp
Wednesday, September 18, 2002 10:11:26 AM
Color profile: Generic CMYK printer profile
Composite Default screen
14
Chapter 1: RHCE Prerequisites
CertPrs8 / RHCE Red Hat Certified Engineer Linux Study Guide / Jang / 222485-1 / Chapter 1
commands, use their man pages. Study the switches. Try them out! Only with practice,
practice, and more practice can you really understand the power behind some of these
commands.
Basic Navigation
Everything in Linux can be reduced to a file. Directories are special types of files that
serve as containers for other files. Drivers are files. As discussed earlier, devices are
special types of files. The nodes associated with USB hardware are just files. And so
on. To navigate around these files, you need some basic commands to tell you where
you are, what is there with you, and how to move around.
The Tilde (~) But first, take note of the home base for all users in the bash shell,
as represented by the tilde (~). This represents the home directory of the currently
logged on user. If your username is tb, your home directory is /home/tb. If you’ve
activated the superuser account, your home directory is /root. Thus, the effect of the
cd ~ command depends on your username; if you’re user tb, this command brings
you to the /home/tb directory. If you’re the root user, this command brings you to
the /root directory.
Paths There are two path concepts you need to know when you work with Linux
directories: absolute paths and relative paths. An absolute path describes the complete
directory structure based on the top level directory, root (/). A relative path is based
on the current directory, also known as the present working directory. Relative paths
do not include the slash in front.
The difference between an absolute path and a relative one is important. Especially
when you’re creating a script, absolute paths are essential. Otherwise, scripts executed
from other directories may lead to unintended consequences.
pwd In many configurations, you may not know where you are relative to the
root (/) directory. The pwd command, which is short for present working directory,
can tell you, relative to root (/). Once you know where you are, you can know if you
need to move to a different directory.
cd It’s easy to change directories in Linux. Just use cd and cite the absolute path
of the desired directory. If you use the relative path, just remember that your final
destination depends on the present working directory.
D:\omh\CertPrs8\485-1\ch01.vp
Wednesday, September 18, 2002 10:11:26 AM
Color profile: Generic CMYK printer profile
Composite Default screen
Basic Commands
15
CertPrs8 / RHCE Red Hat Certified Engineer Linux Study Guide / Jang / 222485-1 / Chapter 1
ls The most basic of commands is to list the files in the current directory. But the
Linux ls command, with the right switches, can be quite powerful. The right kind of
ls can tell you everything about a file, such as creation date, last access date, and size.
It can help you organize the listing of files in just about any desired order. Important
variations on this command include ls -a to reveal hidden files, ls -l for long listings,
and ls -i for inode numbers.
Looking for Files
You have two basic commands for file searches: find and locate.
find The find command searches through directories and subdirectories for a desired
file. For example, if you wanted to find the directory with the XF86Config GUI
configuration file, you could use the following command, which would start the
search in the root directory:
# find / -name XF86Config
But this search on my older laptop computer with a 200 MHz CPU took several
minutes. Alternatively, if you know that this file is located in the /etc subdirectory
tree, you could start in that directory with the following command:
# find /etc -name XF86Config
locate If this is all too time consuming, Red Hat Linux includes a default database
of all files and directories. Searches with the locate command are almost instantaneous.
And locate searches don’t require the full filename. The drawback is that the locate
command database is normally updated only once each day, as documented in the
/etc/cron.daily/slocate.cron script.
The first time I started Red Hat Linux during the RHCE exam, I ran this script;
I could then use locate to find the files that I needed—quickly.
Getting into the Files
Now that you see how to find and get around different files, it’s time to start reading,
copying, and moving the files around. Most Linux configuration files are text files.
Linux editors are text editors. Linux commands are designed to read text files. If in
doubt, you can check what the file type is by using the file command, since Linux
doesn’t require a file extension.
D:\omh\CertPrs8\485-1\ch01.vp
Wednesday, September 18, 2002 10:11:26 AM
Color profile: Generic CMYK printer profile
Composite Default screen
16
Chapter 1: RHCE Prerequisites
CertPrs8 / RHCE Red Hat Certified Engineer Linux Study Guide / Jang / 222485-1 / Chapter 1
cat The most basic command for reading files is cat. The cat filename command
scrolls the text within the filename file. It also works with multiple filenames; it
concatenates the file names that you might list - as one continuous output to your screen.
less and more Larger files demand a command that can help you scroll though
the file text at your leisure. Linux has two of these commands: more and less. With
the more filename command, you can scroll through the text of a file, from start to
finish, one screen at a time. With the less filename command, you can scroll in both
directions through the same text with the
PAGE UP
and
PAGE DOWN
keys. Both
commands support vi-style searches.
head and tail The head and tail commands are separate commands that work in
essentially the same way. By default, the head filename command looks at the first 10
lines of a file; the tail filename command looks at the last 10 lines of a file. You can
specify the number of lines shown with the -nxy switch. Just remember to avoid the
space when specifying the number of lines; the tail -n15 /etc/passwd command lists
the last 15 lines of the /etc/passwd file.
Creating Files
A number of commands are used to create new files. Alternatively, you can let a text
editor such as vi create a new file for you.
cp The copy command allows you to take the contents of one file and place a copy
with the same or different name in the directory of your choice. One of the dangers
of cp is that it can easily overwrite files in different directories, without prompting
you to make sure that’s what you really wanted to do.
mv While you can’t rename a file in Linux, you can move it. The mv command
essentially puts a different label on a file. Unless you’re moving the file to a different
partition, everything about the file, including the inode number, remains the same.
ln You can create a linked file. As discussed earlier, linked files are common with
device files such as /dev/modem and /dev/mouse. They’re also useful to make sure
D:\omh\CertPrs8\485-1\ch01.vp
Wednesday, September 18, 2002 10:11:26 AM
Color profile: Generic CMYK printer profile
Composite Default screen
Basic Commands
17
CertPrs8 / RHCE Red Hat Certified Engineer Linux Study Guide / Jang / 222485-1 / Chapter 1
that multiple users have a copy of the same file in their directories. Hard links include
a copy of the file. As long as the hard link is made within the same partition, the inode
numbers are identical. You could delete a hard-linked file in one directory, and it would
still exist in the other directory.
On the other hand, a soft link serves as a redirect; when you open up a file created
with a soft link, you’re directed to the original file. If you delete the original file, the
file is lost. While the soft link is still there, it has nowhere to go.
File Filters
Linux is rich in commands that can help you filter the contents of a file. There are
simple commands to help you search, check, or sort the contents of a file. And there
are special files that contain others; these container files are known as tarballs, which
are the older alternative to the Red Hat Package Manager.
Tarballs are a common way to distribute Linux packages. They are normally
distributed in a compressed format, with a .tar.gz or .tgz file extension,
consolidated as a package in a single file. In this respect, they are similar to
Microsoft-style compressed zip files.
sort
You can sort the contents of a file in a number of ways. By default, the sort command
sorts the contents in alphabetical order depending on the first letter in each line. For
example, the sort /etc/passwd command would sort all users (including those
associated with specific services, etc.) by username.
grep and egrep
The grep command uses a search term to look through a file. It returns the full line
that contains the search term. For example, grep ‘Michael Jang’ /etc/passwd looks
for the name of this author in the /etc/passwd file.
The egrep command is more forgiving; it allows you to use some unusual characters
in your search, including +, ?, |, (, and ). While it’s possible to set up grep to search
for these characters with the help of the backslash, the command can be awkward.
The locate command is essentially a specialized version of grep directed at the
database of files on your Linux computer.
D:\omh\CertPrs8\485-1\ch01.vp
Wednesday, September 18, 2002 10:11:26 AM
Color profile: Generic CMYK printer profile
Composite Default screen
wc
The wc command, short for word count, can return the number of lines, words, and
characters in a file. The wc options are straightforward; for example, wc -w filename
returns the number of words in that file.
Administrative Commands
You’ll work with a number of administrative commands in this book. But every
budding Linux administrator should be familiar with at least two basic administrative
commands: ps and who.
ps
It’s important to know what’s running on your Linux computer. The ps command
has a number of critical switches. When trying to diagnose a problem, it’s common
to get the fullest possible list of running processes, then look for a specific program.
For example, if Mozilla were to suddenly crash, you’d want to kill any associated
processes. The ps aux | grep mozilla command could then help you identify the
process(es) that you need to kill.
who and w
If you want to know what users are currently logged into your system, use the who
command or the w command. This can help you identify the usernames of those who
are logged in, their terminal connections, their times of login, and the processes that
they are running.
If you suspect that a username has been compromised, use the w command to
check currently logged on users. Look at the terminal. If the user is in the office
but the terminal indicates a remote dial-in connection, be suspicious. The w
command can also identify the current process being run by that user.
Wildcards
Sometimes you may not know the exact name of the file or the exact search term.
That is when a wildcard is handy. The basic wildcards are shown in Table 1-4.
Wildcards are sometimes also known in the Linux world as globbing.
18
Chapter 1: RHCE Prerequisites
CertPrs8 / RHCE Red Hat Certified Engineer Linux Study Guide / Jang / 222485-1 / Chapter 1
D:\omh\CertPrs8\485-1\ch01.vp
Wednesday, September 18, 2002 10:11:26 AM
Color profile: Generic CMYK printer profile
Composite Default screen
CERTIFICATION OBJECTIVE 1.04
Printing
As of this writing, printers are not automatically connected or configured during the
installation of Red Hat Linux. You’ll have to install printers yourself. There are two
mutually exclusive print daemons available as of this writing, the older Line Print
Daemon, lpd, and the newer daemon based on the Internet Printing Protocol, CUPS.
There are two basic ways: you can edit the /etc/printcap file directly, which can be
a difficult process. The language associated with /etc/printcap files seems obscure
and difficult to understand, at least on the surface.
A GUI front end is also available for configuring a printer, based on the printconf-
gui utility. Once configured, the print commands are fairly straightforward. As
printer configuration is also an advanced skill, this process is covered in more detail
in Chapter 8.
Red Hat Linux is moving towards the use of CUPS as the default print daemon.
Through its support of the Internet Printing Protocol (IPP), CUPS is more suited
towards managing printers on a network. CUPS also includes a fairly reliable front-
end configuration tool that you can call up in a browser, using TCP/IP port 631.
This process is also covered in more detail in Chapter 8.
Printing
19
CertPrs8 / RHCE Red Hat Certified Engineer Linux Study Guide / Jang / 222485-1 / Chapter 1
Wildcard Description
*
Any number of alphanumeric characters. For example, the ls ab* command would return
the following filenames, assuming they exist in the current directory: ab, abc, abcd.
?
One single alphanumeric character: For example, the ls ?ab command would return the
following filenames, assuming they exist in the current directory: abc, abd, abe.
[]
A range of options. For example, the ls ab[123] command would return the following
filenames, assuming they exist in the current directory: ab1, ab2, ab3. Alternatively, the
ls ab[X-Z] command would return the following filenames, assuming they exist in the
current directory: abX, abY, abZ.
TABLE 1-4
Wildcards in the Shell
D:\omh\CertPrs8\485-1\ch01.vp
Wednesday, September 18, 2002 10:11:26 AM
Color profile: Generic CMYK printer profile
Composite Default screen
20
Chapter 1: RHCE Prerequisites
CertPrs8 / RHCE Red Hat Certified Engineer Linux Study Guide / Jang / 222485-1 / Chapter 1
Adding Printers
The easy way to add a printer is with the Red Hat Printer Configuration Utility,
which is also known by the command used to start it from a terminal, printconf-gui.
It’s fairly easy to configure printers with this tool; just click New as shown in
Figure 1-4 and follow the prompts.
As of this writing, the only way to configure printers through CUPS is with the
browser-based utility. As you’ll see in Chapter 8, once you’ve enabled the tool in the
/etc/xinetd.d/cups configuration file, you can start it up on the local computer by
navigating to localhost:631 in your browser.
Print Commands
Three basic commands are associated with printing in Linux, as described in Table 1-5.
CertPrs8 / RHCE Red Hat Certified Engineer Linux Study Guide / Jang / 222485-1 / Chapter 1
FIGURE 1-4
The Red Hat
Printer
Configuration
Utility
D:\omh\CertPrs8\485-1\ch01.vp
Wednesday, September 18, 2002 10:11:26 AM
Color profile: Generic CMYK printer profile
Composite Default screen
CERTIFICATION OBJECTIVE 1.05
The Linux/Unix Shell
A shell is a user interface. The Linux command shell is the prompt that allows you
to interact with your computer with various system commands. With the right file
permissions, you can set up commands in scripts to run when you want, even in
the middle of the night. Linux shells can process commands in various sequences,
depending on how you manage the input and output of each command. The way
commands are interpreted is in part determined by variables and parameters associated
with each shell. Some of these variables make up the environment that is carried over
even if you change from one shell to another.
The default shell in Linux is bash, also known as the Bourne Again Shell. A number
of other shells are available that are popular with many users. As long as you have
installed the appropriate RPMs, users can start any of these shells. As desired, you
can change the default shell for individual users in the /etc/passwd file.
Basic Shell Programming
“Real” Linux administrators program their own scripts. They create scripts because
they don’t want to sit at their computers all of the time. Scripts can allow Linux to
automatically back up directories when nobody is in the office. Scripts can help Linux
process databases when few people are using the system.
If you’re not a programmer, this is not as difficult as it sounds. For example, utilities
related to crontab automate the creation of a number of different scripts. The cron
system is discussed in more detail in Chapter 6.
The Linux/Unix Shell
21
CertPrs8 / RHCE Red Hat Certified Engineer Linux Study Guide / Jang / 222485-1 / Chapter 1CertPrs8 / RHCE Red Hat Certified Engineer Linux Study Guide / Jang / 222485-1 / Chapter 1
Command Description
lpr
The basic print command. lpr filename prints that file.
lpq
Query the print queue for status. lpr -l lists print job numbers.
lprm Remove a specific job, usually specified by job number, from the printer queue.
TABLE 1-5
Linux Print Commands
D:\omh\CertPrs8\485-1\ch01.vp
Wednesday, September 18, 2002 10:11:27 AM
Color profile: Generic CMYK printer profile
Composite Default screen
Script Execution and Permissions
Any Linux file can be set up as an executable file. Then if the file includes a series
of commands that can be interpreted by the shell, the commands in that file are
executed. For more information on executable files, read the information under
“Basic Security” later in this chapter.
Piping, Input/Output, Error, and Redirection
Linux uses three basic data streams. Data goes in, data comes out, and errors are sent
in a different direction. These streams are known as Standard Input (stdin), Standard
Output (stdout), and Standard Error (stderr). Normally, input comes from the keyboard
and goes out to the screen, while errors are sent to a buffer. In the following example,
filename is stdin to the lpr command:
# lpr filename
When you run cat filename, the contents of that file are sent to the screen as standard
output.
You can redirect each of these streams to or from a file. For example, if you have a
program named database and a datafile with a lot of data, the contents of that
datafile can be sent to the database program with a left redirection arrow. As shown
here, datafile is taken as standard input:
# database < datafile
Standard input can come from the left side of a command as well. For example, if
you need to scroll through the boot messages, you can combine the dmesg and less
commands with a pipe:
# dmesg | less
The output from dmesg is redirected as standard input to less, which then allows
you to scroll through that output as if it were a separate file.
Standard output is just as easy to redirect. For example, the following command
uses the right redirection arrow to send the standard output of the ls command to
the file named filelist.
# ls > filelist
22
Chapter 1: RHCE Prerequisites
CertPrs8 / RHCE Red Hat Certified Engineer Linux Study Guide / Jang / 222485-1 / Chapter 1
D:\omh\CertPrs8\485-1\ch01.vp
Wednesday, September 18, 2002 10:11:27 AM
Color profile: Generic CMYK printer profile
Composite Default screen
You can add standard output to the end of an existing file with a double redirection
arrow with a command such as ls >> filelist.
If you believe that a particular program is generating errors, redirect the error stream
from it with a command like the following:
#
program
2> err-list
Variables and Parameters
Variables can change. Parameters are set. The bash shell includes a number of
standard environment variables. Their default values are shown in the output to the
env command. One critical variable is the value of PATH, which you can check at
the command line with the echo $PATH command. The directories listed in PATH
are automatically searched when you try to run a command. You can easily change
the PATH variable. For example, if you want to add the /sbin directory to your PATH,
just run the following commands:
# PATH=$PATH:/sbin
# export PATH
The most common parameters are the settings associated with Linux configuration
files, which are mostly located in the /etc directory. For example, the /etc/resolv.conf
file uses the nameserver parameter to represent the DNS servers for your network.
This parameter is normally set to the IP address for that DNS server.
Inherited Environment
It’s easy to move from shell to shell. Many experienced Unix users prefer the Korn
shell. Once set, with the set command, environment variables stay the same from shell
to shell. In contrast, shell variables such as umask may change when you move from
shell to shell, or even from user to user. For example, umask is typically different for
regular users and the root user.
The Linux/Unix Shell
23
CertPrs8 / RHCE Red Hat Certified Engineer Linux Study Guide / Jang / 222485-1 / Chapter 1
D:\omh\CertPrs8\485-1\ch01.vp
Wednesday, September 18, 2002 10:11:27 AM
Color profile: Generic CMYK printer profile
Composite Default screen
24
Chapter 1: RHCE Prerequisites
CertPrs8 / RHCE Red Hat Certified Engineer Linux Study Guide / Jang / 222485-1 / Chapter 1
CERTIFICATION OBJECTIVE 1.06
Basic Security
The basic security of a Linux installation is based on file permissions. Default file
permissions are set through the umask shell variable. SUID and SGID permissions
can give all users access to specific files. Ownership is based on the default user and
group IDs of the person who created a file. Managing permissions and ownership
involves commands such as chmod, chown, and chgrp.
Users and groups own files. Users and groups have passwords. Security can be
enhanced if you configure users and groups in the Shadow Password Suite.
File Permissions
Linux file permissions are straightforward. Take the following output from ls -l
/sbin/fdisk:
-rwxr-xr-x 1 root root 73576 Apr 1 18:26 /sbin/fdisk
The permissions are shown on the left-hand side of the listing. Ten characters are shown.
The first character determines whether it’s a regular or a special file. The remaining
nine characters are grouped in threes, applicable to the file owner (user), the group
owner, and everyone else on that Linux system. The letters are straightforward; r=read,
w=write, x=execute. These characters are described in Table 1-6.
Key commands that can help you manage the permissions and ownership of a file
are chmod, chown, and chgrp. The chmod command uses the numeric value of
permissions associated with the owner, group, and others. In Linux, permissions are
assigned the following numeric values: r=4, w=2, and x=1. For example, if you were
crazy enough to give read, write, and execute permissions on fdisk for all users, you
would run the chmod 777 /sbin/fdisk command. The chown and chgrp commands
adjust the user and group owners associated with the cited file.
Users, Groups, and umask
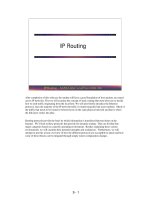
Linux, like Unix, is configured with users and groups. Everyone who uses Linux is set
up with a username, even if it’s just “guest”. Take a look at /etc/passwd. One version
of this file is shown in Figure 1-5.
D:\omh\CertPrs8\485-1\ch01.vp
Wednesday, September 18, 2002 10:11:27 AM
Color profile: Generic CMYK printer profile
Composite Default screen
As you can see, all kinds of usernames are listed in the /etc/passwd file. Even a number
of Linux services such as mail, news, nfs, and apache have their own usernames. In any
case, the /etc/passwd file follows a specific format, described in more detail in Chapter 4.
For now, note that the only users shown in this file are mj and pm, their User IDs
(UID) and Group IDs (GID) are 500 and 501, and their home directories match their
usernames. The next user gets UID and GID 502, and so on.
umask
The way umask works in Red Hat Linux may surprise you, especially if you’re coming
from a different Unix style environment. You cannot configure umask to automatically
Basic Security
25
CertPrs8 / RHCE Red Hat Certified Engineer Linux Study Guide / Jang / 222485-1 / Chapter 1
Position Description
1 Type of file; - = regular file, d=directory, b=device, l=linked file
234 Permissions granted to the owner of the file
567 Permissions granted to the group owner of the file
890 Permissions granted to all other users on the Linux system
TABLE 1-6
Description of File Permissions
FIGURE 1-5
/etc/passwd
D:\omh\CertPrs8\485-1\ch01.vp
Wednesday, September 18, 2002 10:11:27 AM
Color profile: Generic CMYK printer profile
Composite Default screen