Tài liệu Lập trình iphone chuyên nghiệp part 22 pdf
Bạn đang xem bản rút gọn của tài liệu. Xem và tải ngay bản đầy đủ của tài liệu tại đây (378.25 KB, 9 trang )
Case Studies: Beyond
Edge - to - Edge Design
Throughout this book, you ’ ve focused on building iPhone and iPod touch applications that
generally adhere to the edge - to - edge navigation UI model. For example, Chapter 3 used the
standard UI model for iRealtor, a home buyers application. Chapter 7 did the same for iPros-
pector, a contact manager. However, not all applications that you wish to create lend themselves
to standard navigation lists and destination pages. Just a quick scan of built - in applications on
iPhone and iPod touch shows a variety of different UI design models.
This chapter walks you through two case study applications that offer new takes on extending the
normal application models. The first application extends iRealtor to provide an iPhone - like photo
viewer to display home photos. The second application, WYFFL Online, demonstrates more tech-
niques on converting a standard Web site into an iPhone/iPod touch application. Both of these
case studies show you how to extend the iUI application framework for your own custom needs.
Case Study: iRealtor 2.0
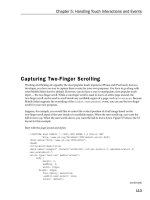
Chapter 3 showcased iRealtor as a mobile application for home buyers. Perhaps its greatest limita-
tion was only providing a single picture of the house on its listings page. To overcome that
limitation, you wanted to add a photo viewer inside of iRealtor. Though there are limitations
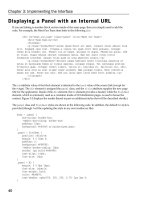
because of the Mobile Safari environment, you want to emulate the basic look of the built - in
Photo application (see Figure 11 - 1 ) with its black background and toolbar and Next and Previous
buttons. However, you want to do this customization without leaving the basic iUI framework
of the application.
c11.indd 237c11.indd 237 12/7/07 2:58:07 PM12/7/07 2:58:07 PM
Chapter 11: Case Studies: Beyond Edge-to-Edge Design
238
Figure 11-2: Emulating Photos inside of Mobile Safari
Figure 11 -1: Photos application
Figure 11 - 2 shows the final look of the page that the case study is building.
The first step is to create a new style sheet called photo.css and add a link to the style from the main
Web page:
< style type=”text/css” media=”screen” > @import “../iui/photo.css”; < /style >
Next, the following
div
element is added to the irealtor.html file to serve as the Photos page, assigning a
class
of
photoPanel
:
< div id=”photos” class=”photoPanel” title=”Photos” >
< /div >
Customizing the Application Toolbar
Once those preliminary tasks are completed, you are ready to create the graphics and style rules necessary
for displaying a black toolbar rather than the default blue one. The standard iUI toolbar uses the blue - colored
backButton.png and toolButton.png for the background of the back and search buttons. Using Photoshop,
c11.indd 238c11.indd 238 12/7/07 2:58:08 PM12/7/07 2:58:08 PM
Chapter 11: Case Studies: Beyond Edge-to-Edge Design
239
you recreated those buttons in black and called them blackButton.png and blackToolButton.png. You also
created a black background image for the entire toolbar called blackToolbar.png.
Rather than creating a second black toolbar, it is much easier to customize the look of the standard tool-
bar when the application enters a photo state (a
photo
attribute on the
body
element). Here ’ s the new
rule for the new
toolbar
class selector:
body[photo=”true”] > .toolbar {
background: url(blackToolbar.png) #000000 repeat-x !important;
border-bottom: 1px solid #000000 !important;
}
Next, the
button
class selector and
backButton id
selector are customized for the photo state:
body[photo=”true”] .button {
-webkit-border-image: url(blackToolButton.png) 0 5 0 5;
}
body[photo=”true”] #backButton {
-webkit-border-image: url(blackButton.png) 0 8 0 14;
}
In order for the application to change into photo state, it is necessary to customize the
showPage
function
inside of iui.js:
showPage: function(page, backwards)
{
if (page)
{
if (currentDialog)
{
currentDialog.removeAttribute(“selected”);
currentDialog = null;
}
if (hasClass(page, “dialog”))
showDialog(page);
else
{
var fromPage = currentPage;
currentPage = page;
if (hasClass(page, “photoPanel”))
document.body.setAttribute(“photo”, “true”);
else
document.body.removeAttribute(“photo”);
if (fromPage)
setTimeout(slidePages, 0, fromPage, page, backwards);
else
updatePage(page, fromPage);
}
}
},
c11.indd 239c11.indd 239 12/7/07 2:58:09 PM12/7/07 2:58:09 PM
Chapter 11: Case Studies: Beyond Edge-to-Edge Design
240
Using the support function
hasClass()
, the function checks to see whether the
page
element (a
div
) is
assigned the
photoPanel
class. If so, then
photo
attribute is added to body. The
else
statement
removes the photo attribute from body for all other pages.
No more changes are needed to enable iui.js for this new application state.
Creating and Styling the Photos Page
The next step is to create a rule for the
photoPanel
class in photo.css:
body > .photoPanel {
box-sizing: border-box;
padding: 10px;
background: #000000;
width: 100%;
min-height: 417px;
}
The Photos page contains an image element and buttons for moving between photos. Because
a
links are
heavily controlled by iUI (
onclick
events and styles),
input elements
are used for the Next and Pre-
vious buttons to eliminate potential conflicts. Here ’ s the HTML code:
< div id=”photos” class=”photoPanel” title=”Photos” >
< img id=”photoImage”/ >
< div class=”controlbar” >
< input class=”previousControlButton” type=”button” id=”prevButton” >
< input class=”nextControlButton” type=”button” id=”nextButton” >
< /div >
< /div >
The two
input
buttons are each assigned specific styles, which are housed in a
div
element assigned to
a
controlbar
class.
Returning to photo.css, styles are added for each of these elements:
.photoPanel img {
display: block;
margin: 10px auto 0px auto;
width:300px;
}
.photoPanel .controlbar {
display: block;
margin-top:30px;
width: 100%;
height: 40px;
text-align: center;
}
.previousControlButton {
display: inline-block;
height: 40px;
width: 36px;
margin: 0 20px;
c11.indd 240c11.indd 240 12/7/07 2:58:09 PM12/7/07 2:58:09 PM
Chapter 11: Case Studies: Beyond Edge-to-Edge Design
241
background: url(prev.png) no-repeat;
border-style: none;
}
.nextControlButton {
display: inline-block;
margin: 0 auto;
height: 40px;
width: 36px;
background: url(next.png) no-repeat;
border-style: none;
}
Each of the images has a physical width of 300px. The image rule is assigned a width of 300px and is
centered in the viewport.
Because developers cannot hide the bottom toolbar in Mobile Safari, the positioning of the
div controlbar
is better suited to be displayed higher inside the application than in the built - in Photo app. The style rule sets
the
controlbar
to display 30px below the image. The buttons are positioned inside of the
controlbar
.
Listing 11 - 1 displays the entire source of the photo.css style sheet.
Listing 11 - 1: photo.css
body[photo=”true”] > .toolbar {
background: url(blackToolbar.png) #000000 repeat-x !important;
border-bottom: 1px solid #000000 !important;
}
body[photo=”true”] .button {
-webkit-border-image: url(blackToolButton.png) 0 5 0 5;
}
body[photo=”true”] #backButton {
-webkit-border-image: url(blackButton.png) 0 8 0 14;
}
body > .photoPanel {
box-sizing: border-box;
padding: 10px;
background: black;
width: 100%;
min-height: 417px;
}
.photoPanel img {
display: block;
margin: 10px auto 0px auto;
width:300px;
}
.photoPanel .controlbar {
display: block;
margin-top:30px;
width: 100%;
height: 40px;
text-align: center;
}
(continued)
c11.indd 241c11.indd 241 12/7/07 2:58:09 PM12/7/07 2:58:09 PM