Tài liệu Teach Yourself PL/SQL in 21 Days- P10 docx
Bạn đang xem bản rút gọn của tài liệu. Xem và tải ngay bản đầy đủ của tài liệu tại đây (2.47 MB, 50 trang )
Leveraging Large Object Types 427
14
The second part of the procedure selects the row where text will be added, locks the row
for updating, assigns the starting position to the length of the contents + 1 (so no data is
overwritten), and calls the
WRITE
procedure. This transaction is then committed.
Analyzing the Contents of an Internal
LOB
In this section, you can analyze the contents of an internal
LOB
by working with the
functions
INSTR
and
SUBSTR
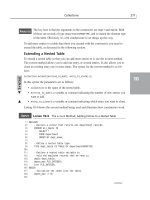
. Execute the code in Listing 14.8, and make sure that you
have entered
SET SERVEROUTPUT ON
at the SQL*Plus prompt so you can see output as
the program executes.
L
ISTING
14.8
Extracting and Matching Data Inside
CLOB
s
1: DECLARE
2: /* This PL/SQL block finds patterns in a CLOB. It also
3: extracts part of the data from a CLOB with SUBSTR */
4:
5: Source_Lob CLOB;
6: v_Pattern VARCHAR2(6) := ‘Oracle’;
7: v_Starting_Location INTEGER := 1;
8: v_Nth_Occurrence INTEGER := 1;
9: v_Position INTEGER ;
10: v_Extract_Amount INTEGER;
11: v_Buffer VARCHAR2(100) ;
12: BEGIN
13: -- Search for 1st Occurrence of Oracle in Row 5
14: SELECT CLOB_LOCATOR into Source_LOB
15: FROM LOBS
16: WHERE LOB_INDEX = 5;
17: v_Position := DBMS_LOB.INSTR(Source_LOB,v_Pattern,
18: v_Starting_Location,v_Nth_Occurrence);
19: DBMS_OUTPUT.PUT_LINE(‘The first occurrence starts at position: ‘
20: || v_Position);
21:
22: -- Search for 2nd Occurrence of Oracle in Row 5
23:
24: v_Nth_Occurrence := 2;
25:
26: SELECT CLOB_LOCATOR into Source_LOB
27: FROM LOBS
28: WHERE LOB_INDEX = 5;
29: v_Position := DBMS_LOB.INSTR(Source_LOB,v_Pattern,
30: v_Starting_Location,v_Nth_Occurrence);
31: DBMS_OUTPUT.PUT_LINE(‘The second occurrence starts at position: ‘
32: || v_Position);
33:
34: -- Extract part of the data from a CLOB
I
NPUT
continues
18 7982 ch14 11/30/99 1:09 PM Page 427
Please purchase PDF Split-Merge on www.verypdf.com to remove this watermark.
35: SELECT CLOB_LOCATOR into Source_LOB
36: FROM LOBS
37: WHERE LOB_INDEX = 6;
38: v_Buffer := DBMS_LOB.SUBSTR(Source_LOB,11,v_Starting_Location);
39: DBMS_OUTPUT.PUT_LINE(‘The substring extracted is: ‘ || v_Buffer);
40:
41: END;
42:
The first occurrence starts at position: 16
The second occurrence starts at position: 49
The substring extracted is: Oracle Data
The procedure begins by selecting the data from Row 5, and reading the locator
into the
Source_Lob
variable. Using the
INSTR
function, the pattern
‘Oracle’
,
assigned to the
v_Pattern
variable, is searched for the first occurrence, specified by the
v_Nth_Occurrence
variable. The Starting Location is defaulted to the first position in the
CLOB
, stored in the
v_Starting_Location
variable. The process is repeated, except that
you are now searching for the second occurrence of
‘Oracle’
in the
CLOB
.
The last part of the procedure extracts 11 characters from Row 6, and stores them in
v_Buffer
, which is then displayed to the screen.
Using
TRIM
and
ERASE
to Edit
CLOB
s
This sections demonstrates the use of the
TRIM
and
ERASE
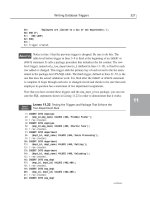
procedures. Execute the code
in Listing 14.9.
L
ISTING
14.9
Reducing Data in
CLOB
s
1: DECLARE
2: /* This erases the data in Row 6, and trims the data in
3: row 5 to one occurrence of the book title. */
4:
5: Source_Lob CLOB;
6: Erase_Amount INTEGER;
7: Trim_Amount INTEGER;
8:
9: BEGIN
10: -- Erase the data completely in Row 6
11:
12: SELECT CLOB_LOCATOR into Source_LOB
13: FROM LOBS
14: WHERE LOB_INDEX = 6 FOR UPDATE; -- Locks Row for Update
15: Erase_Amount :=DBMS_LOB.GETLENGTH(Source_LOB);
428 Day 14
L
ISTING
14.8
continued
O
UTPUT
A
NALYSIS
I
NPUT
18 7982 ch14 11/30/99 1:09 PM Page 428
Please purchase PDF Split-Merge on www.verypdf.com to remove this watermark.
Leveraging Large Object Types 429
14
16: DBMS_LOB.ERASE(Source_LOB,Erase_Amount,1);
17:
18: --Reduce Data in Row 5 to one instance of Book Title
19: SELECT CLOB_LOCATOR into Source_LOB
20: FROM LOBS
21: WHERE LOB_INDEX = 5 FOR UPDATE;
22:
23: TRIM_AMOUNT := DBMS_LOB.GETLENGTH(Source_LOB) / 2;
24: DBMS_LOB.TRIM(Source_LOB, TRIM_AMOUNT);
25: COMMIT;
26:
27: END;
To verify that the
ERASE
and
TRIM
procedures worked, at the SQL prompt type
SELECT * FROM LOBS;
LOB_INDEX CLOB_LOCATOR
--------- -------------------------------------------------------------
1 Teach Yourself Oracle8 in 21 Days
2 Oracle Data Warehousing Unleashed
3 Teach Yourself Database Development With Oracle in 21 Days
4 Oracle Unleashed 2E
5 Teach Yourself Oracle8 in 21 Days
6
Three variables are declared:
•
Source_Lob
holds the locator for the
CLOB
s you will alter.
•
Erase_Amount
holds the number of bytes to erase from Row 6.
•
Trim_Amount
stores the number of bytes that should remain in Row 5.
The procedure starts by reading the locator for the
CLOB
into the variable
Source_Lob
.
Erase_Amount
is assigned the value of the length of the data in Row 6 by using the
GETLENGTH
function. The
ERASE
procedure is called and passes the
CLOB
locator, the total
bytes to erase, and the starting position for erasing the data, which is hard-coded to the
value
1
in this example.
The second half of the block reduces the data in Row 5 by half. The locator for the
CLOB
in Row 5 is read into the variable
Source_Lob
. The
Amount
of data to remain is calculat-
ed by taking the total length of the data by using the
GETLENGTH
function, and dividing
this value by 2. The
TRIM
procedure is called, passing the locator and the amount of
bytes to remain. The transactions are then committed.
I
NPUT
A
NALYSIS
O
UTPUT
18 7982 ch14 11/30/99 1:09 PM Page 429
Please purchase PDF Split-Merge on www.verypdf.com to remove this watermark.
Temporary
LOB
s
Oracle8i introduced temporary
LOB
s, which are synonymous with local variables and do
not exist permanently in the database. The most common usage of temporary
LOB
s is for
performing transformations on
LOB
data. By default their life span is the duration of the
session.
One of the biggest advantages of temporary
LOB
s is their ability to improve performance
over the usage of persistent
LOB
s. By default
LOB
s are persistent in nature unless other-
wise defined. This improved performance is gained because there are no redo records of
logging occurring when temporary
LOB
s are used. Likewise, you can explicitly remove a
temporary
LOB
,thereby freeing up additional memory and tablespace.
PL/SQL operates on temporary
LOB
s through locators in the same way as for persistent
LOB
s. Because temporary
LOB
s are never part of any table, you cannot use SQL Data
Manipulation Language (DML) to operate on them. You must manipulated them by using
the
DBMS_LOB
package as you would with persistent
LOB
s. Security is provided through
the
LOB
locator. Only the user who created the temporary
LOB
can access it. Locators are
not designed to be passed from one user’s session to another.
430 Day 14
When you copy a persistent
LOB
into a temporary
LOB
locator, the temporary
LOB
locator points to the persistent
LOB
. The persistent
LOB
is not copied into
the temporary
LOB
—only the locators are affected.
Note
Managing Temporary
LOB
s
All temporary
LOB
s are recorded in the
v$temporary_LOBS
view. A simple selection on
this view will display all temporary
LOB
s currently valid for that session. This is a great
place to monitor for unwanted overhead of unnecessary temporary
LOB
s.
Creating Temporary
LOB
s
To create temporary
LOB
s, you use the procedure
CREATETEMPORARY
, which resides in the
DBMS_LOB
package. The Syntax for calling this procedure is as follows.
18 7982 ch14 11/30/99 1:09 PM Page 430
Please purchase PDF Split-Merge on www.verypdf.com to remove this watermark.
Leveraging Large Object Types 431
14
DBMS_LOB.CREATETEMPORARY (lob_loc, cache, dur);
In this syntax the parameters are as follows:
•
lob_loc
is the location of the
LOB
.
•
cache
specifies whether the
LOB
should be read into the database buffer.
•
dur
is one of two predefined duration values (
SESSION
or
CALL
), which specifies
whether the temporary
LOB
is cleaned up at the end of the session or call. The
default value for this parameter is
duration
.
The following example illustrates the creation of a temporary
LOB
:
begin
DBMS_LOB.CREATETEMPORARY
(Dest_Loc,
TRUE,
DBMS_LOB.SESSION);
End;
In this example a temporary
LOB
is created that will be loaded into the buffer and
remain in existence for the duration of the current session. After this session is
completed, the temporary
LOB
will disappear, and all memory and tablespace allocated to
it will be returned.
Summary
In this lesson you have learned how Oracle handles large objects, referred to as
LOB
s. The
two types of
LOB
s are internal and external
LOB
s. Internal
LOB
s can be persistent or tem-
porary. External
LOB
s, called
BFILE
s, are files accessible to the operating system, rather
than data stored in a table. Internal
LOB
s can also be binary, character, multicharacter, and
fixed width. These have full transactional support and can be committed or rolled back.
LOB
s can have a maximum size of 4GB, or the size of an unsigned
LONG
integer.
Q&A
Q What is the difference between an external and an internal
LOB
?
A Internal
LOB
s are stored within the Oracle database. External
LOB
s are stored and
maintained by the operating system.
Q What possible uses are there for
LOB
s?
A You can use
LOB
s to easily store and track pictures, large text files, and sound files,
which can then be used by front-end systems to display or play back the data.
,
S
YNTAX
,
I
NPUT
A
NALYSIS
18 7982 ch14 11/30/99 1:09 PM Page 431
Please purchase PDF Split-Merge on www.verypdf.com to remove this watermark.
QHow are paths accessed by Oracle?
A A path is defined as a directory object, which you create by using the SQL state-
ment
CREATE DIRECTORY
.
Workshop
You can use this to test your comprehension of this lesson and put what you’ve learned
into practice. You’ll find the answers to the quiz and exercises in Appendix A,
“Answers.”
Quiz
1. What are the two types of internal
LOB
s?
2. What is the maximum size of a
LOB
?
3. Can you write to external files?
4. When copying
LOB
s from one row to another, is a new locator copied?
Exercise
Create a temporary
LOB
that is of
BLOB
datatype, that will not be stored in the buffer, and
that will be limited to the current call.
432 Day 14
18 7982 ch14 11/30/99 1:09 PM Page 432
Please purchase PDF Split-Merge on www.verypdf.com to remove this watermark.
In Review
You have finished your second week of learning how to pro-
gram in PL/SQL. The week started with learning about SQL,
creating and using tables, and working with stored procedures
and packages. You know all about encapsulation and grouping
similar procedures and functions together in packages. You
have also learned how to plan for and react to certain runtime
errors that can arise in PL/SQL code. This includes how to
write exception-handling routines to handle internal and user-
defined PL/SQL processing errors.
On Day 9 you learned how to manipulate data with PL/SQL
cursors. Cursors are wonderful constructs in that they enable
you to process a multiple-row query result set one row at a
time. You also learned how to pass arguments into cursors and
how to use cursors as variables.
You have also, on Day 10, learned about the various PL/SQL
collection types. On Day 11, you learned how to use triggers,
which are automatically executed in response to certain SQL
statements and database events. On Day 12, you were intro-
duced to Oracle8i’s object features.
On Day 13, you learned how to prepare for errors and write
error-handling routines to help prevent unwanted termination
of your PL/SQL programs’ execution. Finally, the week ended
on Day 14 with you learning how to use the Oracle 8i large
object datatypes.
W
EEK
2
8
9
10
11
12
13
14
19 7982 wir 2 11/30/99 1:09 PM Page 433
Please purchase PDF Split-Merge on www.verypdf.com to remove this watermark.
19 7982 wir 2 11/30/99 1:09 PM Page 434
Please purchase PDF Split-Merge on www.verypdf.com to remove this watermark.
At a Glance
At this point, you should have mastered the basics of Oracle’s
PL/SQL language, from functions to procedures to cursors.
With this knowledge, you can now master the packages sup-
plied by Oracle, which offer some additional advanced fea-
tures. Each chapter guides you through a package or concept
and demonstrates its topic through an actual example you can
try.
Where You Are Going
Day 15 covers advanced topics such as managing transactions
and locks. You will then continue with the topics of dynami-
cally creating SQL and writing to external files. Next you are
exposed to the Oracle-provided package
DBMS_JOB
. Later in
the week, you will see how sessions communicate using the
DBMS_PIPE
package and learn how to manage alerts by using
the
DBMS_ALERT
package. Toward the end of the week you
will learn about the Java engine, which is a new feature of
Oracle 8i. You’ll see how Java classes can be loaded into
the database, and you’ll learn how you can interface your
PL/SQL code to Java methods. Finally, the week ends with a
discussion on how to use Oracle8i’s Advanced Queuing fea-
tures.
This is your last week reading this book. It’s the week with
the toughest and most challenging topics, but they are also the
most interesting topics. So forge ahead, and good luck!
W
EEK
3
15
16
17
18
19
20
21
20 7982 wag 3 11/30/99 1:07 PM Page 435
Please purchase PDF Split-Merge on www.verypdf.com to remove this watermark.
20 7982 wag 3 11/30/99 1:07 PM Page 436
Please purchase PDF Split-Merge on www.verypdf.com to remove this watermark.
D
AY
15
W
EEK
2
Managing Transactions
and Locks
by Tom Luers
Today you will cover transactions and locks, plus the benefits you can gain by
controlling them. Managing transactions provides the user of the Oracle server,
the application developer, or the database administrator the capability of guar-
anteeing data consistency and data concurrency. Data consistency provides the
user a consistent view of data, which consists of data committed by other users
as well as changes made by the user. Data concurrency provides the user access
to data concurrently used by many other users. Without transactions coordinat-
ing data concurrency and data consistency, the user of the server would experi-
ence inconsistent data reads, lost updates, and nonrepeatable reads. In today’s
transaction and locks lesson you will learn:
•Starting and stopping transactions
•Implementing two-phase commits
•Using savepoints
•Using locks
21 7982 ch15 11/30/99 1:07 PM Page 437
Please purchase PDF Split-Merge on www.verypdf.com to remove this watermark.
Types of Transactions
A transaction is a logical unit of work that is composed of one or more Data
Manipulation Language (DML) or Data Definition Language (DDL) statements.
For every transaction in Oracle, two situations can occur. If the statements in a transac-
tion complete normally, then the effects of the transaction are made permanent in the
database. This is called committing the transactions. The other situation occurs when any
one of the statements is unable to complete for whatever reason. In this case, the effects
of the transaction are removed from the database and the transaction ends. This removal
of the effects of a transaction is called rolling back the transaction.
Oracle provides two general types of transactions: read-only and read-write
transactions. The read-only transaction specifies that the queried data and all
queries within the same transaction will not be affected by any other transactions that
take place in the database. In other words, any subsequent query can only read changes
committed prior to the beginning of the current transaction. The read-write transaction
guarantees that data returned by a query is consistent with respect to the time the query
began.
The read-only transaction enforces transaction-level read consistency. This type of trans-
action can contain only queries and cannot contain any DML statements. In this situa-
tion, only data committed prior to the start of the transaction is available to the query.
Thus, a query can be executed multiple times and return the same results each time.
The read-write transaction provides for statement-level read consistency. This type of
transaction will never see any of the changes made by transactions that commit during
the course of a query execution.
Starting a Transaction
A transaction begins with the first SQL statement being executed and ends when the
effects of the transaction are saved or backed out. The
SET TRANSACTION
command also
initiates a transaction.
The
SET TRANSACTION
command is an integral part of transaction management. This
command performs one of these operations on the current transaction:
•Establishes the transaction as either a read-only or a read-write transaction.
•Assigns your current read-write transaction to a specified rollback segment.
438 Day 15
N
EW
T
ERM
N
EW
T
ERM
21 7982 ch15 11/30/99 1:07 PM Page 438
Please purchase PDF Split-Merge on www.verypdf.com to remove this watermark.
Managing Transactions and Locks 439
15
SET TRANSACTION parameter
In this syntax,
parameter
can be one of the following values:
•
READ ONLY
—Establishes transaction-level read consistency.
•
READ WRITE
—Establishes statement-level read consistency.
•
ISOLATION LEVEL
—Establishes how DML transactions are handled. You have two
options here:
SERIALIZABLE
and
READ COMMITTED
. The
SERIALIZABLE
options caus-
es any DML transaction to fail if it attempts to manipulate any data object that has
been modified and not committed. The
READ COMMITTED
causes the same DML
transaction to wait for the previous DML lock to disappear. This is the default
nature of Oracle.
•
USE ROLLBACK SEGMENT
—Defines the appropriate rollback segment to be used.
The read-only transaction is the default mode of all transactions. With this mode, you do
not have a rollback segment assigned. Additionally, you cannot perform an
INSERT
,a
DELETE
, an
UPDATE
,or a
SELECT FOR UPDATE
clause command during this transaction.
The read-write transaction mode provides no restrictions on the DML statements allowed
in the transaction.
The
SET TRANSACTION
command allows you to explicitly assign a particular rollback
segment to the read-write transaction. This rollback segment is used to undo any changes
made by the current transaction should a rollback be executed. If you do not specify a
rollback segment, Oracle assigns one to the transaction.
The following example of the
SET TRANSACTION
command would allow the user to run
this script every weekend without worrying about any other users who might be modify-
ing data:
COMMIT;
SET TRANSACTION read only;
execute_emp_change_2;
COMMIT;
Ending a Transaction
Ending a transaction means that either the changes made by the transaction are saved or
that all changes are backed out. As you learned previously in this lesson, saving all pend-
ing changes to the database is known as committing the transaction. Backing out is
accomplished through the
ROLLBACK
statement or when there is abnormal termination in
the transaction. The
ROLLBACK
statement is discussed further in the next section,
“Canceling a Transaction.”
,
S
YNTAX
,
21 7982 ch15 11/30/99 1:07 PM Page 439
Please purchase PDF Split-Merge on www.verypdf.com to remove this watermark.
Committing occurs when the user either explicitly or implicitly saves the transaction
changes to the database permanently. Until you perform a commit, the following princi-
ples characterize the state of your transaction:
• DML operations affect only the database buffer. Because the changes have only
affected the buffer, these changes can be backed out.
•A rollback segment buffer is created in the server.
• The owner of the transaction can view the effects of the transaction by using the
SELECT
statement.
•Other users of the database cannot see the effects of the transaction.
• The affected rows are locked and other users cannot change the data within the
affected rows.
After the commit is executed, the following occurs:
1. Locks held on the affected rows are released.
2. The transaction is marked as complete.
3. The internal transaction table of the server generates a system change number,
assigns this number to the transaction, and saves them both in the table.
You use the
COMMIT
statement to explicitly make permanent the changes from a transac-
tion. The following example shows a simple transaction being executed, with a
COMMIT
being issued after the transaction is executed:
SQL>INSERT INTO TABLE employee VALUES
SQL>(emp_id, emp_name)
SQL>VALUES (5, “Jacks Sharon”)
1 row created
SQL> COMMIT;
Commit completed
You can use the
COMMENT
clause with the
COMMIT
statement to place a text string in the
data dictionary, along with the transaction ID. You can view this information in the
dba_2pc_pending
data dictionary view. Usually you use this view to obtain additional
information about a transaction that has a questionable status in a distributed
environment.
To make an explicit commit by issuing the appropriate commands, you must have the
force transaction
system privilege. To manually commit a distributed transaction that
was originated by another user, you must have the
force any transaction
system priv-
ilege. Oracle performs an implicit commit before and after every DDL command. Oracle
does this implicit commit automatically without the user having to issue any commands.
440 Day 15
21 7982 ch15 11/30/99 1:07 PM Page 440
Please purchase PDF Split-Merge on www.verypdf.com to remove this watermark.
Managing Transactions and Locks 441
15
Canceling a Transaction
Rolling back a transaction means undoing any change that the current transaction has
made. To execute a rollback of the entire transaction, you issue the
ROLLBACK
command.
The following example illustrates the use of the
ROLLBACK
command to undo the effects
of the
UPDATE
command:
UPDATE TABLE employee
(set pay_rate = pay_rate * 1.25
WHERE pay_type = ‘S’;
ROLLBACK;
Alternatively, you can roll back a portion of a transaction by using the
ROLLBACK TO
SAVEPOINT
command. Savepoints are discussed later in this lesson, in the section
“Creating Bookmarks with Savepoints.”
When you roll back an entire transaction, the following occurs:
1. All changes made by the current transaction are undone, using the corresponding
rollback segment.
2. All locks on the rows caused by the transaction are released.
3. The transaction is ended.
When you roll back a transaction to a savepoint, the following occurs:
• Only the SQL statements executed after the last savepoint are rolled back.
• The specified savepoint in the
ROLLBACK
command is preserved, but all other save-
points after that savepoint are removed from the database.
•All locks established since the specified savepoint are released.
• The transaction is still active and can continue.
No privileges are required to roll back your own transaction. Oracle requires that you
have the
force transaction
system privilege to roll back any in-doubt distributed trans-
action you own. If the distributed transaction is owned by someone else, then you are
required to have the
force any transaction
system privilege.
Oracle performs an implicit rollback if a severe failure occurs with the host computer or
in the application program.
Exploring the Two-Phase Commit
Oracle manages the commits and rollbacks of distributed transactions and maintains data
integrity for all the distributed databases participating in the distributed transaction.
Oracle performs these tasks by a mechanism known as two-phase commit.
21 7982 ch15 11/30/99 1:07 PM Page 441
Please purchase PDF Split-Merge on www.verypdf.com to remove this watermark.
A two-phase commit is a mechanism which guarantees that all database servers
participating in a distributed transaction either all commit or all roll back the
statements in the transaction. A two-phase commit mechanism also protects implicit
DML operations performed by integrity constraints, remote procedure calls, and triggers.
In a nondistributed environment, all transactions are either committed or rolled back as a
unit. However, in a distributed environment, commits and rollbacks of a distributed trans-
action must be coordinated over a network so that the participating databases either all
commit or roll back the transaction. This must hold true even if the network fails during
the distributed transaction. The two-phase commit guarantees that the nodes participating
in the transaction either commit or roll back the transaction, thus maintaining complete
data integrity of the global database.
All implicit DML operations performed by integrity constraints, remote procedure calls,
and triggers are protected by Oracle’s two-phase commit.
Creating Bookmarks with Savepoints
Asavepoint is like a bookmark in the transaction. You explicitly place this bookmark for
reference at a later time. Savepoints are used to break a large transaction up into smaller
pieces. This allows you to roll back your work to intermediate points in the transaction
rather than roll back the entire transaction. For example, if you are performing a large
number of updates and an error occurs, you only have to roll back to the last savepoint;
you would not need to reprocess every statement.
The following code creates the savepoint named
master_credit
:
SAVEPOINT master_credit
Savepoint names must be unique within a given transaction. If you create a second save-
point named the same as an earlier savepoint, the previous savepoint is erased.
The following is an example of rolling back a transaction to the
employee_1
savepoint:
INSERT INTO employee VALUES
(6,’Tom Brandon’,3,1000.00,’S’);
SAVEPOINT employee_1;
INSERT INTO employee VALUES
(7,’Catherine Ann’,2,2000.00,’S’);
ROLLBACK TO SAVEPOINT employee_1;
In this example, the insertion of the employee Catherine Ann is removed from
the transaction. At the point of the rollback to the savepoint, the insertion of Tom
is the pending data in the current transaction.
442 Day 15
I
NPUT
N
EW
T
ERM
A
NALYSIS
21 7982 ch15 11/30/99 1:07 PM Page 442
Please purchase PDF Split-Merge on www.verypdf.com to remove this watermark.
Managing Transactions and Locks 443
15
Using Release Option
Typically when your program ends successfully, all locks, cursors, and some memory are
released back to the system. However, if your program terminates abnormally, some of
these locks and cursors might remain active for a period of time. This causes unwanted
overhead in the database, until the database recognizes the termination and then cleans
up the mess.
The following example illustrates the use of the
RELEASE
option with the
COMMIT
and the
ROLLBACK
commands:
EXEC SQL COMMIT RELEASE;
or
EXEC SQL ROLLBACK RELEASE;
In this example, you are forcing the program to terminate cleanly. This causes
the locks, memory, and cursors to be freed up. Without the release option, you
may incur some unwanted overhead in the database for a short period of time.
Using Locking
The Oracle database uses locks to give the user temporary ownership and control of a
data object such as a table or row. Oracle automatically locks a row on behalf of a trans-
action to prevent other transactions from acquiring a lock on the same row. You don’t
want simultaneous row manipulations by two separate transactions. Data locks prevent
destructive interference of simultaneous conflicting DDL and DML statements. For
example, Oracle prevents a table from being dropped if there are uncommitted transac-
tions on that table. These data locks are automatically released when the transaction
completes by a commit or rollback.
Oracle generates what’s known as a read-consistent view of data when you query data
and while at the same time the data is being manipulated by another user. When a query
is active, the results of the query do not change, regardless of any update manipulations
that occur. If the query is reexecuted, the data returned reflects any updates executed. The
next two sections examine two types of data locking: table and row.
Locking Tables
DML operations can obtain data locks for specific rows and for specific tables. These
locks are used to protect the data in the table when the table is being accessed concur-
rently by multiple users.
I
NPUT
A
NALYSIS
21 7982 ch15 11/30/99 1:07 PM Page 443
Please purchase PDF Split-Merge on www.verypdf.com to remove this watermark.
A transaction acquires a table lock when a table is modified by the following DML state-
ments:
INSERT
,
UPDATE
,
DELETE
,
SELECT
with the
UPDATE
option, and
LOCK TABLE
. The
table lock is specifically in place to ensure that the current transaction has access to the
data and to prevent any conflicting DDL operations that might happen.
444 Day 15
Note that placing a table lock does prevent other transactions acquiring a
lock (row or table) on the same table.
Note
The table lock can be executed in five different modes:
•
row share
—This table lock is the least restrictive of the table locks. It allows for
other concurrent transactions to query, insert, update, delete, and lock rows in the
same table. The
row share
table lock does not allow exclusive write access to the
same table.
•
row exclusive
—This lock occurs when several rows in a table have been updated.
This lock still allows other transactions to query, insert, update, delete, or lock rows
in the same table. The
row exclusive
lock does not prevent any manual locking or
exclusive read and writes on the same table.
•
share lock
—The
share lock
table lock allows for other transactions to only
query and lock specific rows. This lock prevents all updates, inserts, and deletes
from the same table.
•
share row exclusive
—This table lock is accomplished only through the lock
table with the
share row exclusive
parameter. This lock only permits queries and
selects for
UPDATE
statements.
•
exclusive
—This lock allows the transaction write access to a table. This lock
means that other transactions can only query the table.
Implicit data locking occurs automatically for all SQL statements, so users of the data-
base do not have to explicitly lock any rows. By default, Oracle locks resources at the
lowest level possible.
In a multiuser database, locks have two different levels:
•
exclusive
—This prohibits the sharing of the associated resource. The first transac-
tion that acquires the resource is the only transaction that can alter the resource
until the lock is released.
•
share
—This lock allows the associated resource to be shared, depending on the
operations involved. Several transactions can acquire share locks on the same
resource. Share locks provide a greater degree of data concurrency than do exclu-
sive locks.
21 7982 ch15 11/30/99 1:07 PM Page 444
Please purchase PDF Split-Merge on www.verypdf.com to remove this watermark.
Managing Transactions and Locks 445
15
Locking Rows
Row locks are acquired automatically by the transactions when a row is modified by the
following commands:
INSERT
,
DELETE
,
UPDATE
, and
SELECT
with the
FOR UPDATE
clause.
The following example of the
SELECT
command places a row lock on the
employee
table:
SELECT emp_id, pay_rate
FROM employee
WHERE pay_type = ‘H’
FOR UPDATE;
These row locks stay in effect until the transaction is completed or rolled back.
The row lock is always exclusive, which prohibits other transactions from modi-
fying the same row. When the row lock is issued, a corresponding table lock is also
issued to prevent any conflicting DDL statements from taking effect.
Explicit Locks
A transaction explicitly acquires the specified table locks when a
LOCK TABLE
statement
is executed and overrides the default locking mechanisms. When a
LOCK TABLE
statement
is issued on a view, the underlying base tables are locked. The syntax for the
LOCK TABLE
statement is as follows.
LOCK TABLE table_name IN lock_mode MODE NOWAITE;
In this syntax the parameters are as follows:
•
table_name
is the name of the table you want to lock.
•
lock_mode
is the mode you want. See a full listing of the lock modes earlier in this
lesson, in the section called “Locking Tables.”
•
NOWAIT
is optional. If it is specified, then control is immediately returned to the
transaction if there is already a lock on the data object. If
NOWAIT
is omitted, then
the transaction waits for the existing lock to be lifted, and then locks the data
object for itself and executes the transaction.
The following example illustrates the use of the
LOCK TABLE
statement:
LOCK TABLE employee, department
IN EXCLUSIVE MODE;
This example creates a table lock on the tables
employee
and
department
. The
lock acquires exclusive table locks for the transaction. Because the
NOWAIT
option is omitted, the transaction will wait, if necessary, for any preexisting locks to
diminish before continuing processing.
I
NPUT
A
NALYSIS
,
S
YNTAX
,
I
NPUT
A
NALYSIS
21 7982 ch15 11/30/99 1:07 PM Page 445
Please purchase PDF Split-Merge on www.verypdf.com to remove this watermark.
The
DBMS_LOCK
Package
Oracle supplies a package with the database to assist you in managing the database
locks. This Oracle-supplied package is named
DBMS_LOCK
. Through this package, you can
request a lock of a specific mode, give it a unique name recognizable in another proce-
dure in the same or another instance, change the lock mode, and release the lock.
The following functions are included in the
DBMS_LOCK
package:
ALLOCATE_UNIQUE
,
REQUEST
,
CONVERT
,
RELEASE
, and
SLEEP
. They are described in more detail in the follow-
ing sections.
The
ALLOCATE UNIQUE
Function
The
ALLOCATE_UNIQUE
function allocates a unique lock identifier (in the range of
1073741824 to 1999999999), given a lock name. Lock identifiers are used to enable
applications to coordinate their use of locks. The
ALLOCATE UNIQUE
function is provided
because in some cases it might be easier for applications to coordinate their use of locks
based on lock names rather than lock numbers.
If you choose to identify locks by name, you can use
ALLOCATE_UNIQUE
to generate a
unique lock identification number for these named locks.
The first session to call
ALLOCATE_UNIQUE
with a new lock name causes a unique lock ID
to be generated and stored in the
DBMS_LOCK_ALLOCATED
table. Subsequent calls (usually
by other sessions) return the lock ID previously generated. The syntax for the
ALLOCATE_UNIQUE
function is as follows
DBMS_LOCK.ALLOCATE_UNIQUE (
lockname IN VARCHAR2,
lockhandle OUT VARCHAR2,
expiration_secs IN INTEGER DEFAULT 864000);
In this syntax the parameters are as follows:
•
lockname
is the name of the lock for which you want to generate a unique ID.
•
lockhandle
returns the lock identifier for the unique identifier generated by the
procedure.
•
expiration secs
is the number of seconds to wait after the last
ALLOCATE_UNIQUE
has been performed on a given lock, before permitting that lock to be deleted from
the
DBMS_LOCK_ALLOCATED
table.
Exploring the
REQUEST
Function
The
REQUEST
function, as the name implies, requests a lock with a given mode. The syn-
tax for the
REQUEST
function is as follows.
446 Day 15
,
S
YNTAX
,
21 7982 ch15 11/30/99 1:07 PM Page 446
Please purchase PDF Split-Merge on www.verypdf.com to remove this watermark.