Tài liệu OCA: Oracle Database 11g Administrator Certified Associate- P15 ppt
Bạn đang xem bản rút gọn của tài liệu. Xem và tải ngay bản đầy đủ của tài liệu tại đây (701.62 KB, 50 trang )
Managing Tablespaces
531
MANAGEMENT AUTO
clause. Oracle strongly recommends
AUTOMATIC
segment space manage-
ment for permanent locally managed tablespaces, and the default behavior of Oracle 11g is
AUTO
. Here is a statement that creates a tablespace with manual segment space management:
CREATE TABLESPACE hr_index
DATAFILE ‘/u02/oradata/11GR11/hr_index01.dbf’ SIZE 2G
EXTENT MANAGEMENT LOCAL AUTOALLOCATE
SEGMENT SPACE MANAGEMENT MANUAL;
When automatic segment space management is specified, bitmaps are used instead of free
lists to identify which data blocks are available for inserts. The parameters
PCTFREE
and
PCTUSED
are ignored for segments in tablespaces with automatic segment space management.
Automatic segment space management is available only on tablespaces configured for local
extent management; it is not available for temporary or system tablespaces. Automatic seg-
ment space management performs better and reduces your maintenance tasks, making it the
preferred technique.
To specify automatic segment space management, use the
SEGMENT SPACE MANAGEMENT
AUTO
clause of the
CREATE TABLESPACE
statement like this or do not include the
SEGMENT
SPACE MANAGEMENT
clause (it is the default):
CREATE TABLESPACE hr_index
DATAFILE ‘/u02/oradata/11GR11/hr_index01.dbf’ SIZE 2G
EXTENT MANAGEMENT LOCAL AUTOALLOCATE
SEGMENT SPACE MANAGEMENT AUTO;
When automatic segment space management is used, Oracle ignores the storage param-
eters
PCTUSED
,
FREELISTS
, and
FREELIST GROUPS
when creating objects.
Although the name segment space management sounds similar to extent
management, it is quite different and can be more accurately regarded as
block space management.
Choosing Other Tablespace Options
Several options are available to use when creating a tablespace. You learned to create
BIGFILE
or
SMALLFILE
tablespaces and use the
EXTENT MANAGEMENT
and
SEGMENT SPACE
MANAGEMENT
options in the previous sections. In this section, you will learn the other
options available while creating a tablespace:
Specifying nondefault block size
ÛN
Specifying default storage characteristics
ÛN
Specifying logging and flashback clauses
ÛN
Creating offline tablespaces
ÛN
95127c10.indd 531 2/17/09 2:00:34 PM
Please purchase PDF Split-Merge on www.verypdf.com to remove this watermark.
532
Chapter 10
N
Allocating Database Storage and Creating Schema Objects
The following example shows the optional clauses you can use while creating a dictionary-
managed tablespace:
CREATE TABLESPACE APPL_DATA
DATAFILE ‘/disk3/oradata/DB01/appl_data01.dbf’
SIZE 100M
DEFAULT STORAGE (
INITIAL 256K
NEXT 256K
MINEXTENTS 2
PCTINCREASE 0
MAXEXTENTS 4096)
BLOCKSIZE 16K
MINIMUM EXTENT 256K
LOGGING
ONLINE
FORCE LOGGING
FLASHBACK ON
EXTENT MANAGEMENT DICTIONARY
SEGMENT SPACE MANAGEMENT MANUAL;
The following example shows the optional clauses you can use while creating a locally
managed tablespace:
CREATE TABLESPACE APPL_DATA
DATAFILE ‘/disk3/oradata/DB01/appl_data01.dbf’
SIZE 100M
DEFAULT STORAGE COMPRESS
BLOCKSIZE 16K
LOGGING
ONLINE
FORCE LOGGING
FLASHBACK ON
EXTENT MANAGEMENT LOCAL
SEGMENT SPACE MANAGEMENT AUTO;
Though Oracle manages the tablespace characteristics very efficiently with its default
values, you can specify several clauses to a finer level of control. The clauses in the
CREATE
TABLESPACE
command can specify the following:
DEFAULT STORAGE
clause T h e
DEFAULT STORAGE
clause specifies the default storage parameters
for new objects that are created in the tablespace. If an explicit storage clause is specified when
creating an object, the tablespace defaults are not used for the specified storage parameters.
The storage parameters are specified within parentheses; no parameter is mandatory, but if
95127c10.indd 532 2/17/09 2:00:34 PM
Please purchase PDF Split-Merge on www.verypdf.com to remove this watermark.
Managing Tablespaces
533
you specify the
DEFAULT STORAGE
clause, you must specify at least one parameter inside the
parentheses. The storage parameters are valid only for dictionary-managed tablespaces; for
locally managed tablespaces, you can specify only the
COMPRESS
option. I will discuss the
storage parameters later in the chapter in the section “Creating a Table.”
BLOCKSIZE
clause
Oracle allows a tablespace to have a different block size than the default
standard database block size. The database block size is specified when you create the data-
base using the initialization parameter
DB_BLOCK_SIZE
. This is the block size used for the
SYSTEM
tablespace and is known as the standard block size. The valid sizes of the nonstan-
dard block size are 2KB, 4KB, 8KB, 16KB, and 32KB. If you do not specify a block size for
the tablespace, the database block size is assumed. Multiple block sizes in the database are
beneficial for large databases with OLTP and Decision Support System (DSS) data stored
together and for storing large tables. The restrictions on specifying nonstandard block sizes
along with the tablespace creation are discussed in the section “Using Nonstandard Block
Sizes.”
MINIMUM EXTENT
clause T h e
MINIMUM EXTENT
clause specifies that the extent sizes should
be a multiple of the size specified. You can use this clause to control fragmentation in the
tablespace by allocating extents of at least the size specified; this clause is always a mul-
tiple of the size specified. In the
CREATE TABLESPACE
example, all the extents allocated in
the tablespace would be a multiple of 256KB. The
INITIAL
and
NEXT
extent sizes specified
should be a multiple of
MINIMUM EXTENT
. This clause is valid only for dictionary-managed
tablespaces.
LOGGING
/
NOLOGGING
clause
The
LOGGING/NOLOGGING
clause specifies that the DDL opera-
tions and direct-load
INSERT
should be recorded in the redo log files. This is the default,
and the clause can be omitted. When you specify
NOLOGGING
, data is modified with minimal
logging, and hence the commands complete faster. Since the changes are not recorded in the
redo log files, you need to apply the commands again in the case of a media recovery. You
can specify
LOGGING
or
NOLOGGING
in the individual object creation statement, and it over-
rides the tablespace default.
FORCE LOGGING
clause You must specify this clause to log all changes irrespective of the
LOGGING
mode for individual objects in the tablespace. You can specify the
NOLOGGING
clause and
FORCE LOGGING
clause together when creating a tablespace. If you do so, the
objects will be created in
NOLOGGING
mode and will be overridden by the
FORCE LOGGING
mode. When you take the tablespace out of the
FORCE LOGGING
mode, the
NOLOGGING
attri-
bute for objects goes into effect.
ONLINE/OFFLINE
clause
This clause specifies that the tablespace should be made online or
available as soon as it is created. This is the default, and hence the clause can be omitted. If
you do not want the tablespace to be available, you can specify
OFFLINE
.
FLASHBACK ON/OFF
clause
FLASHBACK ON
puts the tablespace in the flashback mode and is
the default. The
OFF
option turns flashback off, and hence Oracle will not save any flash-
back data. I will discuss flashback operations in Chapter 15, “Implementing Database
Backups.”
95127c10.indd 533 2/17/09 2:00:35 PM
Please purchase PDF Split-Merge on www.verypdf.com to remove this watermark.
534
Chapter 10
N
Allocating Database Storage and Creating Schema Objects
The clauses related to encrypting the tablespace are not discussed here
because they are beyond the scope for this book.
Using Nonstandard Block Sizes
The block size used while creating the database is specified in the initialization parameter
using the
DB_BLOCK_SIZE
parameter. This is known as the standard block size for the data-
base. You must choose a block size that suits most of your tables as the standard block
size. In most databases, this is the only block size you will ever need. Oracle gives you the
option of having multiple block sizes, which is especially useful when you’re transporting
tablespaces from another database with a different block size.
The
DB_CACHE_SIZE
parameter defines the buffer cache size that is associated with
the standard block size. To create tablespaces with nonstandard block size, you must set
the appropriate initialization parameter to define a buffer cache size for the block size. The
initialization parameter is
DB_nK_CACHE_SIZE
, where
n
is the nonstandard block size.
n
can have values 2, 4, 8, 16, or 32 but cannot have the size of the standard block size. For
example, if your standard block size is 8KB, you cannot set the parameter
DB_8K_CACHE_SIZE
.
If you need to create a tablespace that uses a different block size, say 16KB, you must set
the
DB_16K_CACHE_SIZE
parameter. By default, the value for
DB_nK_CACHE_SIZE
parameters
is 0MB.
The temporary tablespaces created should have the standard block size.
The
DB_nK_CACHE_SIZE
parameter is dynamic; you can alter its value using
the
ALTER SYSTEM
statement.
Creating Temporary Tablespaces
Oracle can manage space for sort operations more efficiently by using temporary tablespaces.
By exclusively designating a tablespace for temporary segments, Oracle eliminates the allo-
cation and deallocation of temporary segments in a permanent tablespace. A temporary
tablespace can be used only for sort segments. A temporary tablespace is used for temporary
segments, which are created, managed, and dropped by the database as needed. These tem-
porary segments are most commonly generated during sorting operations such as
ORDER BY
,
GROUP BY
, and
CREATE INDEX
. They are also generated during other operations such as hash
joins or inserts into temporary tables.
You create a temporary tablespace at database creation time with the
DEFAULT TEMPORARY
TABLESPACE
clause of the
CREATE DATABASE
statement or after the database is created with
the
CREATE TEMPORARY TABLESPACE
statement, like this:
CREATE TEMPORARY TABLESPACE temp
TEMPFILE ‘/u01/oradata/11GR1/temp01.dbf’ SIZE 1G;
95127c10.indd 534 2/17/09 2:00:35 PM
Please purchase PDF Split-Merge on www.verypdf.com to remove this watermark.
Managing Tablespaces
535
Notice that the keyword
TEMPFILE
is used instead of
DATAFILE
. Temp files are available
only with temporary tablespaces, they never need to be backed up, and they do not log data
changes in the redo logs. The
EXTENT MANAGEMENT LOCAL
clause is optional and can be
omitted; you can provide it to improve readability. If you do not specify the extent size by
using the
UNIFORM SIZE
clause, the default size used will be 1MB.
Although it is always good practice to create a separate temporary
tablespace, it is required when the
SYSTEM
tablespace is locally managed.
Temporary tablespaces are created using temp files instead of data files. Temp files are
allocated slightly differently than data files. Although data files are completely allocated
and initialized at creation time, temp files are not always guaranteed to allocate the disk
space specified. This means that on some Unix systems a temp file will not actually allocate
disk space until a sorting operation requires it. Although this delayed allocation approach
allows rapid file creation, it can cause problems down the road if you have not reserved the
space that may be needed at runtime.
Each user is assigned a temporary tablespace when the user is created. By default, the
default tablespace (where the user creates objects) and the temporary tablespace (where the
user’s sort operations are performed) are both the
SYSTEM
tablespace. No user should have
SYSTEM
as their default or temporary tablespace. This will unnecessarily increase fragmen-
tation in the
SYSTEM
tablespace.
When creating a database, you can also create a temporary tablespace using the
DEFAULT
TEMPORARY TABLESPACE
clause of the
CREATE DATABASE
statement. If the default temporary
tablespace is defined in the database, all new users will have that tablespace assigned as the
temporary tablespace by default if you do not specify another tablespace for the users’ tem-
porary tablespace. You can also designate a data tablespace for application tables during
database creation using the
DEFAULT TABLESPACE
clause.
If there are multiple temporary tablespaces in a database and if you want to utilize the
space in multiple temporary tablespaces to a user’s sort operation, you can use the tempo-
rary tablespace groups. When creating the temporary tablespace, use the
TABLESPACE GROUP
clause as in the following example:
CREATE TEMPORARY TABLESPACE TEMP01
TEMPFILE ‘/u01/oradata/11GR1/temp01a.dbf’ size 200M
EXTENT MANAGEMENT LOCAL UNIFORM SIZE 5M
TABLESPACE GROUP ALL_TEMPS;
In this example, the tablespace is made part of the
ALL_TEMPS
temporary tablespace
group. Tablespace groups are applicable only to temporary tablespaces. If the group does
not exist, Oracle creates the group and adds the tablespace to the group.
When creating a temporary tablespace, you can use only the
EXTENT
MANAGEMENT
and
TABLESPACE GROUP
clauses along with
TEMPFILE
clause.
All other options are invalid for temporary tablespaces.
95127c10.indd 535 2/17/09 2:00:35 PM
Please purchase PDF Split-Merge on www.verypdf.com to remove this watermark.
536
Chapter 10
N
Allocating Database Storage and Creating Schema Objects
Creating Undo Tablespaces
An undo tablespace stores undo segments, which are used by the database for several pur-
poses, including the following:
Rolling back a transaction explicitly with a
ÛN
ROLLBACK
statement
Rolling back a transaction implicitly (for example, through the recovery of a failed
ÛN
transaction)
Reconstructing a read-consistent image of data
ÛN
Recovering from logical corruptions
ÛN
To create an undo tablespace at database creation time, set the initialization parameter
UNDO_MANAGEMENT=AUTO
(default), and include an
UNDO TABLESPACE
clause in your
CREATE
DATABASE
statement, like this:
CREATE DATABASE “TEST1”
DATAFILE ‘/u01/app/oracle/oradata/TEST1/system01.dbf’
SIZE 300M REUSE AUTOEXTEND ON NEXT 10240K MAXSIZE UNLIMITED
EXTENT MANAGEMENT LOCAL
SYSAUX DATAFILE ‘/u01/app/oracle/oradata/TEST1/sysaux01.dbf’
SIZE 120M REUSE AUTOEXTEND ON NEXT 10240K MAXSIZE UNLIMITED
SMALLFILE DEFAULT TEMPORARY TABLESPACE TEMP
TEMPFILE ‘/u01/app/oracle/oradata/TEST1/temp01.dbf’
SIZE 20M REUSE AUTOEXTEND ON NEXT 640K MAXSIZE UNLIMITED
SMALLFILE UNDO TABLESPACE “UNDOTBS1”
DATAFILE ‘/u01/app/oracle/oradata/TEST1/undotbs01.dbf’
SIZE 200M REUSE AUTOEXTEND ON NEXT 5120K MAXSIZE UNLIMITED
DEFAULT TABLESPACE “USERS”
DATAFILE ‘/u01/app/oracle/oradata/TEST1/users01.dbf’
SIZE 5M REUSE AUTOEXTEND ON NEXT 1280K MAXSIZE UNLIMITED
EXTENT MANAGEMENT LOCAL SEGMENT SPACE MANAGEMENT AUTO
CHARACTER SET WE8MSWIN1252
NATIONAL CHARACTER SET AL16UTF16
LOGFILE
GROUP 1 (‘/u01/app/oracle/oradata/TEST1/redo01.log’) SIZE 51200K,
GROUP 2 (‘/u01/app/oracle/oradata/TEST1/redo02.log’) SIZE 51200K,
GROUP 3 (‘/u01/app/oracle/oradata/TEST1/redo03.log’) SIZE 51200K
SET DEFAULT SMALLFILE TABLESPACE
USER SYS IDENTIFIED BY mysupersekret
USER SYSTEM IDENTIFIED BY supersekret;
You can create an undo tablespace after database creation with the
CREATE UNDO
TABLESPACE
statement, like this:
CREATE UNDO TABLESPACE undo
DATAFILE ‘/ORADATA/PROD/UNDO01.DBF’ SIZE 2G;
95127c10.indd 536 2/17/09 2:00:35 PM
Please purchase PDF Split-Merge on www.verypdf.com to remove this watermark.
Managing Tablespaces
537
When creating undo tablespace, you can specify the undo retention clause. The
RETENTION GUARANTEE
option specifies that Oracle should preserve unexpired undo
data until the period of time specified by the
UNDO_RETENTION
initialization parameter.
This setting is useful for flashback query operations.
RETENTION NOGUARANTEE
is the
default.
The only tablespace clauses available to specify are
EXTENT MANAGEMENT LOCAL
and
DATAFILE
when creating undo tablespaces. Undo management and retention are discussed
in Chapter 13, “Managing Data and Undo.”
Although it is always good practice to create a separate undo tablespace, it
is required when the
SYSTEM
tablespace is locally managed.
Removing Tablespaces
Tablespaces that are not needed in the database can be dropped. Once a tablespace is dropped,
there is no rollback. Though you can drop a tablespace with objects in it, it may be safer to
drop the objects first and then drop the tablespace. To remove a tablespace from the database,
use the
DROP TABLESPACE
statement:
DROP TABLESPACE USER_DATA;
If the tablespace is not empty, you should specify the optional clause
INCLUDING
CONTENTS
to recursively remove any segments (tables, indexes, and so on) in the tablespace,
like this:
DROP TABLESPACE dba_sandbox INCLUDING CONTENTS;
If there are referential integrity constraints from the objects on other tablespaces refer-
ring to the objects in the tablespace that is being dropped, you must specify the
CASCADE
CONSTRAINTS
clause:
DROP TABLESPACE USER_DATA INCLUDING CONTENTS CASCADE CONSTRAINTS;
When you drop a tablespace, the control file is updated with the tablespace and data file
information.
Dropping a tablespace does not automatically remove the data files from the file system.
Use the additional clause
INCLUDING CONTENTS AND DATAFILES
to remove the underlying
data files as well as the stored objects, like this:
DROP TABLESPACE hr_data INCLUDING CONTENTS AND DATAFILES;
If the Oracle Managed Files feature is used for the tablespace, such files will be removed
automatically when you drop the tablespace. For files that are not Oracle managed, if you
need to free up the disk space, you can either use OS commands to remove the data files
belonging to the dropped tablespace or use the
AND DATAFILES
clause.
You cannot drop the
SYSTEM
tablespace.
95127c10.indd 537 2/17/09 2:00:35 PM
Please purchase PDF Split-Merge on www.verypdf.com to remove this watermark.
538
Chapter 10
N
Allocating Database Storage and Creating Schema Objects
Modifying Tablespaces
Use an
ALTER TABLESPACE
statement to modify the attributes of a tablespace. These are
some of the actions you can perform on tablespaces:
Change the default storage clauses and the
ÛN
MINIMUM_EXTENT
of a dictionary-managed
tablespace.
Change the extent allocation and
ÛN
LOGGING
/
NOLOGGING
modes.
Change the availability of the tablespace.
ÛN
Make the tablespace read-only or read-write.
ÛN
Coalesce the contiguous free space.
ÛN
Add more space by adding new data files or temporary files.
ÛN
Resize the data files or temporary files.
ÛN
Rename a tablespace or rename files belonging to the tablespace.
ÛN
Shrink temporary files or shrink space in the tablespace.
ÛN
Change flashback on or off and change retention guarantee.
ÛN
Begin and end a backup.
ÛN
The following sections detail common modifications you can perform on the
tablespaces.
Changing Storage Defaults
Changing the default storage or
MINIMUM_EXTENT
or
LOGGING
/
NOLOGGING
does not affect the
existing objects in the tablespace. The
DEFAULT STORAGE
and
LOGGING
/
NOLOGGING
clauses
are applied to the newly created segments if such a clause is not explicitly specified when
creating new objects. For example, to change the storage parameters, use the following
statement:
ALTER TABLESPACE APPL_DATA
DEFAULT STORAGE (INITIAL 2M NEXT 2M);
Only the
INITIAL
and
NEXT
values of the storage
STORAGE
are changed; the other storage
parameters such as
PCTINCREASE
or
MINEXTENTS
remain unaltered.
Adding a Data File to a Tablespace
Smallfile tablespaces can have multiple data files and can thus be spread over multiple file sys-
tems without engaging a logical volume manager. To add a data file to a smallfile tablespace,
use an
ADD
clause with the
ALTER TABLESPACE
statement. For example, the following statement
adds a 2GB data file on the
/u02
file system to the
receivables
tablespace:
ALTER TABLESPACE receivables ADD DATAFILE
‘/u02/oradata/ORA10/receivables01.dbf’
SIZE 2G;
95127c10.indd 538 2/17/09 2:00:35 PM
Please purchase PDF Split-Merge on www.verypdf.com to remove this watermark.
Managing Tablespaces
539
Taking a Tablespace Offline or Online
You can control the availability of certain tablespaces by altering the tablespace to be
offline or online. When you make a tablespace offline, the segments in that tablespace are
not accessible. The data stored in other tablespaces is available for use. When making a
tablespace unavailable, you can use these four options:
NORMAL
This is the default. Oracle writes all the dirty buffer blocks in the SGA to the data
files of the tablespace and closes the data files. All data files belonging to the tablespace
must be online. You need not do a media recovery when bringing the tablespace online. For
example:
ALTER TABLESPACE USER_DATA ONLINE;
TEMPORARY
Oracle performs a checkpoint on all online data files. It does not ensure that
the data files are available. You may need to perform a media recovery on the offline data
files when the tablespace is brought online. For example:
ALTER TABLESPACE USER_DATA OFFLINE TEMPORARY;
IMMEDIATE
Oracle does not perform a checkpoint and does not make sure that all data
files are available. You must perform a media recovery when the tablespace is brought back
online. For example:
ALTER TABLESPACE USER_DATA OFFLINE IMMEDIATE;
FOR RECOVER
This makes the tablespace offline for point-in-time recovery. You can copy
the data files belonging to the tablespace from a backup and apply the archive log files. For
example:
ALTER TABLESPACE USER_DATA OFFLINE FOR RECOVER;
You cannot make the
SYSTEM
tablespace offline because the data dictionary must always be
available for the functioning of the database. If a tablespace is offline when you shut down
the database, it remains offline when you start up the database. You can make a tablespace
offline by using the following statement:
ALTER TABLESPACE USER_DATA OFFLINE
When a tablespace is taken offline, SQL statements cannot reference any objects contained
in that tablespace. If there are unsaved changes when you take the tablespace offline, Oracle
saves rollback data corresponding to those changes in a deferred rollback segment in the
SYSTEM
tablespace. When the tablespace is brought back online, Oracle applies the rollback
data to the tablespace, if needed.
Making a Tablespace Read-Only
If a tablespace contains static data, it can be marked read-only. Tablespaces that contain
historic or reference data are typical candidates for read-only. When a tablespace is read-
only, it does not have to be backed up with the nightly or weekly database backups. One
backup after being marked read-only is all that is needed for future recoveries. Tables in a
95127c10.indd 539 2/17/09 2:00:35 PM
Please purchase PDF Split-Merge on www.verypdf.com to remove this watermark.
540
Chapter 10
N
Allocating Database Storage and Creating Schema Objects
read-only tablespace can only be selected from; their rows cannot be inserted, updated, or
deleted.
You cannot make the
SYSTEM
tablespace read-only. When you make a tablespace read-
only, all the data files must be online, and the tablespace can have no active transactions.
You can drop objects such as tables or indexes from a read-only tablespace, but you cannot
create new objects in a read-only tablespace.
Use a
READ ONLY
clause with an
ALTER TABLESPACE
statement to mark a tablespace read-
only. For example, to mark the
SALES2007
tablespace read-only, execute the following:
ALTER TABLESPACE sales2007 READ ONLY;
If you need to make changes to a table in a read-only tablespace, make it read writable
again with the keywords
READ WRITE
, like this:
ALTER TABLESPACE sales2007 READ WRITE;
Oracle normally checks the availability of all data files belonging to the database when
starting up the database. If you are storing your read-only tablespace on offline storage
media or on a CD-ROM, you might want to skip the data file availability checking when
starting up the database by setting the parameter
READ_ONLY_OPEN_DELAYED
to
TRUE
. Oracle
checks the availability of data files belonging to read-only tablespaces only at the time of
access to an object in the tablespace. A missing or bad read-only file will not be detected at
database startup time.
Putting a Tablespace in Backup Mode
If you perform non-RMAN online backups, sometimes called user-managed backups, you
need to put a tablespace in backup mode before you begin to copy the data files using an
operating-system program. While the tablespace is in backup mode, the database continues
to write data to the data files (checkpoints occur), but the occurrences of these checkpoints
are not recorded in the header blocks of the data files. This omission tells the database that
recovery may be needed if the database instance gets terminated abruptly.
While a tablespace is in backup mode, some additional information is written to the
redo logs to assist with recovery, if needed.
See Chapter 15 for more information on backups, and see Chapter 16,
“Recovering the Database,” for more information about recovery.
Some companies perform backups by splitting a third mirror, mounting these mirrored
file systems onto another server, and then copying them to tape. To safely split the mirror,
alter all your tablespaces into backup mode, make the split, and then alter all the tablespaces
out of backup mode. Put them into backup mode like this:
ALTER TABLESPACE system BEGIN BACKUP;
Use the keywords
END BACKUP
to take a tablespace out of backup mode, like this:
ALTER TABLESPACE system END BACKUP;
95127c10.indd 540 2/17/09 2:00:35 PM
Please purchase PDF Split-Merge on www.verypdf.com to remove this watermark.
Managing Tablespaces
541
If you forget to take a tablespace out of backup mode, the next time you bounce your
database, it will see that the checkpoint number in the control file is later than the one in
the data file headers and report that media recovery is required.
Obtaining Tablespace Information
DBAs often need to find the space used and available in a tablespace as well as query the
tablespace characteristics. The data dictionary is the place to go for obtaining tablespace
information. You can use the command-line utility SQL*Plus to query the information from
data dictionary tables, or you can use Enterprise Manager Grid Control. We will review
both in this section.
Obtaining Tablespace Information Using SQL*Plus
Many data dictionary views can provide information about tablespaces in a database, such
as the following:
DBA_TABLESPACES
ÛN
DBA_DATA_FILES
ÛN
DBA_TEMP_FILES
ÛN
V$TABLESPACE
ÛN
The
DBA_TABLESPACES
view has one row for each tablespace in the database and provides
the following information:
The tablespace block size
ÛN
The tablespace status: online, offline, or read-only
ÛN
The contents of the tablespace: undo, temporary, or permanent
ÛN
Whether it uses dictionary-managed or locally managed extents
ÛN
Whether the segment space management is automatic or manual
ÛN
Whether it is a bigfile or smallfile tablespace
ÛN
To get a listing of all the tablespaces in the database, their status, contents, extent man-
agement policy, and segment management policy, run the following query:
SELECT tablespace_name, status,contents
,extent_management extents
,segment_space_management free_space
FROM dba_tablespaces
TABLESPACE_NAME STATUS CONTENTS EXTENTS FREE_SPACE
------------------ --------- --------- --------- ----------
SYSTEM ONLINE PERMANENT LOCAL MANUAL
UNDOTBS1 ONLINE UNDO LOCAL MANUAL
95127c10.indd 541 2/17/09 2:00:36 PM
Please purchase PDF Split-Merge on www.verypdf.com to remove this watermark.
542
Chapter 10
N
Allocating Database Storage and Creating Schema Objects
SYSAUX ONLINE PERMANENT LOCAL AUTO
TEMP ONLINE TEMPORARY LOCAL MANUAL
USERS ONLINE PERMANENT LOCAL AUTO
EXAMPLE ONLINE PERMANENT LOCAL AUTO
DATA ONLINE PERMANENT LOCAL AUTO
INDX ONLINE PERMANENT LOCAL AUTO
The
V$TABLESPACE
view also has one row per tablespace, but it includes some informa-
tion other than
DBA_TABLESPACES
, such as whether the tablespace participates in database
flashback operations:
SELECT name, bigfile, flashback_on
FROM v$tablespace;
NAME BIGFILE FLASHBACK_ON
---------- -------- ------------
SYSTEM NO YES
UNDOTBS1 NO YES
SYSAUX NO YES
USERS NO YES
TEMP NO YES
EXAMPLE NO YES
DATA NO YES
INDX NO YES
See Chapter 15 for more information on flashback operations.
The
DBA_DATA_FILES
and
DBA_TEMP_FILES
views contain information on data files and
temp files, respectively. This information includes the tablespace name, filename, file size,
and autoextend settings.
SELECT tablespace_name, file_name, bytes/1024 kbytes
FROM dba_data_files
UNION ALL
SELECT tablespace_name, file_name, bytes/1024 kbytes
FROM dba_temp_files;
TABLESPACE FILE_NAME KBYTES
---------- ---------------------------------------- -------
USERS C:\ORACLE\ORADATA\ORA11\USERS01.DBF 102400
SYSAUX C:\ORACLE\ORADATA\ORA11\SYSAUX01.DBF 256000
95127c10.indd 542 2/17/09 2:00:36 PM
Please purchase PDF Split-Merge on www.verypdf.com to remove this watermark.
Managing Tablespaces
543
UNDOTBS1 C:\ORACLE\ORADATA\ORA11\UNDOTBS01.DBF 51200
SYSTEM C:\ORACLE\ORADATA\ORA11\SYSTEM01.DBF 460800
EXAMPLE C:\ORACLE\ORADATA\ORA11\EXAMPLE01.DBF 153600
INDX C:\ORACLE\ORADATA\ORA11\INDX01.DBF 102400
TEMP C:\ORACLE\ORADATA\ORA11\TEMP01.DBF 51200
In addition to in the data dictionary, you can obtain tablespace information from several
sources. Some of these sources are the DDL and the Enterprise Manager.
Generating DDL for a Tablespace
Another way to quickly identify the attributes of a tablespace is to ask the database to
generate DDL to re-create the tablespace. The
CREATE TABLESPACE
statement that results
contains the attributes for the tablespace. Use the PL/SQL package
DBMS_METADATA
to
generate DDL for your database objects. For example, to generate the DDL for the
USERS
tablespace, execute this:
SELECT DBMS_METADATA.GET_DDL(‘TABLESPACE’,’USERS’)
FROM dual;
The output from this statement is a
CREATE TABLESPACE
statement that contains all the
attributes for the
USERS
tablespace:
CREATE TABLESPACE “USERS” DATAFILE
‘/u01/app/oracle/oradata/11GR11/users01.dbf’ SIZE 5242880
AUTOEXTEND ON NEXT 1310720 MAXSIZE 32767M
LOGGING ONLINE PERMANENT BLOCKSIZE 8192
EXTENT MANAGEMENT LOCAL AUTOALLOCATE SEGMENT SPACE MANAGEMENT AUTO;
Obtaining Tablespace Information Using the EM Database Control
Instead of querying the data dictionary views with a command-line tool such as SQL*Plus,
you can use the interactive GUI tool EM Database Control to monitor and manage data-
base structures, including tablespaces. The EM Database Control is an alternative to a
command-line interface.
To use the Database Control, follow these steps:
1.
Point your browser to the Enterprise Manager URL for your database (similar to
https://hostname:5500/em/console
).
2.
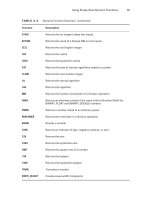
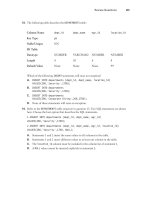
Log in to EM, and navigate to the Server tab of the main screen, which is shown in
Figure 10.2.
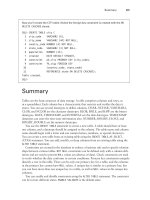
3.
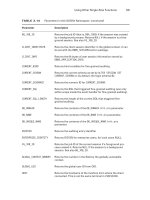
Click the Tablespaces link under the heading Storage to display a list of tablespaces like
that shown in Figure 10.3.
95127c10.indd 543 2/17/09 2:00:36 PM
Please purchase PDF Split-Merge on www.verypdf.com to remove this watermark.
544
Chapter 10
N
Allocating Database Storage and Creating Schema Objects
FIGURE 10.2 The Enterprise Manager Server tab
FIGURE 10.3 The Enterprise Manager Tablespaces screen
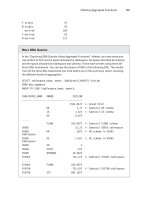
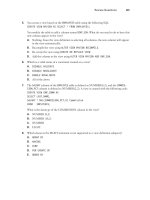
4.
Click the radio button next to the tablespace you want to work with, and then click the
Edit button. You can navigate to the tablespace General, Storage, and Thresholds edit
screens, as shown in Figure 10.4.
95127c10.indd 544 2/17/09 2:00:36 PM
Please purchase PDF Split-Merge on www.verypdf.com to remove this watermark.
Managing Tablespaces
545
FIGURE 10.4 The Enterprise Manager tablespace editor
You use the screens and options in the EM Database Control to manipulate and change
your tablespaces with many of the same options that the command-line interface supports.
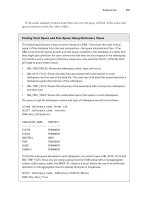
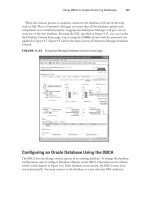
For example, to increase the size of the data file in the
HR_DATA
tablespace, click the Edit
button next to the data file. The EM Database Control displays the tablespace edit screen,
as shown in Figure 10.5.
FIGURE 10.5 Editing the data file size
95127c10.indd 545 2/17/09 2:00:36 PM
Please purchase PDF Split-Merge on www.verypdf.com to remove this watermark.
546
Chapter 10
N
Allocating Database Storage and Creating Schema Objects
Edit the File Size field, increasing it to 100MB. The change will be applied when you
click Continue.
Managing Data Files
Data files (or temporary files) are made when you create a tablespace or when you alter
a tablespace to add files. If you are not using the OMF feature, you will need to manage
data files yourself. The database will create or reuse one or more data files in the sizes and
locations that you specify whenever you create a tablespace. A data file belongs to only
one tablespace and only one database at a time. Temp files are a special variety of data file
that are used in temporary tablespaces. When the database creates or reuses a data file, the
operating-system file is allocated and initialized—filled with a regular pattern of mostly
binary zeros. This initialization will not occur with temp files.
Performing Operations on Data Files
Operations that you may need to perform on data files include the following:
Resizing them
ÛN
Taking them offline or online
ÛN
Moving (renaming) them
ÛN
Sizing Files
You can specify that the data file (or temporary file) will grow automatically whenever space
is needed in the tablespace. This is accomplished by specifying the
AUTOEXTEND
clause for the
file. This functionality enables you to have fewer data files per tablespace and can simplify
the administration of data files. The
AUTOEXTEND
clause can be
ON
or
OFF
; you can also spec-
ify file size increments. You can set a maximum limit for the file size; by default, the file size
limit is
UNLIMITED
. You can specify the
AUTOEXTEND
clause for files when you run the
CREATE
DATABASE
,
CREATE TABLESPACE
,
ALTER TABLESPACE
, and
ALTER DATAFILE
commands. For
example:
CREATE TABLESPACE APPL_DATA
DATAFILE ‘/disk2/oradata/DB01/appl_data01.dbf‘
SIZE 500M
AUTOEXTEND ON NEXT 100M MAXSIZE 2000M;
The
AUTOEXTEND ON
clause specifies that the automatic file-resize feature should be enabled
for the specified file;
NEXT
specifies the size by which the file should be incremented, and
MAXSIZE
specifies the maximum size for the file. When Oracle tries to allocate an extent
in the tablespace, it looks for a free extent. If a large enough free extent cannot be located
95127c10.indd 546 2/17/09 2:00:36 PM
Please purchase PDF Split-Merge on www.verypdf.com to remove this watermark.
Managing Data Files
547
(even after coalescing), Oracle increases the data file size by 100MB and tries to allocate the
new extent.
The following statement disables the automatic file-extension feature:
ALTER DATABASE
DATAFILE ‘/disk2/oradata/DB01/appl_data01.dbf‘
AUTOEXTEND OFF;
If the file already exists in the database, and you want to enable the autoextension fea-
ture, use the
ALTER DATABASE
command. For example, you can use the following statement:
ALTER DATABASE
DATAFILE ‘/disk2/oradata/DB01/appl_data01.dbf‘
AUTOEXTEND ON NEXT 100M MAXSIZE 2000M;
You can increase or decrease the size of a data file or temporary file (thus increasing or
decreasing the size of the tablespace) by using the
RESIZE
clause of the
ALTER DATABASE
DATAFILE
command. For example, to redefine the size of a file, use the following statement:
ALTER DATABASE
DATAFILE ‘/disk2/oradata/DB01/appl_data01.dbf‘
RESIZE 1500M;
When decreasing the file size, Oracle returns an error if it finds data beyond the new file
size. You cannot reduce the file size below the high-water mark in the file. Reducing the file size
helps reclaim unused space.
Making Files Online and Offline
Sometimes you may have to make data files unavailable to the database if there is a file cor-
ruption. You can use the
ONLINE
and
OFFLINE
clauses of the
ALTER DATABASE
statement to
take a data file online or offline. You can specify the filename or specify the unique identi-
fier number that represents the data file. This identifier can be found in the
FILE#
column of
V$DATAFILE
or the
FILE_ID
column of the
DBA_DATA_FILES
view.
To take a data file offline, use the
OFFLINE
clause. If the database is in
NOARCHIVELOG
mode,
then you must specify the
FOR DROP
clause along with the
OFFLINE
clause. The data file will
be taken offline and marked with status
OFFLINE
. You can remove the data file using OS
commands, if you want to get rid of the data file. If the database is in
ARCHIVELOG
mode,
you don’t need to specify the
FOR DROP
clause when taking a data file offline. When you’re
ready to bring the data file online, Oracle performs media recovery on the data file to make
it consistent with the database. Also, the
FOR DROP
clause is ignored if the database is in
ARCHIVELOG
mode. Here is an example of taking a data file offline:
ALTER DATABASE DATAFILE ‘/u01/oradata/11gr1/tools02.dbf’ OFFLINE;
The following statement brings the data file online:
ALTER DATABASE DATAFILE ‘/u01/oradata/11gr1/tools02.dbf’ ONLINE;
95127c10.indd 547 2/17/09 2:00:36 PM
Please purchase PDF Split-Merge on www.verypdf.com to remove this watermark.
548
Chapter 10
N
Allocating Database Storage and Creating Schema Objects
Renaming Files
You can rename data files using the
RENAME FILE
clause of the
ALTER DATABASE
com-
mand. You can also rename data files by using the
RENAME DATAFILE
clause of the
ALTER
TABLESPACE
command. The
RENAME
functionality is used to logically move tablespaces
from one location to another. To rename or relocate data files belonging to a non-
SYSTEM
tablespace, you should follow certain steps. Consider the following example.
Your tablespace
USER_DATA
has three data files named, such as the following:
/disk1/oradata/DB01/user_data01.dbf
ÛN
/disk1/oradata/DB01/userdata2.dbf
ÛN
/disk1/oradata/DB01/user_data03.dbf
ÛN
Renaming a Data File
If you need to rename one of these, say the second file, follow these steps:
1.
Take the tablespace offline:
ALTER TABLESPACE USER_DATA OFFLINE;
2.
Copy or move the file to the new location, or rename the file by using operating-system
commands.
3.
Rename the file in the database by using one of the following two commands:
ALTER DATABASE RENAME FILE
‘/disk1/oradata/DB01/userdata2.dbf‘ TO
‘/disk1/oradata/DB01/user_data02.dbf‘;
or
ALTER TABLESPACE USER_DATA RENAME DATAFILE
‘/disk1/oradata/DB01/userdata2.dbf‘ TO
‘/disk1/oradata/DB01/user_data02.dbf‘;
4.
Bring the tablespace online:
ALTER TABLESPACE USER_DATA ONLINE;
Relocating a Tablespace
You may also determine that you need to relocate the tablespace from disk 1 to disk 2. If
so, you should follow the same steps. You can also rename all the files in the tablespace by
using a single command. The steps are as follows:
1.
Take the tablespace offline:
ALTER TABLESPACE USER_DATA OFFLINE;
2.
Copy the file to the new location by using OS commands on the disk.
95127c10.indd 548 2/17/09 2:00:36 PM
Please purchase PDF Split-Merge on www.verypdf.com to remove this watermark.
Managing Data Files
549
3.
Rename the files in the database by using one of the following two commands. The
number of data files specified before the keyword
TO
should be equal to the number of
files specified after the keyword.
ALTER DATABASE RENAME FILE
‘/disk1/oradata/DB01/user_data01.dbf‘,
‘/disk1/oradata/DB01/userdata2.dbf‘,
‘/disk1/oradata/DB01/user_data03.dbf‘
TO
‘/disk2/oradata/DB01/user_data01.dbf‘,
‘/disk2/oradata/DB01/user_data02.dbf‘,
‘/disk2/oradata/DB01/user_data03.dbf‘;
or
ALTER TABLESPACE USER_DATA RENAME DATAFILE
‘/disk1/oradata/DB01/user_data01.dbf‘,
‘/disk1/oradata/DB01/userdata2.dbf‘,
‘/disk1/oradata/DB01/user_data03.dbf‘
TO
‘/disk2/oradata/DB01/user_data01.dbf‘,
‘/disk2/oradata/DB01/user_data02.dbf‘,
‘/disk2/oradata/DB01/user_data03.dbf‘;
4.
Bring the tablespace online:
ALTER TABLESPACE USER_DATA ONLINE;
Renaming or Relocating Files Belonging to Multiple Tablespaces
If you need to rename or relocate files belonging to multiple tablespaces or if the file belongs
to the
SYSTEM
tablespace, you must follow these steps:
1.
Shut down the database. A complete backup is recommended before making any struc-
tural changes.
2.
Copy or rename the files on the disk by using OS commands.
3.
Start up and mount the database (
STARTUP MOUNT
).
4.
Rename the files in the database by using the
ALTER DATABASE RENAME FILE
command.
5.
Open the database by using
ALTER DATABASE OPEN
.
Moving Read-Only Tablespaces
If you need to move read-only tablespaces to a CD-ROM or any write-once read-many
device, follow these steps:
1.
Make the tablespace read-only.
2.
Copy the data files belonging to the tablespace to the read-only device.
3.
Rename the files in the database by using the
ALTER DATABASE RENAME FILE
command.
95127c10.indd 549 2/17/09 2:00:36 PM
Please purchase PDF Split-Merge on www.verypdf.com to remove this watermark.
550
Chapter 10
N
Allocating Database Storage and Creating Schema Objects
Moving a Data File from the H Drive to the G Drive
Your operating-system administrator informed you that he is seeing lot of contention
on the H drive and is seeking options to move some of the reads off the H drive and
to G drive. As a DBA, you can move one of the hot files belonging to the
receivables
tablespace to the G drive.
You need to take a tablespace offline to perform some maintenance operations, such as
recovering the tablespace or moving the data files to a new location. Use the
OFFLINE
clause with an
ALTER TABLESPACE
statement to take a tablespace offline. Follow these
steps to rename or move a data file:
1.
Take the
receivables
tablespace offline:
ALTER TABLESPACE receivables OFFLINE;
2.
Use an operating-system program to physically move the file, such as Copy in Micro-
soft Windows or
cp
in Unix.
3.
Tell the database about the new location:
ALTER TABLESPACE receivables RENAME DATAFILE
‘H:\ORACLE\ORADATA\ORA10\RECEIVABLES02.DBF’
TO ‘G:\ORACLE\ORADATA\ORA10\RECEIVABLES02.DBF’ ;
4.
Bring the tablespace back online:
ALTER TABLESPACE receivables ONLINE;
Using the Oracle Managed Files Feature
The Oracle Managed Files feature is appropriate for smaller nonproduction databases or
databases on disks using Logical Volume Manager (LVM). LVM is software available with
most disk systems to combine partitions of multiple physical disks to one logical volume.
LVM can use mirroring, striping, RAID 5, and so on. Using the OMF feature has the fol-
lowing benefits:
Error prevention Since Oracle removes the files associated with the tablespace, the DBA
cannot make a mistake by removing a file belonging to an active tablespace.
A standard naming convention The files created using the OMF method have unique and
standard filenames.
Space retrieval When tablespaces are removed, Oracle removes the files associated with
the tablespace, thus freeing up space immediately on the disk. The DBA may forget to
remove the file from disk.
95127c10.indd 550 2/17/09 2:00:37 PM
Please purchase PDF Split-Merge on www.verypdf.com to remove this watermark.