Tài liệu Working with Views ppt
Bạn đang xem bản rút gọn của tài liệu. Xem và tải ngay bản đầy đủ của tài liệu tại đây (34.07 KB, 10 trang )
[ Team LiB ]
Working with Views
Using Outlook views, you can control what fields and messages are visible, and highlight
messages with different colors and fonts. You can use views for many more things,
including displaying your Outlook items with specific fields showing, printing the items
and fields shown in the format used in the view, filtering contacts you want to use in a
mail merge, and copying the visible items and field to use in another program.
You can choose one of three ways to apply, customize, and define views. Choose the
method that you're most comfortable using:
•
Current View menu on the Advanced toolbar
•
Selecting a view from the Navigation Pane Current View list
•
Selecting a view using View, Arrange By, Current View menu
Each of these methods contains one or more customization options, including Customize
Current View, for customizing the current view; Define Views, for creating new views;
and Arrange By, for changing how your items group. For example, the view in Figure 3.1
is arranged by date.
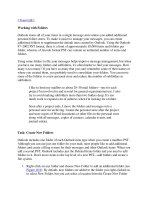
Figure 3.1. When you enable View, Arrange By, Show Views In Navigation Pane,
the views defined for the selected folder are listed at the bottom of the Navigation
pane. You can also use the Current View toolbar button or the View menu to select
a new view. Right-click on the Arranged By: field heading to change the grouping.
Custom on the Arrange By menu opens the same Customize View
dialog as Customize Current View on the Navigation Pane.
Arrange By is a smart grouping feature that's new to Outlook 2003. You can use it to
quickly group by different fields. Arrange By isn't a new view; it's a different way of
viewing the current view. When you expand or collapse groupings and then switch
arrangements, the expanded or collapsed state of the Arrange By: groups isn't
remembered. You must make a new view to save this and other settings.
Also new to Outlook 2003 is the two-line list view. When the list pane is fewer than 100
characters wide, the item's header information displays over two lines so that you can see
more information about the message or item in a smaller space. When the list pane is
greater than 100 characters wide, the list is on just one line, enabling you to see more
items in the same amount of space.
Turn the Reading Pane off and on to switch between the one-and two-
line lists.
Open View, Arrange By, Custom, Other Settings and change the
character count to a lower number. Slide the Reading Pane to the right
to switch to the one-line list and you can still use the Reading Pane.
Use this dialog to disable or always force the two-line list.
The two-line list shows just the first six fields used in the view. By default, they are
Importance, Icon, Attachment, From, Subject, Received Date, and Quick Flags. Changing
the order of the fields changes the fields you'll see in the two-line list.
The Quick Flag column is always the rightmost column. You have to
disable Quick Flags to move the flag column. Disable the Quick Flags
column by right-clicking on the field names in the header row and
choosing Custom. Select the Other Settings button, and then uncheck
Show Quick Flags.
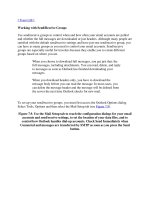
In most cases, changing the current view affects only the current folder's view. To change
the view across all folders, you must modify the view, not customize it. Open the Custom
View Organizer using View, Arrange By, Current View, Define Views and select the
view by name (not <current view settings>), and then choose Modify. This opens the
familiar Customize View dialog and applies the changes to all folders that use the same
view (see Figure 3.2
).
Figure 3.2. The Customize View dialog contains links to all the custom view options.
After changing the fields, arrangements, or other view options, restore the default view
settings from the Customize View dialog or Reset Current View button, or reset the
views from the Custom View Organizer.
Outlook has a startup switch that you can use to reset all views to the
default. Use this switch with care because all customized views are
deleted.
To reset all views, from the Start menu, select Run. In the Run dialog,
type "C:\Program Files\Microsoft Office\OFFICE11\OUTLOOK.EXE
" /cleanviews.
Message Views
Each Outlook item type includes several predefined views. For many users, those views
are all they need. Using smart grouping, Message view may be the only view you'll ever
need to use.
The default views for Mail and Post folders used for Exchange Server and POP3 mail
accounts, as well as archives and personal folders, include Messages, Messages with
AutoPreview, Last Seven Days, Unread Messages in This Folder, Sent To, and Message
Timeline.
The local message store for IMAP accounts has additional default views, including IMAP
messages, Hide Messages Marked for Deletion, Group Message Marked for Deletion,
and Not Downloaded.
All new Mail and Post folders use the Message view, whereas IMAP folders use the
IMAP Messages view by default.
Messages with AutoPreview and IMAP Message views display a
three-line preview of the message body instead of using the Reading
Pane. AutoPreview is 100% safe from viruses.
Calendar Views
Your Calendar folders offer the most view options. The Day/Week/Month and
Day/Week/Month View with AutoPreview views are planner-style calendars, whereas the
remaining views (Active Appointments, Events, Annual Events, Recurring
Appointments, and By Category) use a table format. Use By Category to view all of your
calendar items on one screen. You can drag items not assigned to categories to add them
to a category.
The Day/Week/Month views use the Day Planner view by default, or you can choose
Work Week, Week, or Month view within the view. Along with changing the day
display, you can show or hide the TaskPad and move the calendar thumbnails from the
left or right side of the screen.
Automatic formatting is available for calendar items, using labels on the
Day/Week/Month view and font formatting in any Table view. You can use rules to set
either type of automatic formatting and both are independent of each other. Labels can be
applied using views or individually by selecting a label color on each calendar item.
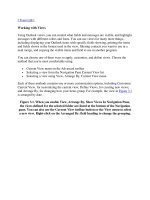
In Figure 3.3
, calendars in the mailbox and public folders are shown side-by-side using a
Day Planner–style format.
Figure 3.3. The Day/Week/Month calendar view provides many view
customizations.