Thiết kế flash với flash cs5 part 32
Bạn đang xem bản rút gọn của tài liệu. Xem và tải ngay bản đầy đủ của tài liệu tại đây (727.9 KB, 7 trang )
ptg
210
Chapter 6
When you export a Flash movie, you can decide how much color infor-
mation to include in each exported bitmap. This is called compression.
The more compression you apply, the less color information is included
and the lower the size and quality of the image. Lossy compression
reduces the file size by removing color information, while lossless com-
pression reduces the file size (not as much) without removing informa-
tion. You can choose to set a global compression for all bitmap files
used in a Flash movie or you can set a separate compression for each
image. As with all image compression, file size needs to be weighed
against image quality. It is always best to experiment until you get the
results you want.
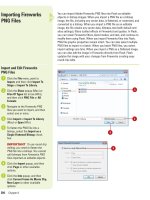
Setting Bitmap
Compression
Set Compression for a Bitmap
Open the Library panel.
Select the bitmap from the Library
item list in which you want to set
compression.
Click the Properties icon in the
bottom of the panel or double-click
the bitmap file in the list.
Select the Allow Smoothing check
box to anti-alias the edges of the
image, making it appear smoother.
Click the Compression popup, and
then select from the following
options:
◆
Lossless (PNG/GIF).
Compresses the image without
losing any information; remains
in its highest quality.
◆
Photo (JPEG). You can choose
to use the compression
information contained by
selecting the Use Document
Default Quality check box. By
deselecting this feature you
can set the level of JPEG
compression applied to the
bitmap. The values are 1-100.
The higher the number, the less
compression applied,
producing a higher quality
image.
Click OK.
6
5
4
3
2
1
2
3
6
5
4
Thumbnail
preview
Click to test
and preview
the image in
thumbnail.
1
From the Library of Wow! eBook
ptg
Chapter 6 Importing Graphics
211
By default, when you import a bitmap into Flash and drag it to the
Stage, you are limited in how you can edit it. Break Apart the image to
remove the image from its bounding box and enable you to cut into the
image, remove parts, select regions, and use it as a fill pattern. The
bitmap is still linked to its parent in the Library. Any edit made to a
bitmap only affects the copy on the Stage. For example, if you break an
image and then edit it down to a tiny portion, in the exported movie the
image appears exactly as you edited it. However, it will still have the
same file size of the image you imported (less any compression you
may have applied). It is always best to do your most severe editing in a
bitmap or paint program outside of Flash.
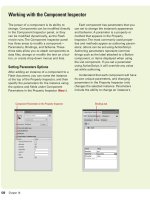
Using Break Apart to
Create Fill Patterns
Create a Bitmap Fill Pattern
Drag a copy of a bitmap to the
Stage from the Library panel; make
sure the bitmap is selected on the
Stage.
Click the Modify menu, and then
click Break Apart.
TIMESAVER
Press
A
+B
(Mac) and Ctrl+B (Win) to quickly
break apart a bitmap on the Stage.
Click the Eyedropper tool on the
Tools panel.
Position the eyedropper over the
image, and then click to select it.
The bitmap is a selected fill that
you can use to fill vector shapes.
Click the Rectangle or Oval tool on
the Tools panel.
Click and drag on the Stage to
create a new shape with the
bitmap fill.
6
5
4
3
2
1
3
4
6
5
Bitmap becomes the selected fill.
Did You Know?
You can select the bitmap fill in the
Color Mixer panel.
In the panel, click
Bitmap from the Fill Style popup, and
then select a thumbnail fill (bitmaps
from the Library appear).
From the Library of Wow! eBook
ptg
212
Chapter 6
Flash defaults to tiling a bitmap fill. Tiling is simply when an image is
repeated in a grid until it fills the entire object. If you have applied a
bitmap fill to a vector object, you can continue to edit its characteris-
tics and placement. You can resize, skew, or rotate the fill or change its
center point within the shape with the Gradient Transform tool. This tool
allows you to dynamically make these changes when it is applied to
any editable shape. As with most of the assets Flash stores in the
Library, any change you make to the application of the fill does not
affect the master object stored in the Library. In this way, bitmaps like
video clips and sounds, behave similarly to symbols in that their master
object is not affected. Although when you use a bitmap in your movie
Flash refers to this as a copy, not an instance, because there are no
built-in controls for bitmaps.
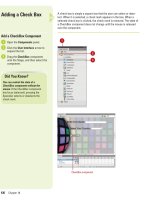
Modifying a Bitmap
Fill
Change the Center Point
Create a shape on the Stage with
a bitmap fill.
Click the Gradient Transform tool
on the Tools panel.
The pointer changes to an arrow
with a small gradient box in the
right-hand corner.
TIMESAVER
Press F to quickly
select the Gradient Transform tool.
Click the shape to select it.
A bounding box appears on the
tile.
Position the pointer over the white
circle in the center of the
bounding box.
The cursor becomes a Move icon.
Click and drag the center point to
a new position.
The tile accommodates to the new
position of the center point.
5
4
3
2
1
4
Bitmap fill in
new location
1
Bounding box
5
2
From the Library of Wow! eBook
ptg
Chapter 6 Importing Graphics
213
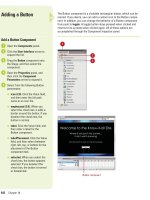
Modify the Orientation and Size
of a Bitmap Fill
Create a shape on the Stage with
a bitmap fill.
Click the Gradient Transform tool
on the Tools panel.
The pointer changes to an arrow
with a small gradient box in the
right-hand corner.
Position the pointer over the
shape, and then select it.
A bounding box appears on the
tile.
Do one of the following:
◆
Bottom-left-corner square.
Drag this to resize the fill
proportionally.
◆
Left-center square. Drag this to
resize width of fill.
◆
Bottom-center square. Drag
this to resize height of fill.
◆
Top-right-corner circle. Drag
this to rotate fill.
◆
Top-center circle. Drag this to
skew fill horizontally.
◆
Right-center circle. Drag this to
skew fill vertically.
4
3
2
1
2
3
Resize proportionally
Resize width
Resize height
Rotate
Skew horizontally Skew vertically
Circle handle
Square handle
Samples of various fills
From the Library of Wow! eBook
ptg
214
Chapter 6
When you use Break Apart on a bitmap, the bitmap becomes a fill and
its content is editable. You can select specific regions of it with any of
Flash's selection tools and procedures. If you want to remove parts of
the bitmap or replace them with different fills you can select those
parts with the Magic Wand tool. The Magic Wand tool selects regions
of similar colors. Clicking on other parts adds those parts to the selec-
tion. The color threshold (or sensitivity) for this tool can be set in the
Magic Wand options popup menu.
Editing a Bitmap with
the Magic Wand
Use the Magic Wand
Select a bitmap on the Stage.
Click the Modify menu, and then
click Break Apart.
TIMESAVER
Press
A
+B
(Mac) or Ctrl+B (Win) to quickly
break apart a bitmap on the Stage.
Click on the Stage to deselect the
broken bitmap.
Click the Lasso tool on the Tools
panel.
Click the Magic Wand Mode
button in the Options section of the
Tools panel.
The pointer becomes a small
magic wand.
Position the pointer over regions
of the image you want to select.
The color region you clicked on is
selected. Subsequent clicks on
other regions are added to the
selection.
6
5
4
3
2
1
4
5
6
Color regions selected
and deleted from
bitmap fill.
3
From the Library of Wow! eBook