Spruce Tree
Bạn đang xem bản rút gọn của tài liệu. Xem và tải ngay bản đầy đủ của tài liệu tại đây (488.38 KB, 7 trang )
Brenda Hoddinott
D-07 BEGINNER: SQUIRKLING
In ten simple steps, you transform a single vertical line on a
sheet of paper, into a silhouette drawing of a majestic spruce
tree. Suggested drawing supplies include good quality white
drawing paper, a kneaded and vinyl eraser, and a 4B (or 6B)
graphite pencil.
You begin this project by setting up and drawing the trunk of the tree and the ground and
then you complete the tree drawing branches and shrubs and grass on the ground.
Squirkling is used to add texture and details to the tree’s branches. Squirkling is an easy
method of shading, in which randomly drawn curved lines (called squirkles) combine
squiggles and scribbles with circles to create textured values. Texture is the surface detail
of an object, as defined in a drawing with various shading techniques. The senses of touch
and sight help identify the surface texture of drawing subjects.
When you draw a portrait, if your proportions are wrong, your drawing just won’t look right no
matter how wonderful your shading is. Not so with a tree; if the proportions are off, it really
doesn’t matter. Proportion is the relationship in size of one component of a drawing to another
or others.
7 PAGES – 9 ILLUSTRATIONS
Recommended for artists, aged ten to ninety-nine, who have limited drawing skills, as well as
home schooling, academic and recreational fine art educators
Published by Hoddinott Fine Art Publishers, Halifax, NS, Canada, Revised 2006
Copyright to all articles, images, text, projects, lessons and exercises within this drawing class belong to Brenda Hoddinott and may
not be reproduced or used for any commercial purposes whatsoever without the written permission of Brenda Hoddinott.
Web sites and
2
SKETCHING A SPRUCE TREE
You first draw the trunk of a tree and the ground from which it grows and then add branches
growing from the trunk of the tree and some grass on the earth below the tree.
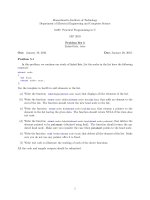
ILLUSTRATION 06-01
Find your drawing
supplies and draw along
with me as I take you
step-by-step through this
project.
Feel free to draw your
tree any shape you prefer,
such as those in the
drawings below.
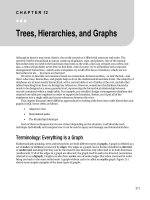
ILLUSTRATION 06-02
Shape refers to the outward outline of a form.
Even though the proportions are different,
they all still look like trees.
1) With a 6B pencil, lightly sketch a
line (as the center of the trunk of
the tree) from the bottom of your
drawing space almost to the top.
Drawing space (also referred to as the
drawing surface or a drawing format)
refers to the area in which you render a
drawing within a specific perimeter. It
can be the shape of your paper or
outlined by any shape you choose,
such as a rectangle or square.
2) Add the ground (or base) from
which the tree grows.
Fill it in with your 6B pencil. You can
make the ground bumpy or fairly level.
Copyright to all articles, images, text, projects, lessons and exercises within this drawing class belong to Brenda Hoddinott and may
not be reproduced or used for any commercial purposes whatsoever without the written permission of Brenda Hoddinott.
Web sites and
3
ILLUSTRATION 06-03
3) Make the base of the tree wider and fill it
in with your 6B pencil.
Observe that the trunk of the tree is very
narrow at the top and gradually gets wider
closer to the bottom.
You strengthen the trunk of the tree by
drawing it wider and anchor the trunk of the
tree in some earth.
4) Before you begin adding branches to
your tree take a few minutes and
practice drawing curved raggedy lines
as in Illustration 06-04.
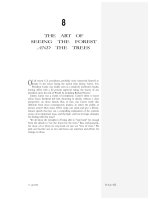
Draw the raggedy edges before you add
darker shading to the inner sections of each
branch. Not very much of your paper
(maybe none at all) is visible in the center of
the branches because there are lots and lots
of curvy lines.
Drawing with loose raggedy lines, creates
realistic looking branches on a tree.
ILLUSTRATION 06-04
Copyright to all articles, images, text, projects, lessons and exercises within this drawing class belong to Brenda Hoddinott and may
not be reproduced or used for any commercial purposes whatsoever without the written permission of Brenda Hoddinott.
Web sites and
4
ILLUSTRATION 06-05
5) Add a few tiny branches at the
top of the tree trunk.
Keep in mind the old expression
“Less is more”! It is easy to add
more branches later if your tree
looks too sparse, but erasing
branches (or sections of
branches), which are too full or
thick is almost impossible.
ILLUSTRATION 06-06
6) Add a few slightly larger branches
in the upper section of the tree
trunk, below those at the top.
Branches on trees tend to become
progressively larger the closer they
are to the base of the tree.
Copyright to all articles, images, text, projects, lessons and exercises within this drawing class belong to Brenda Hoddinott and may
not be reproduced or used for any commercial purposes whatsoever without the written permission of Brenda Hoddinott.
Web sites and
5
ILLUSTRATION 06-07
7) Add larger branches growing from
the center section of the tree trunk.
While branches on trees are usually
larger closer to the bottom, you can’t
always tell this by looking at a tree
from one perspective. Some
branches may be partially hidden
behind the tree and others may be at
the front of the tree.
ILLUSTRATION 06-08
8) Add large branches to the bottom
section of the tree.
For a more realistic looking tree, I
drew some of my lower branches (on
the left) smaller than others above it.