Configure an External Router to Route Inter-VLAN Traffic
Bạn đang xem bản rút gọn của tài liệu. Xem và tải ngay bản đầy đủ của tài liệu tại đây (35.31 KB, 9 trang )
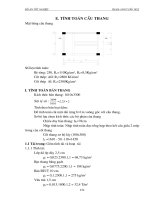
Lab 6.1.2: Configure an External Router to Route Inter-VLAN Traffic
(Router-on-a-Stick)
Accounting
VLAN10
10.1.10.0/24
Marketing
VLAN20
10.1.20.0/24
Fast0/0 (Trunk-ISL)
10.1.1.0/24
Native
VLAN1
Engineering
VLAN30
10.1.30.0/24
10.1.30.2
CORP
ISP
Lo0
200.200.2.0/24
Serial 0/1
DCE
200.200.1.0/24
Serial 0/1
ALSwitch
2900XL
10.1.1.12/24
Objective:
Configure an external router to route Inter-VLAN traffic (Router-on-a-Stick).
Scenario:
Network loads and management issues require you to segment your network from a single
broadcast domain into four functional areas. You select to implement VLANs throughout your
Cisco 2900-switched network and will refer to them as “Accounting”, “Marketing” and
“Engineering” for the users, and “default” used for the native VLAN network management. After
deciding on your subnet ranges and VTP information, illustrated below, your next step is to
implement Inter-VLAN routing using your Cisco 2600 series router. Inter-VLAN routing will allow
individuals and servers on your Virtual LANs to exchange information. Your 2600 Series WAN
router already facilitates a 56k WAN connection to your ISP and a 100mb Ethernet private zone.
Since you have only a single Ethernet connection available on your private zone, your router
must be configured using the “Router-on-a-Stick” method to support the Inter-VLAN routing. Your
VTP and subnetwork information are as follows:
Design:
2900 Switch VTP Configuration Information:
VTP Domain VTP Mode
CORP Server
VLAN Configuration Information:
VLAN
ID
VLAN
Name
VLAN
Subnet
VLAN
Gateway
Switch
Ports
1 default 10.1.1.0/24 10.1.1.1 2
10 Accounting 10.1.10.0/24 10.1.10.1 3-4
20 Marketing 10.1.20.0/24 10.1.20.1 5-6
30 Engineering 10.1.30.0/24 10.1.30.1 7-8
Trunk 1, ISL
Full-Duplex
Cisco 2600 Interface Configuration Information:
Interface IP Address VLAN
FastEthernet 0/0.1 10.1.1.1/24 1 “native”
FastEthernet 0/0.10 10.1.10.1/24 10
FastEthernet 0/0.20 10.1.20.1/24 20
FastEthernet 0/0.30 10.1.30.1/24 30
Serial0/0 200.200.1.2/24
Notes:
Lab Tasks:
1. Cable the lab as shown in the diagram (the ISP cloud is represents a router here).
2. The first router to be configured will be the ISP router. Access the router through the console
port and then enter privileged mode. Clear your NVRAM and reload. The ISP router is not a
core part of the lab but a supplemental item for real-world illustration.
3. Configure the ISP router with the following information:
a. Configure the hostname ISP on the 2600 router.
Router(config)#hostname ISP
b. Configure a loopback 0 interface for simple testing.
ISP(config)#interface Loopback0
ISP(config-if)#ip address 200.200.2.1 255.255.255.0
c. Configure the serial connection to CORP.
ISP(config)#interface Serial0/1
ISP(config-if)#ip address 200.200.1.1 255.255.255.0
ISP(config-if)#clock rate 56000
ISP(config-if)#no shutdown
d. Configure a default route on ISP pointing to CORP.
ISP(config)#ip route 0.0.0.0 0.0.0.0 200.200.1.2
* Note: Verify using ISP#show run
4. Show the brief interface configuration to verify configured IP addresses.
ISP#show ip interface brief
What is the status of the loopback 0 interface?
What is the status of the serial0/1 interface?
Note: serial0/1 might be in a DOWN state because the CORP router is not yet
configured. The Loopback 0 should always be in an UP state by default.
5. After clearing NVRAM and reloading, configure the CORP router as follows:
a. Configure the hostname CORP on the 2600 router.
Router(config)#hostname CORP
b. Configure the serial connection to the ISP.
CORP(config)#interface Serial0/1
CORP(config-if)#ip address 200.200.1.2 255.255.255.0
CORP(config-if)#no shutdown
CORP(config-if)#exit
CORP(config)#exit
Note: Verify using CORP#show run
c. The router will now need to talk to the switch using a standardized trunking protocol.
Standardized meaning that both devices that are connected together must understand
each other. There are of course two primary trunking protocols including ISL and 802.1q.
In this lab we will use ISL trunking. To get started just enable the interface and set the
duplex mode to full.
CORP(config)#interface FastEthernet0/0
CORP(config-if)#full-duplex
CORP(config-if)#no shutdown
Note: It is not necessary to assign an IP address to this interface.
d. Now create a sub-interface for each VLAN. Enable the sub-interface with the proper
trunking protocol and tie it to a particular VLAN using the encapsulation command.
Finally give the sub-interface an IP address that hosts on the VLAN can use for a default
gateway.
VLAN 1 Interface
CORP(config)#interface FastEthernet0/0.1
CORP(config-subif)#description Management VLAN 1
CORP(config-subif)#encapsulation isl 1
CORP(config-subif)#ip address 10.1.1.1 255.255.255.0
VLAN 10 Interface
CORP(config)#interface FastEthernet0/0.10
CORP(config-subif)#description Accounting VLAN 10
CORP(config-subif)#encapsulation isl 10
CORP(config-subif)#ip address 10.1.10.1 255.255.255.0
VLAN 20 Interface
CORP(config)#interface FastEthernet0/0.20
CORP(config-subif)#description Marketing VLAN 20
CORP(config-subif)#encapsulation isl 20
CORP(config-subif)#ip address 10.1.20.1 255.255.255.0
VLAN 30 Interface
CORP(config)#interface FastEthernet0/0.30
CORP(config-subif)#description Engineering VLAN 30
CORP(config-subif)#encapsulation isl 30
CORP(config-subif)#ip address 10.1.30.1 255.255.255.0
* Note: Verify using CORP#show run
6. Show the brief interface configuration to verify configured IP sub interface addresses.
CORP#show ip interface brief
Are all the interfaces in an up state?
7. It is time we verify our Internet connection. Lets ping the ISP interface and the ISP’s
Loopback 0 interface. Both should function prior to continuing with this exercise. If there is a
problem verify your cable connections and IP address assignments. Also check your static
routes in the ISP router and the CORP router.
CORP#ping 200.200.1.2
CORP#ping 200.200.1.1
CORP#ping 200.200.2.1
Were all pings successful?
8. Finally, assign a default route for CORP pointing to the ISP.
CORP(config)#ip route 0.0.0.0 0.0.0.0 200.200.1.1
* Note: Verify using CORP#show run
9. Now it’s time to configure the switch. Catalyst switches, like Cisco routers, utilize startup
configuration files. It is always a good idea to clear any existing configuration before starting a
new configuration. For the 2900XL, this is a two-step process as described below:
a. From a console session, enter privileged mode by entering enable (you may have to
provide a password if one was already assigned).
b. Clear the current startup configuration file.
Switch#erase start
Switch#reload
c. Check flash for any VLAN settings. If vlan.dat exists, delete it.
Switch#show flash
Switch#delete flash
Delete filename [flash]?
Enter vlan.dat at the Delete prompt.
d. Restart the switch
Switch#reload