Integrating Samba
Bạn đang xem bản rút gọn của tài liệu. Xem và tải ngay bản đầy đủ của tài liệu tại đây (114.93 KB, 17 trang )
231
CHAPTER 9
Integrating Samba
Making It Work with Windows
Y
ou may already have a Samba server up and running in your network. Many people
do, because it’s such an easy and convenient solution to offer file sharing to Windows
clients. Few people, however, have a Samba server that is integrated with other operat-
ing systems used in their environment. Achieving such integration is the focus of this
chapter. In this chapter you’ll first read a short section on how to quickly and easily set
up a simple Samba server that offers file sharing and nothing more. In that section you
will use the
oi^l]oos`
command to add individual user accounts. Sure, that works, but
it’s not a very sophisticated solution if you have many users to manage, because you
need to create every user account twice.
Following the short introduction, there are three sections that explain how to truly
integrate Samba in your network. The first section explains how to integrate Samba with
LDAP, which is useful because it provides one centralized location from which you can
manage user accounts. Next, you’ll read how to set up your Samba server as a Windows
NT 4–style Primary Domain Controller (PDC). This solution explains how you can replace
a current Windows NT 4 server with Samba without your users even noticing the change.
The last section explains how to integrate Samba in Active Directory. It teaches you how
to set up Samba as a member server in Active Directory. Currently, making it more than
a member server still isn’t possible, because Samba version 4, which is supposed to make
that possible, is not in a stable state yet.
Setting Up Samba the Easy Way
In this section you’ll learn the easy way to set up Samba. It explains how you can define
a share and create a Samba user that has access to this share. At the end of this section,
you’ll learn how to test whether this share is working properly.
Setting up Samba the easy way involves the following general steps, each of which is
explained in detail in the sections that follow:
CHAPTER 9
N
INTEGRATING SAMBA
232
1. Create a local directory to share.
2. Set permissions on this directory.
3. Configure
oi^*_kjb
to define the share.
4. Create a Samba user account.
5. Test access to the share.
Creating a Local Directory to Share
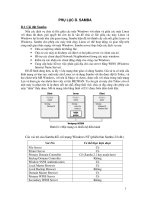
So what exactly is a share? Basically, it is a directory on the local Linux file system that
is accessible over the network. To create such a share, the first step is to create a local
directory. This is as easy as applying the
ig`en
command. So, assuming you want to
share a local directory with the name
+od]na
, simply use
ig`en+od]na
to create the local
directory.
Applying Permissions to the Local Directory
When working with Samba, you need to make sure that the appropriate permissions are
applied to the share. These permissions are granted to a local user account. You can grant
permissions the easy way, by just entering the command
_dik`333+od]na
, but I don’t
recommend doing that. It is much better to create a dedicated group in Linux and make
members of that group all users to whom you want to give access to the share. Assuming
that the name of this group is
o]i^]cnkql
, you use
_dcnlo]i^]cnkql+od]na
to make that
group the share owner. Once that is done, apply the permissions, granting full permis-
sions to the user owner and group owner and no permissions to others:
_dik`33,+od]na
.
This creates a situation that is much more secure, because it ensures that other users can-
not access the share.
Defining the Share
Now that you have set up everything that is necessary on the local file system, you need
to define the share in Samba. Before you can start setting it up, you must install it first.
There are several packages that relate to the Samba file server. You can get a list of them
by using the
]lpepq`aoa]n_do]i^]
command. Listing 9-1 shows the result of this com-
mand when applied to my test server.
CHAPTER 9
N
INTEGRATING SAMBA
233
Listing 9-1. aptitude search samba Provides an Overview of Available Samba Packages
nkkp<iah6z]lpepq`aoa]n_do]i^]
l`lou_k)o]i^])=qpki]pa]`iejeopn]pekjkb]__aoopko]i^]
la^kt)o]i^])a^kt)Behaod]nejc
lacnkqls]na)o]i^]]`iej)aCnkqlS]naO]i^]]`iejeopn]pekj]llhe_]pek
lco]i^]`)CPG'_kjbecqn]pekjpkkhbkno]i^]
eo]i^])]H]jI]j]can)hegabeha]j`lnejpanoanran
ro]i^])_heajp)
e=o]i^])_kiikj)O]i^]_kiikjbehaoqoa`^u^kpdpdaoanran
lo]i^])`^c)O]i^]`a^qccejcoui^kho
lo]i^])`k_)O]i^]`k_qiajp]pekj
lo]i^])`k_)l`b)O]i^]`k_qiajp]pekj$L@Bbkni]p%
louopai)_kjbec)o]i^])CQEbkni]j]cejco]i^]od]nao]j`qoano
To make sure that all packages are installed, use the following command:
]lp)capejop]hho]i^]`lou_k)o]i^]a^kt)o]i^]acnkqls]na)o]i^]]`iejco]i^]`
±
oi^_heajpo]i^])_kiikjo]i^])`^co]i^])`k_o]i^])`k_)l`bouopai)_kjbec)o]i^]
N
Note
The preceding command is not appropriate for my server, because the base packages
o]i^]
and
o]i^])_kiikj
are already installed. However, it will install, in all situations, everything that is needed to
operate a Samba server. I have also replaced the
o]i^])_heajp
package with
oi^_heajp
, because other-
wise the installer would tell me that two Samba client packages are available and ask which one I want to
install.
Now that all Samba packages have been installed, you can edit the general Samba
configuration file
+ap_+o]i^]+oi^*_kjb
to define the share. In
oi^*_kjb
, there are two
types of sections. The first type is the section
Wchk^]hY
, which contains global settings for
your server. The second type consists of the different sections in which the individual
shares are defined. You can recognize them by the name of the share, written between
square brackets. For instance, to define a share for your directory
+od]na
, the section
header would be
Wod]naY
. The definition of this share can be really simple, as shown in
Listing 9-2.
CHAPTER 9
N
INTEGRATING SAMBA
234
Listing 9-2. Defining a Share Isn’t Complicated
Wod]naY
_kiiajp9od]na``ena_pknu
na]`kjhu9jk
l]pd9+od]na
Of course, there are lots of other options that you can add to the share to make it fan-
cier, but basically, if you define the share in this fashion it will work. So save your settings,
and the share will be accessible. It takes a maximum of one minute before the share will
automatically appear.
You’ve now set up basic access to the share. Before continuing, it’s a good idea to
check if it really works. You can do that by using the
oi^_heajp)Hhk_]hdkop
command,
which shows a list of all available shares on the local machine. It prompts for a user pass-
word as well, but because no user credentials are needed to display a list of shares, you
can just press Enter to proceed. Listing 9-3 shows the output of this command.
Listing 9-3. Use smbclient -L localhost to Get an Overview of All Available Shares
nkkp<iah6zoi^_heajp)Hhk_]hdkop
L]ooskn`6
@ki]ej9WIAHYKO9WQjetYOanran9WO]i^]/*,*.4]Y
Od]naj]iaPula?kiiajp
))))))))))))))))))))
lnejp @eogLnejpan@nerano
od]na@eogod]na``ena_pknu
EL? EL?EL?Oanre_a$iahoanran$O]i^](Q^qjpq%%
@ki]ej9WIAHYKO9WQjetYOanran9WO]i^]/*,*.4]Y
Oanran?kiiajp
))))))))))))))))
SkngcnkqlI]opan
))))))))))))))))
SKNGCNKQL
At this point, your share is up and running and available, so it’s time to proceed to
the next step and create a Samba user account.
CHAPTER 9
N
INTEGRATING SAMBA
235
Creating a Samba User Account
So why does a user need a Samba user account if they already have a Linux user account?
To access a share, the user, who typically works on a Windows machine, needs to enter
his credentials. When doing this from a Windows machine, the password that he enters is
encrypted in the Windows way. The problem is that the Linux authentication mechanism
doesn’t know how to handle this encryption. For that reason, the user needs a Samba
user account that has a password that is encrypted the Windows way.
The Samba user account must match an existing Linux user account. That means
that you first have to create the Linux account and then create the Samba account. Yes,
that means creating the same user twice. If you don’t like that solution, you need one
of the advanced solutions, such as Samba integration with LDAP, described later in this
chapter.
To create a Samba account, you need to use the
oi^l]oos`
command. For instance, to
create a user with the name
hej`]
, use
oi^l]oos`)]hej`]
. The command will ask you to
enter the Samba password twice, after which the Samba user account is created.
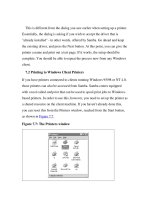
Testing Access to the Share
Now that you have created the Samba user account, it’s time for a small test. Sure, you
can do the test from Windows and make a connection to the share by entering the share
name in the
++oanranj]ia+od]naj]ia
format, but by doing that, you are introducing other
factors that may fail as well. For instance, the Windows test may fail because of a mis-
configured firewall. At this point, we just want to know whether the Samba server is
functioning the right way. Test it by using the
ikqjp
command:
ikqjp)poi^bo)kqoanj]ia9hej`]++hk_]hdkop+od]na+ijp
If this command succeeds in mounting the Samba share on the
+ijp
directory, you
have established that the Samba server is working.
As an alternative way to test access to your share, you may use the
oi^_heajp
command. This command offers an interface that is pretty similar to the FTP cli-
ent command- line interface; you can use
lqp
and
cap
to transfer files from and to the
Samba shared directory from the
oi^_heajp
shell interface. To perform the same test on
++hk_]hdkop+od]na
, use
oi^_heajp))qoan9hej`]++hk_]hdkop+od]na
. If successful, this com-
mand opens a shell interface to the directory. Try for example the
ho
command to get
a list of all files in the share. Listing 9-4 shows an example of a short
oi^_heajp
session.
In this example, user
hej`]
authenticates, uses
ho
to show a list of existing files, uses
cap
to download the file to her current directory, and finally uses
mqep
to close the
oi^_heajp
interface.
CHAPTER 9
N
INTEGRATING SAMBA
236
Listing 9-4. The smbclient Tool Is Similar to the FTP Client Interface
nkkp<iah6zoi^_heajp))qoan9hej`]++hk_]hdkop+od]na
L]ooskn`6
@ki]ej9WIAHYKO9WQjetYOanran9WO]i^]/*,*.4]Y
oi^6X:ho
*@,Sa`=qc-/,06/56/2.,,4
**@,Sa`=qc-/,06-16//.,,4
beha-,Sa`=qc-/,06/56/0.,,4
beha.,Sa`=qc-/,06/56/2.,,4
1,352^hk_gokboeva.,53-1.*0/5/5^hk_go]r]eh]^ha
oi^6X:capbeha-
cappejcbehaXbeha-kboeva,]obeha-$,*,g^+o%$]ran]caj]jg^+o%
oi^6X:mqep
With your Samba server up and running, now it’s time to integrate it with LDAP.
Integrating Samba with LDAP
There are three tasks to accomplish if you want to integrate Samba with LDAP. First, you
need to prepare Samba to talk to LDAP. Next, you have to prepare LDAP as well. Finally,
you can tell Samba to use LDAP.
Preparing Samba to Talk to LDAP
The major difference between the Samba configuration just discussed and integration
with LDAP is in one line in the
Wchk^]hY
section of
oi^*_kjb
. The following line defines
that, by default, passwords are stored in the Trivial Database (TDB) that Samba uses by
default:
l]oo`^^]_gaj`9p`^o]i
This method works fine if you are using only one Samba server or if you are using
Samba as a domain controller in an environment in which no backup domain control-
lers are available. If you are using Samba in a larger- scale environment, you can write
user account information to an LDAP database. To do that, you need to change the
l]oo`^
^]_gaj`
parameter to refer to an LDAP server. The following example would do that:
l]oo`^^]_gaj`9h`]lo]i