Ebook Introduction to AutoCad 2010 - 2D and 2D Design: Part 2
Bạn đang xem bản rút gọn của tài liệu. Xem và tải ngay bản đầy đủ của tài liệu tại đây (11.9 MB, 211 trang )
Part 2
3D Design
Chapter 12
Introducing 3D
modelling
AIMS OF THIS CHAPTER
The aims of this chapter are:
1. To introduce the tools used for the construction of 3D solid models.
2. To give examples of the construction of 3D solid models using tools from the Home/
Modeling panel.
3. To give examples of 2D outlines suitable as a basis for the construction of 3D solid
models.
4. To give examples of constructions involving the Boolean operators Union, Subtract and
Intersect.
223
224
Introduction to AutoCAD 2010
CHAPTER 12
Introduction
As shown in Chapter 1 the AutoCAD coordinate system includes a third
coordinate direction Z, which, when dealing with 2D drawing in previous
chapters, has not been used. 3D model drawings make use of this third Z
coordinate.
The 3D Modeling workspace
It is possible to construct 3D model drawings in the AutoCAD Classic or
2D Drafting & Annotation workspaces, but in Part 2 of this book we will
be working in the 3D Modeling workspace. To set this workspace click the
Workspace Settings icon in the status bar and select 3D Modeling from
the menu which appears (Fig. 12.1). The 3D Modeling workspace appears
(Fig. 12.2).
Fig. 12.1 Selecting 3D Modeling from the Workspace Switching menu
Fig. 12.2 The 3D Modeling workspace in Parallel projection
The workspace in Fig. 12.2 shows grid lines in Parallel projection mode,
brought about by entering perspective at the command line, followed by
entering 0 in response to the prompt which appears. This is the window
in which the examples in this chapter will be constructed. Note the
ViewCube at the top right-hand corner of the drawing area. In Fig. 12.2
this has been highlighted by moving the cursor onto the cube. Changes can
be made to the appearance and uses of the cube in the ViewCube Settings
dialog brought to screen from the right-click menu of the ViewCube
(Fig. 12.3).
Fig. 12.3 The ViewCube Settings dialog
Methods of calling tools for 3D modelling
The default 3D Modeling ribbon is shown in Fig. 12.4.
Fig. 12.4 The 3D Modeling panels
225
CHAPTER 12
Introducing 3D modelling
226
Introduction to AutoCAD 2010
CHAPTER 12
When calling the tools for the construction of 3D model drawings, similar
methods can be used as when constructing 2D drawings. 3D tools can be
called by:
1. A click on a tool icon in a 3D Modeling panel.
2. A click on a tool icon in the Modeling toolbar.
3. A click on the name of a tool from the Draw/Modeling drop-down
menu.
4. Entering the tool name at the command line followed by pressing the
Return button of the mouse or the Return key of the keyboard.
5. Some of the 3D tools have an abbreviation which can be entered at the
command line instead of its full name.
6. Using the Dynamic Input method.
Notes
1. As when constructing 2D drawings, no matter which method
is used, and most operators will use a variety of these six methods,
calling a tool results in prompt sequences appearing at the command
prompt (or if using Dynamic Input on screen) as in the following
example:
Command:enter box right-click
Specify first corner or [Center]:enter 90,120
right-click
Specify other corner or [Cube/Length]:enter
150,200
Specify height or [2Point]:enter 50
Or, if the tool is called from its tool icon, or
from a drop-down menu:
Command:_box
Specify first corner or [Center]:enter 90,120
right-click
Specify other corner or [Cube/Length]:enter
150,200
Specify height or [2Point]:enter 50
2. In the following pages, if the tool’s sequences are to be repeated,
they may be replaced by an abbreviated form such as:
Command: box
[prompts]: 90,120
[prompts]: 150,200
Introducing 3D modelling
227
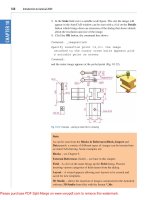
1.
2.
3.
4.
Fig. 12.5 Click Top in
the ViewCube
Make sure layer 0 is current.
Click Top in the ViewCube (Fig. 12.5). The screen switches to a Top view.
Construct an octagon of edge length 60 using the Polygon tool.
With click the house icon in the ViewCube (Fig. 12.6). The screen
switches to an Isometric view.
5. Call the Polysolid tool with a click on its tool icon in the Home/
Modeling panel (Fig. 12.7). The command line shows:
Fig. 12.6 Selecting
Isometric from the
ViewCube
Fig. 12.7 The Polysolid tool icon from the Draw/Modeling drop-down menu
Command: _Polysolid Height ϭ 0, Width ϭ 0,
Justification ϭ Center
Specify start point or [Object/Height/Width/
Justify] ϽObjectϾ:enter h (Height)
Specify height Ͻ4Ͼ: 60
Height ϭ 60, Width ϭ 0, Justification ϭ Center
Specify start point or [Object/Height/Width/
Justify] ϽObjectϾ:enter w (Width)
Specify width Ͻ0Ͼ: 5
Height ϭ 60, Width ϭ 5, Justification ϭ Center
Specify start point or [Object/Height/Width/
Justify] ϽObjectϾ:right-click
Select object:pick the octagon
Command:
Fig. 12.8 Example
polysolid
And the Polysolid forms (Fig. 12.8).
2D outlines suitable for 3D models
When constructing 2D outlines suitable as a basis for constructing some
forms of 3D model, select a tool from the Home/Draw panel, or enter tool
CHAPTER 12
The Polysolid tool (Fig. 12.8)
228
Introduction to AutoCAD 2010
CHAPTER 12
names or abbreviations for the tools at the command line. If constructed
using tools such as Line, Circle and Ellipse, before being of any use for
3D modelling, outlines must be changed into regions with the Region tool .
Closed polylines can be used without the need to use the Region tool.
First example – Line outline & Region (Fig. 12.9)
1. Click Top in the ViewCube to switch the screen to Top view and
Zoom to 1.
2. Construct the left-hand drawing of Fig. 12.9 using the Line tool.
3. Click the Region tool from the Home/Draw panel (Fig. 12.10),
or select Region from the Draw drop-down menu, or from the
Draw toolbar, or enter reg at the command line. The command line
shows:
100
20
Outline constructed
using Line tool
20
60
20
20
Fig. 12.10 Selecting
the Region tool from
the Home/Draw panel
Line outline changed
to a Region
Fig. 12.9 First example – Line outline and Region
Command:_region
Select objects:window the drawing 12 found
Select objects:right-click
1 loop extracted.
1 Region created.
Command:
And the Line outline is changed to a Region – right-hand drawing in Fig. 12.9.
Second example – Union & Subtract regions
(Fig. 12.11)
1. In the ViewCube/Top view, construct drawing 1 of Fig. 12.11 and with
the Copy tool (Home/Modify panel), copy the drawing three times to
produce drawings 2, 3 and 4.
Introducing 3D modelling
229
60
60
R25
3. Union of 2 regions
2. Union of all 3 regions
4. Subtract region from Union
Fig. 12.11 Second example – Union and Subtract of regions
2. With the Region tool change all the outlines into regions.
3. Drawing 2 – call the Union tool from the Home/Solid Editing panel
(Fig. 12.12). The command line shows:
Fig. 12.12 The Union tool icon in the Home/Solid Editing panel
Command:_union
Select objects:pick the left-hand region 1 found
Select objects:pick the circular region 1 found, 2
total
Select objects:pick the right-hand region 1 found,
3 total
Command:
4. Drawing 3 – with the Union tool form a union of the left-hand region
and the circular region.
CHAPTER 12
30
70
1
230
Introduction to AutoCAD 2010
CHAPTER 12
5. Drawing 4 – call the Subtract tool, also from the Home/Solid Editing
panel. The command line shows:
Command:_subtract Select solids and regions to
subtract from ...
Select objects:pick the region just formed 1 found
Select objects:right-click
Select solids and regions to subtract:pick the
right-hand region 1 found
Select objects:right-click
Command:
The Extrude tool
The Extrude tool can be called with a click in the Modeling toolbar,
with a click on its name in the Draw/Modeling panel (Fig. 12.13), or by
entering extrude or its abbreviation ext at the command line.
Fig. 12.13 The Extrude tool from the Draw/Modeling drop-down menu
Note
In this chapter 3D models are shown in illustrations as they appear in
the acadiso3D.dwt template screen. In later chapters, 3D models are
sometimes shown in outline only. This is to allow the reader to see the
parts of 3D models in future chapters more clearly in the illustrations.
Examples of the use of the Extrude tool
The first two examples of forming regions given in Figures 12.10 and
12.11 are used to show the results of using the Extrude tool.
Introducing 3D modelling
231
First example – Extrude (Fig. 12.14)
From the first example of forming a region:
Command:_extrude
Current wire frame density: ISOLINESϭ4
Select objects to extrude:pick region 1 found
Select objects to extrude:right click
Specify height of extrusion or [Direction/Path/
Taper angle] Ͻ45Ͼ:enter 50 right-click
Command:
2. Select ViewCube/Isometric. The extrusion appears in an isometric view.
3. Call Zoom and zoom to 1.
Fig. 12.14 First
example – Extrude
The result is shown in Fig. 12.14.
Notes
1. In the above example we made use of an isometric view possible
from the ViewCube (Fig. 12.5). The ViewCube can be manipulated
to show a variety of views by dragging to its required positions
under mouse control.
2. Note the Current wire frame density: ISOLINES ؍4 in the
prompts sequence when Extrude is called. The setting of 4 is
suitable when extruding plines or regions consisting of straight lines,
but when arcs are being extruded it may be better to set ISOLINES
to a higher figure as follows:
Command:enter isolines right-click
Enter new value for ISOLINES Ͻ4Ͼ:enter 16
right-click
Command:
Second example – Extrude (Fig. 12.16)
From the second example of forming a region:
1. Set ISOLINES to 16.
2. Call the Extrude tool. The command line shows:
Command:_extrude
Current wire frame density: ISOLINESϭ16
CHAPTER 12
1. Call Extrude (Fig. 12.13). The command line shows:
CHAPTER 12
232
Introduction to AutoCAD 2010
Select objects to extrude:pick the region 1 found
Select objects to extrude:right-click
Specify height of extrusion or [Direction/Path/
Taper angle]:enter t right-click
Specify angle of taper for extrusion:enter 5
right-click
Specify height of extrusion or [Direction/Path/
Taper angle]:enter 100 right-click
Command:
Fig. 12.15 Second
example – new position
of the ViewCube
3. Drag the ViewCube to a new view as shown in Fig. 12.15.
4. Zoom to 1.
The result is shown in Fig. 12.16.
Fig. 12.16 Second example – Extrude
Third example – Extrude (Fig. 12.18)
From the third example of forming a region:
Fig. 12.17 The 3D
Polyline tool from the
Home/Draw panel
1. Place the screen in the ViewCube/Top view and construct a rectangle
of size 80 ϫ 50, filleted to a radius of 15. Place the drawing in the
View Cube/Front view and using the 3D Polyline tool from the
Home/Draw panel (Fig. 12.17) construct a 3D polyline of three plines
each of length 45 and at 45° to each other at the centre of the outline as
shown in Fig. 12.18.
2. Place the screen in the ViewCube/Isometric view.
3. Set ISOLINES to 24.
4. Call the Extrude tool. The command line shows:
Command:enter ext right-click
Current wire frame density: ISOLINESϭ24
Select objects to extrude:pick the rectangle 1
found
Select objects to extrude:right-click
Specify height of extrusion or [Direction/Path/
Taper angle] Ͻ100 Ͼ :enter p right-click
Select extrusion path or [Taper angle]:pick the
path
Command:
The result is shown in Fig. 12.18.
Fig. 12.18 Third example – Extrude
The Revolve tool
The Revolve tool can be called with a click on its tool icon in the
Modeling toolbar, by a click on its tool icon in the Home/Modeling
panel, by a click on its name in the Modeling sub-menu of the Draw
drop-down menu, or by entering revolve or its abbreviation rev at the
command line.
Examples of the use of the Revolve tool
Solids of revolution can be constructed from closed plines or from regions.
First example – Revolve (12.21)
1. Construct the closed polyline Fig. 12.19.
233
CHAPTER 12
Introducing 3D modelling
234
Introduction to AutoCAD 2010
85
45
10
15
CHAPTER 12
R10
R5
45
10
Start point for axis
280
Axis endpoint
Fig. 12.19 First example – Revolve. The closed pline
2. Set ISOLINES to 24.
3. Call the Revolve tool from the Home/Modeling control panel (Fig.
12.20). The command line shows:
Command:
Command:_revolve
Current wire frame density: ISOLINESϭ24
Select objects to revolve:pick the polyline 1 found
Select objects to revolve:right-click
Specify axis start point or define axis by [Object/
X/Y/Z] ϽObjectϾ:pick
Specify axis endpoint:pick
Specify angle of revolution or [Start angle]
Ͻ360Ͼ:right-click
Command:
Fig. 12.20 The Revolve tool from the Home/3D Modeling panel
Introducing 3D modelling
235
4. Place in the ViewCube/Isometric view. Zoom to 1.
Second example – Revolve (Fig. 12.23)
Fig. 12.21 First
example – Revolve
1. Place the screen in the ViewCube/Front view. Zoom to 1.
2. Construct the pline outline (Fig. 12.22).
4
4
40
Semi-ellipse based
on 180 x 100 axes
Fig. 12.22 Second example – Revolve. The pline outline
3. Set ISOLINES to 24.
4. Call the Revolve tool and construct a solid of revolution.
5. Place the screen in the ViewCube/Isometric view. Zoom to 1.
Fig. 12.23 Second example – Revolve
Third example – Revolve (Fig. 12.24)
1. Construct the pline (left-hand drawing of Fig. 12.24). The drawing must
be either a closed pline or a region.
2. Call Revolve and form a solid of revolution through 180°.
3. Place the model in the ViewCube/Isometric view. Zoom to 1.
The result is shown in Fig. 12.24 (right-hand drawing).
CHAPTER 12
The result is shown in Fig. 12.21.
236
Introduction to AutoCAD 2010
30
65
40
CHAPTER 12
R25
R25
20
240
R5
R25
95
Fig. 12.24 Third example – Revolve. The outline to be revolved and the solid of revolution
Other tools from the Home/Modeling panel
First example – Box (Fig. 12.26)
1. Place the window in the ViewCube/Front view.
2. Click the Box tool icon in the Home/Modeling panel (Fig. 12.25). The
command line shows:
Fig. 12.25 Selecting
the Box tool from the
pop-up in the Home/
Modeling panel
Command:_box
Specify first corner or [Center]:enter 90,90
right-click
Specify other corner or [Cube/Length]:enter 110,-30
right-click
Specify height or [2Point]:enter 75 right-click
Command:right-click
BOX Specify first corner or [Center]: 110,90
Specify other corner or [Cube/Length]: 170,70
Specify height or [2Point]: 75
Command:
BOX Specify first corner or [Center]: 110,-10
Specify other corner or [Cube/Length]: 200,-30
Specify height or [2Point]: 75
Command:
Introducing 3D modelling
237
Command:_union
Select objects:pick one of the boxes 1 found
Select objects:pick the second of box 1 found, 2
total
Select objects:pick the third box 1 found, 3 total
Select objects:right-click
Command:
Fig. 12.26 First
example – Box
And the three boxes are joined in a single union. See Fig. 12.26.
Second example – Sphere and Cylinder (Fig. 12.27)
1. Set ISOLINES to 16.
2. Click the Sphere tool icon from the Home/Modeling panel. The
command line shows:
Command:_sphere
Specify center point or [3P/2P/Ttr]: 180,170
Specify radius or [Diameter]: 50
Command:
3. Click the Cylinder tool icon in the Home/Modeling panel. The
command line shows:
Command: _cylinder
Specify center point of base or [3P/2P/Ttr/
Elliptical]: 180,170
Specify base radius or [Diameter]: 25
Specify height or [2Point/Axis endpoint]: 110
Command:
4. Place the screen in the ViewCube/Front view. Zoom to 1.
5. With the Move tool (from the Home/Modify panel), move the cylinder
vertically down so that the bottom of the cylinder is at the bottom of the
sphere.
6. Click the Subtract tool icon in the Home/Solid Editing panel. The
command line shows:
Command:_subtract Select solids and regions to
subtract from ..
Select objects:pick the sphere 1 found
CHAPTER 12
3. Place in the ViewCube/Isometric view. Zoom to 1.
4. Call the Union tool from the Home/Solid Editing panel. The command
line shows:
CHAPTER 12
238
Introduction to AutoCAD 2010
Select objects:right-click
Select solids and regions to subtract
Select objects:pick the cylinder 1 found
Select objects:right-click
Command:
7. Place the screen in the ViewCube/Isometric view. Zoom to 1.
Fig. 12.27 Second
example – Sphere and
Cylinder
The result is shown in Fig. 12.27.
Third Example – Cylinder, Cone and Sphere (Fig. 12.28)
1. Call the Cylinder tool and with a centre 170,150 construct a cylinder
of radius 60 and height 15.
2. Click the Cone tool in the Home/Modeling panel. The command line
shows:
Command:_cone
Specify center point of base or [3P/2P/Ttr/
Elliptical]: 170,150
Specify base radius or [Diameter]: 40
Specify height or [2Point/Axis endpoint/Top
radius]: 150
Command:
Fig. 12.28 Third
example – Cylinder,
Cone and Sphere
3. Call the Sphere tool and construct a sphere of centre 170,150 and
radius 45.
4. Place the screen in the Front view and with the Move tool, move the
cone and sphere so that the cone is resting on the cylinder and the
centre of the sphere is at the apex of the cone.
5. Place in the ViewCube/Isometric view, Zoom to 1 and with the Union
tool form a single 3D model from the three objects.
The result is shown in Fig. 12.28.
Fourth Example – Box and Wedge (Fig. 12.29)
1. Click the Box tool icon in the Home/Modeling panel and construct two
boxes, the first of corners 70,210 and 290,120 of height 10, the second
of corners 120,200,10 and 240,120,10 and of height 80.
2. Place the screen in the ViewCube/Front view and Zoom to 1.
3. Click the Wedge tool icon in the Home/Modeling panel. The command
line shows:
Command:_wedge
Specify first corner or [Center]: 120,170,10
Specify other corner or [Cube/Length]: 80,160,10
Specify height or [2Point]: 70
Command:right-click
WEDGE
Specify first corner of wedge or [Center]:
240,170,10
Specify corner or [Cube/Length]: 280,160,10
Specify height or [2Point]: 70
Command:
Fig. 12.29 Fourth
example – Box and
Wedge
4. Place the screen in the ViewCube/Isometric view and Zoom to 1.
5. Call the Union tool from the Home/Solid Editing panel and in
response to the prompts in the tool’s sequences pick each of the 4
objects in turn to form a union of the 4 objects.
The result is shown in Fig. 12.29.
Fifth Example – Cylinder and Torus (Fig. 12.30)
1. Using the Cylinder tool from the Home/Modeling panel, construct a
cylinder of centre 180,160, of radius 40 and height 120.
2. Click the Torus tool icon in the Home/Modeling panel. The command
line shows:
Command:_torus
Specify center point or [3P/2P/Ttr]: 180,160,10
Specify radius or [Diameter]: 40
Specify tube radius or [2Point/Diameter]: 10
Command:right-click
TORUS
Specify center point or [3P/2P/Ttr]: 180,160,110
Specify radius or [Diameter] Ͻ40Ͼ:right-click
Specify tube radius or [2Point/Diameter] Ͻ10Ͼ:
right-click
Command:
Fig. 12.30 Fifth
example – Cylinder
and Torus
3. Call the Cylinder tool and construct another cylinder of centre
180,160, of radius 35 and height 120.
4. Place in the ViewCube/Isometric view and Zoom to 1.
5. Click the Union tool icon in the Home/Solid Editing panel and form a
union of the larger cylinder and the two torii.
6. Click the Subtract tool icon in the Home/Solid Editing panel and
subtract the smaller cylinder from the union.
The result is shown in Fig. 12.30.
239
CHAPTER 12
Introducing 3D modelling
240
Introduction to AutoCAD 2010
CHAPTER 12
The Chamfer and Fillet tools
The Chamfer and Fillet tools from the Home/Modify panel (Fig. 12.31)
used to create chamfers and fillets in 2D drawings in AutoCAD 2010 can
just as well be used when constructing 3D models.
Fig. 12.31 The Chamfer and Fillet tools in the Home/Modify panel
Example – Chamfer and Fillet (Fig. 12.34)
1. Working to the sizes given in Fig. 12.32 and using the Box and
Cylinder tools, construct the 3D model in Fig. 12.33.
2. Place in the ViewCube/Isometric view. Union the two boxes and with
the Subtract tool, subtract the cylinders from the union.
Box 160 ϫ 100 ϫ 10
Cylinders R5
height 10
Elliptical cylinder
80 ϫ 40 height 60
Box 120 ϫ 60 ϫ 50
Fig. 12.32 Example – Chamfer and Fillet – sizes for the model
241
CHAPTER 12
Introducing 3D modelling
Fig. 12.33 Example – isometric view – Chamfer and Fillet – the model before using the tools
Note
To construct the elliptical cylinder, call the Cylinder tool from the
Home/Modeling panel. The command line shows:
Command:_cylinder
Specify center point of base or [3P/2P/Ttr/
Elliptical]:enter e right-click
Specify endpoint of first axis or [Center]:
130,160
Specify other endpoint of first axis: 210,160
Specify endpoint of second axis: 170,180
Specify height or [2Point/Axis endpoint]: 50
Command:
3. Click the Fillet tool icon in the Home/Modify panel (Fig. 12.31). The
command line shows:
Command:_fillet
Current settings: ModeϭTRIM. Radiusϭ1
Specify first object or [Undo/Polyline/Radius/Trim/
Multiple]:enter r (Radius) right-click
Specify fillet radius Ͻ1Ͼ: 10
Select first object:pick one corner
Select an edge or [Chain/Radius]:pick a second
corner
Select an edge or [Chain/Radius]:pick a third
corner
Select an edge or [Chain/Radius]:pick the fourth
corner
242
Introduction to AutoCAD 2010
CHAPTER 12
Select an edge or [Chain/Radius]:right-click
4 edge(s) selected for fillet.
Command:
4. Click the Chamfer tool in the Home/Modify panel (Fig. 12.31). The
command line shows:
Command:_chamfer
(TRIM mode) Current chamfer Dist1ϭ1, Dist2ϭ1
Select first line or [Undo/Polyline/Distance/
Angle/Trim/mEthod/Multiple]:enter d
(Distance)right-click
Specify first chamfer distance Ͻ1Ͼ: 10
Specify second chamfer distance Ͻ10Ͼ: 10
Select first line:pick one corner One side of the
box highlights
Base surface selection ... Enter surface selection
[Next/OK (current)] ϽOKϾ:right click
Specify base surface chamfer distance Ͻ10Ͼ:
right-click
Specify other surface chamfer distance Ͻ10Ͼ:
right-click
Select an edge or [Loop]:pick the edge again
Select an edge:pick the second edge
Select an edge [or Loop]:right-click
Command:
And two edges are chamfered. Repeat to chamfer the other two edges.
Figure 12.34 shows the completed 3D model.
Fig. 12.34 Example – Chamfer and Fillet
Introducing 3D modelling
243
The tools Union, Subtract and Intersect found in the Home/Solids
Editing panel are known as the Boolean operators after the mathematician
Boole. They can be used to form unions, subtractions or intersections
between extrusions, solids of revolution, or any of the 3D Objects.
Note on using 2D Draw tools on 3D models
As was seen when using the Move from the Home/Draw panel
when working in the 2D Drafting & Annotation workspace and the
Chamfer and Fillet tools from the Home/Modify panel, so can other
tools – Move, Copy, Mirror, Rotate and Scale from the Home/Modify
panel in the 3D Modeling workspace – be used in connection with the
construction of 3D models.
Constructing 3D surfaces using the Extrude tool
In this example of the construction of a 3D surface model the use of the
Dynamic Input (DYN) method of construction will be shown.
1. Place the AutoCAD drawing area in the ViewCube/Isometric view.
2. Click the Dynamic Input button in the status bar to make dynamic
input active.
Example – Dynamic Input (Fig. 12.36)
1. Using the Line tool from the Home/Draw panel construct the outline
(Fig. 12.35).
Fig. 12.35 Example – constructing the Line outline
CHAPTER 12
Note on the tools Union, Subtract and Intersect
244
Introduction to AutoCAD 2010
CHAPTER 12
2. Call the Extrude tool and window the line outline.
3. Extrude to a height of 100.
The stages of producing the extrusion are shown in Fig. 12.35 and Fig.
12.36. The resulting 3D model is a surface model.
Note
The resulting 3D model shown in Fig. 12.36 is a surface model because
the extrusion was constructed from an outline consisting of lines,
which are individual objects in their own right. If the outline had been a
polyline, the resulting 3D model would have been a solid model.
Fig. 12.36 Example – Dynamic Input
The Sweep tool
To call the Sweep tool, click on its tool icon in the Home/Modeling panel
(Fig. 12.37).
Introducing 3D modelling
245
70
CHAPTER 12
75
10
10
Fig. 12.38 Example
Sweep – the outline to
be swept
Fig. 12.37 Selecting the Sweep tool from the Home/Modeling panel
R77
140
Example – Sweep (Fig. 12.40)
1. Construct the pline outline Fig. 12.38 in the ViewCube/Top view.
2. Change to the ViewCube/Front view, Zoom to 1 and construct a pline
as shown in Fig. 12.39 as a path central to the ellipse.
3. Place the window in a ViewCube/Isometric view and click the Sweep
tool icon (Fig. 12.37). The command line shows:
130
R94
Fig. 12.39 Example
Sweep – the pline path
Command:_sweep
Current wire frame density: ISOLINESϭ4
Select objects to sweep:pick the ellipse 1 found
Select objects to sweep:right-click
Select sweep path or [Alignment/Base point/Scale/
Twist]:pick the pline
Command:
The result is shown in Fig. 12.40.
The Loft Tool
To call the Left tool, click on its icon in the Home/Modeling panel.
Example – Loft (Fig. 12.43)
Fig. 12.40 Example –
Sweep
1. Construct the seven circles shown in Fig. 12.41 at vertical distances of
30 units apart.
2. Place the drawing area in the ViewCube/Isometric view.
3. Call the Loft tool with a click on its tool icon in the Home/Modeling
panel (Fig. 12.42).
CHAPTER 12
246
Introduction to AutoCAD 2010
4. The command line shows:
Command:_loft
Select cross-sections in lofting order:ϽSnap
offϾpick the bottom circle 1 found
Select cross-sections in lofting order:pick the
next circle 1 found, 2 total
Select cross-sections in lofting order:pick the
next circle 1 found, 3 total
Select cross-sections in lofting order:pick the
next circle 1 found, 4 total
∅100
∅80
∅60
∅30
∅60
∅80
∅100
Fig. 12.41 Example Loft – the cross sections
Select cross-sections in
next circle 1 found, 5
Select cross-sections in
next circle 1 found, 6
Select cross-sections in
next circle 1 found, 7
Select cross-sections in
right-click
lofting
total
lofting
total
lofting
total
lofting
order:pick the
order:pick the
order:pick the
order:
And the Loft Settings dialog appears (Fig. 12.43).