Shop manual ô tô NISSAN 2000 Xterra - P10
Bạn đang xem bản rút gọn của tài liệu. Xem và tải ngay bản đầy đủ của tài liệu tại đây (1.05 MB, 36 trang )
ENGINE LUBRICATION &
COOLING SYSTEMS
SECTION
LC
CONTENTS
KA24DE
ENGINE LUBRICATION SYSTEM..................................3
Precautions..................................................................3
SUPPLEMENTAL RESTRAINT SYSTEM (SRS)
″AIR BAG″
.................................................................3
LIQUID GASKET APPLICATION PROCEDURE
............3
Preparation ..................................................................4
SPECIAL SERVICE TOOLS
........................................4
Lubrication Circuit........................................................5
Oil Pressure Check......................................................6
Oil Pump......................................................................6
REMOVAL AND INSTALLATION
.................................6
REGULATOR VALVE INSPECTION
............................7
OIL FILTER
...............................................................7
OIL PUMP INSPECTION
............................................7
Service Data and Specifications (SDS).......................8
OIL PRESSURE CHECK
............................................8
REGULATOR VALVE
.................................................8
OIL PUMP
.................................................................8
ENGINE COOLING SYSTEM..........................................9
Precautions..................................................................9
SUPPLEMENTAL RESTRAINT SYSTEM (SRS)
″AIR BAG″
.................................................................9
LIQUID GASKET APPLICATION PROCEDURE
............9
Preparation ................................................................10
SPECIAL SERVICE TOOLS
......................................10
Cooling Circuit ...........................................................10
System Check............................................................11
CHECKING COOLING SYSTEM HOSES
...................11
CHECKING RADIATOR
............................................11
CHECKING COOLING SYSTEM FOR LEAKS
............11
CHECKING RADIATOR CAP
....................................12
Water Pump...............................................................12
REMOVAL
...............................................................12
INSPECTION
...........................................................12
INSTALLATION
........................................................13
Thermostat.................................................................13
REMOVAL
...............................................................13
INSPECTION
...........................................................13
INSTALLATION
........................................................13
Radiator .....................................................................14
REMOVAL AND INSTALLATION
...............................14
COMPONENTS
.......................................................15
INSPECTION
...........................................................15
Cooling Fan (Crankshaft driven) ...............................16
REMOVAL AND INSTALLATION
...............................16
INSPECTION
...........................................................16
Refilling Engine Coolant............................................16
Overheating Cause Analysis .....................................17
Service Data and Specifications (SDS).....................18
THERMOSTAT
........................................................18
RADIATOR
..............................................................18
VG33E
ENGINE LUBRICATION SYSTEM................................19
Precautions................................................................19
SUPPLEMENTAL RESTRAINT SYSTEM (SRS)
″AIR BAG″
...............................................................19
LIQUID GASKET APPLICATION PROCEDURE
..........19
Preparation ................................................................20
SPECIAL SERVICE TOOLS
......................................20
Lubrication Circuit......................................................20
Oil Pressure Check....................................................21
Oil Pump....................................................................21
REMOVAL AND INSTALLATION
...............................21
DISASSEMBLY AND ASSEMBLY
..............................22
INSPECTION
...........................................................23
REGULATOR VALVE INSPECTION
..........................23
OIL FILTER
.............................................................23
OIL FILTER BRACKET
.............................................24
Service Data and Specifications (SDS).....................24
OIL PRESSURE CHECK
..........................................24
REGULATOR VALVE
...............................................24
OIL PUMP
...............................................................24
ENGINE COOLING SYSTEM........................................25
Precautions................................................................25
SUPPLEMENTAL RESTRAINT SYSTEM (SRS)
″AIR BAG″
...............................................................25
LIQUID GASKET APPLICATION PROCEDURE
..........25
Preparation ................................................................26
GI
MA
EM
EC
FE
CL
MT
AT
TF
PD
AX
SU
BR
ST
RS
BT
HA
SC
EL
IDX
SPECIAL SERVICE TOOLS
......................................26
Cooling Circuit ...........................................................26
System Check............................................................26
CHECKING COOLING SYSTEM HOSES
...................27
CHECKING RADIATOR CAP
....................................27
CHECKING RADIATOR
............................................27
CHECKING COOLING SYSTEM FOR LEAKS
............27
Water Pump...............................................................28
REMOVAL
...............................................................28
INSPECTION
...........................................................29
INSTALLATION
........................................................29
Thermostat.................................................................29
REMOVAL
...............................................................29
INSPECTION
...........................................................30
INSTALLATION
........................................................30
Radiator .....................................................................31
REMOVAL AND INSTALLATION
...............................31
COMPONENTS
.......................................................31
INSPECTION
...........................................................32
Cooling Fan (Crankshaft driven) ...............................32
REMOVAL AND INSTALLATION
...............................32
INSPECTION
...........................................................32
Refilling Engine Coolant............................................34
Overheating Cause Analysis .....................................34
Service Data and Specifications (SDS).....................35
THERMOSTAT
........................................................35
RADIATOR
..............................................................35
CONTENTS
(Cont’d)
LC-2
Precautions
SUPPLEMENTAL RESTRAINT SYSTEM (SRS) “AIR BAG”
NGLC0066
The Supplemental Restraint System “AIR BAG” and “SEAT BELT PRE-TENSIONER”, used along with a seat
belt, helps to reduce the risk or severity of injury to the driver and front passenger in certain types collisions.
The Supplemental Restraint System consists of air bag modules (located in the center of the steering wheel),
a front passenger air bag module (located on the instrument panel on the passenger side), seat belt pre-
tensioners, a diagnosis sensor unit, a crash zone sensor (4WD models), a warning lamp, wiring harness, and
spiral cable.
Information necessary to service the system safely is included in the RS section of this Service Manual.
WARNING:
¼ To avoid rendering the SRS inoperative, which could increase the risk of personal injury or death
in the event of a collision which would result in air bag inflation, all maintenance should be per-
formed by an authorized NISSAN dealer.
¼ Improper maintenance, including incorrect removal and installation of the SRS, can lead to per-
sonal injury caused by unintentional activation of the system. For removal of Spiral Cable and Air
Bag Module, refer to RS-16.
¼ Do not use electrical test equipment on any circuit related to the SRS unless instructed to in this
Service Manual. Spiral cable and wiring harnesses (except “SEAT BEAT PRE-TENSIONER”) cov-
ered with yellow insulation either just before the harness connectors or on the complete harness,
are related to the SRS.
SEM164F
AEM080
LIQUID GASKET APPLICATION PROCEDURE
NGLC0067
1. Use a scraper to remove all traces of old liquid gasket from
mating surfaces and grooves. Also, completely clean any oil
from these areas.
2. Apply a continuous bead of liquid gasket to mating surfaces.
(Use Genuine RTV Silicone Sealant Part No. 999 MP-A7007
or equivalent.)
¼ For oil pan, be sure liquid gasket diameter is 3.5 to 4.5 mm
(0.138 to 0.177 in).
¼ For areas except oil pan, be sure liquid gasket diameter is 2.0
to 3.0 mm (0.079 to 0.118 in).
3. Apply liquid gasket around the inner side of bolt holes (unless
otherwise specified).
4. Assembly should be done within 5 minutes after coating.
5. Wait at least 30 minutes before refilling engine oil and engine
coolant.
GI
MA
EM
EC
FE
CL
MT
AT
TF
PD
AX
SU
BR
ST
RS
BT
HA
SC
EL
IDX
ENGINE LUBRICATION SYSTEM
KA24DE
Precautions
LC-3
Preparation
SPECIAL SERVICE TOOLS
=NGLC0068
The actual shapes of Kent-Moore tools may differ from those of special service tools illustrated here.
Tool number
(Kent-Moore No.)
Tool name
Description
(J34301-C)
Oil pressure gauge set
1: (J34301-1)
Oil pressure gauge
2: (J34301-2)
Hoses
3: (J34298)
Adapter
4: (J34282-1)
Adapter
5: (790-301-1230-A)
60° adapter
6: (J34301-15)
Square socket
AAT896
Measuring oil pressure
Maximum measuring range:
1,379 kPa (14 kg/cm
2
, 200 psi)
WS39930000
( — )
Tube presser
NT052
Pressing the tube of liquid gasket
KV10115801
(J38956)
Oil filter wrench
NT362
Removing oil filter
ENGINE LUBRICATION SYSTEM
KA24DE
Preparation
LC-4
Lubrication Circuit
NGLC0069
ALC116
1. Connecting rod
2. Connecting rod bearing
3. Main bearing
4. Oil filter
5. Oil strainer
6. Oil pump
7. Oil pan
8. Piston oil jet
9. Timing chain tensioner
10. Idler sprocket
11. Upper timing chain tensioner
12. Exhaust camshaft
13. Intake camshaft
GI
MA
EM
EC
FE
CL
MT
AT
TF
PD
AX
SU
BR
ST
RS
BT
HA
SC
EL
IDX
ENGINE LUBRICATION SYSTEM
KA24DE
Lubrication Circuit
LC-5
ALC059
Oil Pressure Check
NGLC0070
WARNING:
¼ Be careful not to burn yourself, as the engine and oil may
be hot.
¼ For M/T models, put gearshift lever in Neutral “N” posi-
tion. For A/T models, put selector lever in Park “P” posi-
tion.
1. Check oil level.
2. Remove oil pressure switch.
3. Install pressure gauge.
4. Start engine and warm it up to normal operating temperature.
5. Check oil pressure with engine running under no-load.
Engine speed Approximate discharge pressure
Idle speed More than 78 kPa (0.8 kg/cm
2
, 11 psi)
3,000 rpm 412 - 481 kPa (4.2 - 4.9 kg/cm
2
,60-
70 psi)
¼ If difference is extreme, check oil passage and oil pump
for oil leaks.
6. Install oil pressure switch with sealant.
: 12.25 – 17.15 N·m (1.3 – 1.7 kg-m, 9 – 12 ft-lb)
Oil Pump
REMOVAL AND INSTALLATION
NGLC0071
SLC945-A
ENGINE LUBRICATION SYSTEM
KA24DE
Oil Pressure Check
LC-6
ALC054
¼ Always replace with new oil seal and gasket.
¼ When removing oil pump, turn crankshaft so that No. 1
piston is at TDC on its compression stroke.
¼ When installing oil pump, apply engine oil to gears, then
align punchmark on drive spindle and oil hole on oil
pump.
ALC058
REGULATOR VALVE INSPECTION
NGLC0072
1. Visually inspect components for wear and damage.
2. Check oil pressure regulator valve sliding surface and valve
spring.
3. Coat regulator valve with engine oil. Check that it falls
smoothly into the valve hole by its own weight.
¼ Replace regulator valve set or oil pump assembly, if dam-
aged.
ALC124
OIL FILTER
NGLC0073
The oil filter is a small, full-flow cartridge type and is provided with
a relief valve.
¼ The new and previous oil filter designs differ from each
other and are not interchangeable.
¼ Use Tool KV10115801 (J38956) for removing oil filter.
SLC026
SLC732
OIL PUMP INSPECTION
NGLC0074
Using a feeler gauge, check the following clearances.
Standard clearance:
Unit: mm (in)
Rotor tip clearance 1 Less than 0.12 (0.0047)
Outer rotor to body clearance 2 0.15 - 0.21 (0.0059 - 0.0083)
Side clearance (with gasket) 3 0.04 - 0.100 (0.0016 - 0.0039)
¼ If the tip clearance (1) exceeds the limit, replace gear set.
¼ If body to gear clearances (2, 3) exceed the limit, replace
oil pump assembly.
GI
MA
EM
EC
FE
CL
MT
AT
TF
PD
AX
SU
BR
ST
RS
BT
HA
SC
EL
IDX
ENGINE LUBRICATION SYSTEM
KA24DE
Oil Pump (Cont’d)
LC-7
Service Data and Specifications (SDS)
OIL PRESSURE CHECK
NGLC0075
Engine speed Approximate discharge pressure
Idle speed More than 78 kPa (0.8 kg/cm
2
, 11 psi)
3,000 rpm 412 - 481 kPa (4.2 - 4.9 kg/cm
2
, 60 - 70 psi)
REGULATOR VALVE
NGLC0131
Unit: mm (in)
Regulator valve to oil pump cover clearance 0.040 - 0.097 (0.0016 - 0.0038)
OIL PUMP
NGLC0076
Unit: mm (in)
Rotor tip clearance Less than 0.12 (0.0047)
Outer rotor to body clearance 0.15 - 0.21 (0.0059 - 0.0083)
Side clearance (with gasket) 0.04 - 0.100 (0.0016 - 0.0039)
ENGINE LUBRICATION SYSTEM
KA24DE
Service Data and Specifications (SDS)
LC-8
Precautions
SUPPLEMENTAL RESTRAINT SYSTEM (SRS) “AIR BAG”
NGLC0133
The Supplemental Restraint System “AIR BAG” and “SEAT BELT PRE-TENSIONER”, used along with a seat
belt, helps to reduce the risk or severity of injury to the driver and front passenger in certain types collisions.
The Supplemental Restraint System consists of air bag modules (located in the center of the steering wheel),
a front passenger air bag module (located on the instrument panel on the passenger side), seat belt pre-
tensioners, a diagnosis sensor unit, a crash zone sensor (4WD models), a warning lamp, wiring harness, and
spiral cable.
Information necessary to service the system safely is included in the RS section of this Service Manual.
WARNING:
¼ To avoid rendering the SRS inoperative, which could increase the risk of personal injury or death
in the event of a collision which would result in air bag inflation, all maintenance should be per-
formed by an authorized NISSAN dealer.
¼ Improper maintenance, including incorrect removal and installation of the SRS, can lead to per-
sonal injury caused by unintentional activation of the system. For removal of Spiral Cable and Air
Bag Module, refer to RS-16.
¼ Do not use electrical test equipment on any circuit related to the SRS unless instructed to in this
Service Manual. Spiral cable and wiring harnesses (except “SEAT BEAT PRE-TENSIONER”) cov-
ered with yellow insulation either just before the harness connectors or on the complete harness,
are related to the SRS.
SEM164F
AEM080
LIQUID GASKET APPLICATION PROCEDURE
NGLC0109
1. Use a scraper to remove all traces of old liquid gasket from
mating surfaces and grooves. Also, completely clean any oil
from these areas.
2. Apply a continuous bead of liquid gasket to mating surfaces.
(Use Genuine RTV Silicone Sealant Part No. 999 MP-A7007
or equivalent.)
¼ For oil pan, be sure liquid gasket diameter is 3.5 to 4.5 mm
(0.138 to 0.177 in).
¼ For areas except oil pan, be sure liquid gasket diameter is 2.0
to 3.0 mm (0.079 to 0.118 in).
3. Apply liquid gasket around the inner side of bolt holes (unless
otherwise specified).
4. Assembly should be done within 5 minutes after coating.
5. Wait at least 30 minutes before refilling engine oil and engine
coolant.
GI
MA
EM
EC
FE
CL
MT
AT
TF
PD
AX
SU
BR
ST
RS
BT
HA
SC
EL
IDX
ENGINE COOLING SYSTEM
KA24DE
Precautions
LC-9
Preparation
SPECIAL SERVICE TOOLS
=NGLC0110
The actual shapes of Kent-Moore tools may differ from those of special service tools illustrated here.
Tool number
(Kent-Moore No.)
Tool name
Description
EG17650301
(J33984-A)
Radiator cap tester
adapter
NT564
Adapting radiator cap tester to radiator filler neck
a: 28 (1.10) dia.
b: 31.4 (1.236) dia.
c: 41.3 (1.626) dia.
Unit: mm (in)
WS39930000
( — )
Tube presser
NT052
Pressing the tube of liquid gasket
Cooling Circuit
NGLC0111
ALC117
ENGINE COOLING SYSTEM
KA24DE
Preparation
LC-10
System Check
NGLC0112
WARNING:
Never remove the radiator cap when the engine is hot. Serious
burns could occur from high pressure coolant escaping from
the radiator.
Wrap a thick cloth around the radiator cap. Slowly turn it a
quarter turn to allow built-up pressure to escape. Carefully
remove the radiator cap by turning it all the way.
CHECKING COOLING SYSTEM HOSES
NGLC0112S01
Check hoses for the following:
¼ Improper attachment
¼ Leaks
¼ Cracks
¼ Damage
¼ Chafing
¼ Deterioration
CHECKING RADIATOR
NGLC0112S02
Check radiator for mud or clogging. If necessary, clean radiator as
follows.
¼ Be careful not to bend or damage the radiator fins.
¼ When radiator is cleaned without removal, remove all sur-
rounding parts such as cooling fan, radiator shroud and horns.
¼ Tape the harness connectors to prevent water from entering.
1. Apply water by hose to the back side of the radiator core ver-
tically downward.
2. Apply water again to all radiator core surfaces once per
minute.
3. Stop washing when stains no longer flow out from the radia-
tor.
4. Blow air into the back side of radiator core vertically downward.
¼ Use compressed air lower than 490 kPa (5 kg/cm
2
, 71 psi) and
keep distance more than 30 cm (11.8 in).
5. Blow air again into all the radiator core surfaces once per
minute until no water sprays out.
SLC756A
CHECKING COOLING SYSTEM FOR LEAKS
NGLC0112S03
To check for leakage, apply pressure to the cooling system with a
radiator cap tester.
Testing pressure:
157 kPa (1.6 kg/cm
2
, 23 psi)
CAUTION:
Higher pressure than specified may cause radiator damage.
GI
MA
EM
EC
FE
CL
MT
AT
TF
PD
AX
SU
BR
ST
RS
BT
HA
SC
EL
IDX
ENGINE COOLING SYSTEM
KA24DE
System Check
LC-11
SLC755A
CHECKING RADIATOR CAP
NGLC0112S04
To check radiator cap, apply pressure to radiator cap with a radia-
tor cap tester.
Radiator cap relief pressure:
Standard
78 - 98 kPa (0.8 - 1.0 kg/cm
2
, 11 - 14 psi)
Limit
59 - 98 kPa (0.6 - 1.0 kg/cm
2
,9-14psi)
SMA967B
Pull the negative pressure valve to open it.
Check that it closes completely when released.
ALC077
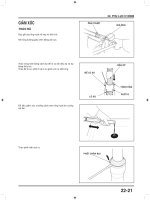
Water Pump
REMOVAL
NGLC0113
CAUTION:
¼ When removing water pump assembly, be careful not to
get coolant on drive belts.
¼ Water pump cannot be disassembled and should be
replaced as a unit.
¼ After installing water pump, connect hose and clamp
securely. Check for leaks using radiator cap tester.
1. Drain coolant from engine.
Refer to MA-18 (“Changing Engine Coolant”, “ENGINE MAIN-
TENANCE”).
2. Remove fan coupling with fan.
3. Remove power steering pump drive belt, generator drive belt
and A/C compressor drive belt.
4. Remove water pump.
SLC738
INSPECTION
NGLC0114
¼ Check body assembly for rust or corrosion.
¼ Check for rough operation due to excessive end play.
ENGINE COOLING SYSTEM
KA24DE
System Check (Cont’d)
LC-12
SLC188A
INSTALLATION
NGLC0115
1. Use a scraper to remove liquid gasket from water pump.
¼ Also remove traces of liquid gasket from mating surface
of cylinder block.
ALC078
2. Apply a continuous bead of liquid gasket to mating surface of
water pump.
¼ Use Genuine RTV Silicone Sealant Part No. 999 MP-A7007
or equivalent.
When filling radiator with coolant, refer to MA-18 (“Changing
Engine Coolant”, “ENGINE MAINTENANCE”).
When installing drive belts, refer to MA-17 (“Checking Drive
Belts”).
ALC087
Thermostat
REMOVAL
NGLC0116
¼ Be careful not to spill coolant over engine compartment.
Use a rag to absorb coolant.
1. Drain coolant from engine. Refer to MA-18 (“Changing Engine
Coolant”, “ENGINE MAINTENANCE”).
2. Remove air cleaner and air duct assembly.
3. Remove water hose from water inlet housing.
4. Remove water inlet housing, then take out thermostat.
SLC343
INSPECTION
NGLC0117
1. Check valve seating condition at normal room temperature. It
should seat tightly.
2. Check valve opening temperature and valve lift.
Valve opening temperature 76.5°C (170°F)
Valve lift More than 8 mm/90°C (0.31 in/194°F)
3. Check if valve closes at 5°C(9°F) below valve opening
temperature.
ALC088
INSTALLATION
NGLC0118
1. Use a scraper to remove old liquid gasket from water inlet.
¼ Also remove traces of liquid gasket from mating surface
of front cover.
2. Apply a continuous bead of liquid gasket to mating surface of
water inlet.
¼ Use Genuine RTV Silicone Sealant Part No. 999 MP-A7007
or equivalent.
GI
MA
EM
EC
FE
CL
MT
AT
TF
PD
AX
SU
BR
ST
RS
BT
HA
SC
EL
IDX
ENGINE COOLING SYSTEM
KA24DE
Water Pump (Cont’d)
LC-13
SLC097
3. Install thermostat with jiggle valve or air bleeder at upper side.
4. Install water inlet housing.
5. Install water hose to water inlet housing.
6. Install air cleaner and air duct assembly.
7. Refill engine coolant. Refer to MA-18 (“Changing Engine
Coolant”, “ENGINE MAINTENANCE”).
¼ After installation, run engine for a few minutes and check
for leaks.
Radiator
REMOVAL AND INSTALLATION
NGLC0119
1. Remove under cover.
2. Drain coolant from radiator. Refer to MA-18 (“Changing Engine
Coolant”, “ENGINE MAINTENANCE”).
3. Disconnect upper and lower radiator hoses.
4. Remove air cleaner and air duct assembly.
5. Remove lower radiator shroud.
6. Remove radiator shroud.
7. Remove A/T oil cooler hoses (A/T models only).
8. Disconnect coolant reservoir hose.
9. Remove radiator.
10. After replacing radiator, install all parts in reverse order of
removal.
11. Refill engine coolant. Refer to MA-18 (“Changing Engine
Coolant”, “ENGINE MAINTENANCE”).
¼ After installation, run engine for a few minutes, and check
for leaks.
ENGINE COOLING SYSTEM
KA24DE
Thermostat (Cont’d)
LC-14