Exam ref 70 412 configuring advanced windows server 2012 r2 services
Bạn đang xem bản rút gọn của tài liệu. Xem và tải ngay bản đầy đủ của tài liệu tại đây (28.01 MB, 385 trang )
spine = .75”
Prepare for Microsoft Exam 70-410—and help demonstrate your
real-world mastery of implementing and configuring Windows
Server 2012 core services. Designed for experienced IT professionals
ready to advance their status, Exam Ref focuses on the critical
thinking and decision-making acumen needed for success at the
MCSA level.
This Microsoft Exam Ref:
• Organizes its coverage by exam objectives.
• Features strategic, what-if scenarios to challenge you.
• Includes a 15% exam discount from Microsoft.
Offer expires 12/31/XXXX. Details inside.
About the Exam
Exam 70-410 is one of three Microsoft
exams focused on the skills and
knowledge necessary to implement a
core Windows Server 2012 infrastructure
into an existing enterprise environment.
About Microsoft
Certification
The new Microsoft Certified Solutions
Associate (MCSA) certifications validate
the core technical skills required to build
a sustainable career in IT.
Exams 70-410, 70-411, and 70-412 are
required for the MCSA: Windows Server
2012 certification.
See full details at:
microsoft.com/learning/certification
About the Author
Craig Zacker is an educator and editor who has written or contributed to
dozens of books on operating systems,
networking, and PC hardware. He is
coauthor of the Microsoft Training Kit
for Exam 70-686 and author of
Windows Small Business Server 2011
Administrator’s Pocket Consultant.
Advanced Windows Store App
Development Using HTML5 and JavaScript
Focus on the expertise measured by these
objectives:
• Install and Configure Servers
• Configure Server Roles and Features
• Configure Hyper-V
• Deploy and Configure Core Network Services
• Install and Administer Active Directory
• Create and Manage Group Policy
Advanced Windows Store
App Development Using
HTML5 and JavaScript
Exam Ref
70-482
Exam Ref 70-482
Author
Author
Author
Configuring
Advanced
Windows Server
2012 R2 Services
Exam Ref 70 412
2p
microsoft.com/mspress
ISBN: 978-0-7356-xxxx-x
90000
U.S.A.$39.99
Canada $41.99
[Recommended]
0
000000 000000
Certification/Windows Server
Celebrating 30 years!
J.C. Mackin
Orin Thomas
Exam Ref 70-412:
Configuring Advanced
Windows Server 2012 R2
Services
J.C. Mackin
Orin Thomas
PUBLISHED BY
Microsoft Press
A Division of Microsoft Corporation
One Microsoft Way
Redmond, Washington 98052-6399
Copyright © 2014 by J.C. Mackin (Content); Orin Thomas (Content)
All rights reserved. No part of the contents of this book may be reproduced or transmitted in any form or by any
means without the written permission of the publisher.
Library of Congress Control Number: 2014931891
ISBN: 978-0-7356-7361-8
Printed and bound in the United States of America.
First Printing
Microsoft Press books are available through booksellers and distributors worldwide. If you need support related
to this book, email Microsoft Press Book Support at Please tell us what you think of
this book at />Microsoft and the trademarks listed at />EN-US.aspx are trademarks of the Microsoft group of companies. All other marks are property of their respective
owners.
The example companies, organizations, products, domain names, email addresses, logos, people, places, and
events depicted herein are fictitious. No association with any real company, organization, product, domain name,
email address, logo, person, place, or event is intended or should be inferred.
This book expresses the author’s views and opinions. The information contained in this book is provided without
any express, statutory, or implied warranties. Neither the authors, Microsoft Corporation, nor its resellers, or
distributors will be held liable for any damages caused or alleged to be caused either directly or indirectly by
this book.
Acquisitions Editor: Anne Hamilton
Developmental Editor: Karen Szall
Editorial Production: Box Twelve Communications
Technical Reviewer: Brian Svidergol
Cover: Twist Creative • Seattle
Contents at a glance
Introductionxi
Preparing for the exam
xiii
Chapter 1
Configure and manage high availability
1
Chapter 2
Configure file and storage solutions
Chapter 3
Implement business continuity and disaster recovery
Chapter 4
Configure network services
215
Chapter 5
Configure the Active Directory infrastructure
267
Chapter 6
Configure access and information protection solutions
309
83
151
Index349
Contents
Introductionix
Microsoft certifications
ix
Errata & book support
x
We want to hear from you
x
Stay in touch
x
Preparing for the exam
xi
Chapter 1 Configure and manage high availability
1
Objective 1.1: Configure Network Load Balancing (NLB) . . . . . . . . . . . . . . . 1
Network Load Balancing fundamentals
2
Creating and configuring an NLB cluster
3
Configuring port rules
8
Upgrading an NLB cluster
14
Objective summary
16
Objective review
16
Objective 1.2: Configure failover clustering. . . . . . . . . . . . . . . . . . . . . . . . . . 17
Understanding failover clustering
18
Creating a failover cluster
20
Configuring cluster networking
23
Using Active Directory Detached Clusters
24
Configuring cluster storage
25
Configuring Quorum
32
Implementing Cluster Aware Updating
34
Migrating a failover cluster
38
Objective summary
40
Objective review
41
What do you think of this book? We want to hear from you!
Microsoft is interested in hearing your feedback so we can continually improve our
books and learning resources for you. To participate in a brief online survey, please visit:
www.microsoft.com/learning/booksurvey/
v
Objective 1.3: Manage failover clustering roles . . . . . . . . . . . . . . . . . . . . . . 42
Configuring roles
42
Assigning role startup priorities
48
Using node drain
49
Monitoring services on clustered virtual machines
50
Objective summary
54
Objective review
55
Objective 1.4: Manage virtual machine (VM) movement. . . . . . . . . . . . . . 56
Performing a live migration
57
Additional migration considerations
66
Using storage migration
70
Configuring virtual machine network health protection
72
Configuring drain on shutdown
73
Objective summary
74
Objective review
74
Answers. . . . . . . . . . . . . . . . . . . . . . . . . . . . . . . . . . . . . . . . . . . . . . . . . . . . . . . . . 77
Chapter 2 Configure file and storage solutions
83
Objective 2.1: Configure advanced file services . . . . . . . . . . . . . . . . . . . . . . 83
What is BranchCache?
84
Configuring BranchCache
87
Using File Server Resource Manager (FSRM)
92
Implementing file access auditing
95
Installing the Server for NFS component
96
Objective summary
98
Objective review
99
Objective 2.2: Implement Dynamic Access Control (DAC) . . . . . . . . . . . . 100
Introducing DAC
101
Configuring claims-based authentication
103
Configuring file classification
107
Configuring access policies
118
Objective summary
124
Objective review
124
Objective 2.3: Configure and optimize storage. . . . . . . . . . . . . . . . . . . . . . 126
iSCSI storage
vi
Contents
126
Using Features on Demand
136
Installing the Data Deduplication component
139
Using storage tiers
142
Objective summary
144
Objective review
144
Answers. . . . . . . . . . . . . . . . . . . . . . . . . . . . . . . . . . . . . . . . . . . . . . . . . . . . . . . . 146
Chapter 3 Implement business continuity and disaster recovery151
Objective 3.1: Configure and manage backups. . . . . . . . . . . . . . . . . . . . . . 151
Using the Windows Server Backup feature
152
Understanding Backup Operators
160
Using the Shadow Copies feature (Previous Versions)
160
Configuring Windows Azure Backup
162
Objective summary
171
Objective review
172
Objective 3.2: Recover servers. . . . . . . . . . . . . . . . . . . . . . . . . . . . . . . . . . . . 174
Using the Advanced Boot Options menu
174
Recovering servers with the Windows installation media
178
Objective summary
184
Objective review
185
Objective 3.3: Configure site-level fault tolerance. . . . . . . . . . . . . . . . . . . 186
Configuring Hyper-V physical host servers
186
Configuring VMs
190
Performing Hyper-V Replica failover
197
Using Hyper-V Replica in a failover cluster
201
Configuring Hyper-V Replica Extended Replication
204
Using Global Update Manager
205
Recovering multi-site failover clusters
206
Objective summary
207
Objective review
208
Answers. . . . . . . . . . . . . . . . . . . . . . . . . . . . . . . . . . . . . . . . . . . . . . . . . . . . . . . . 210
Chapter 4 Configure network services
215
Objective 4.1: Implement an advanced DHCP solution. . . . . . . . . . . . . . . 215
Creating and configuring superscopes and multicast scopes
216
Implementing DHCPv6
218
Contents
vii
Configuring high availability for DHCP
222
Configuring DNS registration
223
Configuring DHCP Name Protection
224
Objective summary
226
Objective review
227
Objective 4.2: Implement an advanced DNS solution. . . . . . . . . . . . . . . . 228
Implementing DNSSEC
229
Configuring DNS Socket Pool
230
Configuring DNS cache locking
230
Configuring DNS logging
231
Configuring delegated administration
232
Configuring recursion
233
Configuring netmask ordering
234
Configuring a GlobalNames zone
235
Analyzing zone-level statistics
235
Objective summary
237
Objective review
238
Objective 4.3: Deploy and manage IPAM. . . . . . . . . . . . . . . . . . . . . . . . . . . 239
Understanding IPAM
239
Installing and configuring IPAM
240
Managing address space
250
Configuring IPAM database storage
258
Objective summary
260
Objective review
260
Answers. . . . . . . . . . . . . . . . . . . . . . . . . . . . . . . . . . . . . . . . . . . . . . . . . . . . . . . . 262
Chapter 5 Configure the Active Directory infrastructure
267
Objective 5.1: Configure a forest or a domain. . . . . . . . . . . . . . . . . . . . . . . 267
viii
Contents
Implementing multi-domain Active Directory environments
268
Implementing multi-forest Active Directory environments
269
Configuring interoperability with previous versions of
Active Directory
270
Upgrading existing domains and forests
271
Configuring multiple user principal name (UPN) suffixes
272
Objective summary
274
Objective review
275
Objective 5.2: Configure trusts. . . . . . . . . . . . . . . . . . . . . . . . . . . . . . . . . . . . 276
Understanding trust concepts
276
Configuring external trusts and realm trusts
277
Configuring forest trusts
278
Configuring shortcut trusts
279
Configuring trust authentication
280
Configuring Security IDentifier (SID) filtering
280
Configuring name suffix routing
281
Objective summary
282
Objective review
283
Objective 5.3: Configure sites. . . . . . . . . . . . . . . . . . . . . . . . . . . . . . . . . . . . . 284
Configuring sites and subnets
284
Creating and configuring site links
287
Managing registration of SRV records
290
Moving domain controllers between sites
291
Objective summary
293
Objective review
293
Objective 5.4: Manage Active Directory and SYSVOL replication. . . . . . 294
Configuring replication to Read-Only Domain Controllers (RODCs)
295
Monitoring and managing replication
298
Upgrading SYSVOL replication to Distributed File System Replication (DFSR)
300
Objective summary
301
Objective review
302
Answers. . . . . . . . . . . . . . . . . . . . . . . . . . . . . . . . . . . . . . . . . . . . . . . . . . . . . . . . 303
Chapter 6 Configure access and information protection
solutions
309
Objective 6.1: Implement Active Directory Federation Services (AD FS) . . . 309
Installing AD FS
310
Implementing claims-based authentication
310
Configuring authentication policies
312
Configuring Workplace Join
313
Configuring multi-factor authentication
315
Objective summary
316
Objective review
317
Contents
ix
Objective 6.2: Install and configure Active Directory
Certificate Services (AD CS) . . . . . . . . . . . . . . . . . . . . . . . . . . . . . . . . . . . 318
Installing an Enterprise Certificate Authority (CA)
318
Configuring CRL Distribution Points (CDP)
322
Installing and configuring online responders
323
Implementing administrative role separation
323
Configuring CA backup and recovery
325
Objective summary
327
Objective review
327
Objective 6.3: Manage certificates . . . . . . . . . . . . . . . . . . . . . . . . . . . . . . . . 328
Managing certificate templates
328
Implementing and managing certificate validation and
revocation330
Managing certificate enrollment
331
Managing certificate renewal
332
Configuring and managing key archival and recovery
332
Implementing and managing certificate deployment
334
Objective summary
335
Objective review
336
Objective 6.4: Install and configure Active Directory Rights
Management Services (AD RMS) . . . . . . . . . . . . . . . . . . . . . . . . . . . . . . . 337
Installing a licensing or certificate AD RMS server
337
Managing AD RMS Service Connection Point (SCP)
338
Managing RMS templates
339
Configuring exclusion policies
340
Backing up and restoring AD RMS
341
Objective summary
342
Objective review
343
Answers. . . . . . . . . . . . . . . . . . . . . . . . . . . . . . . . . . . . . . . . . . . . . . . . . . . . . . . . 344
Index349
What do you think of this book? We want to hear from you!
Microsoft is interested in hearing your feedback so we can continually improve our
books and learning resources for you. To participate in a brief online survey, please visit:
www.microsoft.com/learning/booksurvey/
x
Contents
Introduction
Unlike other exams in the MCSA track, the Microsoft 70-412 certification exam deals with
advanced topics such as Active Directory Rights Management Services and Active Directory
Federation Services. Much of the exam comprises topics that even experienced systems administrators encounter less frequently than they encounter core infrastructure technologies,
like Active Directory Domain Services and Windows Deployment Services.
Candidates for this exam are Information Technology (IT) Professionals who want to
validate their advanced Windows Server 2012 R2 operating system configuration skills and
knowledge. To pass this exam, candidates require strong understanding of how to configure and manage Windows Server 2012 R2 high availability, file and storage solutions, business and disaster recovery, network services, Active Directory infrastructure, and access and
information protection solutions. To pass this exam, candidates require a thorough theoretical understanding as well as meaningful practical experience implementing the technologies involved. If you lack this experience, consider using the Microsoft Press companion
title, Training Guide: Configuring Advanced Windows Server 2012 R2 Services, which contains
extensive practical lab exercises.
This Exam Reference book covers every exam objective, but it does not cover every exam
question. Only the Microsoft exam team has access to the exam questions and Microsoft
regularly adds new questions to the exam, making it impossible to cover specific questions.
You should consider this book a supplement to your relevant real-world experience and other
study materials. If you encounter a topic in this book that you do not feel completely comfortable with, use the links you’ll find in text to find more information and take the time to
research and study the topic. Great information is available on TechNet as well as in product
team blogs and online forums.
Microsoft certifications
Microsoft certifications distinguish you by proving your command of a broad set of skills and
experience with current Microsoft products and technologies. The exams and corresponding
certifications are developed to validate your mastery of critical competencies as you design
and develop, or implement and support, solutions with Microsoft products and technologies
both on-premises and in the cloud. Certification brings a variety of benefits to the individual
and to employers and organizations.
xi
MORE INFO ALL MICROSOFT CERTIFICATIONS
For information about Microsoft certifications, including a full list of available certifications, go to />
Errata & book support
We’ve made every effort to ensure the accuracy of this book and its companion content. Any
errors that have been reported since this book was published are listed at:
/>If you find an error that is not already listed, you can report it to us through the same
page.
If you need additional support, email Microsoft Press Book Support at
Please note that product support for Microsoft software is not offered through the addresses above.
We want to hear from you
At Microsoft Press, your satisfaction is our top priority, and your feedback our most valuable
asset. Please tell us what you think of this book at:
/>The survey is short, and we read every one of your comments and ideas. Thanks in advance for your input!
Stay in touch
Let’s keep the conversation going! We’re on Twitter: />
xii Introduction
Preparing for the exam
Microsoft certification exams are a great way to build your resume and let the world know
about your level of expertise. Certification exams validate your on-the-job experience and
product knowledge. While there is no substitution for on-the-job experience, preparation
through study and hands-on practice can help you prepare for the exam. We recommend
that you round out your exam preparation plan by using a combination of available study
materials and courses. For example, you might use the Training Guide and another study
guide for your “at home” preparation and take a Microsoft Official Curriculum course for the
classroom experience. Choose the combination that you think works best for you.
Preparing for the exam xiii
CHAPTER 1
Configure and manage
high availability
This domain relates to multi-server features that help selected services and applications
remain online and responsive to clients. These features include Network Load Balancing,
failover clustering, and the live migration of virtual machines (VMs). Understanding the
topics covered in this domain requires a deep understanding of new technologies that
you might not have implemented in your own environment. You should supplement the
information in this chapter with some hands-on practice so that you can develop an understanding of how you can use these technologies to address
real-world scenarios and solve problems in an advanced
important
server environment.
Have you read
page xv?
Objectives in this chapter:
■■
Objective 1.1: Configure Network Load Balancing
(NLB)
■■
Objective 1.2: Configure failover clustering
■■
Objective 1.3: Manage failover clustering roles
■■
Objective 1.4: Manage virtual machine (VM) movement
It contains valuable
information regarding
the skills you need to
pass the exam.
Objective 1.1: Configure Network Load Balancing
(NLB)
Network Load Balancing (NLB) is a Windows Server feature that lets you make a group of
servers appear as one server to external clients. This group of servers joined through NLB is
called an NLB cluster or a server farm, and each member server in the farm is usually called
a host or node. The purpose of NLB is to improve both the availability and scalability of a
service hosted on all the individual nodes.
NLB is surprisingly easy to get up and running in a default configuration. However, for
the purposes of the 70-412 exam, you need to understand more than the basics about NLB.
Make sure you also learn about the advanced configuration choices for the feature, such as
priority settings and all port rule settings.
1
This objective covers how to:
■■
Install NLB nodes
■■
Configure NLB prerequisites
■■
Configure affinity
■■
Configure port rules
■■
Configure cluster operation mode
■■
Upgrade an NLB cluster
Network Load Balancing fundamentals
NLB improves both the availability and scalability of a service by receiving all client requests
and distributing them among two or more servers. To each client, an NLB cluster just looks
like a single server assigned one name and one address.
In the most typical scenario, NLB is used to create a web farm—a group of computers
running Windows Server and working to support a website or a web application. But you can
also use NLB to create other types of server farms: Remote Desktop Server farms, VPN server
farms, or proxy server/firewall farms. Figure 1-1 shows a deployment of an NLB cluster of
servers running Internet Information Services (IIS) behind an NLB cluster of servers running
Forefront Threat Management Gateway (TMG).
Server running Forefront TMG
Servers running IIS
LAN (ethernet)
Internet
LAN (ethernet)
To data storage
Server running Forefront TMG
Servers running IIS
2-host NLB cluster
4 -host NLB cluster
FIGURE 1-1 Basic diagram for two connected NLB clusters
First, NLB improves the availability of a service by absorbing individual server failures and
hiding these failures from clients. NLB automatically detects servers that are unresponsive or
disconnected from the farm and then redistributes new client requests among the remaining
2
CHAPTER 1
Configure and manage high availability
live hosts. Second, NLB supports scalability because a group of servers can handle more client
requests than a single server can. And as the demand for a service such as a website grows,
you can keep adding more servers to the farm so that it can handle an even greater workload.
An important point to understand about NLB is that each individual client is directed to
exactly one server in the NLB cluster. The client therefore gets just the processing, memory,
and storage resources of that one host only. Each node in the NLB cluster works independently without access to the resources in the other servers, and changes made on one server
are not copied to other nodes in the farm. You use NLB to support what are termed stateless applications. You shouldn’t use NLB with stateful applications such as database servers
that allow individual clients to update data because such an arrangement would result in an
inconsistent experience from client to client.
Creating and configuring an NLB cluster
Next, install the Network Load Balancing feature on the servers. You can install the NLB
feature by using the Add Roles and Features Wizard available in Server Manager. On the
70-412 exam, you’re more likely to need to know how to install this feature by using Windows
PowerShell. To do that, type the following at an elevated Windows PowerShell prompt:
Install-WindowsFeature NLB -IncludeManagementTools
NOTE ALIASES
Add-WindowsFeature is an alias of Install-WindowsFeature, and Remove-WindowsFeature
is an alias of Uninstall-WindowsFeature.
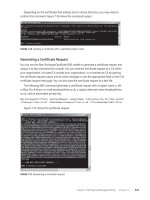
After you install the NLB feature with the management tools, you need to configure the
NLB cluster by using either the Network Load Balancing Manager graphical tool or Windows
PowerShell. You can access Network Load Balancing Manager from the Tools menu of Server
Manager. You can also open Network Load Balancing Manager by typing Nlbmgr at a
command prompt.
EXAM TIP
In Windows Server 2012 R2, management tools are not always installed alongside the
associated roles or features as they were in previous versions of Windows Server. A management tool is installed by default only when you install the associated role or feature by
using the Add Roles and Features Wizard. If you use the Install-WindowsFeature cmdlet to
install a role or feature, the associated management tool is not automatically installed. To
install the tool with the role or feature, use the -IncludeManagementTools option. When
managing multiple servers from a single server, also known as fan-out administration,
you’re likely to install management tools for remote roles and features on the local server
or even on the desktop computer running Windows 8.1 that you are using on a day-to-day
basis as a systems administrator.
Objective 1.1: Configure Network Load Balancing (NLB)
CHAPTER 1
3
To start the New Cluster Wizard, in the Network Load Balancing Manager console tree,
right-click Network Load Balancing Clusters and then click New Cluster as shown in Figure
1-2. Note that even though the user interface refers an NLB cluster as simply a “cluster,” on
the 70-412 exam, you are much more likely to see such a cluster called specifically an “NLB
cluster” or a “farm.”
FIGURE 1-2 Creating a new NLB cluster
The first page of the New Cluster Wizard is the New Cluster: Connect page, shown in
Figure 1-3. This page first requires you to connect to a server on which you have installed the
NLB feature. After connecting to a server, you choose an interface on that server to use for
NLB traffic. It’s fine for testing purposes if the server you want to add to the NLB cluster has
only one network interface—you can technically share one interface for NLB and normal network communication. But in a production environment, you normally want to reserve for NLB
a dedicated network adapter on every node and then assign these interfaces to one separate
network segment that has its own connection to the local router. Whether you reserve a
dedicated interface to NLB or not, the interface you do assign to NLB must be given a static
address. You will later assign this interface a second IP address that will be shared by every
node in the NLB cluster.
4
CHAPTER 1
Configure and manage high availability
FIGURE 1-3 Specifying an interface reserved for NLB cluster traffic
The second page of the wizard is the New Cluster: Host Parameters page, shown in
Figure 1-4. The settings on this page apply only to the local host (node), not to the entire NLB
cluster.
FIGURE 1-4 The second page of the New Cluster Wizard
There are essentially three configuration areas on this page: Priority (Unique Host
Identifier), Dedicated IP Addresses, and Initial Host State.
Objective 1.1: Configure Network Load Balancing (NLB)
CHAPTER 1
5
■■
■■
■■
Priority (Unique Host Identifier) The Priority setting is a value from 1 to 32 that is
unique to each host in the NLB cluster. The value 1 is given to the host with the highest priority. This priority value determines which node in the NLB cluster will handle
network traffic that is not load balanced (in other words, not covered by the port rules
you create later in the wizard). If the host with the highest priority is not available, the
host with the next highest priority handles this non-load-balanced traffic. Also known
as the Host Priority setting.
Dedicated IP Addresses Here you can modify the local IP address or set of
addresses that the host connects to the NLB cluster. You would normally need to adjust
the default IP addresses here only if you’ve assigned more than one IP address to
the interface you already dedicated to NLB. Remember, the IP addresses we’re talking about on this page aren’t assigned to the cluster as a whole. They’re used for the
local host only. These dedicated IP addresses you assign to the individual hosts in an
NLB cluster must all be located on one logical subnet and be reachable externally as
necessary through a working routed pathway or from the local network segment.
Initial Host State Here you can set the default state of the local node within the NLB
cluster. The options are Started (the default), Suspended, or Stopped. As you can see
in Figure 1-4, you can also enable the option to retain the suspended state after the
computer restarts.
Now you get to choose the virtual IP address or addresses that will be assigned to the
entire server farm as a whole. The “virtual” cluster address or addresses you choose here must
be on the same logical subnet as the “dedicated” host IP address or addresses you just chose
on the previous page.
The New Cluster: Cluster IP Addresses page is shown in Figure 1-5.
FIGURE 1-5 Assigning a virtual IP address to an NLB cluster
6
CHAPTER 1
Configure and manage high availability
During setup, you use the New Cluster: Cluster Parameters page, shown in Figure 1-6, to
configure the cluster’s IP address, subnet mask, fully qualified domain name, network address,
and cluster operation mode. These settings can be modified after the cluster is created.
FIGURE 1-6 The fourth page of the New Cluster Wizard
This page includes a Cluster IP Configuration area at the top and a Cluster Operation
Mode at the bottom.
■■
■■
Cluster IP Configuration These settings are easy to understand. Here you just verify
the virtual IP address and add a Fully Qualified Domain Name (FQDN) for the entire
NLB cluster in the Full Internet Name text box. But you should also note the Network
Address value: It’s a virtual MAC address assigned to all network adapters that you
have dedicated to the NLB cluster.
Cluster Operation Mode The meaning of this setting is a bit less obvious. In it you
set the new NLB cluster’s operation mode to Unicast, Multicast, or IGMP Multicast.
Let’s go over what these mean in this context:
■■
■■
■■
Unicast: Unicast mode (the default) allows the NLB cluster’s MAC address to completely replace each host adapter’s MAC address. This setting is technically efficient,
but it’s incompatible with some network adapters and in some virtual environments.
Multicast: In this setting, each host can keep its original MAC address. The cluster
MAC address is used as a multicast address, which each host eventually translates
into its own original MAC address.
IGMP Multicast: This option configures multicast at the IP address level. The advantage of this option is that it prevents switch flooding by limiting NLB traffic to NLB
ports only. The disadvantage of this option is that not all switches can handle IGMP
Multicast.
Objective 1.1: Configure Network Load Balancing (NLB)
CHAPTER 1
7
Configuring port rules
Port rules are the most important part of an NLB cluster’s configuration. These port rules
define which traffic will be load balanced in the NLB cluster and how it will be load-balanced.
Each port rule matches incoming traffic as defined by a range of destination TCP or UDP
ports and (optionally) a destination IP address. You aren’t permitted to create two rules that
match the same incoming traffic, so you never have to deal with rule conflicts, rule priority, or
rule order. Only one port rule can ever apply to an incoming packet.
One port rule is predefined, which you can see in Figure 1-7. The predefined rule
essentially matches all TCP/IP traffic (more precisely, all traffic sent between TCP and UDP
ports 0 and 65535). You might want to keep this predefined rule for your NLB cluster in the
real world, but it’s not very useful for exam 70-412 preparation.
FIGURE 1-7 The fifth page of the New Cluster Wizard
For the 70-412 exam, assume that in any NLB scenario you see, the predefined port rule
will be removed and all port rules will be custom-configured. So, to prepare for the exam, you
need to understand all of the customizable configuration options on the Add/Edit Port Rule
dialog box, shown in Figure 1-8. You also need to understand the two additional options that
appear in this dialog box when you later edit an existing port rule within a particular host’s
properties (not the cluster’s properties) in Network Load Balancing Manager.
8
CHAPTER 1
Configure and manage high availability
FIGURE 1-8 Adding or editing an NLB port rule
On the Add/Edit Port Rule page, you can edit the following options:
■■
■■
■■
Cluster IP Address This area lets you define the matching criteria for a new port rule
so that it matches incoming traffic directed at just one of the cluster’s addresses. By
default, a new port rule matches all of an NLB cluster’s addresses.
Port Range and Protocols These sections let you define the matching criteria for a
new port rule so that it matches incoming traffic directed at a contiguous range of one
or more TCP ports, UDP ports, or both. The range you define cannot overlap a range
defined in another port rule.
Filtering Mode This section allows you to specify how requests are distributed. You
can choose between Multiple Host, Single Host, and Disable This Port Range.
The Multiple Host filtering mode is the default setting. Multiple Host filtering mode provides both load balancing and fault tolerance for all incoming requests matching the port
rule. Client requests matching the port rule are distributed among active nodes in the farm.
When you choose the Multiple Host filtering mode, you need to choose an affinity setting,
which determines how a client that is interacting with the cluster during a session will respond. The options are None, Single and Network and work in the following manner:
■■
None With this setting, each client traffic is directed to any node in the cluster,
dependent on existing load. Subsequent traffic from the client will be directed to any
node in the cluster dependent on existing load.
Objective 1.1: Configure Network Load Balancing (NLB)
CHAPTER 1
9
■■
■■
Single With this setting, if a client named Client1 connects to a node named Host1
on the first connection to an NLB cluster, then Client1 will keep connecting to Host1
in the future. If a client named Client2 connects to an NLB node named Host2, then
Client2 will keep connecting to Host2 in the future, and so on. The advantage of this
setting is that it allows user state data to be maintained from one session to the next if
this data is saved on the local node. This is the default affinity setting.
Network With this option, each node in the NLB cluster is responsible for all connections that match a given /24 IPv4 network address. For example, if a client named
Client1 first connects to the NLB cluster through a proxy server named Proxy1 that
is assigned the address 207.46.130.101 and then later connects to the NLB cluster
through a proxy server named Proxy 2 that is assigned the address 207.46.130.102,
the connection will be returned to the same NLB host because both proxy servers are
assigned the same /24 network address. (207.46.130.z).
Be aware that your choice here among these three Affinity settings can be restricted by
the application you are hosting in the NLB cluster. For example, some applications support
the Affinity-None setting, but others don’t.
The Single Host filtering mode directs all matching traffic toward the host with the highest
priority value. If that host fails, then the traffic is directed to the host with the next highest priority. You might remember that this same service is provided for traffic that does
not match any port rule at all. So why bother creating a port rule in Single Host mode? The
advantage of configuring a port rule in Single Host mode is that with a port rule you can later
define a custom server priority for this particular traffic with the Handling Priority setting in
Network Load Balancing Manager.
EXAM TIP
You need to understand the Affinity-None, Affinity-Single, and Affinity-Network settings
for the 70-412 exam.
The Timeout setting extends affinity through configuration changes in the NLB cluster
up to the number of minutes specified. If, for example, the NLB cluster is used to support a
web storefront, a customer might experience the benefit of the Timeout setting by always
being able to retain items in a shopping cart for the number of minutes specified. Without
extending affinity with the Timeout setting, the items in the shopping cart could theoretically
disappear if the customer’s connection is redirected to another host after a configuration
change to the server farm. The Disable This Port Range setting allows you to have the NLB
cluster drop all traffic on the specified ports.
The Load Weight and Handling Priority settings are available for you to configure only
when editing an existing port rule through a host’s properties in Network Load Balancing
Manager. When you edit an existing port rule, a special version of the Add/Edit Port Rule
dialog box opens, which is shown in Figure 1-9.
10
CHAPTER 1
Configure and manage high availability