Sách Tiếng Anh công nghệ ô tô và chế tạo máy: Phần 1
Bạn đang xem bản rút gọn của tài liệu. Xem và tải ngay bản đầy đủ của tài liệu tại đây (21.22 MB, 300 trang )
LE T H A O LOAN
TlSNGANHCONGNGHi
0 TO S C H i
NHA
X L 1A T
no MAY
DAN TH ANH N1EN
NHA XUAT BAN THANH
N IE N
62 Bd Trieu - Hd Noi - DT: (W) 9434044 - FAX (04) 9436024
Chi iihdiih: 270 Nguyen Dinh ChTeu - 03 TPHCM DT: (08) 9305243- (08) 93032G2
TIENG ANH Q U A N TR1 KINH I)OANH
Chiu trach n h iem xuat ban:
M AI TH O I C H IN H
-
B ien tap:
N G U Y E N SON
T rin h bay bia:
NGUYEN HUNG
Siia ban in:
N G U Y E N G IAN G
In 1.000 cuon, kho 14,5x20,5cm. Tai Cong ty Co phan in Ben
Tre. Giay CNKHXB so 248/1528 CXB cap ngay 9-9-2005. In
xong va nop liTu chieu thang 01 nam 2006.
Contents
Things Every Driver Should K n o w ........................................ 7
The W ay to Your Cars Heart Is through Your Toolbox . 36
Preventive M aintenance: A M onthly Under-the-Hood
C h e c k ............................................................................................. 68
The Inner Secrets of Your Car R e v e a le d ........................102
The Electrical System: Your C ar’s Soark of L ife ..........123
The Fuel S y s t e m : ..................................................................... 145
The Heart and Lungs of Your C a r ..................................... 145
The Cooling System Up C lo s e ............................................ 217
Take the Drive Train: Understanding Transm issions
without Losing Your M i n d ....................................................232
It’s the B ra k e s !.......................................................................... 249
Steering and Suspension System s Smooth the W ay. 267
Keeping Your E le c tr ic a l........................................................ 284
System in T u n e ......................................................................... 284
Keeping Your Fuel System in T u n e ..................................368
Changing Your O i l ................................................................... 458
SLubrication Extends the life of Your V e h ic l e ............. 480
What to Do If Your Transm ission Stops Running
S m o o th ly ......................................................................................490
Being a Buddy to Your Brakes and B e a r in g s .............. 512
Checking Your Tires, Alignm ent, and S t e e r i n g ........... 580
Troubleshooting Leaks, Squeaks, Sm ells, and Strange
S e n s a tio n s ..................................................................................618
What to Do If Your Car Drops Dead or W o n ’t S t a r t .....653
When All Else Fails: Finding and Dealing with a Good
M e c h a n ic ..................................................................................... 680
Keeping Your Car Clean and B e a u tifu l............................ 721
Getting Rid of Dings, Dents, and Other Hard Knocks 770
The Ten Most Important Preventive M aintenance
M e a su re s S e n s a tio n s ............................................................... 801
Ten “ Eco-Logical” W ays
812
to Save Fuel .......................
812
7
Qai 1
Things Every Driver
Should Know
Purpose and layout - Muc dich va bo cuc:
s---------------------------------------------------------------------------------------------------- '
□ Knowing when to do it yourself: kin nao thi ban tit lam
□
Paying attention to safety: c/n'i y den an toan
□
Filling ‘er up yourself: tit do xa n g vao xe
□
Getting under the hood: Cacli m o capo xe
□
Jacking up the car: Cacli doi xe
□
Changing a tire: Cacli t/iay m ot vd xe
□
Getting into your car when you lock yourself out: Cacli
vao xe khi ban bi klioa a ben ngoai
□
Taking things apart (and putting them back together
again): Cacli thao rbi cac bo plian (va rap cluing lai nhit
cu)
Cm ! ')i
^ w
( V jX O i i -
If you're not particularly ,nfiechanically inclined, you may
watch those who are with admiration and amazement - and
'exasperation because they have something you don’t: an under
standing o f how things work and how things go together. When
they take som ething apart, they can reassem b’ e it back the way
it was. W hen they say that they want to take a look under the
hood, they can actually get the darn thing open. And when they
need to change a flat, they don’t spend ten minutes trying to
figure out which end o f the jack is up.
8
The good news is that you don’t have to be born with a
wrench in your hand to know how to fix things - even things as
seemingly complicated as a car. 1 know; I’ve been there. The
section in the Introduction called How I Became Intimately
Involved with My Car (and Why You’ll Want to Do It, Too)''
tells you all about my automotive epiphany.
O f course, the simplest things can sometimes be the big
gest hurdles to overcome. After all, if you can’t even figure out
how to open the hood, how can you check the oil or the cool
ant level? That’s why I begin this book with a chapter on the
basics. I explain simple tasks that you use again and again as
you work on your vehicle - like how to open the hood, jack up
a car, and change a tire. I also include instructions for filling
the tank with gas yourself (it’s cheaper than full-service), a
surefire method for taking anything apart and putting it back
together again, and safety pointers that every m echanic expe
rienced and beginner - should heed.
You can find a definition in the Practical Glossary o f Au
tomotive Terms at the end o f the book for any word that’s
printed in this special type.
1. Before you tackle any job
It's wonderful to do things yourself. It costs you less, it gives
you a sense o f power to know that you did it on your own, and
you know that the jo b ’s been done right. Nevertheless, to avoid
getting in over my head, I always ask m yself the following ques
tions before undertaking any job:
♦
Do I really want to do this? Will it be fun - or horrendous9
I try never to do anything that doesn't feel good anymore
(unless it's absolutely necessary).
♦
Do I know how to do it? If not, where do I go to learn?
♦
Does it require such expensive tools that it would cost less
to have someone do it for me than to buy those tools0 C a n
I borrow the tools I need?
9
♦
If I goof, can som ething be seriously damaged? Can I?
♦
How long will it take, and what is my time worth? How
much money will I save by doing it myself?
You’ll be happy to know that almost every job in this book
should pass these tests. If you find one that doesn’t, don’t hesi
tate to turn it over to a Professional - after you read enough to
know that the job is definitely necessary, what it entails, whether
the work has been done properly, and how to get Satisfaction if
it isn’t. With that in mind, let’s get on to the very first thing you
need to know in order to work on your vehicle.
2. Safety Rules
The first time I tuned my car, I was sure that if I made
the smallest mistake, the car would explode when I started it.
This seems to be a com m on delusion, but it just isn’t so. All
you’ll get is silence (which can be just as disconcerting, but not
lethal after all). This isn’t to say that working on cars is free
from danger, though. Before you do any work on a vehicle, be
sure to observe the following safety rules:
♦
Don’t smoke while you’re working on your car - for obvi
ous reasons!
♦
Never work on your car unless the parking brake is on,
the gearshift is in Park or Neutral, and the engine is.
shut off. If you have to run the engine to adjust som e
thing, turn it on and off yourself to avoid the risk that a
friendly helper may misunderstand and turn the engine
on while your hands are in the way.
♦
Be sure that the parts o f the engine you’re working on
are nice and cool so that you don’t get burned. I f you’re
doing a job that calls for a warm engine, be very careful.
♦
N e v e r ja c k a car up unless the w h e e ls are p rop erly
blocked. I go into more detail about this later in this
chapter in the "The Safe Way to Use a Jack" and "How to
Change a Tire" sections.
10
♦
Use insulated tools for electrical work.
♦
Before using a wrench or ratchet on a part that’s stuck ,
make sure that, if it suddenly comes loose, your hand w on’t
hit anything. To avoid the possibility o f being injured be
cause your hand slams into something, pull on wrenches
whenever possible rather than pushing on them.
♦
Take off your rings, long necklaces, or other jewelry. If
they get caught on parts, they - and you - can be damaged.
♦
Tie back long hair. If your hair accidentally gets into a
m oving fan or belt, you can literally be scalped.
♦
If you’re working with toxic chemicals, such as antifreeze,
cleaners, and the like keep them away from your mouth
and eyes, wash your hands thoroughly after using them,
and either store them safely away from pets and ch il
dren or dispose o f them in a way that’s good for the
environment. (For examples, see the next paragraph and
the sidebar "How to dispose of empty gasoline cans safely",
later in this chapter.)
♦
K n ow that g a so lin e is e x t r e m e ly d a n g e rou s to have
around. Not only is it toxic and flammable, but the vapor
in an empty can is explosive enough to take out a city
block. If you must keep a small amount o f gasoline on
hand for a lawn mower or chain saw, always store it in a
ventilated gasoline can designed specifically for that pur
pose. Unless you’re going far into the wilds, never carry
a can o f gasoline in or on your vehicle.
♦
W ork in a well-ventilated area to avoid breathing in car
bon monoxide if you have to run the engine, or breathing
in toxic fumes from chemicals and gasoline. If possible,
work outdoors in your driveway, your backyard, or a park
ing lot. If you must work in your garage, be sure to keep
the garage door open and move the vehicle as close to the
door as possible.
♦
Keep a fire extinguisher handy. You can find reasons for
11
this that may surprise you in Chapter 2.
So much for the scary stuff. It’s all a matter o f common
sense, really. And remember: Making a car blow up is almost
impossible unless you drop a match into the fuel tank. If you do
something incorrectly, the worst thing that will probably hap
pen is that the car w on’t start until you get it right.
3. How to fill 'er up yourself
More and more gas stations are shifting toward self-Service. If you’ve been reluctant to abandon the luxury o f the.fullservice lane, chances are that it’s going to get more and more
difficult to find one. Knowing how to fill ‘er up yourself not only
prevents you from being stranded with an em pty tank when
there’s no one available to fill it for you, but it also saves you
money on every gallon, every time.
Always extinguish your cigarette before you start to pump
gasoline. If the flame comes in contact with gasoline fumes, it
can cause an explosion.
H ere’s how to pump your own gas:
1.
Look at the price window on the pump.
If a price is registered there, have the attendant clear
the m achine so that the price window reads "$0.00."
2.
Move the lever on the pump to ON.
3.
U nscrew the cap from your fuel tank.
4.
U nhook the pump nozzle and hose from the pump and
place the nozzle into the fuel tank opening.
5.
Squeeze the trigger on the pump nozzle to allow gasoline
to flow out o f the hose and into your fuel tank.
There's usually a little latch near the trigger that keeps
the trigger open so that you don’t have to stand there hold
ing onto it. Don't worry about overflows; gas pumps shut
o ff automatically when your tank is almost full.
12
Engaging the trigger latch gives you time to take advan
tage o f the other free services at the gas station. You can
wash your car’s windows or check the air pressure in your
tires and add air if they need it. (There are instructions for
doing so in Chapter 19.)
When the gasoline stops flowing, the trigger clicks closed
and the numbers in the pump window stop moving. R e
move the nozzle from the fuel tank and hang it back on
the pump.
Never "top o f f a tank by adding fuel after the pump has
shut o ff auto matically. If you overfill your tank, the fuel
may overflow the fill hole or leak out onto the road through
an overflow outlet. This is not just a waste o f your money;
spilled gasoline ruins asphalt, pollutes the air, and is a fire
hazard. This kind o f leakage is especially prone to happen
if it’s a hot day and the gasoline in your tank expands.
6. Replace the cap on your fuel tank.
4. How to Open the Hood
How can you do even simple "under-the-hOod” jo b s - such
as checking the oil, antifreeze, and transmission fluid; refill
ing windshield wiper fluid; and checking accessory belts - if
you don’t know how to get the hood open?
The good news is that opening the hood o f a car is easy
and uncomplicated if you know how to do it. Although the
location of the hood release may differ from one vehicle to the
next, all releases work in pretty much the same way:
♦
In newer models, the hood release is often inside the v e
hicle, somewhere near the steering column or on the floor
next to the driver’s seat. (It generally displays the word
H ood or a picture o f a car with its hood up.) In older m od
els, the hood release is behind the grill or behind the
bumper.
♦
All vehicles have a safety catch that stops the released
13
hood from popping all the way open. The purpose of the
safety catch is to prevent the hood from accidentally com
ing open and obscuring your vision while you’re driving.
♦
Once the hood is up, it usually stays up on its own, unless
you need to prop it up with a safety rod.
If you haven’t the faintest idea o f how to get your hood
open, head for the full-service bay the next time you go in for
gas and ask the attendant to show you how to open the hood.
You may pay a little more for fuel, but the lesson will be worth
it, and you can get your windows washed and your tire pres
sure checked for nothing! (If you’re really short o f cash, just
ask for $5 worth o f gasoline; the difference in cost will be
negligible.)
H ere’s how to open the hood o f your car yourself:
1.
Find your hood release and pop open the hood.
Either consult your owner’s manual, or try to remember
the last time a service station attendant opened the hood
o f your car. Did he or she ask you to pull a lever inside the
vehicle? Or did he or she go directly to the front grill?
If the hood release is at the front o f the car, look around
and through the grill and feel under the grill and behind
the bumper tc find a handle, lever, arm, or button. Then
pull, press, or push front to back and side to side on the
thing you find until it releases the hood. If the hood release
is inside the car, press, push, or pull it until you hear the
hood pop open.
The hood will open a little, but it will probably be stopped
by the safety catch: a metal lever that, when pressed one
way or the other, releases the hood so that it can open all
the way.
2.
With one hand, raine the hood as far as it will go. With the
other hand, feel along the area between the hood and the
grill for the safety catch. Release It and then raise the
hood the rest o f the way.
14
3.
Secure the hood If necessary.
If the hood stays up all by itself, fine. If it doesn’t, look for a
safety rod that’s attached either to the underside o f the
hood or to the bottom edge o f the hood opening. Either lift
or lower the rod (depending on where it’s located) and fit
the end of it into the slot that’s provided to hold it in place.
On some vehicles, the hood is held up by two gas-pressur
ized cylinders known as hood shocks. If the gas has leaked
out of these units, be careful because the hood could come
down at any moment. If that’s the case, replace these units
or secure the hood with a broom handle or similar object.
5. The safe way to use a Jack
The most obvious reason to jack up a car is to change a tire,
but other jobs, such as inspecting brakes, may also require you
to get under the vehicle. (Even if you’re reed-thin enough to
squeeze yourself between the pavement and the underside o f
your car, you still need room to move around and manipulate
tools.) Chapter 2 has detailed information about the different
types of jacks, as well as items such as jack stands (essential)
and creepers (nonessential, but nice). This section explains how
to use a jack safely and efficiently. The next section shows you
how to change a tire after the vehicle is in the air.
Jacks are used only to get a vehicle off the ground. They
should never be used to hold a vehicle in place. Even if you're
simply changing a tire, you need to make sure that you’ve blocked
the other wheels so that the car doesn’t roll off the jack. You
must use jack stands when you work underneath you r car.- if
you don’t, you run the risk o f serious injury or even death.
People have been crushed to death when vehicles that were
improperly secured fell on them.
B efore you attempt to jack up your vehicle, observe the
following safety precautions:
♦
Never change a tire on a freeway or highway. Not only
15
can you be seriously injured, but you can also fall prey to
carjackers. D on’t exit the car on the side nearest traffic;
use a cellular phone to call road service or the AAA. If you
have no cellular phone and a public phone isn’t near enough
to make a call and get right back into your car, hang a
white rag or a white piece o f paper out o f the driver’s side
window and wait for the highway patrol to rescue you.
♦
Always park a vehicle on level ground before you jack it up.
If you get a flat tire on a hill and can’t coast to the bottom
without killing the tire completely, then park close to the
curb, turn the wheels toward the curb, and block the down
side wheels securely to prevent the car from rolling. Even
after taking these precautions, however, I'd be nervous.
♦
Never jack up a vehicle without blocking the wheels. Even
if the car is on level ground, use bricks, wooden wedges,
or metal wheel chocks to block the wheels at the oppo
site end o f the car from the end that is to be raised.
Doing so keeps the vehicle from rolling after it has been
jacked up.
Keep the blocks in the trunk o f your car so that you w on ’t
have to go hunting around if you have to change a tire
when you’re away from home.
If you find yourself faced with the job of changing a tire
and you have nothing with which to block the wheels, park
near the curb with the wheels turned in. This may not
keep you from getting hurt i f the car rolls off the jack, but
at least innocent motorists and pedestrians w on’t have to
deal with a runaway driverless car!
♦
Be sure that your gearshift is in Park (or in First if you
have a manual transmission) and that the emergency brake
is on before you jack it up. The only time you don’t want the
emergency brake on is when you have to be able to rotate a
rear wheel or remove rear brake drums to inspect the
brakes. In such a case, make sure that the front wheels are
blocked securely, preferably with chocks designed for the
16
purpose. (Chocks are available at a low cost at auto supply
stores, and they stow neatly in the trunk.)
Once you’ve observed the safety precautions just listed,
follow these steps:
1.
If you’re going to remove a wheel to change a tire or
check your brakes, remove the hubcap (if there is one)
and loosen the lug nuts before you jack up the car.
Once the car is jacked up, the wheel will turn freely,
which makes getting a hubcap off harder and makes start
ing the nuts almost impossible. Instructions for removing
a hubcap and loosening lug nuts are in the next section,
"How to Change a Tire".
2.
Place the jack under the part o f the vehicle that It should
contact when raised. If you are using jack stands, place
them near the jack.
W here you place your jack depends on whether you’re
planning to do a one-wheel job, such as tire changing or
brake checking, or a two-wheel, whole-end repair job. To
find out the proper place to position the ja ck for your
particular vehicle, check your owner’s manual. If you have
no manual, ask the service department at your dealership
to show you the proper place, or follow these rules:
Never place the jack so that the weight o f the vehicle
rests on something that can bend, break, or give. If your
manual is incomprehensible or jacks this kind o f infor
mation, try to place the jack so that it touches either the
car frame or the big bar that supports the front wheel
suspension. You can also place jacks near the rear-wheel
axle. Until you become more proficient at this, I'd stick
to jack ing up one wheel at a time. It may mean more
work, but the practice is good for you.
3.
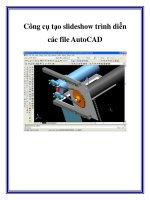
Lift the vehicle by using the jack. How you accomplish this
depends on the type of jack you're using (see Figure 1-1 :
<> If you have a hydraulic jack, place the handle into the
17
appropriate location and pump up and down. Use nice,
even strokes, taking the jack handle from its lowest to
its highest point on each stroke to cut down on the
labor involved.
I f you have a tripod jack, turn the crank.
❖ If you have a scissor jack, insert the rod or wrench
over the knob and then crank.
Figure 1-1:
The type of
ja c k you
have
determ ines
w h e th e r you
crank, turn,
or pump
4.
S cisso r ja c k
Tripod ja c k
H ydra u lic jack
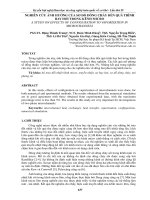
If you have jack stands, place them under the car, near the
place where the jack is touching the vehicle (See Figure 12). Raise the stands until they are high enough to just fit
under, and lock them in place. Lower the jack until the car
is resting on the jack stands. Then remove the jack.
Substituting boxes stones, or bricks for jack stands is very
dangerous. They can slip out or break while you’re under
the car A jack can do the Same thing, so if you’re going to
work under your car
5jan to change
your own oil and do
sjure to buy a
pair o f jack stands.
tting under
there j-ourself will p iy for the stands in no t e. You can
find information about buying jack stands in C apter 2.
5.
Before you begin to work, wiggle the car a little to make
sure that it's resting securely on the jack or the jack stands.
Doing so also tells you w hether you have the w heels
blocked properly. It's better if the vehicle falls while all
four wheels are in place. (It will bounce just a little.)
18
Figure 1-2:
Jack stands
hold your
vehicle up
safely.
If you remove a wheel and begin to work without making
sure that you jacked up the car and blocked it securely, it
can do a lot o f damage to itself - and to you - if it falls. (This
is not meant to frighten you away from jacking up your car
and working on or under it. It’s just to empha size the fact
that a few simple precautions will remove any danger)
6.
W hen you’re finished working, lower the vehicle to the
ground.
If you’re using a tripod or scissor jack, simply turn the
crank in the opposite direction. If you’re using a hydraulic
jack, use the rod to turn the pressure release valve. The
jack will do the rest o f the work for you.
6. How to Change a Tire
Even if you're a member o f the AAA or CAA, there’s always
a chance that you'll find yourself stuck with a flat tire on a
remote road with no telephone in sight. On these occasions,
all traffic generally vanishes, leaving you helpless unless you
know how to change a tire yourself. Everyone should have a
19
general idea o f w h at’s involved:
1.
Secure the vehicle so that it w on’t roll.
2.
Jack up the vehicle, following the instructions in the pre
ceding section, "The Safe Way to Use a Jack".
3.
Remove the old tire.
4.
Put on the new tire.
5.
Put away the jack ing stuff and the old tire.
6.
Drive happily into the sunset.
But the job gets sticky in a couple o f places. Unless you’re
properly equipped, you can find yourself out o f luck and in for a
long wait for help to come along. The following sections explain
in detail, and in order, how to change a tire. To make sure that
you have the tools you need, read the section called "More Things
to Carry in Your Car" in Chapter 2, and then stock up.
If you own a luxury car with an air suspension, you need to
turn the system o ff before jacking up your car. Vehicles with air
suspensions have an on/off switch located in the trunk area.
7. Removing a hubcap
If you have an older car that still has hubcaps (instead o f
the wheel covers on more recent models), the first task in
changing a tire - after you pull to the side o f the road and
finish banging the heel o f your hand against the steering wheel
in frustration -is to rem ove the hubcap o f the injured tire. The
following steps tell you how:
1.
Use a screwdriver or the flat end o f a lug wrench (see
Figure 2-20 in Chapter 2) to pry off the hubcap.
Just insert the point o f the tool where the edge o f the
cap m eets the w heel, and apply a little leverage (see
Figure 1-3). The cap should pop off. You may have to do
this in a couple o f places; it’s like prying the lid o ff a can
o f paint.
20
*
Figure 1-3:
You can use
a s c re w
driver to pry
a hubcap
loose.
2.
Lay the cap an its back so that you can put the lug nuts
into it to keep them from rolling away and heading for
the nearest sewer.
After you remove the hubcap, the next task is to loosen the
lug nuts.
8. Loosening the lug nuts
Lug nuts are those big nuts that hold the wheel in place.
Most garages retighten them with a power tool, and unless you’ve
done the job yourself by hand, they’re going to be pretty hard to
loosen. (Take my advice in Chapter 2 and buy a cross-shaft lug
wrench. Figure 2-20 shows what one looks like.)
Before you begin, you have to ascertain whether the lug
nuts on the wheel you’re working on are right-hand threaded
or left-hand threaded. This isn't a left-handed hammer joke;
the threads determine which way you turn the wrench. The
lug nuts on the right side o f a vehicle are always right-hand
threa d ed, but the nuts on the left side may be left-hand
21
threaded. Look at the lug nuts on your car; in the center o f
the lugs you should see an R, an L, or no letter at all:
♦
A lug with an R or with no letter is right-threaded. Turn
it counterclock w ise to loosen it.
♦
A lugs with "an L is left-threaded. Turn it clockwise to loosen it.
For the purposes o f sanity, I’ll assume that your car has
right-threaded nuts. I f you have a couple o f lefties, just turn the
wrench in the opposite direction as you follow these steps to
loosen the lug nuts:
1.
Find the end o f the wrench that fits the lug nuts on your
car, and fit it onto the first nut.
Always work on lug nuts in rotation. That way, you w on’t
forget to tighten any later.
2.
Apply all your weight to the bar on the left
This starts turning the nut counterclockw ise, which loos
ens it.
If the nut has been put on with a power tool and you can't
get it started, a piece of hollow pipe, fitted over that lefthand arm o f the cross-shaft wrench, magically adds enough
leverage to start the nut easily (see Figure 1-4). After you
replace the nut yourself, this aid is no longer necessary.
But rem em ber, the longer the arms on your lug wrench,
the more leverage you have.
Figure 1-4:
A h o llo w
pipe and a
c ro s s -s h a ft
w re n c h can
loosen the
tig h te s t
lug nuts
22
Don’t remove the lug nuts completely; just get them loose
enough so that you can remove them by hand after raising the
car (a feat explained in an earlier section of this chapter. The
Safe Way to Use a Jack").
9. Changing the tire
Once the vehicle is safely jacked up and the lug nuts are off,
follow these instructions to change the tire:
1.
Remove the spare from the trunk If you haven't already
done so.
Actually, it’s easier to do this before jacking up the car. If
you haven’t checked your spare recently, keep your fin
gers crossed that it has enough air in it! Roll the spare to
the scene o f the action.
2.
Grasp the flat tire with both hands and pull it toward you.
The flat tire sits on the exposed bolts that the lug nuts
screwed onto.
As you pull the flat off, it should slide along the bolts until,
suddenly, it clears the end of the bolts and you find your
self supporting its full weight. Tires are heavy, and you’ll
be quite happy to lower it to the ground (if you haven’t
already dropped it).
3.
Roll the flat along the ground to the trunk to get it out of
the way.
4.
Lift the spare onto the lug bolts.
Because tires are heavy you may have a little trouble
lifting the spare into place - especially if you’re not ac
customed to lifting heavy things. If this is the case, a bit
o f ingenuity may help; see the sidebar "A little ingenuity
goes a long way" for details.
5.
After you have the spare tire in place, replace the lug
nuts and tighten them by hand.
23
Give each lug nut a jolt with the wrench to get it firmly
into place, but wait until the car is on the ground before
you really try to tighten the lug nuts.
Remember, right-hand threaded nuts tighten in a clock
wise direction; lefties go the other way.
6.
Replace the jack, lift the car o ff the jack stands (if you used
them), and lower the car to the ground.
7.
Once the car is resting on the ground, use the lug wrench
to tighten the lugs as much as you can.
You don’t want to twist them o ff the bolts or ruin the
threads, but you don’t want the wheel to fall off, either.
Use your hollow pipe if you’re worried about tightening
them sufficiently, or step on the right-hand arm o f the
lug wrench after the nut is tight.
8.
If your car has hubcaps, place the hubcap against the
wheel and whack it into place with the heel o f your hand.
Cushion your hand with a soft rag first so that you w on’t
hurt it. And don’t hit the hubcap with a wrench or hammer
- you’ll dent it. Whack it a couple o f times, in a couple o f
places, to be sure that it’s on evenly and securely. (Even
secondhand hubcaps can cost from $20 to more than $100
apiece to replace.) If it’s too much of a hassle, or if you
don’t have the time to replace the hubcap, you can take it
home and install it later; it’s mostly ornamental, and you
can drive for a while without it. But do replace it soon
because it helps keep dust and dirt out o f your brakes
and bearings.
9.
Put the flat in the trunk where the spare was located,
and put your tools away.
Don’t forget to remove the wheel blocks, and d o n ’t forget
to have that flat fixed!
Make sure that your flat tire is repaired properly. Instead
o f d ism ounting the tire from the w heel rim, inspectin g it,
24
fixing it, and remounting it, some service stations simply plug
the flat from the outside. Several states now outlaw this proce
dure, known as "outside-in" repair. To avoid this, tell the ser
vice facility that you d on ’t want the tire plugged from the out
side; you want the flat corrected the proper way.
If you get caught in the middle of nowhere with a flat tire
and are unable to change it yourself, you can get rolling again
without riding on the flat. If you carry an aerosol can o f non
flammable inflator/sealant, simply screw the nozzle o f the can
onto the valve stem of the flat tire, and it fills the tire with air
and some sort of goo that temporarily seals the puncture. Be
cause there’s still some question about how permanent this fix
is and its ultimate effects on your tire, use inflator/sealant
only in emergencies, get to a service station as soon as pos
sible, and ask the attendant to try to remove the stuff before
fixing the tire.
You may not find the prospect o f changing your own flat
tires especially alluring. But isn’t it nice to know that if a crisis
does occur and you’re not near a phone or don’t have the time to
wait for the auto club, you can get yourself rolling again in less
than 15 minutes?
If reading these instructions makes you think that you’d
rather languish by the side o f the road for hours than undertake
changing a tire yourself, you might consider outfitting your ve
hicle with run-flat tires. Although these tires will set you back
a couple o f hundred bucks, you’ll be able to drive with a flat to
the nearest service station without ruining the tire.
To make the job easier should an em ergency arise, you
may want to go out and check the lug nuts on your car now. If
they’re on hideously tight, loosen them with a lug wrench and
a pipe and retighten them to a reasonable tension s o that y o u
w on’t have to struggle at the side of the road.
25
10.
Getting back into a car when you've
locked yourself out
H ere’s an "em ergency" that may not be dangerous, but
certainly can be exasperating!
If you tend to be feather-headed and leave the keys in
your car fairly often, you may be tempted to hide an extra key
somewhere on the vehicle.
However, I must warn you that unless you’re very clever
about where you hide it, you may be inviting someone to steal
your car or its contents. Those little magnetic boxes that stick
to the metal surface o f the body or frame are the best bets here,
but be sure to place your box in an obscure and hard-toreacli
area where it can’t jiggle loose and fall out. I leave the choice o f
area up to you - if I publish a list o f suggestions, the Car Thieves
o f America will nominate me for their annual Helpful Dummy
Award! Be imaginative. Struggling a little to reach that extra
key is better than giving the car away easily. And don’t hide
your house key with it. You don’t want to give euerything away,
do you?
Assuming that you’ve decided not to risk hiding that extra
set on your car, here’s how to get in without a key:
♦
I f you have the old-style door locks with little buttons
that go up and down, obtain a wire coat hanger, straighten
it out, and bend the end o f it into a little hook. Insert it
between the rubber molding and the side window or vent
window and then, carefully, with the dexterity of a jewel
thief, hook it around the door button and pull it up.
♦
If you or your auto manufacturer has had the foresight to
replace these buttons with the new, smooth kind, your
vehicle has less o f a chance o f being stolen, but you will
have a harder job getting into it without a key. You may
be able to use the hanger to hook one or to push the
g iz m o nea r th e d oor h a n d le, but m ost o f th em w ill
26
straighten out your hanger before they condescend to
budge. Sorry!
♦
If you’re in a parking facility or near a service station,
the attendants often have a gadget called a jim m y' that
can be slid between the window and the door and used to
operate the locking mechanism. It certainly doesn't hurt
to ask. If they have one, ask them to do the job for you
and be generous with your thanks. They’ve just saved you
a lot o f time and money.
♦
If you call a locksmith, you’ll have to prove that you own
the vehicle before any work can be done, and you’ll prob
ably also have to pay immediately. (Let’s hope that you
didn’t lock your wallet in there along with your keys.) If
your key is lost outside your car and your steering wheel
locks, the locksmith may have to dismount the steering
wheel and remove the lock - this can cost you lots o f money,
plus time and aggravation, before you can drive o ff again.
T here’s good news, however. Each car key is coded by the
auto manufacturer, and if you have the key code number, a
locksmith can make you a new key as long as you have
identification and can describe the vehicle in terms o f its
vital statistics. General Motors car keys have little coded
tags that you knock out of the key and keep; other U.S.
cars come with little metal tags with the number on them;
and most foreign carmakers, engrave the number right
on the keys.
As a valuable favor to yourself, write down the code num
ber where someone at home can read it to you in an em e r
gency. Also record it without identifying what it is - in
your pocket address book or in your wallet before you lose
your keys. If you don’t know the code number for your
keys and you bought the car, new or used, from a dealer,
the dealer may still have the number on file. Failing that,
a good locksmith may be able to analyze a key in fairly
new condition and come up with the proper code for it.