tekla tutorial lesson 9 newtemplate editor
Bạn đang xem bản rút gọn của tài liệu. Xem và tải ngay bản đầy đủ của tài liệu tại đây (855.23 KB, 38 trang )
Template Editor
Tekla Structures 11.0 Basic Training
March 16, 2005
Copyright © 2005 Tekla Corporation
Copyright © 2005 Tekla Corporation TEKLA STRUCTURES BASIC TRAINING
i
Template Editor
Contents
Contents i
1 Template Editor 3
1.1 Create a New Template from Scratch 3
Define template properties 4
Insert template components and objects 5
Edit component properties 14
1.2 Convert old Templates to new Format 16
Convert assembly_part_list.tpl template 16
Edit the template components 18
Edit template objects 19
Fit template components by the objects 22
Convert assembly_bolt_list.tpl template 22
1.3 Convert an AutoCAD File Into a Template 25
Create a drawing title and revision templates 25
Insert the AutoCAD file and edit its contents 25
Break the template into two separate templates 29
Create a "bill of materials" template 31
Copyright © 2005 Tekla Corporation TEKLA STRUCTURES BASIC TRAINING
3
Template Editor
1 Template Editor
You will learn how to work with Template Editor. You will create a new textual template
from scratch. You will also create two graphical ones – one by converting an old template
and one by converting an AutoCAD block into a new template. There are links to help files
in the text. It is recommended to read the help file for more detailed descriptions.
Templates are descriptions of forms and tables which can be included in Tekla Structures.
The forms can be graphical to be included in drawings as tables, text blocks, drawing
headers, or ASCII text form to be used as reports. The contents of the template fields are
filled in by Tekla Structures using the templates at run time. Templates are created and
edited with
Template Editor, which is a separate application in Tekla Structures and can be
run also standalone.
1.1 Create a New Template from Scratch
Template Editor can be opened in Tekla Structures
Tools > Templates… drop-down menu
both in modeling and drawing editors or, in the drawing editor, by clicking on the
corresponding icon "
Run template editor".
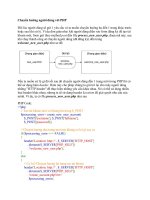
1. We will first create a textual template to be used in report creation, which will list bolts,
washers and nuts belonging to parts in an assembly. Create a new template by clicking
on the
New icon, or by selecting New from the File menu, or by typing Ctrl + N.
2. Select "Textual template" as the template type.
In this lesson
What are
templates?
Start the Template
Editor
Create a new
template
Copyright © 2005 Tekla Corporation TEKLA STRUCTURES BASIC TRAINING
4
Template Editor
3. Click OK. A new empty template is created.
Define template properties
Template properties define the size, margins and column usage of the output template. Read
more about template page settings in TempEd Help: Template Editor > Working with
templates > Editing template properties > Edit page and margin settings
1. Double-click in an empty area in the template window to open the
Template Page
Properties
dialog.
2. Set the
Width to be 80 characters and the Height to be 40 characters.
3. Define
View height to be 30 characters.
4. Click
OK.
5. Select
Options > Preferences from drop-down menu. Read more about preferences
settings in TempEd Help: Template Editor > Menu Reference > Options menu
commands > Preferences…
6. Select Millimeters as graphical units.
Copyright © 2005 Tekla Corporation TEKLA STRUCTURES BASIC TRAINING
5
Template Editor
7. Click
OK.
Now, let's save the template.
1. Select
File > Save as… .
2. Browse to the
Template folder and save the template file with the name
Assembly_part_bolt_list.rpt.
Insert template components and objects
The template layout is designed with template components. Template objects are then placed
inside template components to add either graphical or textual data. The properties of
components, objects and the template itself determine the final appearance. Read more about
template components in TempEd Help: Template Editor > Working with template
components .
In this example template we need the components
header, page header, 5 rows, page
footer and footer to form an assembly – part – bolt – washer – nut list.
1. Insert the template header and page header components by clicking on the "Header" and
"Page header" icons on the
Component toolbar.
2. Insert the row components. For each row, after clicking on the "Row" icon in the
Component toolbar, select the content type (assembly, part, bolt, …) from the drop-
down list and click
OK.
Save the template
Insert template
components
Each row usually represents an object from the Tekla Structures database. The
content type defines what kind of data can be read into the row. Only the object
specific attributes are available for each content type.
Copyright © 2005 Tekla Corporation TEKLA STRUCTURES BASIC TRAINING
6
Template Editor
3. Insert the template page footer and footer components by clicking on the
Page footer
and
Footer icons on the Component toolbar.
The components appear in the template work area and are listed in the content browser on
the left.
1. Next, give a descriptive name for the rows -
Steel_assembly, Part, Bolt, Washer, Nut -
by selecting the row in the content browser and typing the name.
Edit the template
components
Copyright © 2005 Tekla Corporation TEKLA STRUCTURES BASIC TRAINING
7
Template Editor
2. Then, define the hierarchy for the rows according to the actual hierarchy in the model. In
the model, the bolts, washers and nuts are attached to parts, which in turn form an
assembly. Read more about the hierarchy of template components in TempEd Help:
Template Editor > Working with template components > Working with rows > Use row
hierarchy .
Select the
Part row and click on the Shift row down a level button in the content
browser.
3. Then shift the
Bolt, Washer and Nut rows below the Part row by selecting the row and
clicking twice on the shift button.
Copyright © 2005 Tekla Corporation TEKLA STRUCTURES BASIC TRAINING
8
Template Editor
Next, insert the template objects inside the components. In textual templates you can only
use text strings and value fields. Read more about template objects in TempEd Help:
Template Editor > Working with template objects
1. First, insert text into the header by selecting
Text in the Insert drop-down menu or by
clicking on the corresponding
A icon and typing the text in the Enter text dialog.
2. Click
OK and place the text in the header.
3. Next put a value field next to the text by selecting
Value Field in the Insert drop-down
menu or by clicking on the corresponding
Value Field icon and then point the position.
Read more about value fields in TempEd Help: Template Editor > Working with
template objects > Value fields.
The
Select Attribute dialog opens.
4. Select the
NAME attribute under the Project branch and click OK. Click on the + boxes
on the left in the tree structure to open the sub-rows.
5. Double-click on the value field and type a descriptive name for the value field in the
Value Field Properties dialog's Name field.
The whole hierarchical structure is needed for collecting the data from the
model. For example, bolt data cannot be collected directly under assembly – a
part row is needed in between. Each row has an option "Hide in output" in
case you do not want the row contents to be visible in the final printout.
Insert objects into
header
Copyright © 2005 Tekla Corporation TEKLA STRUCTURES BASIC TRAINING
9
Template Editor
6. Add
DATE and TIME value fields and corresponding texts to the right end of the header.
The objects also appear in the content browser.
You can open several templates simultaneously and copy-paste objects from
one template to another. The Value Field Properties dialog can be opened also
by double-clicking on the field name inside the content browser.
7. Select the
DATE and TIME value fields and align them using the right mouse button
command
Align > Rights.
Insert texts into the Page Header according to the example below.
Insert objects into
page header
Copyright © 2005 Tekla Corporation TEKLA STRUCTURES BASIC TRAINING
10
Template Editor
Insert and align texts and value fields into the rows as shown below. In the Value Field
Properties
dialog, click on the Attribute… button to open the Select attribute dialog and
then pick the attributes and give descriptive names to the value fields that appear in the
content browser. Read more about attribute descriptions in Tekla Structures Help: System >
Appendix D: Template fields.
Insert texts and a value field "PAGE" into the Page Footer according to the example below.
1. Insert texts into the Footer according to the example below.
Between the texts, add a value field which counts the total number of assemblies. Copy (Ctrl
+ C) the name of the value field to be counted from the content browser and open the
Value
Field Properties dialog.
Insert objects into
rows
Note: the Value Field names must be unique in every row. For example, if
you use the attribute NUMBER in different rows you should give a different
name in the Value Field Properties dialog for each value field:
NUMBER_of_assemblies, NUMBER_of_parts, etc.
Insert objects into
page footer
Insert objects into
footer
Copyright © 2005 Tekla Corporation TEKLA STRUCTURES BASIC TRAINING
11
Template Editor
2. Type the name for the value field and set the data type to be "Number".
3. Click on the
Formula… button to open the Formula Contents dialog.
4. Select
Total from the Value Field Function drop-down menu.
5. Paste the name of the value field "NUMBER_of_assemblies" inside the quotation marks
(you can also select it from a list which opens by clicking on the
Select button), then
click the
Check button to verify the syntax.
6. Click
OK in the Check dialog.
7. Click
OK in the Formula Contents dialog.
8. Click
OK in the Value Field Properties dialog.
Sorting
When the value fields are placed inside the template components, the next step is to define
the sorting of the fields and rows. The sorting is done at three levels:
•
Inside the value field alpha-numerically ascending or descending (A to Z or Z to A).
Sorting of value field distinguishes all different values of the field and a new row will be
written to each different value.
•
Between the value fields according to the appearance order in the Content Browser
by sort order priority. The sort priority determines how several value fields affect the
sorting of a row. Read more about value field sorting in TempEd Help: Template Editor
> Working with template objects > Value fields > Set sort priority of value fields.
Copyright © 2005 Tekla Corporation TEKLA STRUCTURES BASIC TRAINING
12
Template Editor
• The sort type of a
row by sorting type values Combine and Distinct which separate or
combine
identical row contents. Read more about row sorting in TempEd Help:
Template Editor > Working with template components > Editing component properties
> Edit sort type of row.
Define first the sorting inside the value fields.
1. Double-click on the
"Assembly_position" value field in the content browser or inside
the template component and set the order to be "
Ascending". The field values are sorted
alphabetically from A to Z, which can be seen in the content browser as an arrow.
2. Repeat for the "Part_position", "Bolt_diameter", "Bolt_standard", "Bolt_length",
"Washer_diameter", "Washer_standard", "Nut_diameter" and "Nut_standard" value
fields in all rows.
Next, set the sorting between the value fields by giving the sort order priority in the content
browser.
1. Select the
Assembly_position value field in the Content Browser and click on the
Move item up button. You can also drag and drop the value field into a new location.
The assemblies become sorted first by assembly position number, then by amount of
assemblies.
2. Repeat for all value fields in the following rows as shown in the example below:
Note: When you want to sum value field values, make sure that the sort type of
the row containing the value field is Combine. This ensures that your will be
outputting only summary lines instead of repeating lines with information on
individual database objects. Read more about summing field values in TempEd
Help: Template Editor > Working with template objects > Value fields > Sum
field values automatically.
Define sort order
inside value fields
Define sort order
between value
fields
Copyright © 2005 Tekla Corporation TEKLA STRUCTURES BASIC TRAINING
13
Template Editor
If all the rows have identical values in all value fields that are used in sorting, the rows are
called "Duplicate lines". If you want to output only one line instead of outputting a line for
each duplicate object, set the row sort type to be
COMBINE. Then, for example, 5 pieces of
assembly A/1 is listed in one row instead of 5 rows.
1. Double-click on the "Steel_assembly" row in the content browser or the corresponding
component border to open the
Row Properties dialog.
2. Set the
Sort type to Combine.
3. Click
OK.
4. Repeat for all other rows.
Summing
When the row's sort type is set to "Combine", the value field can be summed. Value field
summing has three options:
•
"Don't sum values" gives the value of an individual field.
•
"Sum values across all rows" gives a total sum of all identical value fields in the
whole template, independent of the hierarchical structure of the rows.
•
"Sum values within one row" gives a sum of identical value fields inside the
hierarchical structure.
First, define the summing of the number of assemblies.
1. Open the "NUMBER_of_assemblies" value field properties dialog.
2. Set the summing option to Sum values across all rows.
3.
Close the dialog by clicking OK.
Define sort order
between rows
Define summing
of NUMBER value
fields
Copyright © 2005 Tekla Corporation TEKLA STRUCTURES BASIC TRAINING
14
Template Editor
4. Next, set the summing of the number of parts inside one assembly. Because the part row
is hierarchically under the assembly row in the Content Browser, you must use the
summing option
Sum values within one row to get the number of identical parts inside
one assembly. (If the option
Sum values across all rows were used, the number of
identical parts would be multiplied with the number of identical assemblies.)
5. Define the summing of the number of bolts, washers and nuts using the Sum values
within one row
summing option.
Edit component properties
Rules
The row rule is used if a row is to be output only under some special conditions. Read more
about rules in TempEd Help: Template Editor > Working with formulas and rules
.
In this example template, we want to list only workshop bolts and leave site bolts out.
Therefore, a rule is needed to separate them and output only the shop bolts.
1. Double-click on the
Bolt row in the content browser or the corresponding component
border to open the
Row Properties dialog.
2. Click on the
Wizard button to open the Rule Wizard.
3. First, select the attribute by clicking on the
None button, which opens the Select
Attribute or Value Field
dialog.
4. Select the attribute
"SITE_WORKSHOP".
5. Click
OK.
6. Set the Condition to be "
Equals".
7. Set the Value to be
"Workshop"
Copyright © 2005 Tekla Corporation TEKLA STRUCTURES BASIC TRAINING
15
Template Editor
8. Click
OK in the Rule Wizard dialog.
The rule is generated into the Rule box. Read more about the Wizard in TempEd Help:
Template Editor > Working with formulas and rules > Row rules > Rule Wizard dialog.
9. Click
OK in the Row Properties dialog.
10. Repeat for the Washer and Nut rows.
Height
Next, edit the template component heights to fit the contents by selecting the component
handle in the middle and dragging them.
The final template rows should look like this:
Copyright © 2005 Tekla Corporation TEKLA STRUCTURES BASIC TRAINING
16
Template Editor
1.2 Convert Old Templates to New Format
When you open an old template file, the Template Editor automatically converts it to the new
format. In the converted template, you need to do some editing: define the hierarchy, rules
and sorting of the rows and fields. Read more about Template conversion in TempEd Help:
Template Editor > Template Conversion.
Convert assembly_part_list.tpl template
1. The converting process starts with opening the file to be converted. Select File > Open
or click on the corresponding icon.
2. Select the file
assembly_part_list.tpl from the browser. It should be located in the
Template folder of your environment folder of the Tekla Structures program folders.
Template Editor automatically recognizes an old file and prompts you to convert it to the
new format.
3. Click
Yes.
Copyright © 2005 Tekla Corporation TEKLA STRUCTURES BASIC TRAINING
17
Template Editor
4. Define the conversion options.
Always back-up the original file for later usage.
5. Click
OK. The converted template is opened with an info dialog about the grid spacing
and a list of warnings is displayed. Read more about warnings in TempEd Help:
Template Editor > Template conversion > Template conversion warnings.
Copyright © 2005 Tekla Corporation TEKLA STRUCTURES BASIC TRAINING
18
Template Editor
Edit the template components
1. Rename the template components using descriptive names. See previous section for the
naming procedure.
2. Define the hierarchy of the rows by shifting the part row down a level. See the previous
section and Appendix I on how to define the hierarchy.
3. Edit component rules. As the content type of the row is now defined in the
Row
Properties
dialog, rules are no longer needed to define it. Therefore, the unnecessary
rules can be removed. Open the Row Properties dialog and click on the Advanced…
button.
4. Select the rule and delete it.
Copyright © 2005 Tekla Corporation TEKLA STRUCTURES BASIC TRAINING
19
Template Editor
5. Click OK in the Rule Wizard dialog.
6. Click
OK in the Row Properties dialog.
Edit template objects
Check all value field contents: some of the attribute names are different from those in the
Template Editor version 2.2, and the formula structure has changed as well. Read more about
attribute names in TempEd Help: Template Editor > Template conversion > Troubleshooting
conversion > Mapping attribute names and properties in template conversion.
1. Open the value field properties dialog for each value field and check the attribute name.
A warning is displayed if the attribute is unknown.
2. Open the list of attributes by clicking on the
Attribute… button.
3. Select the correct attribute from the list and click
OK.
4. It is advisable to load the default settings for the attribute as prompted on the dialog.
5. Define the
sorting of the value fields after conversion, where needed. See the previous
section for detailed sorting instructions. The same sorting rules apply to converted value
fields as to those created by the user:
• Check the alphabetical sorting of the value fields in the content browser and change the
ascending / descending values if needed.
• See the appearance order of value fields in the content browser and shift them to the
correct location. The current order is converted according to the sorting order in the old
template.
• Also check whether similar rows need to be displayed.
V
alue fields
Copyright © 2005 Tekla Corporation TEKLA STRUCTURES BASIC TRAINING
20
Template Editor
6.
Rename the value fields to more descriptive ones. After conversion, the names appear
in the format field_ATTRIBUTE_NAME. Keep in mind that the value field names must
be unique.
You can rename the objects directly in the content browser, without opening
the properties dialog.
7. Align the value fields with text objects. First, select the objects and then right-click and
Align > Lefts.
8. Go through the summing value fields in the footer. Change the
formulas to have the
correct
value field names inside the brackets and quotation marks. See the previous
section for more information.
Copyright © 2005 Tekla Corporation TEKLA STRUCTURES BASIC TRAINING
21
Template Editor
9. Next, change the color of the value fields. Select all value fields by picking them while
holding down the
Shift key.
10. Right-click and select
Properties… .
11. Click on the
Font button.
12. Change the color to red.
13. Click
OK in the Select Font dialog.
14. Click
OK in the Value Field Properties dialog.
Next, edit the colors of all border lines in the template.
1. Select all lines by picking them while holding down the
Shift key.
2. Right-click and select
Properties… .
3. Change the color to yellow.
Graphical objects
Copyright © 2005 Tekla Corporation TEKLA STRUCTURES BASIC TRAINING
22
Template Editor
4. Click
OK.
Next, edit the colors of all text strings.
1. Select all text strings of the same font size by picking them while holding down the
Shift
key.
2. Right-click and select
Properties… .
3. Click on the
Font button.
4. Change the color to green.
5. Click
OK in the Select Font dialog.
6. Click
OK in the Text Properties dialog.
Fit template components by the objects
The right side of template components can be fitted by the contents. Select the menu
command
Edit > Crop > Template Right Side. Empty spaces are cut off from the right side.
The finalized template should now look like the example below:
Convert assembly_bolt_list.tpl template
The second example of file conversion has an additional hierarchy definition for a missing
object branch.
1. The converting process starts again with the opening command.
2. …and selecting the file to be converted: this time the file
assembly_bolt_list.tpl.
Text objects
Copyright © 2005 Tekla Corporation TEKLA STRUCTURES BASIC TRAINING
23
Template Editor
3. Define the conversion options and …
4. …edit the template components and objects like in the previous example but leave the
hierarchy definition for the next task.
The whole hierarchy of the objects must be defined in the template (see appendix I) in order
to get the data of sub-rows. In this example bolts are attached to some part, not to the
assembly directly. Therefore, an additional row is needed between the assembly and bolt
rows.
1. In the components toolbar select "
Row".
2. Select "PART" as the content type
A new row is created.
3. Double-click on the new row in the content browser or on the row border in the editor to
open the
Row Properties dialog.
4. Enter a descriptive name for the row in the Content Browser.
5. Move the row up between the Assembly and Bolt rows by selecting the row and clicking
on the
Move item up button.
6. Shift the Part row hierarchically down a level under the Assembly row by clicking on
the
Shift row down a level button.
Hierarchy
Copyright © 2005 Tekla Corporation TEKLA STRUCTURES BASIC TRAINING
24
Template Editor
7. Select the Bolt row and shift it under the part row by clicking on the
Shift row down a
level
button twice.
The Part row can now be hidden in the final output.
1. Open the Part row's properties dialog.
2. Tick the
Hide in output field. The row is run, but not printed into final output.
3. Click
OK.
The hidden row is displayed as a dashed line.
The Part row needs some contents. Add a value field
PART_POS with ascending sorting into
the row in order to have all different parts listed. It will not be visible, because the row has
the option "Hide in output".
The final template should look like this:
The hidden objects (row and value field) are displayed as dashed lines.
V
isibility
New objects