Macromedia dreamweaver CS3 tutorial
Bạn đang xem bản rút gọn của tài liệu. Xem và tải ngay bản đầy đủ của tài liệu tại đây (2.26 MB, 58 trang )
Macromedia Dreamweaver
CS3 Tutorial
Create a folder on your computer called website1 to hold all of your web
pages. Example of the webpage Link: syllabus.html
Inside of the website1 folder create a folder called images to hold your
graphics.
Example of the Image Link: images/logo.jpg
Notice how the forward slash in the link represents the location of a new
folder.
website1
images
All folders, web pages, and graphic names must be lowercase, no
spaces, and no special characters for ease of linking later.
Launch Dreamweaver
Select HTML
New Page Appears
Or Select File>New
Select HTML, Create
Page Size Settings
Check Mark When Active
Window>Insert
Window>Properties
Window>Files
Window>Insert Palette
Window>Properties Palette
Window>Files Palette
From the Files Palette Link:
Select Manage Sites
Select The New Site Button
Set the New Site Definitions
1. Name Your Webpage
2. Click on the Folder Icon &
Locate the website1 folder
3. Click on the Folder Icon &
Locate the images folder
inside of the website1 folder
4. Add HTTP URL Address:
oria
.edu/~yourlastname/website
1/index.html
5. OK, Done Buttons
1
2
3
4
The File Structure You Created
Begin Creating the index.html
main webpage
Modify>Page Properties
Appearance, Set
Font, Text, Background Color
Links, Set Link, Visited Link
Colors
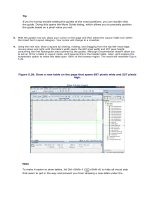
Insert Tables to Hold Content in the
Desired Locations
Insert>Table: Set Rows, Columns,
Width, Border, OK
Select Font Properties, click the
curser on the page, type in text
Font Hierarchy Setting Example
Title = Heading 1 size, Ariel font, left align, bold style.
Subtitles = Paragraph size, Ariel font, left align, bold style.
Body = Paragraph size, Ariel font, left align, normal style.
Drag Adjust Column Widths, or
Select Cells & Merge or Split
Before Adding Images go to
File>Save As & name your page
(main page is named index.html)
Remember to
use all
lowercase
letters, no
spaces or
special
characters