microsoft publisher 2010 product guide
Bạn đang xem bản rút gọn của tài liệu. Xem và tải ngay bản đầy đủ của tài liệu tại đây (2.28 MB, 47 trang )
Microsoft Publisher 2010
Product Guide
Introduction 1
Publisher 2010: At-a-Glance 2
Create visually compelling publications 2
Save time and simplify your work 3
Access the right tools at the right time 3
Share your publications with confidence 4
Publisher 2010: A Closer Look 5
Easier Access to Online Templates Improved! 5
Customize Templates and Reuse Custom Content 6
Building Blocks Improved! 7
Share with the Publisher User Community New! 8
Tools for Editing and Working with Photos New and Improved! 10
Object Alignment Technology New! 12
Fine Typography New! 12
Live Preview New! 14
Paste with Live Preview New! 15
Hide Scratch Area New! 16
Page Navigation New! 17
Ribbon New! 18
Backstage View New! 19
Integrated Print Experience New! 20
Commercial and Digital Print Support Improved! 21
Publish to PDF or XPS Improved! 23
Language Tools Improved! 24
Save and Manage Your Customer Lists 25
Send E-mail Newsletters 25
Where to Find It 27
Version Comparison 34
FAQ 40
Requirements\Disclosures 44
1
With its simple-to-use design tools, Microsoft
®
Publisher 2010 gives you the power to create,
print, and share professional-quality marketing materials and publications.
Work more efficiently with an updated user interface, improved photo tools that enable you to
get exactly the results you want, plus visual guides that help you navigate publications and see
what you’re printing. Whether you need a brochure, flyer, catalog or e-mail newsletter, you can
do it yourself with less expense and less work. Publisher 2010 makes it easy to create your own
successful communications.
2
You don’t have to be a professional designer to get professional results from your marketing
and communications materials. A wide range of pre-designed, customizable templates and easy,
accessible design tools help you quickly go from concept to completion to create visually rich
publications.
Create visually compelling publications
The look of your content can significantly impact how it is received by your audience. But if you
aren't a graphic designer or you don’t have the time to start from scratch, you may wonder how
you can create visually compelling publications. Publisher 2010 provides a range of new and
improved features that can get you started and help you look like a pro with publications that
always make a great impression.
Easily access pre-designed templates—both built-in and hosted on Office.com—from
within Publisher 2010. Customize the templates you select to suit your needs for quick,
great-looking results.
Use improved tools for editing and working with photos—including improved pan, zoom,
and crop —that make it a snap to replace and perfect images while preserving formatting
and page layout.
Design and lay out pages like an expert with new object alignment technology that
provides visual guides to help you effortlessly position your content while always leaving the
final layout up to you.
Create incredible publications in no time when you insert and customize pre-built content
building blocks. Choose from an array of page parts—such as sidebars and page stories—
as well as calendars, borders, advertisements, and more.
Give your text the look of professional typesetting with new fine typography tools.
Publisher 2010 provides support for the stylistic sets, stylistic alternates, ligatures, alternative
number formats, and other professional typography features available in many OpenType
fonts.
3
Save time and simplify your work
No matter what you are designing, you want to focus on the end result, not the tasks associated
with getting there. To help you keep your attention where it needs to be, Publisher 2010 delivers
new and improved tools and a more efficient workspace that simplify the creation process and
save you time at every step.
Get it right the first time. Publisher 2010 gives you a Live Preview of formatting options for
many types of content before you commit to a selection. Preview options for pasting text
and even preview how a template will look as you try out design schemes.
Take advantage of a more flexible workspace with the ability to hide the scratch area that
surrounds the Publisher 2010 publication window. Show or hide content outside the printed
page to easily create custom bleeds or keep content handy as you design.
A new page navigation pane provides a thumbnail view of each page of your publication so
that you can quickly move from page to page or drag thumbnails to reorder pages.
Access the right tools at the right time
Save time and create better content with easier access to all of the tools you need.
The improved, customizable Ribbon is available in Publisher 2010 to make the commands
you need most accessible. Create custom tabs with the features you use most or even
customize built-in tabs.
The new Microsoft Office Backstage™ view replaces the traditional File menu in all
Microsoft
Office 2010 applications and provides a centralized, organized space for all of your
publication management tasks.
Whether you are sending a flyer within an e-mail message, a large-quantity mailing to a
commercial printer, or a publication for viewing on the Web, Publisher 2010 provides new and
improved ways for you to share, print, and publish with ease.
4
Share your publications with confidence
With Publisher 2010 you can preview every detail of your publication to see precisely how it will
print and publish in a wide range of formats that make sharing a breeze.
With the integrated print experience in Publisher 2010, it’s easier and quicker than ever to
print both simple and complex documents, and get the results you expect. Take advantage
of a full page print preview directly alongside a host of adjustable print and print preview
settings.
When you need to print in larger quantities or at higher quality, use improved commercial
and digital print support. Select from a range of professional color models and
customizable settings.
Quickly create a PDF or XPS copy of your publication for easier printing and sharing and get
the option to include password-protection for PDF files.
Customize your multilingual work experience and collaborate more easily using improved
language tools that enable you to set separate languages for many aspects of your
Publisher 2010 editing environment.
Compile, edit, and manage your customer list directly in Publisher, using the easy and
efficient Mailings tab on the Publisher 2010 Ribbon.
5
Create visually compelling publications
Easier Access to Online Templates Improved!
Sometimes the greatest challenge on a project can be getting started. With this in mind,
Publisher 2010 lets you access a growing library of templates hosted on Office.com from right
within Publisher 2010.
Find 25 categories of customizable templates designed by both
businesses and the Publisher user community.
1
Figure 1: Access pre-
installed and online
templates from the
New tab in
Backstage view.
1
As of general availability of Office 2010, community content such as shared templates and building blocks will be available in the
following specific markets and language versions: Australia, Austria, Belgium (Dutch and French languages), Brazil, Canada (English
and French languages), France, Germany, Hong Kong, India (English language), Italy, Japan, Korea, Latin America, Luxembourg,
Mexico, Netherlands, Poland, Russian, Spain, Switzerland (French and German languages), Taiwan, United Kingdom, and the United
States Community content may be enabled in additional versions after release, so please check Office.com periodically to see if
your language and/or market is listed.
6
Customize Templates and Reuse Custom Content
You may want to customize a pre-designed or blank template to take on your organization’s
visual brand identity or add your own personal flair to a publication. Whatever your
customization needs, Publisher 2010 gives you an array of tools to get the results you want.
Design Schemes: Select from dozens of color schemes and font schemes or create your
own. Find galleries of color and font schemes on the Page Design tab of the Ribbon and just
point to a gallery option to preview the look on your active publication or template.
Reuse Custom Content: Save and reuse your color and font schemes, as well as your
organization’s contact information and logo. Easily implement your brand identity and
create a consistent look for your publications.
Template Live Preview: Preview how your customizations will look before you even create a
publication. In Backstage view, on the New tab, select an existing template from your files,
built-in Publisher 2010 templates, or online templates, and then use the Customize pane
shown in Figure 2 to preview the publication with your saved design schemes, company
information, and logo before you even create it. Creating content with your branding has
never been easier.
Figure 2: Preview
customizations
as you select a
template.
7
Quick Tips:
Take advantage of an improved color palette that provides a range of tints and shades for your
selected scheme colors. Wherever you can access a color palette in Publisher 2010–such as when
formatting text or shapes–tints and shades appear automatically below your scheme colors.
Save time and improve the look of tables in your publications with a wide range of built-in table
styles. Preview and apply styles easily from the Table Formats gallery on the Table Tools Design tab or
use the familiar Table AutoFormat dialog box to customize table styles.
Categorize and organize your templates within My Templates. When you save a file from within
Publisher as a Publisher template, you get the option to create and assign categories. Then, when you
need to access your own custom templates, you can find them within your own categories in the My
Templates folder located on the New tab in Backstage view.
Building Blocks Improved!
No one likes to spend time recreating or searching for misplaced work. With Publisher 2010 you
can easily reuse content from your publications and other documents. Save frequently-used text,
design elements, and graphics as building blocks that you can quickly add to your publications
when you need them.
You can also access galleries of built-in building block content as well as content created by
other Publisher users that is hosted online. Browse through borders, sidebars, page stories and
more to find just the thing you need to make your publication stand out.
8
Figure 3: Find building block galleries for Page Parts, Calendars,
Borders & Accents, and Advertisements on the Insert tab.
Share with the Publisher User Community New!
Share your masterpiece on Office.com right from within Publisher 2010. Now, after you save a
custom template or building block, it’s easy to share your work with other Publisher users.
Submit your template or building block entry to Office.com for publication as Community
Content.
2
Once your content is hosted online, you and other Publisher 2010 users can see it
when searching for templates or building blocks on Office.com, or when your template or
building block search in Publisher 2010 includes online content.
2
An Internet connection is required to submit your content to Office.com.
9
Figure 4: After you save your custom template, find the option to Share
with Template Community on the Save & Send tab in Backstage view.
Figure 5: Right-click your saved, custom building block entry in the gallery
10
where it appears for the option to Share with Building Block Community.
Tools for Editing and Working with Photos New and Improved!
It’s now easier than ever to add, replace and customize images in your publications. Easily swap
out pictures while preserving the look and layout of your document. Pan, zoom or crop images
to display exactly the picture you want. And, access a range of picture formatting and editing
tools from a centralized Picture Tools tab that appears automatically whenever you select a
photo. Publisher 2010 gives you the power to perfect the images in your publications without
the need to use additional picture editing programs.
Customize pictures: View the entire image while you pan, zoom, or crop within the picture
area to display exactly the part of the photo you want every time.
Figure 6: The full picture appears in shadow while you easily pan, zoom, and
crop for flawless results.
Add or replace pictures: Click the icon in the center of a picture placeholder (formerly
called a picture frame) to add a picture from your files. When you insert a picture, the
placeholder remains the size you made it and it is filled with the inserted picture. Drag the
image to pan, resize it to zoom, and crop your image so that it fits exactly as you want it
11
within the placeholder area, as shown in Figure 6. You can also use powerful new crop
shortcuts to fit your full image proportionally within the crop area, fill the crop area with
your image, or remove the crop.
Swap pictures or picture formatting: Swap the position of any two selected pictures on a
publication page to fine-tune your page layout with just a click. Images exchange locations
on the page and take on the picture formatting at their destination. Or, fine-tune page
design just as easily by selecting the option to swap picture formatting only, which leaves
selected images in place and trades just their brightness, contrast, and recolor settings.
Insert picture captions: Select from a gallery of caption formatting and layout options and
insert a formatted picture caption in precisely the right position with just a click. Place the
caption at the top, bottom, or sides of your photos, or even overlay text.
Format and edit pictures: Use the Picture Tools Format tab on the new Ribbon for easy
access to many of the new and improved photo tools discussed here as well as editing tools
ranging from brightness, contrast, and recolor to a new gallery of picture styles or the option
to change the shape of the picture.
Figure 7: The Picture Tools Format tab appears automatically when you select a picture in
Publisher 2010.
Publisher 2010 makes it easy to format, apply effects, and edit the photos in your publications to
get the look you want without having to open another software product.
12
Object Alignment Technology New!
Creating your layout is easier than ever with new object alignment technology. Dynamic
guidelines display suggested locations for shapes, text boxes, and images as you drag them and
enable you to easily align to existing objects. Publisher 2010 shows a suggested location for the
object you’re moving whenever it aligns with other objects on the page, but always leaves the
final decision up to you. You stay in control of the placement of every object and get the results
you want.
Figure 8: Dynamic
alignment guides appear
automatically when a new
object is aligned with others
such as the left edge of the
existing image, as shown
here.
Fine Typography New!
Add flair to your text with new fine typography options available in Publisher 2010. Create the
look of professional typesetting in just a few clicks with support for ligatures, stylistic sets, and
other typography features available in many OpenType fonts. For example, explore the
typography features in existing OpenType fonts such as Calibri, Corbel, and Cambria. Or try
Gabriola, a new font in Office 2010 that offers a rich array of stylistic sets.
Publisher 2010 provides support for the following OpenType typography features:
Stylistic sets: Use stylistic sets to get a different look for selected text without searching for
another font.
13
Figure 9: Text
in the Gabriola
font, using a
range of
stylistic sets.
Stylistic Alternates: Stylistic alternates provide alternative shapes for individually selected
characters.
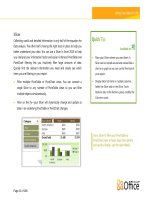
Number styles: Control the appearance and layout of numbers in your text using number
styles that combine alternatives for number forms and number spacing.
Figure 10: Different
number styles applied
to address text and to
price and date
information in the
Cambria font.
Ligatures: Ligatures give your document the look of professional typesetting by combining
character pairs to improve readability.
Figure 11: Standard
ligatures applied to
text in the
Constantia font.
OpenType kerning: When you apply the font kerning you know from earlier versions of
Publisher, Publisher 2010 now uses the OpenType values when available for a more precise
result as specified by the font designer.
14
Note: Many of the same OpenType typography capabilities are also available in Microsoft
®
Word 2010.
Quick Tip: Use the Swash feature, available on the Text Box Tools Format tab, in the Typography group,
to turn flourishes on or off for selected characters within a stylistic set, such as those shown on the P as
well as the b, l, and h in the following image:
Save time and simplify your work
Live Preview New!
Save time and get the formatting you want by previewing formatting for text and objects before
you apply it. Just point to options in a formatting gallery, such as Shape Fill, Font, or Color
Scheme, and immediately see a preview of that formatting on your selected content.
Figure 12: Preview formatting options on your content before you apply it.
15
Paste with Live Preview New!
Save time when reusing text within Publisher 2010 or across applications. When you copy text
and then paste it using Paste with Live Preview, you can preview various options for how your
text will look, such as Keep Source Formatting or Keep Text only. Instead of using Undo and
trying again, Paste with Live Preview now helps you get it right the first time.
Figure 13: Simply point
to a paste option to
preview results and
then click to select the
option you prefer.
Quick Tip: You can still access paste options after you paste and change your mind without having to
undo any actions. Click the icon that appears alongside pasted content to expand Paste Options. Or, if
you prefer to use the keyboard, press CTRL to expand Paste Options and then use the left and right arrow
keys to move through the options. If you select a different option from your first choice, the result is
automatically replaced.
Note: Paste with Live Preview is also available in Word 2010, Microsoft PowerPoint
®
2010,
Microsoft Excel
®
2010, and Microsoft Outlook
®
2010.
16
Hide Scratch Area New!
The Publisher scratch area surrounds the publication and allows objects to be placed off-page
for convenient retrieval or partially off-page for creating edge-to-edge bleeds. When you place
objects on the scratch area, Publisher 2010 now gives you the option to hide or show that
content as needed. Just click to hide scratch area content and see only the printed page; then
click again to restore it. If you have objects that bleed off the page, this view lets you see exactly
how they will be clipped on output.
Figure 14: Hide the scratch area to easily see full bleed designs.
17
Page Navigation New!
Use the new Page Navigation pane for a birds-eye view of your publication. View thumbnails of
each page, including two-page spreads, and just click a thumbnail to quickly move to that page
or drag thumbnails to quickly rearrange pages.
You can also right-click a thumbnail in this pane for easy access to several common page
management features as shown in Figure 15. Insert a new page or a duplicate of the selected
page, change the applied master page, and more.
Figure 15: A shortcut
menu of page
management tasks
appears when you right-
click a page in the Page
Navigation pane.
18
Access the right tools at the right time
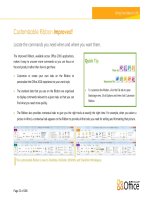
Ribbon New!
Locate the commands you need when you want them and where you want them. New to
Publisher 2010, the Ribbon helps you access more commands quickly and focus on the end
product, not how to get there.
The Ribbon replaces traditional menus and toolbars to give you a more personalized work
experience. You no longer have to navigate complex menus or open multiple toolbars to make a
small formatting adjustment or change a drawing.
Use the Ribbon to more easily find and use the full range of features that Publisher 2010
provides—so that you can get more done in less time.
The standard tabs that you see on the Ribbon are organized to display commands relevant
to a given task, so that you can find what you need more quickly.
The Ribbon also provides tabs to give you exactly the tools you need, when you need them.
For example, The Text Box Tools Format tab and Drawing Tools Format tab appear when a
text box is selected, providing a wide range of options as you see in Figure 16.
You can also create your own tabs or customize built-in tabs on the Ribbon to personalize
the Publisher 2010 experience to your unique work style.
Figure 16: Contextual tabs, such as the Text Box Tools Format tab shown here, appear
automatically when relevant content is selected.
Quick Tips:
When you select text, a transparent Mini Toolbar appears by default. Point to the toolbar and it
becomes solid, putting a variety of common text formatting tools right at your fingertips.
19
The Quick Access Toolbar appears above the Ribbon by default, as you see in Figure 16. Right-click
virtually any command on the Ribbon for the option to add it to the Quick Access Toolbar, so that you
can keep your favorite commands instantly accessible.
If you prefer to access commands using the keyboard, try the improved accelerator key functionality
known as Key Tips. Press the ALT key on your keyboard to display Key Tips on the Ribbon and Quick
Access Toolbar. A letter or number combination appears that you can press to access each command.
Backstage View New!
On the left edge of the Ribbon you see the File tab. Just click that tab for an all-access pass that
makes it easier than ever to manage your publications and customize your Publisher experience.
The Backstage view replaces the traditional File menu to let you get started, share, print, and
publish with just a few clicks. For example:
Get started quickly with built-in and new community-submitted templates that are hosted
online and accessed through Publisher.
Access and edit saved contact information for your organization, review and update file
properties, run Design Checker to eliminate errors before sharing your publication, and
customize commercial print settings all from the centralized Info tab shown in Figure 17.
Use the integrated print experience to adjust print settings while viewing a large print
preview of your publication with rulers and page numbers.
Save a copy of your publication to PDF or an image file format for ease of sharing, send your
publication by e-mail, package it for a commercial printer, and much more from the Save &
Send tab.
20
Figure 17: Access
all of your file-
management tasks
easily in one
centralized space
with Backstage
view.
Share your publications with confidence
Integrated Print Experience New!
Publisher 2010 delivers a combined print and preview experience that makes it much easier to
print both simple and complex documents. Adjust print settings while viewing a large print
preview of your publication—no need to switch back and forth between multiple screens to see
the impact of your changes. View and adjust page boundaries, page numbers, sheet rulers and
other key print information.
Zoom in on a selection, use a ruler to verify paper size, or decide how many pages you want to
view at once. You can also use the new backlight feature to see ―through‖ the paper to preview
the other side of your publication, so that your printed page ―flips‖ exactly as you want it. Or,
make sure that objects align correctly across multiple pages in a publication directly from within
this combined print and print preview environment.
21
Figure 18: See and manage every aspect of how your publication will print.
Commercial and Digital Print Support Improved!
Documents designed for printing in larger quantities at higher-quality often require printing by
a commercial printer. With Publisher 2010, you can make printing your commercial print jobs
seamless by taking advantage of improved commercial printing support, including a broader
variety of color models that make it easy to get the result you want.
Some of the tools available include the following:
Save as a PDF file with or without password protection.
Select and specify settings for multiple color models including spot color, CMYK process
color, Pantone PMS and the new Pantone GOE color system.
Easily manage embedded fonts and font substitution.
Set a variety of registration settings for your publication, such as overprint and spot color
options.
Use the Save for a Commercial Printer Pack and Go Wizard to effortlessly prepare your
publication for sending to a commercial press.
22
Figure 19: Customize commercial print settings and easily prepare your publication for the
printer.
Quick Tip: Don’t spend your valuable time guessing about how your publication will look when printed or
shared—get the help you need before you publish. The Design Checker in Publisher 2010 is accessible
from the Info tab in Backstage view to review your publication for a variety of common design and layout
mistakes and provide options to help you fix them. You can also use Design Checker with commercial
print and e-mail publications to help you identify and fix common design errors prior to distributing them.