microsoft outlook 2010 product guide
Bạn đang xem bản rút gọn của tài liệu. Xem và tải ngay bản đầy đủ của tài liệu tại đây (2.93 MB, 65 trang )
Microsoft Outlook 2010
Product Guide
Microsoft Outlook 2010: An Overview 1
Outlook 2010: At-a-Glance 2
Get easier access to the right tools, at the right time. 2
Save time viewing, creating, and managing your e-mail. 2
Deliver polished and professional communications. 3
Connect with people, connect your e-mail accounts, and stay up to date. 3
Access your vital information virtually anywhere, anytime. 4
Outlook 2010: A Closer Look 5
Ribbon Improved! 5
Microsoft Office Backstage View New! 6
Conversation View Improved! 8
Quick Steps New! 9
MailTips New! 10
Search Tools Improved! 11
Office Themes Improved! 12
Paste with Live Preview New! 13
Picture Editing Tools New and Improved! 14
SmartArt Graphics Improved! 15
Multiple Mailbox Support Improved! 16
Schedule View New! 16
Room Finder New! 18
Calendar Preview New! 19
Contact Card New! 19
People Search Improved! 21
Outlook Social Connector New! 21
Translation Tools Improved! 23
Language Tools Improved! 24
Voice Mail Preview New! 25
Microsoft Outlook Web App Improved! 25
Microsoft Outlook Mobile 2010 Improved! 26
Exploring Conversation View 28
Make the switch to Conversation View 28
Conversation View: General Tips 28
Setting your Conversation View preferences 29
What is a split conversation? 31
Migrating your preferred settings to other folders 33
Conclusion 36
Where to Find It 37
Version Comparison 43
Outlook 2010 FAQ 52
Feature Availability / Disclosure 62
Outlook Mobile 2010 62
Outlook Web App 62
Links provided in this product guide 62
1
Microsoft® Outlook® 2010 offers premium business and personal e-mail management tools to
more than 500 million Office users worldwide. We know the average person reads about 1,800
messages per month and deletes about 1,500 of them. Even though e-mail is important to you,
don’t you wish you could spend less time managing it? Manage your day efficiently with
Outlook 2010. From a redesigned look to advanced organization, search, and scheduling
features, you can stay on top of your daily communications and agenda to get things done.
For many of us, e-mail is a vital part of our everyday lives. We rely on mobile devices for
communication and living that ―always on‖ lifestyle. It’s how we stay in touch with friends, family,
business, and the world at large. Whether you’re waiting for a flight, reading a book in a coffee
house, or leaving a meeting with a client, you want your e-mail available to you on your
schedule, not your location. Outlook 2010 can provide anywhere access to your e-mail, calendar,
and address books and they’re never farther away than your closest Web browser or
smartphone.
1
Connect with other people at work and at home along with a variety of Web
services and social networks when you’re on the go so you can keep in touch with the people
that matter most.
Welcome to Outlook 2010—our most powerful and intuitive version yet.
1
Web and smartphone access require an appropriate device and an Internet connection. Web functionality uses Outlook Web App, which
requires Microsoft Exchange Server 2010 and a supported Internet Explorer
®
, Firefox, or Safari browser. Some mobile functionality
requires Microsoft Outlook Mobile 2010 which is not included in Office 2010 applications, suites, or Office Web Apps. There are some
differences between the features of Outlook Web App, Outlook Mobile 2010, and Outlook 2010.
2
Take a glance at how Outlook 2010 is designed to give you the best productivity experience
across PC, phone, and browser. Get a closer look at the new and improved features in the
sections that follow.
Get easier access to the right tools, at the right time.
New and improved features can help you be more productive, but only if you can find them
when you need them. Fortunately, the enhanced, customizable Ribbon in Outlook 2010 makes
it easy to uncover more commands so you can focus on the end product, not how to get there.
Want an easier time configuring new and existing accounts? Wishing for a faster, more direct
route to print something? Or perhaps you need an easier way to clean up your mailbox? The
new Microsoft Office Backstage™ view can help you achieve all of this and more. You can now
more easily manage your account, print, and customize your Outlook 2010 experience, all from
one convenient location.
Save time viewing, creating, and managing your e-mail.
Think about how much e-mail you receive in the typical week today versus the typical week five
years ago. We’ve redesigned Outlook 2010 to reflect these changes in your lifestyle and help
keep up with the vast amounts of information coming at you every day.
Manage large amounts of e-mail with ease. Condense or categorize entire conversations—or
even ignore them with a few clicks. With new conversation management tools and the
improved Conversation View, dozens of e-mails can suddenly turn into just a few relevant
items and help you gain control over your e-mail to get more time back in your day to focus
on other things.
3
Send the right information to the right people and respond to information rapidly. MailTips
2
instantly alert you to potential distribution issues and Quick Steps take the multi-command
tasks you perform most down to just a single click.
Deliver polished and professional communications.
Over the years, e-mail has evolved from one or two paragraphs of text to family or business
newsletters, personalized stationery, agendas, and so much more. Whether your e-mail is
personal or business related, Outlook 2010 brings innovative tools you’d expect from Microsoft
Office to help you bring your ideas to life.
Rapidly turn information into action with beautifully formatted e-mails. Use newly added
Office themes to express your formatting style. When it comes to reusing content via paste,
Paste with Live Preview enables you to get the formatting right the first time.
Grab your readers’ attention by visually conveying your message. You don’t need to be an
expert to deliver polished and professional e-mails. New and improved picture editing
tools, SmartArt® graphics, and the ability to insert screenshots directly into your messages,
enable you to incorporate great-looking graphics without using additional photo-editing
programs.
Connect with people, connect your e-mail accounts, and stay up to date.
Whether you’re managing a team or organizing a family event, it’s important to stay connected
to people inside and outside your office or home. Outlook 2010 brings together various e-mail
and communication networks so that staying connected with the people you care about is fast,
simple, and fun.
Combine multiple e-mail accounts, calendars, and address books and easily manage them
from a single, centralized view.
Manage your schedule stress-free using the new Schedule View and group scheduling
tools.
2
Microsoft Exchange Server 2010 is required for MailTips and must be enabled by an Exchange administrator.
4
View the availability of a person and instantly reach out to them using a variety of
communication methodsall on a new easy-to-access contact card.
Get additional information about people, such as mutual friends and other social
information, while staying better connected to your social and business circles through the
Outlook Social Connector.
Access your vital information virtually anywhere, anytime.
Check e-mail anywhere and quickly locate those important addresses and phone numbers when
you need them. Now you can stay connected to your work and personal connections by taking
the Outlook experience with you and stay on top of your needs while you’re on the go.
Combine your communications and receive voice mail previews in your inbox.
3
Microsoft Outlook Web App: Stay up to the minute and in touch. View your Outlook e-
mail messages, contacts, and calendar events stored on Microsoft Exchange Server 2010
through your Web browser.
4
Microsoft Outlook Mobile 2010: Sync Outlook 2010 with an enhanced mobile version of
Outlook specifically suited to your Windows® phone.
5
No desktop required.
3
Requires Microsoft Exchange 2010 and Microsoft Exchange Unified Messaging.
4
Outlook Web App, formerly known as Outlook Web Access, is available to Microsoft Exchange customers.
5
An appropriate device and Internet connection are required. Outlook Mobile 2010 is not included in Office 2010 applications, suites,
or Office Web Apps. Outlook Mobile 2010 comes pre-installed on Windows phones and is the default e-mail client. Outlook Mobile
2010 will be released on Windows phones (Windows Mobile
®
6.5 or above) by the general availability of Microsoft Office 2010. There
are some differences between the features of Outlook Mobile 2010 and the Office 2010 applications.
5
Explore new ways Outlook 2010 can help you get things done whether you’re working on your
ideas on your own, together, or on the go.
Get easier access to the right tools, at the right time.
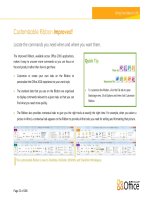
Ribbon Improved!
The Ribbon replaces the menu and toolbars at the top of the main Outlook window to give you
a more customized work experience. It’s designed to help you more easily find and use the full
range of features that Outlook provides—so that you can get more done in less time.
Figure 1 - The Ribbon is now available across Outlook 2010.
Locate the commands you need when you want them and where you want them. The improved
Ribbon, now available across Outlook and the Office 2010 applications, makes it easy to uncover
more commands so you can focus on the end product rather than how to get there.
Customize or create your own tabs on the Ribbon to personalize the Outlook 2010
experience to your work style.
The standard tabs you see on the Ribbon are organized to display commands relevant to a
given task, so that you can find what you need more quickly.
The Ribbon also provides contextual tabs to give you exactly the tools you need, when you
need them as shown in Figure 2.
6
Figure 2 - Update your Calendar and Task items without leaving your inbox. For example, click a
Calendar or Task item on your To-Do Bar to display a contextual tab on the Ribbon that provides
you tools for working with that item.
Quick Tip: While you’re checking out the Ribbon at the top of the screen, don’t forget to look down. The
status bar at the bottom of the Outlook window is now customizable. Just right-click to select the items
you want to view, such as count of items in your inbox, unread items, mailbox quota, and more. There’s
even a new zoom slider on the right side of the status bar that lets you quickly increase or decrease the
size of information displayed in the Reading Pane.
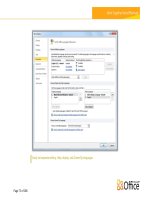
Microsoft Office Backstage View New!
On the left edge of the Ribbon you see the File tab. Just click that tab for an all-access pass that
makes it easier than ever to manage your accounts and customize your Outlook experience.
The new Backstage view replaces the traditional File menu from previous versions to provide a
single location for all of your account management tasks. For example:
When you first open Backstage view, you’re on the Info tab, shown in Figure 3. From this one
location, you can manage your account settings, such as add a new e-mail account,
configure automatic replies for when you are out of the office, modify your archive options,
and organize your rules and alerts.
7
Figure 3 – Manage your Outlook account in one convenient location in Backstage view.
From the Open tab in Backstage view, you can import and export files, open Outlook data
files, and save Outlook items in other formats.
The Print tab provides a new print experience with a full page Print Preview right alongside
the print options you need.
Get application help and links to other online self-help resources, such as training tutorials.
Also find information about the version you are running, activation, and licensing
information on the Help tab.
The Options tab offers extensive options for setting your preferences, including the ability to
customize the Ribbon and Quick Access Toolbar.
The Ribbon helps you create your content. Backstage view helps you manage it.
Quick Tip: If your mailbox has a size limit, a new quota thermometer provides a visual representation of
how much space is left in your mailbox, shown in Figure 3.
8
Save time viewing, creating, and managing your e-mail.
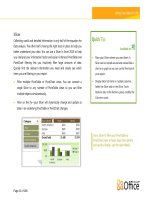
Conversation View Improved!
The improved Conversation View in Outlook 2010 helps you get straight to the relevant facts. It
condenses multiple e-mails in a discussion, called a conversation thread, and displays them as
single line item—even if some messages in the conversation are located in other folders. Not
only does this help reduce information overload, but it also helps improve the tracking and
managing of related e-mails. And, new conversation management tools can help you save
valuable inbox space.
Figure 4 – Use
Conversation
View and stay
on top of your
conversations.
View only the relevant information. When you click on a conversation, Outlook shows you
the latest message in the conversation. Expand to see earlier, redundant messages, or see
individual contributors.
Determine if there are multiple messages in the conversation at-a-glance. The message icon
for a conversation with more than one message displays multiple envelopes.
Store fewer e-mails. All redundant e-mails in the conversation can be quickly eliminated
using Clean Up and unique messages will be preserved.
9
Take yourself out of irrelevant conversations. Use Ignore and send the entire conversation,
and future messages, to your Deleted Items folder.
If you’re an Exchange user, when you Ignore a conversation, future messages will be sent to
your Deleted Items even if you access your e-mail on Outlook Web App or your smartphone.
Quickly take action on the entire conversation in just a few clicks. Select the conversation
subject and assign all messages in the thread to a category, mark them as read, move or
copy them to another folder, and more.
Start harnessing the power of Conversation View! On the View tab, in the Conversations
group, select Show as Conversations, as shown in Figure 5.
Figure 5 – Also check out
the options under
Conversation Settings when
you turn on Conversation
View.
Quick Tip: Your Conversation View preferences can be easily customized. Find options such as Show
Messages from Other Folders, Show Senders Above the Subject, and more, on the View tab, in the
Conversations group, under Conversation Settings. For more information on using Conversation View,
see the section titled Exploring Conversation View at the end of this guide.
Quick Steps New!
Many e-mails you receive involve more steps than reading it and simply leaving it in your inbox.
Sometimes you need to move it to another folder, create a meeting or appointment, forward it
to others, or any combination of tasks. Outlook 2010 introduces a new featureQuick Stepsto
help you manage and rapidly respond to information by creating and defining common tasks
that can be executed in one quick and easy step.
10
Figure 6 - Use Quick Steps to perform
multiple actions in a single click.
Quick Steps enable you to:
Spend less time in your inbox by reducing the number of clicks needed to take action.
Forward an e-mail to your team and delete the original, flag, categorize and file an e-mail
into a specified folder, and do more in a flash.
Organize your Quick Steps and avoid searching for commands by keeping your favorites
front and center, and grouped together.
Quick Tips:
The first time you click on a pre-built Quick Step, other than Reply & Delete, a prompt will display,
enabling you to customize it to fit your work style.
If you’re an Exchange user, when you first click the To Manager or Team E-mail Quick Step, e-mail
addresses for your team will automatically populate.
6
MailTips New!
For business users, sending unnecessary e-mail messages and distributing confidential
information outside the company are frequent concerns. The new MailTips feature instantly
alerts you when you are about to send e-mail to the following and more:
7
A large distribution list—avoid spamming a large audience with unnecessary messages.
Someone who is out of office—save time from sending e-mails that won’t be responded to
in time for your deadlines.
6
Reporting line data must be configured for Team e-mail addresses to automatically populate.
7
Microsoft Exchange Server 2010 is required for MailTips and must be enabled by an Exchange administrator.
11
Invalid recipient address—determine if a recipient will receive your message immediately
and avoid bounce notices.
External parties—help prevent sending confidential information outside the company.
Figure 7 - MailTips notify you if a recipient has set an automatic reply prior to sending your
e-mail and helps save you time.
Search Tools Improved!
Searching for a specific item can appear daunting—especially when you don’t have time to sift
through every folder and read each piece of content. Fortunately, with Outlook 2010 you can
easily sort through your data and find what you need when you need it. Contextual Search
Tools, shown in Figure 8, help you quickly narrow your search and locate your vital information.
Figure 8 – Let Outlook do your searching for you and use the Search Tools to help you build
search criteria so you can find what you need.
12
Narrow your search in a few simple clicks. Easily add additional criteria into your search to
narrow your results to include only those items with file attachments, a specific timeframe,
e-mails sent directly to you or another recipient, and more.
Quickly refine your search location. Change the scope to broaden your search and include
subfolders, all mail items, or all Outlook items.
Manage your search options without leaving your search results. Modify search locations
and options, or quickly return to a previous search.
Quick Tip: When you type in an Instant Search box, AutoComplete suggestions will dynamically display to
help refine your search. To use a suggestion, click an item in the list or press your Down arrow key to
highlight the suggestion and then press Enter.
Deliver polished and professional communications.
Office Themes Improved!
Office themes and styles in Outlook 2010 offer formatting options to help you create
professionally formatted e-mail messages or those with a personal touch. Enjoy a wide range of
additional, out-of-the-box Office themes. Coordinate colors, fonts, and graphic formatting
effects. Simply select the Office theme you want and Outlook 2010 does the rest.
Figure 9 – Choose from a variety of
Office themes and create beautifully
formatted e-mails.
13
Quickly obtain consistent formatting. Text, charts, graphics, tables, and drawing objects all
change to reflect the theme you have selected, helping ensure that all elements in your
e-mail complement one another in a few simple clicks.
Predefine your formatting preferences. When you add new content, such as a graphic or
diagram, Outlook 2010 will automatically match them to your chosen Office theme.
Quick Tip: When creating a new e-mail, use the Themes group, found on the Options tab, to mix and
match theme colors, fonts, and effects. Save your custom preferences for reuse by creating your own
theme using Save Current Theme at the bottom of the Themes gallery.
Note: Office themes in Outlook 2010 use the same exact theme found in Microsoft Word 2010,
Microsoft PowerPoint® 2010, Microsoft Excel® 2010, and Microsoft Access® 2010.
Paste with Live Preview New!
Content for an e-mail is pulled from a variety of sources—tables from Web pages, charts and
graphics from documents, presentations, or workbooks, or content from your notes or other
e-mail messages. Save time when reusing content within Outlook or across applications. Pasting
content in Outlook 2010 has never been easier. Paste with Live Preview enables you to preview
various Paste Options so you can visually determine how your pasted content will look prior to
actually pasting. No more using Undo and trying again, Paste with Live Preview helps you get it
right the first time.
Figure 10 - Preview
formatting before
committing. For example,
the options shown here
enable you to preview
how text and a table will
appear in your e-mail
before you paste.
14
Use Paste with Live Preview to preview reused content prior to actually pasting. Simply hover
your mouse pointer on Paste Options to preview results. Paste Option items change
contextually to best fit the content you are reusing and ScreenTips provide additional
information to help you make a decision.
Quick Tip: The Paste Options gallery can be accessed after pasting. Click the icon that appears when you
paste to expand Paste Options. Or, if you prefer to use the keyboard, press Ctrl to expand Paste Options
and then use the left and right arrow keys to move through the options.
Note: Paste with Live Preview is also available in PowerPoint 2010, Excel 2010, Outlook 2010,
and for text in Microsoft Publisher 2010.
Picture Editing Tools New and Improved!
E-mail isn’t always about text. Dynamic graphics can grab your readers’ attention and
compelling visuals help you more easily convey your message. Outlook 2010 includes new and
improved picture editing tools for modifying images in your e-mail and gives you the freedom
to be your own graphic designer. Use the enhanced cropping tool or choose from a gallery of
picture corrections. Sharpen and soften photos or use a color wash to enhance them. You can
even add an artistic flair by adding effects such as photocopy, marker, line drawing, glass,
pastels and more.
Figure 11 –
An advanced
cropping tool
displays your
full image in
shadow while
you crop.
Obtain the perfect picture every time. With improved cropping, you’ll see the entire image
while making your adjustments. You can also move the image around within the crop box to
fine-tune your pictures.
15
Grab screenshots on the fly. Easily incorporate screenshots into your work through the new
Screenshot feature without leaving Outlook.
Focus on foreground, not the background. A new Remove Background tool makes editing
photos a snap right within Outlook 2010.
Quick Tip: Use the new Screen Clipping tool, found on the Insert tab under Screenshot, to capture a
portion of your screen and show only the details you want to convey.
Note: The same new and improved picture editing tools are also available in, PowerPoint 2010,
Word 2010, and Excel 2010.
SmartArt Graphics Improved!
Create professional-quality diagrams in your messages as easily as typing a bulleted list. Office
2010 adds dozens of additional SmartArt layouts for even more choices to help you display your
important information most effectively. You can also use SmartArt to add graphic elements such
as a series of captioned pictures.
Figure 12 – Use SmartArt
for diagrams, artwork, and
more.
Note: SmartArt graphics are also available in Word 2010, PowerPoint 2010, and Excel 2010.
16
Connect with people, connect your e-mail accounts, and stay up to date.
Multiple Mailbox Support Improved!
These days, communication extends beyond a single mailbox. You may have e-mail, address
books, and calendars from a variety of Web providers or more than one Exchange account.
Outlook 2010 has expanded support for multiple mailboxes and enables you to seamlessly work
across your accounts.
Switching between Microsoft Exchange accounts is now simplified. Connect multiple
Exchange mailboxes in a single Outlook profile so you can easily access and manage your
accounts in one location.
Synchronize multiple e-mail accounts from services such as Windows Live™ Hotmail®,
Gmail, or almost any other provider to Outlook 2010.
8
Quick Tip: When messages are deleted from an IMAP e-mail account they are now moved to your
Deleted Items folder. Marking messages for deletion and purging is no longer necessary.
Schedule View New!
Outlook 2010 was designed to help keep you connected. Share your time with others and stay
up-to-date on their schedulesall from one easy-to-view location. The new Schedule View
slices a group of calendars horizontally and streamlines their display. See what you, your family
members, or friends and colleagues are scheduled to do, determine when they are available, and
schedule a meeting or appointment.
If using Exchange Server, you’ll see your Team calendar automatically listed in the Calendar
Navigation Pane, shown in Figure 13.
9
When you select the check box next to your Team
calendar group, the calendars for your entire team will instantly display.
8
Window Live Hotmail accounts require the Outlook Hotmail Connector, available as a free download.
9
Reporting line data must be configured for Team calendar to automatically generate.
17
Figure 13 - Use
Schedule View to
manage or view
multiple
calendars.
Quickly schedule meetings. When viewing shared calendars, such as a shared Exchange
calendar or a calendar published on Office.com, find an available time slot using the
combined timeline shown at the top of the view and double-click the timeline to create a
new meeting for the group.
Quick Tips:
Your calendar view will change automatically depending on the number of calendars you choose to
display. By default, when you select five or more calendars, your view will automatically switch to
Schedule View. To modify the threshold for automatic view switching: in Backstage view, click Options
and find Schedule View preferences on the Calendar tab under Display Options.
Don’t have Microsoft Exchange? No problem. Use the Microsoft Office Outlook Calendar Sharing
Service to share calendars on Office.com and take advantage of scheduling meetings in Schedule
View. Display your calendar, and on the Home tab, in the Share group, click Publish to Office.com.
10
10
A Windows Live ID is required to publish a calendar on Office.com. As of the release of Microsoft Office 2010, the ability to view a
published calendar through a Web browser is discontinued. Subscribers can access your published calendar through programs such
as Windows Live Calendar, Google Calendar, or Apple iCal.
18
Room Finder New!
Schedule your conference room in just a few clicks. If you’re an Exchange user, you can schedule
a room for your meeting directly from a new meeting request. Just choose a group of rooms, or
building, for your meeting and Room Finder will show you all rooms that are free at that given
time.
11
When you select a room, it’s automatically added to the recipient list.
Figure 14 - Room Finder simplifies scheduling a room for your meeting.
11
Microsoft Exchange Server 2010 is required.
19
Calendar Preview New!
Handling a meeting request usually involves three steps—reading the meeting request, checking
your calendar, and responding to the request. Now when you receive a meeting request, the
new calendar preview helps you better understand how it affects your calendar without leaving
your inbox.
Instantly review any calendar conflicts or adjacent items in a calendar snapshot, shown in the
meeting request, so you can read the request and check the date on your calendar at the
same time.
Figure 15 – Save time by reviewing your calendar as you take action on a meeting request.
Contact Card New!
See availability and keep in touch with your contacts instantly. By using Microsoft Office
Communicator, or your instant messaging application, you can view presence information for
those on your contact list.
12
Easily connect to your colleagues and friends without switching to
another application.
12
Instant messaging and presence information require one of the following: Office Communications Server 2007 R2 with Office
Communicator 2007 R2, Windows Live Messenger, or another instant messaging application that supports IMessenger. Voice calls
require Office Communicator 2007 R2 or an instant messaging application that supports IMessengerAdvanced.
20
Hover your mouse pointer on a name to display the new contact card, shown in Figure 16,
and then easily initiate a conversation directly through instant messaging, send an e-mail,
schedule a meeting, and more.
Figure 16 - View a variety of communication options and information on the new contact
card. Click to expand the card for more details.
Expand the contact card and reveal more information for your contact, such as contact
phone numbers.
With Office Communicator you get additional functionality including the ability to initiate
voice calls directly from the contact card.
If you are using Exchange Server, you have the option of listening to an audio file of how to
pronounce the contact’s name, see their calendar status, and view organization hierarchy.
13
13
Calendar status requires Microsoft Exchange Server 2007 or higher. Person name pronunciation requires Exchange Unified
Messaging and audio file with pronounced name must be available. Reporting line data must be configured to view organization
hierarchy.
21
Quick Tips If using Office Communicator, when you reply to an e-mail with an instant message, your
instant message conversation history will be connected to that e-mail discussion thread and shown when
viewing your messages in Conversation View.
Note: Viewing instant message history in a conversation requires you show messages from other folders
in Conversation View and in Office Communicator, elect to save instant message conversations in your
Communicator History folder.
People Search Improved!
Get easy and direct access to your contacts. Outlook 2010 provides access to your Office
Communicator contacts directly from your inbox. Begin typing the name of the person you’re
looking for in the Find a Contact box and Outlook 2010 will search your contacts and instantly
show you the people who fit that spelling profile.
Quick Tips:
To search other address books instead of your Office Communicator contacts, type your search string
and press Enter.
Also get access to your Office Communicator contacts through Quick Contacts, shown at the bottom
of your To-Do Bar.
Outlook Social Connector New!
There are so many ways to stay connected these days. Switching back and forth between various
tools and Web sites make organizing your information challenging. Fortunately, Outlook 2010
can help you stay connected. The all-new Outlook Social Connector (OSC) connects you to the
social and business networks you use, including Microsoft SharePoint®
2010 and Windows
Live.
14
Even connect to other popular third-party sites, such as Facebook, LinkedIn, and
MySpace.
15
It’s easy to get more information and stay in touch with the people in your network
without leaving Outlook.
14
Microsoft Office Professional Plus 2010 is required to view SharePoint 2010 My Site social data.
15
Connecting to a third-party social network requires an add-in provided by that social network. In most cases, usage of that social
network requires you to be subject to the terms and conditions of the provider.
22
Figure 17 - Connect
to your favorite social
networks in Outlook
2010 and keep in the
loop without leaving
Outlook.
Stay up-to-the-minute with the people in your networks by accessing everything from
e-mail threads to status updates in one single, centralized view.
Synchronize your contact data right into Microsoft Outlook and obtain information about
your friends and colleagues. See updates from third-party social networks, recently posted
files—even view shared photos.
Connect to SharePoint Server 2010 My Site social information and receive updates from your
workplace such as newly posted or tagged documents, site activity, and more.
Easily track your communication history. Use the Outlook Social Connector to display a quick
view of related Outlook content when you click on a contact’s name, such as recent e-mail
conversations, meetings, and shared documents.
Download third-party providers for your favorite social networks and connect with the
people in your network, all without leaving your inbox.