Configuring Electronic Signatures in SIMATIC WinCC
Bạn đang xem bản rút gọn của tài liệu. Xem và tải ngay bản đầy đủ của tài liệu tại đây (6.13 MB, 53 trang )
Configuring Electronic Signatures in
SIMATIC WinCC
SIMATIC WinCC V7.2, SIMATIC Logon V 1.5
Application Description May 2014
Applications & Tools
Answers for industry.
Siemens Industry Online Support
This entry is taken from the Siemens Industry Online Support. The following link
takes you directly to the download page of this document:
/>
For further information on this topic, you may also actively use our Technical
Forum in the Siemens Industry Online Support. Share your questions, suggestions
or problems and discuss them with our strong forum community:
Copyright
Siemens AG 2014 All rights reserved
/>
2
Electronic Signature
V1.1, Entry ID: 67688514
s
1
Solution
2
Functional Mechanisms
3
Installation
4
SIMATIC WinCC
Electronic Signature
Description of the User
Interface
5
WinCC V7.2
Example Project
6
Applying Electronic
Signatures to Specific
Projects
7
Links & Literature
8
History
9
Copyright
Siemens AG 2014 All rights reserved
Task
Electronic Signature
V1.1, Entry ID: 67688514
3
Warranty and Liability
Warranty and Liability
Note
The Application Examples are not binding and do not claim to be complete
regarding the circuits shown, equipping and any eventuality. The application
examples do not represent customer-specific solutions. You are responsible for
ensuring that the described products are used correctly. These Application
Examples do not relieve you of your responsibility to use safe practices in
application, installation, operation and maintenance. When using these
Application Examples, you recognize that we cannot be made liable for any
damage/claims beyond the liability clause described. We reserve the right to
make changes to these Application Examples at any time and without prior
notice. If there are any deviations between the recommendations provided in this
application example and other Siemens publications – e.g. catalogs – the
contents of the other documents have priority.
We do not accept any liability for the information contained in this document.
Copyright
Siemens AG 2014 All rights reserved
Any claims against us – based on whatever legal reason – resulting from the use of
the examples, information, programs, engineering and performance data etc.,
described in this Application Example shall be excluded. Such an exclusion shall
not apply in the case of mandatory liability, e.g. under the German Product Liability
Act (“Produkthaftungsgesetz”), in case of intent, gross negligence, or injury of life,
body or health, guarantee for the quality of a product, fraudulent concealment of a
deficiency or breach of a condition which goes to the root of the contract
(“wesentliche Vertragspflichten”). The damages for a breach of a substantial
contractual obligation are, however, limited to the foreseeable damage, typical for
the type of contract, except in the event of intent or gross negligence or injury to
life, body or health. The above provisions do not imply a change of the burden of
proof to your detriment.
Any form of duplication or distribution of these Application Examples or excerpts
hereof is prohibited without the expressed consent of Siemens Industry Sector.
4
Electronic Signature
V1.1, Entry ID: 67688514
Table of Contents
Table of Contents
Warranty and Liability ................................................................................................. 4
1
Task ..................................................................................................................... 6
2
Solution............................................................................................................... 7
2.1
2.2
3
Solution overview ................................................................................. 7
Description of the core functionality ..................................................... 9
Functional Mechanisms .................................................................................. 11
3.1
3.2
3.3
“EsigWinCCInterface.dll” dynamic link library .................................... 11
Functions and modules for configuration ........................................... 11
Functions and modules for Runtime .................................................. 13
Installation ........................................................................................................ 14
5
Description of the User Interface ................................................................... 16
5.1
5.1.1
5.1.2
5.1.3
5.1.4
5.2
6
7
User interface for configuration .......................................................... 16
Menu................................................................................................... 16
“Electronic signature – configuration” dialog ...................................... 17
“Reset Electronic Signature Parameters” dialog ................................ 19
“Configure Electronic Signatures in database” dialog ........................ 20
User interface in Runtime ................................................................... 22
Example Project ............................................................................................... 24
6.1
6.1.1
6.1.2
6.2
6.2.1
6.2.2
6.2.3
6.2.4
Copyright
Siemens AG 2014 All rights reserved
4
Preparation for using the sample project ........................................... 25
Creating user groups and users in Windows ..................................... 25
Changing the configured computer name .......................................... 27
Description of the sample project ....................................................... 28
“Example 1” area button ..................................................................... 28
“Example 2” area button ..................................................................... 30
“Configuration” area button ................................................................ 31
WinCC message system – operation list ........................................... 32
Applying Electronic Signatures to Specific Projects ................................... 33
7.1
7.1.1
7.1.2
7.1.3
7.1.4
7.1.5
7.2
7.3
7.4
Preparations of configuration ............................................................. 33
Importing macros................................................................................ 33
Adapting the template file ................................................................... 35
Integrating global scripts .................................................................... 37
Configuring the database ................................................................... 39
Configuring the messages in Alarm Logging ..................................... 39
Configuring ......................................................................................... 42
Removing an electronic signature from an object .............................. 49
Qualification and test of the application in the project ........................ 52
8
Links & Literature ............................................................................................ 53
9
History............................................................................................................... 53
Electronic Signature
V1.1, Entry ID: 67688514
5
1 Task
1
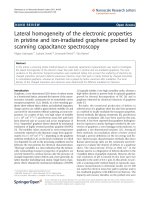
Task
In many branches, especially in the pharmaceutical and food industry it is often the
case that different critical operator actions have to be authorized via electronic
signature. Such kinds of operator actions may include, for example:
changing a setpoint value
executing a switching operation
starting a sequence of operations
starting a batch
Depending on the requirement, an action complying with the two-man rule may be
necessary. This means that the operation has to be authorized by at least two
different people. The approval will be acquired with the help of an electronic
signature and saved in a long-term archive for later traceability. Based on the
entries in the archive it has to be clear, who carried out an operator action at what
time and when this was confirmed.
Copyright
Siemens AG 2014 All rights reserved
Figure 1-1
6
Electronic Signature
V1.1, Entry ID: 67688514
2 Solution
2
Solution
2.1
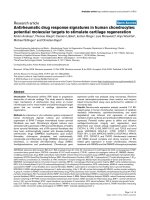
Solution overview
The solution presented in this entry has the following functionality:
In order to be able to carry out a critical operator action on the WinCC operator
system, one or several users have to provide an electronic signature. The
authentication of individual users is polled via an input dialog and is carried out with
the help of SIMATIC Logon. The persons with electronic signature authorization
are defined in the different user groups. Only once all required signatures are
present, is the critical operator action carried out. The data of the signatures
performed (time, user, operator action, operator station) is written in the WinCC
message archive as audit trail.
Copyright
Siemens AG 2014 All rights reserved
Abbildung 2-1
Advantages
Using this application offers the following advantages:
dialog-supported configuration of multiple, role-based electronic signatures
simple integration of the “electronic signature” function in a WinCC project
reduced costs and minimized configuration time by using preconfigured
modules
the plant is operated only by authorized personnel, thus increasing the
protection against faults and errors
excellent traceability of important operator actions
simple documentation through automatically created audit trails in WinCC
long-term archiving of electronic signatures through WinCC’s archiving concept
Electronic Signature
V1.1, Entry ID: 67688514
7
2 Solution
Alternatives
The solution described in this document is quite comprehensive and fulfills the
requirements of multiple electronic signatures with a role concept.
Solutions for simple electronic signatures can also be realized on the basis of the
following functions of SIMATIC Logon.
Verify Logon
Authenticate User
Authenticate User no GUI
Further information on these functions and a detailed description of their use can
be found in the SIMATIC Logon Programming Guide Edition 03/2009
(A5E00734600-03).
For further information on SIMATIC, please refer to the following entry:
/>
Copyright
Siemens AG 2014 All rights reserved
Installation
The “67688514_WinCC_ElectronicSignature_setup_e.exe” file includes all scripts
and modules required to use the electronic signature. A sample project will
furthermore be installed.
Validity
The electronic signature can be used with WinCC V7.2 and SIMATIC Logon V1.5.
The function is also optionally available for the WinCC Web navigator.
Assumed knowledge
Basic knowledge of SIMATIC WinCC, SIMATIC Logon and the Microsoft operating
systems is assumed.
8
Electronic Signature
V1.1, Entry ID: 67688514
2 Solution
2.2
Description of the core functionality
Principle of the core functionality
Copyright
Siemens AG 2014 All rights reserved
Abbildung 2-2
Electronic Signature
V1.1, Entry ID: 67688514
9
2 Solution
Table 2-1
No.
Action
Description
The operator would like to change the
status of an object or the value of a tag.
A dialog opens, requesting the entry of
an electronic signature.
2.
The authorized personnel confirm the
change with an electronic signature.
If more than one signature is required, it
can be specified whether these
signatures are entered in one session,
or in several sessions.
3.
After successful entry of the signature,
an audit trail message will be
generated.
If the signature was entered
successfully, a respective entry in the
WinCC messages system is generated.
If the signing process is aborted, a
warning prompt will appear.
4.
Once all required signatures are
available, the operation will be
executed.
In addition, an audit trail entry will be
generated in the WinCC message
system. It includes the information for
the actual object change.
Copyright
Siemens AG 2014 All rights reserved
1.
10
Electronic Signature
V1.1, Entry ID: 67688514
3 Functional Mechanisms
3
Functional Mechanisms
In order to be able to use the functionality of the electronic signature, some
programs and scripts are required. They are installed on the system by the
included setup file and are registered in the WinCC Graphics Designer.
Furthermore, the file “EsigWinCCInterface.dll” will be copied to the installation
directory of WinCC. These functions are briefly described in the following chapters.
The application example was also tested in a redundant system environment. If
the solution is be used in the context of such a system, it is absolutely necessary
that only on one system the project is configured. After that the project must be
transferred to the redundant system with the WinCC Project duplicator.
Note
“EsigWinCCInterface.dll” dynamic link library
The “EsigWinCCInterface.dll” Dll file includes auxiliary functions for generating tag
structures. The prototypes of these structures are required for the instances of the
different electronic signatures which are also created with the help of dll functions.
The DLL functions are used for generating an electronic signature in the
“eSigConfDlgWithDb” VBA script.
3.2
Functions and modules for configuration
The table below lists the functions and modules that are required for the
configuration of electronic signatures in the WinCC Graphics Designer. For the
configuration, these functions can be called under the “eSignature” menu item.
Copyright
Siemens AG 2014 All rights reserved
3.1
Table 3-1
Module
Description
MenuBar.bas
Shows the user-specific “eSignature” menu in the Graphics Designer. The
following menu items are created:
eSignature > …
> Assign eSignature
> Reset eSignature parameters
> Configure the eSignature parameters in the DB
> Create eSignature table in DB
WinCCTagDlg.bas
Displays the WinCC tag dialog.
The dialog is called from the “Reset eSignature parameters” function in order
to display and select tags.
WinCCUserGroups.bas
Includes various functions that are required to list the existing WinCC groups
for the “Electronic signature configuration” function.
TextLibrary.bas
Includes various functions for switching over between different languages
(German/English) in the different configuration dialogs.
Common.bas
Includes constants that are required throughout the project and which are
referenced by the individual modules.
Electronic Signature
V1.1, Entry ID: 67688514
11
3 Functional Mechanisms
Module
Description
Includes various functions to generate the configuration table in the WinCC
data base. The table includes the data for the electronic signature and it will
be created by the “Create eSignature table in DB” function, if not yet
available.
eSigConfDlgWithDB.frm
Dialog for electronic signature configuration.
eSigResetParamDlg.frm
Dialog to reset the electronic signature.
eSigConfigDB.frm
Dialog for the configuration of the electronic signature in the database.
Copyright
Siemens AG 2014 All rights reserved
CreateTableInDB.bas
12
Electronic Signature
V1.1, Entry ID: 67688514
3 Functional Mechanisms
3.3
Functions and modules for Runtime
In order to be able to use the function of the electronic signature during WinCC
Runtime, some global scripts are required. The following functions were created in
the Global Script Editor:
Table 3-2
Global project function in order to create an audit trail message once a
signature has been made or in the event of a cancellation.
ResetESignature
Param.bmo
Global project function in order to reset the parameters once the signature
was successfully performed. This script is called from the project image of
the automation object.
GetSignatureRecord
FromDatabase.bmo
Global project function in order to read out configuration files from the WinCC
database and to write them into the respective tag structures. This function
has to be called via the start screen using the “Open image” event. In the
sample project, this function can also be executed from the administrator
screen.
Init_Esig_Dlg.bmo
Global project function in order to initialize and open the dialog for the
electronic signature.
CreateESignature_
AuditTrail.fct
Global project function in order to create audit trail messages for the
individual signatures in the WinCC message system.
Copyright
Global project function, in order to delete an already performed signature
within a session, if there is a cancellation.
CreateSigMsgs.bmo
Siemens AG 2014 All rights reserved
DeleteSignaturesFrom
CurrentSession.bmo
Electronic Signature
V1.1, Entry ID: 67688514
13
4 Installation
4
Installation
Install all required components for the electronic signature with the help of the
setup file. You then have the option to insert the functionality of the electronic
signature in a customer-specific WinCC project. Furthermore, the WinCC sample
project will be installed with the setup.
The installation of the components for the electronic signature requires Windows
administrator rights.
Note
The sample project was created with WinCC V7.2 If the project is used with a
later WinCC version it has to be converted beforehand with the “project
migratory”.
Functions and modules
All WinCC modules and functions required are copied to the WinCC installation
directory in the “eSignature” subdirectory.
The following files are copied:
Siemens AG 2014 All rights reserved
Table 4-1
Type
File
TextLibrary.bas
WinCCTagDlg.bas
WinCCUserGroups.bas
MenuBar.bas
Common.bas
CreateTableInDB.bas
Forms (dialogs)
eSigConfDlgWithDb.frm
eSigResetParamDlg.frm
eSigConfigDB.frm
eSigConfigDB.frx
eSigConfDlgWithDb.frx
eSigResetParamDlg.frx
Global C default function
CreateESignature_AuditTrail.fct
Global VBS functions
Copyright
VBA Module
DeleteSignaturesFromCurrentSession.bmo
CreateESigMsgs.bmo
ResetESignatureParam.bmo
GetSignatureRecordFromDatabase.bmo
Init_SLEsig_Dlg.bmo
DLL (Dynamic Link Library)
The “EsigWinCCInterface.dll” DLL is used in VBA modules and is installed in the
WinCC installation directory, in the “Bin” subdirectory.
14
Electronic Signature
V1.1, Entry ID: 67688514
4 Installation
WinCC example project
Copyright
Siemens AG 2014 All rights reserved
The WinCC sample project is copied into the
“C:\Users\Public\Documents\Siemens\eSig_DemoProject\eSignature_Demo_WinC
C_V4\eSignature_Demo_WinCC_V4” directory.
Electronic Signature
V1.1, Entry ID: 67688514
15
5 Description of the User Interface
5
Description of the User Interface
5.1
User interface for configuration
5.1.1
Menu
A separate menu was created for the configuration of the electronic signature. This
menu list is added to the menu bar in Graphics Designer.
Figure 5-1
Table 5-1
Siemens AG 2014 All rights reserved
Function
Description
Opens the dialog for the configuration of the “Reset
eSignature parameters” function for the selected object.
Configure the eSignature
parameters in the DB
Opens the dialog to change the already configured
electronic signatures in the database.
Create eSignature table in
DB
16
Opens the dialog for the configuration of a new electronic
signature for the selected object.
Reset eSignature parameters
Copyright
Assign eSignature
Creates the configuration table for the data of the
electronic signature in the WinCC database, if it does not
yet exist.
Electronic Signature
V1.1, Entry ID: 67688514
5 Description of the User Interface
5.1.2
“Electronic signature – configuration” dialog
From the “Electronic Signature> Assign eSignature” menu command you get to the
configuration dialog for the electronic signature.
Copyright
Siemens AG 2014 All rights reserved
Figure 5-2
Table 5-2
Field
Description
Unique Tag
Name
The name of the electronic signature has to be unique throughout the
entire project. The field has already been assigned as:
eSig_
The “eSig_” prefix cannot be changed.
Object Name
Name of the automation object for which the electronic signature is
being configured. This name will later appear in the audit trail for the
electronic signature in the WinCC message system.
Operation
Describes the type of operation to be executed once the electronic
signature was successfully performed.
Operation text
with source and
target values
If this property has been selected, the operation text displayed will be
supplemented by the source and target values for the electronic
signature in the Runtime dialog.
Area
This is where information regarding the plant area can be stored.
Unit
This is where information regarding the unit of the value to be
changed can be stored.
Electronic Signature
V1.1, Entry ID: 67688514
17
5 Description of the User Interface
Field
Description
Quantity of
Signatures
Specifies the number of signatures to be entered that are required to
be able to execute the operation. 1 to 3 signatures can be selected.
The default value is “1”.
Audit Trail
Message No.
Message number for the audit trail which is generated once a
signature was successfully performed. If several signatures are
polled, a separate audit trail entry will be generated for each
signature.
The default message number is “1000”.
Timeout
Period in seconds during which the electronic signature(s) have to be
performed.
The default value is “0” (without time limit).
Signature order
If several signatures are expected, it can be specified whether they
have to be entered in a specific order.
The default setting is “any order”.
Input Session
If several signatures are expected, it can be specified whether they
are entered in one session or in several sessions.
The default setting is “in different sessions”.
If this option is selected, all signature parameters will be reset after
successful completion of the signature process.
This option is selected by default.
Siemens AG 2014 All rights reserved
Reset after
execution of all
signatures
The following options can be selected:
UserID
Full Name
UserID and Full Name
The default selection is “UserID“.
Available WinCC
user groups
List of the user groups configured in the operator system (User
Administrator).
Selected groups
List of user groups that have to perform an electronic signature for
this object.
Copyright
Details of the
user information
Moves the selected group into the “Selected groups” list.
Removes the selected group from the “Selected groups” list.
Moves the selected user group in the “Selected group” list one
position up.
Moves the selected user group in the “Selected group” list one
position down.
Assign
eSignature
Cancel
18
Configures the function of the electronic signature on the selected
object. For this purpose, a VB script is generated on the “Mouse
Action” event which calls the input dialog and transfers the required
parameters. Furthermore, an auxiliary object (rectangle) is generated
which is required for the creation of the audit trail messages.
Closes the dialog without any further actions.
Electronic Signature
V1.1, Entry ID: 67688514
5 Description of the User Interface
5.1.3
“Reset Electronic Signature Parameters” dialog
You get to the configuration dialog for the “Reset Electronic Signature Parameters"
function under the “Electronic Signature > “Reset parameter” command.
Table 5-3
Field
Unique Tag Name
Copyright
Siemens AG 2014 All rights reserved
Figure 5-3
Description
The name corresponds to the unique name specified in the
configuration dialog for the electronic signature.
This is the structure tag name of the electronic signature to be reset
after the electronic signature has been successfully applied.
Opens the tag dialog.
Note
It is not possible to select the instance name of the structure tag.
You may, however, select any tag from the structure, since the
program will identify the structure automatically.
Copies the current structure into the “selected Objects” list. Several
structure tags can be added.
Selected Objects
List of the selected instances (automation objects), for which the
parameters of the electronic signatures are to be reset.
Reset parameter
Configures the “Reset Electronic Signature Parameters” function of
the electronic signature at the selected object. For this purpose, a
VB script is created on the “mouse action” event which resets the
signature parameters from the list.
Cancel
Closes the dialog without any further actions.
Electronic Signature
V1.1, Entry ID: 67688514
19
5 Description of the User Interface
5.1.4
“Configure Electronic Signatures in database” dialog
You get to the dialog for configuring the existing signatures in the database under
the “Electronic Signatures > Configure Electronic Signatures in database” menu
command.
Copyright
Siemens AG 2014 All rights reserved
Figure 5-4
Table 5-4
Field
Description
Electronic
Signatures
Quantity of
Signatures
Shows the number of required signatures. This parameter cannot
be changed.
Signature order
Shows whether a certain sequence is required or not. This
parameter can be changed if more than one signature is required.
Input Session
Shows whether the signatures are to be entered in one session or
not. This parameter can be changed if more than one signature is
required.
Details of the user
information
20
The list includes all electronic signatures of the current WinCC
project. When clicking an electronic signature from this list, the
relevant parameters will be shown in the corresponding fields.
Shows the original configuration. The following options can be
selected:
UserID
Full Name
UserID and Full Name
Electronic Signature
V1.1, Entry ID: 67688514
5 Description of the User Interface
Field
Description
Audit Trail Message
No.
Displays the originally configured message number. A different
message number can be entered.
Note
The program does not check whether the entered message number
has actually been configured.
Timeout
Displays the originally configured time in seconds. If a “0” is entered
in the input field, there is no time limit for entering the electronic
signature.
st
nd
rd
Copies the changed configuration of the selected electronic
signature into the database.
Delete
Deletes the selected signature from the database.
Note
In this case, the respective object and the tag structure has to be
deleted manually in the process image.
Close
Closes the dialog without any further actions.
Copyright
Displays the configured user groups which have to make an
nd
rd
electronic signature. The selection fields of the 2 and 3 user
group are only enabled if two or three was selected under “Quantity
of Signatures”. You can select from all configured OS user groups.
Note
If the configured user group should no longer be available, for
example, because it was deleted in the User Administrator, it will be
marked as missing (red) in the selection field.
Modify
Siemens AG 2014 All rights reserved
1 /2 /3 WinCC
user groups
Electronic Signature
V1.1, Entry ID: 67688514
21
5 Description of the User Interface
5.2
User interface in Runtime
When clicking with the mouse on an automation object that was configured with an
electronic signature, a dialog field for entering the electronic signatures will open up.
Copyright
Siemens AG 2014 All rights reserved
Figure 5-5
Table 5-5
Field
Description
Element
Operation
Describes the action that will be executed once the signature was
successfully performed.
Entry
Displays whether all required signatures can be entered in one session
or in separate sessions (the dialog can be closed in the meantime).
Sequence
Displays whether a certain sequence is required when entering the
signatures.
Requested at
Displays the time when the acquisition of the electronic signatures
started.
Valid until
Displays the time by which all required signatures have to be entered. If
no time is displayed in this output field, there will be no time limit for
entering the signature.
Signatures
22
Describes the object for which an electronic signature will be acquired.
Shows the list of user groups from which an electronic signature is
required.
Electronic Signature
V1.1, Entry ID: 67688514
5 Description of the User Interface
Field
Description
Closes the dialog window and executes the initially started operation,
provided all required signatures are available.
If the “All together” condition is required, the dialog cannot be closed
with “OK” between entering the signatures.
Cancel
Closes the dialog without any further actions. After a note to the user,
any previously performed electronic signatures are deleted. No separate
audit trail message will be created.
Help
Opens the help of “Electronic Signature”. This function is disabled so
that the operator cannot leave the visualization interface.
Copyright
Opens the SIMATIC logon dialog for authenticating the electronic
signature.
OK
Siemens AG 2014 All rights reserved
Signing…
Electronic Signature
V1.1, Entry ID: 67688514
23
6 Example Project
6
Example Project
The sample application includes different operator actions for which electronic
signatures are requested.
executing a switching action (e.g. motor on/off or open/close valve)
changing a setpoint (e.g. temperature value of a controller)
starting a sequence
The different examples furthermore describe various requirements for electronic
signatures.
several signatures (two-man rule)
maintaining a specific sequence when entering the signatures
joint input of all required signatures with or without time limit
Each successful signature is saved in WinCC Alarm Logging as operator message.
An audit trail message will furthermore be created which includes additional
information on the executed object chance, once a signature was successfully
performed.
Siemens AG 2014 All rights reserved
The sample project includes all required functions and modules in order to assign
the functionality of the electronic signature to an automation object in WinCC and
to be able to configure it according to the requirement.
Copyright
Figure 6-1
24
Electronic Signature
V1.1, Entry ID: 67688514
6 Example Project
6.1
Preparation for using the sample project
In order for the sample project to function in the desired way, the following
preparatory steps have to be performed.
6.1.1
Creating user groups and users in Windows
The sample project uses various user groups with different authorization levels and
for this reason they have to be configured in the user administrator. Execute the
following steps for the configuration of the user groups and users.
Table 6-1
No.
Action
Start the Windows Computer Management and go the “Local Users and Groups”
entry.
2.
Create the following user groups (for the function of the application, it is important to
spell precisely):
Operator
Spezial_Operator
Laboratory
SuperUsers
Copyright
Siemens AG 2014 All rights reserved
1.
Electronic Signature
V1.1, Entry ID: 67688514
25