embeddedsystemsandlabsforarm v1 1 phần 10 pot
Bạn đang xem bản rút gọn của tài liệu. Xem và tải ngay bản đầy đủ của tài liệu tại đây (215.29 KB, 29 trang )
Embedded Systems Development and Labs; The English Edition
263
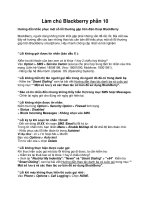
Figure 6-20 IIS Interface Circuit
6.3.5 Sample Programs
/* function code */
/*******************************************************************
* name: Test_Iis
* func: Test IIS circuit
* para: none
* ret: none
* modify:
* comment:
********************************************************************/
void Test_Iis(void)
{
IISInit(); // initialize IIS
Uart_Printf(" press \"R\" to Record , any key to play wav(t.wav)\n");
if(Uart_Getch()=='R')
Record_Iis(); // test record
Playwave(5); // play wave 5 times
IISClose(); // close IIS
}
/*********************************************************************
* name: IISInit
* func: Initialize IIS circuit
* para: none
Embedded Systems Development and Labs; The English Edition
264
* ret: none
* modify:
* comment:
********************************************************************/
void IISInit(void)
{
rPCONE = (rPCONE&0xffff)+(2<<16); // Set I/O port PE8 output CODECLK signal
iDMADone = 0;
/* initialize philips UDA1341 chip */
Init1341(PLAY);
}
/********************************************************************
* name: Init1341
* func: Init philips 1341 chip
* para: none
* ret: none
* modify:
* comment:
******************************************************************/
void Init1341(char mode)
{
/* Port Initialize */
rPCONA = 0x1ff; // set PA9 as output and connect to L3D
rPCONB = 0x7CF; // set PG5:L3M connect to PG4:L3C
rPDATB = L3M|L3C; // L3M=H(start condition),L3C=H(start condition)
/* L3 Interface */
_WrL3Addr(0x14+2); // status (000101xx+10)
#ifdef FS441KHZ
_WrL3Data(0x60,0); // 0,1,10,000,0 reset,256fs,no DCfilter,iis
#else
_WrL3Data(0x40,0); // 0,1,00,000,0 reset,512fs,no DCfilter,iis
#endif
_WrL3Addr(0x14+2); // status (000101xx+10)
#ifdef FS441KHZ
_WrL3Data(0x20,0); // 0,0,10,000,0 no reset,256fs,no DCfilter,iis
#else
_WrL3Data(0x00,0); // 0,0,00,000,0 no reset,512fs,no DCfilter,iis
#endif
Embedded Systems Development and Labs; The English Edition
265
_WrL3Addr(0x14+2); // status (000101xx+10)
_WrL3Data(0x81,0); // 1,0,0,0,0,0,11 OGS=0,IGS=0,ADC_NI,DAC_NI,sngl speed,AonDon
_WrL3Addr(0x14+0); // DATA0 (000101xx+00)
_WrL3Data(0x0A,0);
//record
if(mode)
{
_WrL3Addr(0x14+2); //STATUS (000101xx+10)
_WrL3Data(0xa2,0); //1,0,1,0,0,0,10 : OGS=0,IGS=1,ADC_NI,DAC_NI,sngl speed,AonDoff
_WrL3Addr(0x14+0); //DATA0 (000101xx+00)
_WrL3Data(0xc2,0); //11000,010 : DATA0, Extended addr(010)
_WrL3Data(0x4d,0); //010,011,01 : DATA0, MS=9dB, Ch1=on Ch2=off,
}
//record
}
/*******************************************************************
* name: _WrL3Addr
* func: write control data address to 1341 through L3-interface
* para: data control data address
* ret: none
* modify:
* comment:
********************************************************************/
void _WrL3Addr(U8 data)
{
U32 vPdata = 0x0; // L3D=L
U32 vPdatb = 0x0; // L3M=L(in address mode)/L3C=L
S32 i,j;
rPDATB = vPdatb; // L3M=L
rPDATB |= L3C; // L3C=H
for( j=0; j<4; j++ ) // tsu(L3) > 190ns
;
//PA9:L3D PG6:L3M PG7:L3C
for( i=0; i<8; i++ )
{
Embedded Systems Development and Labs; The English Edition
266
if( data&0x1 ) // if data bit is 'H'
{
rPDATB = vPdatb; // L3C=L
rPDATA = L3D; // L3D=H
for( j=0; j<4; j++ )// tcy(L3) > 500ns
;
rPDATB = L3C; // L3C=H
rPDATA = L3D; // L3D=H
for( j=0; j<4; j++ )// tcy(L3) > 500ns
;
}
else // if data bit is 'L'
{
rPDATB = vPdatb; // L3C=L
rPDATA = vPdata; // L3D=L
for( j=0; j<4; j++ )// tcy(L3) > 500ns
;
rPDATB = L3C; // L3C=H
rPDATA = vPdata; // L3D=L
for( j=0; j<4; j++ )// tcy(L3) > 500ns
;
}
data >>= 1;
}
rPDATG = L3C|L3M; // L3M=H,L3C=H
}
/*********************************************************************
* name: _WrL3Data
* func: write control data to 1341 through L3-interface
* para: data control data
* halt halt operate
* ret: none
* modify:
* comment:
******************************************************************/
void _WrL3Data(U8 data,int halt)
{
U32 vPdata = 0x0; // L3D=L
U32 vPdatb = 0x0; // L3M/L3C=L
S32 i,j;
Embedded Systems Development and Labs; The English Edition
267
if(halt)
{
rPDATB = L3C; // L3C=H(while tstp, L3 interface halt condition)
for( j=0; j<4; j++ ) // tstp(L3) > 190ns
;
}
rPDATB = L3C|L3M; // L3M=H(in data transfer mode)
for( j=0; j<4; j++ ) // tsu(L3)D > 190ns
;
// PA9:L3MODE PG6:L3DATA PG7:L3CLOCK
for( i=0; i<8; i++ )
{
if( data&0x1 ) // if data bit is 'H'
{
rPDATB = L3M; // L3C=L
rPDATA = L3D; // L3D=H
for( j=0; j<4; j++ )// tcy(L3) > 500ns
;
rPDATB = L3C|L3M; // L3C=H,L3D=H
rPDATA = L3D;
for( j=0; j<4; j++ )// tcy(L3) > 500ns
;
}
else // if data bit is 'L'
{
rPDATB = L3M; // L3C=L
rPDATA = vPdata; // L3D=L
for( j=0; j<4; j++ )// tcy(L3) > 500ns
;
rPDATB = L3C|L3M; // L3C=H
rPDATA = vPdata; // L3D=L
for( j=0; j<4; j++ )// tcy(L3) > 500ns
;
}
data >>= 1;
}
rPDATB = L3C|L3M; // L3M=H,L3C=H
}
Embedded Systems Development and Labs; The English Edition
268
6.3.6 Exercises
(1) Write a program that implements the function of adjusting the voice volume via button.
(2) Write a program that implements the recording function.
Embedded Systems Development and Labs; The English Edition
269
Chapter7 Real Time Operation System Labs
7.1 uC/OS Porting Lab
6.3.1 Purpose
● Get familiar with the uC/OS-II porting conditions and uC/OS-II kernel basic architecture
● Understand the steps of porting the uC/OS-II kernel to the ARM processor.
7.1.2 Lab Equipment
● Hardware: Embest S3CEV40 hardware platform, Embest Standard/Power Emulator, PC.
● Software: Embest IDE 2003, Windows 98/2000/NT/XP operation system.
7.1.3 Content of the Lab
Learn how to port the uC/OS-II kernel to the S3C44B0 ARM processor. Test its functionality using the Embest
IDE.
7.1.4 Principles of the Lab
1. uC-OS-II File System
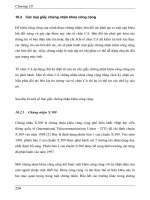
The file system of the uC/OS-II real time kernel is shown in Figure 7-1. The application software layer is the
code based on the uC/OS-II kernel. The uC/OS-II includes the following three parts:
● Kernel Code: This part has no relationship with the microprocessor. The kernel code includes 7 source files
and 1 header file. The 7 source files are responsible for tasks such as: kernel management, event
management, message queue management, memory management, message management, semaphore
management, task scheduling and timer management.
● Configuration Code: This part includes 2 header files for configuring the number of events per control
block and it includes message management code, etc.
● Processor Related Code: Includes 1 header file, 1 assembly file and 1 C file. In the process of porting the
uC/OS-II kernel the users need to consider these files.
Application Software
Kernel Code (CPU independent)
Oscore.c
Os_mbox.c
Os_mem.c
Os_q.c
Os_sem.c
Os_task.c
Os_time.c
Ucos_ii.h
Configuration Code (Application Related)
Os_cfg.h
Includes.h
Embedded Systems Development and Labs; The English Edition
270
Figure 7-1 uC/OS-II File System
2. uC/OS-II Porting Conditions
Porting the uC/OS-II to the ARM processor requires the following conditions:
1) The C Compiler Targeting the Microprocessor Can Generate Reentry Code
Reentry code means that a piece of code can be used by more than one task without fear of data corruption. In
another words, this code can be recalled after it was interrupted during the processing.
The following are two examples of non-reentrant and reentrant functions:
Int temp;
Void swap (int *x, int *y)
{
temp=*x;
*X=*Y;
*y=Temp;
}
void swap(int *x, int *y)
{
int temp;
temp=*x;
*X=*Y;
*y=Temp;
}
The difference between these two functions is that the place for storing the variable temp is different. In the first
function, “temp” is a global variable. In the second function, “temp” is a local variable. As a result, the upper
function is not reentrant function. The lower function is a reentrant function.
2) Use C Language to Enable/Disable Interrupts
This can be done through the CPSR register within the ARM processor. The CPSR register has a global
interrupt disable bit. Controlling this bit can enable/disable interrupts.
3) Microprocessor Supports Interrupts and Supports Timer Interrupts (Ticks)
All of the ARM processor cores support interrupts and they can generate timer interrupts.
4) Microprocessor Provide Hardware Support for Stack Control
Porting Code (Microprocessor Related)
Os_cup.h
Os_cpu_a.asm
Os_cup_c.c
Embedded Systems Development and Labs; The English Edition
271
For the 8-bit microprocessors that have only 10 address lines, the chip can only access a maximum of 1Kb
memory. For these processors it is difficult to port the uC/OS-II kernel.
5) Microprocessor has Stack Pointer and Other Instructions for Reading Registers and Store the
Contents of Register to Memory or Stack.
The ARM processor has STMFD instruction for pushing the content of registers to stack, LDMFD instruction
for pulling the register contents back from stack
3. uC/OS-II Porting Steps
1) Basic Configuration and Definition
All the basic configurations and definitions are in 0s_cup.h.
● Defines the data type related to compiler. In order to port uC/OS-II applications, there should be no int,
unsigned int, etc definitions in the program. UC/OS has its own data type such as INT16U which represents
16-bit unsigned integer. For a 32-bit ARM processor, the INT16U is unsigned short. For a 16-bit ARM
processor, the INT16U is unsigned int.
● Defines interrupt enable or disable.
● Defines stack growing direction. After defining the growing direction of stack, the value of
OS_STK_GROWTH is defined.
● Define the micro OS_TASK_SW. OS_TASK_SW is a called when a uc/OS-II lower priority task is
switched with higher priority task. There are two ways to define it. One way is by using software interrupt
and make the interrupt vector to point to the OSCtxSw() function. Another way is to call the OSCrxSw()
function directly.
2) Porting OS_CPU_A.ASM Assembly File
In the OS_CPU_A.ASM, there are four functions that need to be ported.
(1) OSStartHighRdy() function. This function is called by OSStart() function to start the highest priority task
ready to run. OSStart() is responsible for setting the tasks in the ready status. The functions of this routine are
described in the MicroC/OS-II book using pseudocode language. This pseudocode must be converted in ARM
assembly language. OSStartHighRdy() function loads the stack pointer of the CPU with the top-of-stack pointer
of the highest priority task. Restore all processor registers from the new task’s stack. Execute a return from
interrupt instruction. Note that OSStartHighRdy() never returns to OSStart().
(2) OSCtxSw() function. This function is responsible for the context switch. OSCtxSw() is generally written in
assembly language because most C compilers cannot manipulate CPU registers directly from C. This function is
responsible for pushing the registers of the current task on the stack; changing the SP to the new stack value;
restore the registers of the new task; execute and return from the interrupt instruction. This function is called by
OS_TASK_SW which in turn is called by the OSSched() function. OSSched() function is responsible for
scheduling the tasks.
(3) OSIntCtxSw() function. This function is called by OSIntExit() function to perform a context switch from an
ISR. OSIntExit is called by OSTickISR() function. Because OSIntCtxSw() is called from an ISR, it is assumed
that all the processor registers are already properly saved onto the interrupted task’s stack. OSIntCtxSw()
function responds for switching the tasks in timer interruptions. The OSCtxSw() function and OSIntCtxSw()
function are responsible for the switching between tasks. OSIntCtxSw() function is responsible for saving the
current task pointer and recover the register values from the stack.
Embedded Systems Development and Labs; The English Edition
272
(4) OSTickISR() function is a time tick function generated by the timer interrupt. OSTickISR() is responsible
for saving the microprocessor registers and recovering the registers when the task switching is finished.
3) Porting OS_CPU_C.C File
The third step of porting the uC/OS-II kernel is to port the OS_CPU_C.C file. There are 6 functions in this file
that need to be ported.
OSTaskStkInit()
OSTaskCreateHook()
OSTaskDelHook()
OSTaskSwHook()
OSTaskStatHook()
OSTaskTickHook()
The last 5 functions are called hook functions and are used mainly for extending the functions of uC/OS-II. Note
that these functions don’t have to contain code.
The only function that really needs to be ported is the OSTTaskStkInit(). This function is called when the task is
created. This function is responsible for initializing the stack architecture for tasks. This function can be in the
same form for porting to most of the ARM processors.
Please refer to the following sample programs.
7.1.5 Sample Programs
1. OSStartHighRdy
OSStartHighRdy:
BL OSTaskSwHook
MOV R0,#1
LDR R1,=OSRunning
STRB R0,[R1]
LDR r4, addr_OSTCBCur @ Get current task TCB address
LDR r5, addr_OSTCBHighRdy @ Get highest priority task TCB address
LDR r5, [r5] @ get stack pointer
LDR sp, [r5] @ switch to the new stack
STR r5, [r4] @ set new current task TCB address
LDMFD sp!, {r4} @ YYY
MSR SPSR_cxsf, r4
LDMFD sp!, {r4} @ get new state from top of the stack
MSR CPSR_cxsf, r4 @ CPSR should be SVC32Mode
LDMFD sp!, {r0-r12, lr, pc } @ start the new task
2. OS_Task_Sw
OS_TASK_SW:
Embedded Systems Development and Labs; The English Edition
273
STMFD sp!, {lr} @ save pc
STMFD sp!, {lr} @ save lr
STMFD sp!, {r0-r12} @ save register file and ret address
MRS r4, CPSR
STMFD sp!, {r4} @ save current PSR
MRS r4, SPSR @ YYY+
STMFD sp!, {r4} @ YYY+ save SPSR
# OSPrioCur = OSPrioHighRdy
LDR r4, addr_OSPrioCur
LDR r5, addr_OSPrioHighRdy
LDRB r6, [r5]
STRB r6, [r4]
@ Get current task TCB address
LDR r4, addr_OSTCBCur
LDR r5, [r4]
STR sp, [r5] @ store sp in preempted tasks's TCB
# Get highest priority task TCB address
LDR r6, addr_OSTCBHighRdy
LDR r6, [r6]
LDR sp, [r6] @ get new task's stack pointer
# OSTCBCur = OSTCBHighRdy
STR r6, [r4] @ set new current task TCB address
LDMFD sp!, {r4} @ YYY+
MSR SPSR_cxsf, r4 @ YYY+
LDMFD sp!, {r4} @ YYY+
MSR CPSR_cxsf, r4 @ YYY+
LDMFD sp!, {r0-r12, lr, pc} @ YYY+
3. RunNewTask:
RunNewTask:
SUB lr, lr, #4
STR lr, SAVED_LR @STR lr, [pc, #SAVED_LR 8]
#;;;;;;;;;;;;;;;;;;;;;;;;;;;;;;;;;;;;;;;;;;
#Change Supervisor mode
#!!!r12 register don't preserved. (r12 that PC of task)
Embedded Systems Development and Labs; The English Edition
274
MRS lr, SPSR
AND lr, lr, #0xFFFFFFE0
ORR lr, lr, #0x13
MSR CPSR_cxsf, lr
#;;;;;;;;;;;;;;;;;;;;;;;;;;;;;;;;;;;;;;;;;;
#Now Supervisor mode
#;;;;;;;;;;;;;;;;;;;;;;;;;;;;;;;;;;;;;
STR r12, [sp, #-8] @ saved r12
LDR r12, SAVED_LR @LDR r12, [pc, #SAVED_LR 8]
STMFD sp!, {r12} @ r12 that PC of task
SUB sp, sp, #4 @ inclease stack point
LDMIA sp!, {r12} @ restore r12
STMFD sp!, {lr} @ save lr
STMFD sp!, {r0-r12} @ save register file and ret address
MRS r4, CPSR
STMFD sp!, {r4} @ save current PSR
MRS r4, SPSR @ YYY+
STMFD sp!, {r4} @ YYY+ save SPSR
# OSPrioCur = OSPrioHighRdy
LDR r4, addr_OSPrioCur
LDR r5, addr_OSPrioHighRdy
LDRB r6, [r5]
STRB r6, [r4]
# Get current task TCB address
LDR r4, addr_OSTCBCur
LDR r5, [r4]
STR sp, [r5] @ store sp in preempted tasks's TCB
# Get highest priority task TCB address
LDR r6, addr_OSTCBHighRdy
LDR r6, [r6]
LDR sp, [r6] @ get new task's stack pointer
# OSTCBCur = OSTCBHighRdy
STR r6, [r4] @ set new current task TCB address
LDMFD sp!, {r4} @ YYY+
Embedded Systems Development and Labs; The English Edition
275
# AND r4, r4, #0xFFFFFF20
# ORR r4, r4, #0x13
MSR SPSR_cxsf, r4 @ YYY+
LDMFD sp!, {r4} @ YYY+
# AND r4, r4, #0xFFFFFF20
# ORR r4, r4, #0x13
MSR CPSR_cxsf, r4 @ YYY+
ldr r0,=0x4000000
BL SysENInterrupt
LDMFD sp!, {r0-r12, lr, pc} @ YYY+
Exercises
(1) Expand the function of uC/OS-II. Add time calculation of task switching.
(2) Trace OsTickISR() function. Watch the task switching process in timer pacing.
7.2 uC/OS Application Lab
7.2.1 Purpose
● Get familiar with the uC/OS-II boot flow.
● Get familiar with the uC/OS-II task management.
● Learn how to use the inter-task communication, synchronization and memory management functions
provided by uC/OS-II.
7.1.2 Lab Equipment
● Hardware: Embest S3CEV40 hardware platform, Embest Standard/Power Emulator, PC.
● Software: Embest IDE 2003, Windows 98/2000/NT/XP operation system.
7.1.3 Content of the Lab
Write a program that creates 3 tasks for 8-SEG LED displaying, LED lights flashing, and sending data to the
serial port.
7.1.4 Principles of the Lab
1. The Boot Process of the uC/OS-II Kernel
The uC/OS-II booting follows the following steps flow:
(1) Assign task stack in the programs. The purpose of assigning stack is to provide a space for stack and
variables of the running task. The task stack is initialized by defining array unsigned int
StackX[STACKSIZE] and transfer the pointer to this array when task is booted.
(2) Establish Task Function Body. The function body includes variable definitions and initializations,
functions or instructions, time interval settings of suspended task.
Embedded Systems Development and Labs; The English Edition
276
(3) Describes boot task. Transfer the address of task function, task stack and task priority.
(4) The boot process is done by function main(). This function includes hardware initialization before running
tasks, operation system initialization, start timer interrupt, boot tasks, etc.
2. uC/OS-II Task Managment
uC/OS provides the following functions for task management:
OSTaskCreate () create a task
OSTaskCreateExt() extension version of create a task
OSTaskDel() delete a task
OSTaskDelReq() request for a task delete
OSTaskChangePrio() change task priority
OSTaskSuspend() suspend a task
OSTaskResume() resume a task
OSTaskStkChk() stack check
OSTaskQuery() get information of task
3. uC/OS-II System Calls
1) Inter-task Communication and Synchronization – Semaphore, Mailbox and Message Queues
(1) Seaphore
OSSemCreate() create a semaphore
SSemPend() wait for a semaphore
OSSemPost() send a semaphore
OSSemAccept() no waiting request a semaphore
OSSemQuery() query the current status of a semaphore
(2) Mailbox
OSMboxCreate() create a mailbox
OSMboxPend() suspend a mailbox
OSMboxPost() send a message to mailbox
OSMboxAccept() no waiting get a message from mailbox
OSMboxQuery() query status of a mailbox
3) Message Queue
OSQCreate() create a message queue
OSQPend() suspend a message queue
OSQPost() send a message to message queue
OSQAccept() no waiting get a message from message queue
OSQFlush() clear a message queue
OSQuery() query status of a mailbox
2) Other System Calls – Time, Memory Management
(1) Time Management
OSTimeDly() task delay function
OSTimeDlyHMSM() time delay by second, minutes, or hours
OSTimeDlyResume() stop delay when a task is in delay
Embedded Systems Development and Labs; The English Edition
277
OSTimeGet() get system time
OSTimeSet() set system time
(2) Memory Management
OSMemCreate() create a memory partition
OSMemGet() assign a memory block
OSMemPut() release a memory block
OSMemQuery() query the status of a memory block
7.2.5 Sample Programs
void Task1(void *Id)
{
/* print task's id */
OSSemPend(UART_sem, 0, &err);
uHALr_printf(" Task%c Called.\n", *(char *)Id);
OSSemPost(UART_sem);
while(1)
{
led1_on(); // lit the led
led2_off();
OSTimeDly(800); // delay
led1_off();
led2_on();
OSTimeDly(800);
}
}
void Task4(void *Id)
{
int i;
INT32U NowTime;
/* print task's id */
OSSemPend(UART_sem, 0, &err);
uHALr_printf(" Task%c Called.\n", *(char *)Id);
OSSemPost(UART_sem);
while(1)
{
for(i=0; i<16; i++)
{
OSSemPend(UART_sem, 0, &err);
NowTime=OSTimeGet(); //»ñȡʱ¼ä
//uHALr_printf("Run Times at:%d\r", NowTime);
Embedded Systems Development and Labs; The English Edition
278
OSSemPost(UART_sem);
OSTimeDly(180);
}
}
}
void Task3 (void *Id)
{
char *Msg;
int i=0;
/* print task's id */
OSSemPend(UART_sem, 0, &err);
uHALr_printf(" Task%c Called.\n", *(char *)Id);
OSSemPost(UART_sem);
while(1)
{
OSTimeDly(900);
OSSemPend(UART_sem, 0, &err);
EV40_rtc_Disp();
OSSemPost(UART_sem);
}
}
void Task2 (void *Id)
{
int value;
char *Msg;
/* print task's id */
OSSemPend(UART_sem, 0, &err);
uHALr_printf(" Task%c Called.\n\n", *(char *)Id);
OSSemPost(UART_sem);
while(1)
{
value = key_read();
// display in 8-segment LED
if(value > -1)
{
Digit_Led_Symbol(value);
OSTimeDly(90);
}
OSTimeDly(90);
}
Embedded Systems Development and Labs; The English Edition
279
}
void TaskStart (void *i)
{
char Id1 = '1';
char Id2 = '2';
char Id3 = '3';
char Id4 = '4';
/*
* create the first Semaphore in the pipeline with 1
* to get the task started.
*/
UART_sem = OSSemCreate(1);
uHALr_InitTimers(); // enable timer counter interrupt
/*
* create the tasks in uC/OS and assign decreasing
* priority to them
*/
OSTaskCreate(Task1, (void *)&Id1, &Stack1[STACKSIZE - 1], 2);
OSTaskCreate(Task2, (void *)&Id2, &Stack2[STACKSIZE - 1], 3);
OSTaskCreate(Task3, (void *)&Id3, &Stack3[STACKSIZE - 1], 4);
OSTaskCreate(Task4, (void *)&Id4, &Stack4[STACKSIZE - 1], 5);
ARMTargetStart();
// Delete current task
OSTaskDel(OS_PRIO_SELF);
}
void Main(void)//int argc, char **argv
{
char Id0 = '4';
ARMTargetInit(); //hardware initialization
/* needed by uC/OS */
OSInit(); //uC/OS initialization
OSTimeSet(0); // timer setting
/* create the start task */
OSTaskCreate(TaskStart,(void *)0, &StackMain[STACKSIZE - 1], 0);
/* start the operating system */
ARMTargetStart(); //enable timer interrupt
OSStart(); //start the OS
}
Embedded Systems Development and Labs; The English Edition
280
7.2.6 Exercises
Improve the program by implementing inter-task communication and synchronization such that every time
when the 8-SEG LED displays a character the serial port also outputs the same character.
7.3 uC/OS Application Lab
7.3.1 Content of the Lab
Write a start-stop watch program that uses the uC/OS-II kernel. The program is a simple one-button stopwatch
that displays minutes, seconds, and tenths of seconds in the following format: 99:59.9
The stopwatch has a single button that cycles the watch through three modes: CLEAR -> COUNT -> STOP ->
CLEAR …
7.3.2 Stopwatch Tasks
There are five tasks for the complete program, including the start-up task. The priorities assigned to each task
follow the rate monotonic scheduling rule. Following are the task execution rates and the assigned priorities:
Task Task Period Priority
StartTask() One time only 4*
UpdateTimeTsk() 1ms 6
ScanSwTsk() 10ms 8
DispTimeTsk() 100ms 10
TimerModeTsk 1/keypress 12
* Required to be the highest priority.
The following describes briefly the tasks functions:
(1) StartTask(): This task starts by initializing the kernel timer with OSTTickInit(). It then initializes the
LCD and creates the rest of the tasks. Once the rest of the tasks are complete, the start-up task suspends
itself indefinitely.
(2) UpdateTimeTsk(): This is the primary time keeping task. It has the highest priority to keep the
stopwatch accuracy within 1ms. The task increments a global variable called msCntr every millisecond.
(3) ScanSw(): This is the switch-scanning and debouncing task. The main requirement is that it has to run
with a period that is at least one-half the switch bounce time. Since the task period is 10ms, it is
designed for switch bounce times less than 20ms. It also rejects noise pulses up to 10ms wide. Notice
that the task period does not have to be exactly 10ms. It can vary as much as 20% without causing
significant errors. When a valid keypress is accepted, ScanSw() signals a semaphore event flag, SwFlag.
This flag can than be used by other tasks to service a keypress. In this application the timer mode task
changes the mode each time the key is pressed.
(4) TimerModeTsk(). This task is a simple state machine that controls the mode of the stopwatch. Each
time a key is pressed, the SwFlag semaphore is signaled by the switch-scanning task. When SwFlag is
Embedded Systems Development and Labs; The English Edition
281
signaled, this task makes a state transition and some actions based on the state change. For example,
when the state is changed from CLEAR to COUNT, the msCntr is cleared to restart the millisecond
counter in the time update taks. When the CLEAR mode is entered, the display must be cleared one
time at the transition so it is done by this task. Notice that the buffer must be written to twice to clear
old buffer contents.
(5) DispTimeTsk(). This display task displays the current elapsed time by waiting for a value to be written
to the display ring buffer. It then uses BufRead() to copy the time value stored in the ring buffer into a
local display buffer. By using the ring buffer technique, the other tasks will not be blocked to wait for
the display.
7.3.3 Stopwatch Implementation Code
Open the Workspace for the project ucos_44b0_200.ews found in the …\Samsung\ucos_ii directory. Study and
understand the stopwatch implementation presented in this section. Specifically, understand the main.c file. The
main() function and all of the required task functions used in the start-stop watch implementation are found in
this file.
main.c file
#include "includes.h" /* uC/OS interface */
#include "Sems.h" /* Semaphore */
//task stack size
#ifdef SEMIHOSTED
#define TASK_STACK_SIZE (64+SEMIHOSTED_STACK_NEEDS)
#else
#define TASK_STACK_SIZE 10*1024
#endif
//Task definition
/* allocate memory for tasks' stacks */
#define STACKSIZE 128
/* Global Variable */
unsigned int Stack1[STACKSIZE];
unsigned int Stack2[STACKSIZE];
unsigned int Stack3[STACKSIZE];
unsigned int Stack4[STACKSIZE];
unsigned int StackMain[STACKSIZE];
void Task1(void *Id)
{
Embedded Systems Development and Labs; The English Edition
282
/* print task's id */
OSSemPend(UART_sem, 0, &err);
uHALr_printf(" Task%c Called.\n", *(char *)Id);
OSSemPost(UART_sem);
while(1)
{
led1_on();
led2_off();
OSTimeDly(800);
led1_off();
led2_on();
OSTimeDly(800);
}
}
void Task4(void *Id)
{
int i;
INT32U NowTime;
/* print task's id */
OSSemPend(UART_sem, 0, &err);
uHALr_printf(" Task%c Called.\n", *(char *)Id);
OSSemPost(UART_sem);
while(1)
{
for(i=0; i<16; i++)
{
OSSemPend(UART_sem, 0, &err);
NowTime=OSTimeGet(); //»ñȡʱ¼ä
//uHALr_printf("Run Times at:%d\r", NowTime);
OSSemPost(UART_sem);
OSTimeDly(180);
}
}
}
void Task3 (void *Id)
{
char *Msg;
int i=0;
/* print task's id */
Embedded Systems Development and Labs; The English Edition
283
OSSemPend(UART_sem, 0, &err);
uHALr_printf(" Task%c Called.\n", *(char *)Id);
OSSemPost(UART_sem);
while(1)
{
OSTimeDly(900);
OSSemPend(UART_sem, 0, &err);
EV40_rtc_Disp();
OSSemPost(UART_sem);
}
}
void Task2 (void *Id)
{
int value;
char *Msg;
/* print task's id */
OSSemPend(UART_sem, 0, &err);
uHALr_printf(" Task%c Called.\n\n", *(char *)Id);
OSSemPost(UART_sem);
while(1)
{
value = key_read();
// display in 8-segment LED
if(value > -1)
{
Digit_Led_Symbol(value);
OSTimeDly(90);
}
OSTimeDly(90);
}
}
void TaskStart (void *i)
{
char Id1 = '1';
char Id2 = '2';
char Id3 = '3';
Embedded Systems Development and Labs; The English Edition
284
char Id4 = '4';
/*
* create the first Semaphore in the pipeline with 1
* to get the task started.
*/
UART_sem = OSSemCreate(1);
uHALr_InitTimers(); // enable timer counter interrupt
/*
* create the tasks in uC/OS and assign decreasing
* priority to them
*/
OSTaskCreate(Task1, (void *)&Id1, &Stack1[STACKSIZE - 1], 2);
OSTaskCreate(Task2, (void *)&Id2, &Stack2[STACKSIZE - 1], 3);
OSTaskCreate(Task3, (void *)&Id3, &Stack3[STACKSIZE - 1], 4);
OSTaskCreate(Task4, (void *)&Id4, &Stack4[STACKSIZE - 1], 5);
ARMTargetStart();
// Delete current task
OSTaskDel(OS_PRIO_SELF);
}
void Main(void)//int argc, char **argv
{
char Id0 = '4';
ARMTargetInit();
/* needed by uC/OS */
OSInit();
OSTimeSet(0);
/* create the start task */
OSTaskCreate(TaskStart,(void *)0, &StackMain[STACKSIZE - 1], 0);
/* start the operating system */
OSStart();
Embedded Systems Development and Labs; The English Edition
285
}
7.3.4 Lab Exercise
Using the examples presented so far in this chapter implement an intruder alarm application using the uC/OS-II
kernel. The following describes the intruder alarm application.
Intruder Alarm Description
An intruder alarm system receives information about the state of the monitored building from a number of
sensors located at every possible entrance and exit. Sensors function basically as switches, indicating whether a
given sensor has detected an intruder or not. The alarm is located inside the building. It is set (armed) and reset
(disarmed) from inside the building. A digital code of fixed length is required for both setting and resetting the
alarm. One of the entrances, which also functions as an exit, is nominated as the entrance and the exit after the
alarm has been set.
Timing information is crucial for proper functioning of an intruder alarm. When the alarm is initially set, a
specific time delay is allowed for the user to leave the building through the nominated exit. When the alarm is
set, the use of any of the entrances other than the nominated one for re-entry activates the alarm instantly or, at
most, within a matter of a few seconds. The sensors monitoring the entrance nominated for re-entry and the
route to the alarm control point do not activate the alarm until a set time has elapsed. This set time allows the
user to enter the building and disarm the alarm by entering the correct digital code. If this is not done
successfully, the alarm is activated at the end of the set time.
The alarm system has a siren and a strobe and these are located outside the building. If an intruder is detected or
the alarm is not disarmed by the person entering the building through the nominated entrance during the
required time, the siren begins to sound and the strobe begins to flash immediately, as mentioned above. In this
event, the siren continues to sound for a specified time, usually for a few minutes, and then stops, but the strobe
continues to flash. The alarm can be reset by the user only by entering the correct code. If the alarm has already
been triggered, this would turn the alarm off. The correct code is the most up to date code entered when arming
the system.
When entering the code for disarming the alarm, the user is allowed a maximum period to complete the task. If
the user fails to complete this within the given time, the system discards the partial entry and awaits for the next
attempt. The user is allowed as many attempts as possible to enter the correct code within the allocated time. If
the alarm has already been set off, after this period it cannot be reset except by an appointed independent
authority.
Some reasonable limiting values for the timing parameters involved are:
a. Time allowed for setting the alarm and leaving the building – 30 seconds
b. Time between detecting an intruder and triggering the alarm off – 5 seconds
c. Time allowed for re-entry through the nominated entrance and start resetting the alarm – 2 minutes
d. Duration for resetting the alarm after re-entry – 1 minute
e. Maximum duration for entering the code at each attempt – 20 seconds
f. Duration of the siren sound – 5 minutes
Embedded Systems Development and Labs; The English Edition
286
NOTE: In this application you can use the keypad in order to simulate the entrance and exit switches; the 8-SEG
LED or the LCD to perform the flashing; the earphone to simulate the siren sound.
Embedded Systems Development and Labs; The English Edition
287
Appendix A: ARM Instruction, ARM Addressing and Thumb Instruction
Quick Reference
Table A-1 ARM Instruction Quick Reference
Table A-2 ARM Addressing Quick Reference
Table A-3 Thumb Instruction Quick Reference