Router Security Configuration Guide phần 7 pdf
Bạn đang xem bản rút gọn của tài liệu. Xem và tải ngay bản đầy đủ của tài liệu tại đây (456.81 KB, 30 trang )
Router Security Configuration Guide
Here is an example of setting up local username and password and AAA default
login authentication parameters. The default method list designates RADIUS
Central(config)# username joeadmin password 0 G0oD9pa$8
Central(config)# aaa authentication login default radius local
One note about method lists for aaa authentication: whatever method is first in the list
controls whether the authentication procedure will prompt for a username or not. If
the first method in the list is line or enable, then any additional method which
requires a username will automatically fail. When designing your method lists,
decide whether to use usernames and passwords (preferred) or to use just a password
(highly discouraged). For accounting purposes you should use the methods which
allow for usernames and assign each administrator a distinct username.
In a more complex scenario where a more limited set of administrators have access to
the console line, first create the default list. The default list should be for the limited
set of administrators, should apply to the console line only, and should use the local
user database. Accounting records can still be sent to the security server but the
security server's authorization capabilities can not be used since no authentication
records will be sent to the security server. The second list should be a named method
list and should be applied to the appropriate lines, including VTY lines, to allow
additional administrators remote access to the router. For the named method list
which will primarily use the security server, authorization should be used to control
the larger set of administrators. The following is a recommended configuration for
using a RADIUS security server and the local user database as described above.
Central(config)# username annadmin password 0 G%oD9pa$8
Central(config)# username joeadmin password 0 3MiaB-JKJ
Central(config)# aaa authentication login default local
Central(config)# aaa authentication login remotelist radius local
Central(config)# line vty 0 4
Central(config-line)# login authentication remotelist
Central(config-line)# exit
Central(config)# line aux 0
Central(config-line)# login authentication remotelist
Central(config-line)# exit
Central(config)#
In general the default list should be the most restrictive authorization list. When
multiple lists are used it would be a good idea if the default list only used the local
method and then named lists can be used to override the default list as appropriate.
Important: when AAA is turned on, then by default, authentication will use the local
database on all lines. To avoid being locked out of your router, make sure you add an
administrator account to the local username name database before enabling AAA.
Do not use the
aaa authentication enable default command since the
security server pass phrase is stored in the clear and the enable secret is well
protected. Use the enable secret password to protect all higher privilege levels.
182 Version 1.1c
Advanced Security Services
Authorization
The commands used for AAA authorization are:
•
aaa authorization {network | exec | commands level |
reverse-access} {default | list-name} method-list
turns on
AAA authorization for the specified type and designates the order in which
authorization methods will be applied.
•
aaa authorization config-commands tells the router to do
authorization on all configuration commands (this is the default mode set
by the
aaa authorization commands level command). The no form
of this command will turn off authorization on configuration commands in
the EXEC mode.
•
(line): authorization {arap | commands level | exec |
reverse-access} {default | list-name}
applies a specific
authorization type to a line (note: arap is part of the network authorization
type).
Of the four authorization types, exec and command deal with router access control
and apply to lines, the other two (network and reverse-access) primarily deal with
dial-in and dial-out access control and apply to interfaces. Another network type,
arap, is also applied to lines, and will not be covered. This section will concentrate
on exec and command authorization, and Section 4.6.3 on Dial-In Users provides an
overview of network and reverse-access authorization.
AAA authorization is currently of limited use for controlling access to routers beyond
the standard authentication mechanisms. There are two primary scenarios where
authorization is useful. First, if the router is used for dial in access, authorization is
useful for controlling who can access network services, etc. and who can access and
configure the router. Second, authorization can control different administrators who
have access to different privilege levels on the router.
Scenario 1 – Router with dial-in users, authorization configuration for controlling
access to the router:
Central(config)# aaa authorization exec default radius
Central(config)# aaa authorization network default radius
Scenario 2 – Router with two levels of users (exec and privileged exec)
Central(config)# aaa authorization exec default radius
Central(config)# aaa authorization commands 15 default radius
In both scenarios there was no need to apply the authorization method lists to lines
because they are using the default lists. For scenario 1 there would be additional
considerations as described in the Dial-In Users section. In scenario 2,
exec is used
to control all access to exec shells on the router and
commands 15 is used to control
access to privilege level 15 for a more restrictive set of administrators. The router
Version 1.1c 183
Router Security Configuration Guide
commands turn on the checks to query the security server on the router but the actual
user to authorization privilege mapping occurs on the security server.
RADIUS and TACACS+ authorization both define specific rights for users by
processing attributes, which are stored in a database on the security server. For both,
RADIUS and TACACS+, attributes are defined on the security server, associated
with the user, and sent to the network access server where they are applied to the
user's connection. For a list of supported RADIUS attributes, refer to the "RADIUS
Attributes" appendix of [1]. For a list of supported TACACS+ A-V pairs, refer to the
"TACACS+ Attribute-Value Pairs" appendix of [1].
The local database is populated using the
username command. But there are no
useful parameters to set for access to the router from lines (an exception would be for
dial-in access). Important: do not use the username name privilege level command
since the password will be weakly protected. Protect higher levels on the router
using the
enable secret command (see Section 4.1).
Also, in the examples above if the RADIUS security server is not available no one
will be able to get an exec shell and in scenario 2 no one will be able to run privilege
level 15 commands. There is one very important exception to this, AAA
authorization does not apply to the console line. Even if a named method list is
created and applied to the console line authorization will be ignored.
Accounting
The commands used for AAA accounting are:
•
aaa accounting {system | network | exec | connection |
commands level} {default | list-name} {start-stop | wait-
start | stop-only | none} method-list
turns on AAA's
accounting services for the specified accounting type.
•
aaa accounting suppress null-username command prevents
accounting records from being generated for those users who do not have
usernames associated with them. (NULL usernames can occur because of
accounting records on a protocol translation)
•
aaa accounting update {newinfo | periodic number} will allow
administrators to specify when accounting records are sent to security
servers. Periodic generates more accounting records than newinfo since it
will also include interim reports on actions in progress.
•
(line): accounting {arap | commands level | connection |
exec} [default | list-name]
can be used to apply different
accounting services and levels to different lines.
•
show accounting {system | network | exec | commands level}
{start-stop | wait-start | stop-only} tacacs+
command can
184 Version 1.1c
Advanced Security Services
be used to show active connection information. This is not a configuration
command but is worth mention.
AAA allows for four levels of accounting as set by the
aaa accounting command:
• start-stop accounting sends records when the accounting type starts and
stops. This is all done in the background and the user process will
continue regardless of the outcome of the accounting attempt.
• wait-start accounting sends an accounting record at the start and stop of
each specified type. In this case the user process can not continue, and
will actually be terminated, if the start accounting record can not be
recorded. If the start record is sent and acknowledged the user process can
continue and at the end a stop accounting record will also be sent.
• stop-only sends an accounting record at the end user process which is of an
accountable type.
• none specifies that no accounting records will be generated for a particular
accounting type.
Important: if wait-start accounting is specified on an interface or line and no security
server is available for receiving the accounting record then the user process using that
interface or line will be locked out. Do not use wait-start in any accounting method
list intended for the console line! A basic recommendation would be to use wait-start
for remote users and start-stop for local users. For command accounting stop-only
will provide the necessary coverage and will greatly reduce the number of accounting
records.
As mentioned earlier Cisco's RADIUS implementation does not support system and
command accounting. If your security policy calls for keeping a record of every
router command, then you must use TACACS+ accounting.
There are two basic scenarios for accounting depending upon which security server is
in use.
Configuration of TACACS+ accounting:
Central(config)# aaa accounting system default start-stop tacacs+
Central(config)# aaa accounting exec default start-stop tacacs+
Central(config)# aaa accounting exec remoteacc wait-start tacacs+
Central(config)# aaa accounting commands 15 cmdacc stop-only
tacacs+
Central(config)# aaa accounting connection default start-stop
tacacs+
Central(config)# line vty 0 4
Central(config-line)# accounting exec remoteacc
Central(config-line)# accounting commands 15 cmdacc
Central(config)# line aux 0
Central(config-line)# accounting exec remoteacc
Central(config-line)# accounting commands 15 cmdacc
Version 1.1c 185
Router Security Configuration Guide
Configuration of RADIUS accounting:
Central(config)# aaa accounting exec default start-stop radius
Central(config)# aaa accounting exec remoteacc wait-start radius
Central(config)# aaa accounting connection default start-stop
radius
Central(config)# line vty 0 4
Central(config-line)# accounting exec remoteacc
Central(config)# line aux 0
Central(config-line)# accounting exec remoteacc
Since remote administration is more dangerous than console administration, the
configurations above add extra accounting to the remote lines. Part of the extra
protection is requiring that before a remote user can get an exec shell an audit record
must be recorded into the security server. Note: the aux line configuration is not
required if the aux line is disabled as suggested in Section 4.6.2. Also, for
information about RADIUS Attributes and TACACS+ AV Pairs for use in
accounting, refer to the appendices in the Cisco Security Configuration Guide [1].
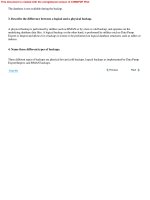
Putting It Together
This section will put together the AAA mechanisms from earlier in this section and
will apply them to the configuration of the Central and South Routers. The Central
router is between the facility backbone and the specific part of the infrastructure. The
South router acts as the first layer of defense to a well protected enclave.
Central
LAN 2
14.2.9.0/24
Facility Network
14.1.0.0/16
14.2.9.250
14.1.15.250
South
Protected Enclave
14.2.10.0/24
14.2.9.64/24
14.2.10.64
East
LAN 1
14.2.6.0/24
14.1.1.20
14.2.6.250
Authentication
Server
14.2.6.18
eth 0 eth 1
eth 0/0
eth 0/1
eth 0/0
eth 0/1
Figure 4-12: Routers and their Authentication Server
Authorization will not be used in these examples since all the administrators in these
examples need configuration access and there is no dial-in access. For a more
186 Version 1.1c
Advanced Security Services
complete example, including authorization and some discussion of dial-in security
concerns, see Section 4.6.3.
Central Router Configuration (IOS 12.0):
Central(config)# enable secret 3rRsd$y
Central(config)# username fredadmin password d$oyTld1
Central(config)# username bethadmin password hs0o3TaG
Central(config)# username johnadmin password an0!h3r(
Central(config)# service password-encryption
Central(config)# banner motd ^T
Legal Notice: Access to this device is restricted.
.
.
^T
Central(config)# radius-server host 14.2.6.18
Central(config)# radius-server key i*Ma5in@u9p#s5wD
Central(config)# aaa new-model
Central(config)# aaa authentication login default radius local
Central(config)# aaa accounting exec default start-stop radius
Central(config)# aaa accounting exec remoteacc wait-start radius
Central(config)# aaa accounting connection default start-stop
radius
Central(config)# access-list 91 permit 14.2.9.0 0.0.0.255 log
Central(config)# access-list 91 deny any log
Central(config)# line con 0
Central(config-line)# transport input none
Central(config-line)# exec-timeout 5 0
Central(config-line)# login local
Central(config-line)# exit
Central(config)# line vty 0 4
Central(config-line)# access-class 91
Central(config-line)# exec-timeout 5 0
Central(config-line)# login local
Central(config-line)# transport input telnet
Central(config-line)# accounting exec remoteacc
Central(config-line)# exit
Central(config)# line aux 0
Central(config-line)# transport input none
Central(config-line)# login local
Central(config-line)# exec-timeout 0 1
Central(config-line)# no exec
Central(config-line)# end
The first thing to do when configuring access to a router is to setup the local access.
The
enable secret command sets the password on the privileged exec level and
the
username commands setup all the local accounts. Now when AAA is turned on
the default authorization will not lock out the console.
The message of the day should be used to provide the legal document for controlling
access to the device and allowing for monitoring. This message should be generic
and hopefully the same on all of your routers, firewalls, servers, workstations, etc.
Version 1.1c 187
Router Security Configuration Guide
Next configure the security server and turn on AAA mechanisms. Since the shared
secret to the RADIUS server is stored in the clear do not use the same shared secret
for the router with any other device. Since communications to the security server are
protected and the connection does not go outside the corporate boundary it is
acceptable to allow communications to the server outside the router.
With the
aaa authentication login command make sure local is in the list as
described earlier. Also, notice that the default accounting for exec is set to start-stop
and that a named list was created for wait-start. This way by applying the named list
to external connections and allowing the default list to automatically apply to console
you will not be locked out of the router. Use connection accounting to track
outbound connections generated by users logged onto the router, these should be
minimal.
Create and apply an access-list to the VTYs to limit remote access to internal
networks only and if possible limit the remote hosts by actual host IP addresses
instead of a network address. Issue the
login local command on the console and
vtys in case AAA services get turned off. This will continue to allow limited remote
access based upon the local database and will be ignored while AAA mechanisms are
still running. Also limit remote access to telnet only and limit the connection idle
time to 5 minutes. The auxiliary port is disabled in this example.
If a TACACS+ server was used in this example instead of the RADIUS server then
system accounting would have also been specified. Command level accounting
could have been applied as well but would probably not be needed here.
South Router Configuration:
South(config)# enable secret rI^3r6Ed
South(config)# username bethadmin password hs0o3TaG
South(config)# username johnadmin password an0!h3r(
South(config)# banner motd ^T
.
.
^T
South(config)# tacacs-server host 14.2.6.18
South(config)# tacacs-server key Ir3@1yh8n#w9@swD
South(config)# aaa new-model
South(config)# aaa authentication login default tacacs+ local
South(config)# aaa accounting exec default start-stop tacacs+
South(config)# aaa accounting exec remoteacc wait-start tacacs+
South(config)# aaa accounting connection default start-stop
tacacs+
South(config)# aaa accounting system default start-stop tacacs+
South(config)# aaa accounting commands 15 default stop-only
tacacs+
South(config)# access-list 91 permit 14.2.9.0 0.0.0.255 log
South(config)# access-list 91 permit 14.2.10.0 0.0.0.255 log
South(config)# access-list 91 deny any log
South(config)# line con 0
South(config-line)# transport input none
188 Version 1.1c
Advanced Security Services
South(config-line)# exec-timeout 5 0
South(config-line)# login local
South(config-line)# exit
South(config)# line vty 0 4
South(config-line)# access-class 91
South(config-line)# exec-timeout 5 0
South(config-line)# login local
South(config-line)# transport input telnet
South(config-line)# login authentication remotelist
South(config-line)# accounting exec remoteacc
South(config-line)# exit
South(config)# line aux 0
South(config-line)# transport input none
South(config-line)# login local
South(config-line)# exec-timeout 0 1
South(config-line)# no exec
South(config-line)# end
As in the first example start by setting up local access to the router. The enable
secret
command sets the password on the privileged exec level and the username
commands setup all the local accounts. In this case there may be fewer local
accounts since this router is the first lines of defense to a secure enclave. Again,
when AAA is turned on the default authorization will not lock out the console.
The Message of the Day should be used to provide the legal document for controlling
access to the device and allowing for monitoring. This message should be generic
and hopefully the same on all of your routers, firewalls, servers, workstations, etc.
Next configure the security server and turn on AAA mechanisms. Since the shared
secret to the TACACS+ server is stored in the clear do not use the same shared secret
for the router with any other device. Since communications to the security server are
protected and the connection does not go outside the corporate boundary it is
acceptable to allow communications to the server outside the router.
With the
aaa authentication login command make sure local is in the list as
described earlier. Notice that the default accounting for exec is set to start-stop and
that a named list was created for wait-start. This way by applying the named list to
external connections and allowing the default list to automatically apply to console
you will not be locked out of the router. Use connection accounting to track
outbound connections generated by users logged onto the router, these should be
minimal. Also, include system and commands 15 accounting since this router is
providing protection to a special enclave.
As before, create and apply an access-list to the vtys to limit remote access to internal
networks only and if possible limit the remote hosts by actual host IP addresses
instead of a network address. Issue the
login local command on the console and
vtys in case AAA services get turned off. This will continue to allow limited remote
access based upon the local database and will be ignored while AAA mechanisms are
still running. Also limit remote access to telnet only and limit the connection idle
time to 5 minutes. The auxiliary port is disabled in this example.
Version 1.1c 189
Router Security Configuration Guide
If a RADIUS server was used in this example instead of the TACACS+ server then
system and command accounting would not be specified.
4.6.3. Dial-In Users
AAA services were designed with remote network access in mind. This includes
remote access to routers as well as to network services like PPP. AAA using
RADIUS is one of the primary means by which this is accomplished by Internet
Service Providers (ISP's). Controlling access for dial-in users is similar to
controlling access to the router but there are different protocols that are used.
Additionally, although it is not shown, it is highly recommended that when dial-in
access to the network or router is in use, that AAA services should be used in
conjunction with a one-time password or similar token technology. Some important
commands for controlling dial-in users are:
•
aaa authentication ppp {default | list-name} <method-list> is
used to specify PPP authentication method lists.
•
aaa authorization {network | exec | commands level | reverse-
access} {default | list-name} <method-list> turns on AAA
authorization for the specified type and designates the order in which
authorization methods will be applied. In this case we are particularly
interested in turning on network authorization.
•
aaa accounting {system | network | exec | connection |
commands level } {default | list-name} {start-stop | wait-
start | stop-only | none} method-list
turns on AAA's accounting
services for the specified accounting type. For dial-in users network needs
to be used.
•
aaa processes number command is used to specify the number of
background processes to start to handle concurrent authentication and
authorization requests.
•
(interface): ppp authentication {pap | chap | pap chap | chap
pap} [if-needed] {default | list-name} [call-in] [one-tone]
command is used to enable pap, chap, or both forms of authentication on
the selected interface.
•
(interface): ppp authorization {default | list-name}
command is used to apply a ppp authorization list to the selected interface.
•
(interface): ppp accounting [default | list-name] command is
used to apply accounting methods to the PPP service on the selected
interface.
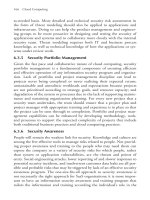
The example below gives one potential application of AAA services for dealing with
dial-in services (Note: this example is not complete). Figure 4-13 shows the relevant
portion of the network, and the configuration for East is shown after it.
190 Version 1.1c
Advanced Security Services
Facility Network
14.1.0.0/16
East
LAN 1
14.2.6.0/24
14.1.1.20/16
14.2.6.250/24
User Host
14.2.6.6/24
Remote Hostmodem
Telephone
Network
modem
Authentication
Server
14.2.6.18/24
net
access
eth 0 eth 1
Central
14.2.9.250/24
14.1.15.250/16
eth 0/0
eth 0/1
LAN 2
14.2.9.0/24
Figure 4-13: Router East in the Network
East(config)# enable secret t!tRd-1rZZ
East(config)# username fredadmin password d$oyTld1
East(config)# username bethadmin password hs0o3TaG
East(config)# banner motd ^T
LEGAL NOTICE: Use of this device restricted to authorized persons.
This device is subject to monitoring at all times, use of this
device constitutes consent to monitoring.
^T
East(config)# radius-server host 14.2.6.18
East(config)# radius-server key i3dRc8sRv(@oeU4)
East(config)# aaa new-model
East(config)# aaa authentication login default radius local
East(config)# aaa authorization exec default radius
East(config)# aaa authorization network default radius
East(config)# aaa accounting exec default start-stop radius
East(config)# aaa accounting exec remoteacc wait-start radius
East(config)# aaa accounting connection default start-stop radius
East(config)# aaa accounting network default wait-start radius
East(config)# access-list 91 permit 14.2.9.0 0.0.0.255 log
East(config)# access-list 91 permit 14.2.6.0 0.0.0.255 log
East(config)# access-list 91 deny any log
East(config)# line con 0
East(config-line)# transport input none
East(config-line)# exec-timeout 5 0
East(config-line)# login local
East(config-line)# exit
East(config)# line vty 0 4
East(config-line)# access-class 91
East(config-line)# exec-timeout 5 0
East(config-line)# login local
East(config-line)# transport input telnet
East(config-line)# accounting exec remoteacc
Version 1.1c 191
Router Security Configuration Guide
East(config-line)# exit
East(config)# interface async 1
East(config-if)# encapsulation ppp
East(config-if)# ppp authentication chap
East(config-if)# end
In this example there are several items left incomplete: 1) the IPSec tunnel to Central
has not been configured (see Section 5.2) to carry remote administrator access to the
router (which is required to protect the username and password traveling across the
facility backbone in the clear), 2) the terminal server lines have not been configured
(and will need to have the remoteacc accounting list applied) and, 3) the
asynchronous interface configuration needs completed (if the aux port is not used as
an asynchronous interface disable it see Section 4.1.4). The following descriptions
will only discuss items which are different from the Putting It Together examples in
the previous section.
AAA authorization for exec and network was added to separate the privileges for
network users and router administrators. In addition, accounting was added for
recording network events. The asynchronous interface contains the commands
necessary for configuring AAA authentication for the ppp protocol. Also the AAA
authorization and accounting default commands for network will also apply to the
ppp traffic as it traverses the line.
If a TACACS+ server was used in this example instead of the RADIUS server then
system accounting would have also been specified. Command level accounting
could have been applied as well but would probably not be needed here.
This section only provides one example for a possible network access server
configuration. Configuring dial-in services is far too complex a subject to be dealt
with in depth in this guide. Consult the Cisco IOS documentation, particularly the
“Dial Solutions Configuration Guide”, for more details.
4.6.4. Security Server Protocols
In Cisco routers and network access servers, AAA is the mechanism used to establish
communications with security servers. Cisco supported security servers are
RADIUS, TACACS+, and Kerberos. Security servers are important to Cisco
network gear when centralized administration is required or when authorization and
accounting services are needed.
RADIUS
Remote Authentication Dial In User Service (RADIUS) is an IETF proposed
standard (RFC 2865) for securing network components. RADIUS is a distributed
client/server based architecture used to pass security information between access
points and a centralized server. RADIUS protects the communications using a shared
secret. RADIUS can be used to provide authentication, authorization, and accounting
services. RADIUS was designed with Dial In access control in mind and the
accounting features are very flexible along these lines. However Cisco's RADIUS
192 Version 1.1c
Advanced Security Services
client does not support auditing of command or system events on the router or
network access server.
As a minimum when setting up a RADIUS server on a Cisco device the host address
and shared secret must be configured as well as turning on and configuring AAA on
the device. This is accomplished using the commands listed:
•
radius-server host {hostname | ip-address} [auth-port
port-number] [acct-port port-number]
command specifies the
radius server's hostname or IP address and the ports to use for
authentication (authorization) and accounting.
•
radius-server key string sets the RADIUS server shared
encryption key. The secrecy and quality of this key is critical to the
security of your RADIUS installation; users never have to type this string,
so make it longer than a typical password. The shared secret key should be
at least 16 characters long and follow the other rules for a good password
as described in Section 4.1.4.
Also, the RADIUS service should be bound to the loopback0 interface, if you have
defined it as described in Section 4.1.4. For a complete list of RADIUS router
configuration commands see the “RADIUS Commands” section in [1]. The example
below shows how to set up RADIUS on the router Central.
Central(config)# ip radius source-interface loopback0
Central(config)# radius-server host 14.2.6.18
Central(config)#
radius-server key W@t7a8y-2m@K3aKy
RADIUS servers are freely available and are in extensive use. To perform
authentication and authorization a RADIUS server uses attributes. These attributes
can be configured to allow/deny access to various router and network services. For
more details see the Security Configuration Guide on "Configuring RADIUS" and
"RADIUS Attributes" sections for more details.
Some RADIUS servers use the old standard port 1645 for authentication, while
others use the new standard port of 1812. IOS always uses 1645 unless you specify
otherwise. Use the auth-port parameter to cause IOS to send RADIUS requests to the
server on that port.
East(config)# radius-server host 14.2.6.18 auth-port 1812
Under IOS 12.1 or later, you can define named groups of RADIUS servers. These
groups may be useful for large enterprises, where different sets of security servers are
used for different groups of users or different purposes. To define a server group, use
the command
aaa server group, as shown below.
! RADIUS example - a group with one server in it
Central(config)# aaa server group radius radGroup1
Central(config-sg)# server 14.2.6.18 auth-port 1812
Central(config-sg)# server 14.2.6.18 key i*Ma5in@u9p#s5wD
Central(config-sg)# end
Central#
Version 1.1c 193
Router Security Configuration Guide
To use a server group, name it in a method list instead of the default group ‘radius’.
Central(config)# aaa authentication login VTlogin group radGroup1
TACACS+
Terminal Access Controller Access Control System plus (TACACS+) is the most
recent Cisco security protocol designed to provide accounting and flexible control of
authentication and authorization services. TACACS+ is implemented by Cisco using
the AAA mechanisms and provides for the centralized validation of users using
routers and network services. TACACS+ protects communications using a shared
secret key between the network device and central server. TACACS+ was designed
with Cisco implementations in mind so it offers a wide range of AAA services
including full auditing of Cisco AAA accounting events.
The primary commands used for configuring TACACS+ on a Cisco router are:
•
tacacs-server host {hostname | ip-address} [port port-
number] [key string]
command can be used to specify the host, IP
address or DNS name, where the TACACS+ server is running. The [port
integer] can be used to specify a new port number. The
key string
parmeter sets the secret key for this TACACS+ server host overriding the
default but should follow same creation rules as the default.
•
tacacs-server key string command sets the default TACACS+
shared encryption key. The security of TACACS+ depends on this secret,
and users never have to type it, so make it longer than a typical login
password. The shared secret key should be at least 16 characters long and
follow all the rules for a good password as described in Section 4.1.4.
For a complete list of TACACS+ router configuration commands see the "TACACS,
Extended TACACS, and TACACS+ Commands" section in the "Security
Command Reference". Simple example for Central:
Central(config)# tacacs-server host 14.2.6.18
Central(config)#
tacacs-server key W@t7a8y-2m@K3aKy
TACACS+ implementations are available through Cisco Secure ACS and Cisco also
offers a free implementation as well. TACACS+ uses attribute-value pairs for
controlling authentication and authorization services. These attribute-value pairs are
configured on the server and used by the router authorization mechanism to control
access to network services. For more details on the TACACS+ and attribute-value
pairs see the Security Configuration Guide sections “Configuring TACACS+” and
“TACACS+ Attribute-Value Pairs”.
Under IOS 12.1 or later, you can define named groups of TACACS+ servers. These
groups may be useful for large enterprises, where different sets of security servers are
194 Version 1.1c
Advanced Security Services
used for different groups of users or different purposes. To define a server group, use
the command
aaa server group, as shown below.
! TACACS+ Example - a group with two servers in it
Central(config)# aaa server group tacacs+ myTacGroup
Central(config-sg)# server 14.2.6.18 key Gx98-vAR1bv*u
Central(config-sg)# server 14.2.10.39 key t777+08cdcoWW
Central(config-sg)# end
Central#
When you want to include the servers of a particular group in a method list, simply
use the group name instead of the default name ‘radius’ or ‘tacacs+’.
Central(config)# aaa authentication login VTlogin group myTacGroup
Kerberos
Kerberos was developed by the Massachusetts Institute of Technology (MIT) and is
standardized by the IETF as a network authentication system in RFC 1510. Kerberos
provides strong authentication for client/server applications by using secret-key
cryptography. This mechanism can verify the identities of two users (i.e. person or
network component) on unprotected networks. This authentication is performed
using a trusted third-party service using conventional (secret key) cryptography. In
this system a client would request the credentials of the party they wish to contact
from the trusted authentication service. The communications between the router and
the Kerberos security server are encrypted.
Kerberos can also be used to perform EXEC shell authorization using Kerberos
Instance Mapping. After the two parties have been authenticated (in this case, the
router and the adminstrator), Kerberos can provide very effective confidentiality and
data integrity services, if your Telnet client supports Kerberos encryption. These two
topics are outside the scope of the Kerberos coverage in this guide, consult the IOS
12.1 Security Configuration Guide for more information.
Kerberos infrastructures are already in wide use. If you already have a Kerberos
infrastructure in place, then this form of centralized authentication may be a way to
gain excellent security for remote administration. Note that Kerberos only allows for
limited authorization capabilities and no accounting. There are free open sources
versions of Kerberos available as well as commercially supported products. Some
modern operating systems come with Kerberos built in. Configuration of a Microsoft
Windows 2000 Server acting as the Kerberos authentication server is covered below.
Configuration of Kerberos installations based on MIT Kerberos are already explained
in the Cisco IOS documentation. Host configuration for using MIT Kerberos is not
covered in this guide, but more details can be found in the IOS documentation [1], as
well as in RFC 1510 [5] and in Tung’s book [8].
This section assumes basic familiarity with Kerberos administration and security
concepts. For a good introduction to these topics, consult [8]. Before attempting
any of the step below, make sure that the IOS installed on your router supports
Version 1.1c 195
Router Security Configuration Guide
Kerberos. (For example, in global config mode type the word kerberos and then
type a question mark; if you get several choices then your IOS supports Kerberos.)
A Windows 2000 Server configured to be a Domain Controller automatically has the
Kerberos Key Distribution Center services installed and running on it. To make it
work with a Cisco router, perform the following steps on your Windows server:
1. Install the Kerberos support tools from the Windows 2000 installation
media. The tools are found in “support\tools\setup.exe”.
2. Update or confirm the DNS entries for the KDC and the router.
3. Create a user account for the router. Open up the “Active Directory
Users and Computers” tool located in the “Control Panel\Administrative
Tools” folder, right click on the “Users” folder, and select “New”, then
“user”. (Note: this is a Kerberos identity for the router, not for any user.)
4. If necessary, create the user accounts on the server for administrators that
will access the router.
196 Version 1.1c
Advanced Security Services
5. Check the Kerberos settings for logins; use the settings shown below in
the column “Effective Setting”. For more information, consult the NSA
Guide to Windows 2000 Kerberos Settings [6].
6. Use the Windows ktpass command, installed in step 1, to create the
host’s keytab file, map the router to its account, and set its password.
7. Install the keytab file on the router. This must be done using the IOS
kerberos srvtab command, as shown below.
Once you are sure that your router supports Kerberos, follow the steps listed below
in global config mode.
1. Define the Kerberos realm.
kerberos local-realm kerberos-realm
2. Designate the Kerberos KDC to use in the realm, along with port
number.
kerberos server kerberos-realm
{hostname | ip-address} [port-number]
3. Map an optional host name or DNS domains to the realm.
Version 1.1c 197
Router Security Configuration Guide
kerberos realm {dns-domain | host} kerberos-realm
4. Define the preauthentication method.
kerberos preauth authentication-method
The recommended method is encrypted-kerberos-timestamp.
5. Generate a local private DES key. The key-password should be 8
randomly-chosen characters.
key config-key 1 key-password
The key will be used to encrypt the Kerberos secret key in the router’s
stored configuration. (This key is stored in the router’s NVRAM, but
cannot be recovered or extracted.)
6. Load the keytab file from a server, link channel, or local file.
kerberos srvtab remote { URL | host filename }
This command supports a wide variety of means for downloading the
srvtab file, including TFTP, FTP, and more. TFTP is the default.
7. Create a login authentication model, specifying Kerberos as the
mechanism to use first.
aaa authentication login {default | list-name}
krb5 [ {other-mechanisms} ]
The two examples below show two different ways of conveying the Kerberos keytab
file, generated by the Windows 2000
ktpass command, over to the router. Neither
approach is perfect the ideal approach would be to load the keytab file directly over
the serial link, but unfortunately that is not supported in any version of IOS that the
authors of this guide have been able to test.
Kerberos Example 1: Network Download
The transcript below shows an example of following the Kerberos setup procedure on
router Central. In this case, the Kerberos KDC provides service on IP address
14.2.6.18, and a TFTP server is on IP address 14.2.9.6. (Note: Windows 2000
installations typically do not include TFTP servers. You will need to use a
commercial TFTP server, or distribute the file from a Unix system equipped with a
TFTP server.)
Central# config t
Enter configuration commands, one per line. End with CNTL/Z.
Central(config)# kerberos local-realm KERBEROS.NSA.GOV
Central(config)# kerberos server KERBEROS.NSA.GOV 14.2.6.18
Central(config)# kerberos realm kerberos.nsa.gov KERBEROS.NSA.GOV
Central(config)# kerberos realm .kerberos.nsa.gov KERBEROS.NSA.GOV
Central(config)# kerberos preauth encrypted-kerberos-timestamp
Central(config)# key config-key 1 aW 8(xZ
Central(config)# kerberos srvtab remote 14.2.9.6 Central.keytab
Loading Central.keytab from 14.2.9.6 (via Ethernet0/1): !
[OK - 78/4096 bytes]
Central(config)#
198 Version 1.1c
Advanced Security Services
The content of the keytab file is very sensitive, because it contains the long-term
Kerberos secret key that the router will use to communicate with the KDC. In
general, it is not a good idea to transfer the keytab file from your server to the router
over TFTP (or FTP, or any other plaintext network protocol). Unless this part of
your configuration takes place on an isolated lab or management network, do not use
this method to distribute the keytab file. Instead, use (1) the console serial download
method described below, or (2) the SCP protocol instead of TFTP (this requires IOS
support for SCP, and it requires setting up SSH as described in Section 5.5).
Kerberos Example 2: Console Link Download
This example shows how to convey the keytab file securely from your server to the
router over the console serial link using the YModem protocol.
Central# copy ymodem: flash:central.key
**** WARNING ****
.
.
Proceed? [confirm]y
Destination filename [central.key]? central.key
Erase flash: before copying? [confirm]n
Max Retry Count [10]: 15
Perform image validation checks? [confirm]n
Ymodem download using crc checksumming with NO image validation
Continue? [confirm]y
Ready to receive file C
4294967295 bytes copied in 23.692 secs (0 bytes/sec)
Central#
Central# config t
Enter configuration commands, one per line. End with CNTL/Z
Central(config)# kerberos local-realm KERBEROS.NSA.GOV
Central(config)# kerberos server KERBEROS.NSA.GOV 14.2.6.18
Central(config)# kerberos realm kerberos.nsa.gov KERBEROS.NSA.GOV
Central(config)# kerberos realm .kerberos.nsa.gov KERBEROS.NSA.GOV
Central(config)# kerberos preauth encrypted-kerberos-timestamp
Central(config)# key config-key 1 .XT9+se%
Central(config)# kerberos srvtab remote flash:central.key
Central(config)# exit
Central# ! optional steps: wiping the keytab from flash
Central# delete flash:central.key
Delete filename [central.key]? central.key
Delete flash:central.key? [confirm]y
Central#
Central# ! the squeeze command may not be supported on all routers
Central# squeeze flash:
Squeeze operation may take a while. Continue? [confirm]y
.
.
Central#
Version 1.1c 199
Router Security Configuration Guide
Kerberos and AAA
Once you have downloaded the keytab file, you can designate Kerberos as your main
AAA authentication method.
Central(config)# aaa new-model
Central(config)# aaa authentication login default krb5 local
Central(config)# exit
Central#
This section presents only a very cursory look at Kerberos authentication. For more
information about administering Kerberos networks, consult [6], [7], and [8].
4.6.5. References
[1] Cisco Systems, Cisco IOS 12.0 Network Security, Cisco Press, 1999.
This book provides a detailed reference for all the security features in Cisco
IOS 12. It includes a great deal of information about AAA, including a
section on configuring Kerberos. The same information is also available in
the on-line documentation, in the Cisco IOS Security Configuration Guide.
[2] Cisco System, Cisco IOS 12.0 Dial Solutions, Cisco Press, 1999.
This documentation volume provides detailed information on setting up
modems and dial-up networking facilities.
[3] Rigney C., et. al. “Remote Authentication Dial In User Service (RADIUS)”
RFC 2865, June 2000.
This is the Internet RFC that defined the core RADIUS protocol.
[4] Carrel, D., and Grant, L. “The TACACS+ Protocol Version 1.78”, Cisco
Systems, January 1997.
available at:
This is the draft RFC that would have standardized the TACACS+ protocol.
It explains the operation of the protocol in great detail.
[5] Kohl, J., “The Kerberos Network Authentication Service (V5)”, RFC 1510,
September 1993.
This is the Internet RFC that defines the Kerberos authentication protocol.
[6] Opitz, D. “Guide to Windows 2000 Kerberos Settings” NSA, July 2001.
available under:
This guide describes prudent Kerberos security settings for Windows 2000.
200 Version 1.1c
Advanced Security Services
[7] “Step-by-Step Guide to Kerberos 5 Interoperability,” Windows 2000 Step-by-
Step Guides, Microsoft Corporation, 2002.
available at:
planning/security/kerbsteps.asp
This article describes how to use Windows 2000 Kerberos with other
Kerberos implementations.
[8] Tung, B., Kerberos - A Network Authentication System, Addison-Wesley, 1999.
This slim handbook provides a good overview of Kerberos.
Version 1.1c 201
Router Security Configuration Guide
4.7. Collected References
The list below describes the major references and sources of information for the
material presented here in Section 4.
4.7.1. Books and Manuals
Cisco Systems, IOS 12.0 Configuration Fundamentals, Cisco Press, 1999.
Basic configuration guide for IOS 12, includes good information on using the
IOS command interface, basic IOS commands, and much more.
Cisco Systems, Cisco IOS Network Security, Cisco Press, 1998.
This book is the security configuration manual and command reference for
IOS 11.3. It includes extensive coverage of access management, AAA, and
related topics. Available on the Cisco Documentation CD as two documents:
the “Security Configuration Guide” and the “Security Command Reference”.
Cisco Systems, Cisco IOS 12.0 Network Security, Cisco Press, 1999.
This book is the security configuration manual and command reference
updated for IOS 12.0. It includes extensive coverage of access management,
AAA, IPSec, and related topics. Available on the Cisco Documentation CD.
Akin, T., Hardening Cisco Routers, O’Reilly & Associates, 2002.
A pragmatic and detailed guide to securing Cisco routers; includes detailed
examples.
Held, G. and Hundley, K., Cisco Security Architectures, McGraw-Hill, 1999.
This book includes excellent general advice about router and router-related
network security, in addition to its Cisco-specific material.
Held, G. and Hundley, K., Cisco Access List Field Guide, McGraw-Hill, 1999.
Access lists are critical to most aspects of Cisco IOS security. This book is a
detailed, practical guide to creating and understanding access lists.
Innokenty, R., Cisco Routers for IP Routing: Little Black Book, Coriolis Group,
1999.
This practical little book includes great advice on managing routes and
routing protocols, mostly oriented toward IOS 11.2 and 11.3.
Chappell, L. editor, Advanced Cisco Router Configuration, Cisco Press, 1999.
Good coverage of advanced Cisco configuration issues, including extensive
material on access lists and OSPF.
202 Version 1.1c
Advanced Security Services
Coulibaly, M.M., Cisco IOS Release: The Complete Reference, Cisco Press, 2000.
Unbelievably detailed information on Cisco IOS release versions, the release
management process, features in releases, and upgrade paths.
McGinnis, E. and Perkins, D., Understanding SNMP MIBs, Prentice-Hall, 1996.
A detailed exploration of the SNMP management information base,
including both standard and vendor-specific structures.
Huitema, C., Routing in the Internet, 2nd Edition, Addison-Wesley, 1999.
A deep and detailed textbook about IP routing technologies, protocols, and
how routing works in the Internet.
4.7.2. Articles and Papers
Thomas, R., “Secure IOS Template - Version 3.1”, November 2003.
available at:
/>This short but highly prescriptive document distills a great deal of Cisco IOS
security practice into an example configuration.
“Increasing Security on IP Networks” Cisco Internetworking Case Studies, 1998.
available at:
/>An old but useful article on using a Cisco router to protect a network
boundary. Includes some coverage of access lists and passwords.
“Improving Security on Cisco Routers”, Cisco Security Advisories, 2002.
available at:
/>A good overview article on tightening up the security on a typical Cisco
router running IOS 11.3 or later.
“Unicast Reverse Path Forwarding”, Cisco IOS 11.1(CC) Release Notes, Cisco
Systems, 2000.
available at:
software/ios111/cc111/uni_rpf.htm
Initial documentation on unicast reverse-path forwarding verification, it
includes a good explanation of the concepts.
Greene, B. and Smith, P., Cisco ISP Essentials, 1st edition, Cisco Press, April 2002.
This detailed guide explains a great deal about operational use of Cisco
routers in the Internet Service Provider environment, including good
coverage of critical security topics. It has also been published as a book,
available from Cisco Press.
Version 1.1c 203
Router Security Configuration Guide
5. Advanced Security Services
This section describes some Cisco IOS facilities that are not central to the task of
securing a router. These facilities offer additional security services that can
contribute to the secure operation of entire networks or communities.
5.1. Role of the Router in Inter-Network Security
When considering the task of joining IP security with IP router functionality, the
network administrator or security engineer can be overwhelmed. The vast amount of
available literature and the technical jargon can cause an administrator to ignore
available security features altogether. To reduce this daunting task to one which is
manageable and easily understandable, this section of the guide will focus on the
concept of “packet protection”. Each packet passing through, or created by the router
has source addresses and is carrying data which may need some form of protection.
By focusing on this fundamental building block of IP networking, we can devote our
energy to providing you with some basic cryptographic concepts, and the specific
Cisco IOS commands that implement them. These can then be easily incorporated
into current router configurations to help meet specific security requirements.
Routers used for supplying packet protection are almost always positioned as
gateway or border devices. These devices sit between untrusted networks, such as the
Internet, and local trusted networks. In 1996, Cisco released IOS version 11.2, which
included the Cisco Encryption Technology (CET). This proprietary solution was a
stopgap effort for customers until a standards-based solution was in place. While it
provided some level of packet protection for Cisco-to-Cisco communications, it did
not allow Cisco products to interoperate with other IP security products. Since the
adoption of the IETF IP Security (IPSec) standards, both Cisco (in IOS 11.3 and
above) and other IP product manufacturers have implemented and offered IPSec
solutions for packet protection to their customers. This standards-based approach
allows for interoperability between Cisco routers and other IP security products, e.g.
non-Cisco routers, firewalls, servers, etc. Thus, IPSec tunnels can be constructed
between two routers’ interfaces using the IPSec protocol framework. This framework
has been scrutinized by many skilled evaluators in industry and academia. It works in
conjunction with the standards-based Internet Key Exchange (IKE) protocol to
provide the users a very solid IP security foundation.
204 Version 1.1c
Advanced Security Services
5.2. IP Network Security
Prior to establishing an IPSec configuration on the router, certain network and current
router configuration checks should be made to eliminate any router connectivity
problems. Since IPSec utilizes IP protocols 50 and 51, and the User Datagram
Protocol (UDP) port 500 in its communications, any access list restrictions on these
ports or protocols should be removed or changed to allow the IPSec packets to be
transmitted and received by the participating routers. The example below illustrates
the ACL rule syntax for permitting incoming IPSec traffic.
access-list 100 permit 50 host 7.12.1.20 host 14.2.0.20
access-list 100 permit 51 host 7.12.1.20 host 14.2.0.20
access-list 100 permit udp host 7.12.1.20 host 14.2.0.20 eq 500
Also, the routers may be configured using several different modes of operation. For
the example in this section, we assume the routers have two modes of operation:
basic mode and privileged EXEC mode. In the basic mode of operation, anyone with
access to the router can view selected information about the current running
configuration. In the privileged EXEC mode, the administrator can update and/or
change the current running configuration. For more information about command
modes, see Section 4.1.
The security guidance of this section does not exhaustively cover all IPSec options.
Rather, it provides a set of options (e.g. which algorithms to use) and the appropriate
Cisco IOS commands to implement them in an easy-to-follow, step-by-step example
to help you set up and test IPSec on your network. In the example that follows, the
external interfaces of the North router, 14.2.0.20, and the Remote router, 7.12.1.20,
will be used to help demonstrate the concepts (see Figure 4-1).
5.2.1. Building IPSec Tunnels
Building IPSec tunnels between two Cisco routers will involve entering three sets of
information into each router’s running configuration files. The sets can be labeled as:
1. Establishing a common IKE Authentication Key
2. Establishing an IKE Security Policy
3. Establishing the IPSec Protection Parameters
Establishing a Common IKE Authentication Key
Prior to establishing an IPSec tunnel between two routers, each router authenticates
the peer IP address with which they are building a tunnel. This authentication
decision is made in the IPSec framework using the IKE protocol. While IKE has
several ways it can authenticate the two routers to each other, we will only discuss
how it uses a jointly held secret value (i.e. a pre-shared key) to do it. However, for
operational security we HIGHLY recommend that IKE authentication decisions be
made using IPSec authentication schemes in conjunction with digital certificates.
Version 1.1c 205
Router Security Configuration Guide
Consult the Cisco IOS 12.0 Security Configuration Guide [2] for details on the other
IKE options.
(Note: the router used for part of this example is named “Remote”, and that name
appears in all the prompts. Do not use a remote administration connection to enter
sensitive IPSec parameters – use a local console connection.)
To use pre-shared keys for making authentication decisions in IKE, each router must
possess the same secret key. These keys should be obtained out-of-band by each of
the routers’ administrators. Once the keys are securely held, the network
administrators for the North and Remote routers (possibly the same person) should
enter the key into their routers. For this example, the secret key is “01234abcde”. We
strongly recommend using difficult-to-guess combinations of characters, numbers,
and punctuation symbols to build operational pre-shared keys. To enter the keys, use
the
crypto isakmp command in global configuration mode, as shown below.
The syntax for the crypto isakmp command is:
crypto isakmp key key-value
address destination-ip-address
.
North# config t
Enter configuration commands, one per line. End with CNTL/Z.
North(config)# crypto isakmp key 01234abcde address 7.12.1.20
North(config)# exit
North#
and
Remote# config t
Enter configuration commands, one per line. End with CNTL/Z.
Remote(config)# crypto isakmp key 01234abcde address 14.2.0.20
Remote(config)# exit
Remote#
When entering new configuration information into the router it is always a good idea,
after entering the new information, to check and see if the router has received the
intended configuration information. One way to verify that the pre-shared keys were
properly entered is to display the router’s running-configuration and look for the pre-
shared key entered above. This can be done using the
show running-config
command in privileged EXEC mode.
Establishing an IKE Security Policy
Each router contains a list of IKE security polices. In order for two routers to be
interoperable, there must be at least one policy in common between them. These
policies capture information needed by the IKE protocol to help build a secure IPSec
tunnel between the two routers. Each necessary parameter for the policy is listed
206 Version 1.1c