MISSION CRITICAL! INTERNET SECURITY phần 9 pot
Bạn đang xem bản rút gọn của tài liệu. Xem và tải ngay bản đầy đủ của tài liệu tại đây (446.77 KB, 52 trang )
Configuring and Securing the Cisco PIX Firewall • Chapter 9 397
4 Warnings Warning message
5 Notifications Normal but significant condition
6 Informational Information message
7 Debugging Debug messages and log FTP commands and
WWW URLs
An example of sending warnings to a syslog server is:
pixfirewall>enable
pixfirewall#configure terminal
pixfirewall(config)#logging trap 4
pixfurewall(config)#logging host inside 172.16.0.38 tcp
NOTE
Syslog is not a secure protocol. The syslog server should be secured and
network access to the syslog server should be restricted.
Securing the PIX
Since the PIX is a security device, limiting access to the PIX to only those
who need it is extremely important. What would happen if individuals
where able to Telnet freely to the PIX from the inside network? Limiting
access to the PIX can be achieved by using the telnet command. Telnet is
an insecure protocol. Everything that is typed on a Telnet session,
including passwords, is sent in clear text. Individuals using a network-
monitoring tool can then capture the packets and discover the password to
login and enable a password if issued. If remote management of the PIX is
necessary, the network communication should be secured.
It is also a good idea to limit the idle-time of a Telnet session and log
any connections to the PIX through Telnet. When possible, use a RADIUS,
Kerberos, or TACACS+ server to authenticate connections on the console or
vty (Telnet) ports:
telnet ip_address netmask interface_name
www.syngress.com
Table 9.2 Continued
Level Type Description
115_MC_intsec_09 12/12/00 3:11 PM Page 397
398 Chapter 9 • Configuring and Securing the Cisco PIX Firewall
where:
■
Ip_address is an IP address of a host or network that can access
the PIX Telnet console. If an interface name is not specified, the
address is assumed to be on the internal interface. PIX automati-
cally verifies the IP address against the IP addresses specified by
the ip address commands to ensure that the address you specify
is on an internal interface.
■
Netmask is the bit mask of ip_address. To limit access to a single
IP address, use 255.255.255.255 for the subnet mask.
■
Interface_name is the name of the interface in which to apply the
security.
■
Timeout is the number of minutes that a Telnet session can be
idle before being disconnected by the PIX. Default is 5 minutes.
TIP
When permitting Telnet access to an interface, be as specific as possible.
If an administrative terminal uses a static IP address, permit only that IP
address for Telnet access.
The following is an example of limiting Telnet access to the PIX to one
host on the inside network.
pixfirewall>enable
pixfirewall#configure terminal
pixfirewall(config)#telnet 172.16.0.50 255.255.255.255 inside
pixfirewall(config)#telnet timeout 5
If features are not used on the PIX they should then be disabled. If
SNMP is not used, deactivate it. If it is used, changed the default commu-
nities and limit access to the management station only.
Finally, a security measure that is often forgotten is to keep the PIX a
secure area. By locking it away in a server room or wiring closet, only lim-
ited individuals will be able to physically reach the PIX. How would your
security policy be enforced if an individual were able to walk up to the PIX
and pull out the power cable?
Take the extra time to secure the PIX according to the security policy.
The PIX is typically the device that enforces the majority of a company’s
www.syngress.com
115_MC_intsec_09 12/12/00 3:11 PM Page 398
Configuring and Securing the Cisco PIX Firewall • Chapter 9 399
security policy. If the PIX itself is not secured, and an unauthorized indi-
vidual gains access to it, the security of the network will be compromised.
Summary
The Cisco PIX Firewall is a very versatile security device. From the PIX 506
SOHO model to the Enterprise class PIX 520 model, the PIX can fulfill the
security needs of any size network.
In this chapter we covered numerous topics including the design of a
security policy and then implementing that security policy on the PIX. It is
extremely important to design a policy thoroughly before implementing it.
Identifying the resources to protect, the services you wish to allow (HTTP,
FTP etc), and requiring users to authenticate in order to access a resource
ahead of time will permit an organization to implement the security policy
in a quick and efficient manner. By creating a security policy on the fly,
your resources can be compromised and data can be corrupted. Instead of
being reactive to attacks and other security holes, creating a detailed secu-
rity policy is a proactive measure in protecting your network.
Remember the key security features of the PIX: URL, ActiveX, and Java
filtering; access control lists; DMZs; AAA authentication and authorization;
DNSGuard, IP FragGuard, MailGuard, Flood Defender, and Flood Guard;
IPSec; stateful filtering; securing access to the PIX; and syslog. These fea-
tures will aid you in creating and implementing your security policy. NAT
and NAPT should not be relied on as a security measure. Using a syslog
server will allow you to archive all of the traffic that passes through your
firewall. By using syslog, you will always have a record of anyone
attempting to attack your firewall from the inside or outside.
FAQs
Q: I have two inside networks. I would like only one of them to be able to
access the Internet (outside network). How would I accomplish this?
A: Instead of using the NAT (inside) 1 0 0 statement, which specifies all
inside traffic, use the NAT (inside) 1 xxx.xxx.xxx.xx yyy.yyy.yyy.yyy
statement where x is the source network you wish to translate, and y is
the source network subnet mask.
Q: I am setting up my outbound access control lists to specify which
traffic I will permit users to use. How do I know which TCP or UDP port
a particular application uses?
www.syngress.com
115_MC_intsec_09 12/12/00 3:11 PM Page 399
400 Chapter 9 • Configuring and Securing the Cisco PIX Firewall
A: Usually the application vendor will have the TCP or UDP port(s) listed in
the documentation, or available on their Web site. For a comprehensive
list of Well Known Ports, Registered Ports, and Dynamic/Private ports,
visit www.isi.edu/in-notes/iana/assignments/port-numbers.
Q: A user has informed me that he believes that his application is not run-
ning due to firewall restrictions. After researching the application, I am
unable to figure out which TCP or UDP port the application uses. How
can I find this information?
A: If you are using a syslog server or third-party application to analyze the
syslog on the PIX, you can query the syslog for instances of the IP
address being denied. From that output, you should be able to deter-
mine the port in question. The following is one line of output from the
syslog:
106019: IP packet from 172.16.0.39 to 212.214.136.27, protocol 17
received from interface "inside" deny by access-group "acl_out"
From this output you can clearly see that host 172.16.0.39 is trying
to access a foreign IP address on port 17. After checking to which ser-
vice port 17 corresponds, you find that the user is trying use an appli-
cation that gives “Quote of the day” messages.
Q: My organization uses Microsoft Exchange server for our mail. How
would I allow our Exchange server to receive external mail if the server
is located on the inside network and a PIX firewall is in place?
A: Since the server is physically located on the inside network, a static
translation will need to be created to assign the Exchange server a
global IP address. Once the translation has been created, use ACLs to
limit to the type of traffic able to reach the server; that is, SMTP. For
example, the Exchange server’s internal IP address is 172.16.0.16, and
the globally assigned IP address will be 207.139.221.40:
pixfirewall(config)#static (inside,outside) 207.139.221.40 172.16.0.16
>netmask 255.255.255.255
pixfirewall(config)#access-list acl_mailin permit tcp any host
207.139.221.40 eq smtp
pixfirewall(config)#access-group acl_mailin in interface outside
www.syngress.com
115_MC_intsec_09 12/12/00 3:11 PM Page 400
Axent Technologies
Raptor Firewall 6.5
Solutions in this chapter:
■
Configuring Axent Raptor Firewall
■
Applying the Firewall to Your Security
Model
■
Avoiding Known Security Issues
Chapter 10
401
115_MC_intsec_10 12/12/00 3:17 PM Page 401
402 Chapter 10 • Axent Technologies Raptor Firewall 6.5
Introduction
Axent’s Raptor Firewall is a full-featured security package that will allow
you to protect your network from outside threats. One of the nicest things
about this package is that it is available on many platforms including
Windows NT, Sun Solaris, HP-UX, and soon Windows 2000.
The Raptor Firewall package is easy to install and configure. It includes
many security measures like content filtering, Out Of Band Authentication
(OOBA), Windows NT Domain Authentication, and Axent Defender, which
can be used with SecureID or CRYPTOCard.
This chapter will give you an overview of the firewall’s capabilities and
discuss some common applications used; then it will discuss some of the
security issues associated with it and help you diagnose common problems.
Configuring Axent Raptor Firewall 6.5
Before you get into the installation and configuration of Raptor, you need
to make sure that you have met the software requirements. The current
minimum requirements for Raptor 6.5 to run on Windows NT are listed in
Table 10.1.
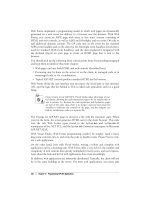
Table 10.1 Raptor 6.5 Minimum System Requirements for Windows NT
Component System Requirements
CPU Pentium II 233 MHz
Memory If the site will have less than 200 users: 64MB RAM
with a 300MB paging file.
If the site will have more than 200 users: 128MB RAM
with a 500MB paging file.
Note that these are the minimum requirements, and
more memory is recommended for more efficient
operation.
Disk Space If the site will have less than 200 users: 2GB HD with
at least 200MB free for Raptor installation files.
If the site will have more than 200 users: 4GB HD.
Web Browser Internet Explorer 5.0 or later
Operating System Windows NT 4
Service Pack 5 or 6a
Network Interface See Axent’s Web site for a list of
Card (NIC) support supported NICs.
www.syngress.com
115_MC_intsec_10 12/12/00 3:17 PM Page 402
www.syngress.com
Installing Raptor Firewall 6.5
To begin the installation process, go to the Axent software directory; we will
be concerning ourselves with the International folder for the time being. Go
to International | Gateway | NT and you will see a Windows NT Command
Script (Setup.cmd). Double-click on the command script to begin the instal-
lation process. If you have downloaded the firewall package from Axent’s
Web site, the executable zip file will extract to the root of your drive. For
more information on the discussed paths, please refer to Table 10.2.
Axent Technologies Raptor Firewall 6.5 • Chapter 10 403
Notes on Installation
There are a few important items to note regarding a Raptor 6.5 install.
■
If you are installing Raptor 6.5 on Windows NT4 Server, it
must be a Member Server. The current software package
does not support an install to a Domain Controller.
■
If you have Service Pack 6a installed on your Windows NT 4
machine, there is a known issue that could curtail function-
ality. It involves TCP sessions held in an infinite wait state
even after a termination has been requested. Microsoft has
released a patch to correct this issue, and a work-around is
included with the Raptor 6.5 installation kit. You can find
more information on this problem at rosoft
.com/support/kb/articles/q254/9/30.asp.
■
Raptor Firewall 6.5 currently does not support software
redundant array of disks (RAID) or Disk Mirroring. Installation
will have to take place on a system that does not have this
implemented.
■
You can install the firewall package with only one NIC, but
dual NICs on separate subnets are recommended for installa-
tion.
If you find that your current setup does not meet all of these min-
imum requirements, those issues will need to be corrected before you
begin with the software installation.
115_MC_intsec_10 12/12/00 3:17 PM Page 403
404 Chapter 10 • Axent Technologies Raptor Firewall 6.5
Table 10.2 Default Directory Structure of the Axent Installation Software
Folder Path
International \\%System Root%\AxentSW\International
ADDITIONAL \\%System Root%\AxentSW\International\
SOFTWARE ADDITIONAL SOFTWARE
Gateway \\%System Root%\AxentSW\International\Gateway
Nt \\%System Root%\AxentSW\International\Gateway\Nt
Setup.cmd \\%System Root%\AxentSW\International\Gateway\Setup.cmd
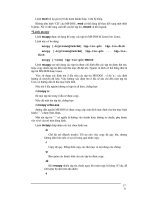
1. After you have launched the Setup.cmd file, you will see a screen
similar to the one found in Figure 10.1. Click Next to advance into
the software setup.
2. Click Yes for the software license agreement to continue. Read the
agreement thoroughly and make sure that you understand what
you are agreeing to.
3. The next screen is the setup for the Raptor License Key and
Product Serial Number. As stated in Figure 10.2, if you leave this
field blank you will have a 30-day evaluation period for the Raptor
firewall software.
4. After you have entered your serial number, you are ready to select
the package you would like to install. For the purposes of this
chapter, we will be concerned with the Raptor Firewall selection as
seen in Figure 10.3. Make sure that the management console box
is checked so that it will also be installed.
www.syngress.com
Figure 10.1 Raptor Firewall initial setup screen.
115_MC_intsec_10 12/12/00 3:17 PM Page 404
Axent Technologies Raptor Firewall 6.5 • Chapter 10 405
5. Once you have selected the software package, you must select the
desired installation location, as shown in Figure 10.4.
6. After you have selected your destination directory, the Raptor
Firewall 6.5 package will be installed. Once the installation has
finished, you will need to select which of your installed NIC(s)
should be set up for the external network and which NIC(s) should
be set up for the internal network (see Figure 10.5). Note that the
NIC(s) on the internal and external networks must be configured
on different subnets for proper operation.
www.syngress.com
Figure 10.2 License Key setup dialog box.
Figure 10.3 Product selection dialog box.
Figure 10.4 Installation directory dialog box.
115_MC_intsec_10 12/12/00 3:17 PM Page 405
406 Chapter 10 • Axent Technologies Raptor Firewall 6.5
7. After your NICs have been set up on the network, you will need to
configure a local administration password for the Raptor
Management Console (RMC), as shown in Figure 10.6.
8. After you have completed this step, the software installation will go
through some final stages before you need to restart your computer.
Upon restart you will be ready to configure the Raptor Firewall.
9. Once you have restarted your system, you can verify proper instal-
lation in two ways. You can double-click on the Raptor Firewall
Setup, and verify the proper location for your NICs. Alternatively,
you may check your network settings. On the desktop, right-click
on Network Neighborhood and then select Properties. Once the
Properties screen is opened, go to the Adapters tab (see Figure
10.7). For each adapter you have loaded in your system, you
should see a virtual NIC provided by the Raptor Firewall software.
www.syngress.com
Figure 10.5 Network selection for NICs.
Figure 10.6 Set the local administration password for the Raptor
Firewall.
115_MC_intsec_10 12/12/00 3:17 PM Page 406
Axent Technologies Raptor Firewall 6.5 • Chapter 10 407
Configuring Raptor Firewall 6.5
Once the Raptor Firewall has been installed, you are ready to configure the
rest of the settings to allow you to secure your network. You will access
and modify the configuration options from the Raptor Management
Console. During the installation, a shortcut was placed on the desktop for
the RMC.
1. Locate the RMC shortcut on your desktop, and double-click it to
launch the RMC application. When you open your first session,
you will not have any connections to Raptor Firewalls configured.
Expand AXENT Technologies, and you will find an icon for the
Raptor Management Console. Your first screen should look like
Figure 10.8.
2. You will need to click on the New Connection button to bring up
the connection dialog box for the firewall. Once you have done
that, you should see a dialog box like the one in Figure 10.9. If you
are managing a local firewall (located on this system), you will
need to make sure that you enter localhost in the Name field of
the dialog box. You will also be required to provide the password
that you used during the setup phase of the firewall.
www.syngress.com
Figure 10.7 Checking Network Properties for installation
verification.
115_MC_intsec_10 12/12/00 3:17 PM Page 407
408 Chapter 10 • Axent Technologies Raptor Firewall 6.5
3. After you have successfully logged into the Raptor Firewall, your
screen should look like Figure 10.10. First of all, notice the
“nt4_srv(Connected)” icon to the left side of the screen. This shows
you that you have successfully logged into the Raptor Firewall. To
the right, you will see several icons for QuickStart and SMTP
Wizard, wizards to help you set up some initial configuration
parameters. The last icon, Disconnect from nt4_srv, will allow you
to close a session while still keeping the RMC open.
QuickStart Configuration Wizard
After you have logged in, it is recommended, but not required, that you go
through the wizards to help you set up your firewall. The QuickStart
Wizard will help you configure Web and File Transfer Protocol (FTP) access,
as well as assist you with setting up e-mail services.
www.syngress.com
Figure 10.8 Getting connected to the Raptor Firewall for the first
time.
Figure 10.9 Creating a connection for a local firewall.
115_MC_intsec_10 12/12/00 3:17 PM Page 408
Axent Technologies Raptor Firewall 6.5 • Chapter 10 409
1. After you click on the QuickStart button, your first screen should
look like Figure 10.11. Click Next to continue to the first configu-
ration screen.
2. The next screen (see Figure 10.12) will allow you to select which
services you would like to configure. You may or may not need to
configure either of these options, depending on your setup.
3. The next screen will ask for the server’s Internet Protocol (IP) or
Domain Name System (DNS) address for e-mail redirection (see
Figure 10.13).
www.syngress.com
Figure 10.10 The initial configuration wizards available upon login.
Figure 10.11 Welcome screen for the QuickStart Configuration
Wizard.
115_MC_intsec_10 12/12/00 3:17 PM Page 409
410 Chapter 10 • Axent Technologies Raptor Firewall 6.5
4. Next, select whether to allow internal users to send e-mail to
external locations (see Figure 10.14). As the wizard states, if this is
not selected, any rules that allow mail to be sent to all systems will
be deleted.
www.syngress.com
Figure 10.12 Select the services you would like to set up using the
wizard.
Figure 10.13 Enter the IP or DNS address of the server.
115_MC_intsec_10 12/12/00 3:17 PM Page 410
Axent Technologies Raptor Firewall 6.5 • Chapter 10 411
5. After you have configured these settings, the wizard will configure
the proper rules for the firewall, and will restart the affected fire-
wall services (see Figure 10.15). You have now completed this
wizard, and you may go on to the next one if desired.
www.syngress.com
Figure 10.14 Select whether or not internal users will be able to
send e-mail outside the internal network.
Figure 10.15 The QuickStart Wizard completes the desired settings.
115_MC_intsec_10 12/12/00 3:17 PM Page 411
412 Chapter 10 • Axent Technologies Raptor Firewall 6.5
SMTP Configuration Wizard
Although the QuickStart Wizard did have some steps for e-mail, the SMTP
Configuration Wizard provides more control over e-mail configuration.
1. When you click on the SMTP Configuration Wizard, your first
screen will look like Figure 10.16.
2. You will recognize the next two screens from the QuickStart
Wizard (Figures 10.13 and 10.14), which ask you to enter the IP or
DNS address of the server. The purpose of this is to allow e-mail
directed at the external interface to be redirected to the internal
mail server. After you have entered the IP address of the server,
you will be asked whether to allow internal hosts to send e-mail
outside of the internal network.
3. The next screen will allow you to set up anti-spam features for the
firewall; you can add or modify current Realtime Blackhole List
(RBL) servers, which allows you to block mail from specific sites
that are known to be spam sites. Upon receipt of a message from
an included spam site, the message will not be relayed beyond the
firewall. See Figure 10.17.
4. The next screen, shown in Figure 10.18, will allow you to set up
anti-relay settings for your e-mail rules. This works in hand with
the anti-spam settings that you just set, but you may also add
specific domains at this time if you wish.
www.syngress.com
Figure 10.16 SMTP Configuration Wizard.
115_MC_intsec_10 12/12/00 3:17 PM Page 412
Axent Technologies Raptor Firewall 6.5 • Chapter 10 413
5. The next screen allows you to set your system to check a Dial-up
User List (DUL). Utilizing a DUL is another way of keeping spam
from riddling your network. You may select from one of the
included sites or add your own, as shown in Figure 10.19. For
more information on spam prevention, RBL, or DUL, check
www.mail-abuse.org.
www.syngress.com
Figure 10.17 Set up RBL servers to be included in your e-mail rules.
Figure 10.18 Set up anti-relay settings for e-mail.
115_MC_intsec_10 12/12/00 3:17 PM Page 413
414 Chapter 10 • Axent Technologies Raptor Firewall 6.5
6. You have now completed the SMTP Configuration Wizard (Figure
10.20). Save and reconfigure now, as some of the settings will not
take effect until you do.
www.syngress.com
Figure 10.19 Set up DUL services with provided servers or add your
own.
Figure 10.20 Save your changes and reconfigure the Raptor
Firewall.
115_MC_intsec_10 12/12/00 3:17 PM Page 414
Axent Technologies Raptor Firewall 6.5 • Chapter 10 415
DNS Configuration
Raptor Firewall includes the capability to proxy DNS information for your
internal network for IP to hostname translation.
1. To verify that you are using DNS Proxy, go to Access Controls and
then go to Proxy Services. On the right-hand side of the screen you
will see what proxy services are available. To check on the status
of the DNS Proxy Daemon (DNSD), right-click on it and select
Properties, as shown in Figure 10.21.
www.syngress.com
False Protection Against Spoofing and SYN Attacks
Note that in the anti-relay screen of the SMTP Configuration Wizard (see
Figure 10.18) there is a checkbox for No Source Routed Address allowed.
This box will cause the firewall to drop any of these packets that it
receives. Source route addressing is where an incoming packet has a
source address that is on the local subnet.
Although this is a good security practice to have, it does not pro-
tect you from SYN flooding or IP spoofing. To protect yourself from
these threats, you should incorporate ingress filters on your routers.
Cisco has a considerable amount of information on these topics on their
Web site, as do other network solution providers such as 3Com, Sun,
and Nortel Networks.
Figure 10.21 Select DNSD and go to properties for current settings.
115_MC_intsec_10 12/12/00 3:17 PM Page 415
416 Chapter 10 • Axent Technologies Raptor Firewall 6.5
2. The Status tab in the Properties menu will allow you to turn DNSD
on or off (see Figure 10.22).
3. The Start of Authority (SOA) tab allows you to set the DNS timers
such as refresh, retry, and expiration, as well as the Time-to-Live
(TTL).
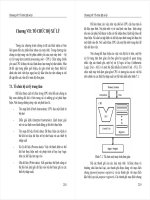
4. The Miscellaneous tab, shown in Figure 10.23, will allow you to
specify a location for a Hosts file of your choice or use the default
(which is the Windows NT 4 Host file). This tab will also allow you
to log any DNS requests or deny outside RFC1597 addresses.
RFC1597 is the allocation of address spaces for internal network
use. These ranges include 10.0.0.0–10.255.255.255,
172.16.0.0–172.31.255.255, and 192.168.0.0–192.168.255.255.
(Note that RFC 1597 was superceded by RFC 1918 in February of
1996, even though Raptor still shows 1597 in their dialog windows.)
WARNING
Do not configure a DNS server on the same server as the Raptor Firewall
if you are using DNSD. This combination is not supported and will cause
problems within the Raptor Firewall.
www.syngress.com
Figure 10.22 Use this screen to select whether or not you will use
DNSD.
115_MC_intsec_10 12/12/00 3:17 PM Page 416
Axent Technologies Raptor Firewall 6.5 • Chapter 10 417
Creating DNS Host Entries
To create DNS entries for servers or other devices, perform the following
steps.
1. Go to DNS Records and right-click in the right-hand section of the
screen. Select New and then Host, as shown in Figure 10.24.
www.syngress.com
Figure 10.23 Set the location of the Hosts file.
Figure 10.24 Select Host from the New menu to create a new DNS
Host entry.
115_MC_intsec_10 12/12/00 3:18 PM Page 417
418 Chapter 10 • Axent Technologies Raptor Firewall 6.5
2. Next, select what type of entry this is to be. If you select Private,
only users on the internal network will have access to this entry
and it will be added to the Hosts file. If you select Public, this entry
will be added to the Hosts.pub file and it will be accessible to
everyone. See Figure 10.25.
Network Interface Configuration
There are several options that you can configure on your installed NICs,
including filters, IP addresses, and card names.
1. To access the configuration options, select Network Interfaces
under Base Components (Figure 10.26).
2. Right-click on the desired NIC and go to Properties (we are begin-
ning with the internal network NIC). Under Properties, you will see
several tabs (Figure 10.27). The first tab is for general information.
The NIC was given a name by Raptor, so you may want to change
it if it will help you remember it better. You may also enter a
Description or change the IP address.
3. Under the Options tab (shown in Figure 10.28), you will be able to
select whether this NIC is part of the internal network or external
network. You may also allow Multicast Traffic, which is traffic des-
tined to a group of nodes. Two things to be sure you are aware
of are SYN Flood Protection and the Port Scan Detection. See
www.syngress.com
Figure 10.25 Select the desired options for the new Host entry.
115_MC_intsec_10 12/12/00 3:18 PM Page 418
Axent Technologies Raptor Firewall 6.5 • Chapter 10 419
Chapter 5 for more information on SYN flooding. Port Scan detec-
tion will allow the firewall to detect if someone is scanning this
interface for open ports. Since we are configuring an internal net-
work NIC, we will not enable Port Scan Detection or SYN Flood
Protection. This, of course, is up to you and how you will set up
your network.
www.syngress.com
Figure 10.26 Locate the Network Interfaces section of the Raptor
configuration.
Figure 10.27 General options menu of a selected NIC.
115_MC_intsec_10 12/12/00 3:18 PM Page 419
420 Chapter 10 • Axent Technologies Raptor Firewall 6.5
4. The Filters tab, shown in Figure 10.29, will allow you to set any fil-
ters you have created as input or output filters on this interface.
Note that Raptor Firewall ships with a sample Denial of Service
(DoS) filter.
www.syngress.com
Figure 10.28 Select options for your NIC.
Figure 10.29 Select any filters that are to be applied to this
interface.
115_MC_intsec_10 12/12/00 3:18 PM Page 420
Axent Technologies Raptor Firewall 6.5 • Chapter 10 421
5. Under the Spoof Protected Networks tab (see Figure 10.30), you
select any network entities that should be spoof protected.
Universe* is the default network entity and is not protected by
default. If you have specific areas that should be protected, you
should create a network entity for that area and enable protection
here. Network entities will be covered later in this chapter.
6. The In Use By tab lists the services and rules that are utilizing the
selected NIC (see Figure 10.31).
External NIC Configuration
In this section, we will be configuring the external NIC that will interface
with networks outside of your own.
1. Select your NIC that is being used by the external network. Right-
click on it and select Properties. Once you are in the Properties
screen, there are several changes you can make that are different
from the default setup.
2. Under the Options tab (see Figure 10.32), you could also set up
SYN Flood Protection and Port Scan Detection. You should make
sure that the This Address Is A Member Of The Internal Network
checkbox is not checked because obviously this NIC is not. If this
box is checked, Raptor will treat this NIC as if it were on the
trusted internal network.
www.syngress.com
Figure 10.30 Select any network entities that should be spoof pro-
tected.
115_MC_intsec_10 12/12/00 3:18 PM Page 421