GWT in Practice phần 9 ppt
Bạn đang xem bản rút gọn của tài liệu. Xem và tải ngay bản đầy đủ của tài liệu tại đây (536.2 KB, 37 trang )
279Summary
form.submit();
}
});
HorizontalPanel buttons = new HorizontalPanel();
buttons.add(save);
inner.add(buttons);
box.setWidget(form);
box.show();
}
});
If you have handled file uploads from HTML or JSP pages before, this will all look fairly
straightforward. We set up the
<form>
tag in the
FormPanel
object as we would for any
other web application
b
c
, and we submit the form when the Save button is clicked
g
. Because we aren’t going to send the user’s browser to a new page when this form
is submitted, we need a way to handle the returned results. Here we’re using a
Form-
Handler
d
.
One special thing to pay attention to here is that when the image is uploaded, our
servlet returns text/plain as the location of the
URL. Safari, however, takes the results
that come back and formats them for viewing in a web page by wrapping them in a
<pre>
tag. Your application needs to check for this and strip it out if you just want
a plain text value back from a server, as we’re doing here
e
.
After we get the value back, we construct the real
URL using the base path from the
GWT application root and set it on the
Book
object
f
.
With the file upload element covered, we have completed our tour of this basic
CRUD application.
9.5 Summary
You have already seen the basics of application construction patterns, but in this chap-
ter we looked at some new issues you’ll need to address in your applications. We
looked at creating a set of client-enabled
DTOs and mapping them to server-side
classes to make sure our service
JPA beans are not serialized to our GWT client. There
are several important reasons for this, as we noted:
■
serialization of JPA entities breaks down in some instances
■
you’ll often want support for
PropertyChangeEvents
in your client model and
not on the server
■
you’ll often want to be able to share your server-side model with other server-
side projects without having
GWTisms attached
In this chapter we used a method whereby the
JPA-enabled data access beans, DAOs,
and service can be used by other applications, not just our
GWT web app, unlike the
direct
JPA example in chapter 4. In this chapter we also looked at configuring Spring
within the scope of a
GWT application, and using the
RemoteServiceServlet
as a
proxy into the Spring-configured application for the client-side application. Finally,
we looked at some common cases in the client application, including dealing with
Submit form
when clicked
g
280 CHAPTER 9 Java Enterprise Reinvented
many-to-many relationships in a CRUD application and handling file uploads from the
client browser.
In practice, this part of the Bookstore application is most useful for administrators.
In the next chapter we’ll examine the customer-facing client application and look at
how Java
EE security constructs can affect a GWT application.
281
Building the Storefront
A bookstore is one of the only pieces of evidence we have that people are
still thinking.
—Jerry Seinfeld
In the last chapter, we looked at a basic
CRUD application for a database of books.
In this chapter, we’re going to take that application and turn it into the basis of an
Ajax storefront that can sell the books listed in the database. While a basic database
of books is
OK, you’ll likely have multiple interfaces to your data—a customer-
facing storefront for buying the books in the database is a good example.
There are a few things we need to do to the chapter 9 application to make this
happen. First, we need to secure our administration tool and create a separate ser-
vice for customers. Next, we need to build a drag-and-drop system using only the
GWT APIs. Also, because the storefront is the customer-facing portion of our appli-
cation, it should be pretty—we’ll look at adapting a JavaScript library to create
This chapter covers
■
Securing GWT applications
■
Dealing with security in the client
■
Building a drag-and-drop system
282 CHAPTER 10 Building the Storefront
reflections for our cover images, as if they were sitting on a reflective surface (see fig-
ure 10.3). Finally, we’ll bring it all together and construct a basic shopping cart system.
10.1 Securing GWT applications
Providing security for your application you’re building is generally of critical impor-
tance. In terms of
GWT applications, security usually means securing the service. In
the last chapter, we built a simple
CRUD service for updating books in the database.
Now we need to secure that service and the page using it. One of the most common
ways to manage identity in the enterprise is with a Lightweight Directory Access Proto-
col (
LDAP) server, so that’s what we’ll use to secure our application.
In the sample application, we’ll use Apache
DS, the directory server from the
Apache Software Foundation. You could, of course, use Microsoft Active Directory,
Fedora or Red Hat Directory Server, or Open
LDAP. We’ll pass over the setup of the
LDAP server—if you’re interested in such details, check out the links in table 10.1.
In our web app, we have two
URLs we must secure: the entry page and the service. First
we need to set up the
LDAP queries in the context.xml file. Listing 10.1 shows how this
is done.
<?xml version="1.0" encoding="UTF-8"?>
<Context path="">
<Realm className="org.apache.catalina.realm.JNDIRealm"
debug="99"
connectionName="uid=admin,ou=system"
connectionPassword="secret"
connectionURL="ldap://localhost:389"
roleBase="ou=roles,dc=manning,dc=com"
roleName="cn"
roleSearch="(uniqueMember={0})"
roleSubtree="false"
userSearch="(uid={0})"
userPassword="userPassword"
userPattern="uid={0},ou=users,dc=manning,dc=com"
digest="MD5"
/>
</Context>
Table 10.1 More information on setting up LDAP environments
Environment URL
ApacheDS />OpenLDAP />Microsoft Active Directory />Listing 10.1 Adding the LDAP queries to Context.xml
Specify user used
to perform query
b
Match groupOfUniqueNames
and field
c
Check field to
determine if
user is present
d
Specify
password field
e
Search pattern
for user’s
global entry
f
Define encoding scheme
for password
283Securing GWT applications
Even if you’re unfamiliar with LDAP, this example should still be fairly straightforward.
First we specify the identity of the root user we’ll use to log in to the
LDAP server
b
.
Here we’re using the default Apache
DS password of
secret
, but you’ll want to change
that. Next we specify the skeleton of a query we’ll use to identify a
role
node
c
. Roles
here are
LDAP objects of
groupOfUniqueNames
type that contain
uniqueMember
s that
point to users in that role
d
. Finally we specify the query base
f
and the password
field we’ll match
e
. Figure 10.1 shows the administrator role for our test application
in
JXplorer.
TIP JXplorer is a handy Java-based LDAP client available for pretty much any
platform. It’s available for free from />Now that the
Realm
is configured for Tomcat, we need to go back to the web.xml file
and define the security settings. First, we want to secure the administration page and
the administration service. We’ll do that with the
<security-constraint>
element.
Listing 10.2 shows how we’ll configure this element.
Figure 10.1 Two uniqueMember attributes point to the users defined as being in the
administrator role.
284 CHAPTER 10 Building the Storefront
<security-constraint>
<display-name>Administration</display-name>
<web-resource-collection>
<web-resource-name>BookstoreService</web-resource-name>
<description>The Administration Service</description>
<url-pattern>
com.manning.gwtip.bookstore/BookstoreService
</url-pattern>
<http-method>GET</http-method>
<http-method>POST</http-method>
<http-method>HEAD</http-method>
<http-method>PUT</http-method>
<http-method>OPTIONS</http-method>
<http-method>TRACE</http-method>
<http-method>DELETE</http-method>
</web-resource-collection>
<web-resource-collection>
<web-resource-name>Administration Page</web-resource-name>
<description>The GWT page that hosts the app</description>
<url-pattern>
com.manning.gwtip.bookstore.Bookstore.jsp
</url-pattern>
<http-method>GET</http-method>
<http-method>POST</http-method>
<http-method>HEAD</http-method>
<http-method>PUT</http-method>
<http-method>OPTIONS</http-method>
<http-method>TRACE</http-method>
<http-method>DELETE</http-method>
</web-resource-collection>
<auth-constraint>
<description/>
<role-name>administrator</role-name>
</auth-constraint>
</security-constraint>
Here we’re specifying the service URL
b
and the host page URL
c
.
You might be asking why we need to secure the host page, and not the scripts
themselves. Well, obviously the host page won’t work without the service. However,
you want to secure the host page so that the user is prompted to log in before this
page is reached. While using
HTTP
Basic
authentication might prompt the user when
the service connection is made, this can be cumbersome, and most people are more
attuned to having a customized login page in a web form these days.
The Servlet specification supports this: we need to create a form that submits the
user credentials to the special
j_security_check
URL, and an error page for when
the login fails. Listing 10.3 shows the remaining bits of the web.xml deployment
descriptor we must set up to facilitate this.
Listing 10.2 The <security-constraint> element locks up the Administration page
Define path to
BookstoreService
servlet
b
Secure HTTP
calls to service
c
Change HTML
to JSP
Restrict
to role
285Securing GWT applications
<login-config>
<auth-method>FORM</auth-method>
<realm-name/>
<form-login-config>
<form-login-page>/login.jsp</form-login-page>
<form-error-page>
/login-error.jsp
</form-error-page> </form-login-config>
</login-config>
<security-role>
<description/>
<role-name>administrator</role-name>
</security-role>
Here we’re specifying that we’re using
FORM
-based authentication
b
, as opposed to
BASIC
for
HTTP
Basic
authentication. Next, we specify the two special JSP pages
c
d
.
Finally, we include a
<security-role>
element for each role our application needs to
support. Since we only have one, we specify
administrator
e
.
Now that we have taken care of the plumbing in our web app, we need to create
the special
JSP pages. We’ll just look at the login.jsp page, in listing 10.4, as it demon-
strates the special login form for using form-based authentication in our application.
<!DOCTYPE HTML PUBLIC "-//W3C//DTD HTML 4.01 Transitional//EN"
" /><html>
<head>
<meta http-equiv="Content-Type"
content="text/html; charset=UTF-8">
<title>Login Page</title>
</head>
<body>
<h1>Login Page</h1>
<form method="POST"
action="<%=response.encodeURL(
request.getContextPath()+
"/j_security_check")%>">
<input type="text" name="j_username" />
<br />
<input type="password" name="j_password" />
<br />
<input type="submit" />
</form>
</body>
</html>
Here we have a very basic HTML form in a JSP page. The action is set to the special
j_security_check
path as mandated by the Servlet specification
b
. We need two
Listing 10.3 The <login-config> and <security-role> elements in web.xml
Listing 10.4 The login.jsp page submitting the credentials to j_security_check
Specify FORM-based
authentication
b
Specify
page with
login form
c
Error page for failed logins
d
Define
administrator role
e
Set action to
j_security_check URL
b
286 CHAPTER 10 Building the Storefront
form fields,
j_username
and
j_password
, which contain the obvious data. Now when
we visit the new
HTML host page, which we have turned into a JSP page, we’re first
prompted with the login form based on the container-managed security settings. Fig-
ure 10.2 shows this prompt in the hosted mode browser.
It might seem that we’re done! The authentication prompt comes up, the user is
validated against the
LDAP server, and we’re passed into a working version of our
CRUD application. So what’s wrong? Well, when you’re using form-based authentica-
tion, the user authentication information is stored in the
HTTP session, which is, by
default, a cookie-based system. If the user’s browser doesn’t accept cookies, or if
you’re prevented from using them by policy (such as in government agency websites),
you have a problem. The session information is lost, and authentication fails when
calls to the
BookstoreService
are made. Once again, the Servlet specification has a
means of working around this:
HttpServletResponse.encodeURL()
.
The
encodeURL()
method will take a path in the application and append the ses-
sion identifier into the
URL string so the server can determine the user authentication
information from the
URL and not from a cookie. The problem is that the URLs for
our service are now part of the monolithic script compilation for the
GWT application,
so we need a way to pass in the proper service
URL to our application. This is where
having the host page as a
JSP page comes in.
First, we need to modify the host page to include the session information. Listing 10.5
demonstrates how we’ll do this, creating a JavaScript object to hold that information.
<!DOCTYPE HTML PUBLIC "-//W3C//DTD HTML 4.01 Transitional//EN"
" /><html>
<head>
Listing 10.5 The new JSP host page with the properly encoded service URL
Figure 10.2 Bookstore.jsp is now intercepted by the login.jsp page, requiring
authentication.
287Securing GWT applications
<script type="text/javascript">
var services = {
bookstoreService :
"<%=response.encodeURL(
"/com.manning.gwtip.bookstore.Bookstore/BookstoreService"
) %>"
};
</script>
<title></title>
<meta name='gwt:module'
content='com.manning.gwtip.bookstore.Bookstore'>
</head>
<body>
<script language="javascript" src="gwt.js"></script>
<iframe id="__gwt_historyFrame" style="width:0;height:0;border:0;">
</iframe>
</body>
</html>
This is not a big change. The important thing is that once this is evaluated on the
server, the path will be encoded with the session information, like this:
/com.manning.gwtip.bookstore.Bookstore/BookstoreService;
jsessionid=A3667E9D89E1A15B5BBD1F4F7791B395
Now we just need to get this information into our application. While it’s not designed
for this purpose, there is a
GWT class that will do just this. In chapter 1 you saw the
Dictionary
class in the internationalization package. It is designed to get internation-
alization data from the host page, but we can also use it to get configuration informa-
tion, such as the encoded service
URL. We’ll go back to the constructor for the
Controller
class and change the way we assign the service endpoint. Listing 10.6
shows the new constructor.
private Controller() {
super();
Dictionary dict = Dictionary
.getDictionary("services");
ServiceDefTarget endpoint = (ServiceDefTarget) service;
endpoint.setServiceEntryPoint(
dict.get("bookstoreService"));
}
First, we get the object we defined in the host page as
services
b
, and then we get
the value of the
bookstoreService
property and bind that to the endpoint of our ser-
vice
c
. Now our service works automagically! The browser will make subsequent
requests to the service using the same
jsessionid
value.
We have now secured the
BookstoreServiceServlet
from unauthenticated users.
Since we cannot use this system to get method-level security, we need to go back and
create a customer service interface that exposes only the methods that unauthenti-
cated or public users should be able to access. Listing 10.7 shows this new interface.
Listing 10.6 The new Controller constructor gets the service URL from the dictionary
Wrap path with
session info
Get Dictionary from
the services object
b
Get value of the
bookstoreService attribute
c
288 CHAPTER 10 Building the Storefront
package com.manning.gwtip.bookstore.client.remote;
import com.google.gwt.user.client.rpc.RemoteService;
import com.manning.gwtip.bookstore.client.model.Author;
import com.manning.gwtip.bookstore.client.model.Book;
import com.manning.gwtip.bookstore.client.model.Review;
import java.util.List;
public interface CustomerService extends RemoteService{
Review createReview(int bookId, Review review)
throws BookstoreRemoteException;
/**
* @gwt.typeArgs <com.manning.gwtip.bookstore.client.model.Book>
*/
List findAllBooks()
throws BookstoreRemoteException;
/**
* @gwt.typeArgs <com.manning.gwtip.bookstore.client.model.Category>
*/
List findAllCategories()
throws BookstoreRemoteException;
/**
* @gwt.typeArgs <com.manning.gwtip.bookstore.client.model.Author>
*/
List findAllAuthors()
throws BookstoreRemoteException;
/**
* @gwt.typeArgs <com.manning.gwtip.bookstore.client.model.Author>
*/
List findAuthorsByName(String firstName, String lastName)
throws BookstoreRemoteException;
Book findBookById(int bookId)
throws BookstoreRemoteException;
/**
* @gwt.typeArgs <com.manning.gwtip.bookstore.client.model.Book>
*/
List findBooksByAuthor(int authorId)
throws BookstoreRemoteException;
List findBooksByCategory(String categoryName)
throws BookstoreRemoteException;
}
Since this service is stateless and unsecured, we have nothing else to do here. The
application now has two services exposed, one secured and one unsecured. We have
defined the access privileges, configured our web application to enforce them, and
modified our class to support cookie-less users.
Listing 10.7 The CustomerService interface
R
euse c
li
ent
beans, define
service
Define only exposed
write method
Define read-only methods
289Building a drag-and-drop system
Now that we have both sides of our security defined, we’ll move on to adding a lit-
tle coolness to our client-side application. The first thing we want to do is build in sup-
port for drag-and-drop shopping.
10.2 Building a drag-and-drop system
When we were looking at JSNI in chapter 6, we used the Script.aculo.us drag-and-drop
system as an integration example. While this does work, it has certain drawbacks. First,
it uses a separate JavaScript file that must be updated with new versions to support
new browsers. One of the big advantages of using
GWT is that when new versions are
released, a simple recompile brings in all the new browser compatibility tweaks with-
out changing or updating files. The second drawback is that those Script.aculo.us
JavaScript files aren’t optimized by the
GWT compiler, which includes obfuscation and
compression. Since we depend on friendly named JavaScript methods, they can’t be
compressed into bandwidth-friendly but non-human-readable versions. The obvious
solution is to build a drag-and-drop system with
GWT.
We’ll break this task down into two large and blindingly obvious steps: dragging
and dropping. Figure 10.3 shows us dragging a book we created with chapter 9’s
CRUD application to the shopping cart widget, outlined in red.
We’ll start by implementing the drag system.
Figure 10.3 The cover of the book being dragged to the shopping cart
290 CHAPTER 10 Building the Storefront
10.2.1 Enabling dragging
Dragging is based on mouse presses and mouse movements. This means, in the GWT
world, using a class that implements
SourcesMouseEvents
. Images implement this
interface, and other classes can be wrapped inside a
FocusPanel
that will provide the
mouse events.
Our drag-and-drop controller will need to add a mouse listener to whatever it is we
need to drag, so unlike the
JSNI example in chapter 6 that worked directly on the
DOM, we’ll use the
SourcesMouseEvents
interface to define the draggables on screen.
Listing 10.8 shows the beginnings of our new
DragAndDrop
class.
public class DragAndDrop {
private static final DragAndDrop instance = new DragAndDrop();
private Draggable dragging;
private Element placeholder;
private Map draggables = new HashMap();
private Map dropListeners = new HashMap();
private List dropTargets;
private DragAndDrop() {
}
public static DragAndDrop getInstance() {
return instance;
}
public void makeDraggable(SourcesMouseEvents w, boolean revert) {
Draggable d = new Draggable();
d.widget = (Widget) w;
d.listener = new DragSupportListener(
(Widget) w, revert);
w.addMouseListener(d.listener);
draggables.put(w, d);
}
class DragSupportListener extends MouseListenerAdapter {
private String startFlow;
private String startZ;
private int startX;
private int startY;
private boolean revert;
private int offsetX;
private int offsetY;
public DragSupportListener(Widget w, boolean revert) {
this.revert = revert;
DOM.addEventPreview(new EventPreview() {
public boolean onEventPreview(
Event event) {
switch(DOM.eventGetType(event)) {
case Event.ONMOUSEDOWN:
DOM.eventPreventDefault(event);
}
Listing 10.8 Enabling dragging in the DragAndDrop class, part 1
Cast to Widget to
get properties
b
Hold original
DOM settings
Override native
drag handling
c
291Building a drag-and-drop system
return true;
}
});
}
public void onMouseDown(Widget sender, int x, int y) {
super.onMouseDown(sender, x, y);
if (dragging != null) {
dragging.listener.onMouseUp(dragging.widget, 0, 0);
}
dragging = (Draggable) draggables.get(sender);
startFlow = DOM.getStyleAttribute(
dragging.widget.getElement(),
"position");
startX = dragging.widget.getAbsoluteLeft();
startY = dragging.widget.getAbsoluteTop();
offsetX = x;
offsetY = y;
startZ = DOM.getStyleAttribute(
dragging.widget.getElement(),
"z-index");
DOM.setStyleAttribute(
dragging.widget.getElement(),
"position",
"absolute");
DOM.setStyleAttribute(
dragging.widget.getElement(), "top",
"" + startY);
DOM.setStyleAttribute(
dragging.widget.getElement(), "left",
"" + startX);
DOM.setStyleAttribute(
dragging.widget.getElement(),
"z-index",
"" + 10000);
placeholder = DOM.createDiv();
DOM.setStyleAttribute(placeholder, "width",
dragging.widget.getOffsetWidth() + "px");
DOM.setStyleAttribute(placeholder, "height",
dragging.widget.getOffsetHeight() + "px");
DOM.setStyleAttribute(placeholder, "background", "#CCCCCC");
int index = DOM.getChildIndex(DOM.getParent(
dragging.widget.getElement()),
dragging.widget.getElement());
DOM.insertChild(DOM.getParent(dragging.widget.getElement()),
placeholder, index);
}
Here we can see the beginnings of dragging. Our support listener holds the basic state
data we need to preserve for the element
b
. When the element is pressed on, we
move the widget into absolute space on the page, still in the same location as it was
originally
e
. Finally, we create a simple gray placeholder
<div>
to make sure the page
Make sure we
aren’t dragging
d
Get original style
attributes
Pull element
into absolute
space
e
Hold page
flow
292 CHAPTER 10 Building the Storefront
flow doesn’t change around our now floating
Widget
. There is also a special case we
need to deal with: what if we’re already dragging something?
d
One of the problems you can run into when making an Ajax drag-and-drop system
is the loss of mouse events. If you move the mouse outside the screen or the observ-
able area of the
GWT app, the drag state will remain, but the movement is no longer
being tracked. We need to clean up and make sure the release state is handled prop-
erly in this situation.
The other gotcha we need to handle is the native drag event support in Safari and
Mozilla. These browsers expect drag events to become “operating system reference
drag events” for the image, rather than just a simple set of mouse events
c
. We’ll take
care of that by handling the native mouse events at a level below the
Sources-
MouseEvents
level.
Listing 10.9 shows the last part of the mouse eventing for dragging.
public void onMouseMove(Widget sender, int x, int y) {
super.onMouseMove(sender, x, y);
if(dragging != null) {
DOM.setStyleAttribute(dragging.widget.getElement(), "top",
Integer.toString(sender.getAbsoluteTop()
- offsetY + y));
DOM.setStyleAttribute(dragging.widget.getElement(),
"left",
Integer.toString(sender.getAbsoluteLeft()
- offsetX + x));
}
}
public void onMouseUp(Widget sender, int x, int y) {
super.onMouseUp(sender, x, y);
DOM.setStyleAttribute(dragging.widget.getElement(), "z-index",
startZ);
if (revert) {
DOM.setStyleAttribute(
dragging.widget.getElement(),
"position",
startFlow);
DOM.setStyleAttribute(
dragging.widget.getElement(), "top",
"" + startY);
DOM.setStyleAttribute(
dragging.widget.getElement(),
"left",
"" + startX);
DOM.removeChild(
DOM.getParent(
dragging.widget.getElement()),
placeholder);
placeholder = null;
Listing 10.9 Enabling dragging in the DragAndDrop class, part 2
If dragging, move
to new position
b
Restore
Widget to
original state
c
Remove
placeholder
d
293Building a drag-and-drop system
}
dragging = null;
}
}
private class Draggable {
public DragSupportListener listener;
public Widget widget;
}
}
Here we have completed the basics of dragging, though the
onMouseUp()
method is
abbreviated—we’ll see the rest of it in the next section. In this example, we’re listen-
ing for move events and repositioning the widget to the new location
b
. Then we
check the
revert
state, and if it’s
true
, we reset the
Widget
to its original DOM posi-
tioning
c
, and finally remove the placeholder
<div>
we created previously
d
.
Now that the dragging elements are following the mouse around, we need to look
into adding drop targets.
10.2.2 Handling drops
The other side of drag and drop is, of course, drop. When items are being dragged
around the screen and released, we want to determine whether they are being
dropped onto something that should trigger a drop event. There are two aspects to
doing this: First, we must set up the listeners we need for sending drop notifications
to our application. Second, we need to determine when a dragged item is actually
dropped onto an item.
Listing 10.10 shows the setup of the listeners we need.
public void addDropListener(Widget w, DropListener dl) {
List listeners = (dropListeners.get(w) != null)
? (List) dropListeners.get(w) : new ArrayList();
listeners.add(dl);
dropListeners.put(w, listeners);
}
public void makeDroppable(Widget w) {
dropTargets = (dropTargets == null) ?
new ArrayList() : dropTargets;
dropTargets.add(w);
}
public void removeDropListener(SourcesMouseEvents w,
DropListener dl) {
List listeners = (dropListeners.get(w) != null)
? (List) dropListeners.get(w) : new ArrayList();
listeners.remove(dl);
}
Listing 10.10 Setting up for drop listeners
Define data class
to hold position
Create
listener list,
store listener
b
Make widget a
drop target
c
Remove
listener from
drop target
d
294 CHAPTER 10 Building the Storefront
This is a really simplistic way to create drop targets. We aren’t actually making a new
widget, we’re simply storing the state of drop targets in the drag-and-drop controller.
This makes using drag and drop much easier than in a lot of other systems, since it
can be instrumented into almost any existing widget. So we need to store a widget as a
drop target
c
, and be able to add
b
and remove
d
listeners for that widget.
We still need to fire events on those listeners. Listing 10.11 shows modifications to
the
onMouseUp()
method in the
DragSupportListener
inner class we’ll use to deter-
mine when a drop event has happened. It’s inserted just before the
revert
logic.
int top = dragging.widget.getAbsoluteTop();
int left = dragging.widget.getAbsoluteLeft();
int centerY = top +
(int) ((float) dragging.widget.getOffsetHeight()
/ (float) 2);
int centerX = left +
(int) ((float) dragging.widget.getOffsetWidth()
/ (float) 2);
for (int i = 0;
(dropTargets != null) && (i < dropTargets.size());
i++) {
Widget w = (Widget) dropTargets.get(i);
if ((centerY >= w.getAbsoluteTop()) &&
(centerY <= (w.getAbsoluteTop() + w.getOffsetHeight())) &&
(centerX >= w.getAbsoluteLeft()) &&
(centerX <= (w.getAbsoluteLeft() + w.getOffsetWidth()))) {
List listeners = (List) dropListeners.get(w);
for (int j = 0;
(listeners != null) && (j < listeners.size());
j++) {
DropListener l = (DropListener) listeners.get(j);
if (l.onDrop(dragging.widget)) {
break;
}
}
}
}
This example includes a bunch of DOM math, but the logic remains fairly simple.
Find the center point of the dragged widget
b
and loop over the drop listeners
c
. If
the drag widget is inside the drop target
d
, call the
onDrop
event
e
and terminate if
true
is returned.
Obviously, if you have a great many drop targets, breaking them up into regions so
you can contain the loop and limit the amount of mouseover checking that has to be
done would be a good optimization here. This method has the advantage of working
Listing 10.11 Determining when a drop event has happened
Find center
point of widget
b
Loop through
drop targets
c
Check if widget
is over target
d
If true, stop
looping through
listeners
e
295Building a drag-and-drop system
no matter what the flow or position state of all the drop targets happens to be at the
time a drop is handled. Working with this method becomes very simple. For instance,
our
Cart
class catches book covers dropped on them:
public class Cart extends FlexTable implements DropListener {
// some code omitted for brevity
public boolean onDrop(Widget dropped) {
if (dropped instanceof CoverImage) {
CoverImage cover = (CoverImage) dropped;
boolean found = false;
for (Iterator it = lineItems.iterator(); it.hasNext();) {
LineItem item = (LineItem) it.next();
If (item.book.getId().equals(cover.book.getId())) {
item.quantity++;
found = true;
break;
}
}
if (!found) {
LineItem item = new LineItem();
item.book = cover.book;
item.quantity = 1;
lineItems.add(item);
}
update();
}
return true;
}
//
Here we simply have to detect the drop event and determine whether the item is
already in the cart. If it is, increment the quantity. If it’s not, add it.
Similarly, instrumenting the
CoverImage
to be draggable is just as easy. In our
BookSummary
class you can see this being done:
public class BookSummary extends FlowPanel {
private static final BookstoreConstants CONSTANTS =
(BookstoreConstants) GWT.create(BookstoreConstants.class);
private Book book;
CoverImage cover = new CoverImage();
FlexTable summary = new FlexTable();
public BookSummary(Book b) {
super();
book = b;
this.add(cover);
cover.setUrl(b.getImage());
cover.book = b;
DragAndDrop.getInstance().makeDraggable(cover, true);
//
We simply call the
makeDraggable()
method and our cover image is automatically
draggable.
296 CHAPTER 10 Building the Storefront
Speaking of the cover image, you may have noticed in figure 10.3 the neat little
Apple-style reflections appearing under the cover images. This comes from the
ReflectedImage
class, which we’ll look at next.
10.3 JSNI special effects
Once again, we fall back to using the JSNI to create pretty image effects. Here we’ll use
either a
<canvas>
element or a Microsoft DirectX
DXImageTransform
to produce a
faded reflection of an image. The core of this JavaScript logic comes from Neon-
Dragon.net () and is available under an
MIT-style license.
The problems we ran into while making this class support image reflection demon-
strate some interesting things about images in
GWT in general, which we’ll talk about
after we look at the code.
Listing 10.12 shows the code for our
ReflectedImage
class.
public class ReflectedImage extends Image {
public ReflectedImage() {
super();
addLoadListener(new LoadListener(){
public void onLoad(Widget widget) {
reflect(getElement(), (float) 0.25, (float) 0.5,
188, 150);
}
public void onError(Widget widget) {
}
});
}
public native void reflect(Element image,
float height, float opacity,
int offsetHeight, int offsetWidth)/*-{
var d = document.createElement('div');
var p = image;
var classes = p.className.split(' ');
var newClasses = '';
for (int j = 0; j < classes.length; j++) {
if (classes[j]!= "reflect") {
if (newClasses) {
newClasses += ' ';
}
newClasses += classes[j];
}
}
var reflectionHeight = Math.floor(offsetHeight * height);
var divHeight = Math.floor(p.height * (1 + height));
var reflectionWidth = offsetWidth;
if (document.all && !window.opera) {
Listing 10.12 The ReflectedImage class using JSNI for image effects
Specify
reflection size
in constructor
b
Create <div> tag
to hold image and
reflection
c
297JSNI special effects
d.className = newClasses;
p.className = 'reflected';
//
reflection.style.marginBottom =
"-"+(p.height-reflectionHeight)+'px';
reflection.style.filter = 'flipv'+
'progid:DXImageTransform.Microsoft.Alpha('+
'opacity='+(opacity*100)+
', style=1,
finishOpacity=0, startx=0, starty=0, '+
' finishx=0, finishy='+(height*100)+')';
//
d.appendChild(p);
d.appendChild(reflection);
} else {
var canvas =
document.createElement('canvas');
//
d.appendChild(p);
d.appendChild(canvas);
context.save();
context.translate(0, image.height-1);
context.scale(1, -1);
context.drawImage(image, 0, 0,
reflectionWidth, offsetHeight);
context.restore();
//
context.fillStyle = gradient;
//
}
}
}-*/;
public native void unreflect(Element image)/*-{
if ("reflected".equals(image.className)) {
image.className = image.parentNode.className;
image.parentNode
.parentNode
.replaceChild(image,
image.parentNode);
}
}-*/;
}
A lot of code has been omitted to save space but, skipping over the ugly part for a
moment, we start by creating a new
<div>
tag to hold the original image and its reflec-
tion
c
. Then we
split
to determine whether we should use the DirectX API
d
or the
standard
<canvas>
element
e
, and we position the reflection and its image into
the appropriate position in the document. Figure 10.4 shows the Safari
DOM inspec-
tor view of the results.
Use DXImageTransform
to create reflection
d
Create <canvas>
element for
reflection
e
Swap image
positions
298 CHAPTER 10 Building the Storefront
There is a bit of hackery involved in this example, but this code is not too out-there.
What’s the object lesson here? The important thing to note, is that we have hard-
coded the reflection size
b
. That seems silly—why have we done that? Unfortunately
in Safari and Opera, the
offsetWidth
and
offsetHeight
properties on the image
don’t seem to be available when the
onLoad
event is fired! We have actually changed
the script’s execution from the original author’s intentions.
The original function of this script was to look for images with a
reflected
class
name and instrument them with reflections in the body’s
onLoad
event. This works
well for standard
HTML pages you just want to add an effect to, but for GWT’s dynamic
pages, we need to be able to do this on demand. Since all the images in our sample
bookstore are of the same size, this isn’t a problem, but it does mean that at image cre-
ation time, you need to know the sizes if you intend to do calculations based on them.
Even in
GWT, you can’t completely escape testing in all browsers.
Figure 10.4 The <div> gets assigned the same class as the original image
(
gwt-Image) with the original image and the nested <canvas> tag inside.
299Summary
10.4 Summary
In this chapter, we ran the gamut of things to consider in your GWT application: using
the Java
EE specification to secure your services and pages against an enterprise direc-
tory, implementing a basic shopping cart using a drag-and-drop system, and creating
reflections on images. While these are disparate parts of the bookstore application, they
have one important aspect in common: you can’t escape understanding core web devel-
opment principles and testing in multiple browsers and with multiple configurations.
Whether it’s working with security in a cookie-free environment, or overriding
some browsers’ native element dragging,
GWT won’t do all the work for you. Recall
that we said in chapter 1,
GWT is a toolkit, not a framework. It won’t replace good old
know-how in web development, but hopefully we have given you some clues to help
you avoid obvious traps. This isn’t all of what’s involved in web development, however.
Building up data in the client side is only a part of what you’ll need to do. Another
side is managing the state of the application in both the client and the server. In the
next chapter, we’ll look at our final application, which shows you more about using
the tools
GWT gives you for managing state.
300
Managing
Application State
Everything is in a state of flux, including the status quo.
—Robert Byrne
In this chapter we’re going to examine an example application we call “State of the
Union.” This application demonstrates state management in a long-lived fashion,
using log files to capture state on the server with the standard Java Servlet
API. This
will be done in the context of a
GWT application, and within the GWT history sys-
tem we introduced in chapter 1.
We’ll cover using the
History
class to update the client state as the model
changes, as well as deal with state on the server, representing state in the client, and
exploring the possible cases where handling user actions is important. Before we
get there, though, we’ll take a look at implementing a publisher-subscriber messag-
ing system on the server, and at using
XML as a non-RPC data representation. All
This chapter covers
■
Building an enhanced Comet service
■
Working with the GWT history system
■
Using standard servlet state
301Overview of the sample application
the while, we’ll emphasize the placement of these techniques in the context of an
MVC pattern on the client.
11.1 Overview of the sample application
State of the Union is a web-based presentation system with two parts. The first is a Swing
desktop application that captures an area of your screen and shares it on the web with
other people (see figure 11.2). This program is available in both source and binary
forms from the Manning website. Since it’s only tangential to our
GWT example, we’re
not going to walk through all the code, but feel free to look at it on your own.
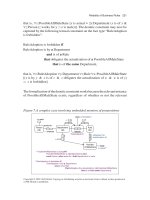
Figure 11.1 shows a
UML diagram of the application and the relationships in the
client classes that we’ll examine in this chapter.
The other part of State of the Union is, of course, our
GWT application. This appli-
cation enables users to watch the presentations as they are given and provides a chat
area so the presenter and users can discuss the presentation. Additionally, we’ll record
each presentation and allow the user to bookmark a presentation and come back to it.
By returning to it, users can see it played back in real time as it occurred from the
moment it was bookmarked, or they can send the link to someone else who can see
the presentation after the fact.
Figure 11.2 shows the screen-sharing box surrounding a portion of a desktop window
and the
GWT shell providing access to the chat area of the application. The area within
the box on the left is shared to the Internet Explorer client pictured in figure 11.3.
The first section of this chapter will provide an overview of the application and lay
out its structure. Then we’ll take a selective tour of important sections of the code,
showing how the features and principles we looked at in earlier chapters can be inte-
grated into a large working application.
In building the State of the Union application, we’ll also use an enhanced version
of the Comet streaming technique we introduced in chapter 5. Since conversations
are taking place in real time, we want the server to push data to the client, and the
Comet technique is an ideal solution. We’ll use Luca Masini’s
GWT Comet implemen-
tation, which we looked at in chapter 5 (from />updated_comet_implementation_for_gwt), as a base and expand it into a more robust
solution with multiple channels, some basic permissions, and security.
After creating the Comet implementation, we’ll construct a primitive file-based
recording mechanism and then use the
History
class to preserve the momentary
state. Once we have built a local service implementation for messaging, we need to
expose it to
GWT clients. To do this, we will use the plain old
javax.servlet.http.
HttpSession
class in a
RemoteServiceServlet
implementation. Lastly, we take a brief
look at the controller and view layers of the State of the Union application.
To begin, we’ll look at the
ConversationServiceLocal
class, which provides the
basis for our messaging system.
302 CHAPTER 11 Managing Application State
ChatMessage
ChatMessage()
Conversation
Conversation()
descriptor : ConversationDescriptor
log : Writer
observable : Observable
startTime : long
users : ArrayList
ConversationServiceLocal
ConversationServiceLocal()
KEEP_ALIVE : ConversationDescriptor
ADMIN_USER : User
keepAliveTimer : Timer
rootDir : String
conversations : HashMap
users : HashMap
ConversationServiceServlet
ConversationServiceServlet()
service : ConversationServiceLocal
Message
Message()
conversation : String
message : String
time : long
ImageMessage
ImageMessage()
JoinMessage
JoinMessage()
LeaveMessage
LeaveMessage()
User
User()
username : String
sendQueue : Queue
subscriptions : HashMap
<<interface>>
ConversationService
listConversations() : ConversationDescriptor[]
startConversation(conversation : ConversationDescriptor) : ConversationDescripto r
joinConversation(conversation : ConversationDescriptor) : boolean
leaveConversation(conversation : ConversationDescriptor) : boolean
endConversation(conversation : ConversationDescriptor) : boolean
sendChatMessage(conversation : ConversationDescriptor,message : String) : boolean
playback(conversationId : long,startPosition : long) : ConversationDescripto r
ConversationServiceServlet -> ConversationService
<<realize>>
StreamServlet
StreamServlet()
USER : String
ConversationDescriptor
ConversationDescriptor()
name : String
adminPassword : String
joinPassword : String
id : long
Comet
Comet()
STREAM_PATH : Strin g
listeners : HashMap
streamingServicePath : String
keepAlive : boolean
<<interface>>
CometListener
onEvent(event : CometEvent) : voi d
CometEvent
CometEvent()
JOIN_TYPE : int
LEAVE_TYPE : int
IMAGE_TYPE : int
CHAT_TYPE : int
username : String
type : int
value : String
time : long
Messages on the
server become
CometEvents
on the client
These represent the
call dependencies to
the ConversationService
variants
ImagePublishingServlet
processRequest() : void
doGet() : void
doPost() : void
getServletInfo() : String
The two standalone
servlets are Stream
and ImagePublishing
Figure 11.1 A UML class diagram of the core classes we’ll look at in State of the Union
303Overview of the sample application
Figure 11.2 The screen-sharing application uploads the framed portion of the screen to the server.
Figure 11.3 Client users can chat and see updated images from the capture application.