ColdFusion MX Bible phần 9 doc
Bạn đang xem bản rút gọn của tài liệu. Xem và tải ngay bản đầy đủ của tài liệu tại đây (1.12 MB, 124 trang )
952
Part VIII ✦ ColdFusion MX Administration
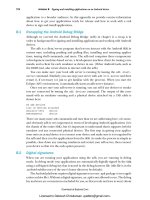
2. For this example, we previously created a database named CFMXDatabase in SQL
Server Enterprise Manager, as shown in Figure 43-13. (Note that you would replace
CFMXDatabase with your own SQL Server database. Setting up this database is beyond
the scope of this book, as it has more to do with SQL Server administration than
ColdFusion.)
Figure 43-13: The database in
SQL Server Enterprise Manager.
3. In ColdFusion Administrator, enter CFMXDatabase (or the name of your own SQL Server
database) in the Database field and 127.0.0.1 in the Server field. For the username and
password, of course, use whatever you set up for this purpose. (In this example, we
enter CFMXUser and the CFMXUser’s password.) Keep the default port of
1443 and
enter a brief description. After you finish, the form looks as shown in Figure 43-14 (with
your own database name, username and password, of course).
Figure 43-14: The datasource settings form.
4. Click Submit, and you’re taken back to the list of datasources, where the new data-
source now appears with an “ok” beside it.
And that’s it. Now, simply referring to
CFMXBibleExample in your CFQUERY and CFSTOREDPROC
tags gives you access to the CFMXDatabase database.
Most datasource setups are about the same, although some target databases that require a
different set of parameters from those shown for SQL Server. The Oracle driver, for example,
communicates with an Oracle database by using a different set of parameters, as you see in
the following section.
51546228 ch43.F 1/30/03 12:29 PM Page 952
953
Chapter 43 ✦ An Overview of ColdFusion MX Administrator
Defining a new Oracle datasource
The process of setting up an Oracle datasource is similar to the one that we describe in the
preceding section for SQL Server, but Oracle requires different connection parameters. Just
as you do with SQL Server, you start by clicking the
Data Sources link under Data &
Services on the left-hand panel of Administrator. (Note: The Oracle driver is available only
with ColdFusion MX Enterprise.) Then just follow these steps:
1. In the Add New Data Source section, enter the name of the new datasource (in this
example, we’re calling it
CFMXBibleOracle) and choose Oracle as the driver type; then
click Add.
Our Oracle installation in this example has a SID (Service ID) named
CFMXServer and a
user named
CFMXUser. Note that administering Oracle is beyond the scope of this
book; the database, username, and password used in this example should be replaced
with your own values.
2. In ColdFusion Administrator, enter CFMXServer in the SID Name field and CFMXUser in
the Username field. Then enter the password, leave the default port of
1521, enter a
brief description, and click Submit.
The built-in Type 4 Oracle driver supports multiple result sets returned from Oracle pack-
ages. See Listing 10-24 in Chapter 10 for a very scalable way to accomplish this task.
Verity Collections
The Verity Collections page of ColdFusion Administrator (shown in Figure 43-15) enables you
to manage your Verity collections. Here you can create new collections, or you can index,
repair, optimize, purge, or delete an existing collection without resorting to writing code.
This section assumes that you are familiar with Verity and its terminology. If you are not,
please read the Verity section of Chapter 32.
To create a new collection, just enter the name of the collection, the collection’s language,
and the name of the directory where you want the collection to be created. The default is
cf_root\verity\collections.
To index a collection, click the Index Collection icon next to the name of the collection that
you want to index. (This icon is the farthest left.) The indexing utility in Administrator gives
you the capability to do only a path index; if you want to use file or custom indexing you must
use a manually coded call to
CFINDEX.
Occasionally, a collection may become unstable and start producing incorrect results. If this
happens, try repairing the collection. (The icon that you click to start this task is the second
from the left.) Repairing the collection may take a long time, so don’t rush it, and especially
don’t try to do anything else with the collection until Administrator is finished.
Optimizing a collection makes it run faster. To optimize a collection, click the middle icon
next to the name of the collection. Optimizing the collection may take a few minutes.
The fourth icon from the left purges the collection, removing all entries from the collection
but leaving the empty collection intact. The last icon, next to the collection name, deletes the
collection entirely.
The bottom section of this Administrator page shows all collections currently available from
an attached Verity K2 Server. No actions may be performed in this section, because K2
Collections are managed through an INI file as part of the setup process for Verity K2 Server.
Note
51546228 ch43.F 1/30/03 12:29 PM Page 953
954
Part VIII ✦ ColdFusion MX Administration
Figure 43-15: The Verity Collections page.
Verity K2 Server
The Verity K2 Server page of ColdFusion Administrator manages ColdFusion’s connection
to Verity K2 Server, the standalone server software that ships with ColdFusion as a high-
performance alternative to ColdFusion Server’s built-in Verity routines. This page is shown
in Figure 43-16:
Figure 43-16: The Verity K2 Server page.
The Add Verity K2 Server section of the page is where you tell ColdFusion which K2 Server to
connect to. You just need to specify the name (or IP address) and port number of the server
where Verity K2 is running in the appropriate fields.
Connected Verity Collections is a misnomer; it should be called Connected Verity Server. This
section of the page tells you which K2 Server is currently connected to the ColdFusion Server
and whether the K2 Server is online. You can disconnect from the K2 Server by clicking the
red
X next to the server name.
51546228 ch43.F 1/30/03 12:29 PM Page 954
955
Chapter 43 ✦ An Overview of ColdFusion MX Administrator
The Connected Verity K2 Collections section tells you which collections the K2 Server
exposes. You can’t do anything to maintain or modify these collections, because they are
managed by K2 Server’s INI file.
Web Services
The Web Services page of ColdFusion Administrator (shown in Figure 43-17) is where you
manage ColdFusion’s connections to Web services. This form has two sections: Add / Edit
ColdFusion Web Service and Active ColdFusion Web Services.
Figure 43-17: The Web Services page.
The Add / Edit ColdFusion Web Service is where you set up the Web-service URLs and the
usernames and passwords that they require. You can assign a name to a Web-service URL
here and use the name as an alias in the
Webservice attribute of your CFINVOKE tags. The
username and password are passed to the Web service’s basic authentication mechanism
after a request for service is made.
Active ColdFusion Web Services describes the Web services to which ColdFusion is currently
subscribed. Each one can be edited, refreshed, or deleted. Refreshing a Web-service connec-
tion releases it from ColdFusion’s cache, reestablishes the WSDL interface to that Web ser-
vice, and keeps the Web service’s name unchanged, whereas removing a Web service
permanently removes its name.
Debugging & Logging
This section of Administrator is focused more on debugging code than on configuring
ColdFusion Server. From here, you can configure debugging output, view log files, and set up
system probes. This section also includes scheduled tasks and a tool to analyze existing
ColdFusion code to help determine incompatibilities with ColdFusion MX. The following
sections describe each of these settings.
Debugging Settings
The Debugging Settings page of ColdFusion Administrator is where you turn on debugging
and manage other performance monitoring settings. This page is shown in Figure 43-18:
51546228 ch43.F 1/30/03 12:29 PM Page 955
956
Part VIII ✦ ColdFusion MX Administration
Figure 43-18: The Debugging Settings page.
51546228 ch43.F 1/30/03 12:29 PM Page 956
957
Chapter 43 ✦ An Overview of ColdFusion MX Administrator
Following are the four major settings on this page, each of which is described in the four sec-
tions that follow:
✦ Enable Debugging
✦ Enable Robust Exception Information
✦ Enable Performance Monitoring
✦ Enable CFSTAT
Enable Debugging
This check box also controls all the options in the Custom Debugging Output section. If this
check box is disabled, no debugging output is shown regardless of the settings in the Custom
Debugging Output section.
Enable Robust Exception Information
Normally, ColdFusion’s default error message shows you only the error message and detail. If
this option is selected, ColdFusion includes the following extra information along with the
error message:
✦ Physical path of template
✦ URI of template
✦ Line number and line snippet
✦ SQL statement used (if any)
✦ Data source name (if any)
✦ Java stack trace
Enable Performance Monitoring
If this option is enabled, ColdFusion Server publishes its performance metric data so that
Windows Performance Monitor can process it. Among the many metrics published are the
following:
✦ Running Requests
✦ Queued Requests
✦ Page Hits/sec
✦ DB Hits/sec
Always enable this option if you’re load-testing your application. If your load-testing suite is a
great one, such as e-TEST Suite from Empirix, it can parallel this data with the other perfor-
mance metrics from your application and its supporting database servers and Web servers.
Do make sure that you keep this option off in production environments, however, because
publishing these metrics causes a performance hit.
Enable CFSTAT
If your platform doesn’t support the Windows Performance Monitor, you can use a command-
line utility named
CFSTAT to get the same information exposed to the Performance Monitor.
Leave this option disabled unless you need it; as happens with the Performance Monitor,
enabling this option causes a performance hit.
51546228 ch43.F 1/30/03 12:29 PM Page 957
958
Part VIII ✦ ColdFusion MX Administration
Debugging IP Addresses
The Debugging IP Addresses page of ColdFusion Administrator tells ColdFusion what IP
addresses are allowed to receive debugging information. This page is shown in Figure 43-19:
Figure 43-19: The Debugging IP Addresses page.
You may want to restrict debugging information to a single IP address (usually 127.0.0.1),
meaning that only users accessing ColdFusion from a certain location may see debugging
information. Restricting this list to only those addresses of developers’ machines is usually a
good idea.
Logging Settings
The Logging Settings page of ColdFusion Administrator (shown in Figure 43-20) tells
ColdFusion where and how log entries should be stored.
Figure 43-20: The Logging Settings page.
51546228 ch43.F 1/30/03 12:29 PM Page 958
959
Chapter 43 ✦ An Overview of ColdFusion MX Administrator
You’ve probably never paid much attention to this page, but it is one of the more important
pages in ColdFusion Administrator. From here, you can turn on the logging of slow pages and
scheduled tasks, which helps you discover performance bottlenecks and related problems.
This page offers the following options:
✦ Log Directory: This directory is where ColdFusion stores its log files. to Changing this
value from the default probably isn’t a good idea. Most tools assume that the
ColdFusion log files are in this directory, and you shouldn’t have any reason to change
its location.
✦ Maximum File Size: This size limit is specified in kilobytes. After the log reaches this
size, it is automatically archived. See the next section for details on how these archives
are stored.
✦ Maximum Number of Archives: After this number of archives is reached, the oldest is
automatically deleted.
✦ Log Slow Pages Taking Longer than x Seconds: By default, this option is disabled.
Enable this feature to discover any potential bottlenecks in your system.
✦ Log All CORBA Calls: Enabling this option is probably not a good idea if your site is
very CORBA-intensive, but it can be a useful debugging tool because you can use the
log files to inspect every call to a CORBA object.
✦ Enable Logging for Scheduled Tasks: If this option is on, all scheduled tasks are logged
as they are executed.
Log Files
The Log Files page of ColdFusion Administrator lets you search, view, download, archive, or
delete ColdFusion’s log files. This page is shown in Figure 43-21:
Figure 43-21: The Log Files page.
This page enables you to keep track of ColdFusion’s log files by using a slick graphical inter-
face. This feature is enabled only for ColdFusion MX Enterprise; if you are using Professional,
your only option is to open the log files and view them in a text editor or build a custom
application to view them. Next to each log file are icons for the following four actions (These
are listed from left to right):
51546228 ch43.F 1/30/03 12:29 PM Page 959
960
Part VIII ✦ ColdFusion MX Administration
✦ Search/View: This icon takes you to the log-file viewer, where you can search the log
files or browse through them to look at all the messages.
✦ Download: This option downloads the log file to your machine for offsite analysis.
✦ Archive: This option copies the log file to an archive file and clears the original log.
The archive file is named
logfilename.log.x, where x is the number of the log file,
with
1 the most recent.
✦ Delete: This option deletes the log file entirely.
Scheduled Tasks
The Scheduled Tasks page of ColdFusion Administrator tells ColdFusion when and how to
execute certain ColdFusion templates on a schedule. This page is shown in Figure 43-22:
Figure 43-22: The Scheduled Tasks page.
Normally, a ColdFusion template executes after a user requests the template with a browser.
But you can also schedule a template to execute at a specific time. That’s where the
Scheduled Tasks page comes in.
Setting up a scheduled task involves the following parameters:
✦ Task Name: Enter an easily identifiable name for the task in this field, as you use this
name to refer to the task in your scheduled-tasks logs.
✦ Duration: This setting consists of a Start Date and an optional End Date. Some confu-
sion surrounds these values, because some people think that ColdFusion begins the
request on the start date and ends the request on the end date. This is not the case; the
value that you enter in the Start Date field is when ColdFusion starts scheduling the
task, and the value in the End Date field is when ColdFusion stops scheduling the task.
51546228 ch43.F 1/30/03 12:29 PM Page 960
961
Chapter 43 ✦ An Overview of ColdFusion MX Administrator
✦ Frequency: You can select among the following three types of scheduling frequency:
• One Time: As the name indicates, this task is executed only once, at the specified
time.
• Recurring: You can execute the task once a day, once a week, or once a month, at
the specified time. If the task recurs daily, the task is executed every day at the
specified time. If the task recurs weekly, the task executes on the same day of the
week as the start date, at the specified time. If the task recurs monthly, the task
executes on the same day of the month as the start date, at the specified time.
• Daily every: This option may seem confusing because you have a Daily option for
Recurring, but they do two different things. This Daily executes the task over a
repeating interval; you could, for example, execute a task every hour from 12 a.m.
to 12 p.m. The Start Time and End Time in this section indicate the time of the
first execution and the time when execution stops for the given day, respectively.
✦ URL: As you’ve probably guessed, this field is where you enter the URL of the template
that’s to execute. This value cannot be an
https:// URL, as CFSCHEDULE currently
does not support SSL.
✦ Username and Password: Use these parameters if the page requires basic authentication.
✦ Timeout (sec): Enter here the number of seconds to wait for a response from the server
before considering the task “failed” and throwing an error.
✦ Proxy Server: If a proxy server is used, specify its address and port number here.
✦ Publish: If this option is enabled, the output from the scheduled task is saved to the file
named in the File field.
✦ File: See the previous option for information.
✦ Resolve URL: If Publish is enabled, all links in the scheduled task’s output are resolved
into a fully qualified URL before the content is written to the file.
System Probes
The System Probes page of ColdFusion Administrator (shown in Figure 43-23) tells ColdFusion
when and how to execute system probes to diagnose the health of your ColdFusion Server.
System probes check the “heartbeat” of your ColdFusion server and report back to you if the
heartbeat cannot be detected. A system probe is a template that ColdFusion executes at a reg-
ular interval, much as it does a scheduled task. The difference is that, every time that
ColdFusion executes a probe, it does the following two things:
✦ ColdFusion marks the probe as either successful or failed depending on the result of
executing the probe — more on this later in this section.
✦ If the probe fails, ColdFusion sends an e-mail to the site administrator telling him that
the probe failed and exactly how it failed.
The following three things cause a probe to fail:
✦ ColdFusion cannot connect to the probe template to execute it, either because the page
does not exist or the Web server is down
51546228 ch43.F 1/30/03 12:29 PM Page 961
962
Part VIII ✦ ColdFusion MX Administration
✦ ColdFusion does not receive a 200-success code from the probe template. See the
Enable HTTP Status Codes option in the section “Settings” earlier in this chapter, for
more information.
✦ The probe constraint defined within Administrator fails. You can set up the probe so
that it looks for a particular string or regular expression within the output returned
from the probe and fails depending on whether the string is found.
Figure 43-23: The System Probes page.
If the probe does fail, you can e-mail the site administrator and/or execute an external
program.
Code Analyzer
The Code Analyzer was included with ColdFusion MX as an assistant to developers upgrading
from earlier versions of ColdFusion. It can find code that results in an error in MX, such as
the old Oracle
maxrows technique and problems using QueryNew(). You point the Cold
Analyzer to the directory containing your source code by entering its path in the Directory
to Analyze field, and the Code Analyzer parses and analyzes all your code. This page is shown
in Figure 43-24:
Unfortunately, the Code Analyzer can’t detect all the problems with your code, so don’t just
run a quick report and tell your client, “We’re good to go” because you probably have lots of
detailed migration work to do. The only real way to analyze your code for migration is to
first perform this basic Code Analyzer run-through, resolve any issues that it spots, and then
perform full formal regression and load tests on the code that is running on an MX staging
server.
51546228 ch43.F 1/30/03 12:29 PM Page 962
963
Chapter 43 ✦ An Overview of ColdFusion MX Administrator
Figure 43-24: The Code Analyzer page.
Extensions
The links in the Extensions section of ColdFusion Administrator enable you to extend
ColdFusion’s capabilities through other technologies, such as Java, C++, and CORBA.
Java Applets
The Java Applets page of ColdFusion Administrator (shown in Figure 43-25) sets up applets
that ColdFusion Server can use with
CFAPPLET.
This page is where you register the applets that you can use with
CFAPPLET so that you don’t
need to write code such as the following:
<applet name=”TickerApplet” code=”sText”
codebase=”http://localhost/classes/” width=”350” height=”20”
hspace=”20”>
<param name=”background” value=”000000”>
<param name=”data” value=”http://localhost/ticker.txt”>
<param name=”defaultMessage” value=”Please wait ”>
<param name=”defaultURL” value=”http://localhost/index.cfm”>
51546228 ch43.F 1/30/03 12:29 PM Page 963
964
Part VIII ✦ ColdFusion MX Administration
<param name=”font” value=”Arial”>
<param name=”foreground” value=”FFFFFF”>
<param name=”frame” value=”_blankLoad”>
<param name=”highlite” value=”FF0000”>
<param name=”pause” value=”2”>
<param name=”refresh” value=”2”>
<param name=”size” value=”12”>
<param name=”wait” value=”3000”>
</applet>
Figure 43-25: The Java Applets page.
Instead, by using this option, you can write the same code as follows:
<cfapplet appletsource=”Ticker” name=”TickerApplet”>
From the main page, you can register a new applet or modify an existing registration. Both
options take you to the applet configuration page, which contains the following options:
✦ Applet Name: This field is where you enter a short alias for your applet.
✦ Code: This field is where you enter is the name of the
.class file without the exten-
sion. Don’t specify a path.
✦ Code Path: This field is for the URL of the directory containing the
.class file or for
the JAR file containing the
.class file.
✦ Archive: If the
.class file is stored in a JAR file, this filed is where you enter the name
of the JAR file. Otherwise, leave this field blank.
✦ Method: If the applet is intended for use as a form control, the applet should expose a
method that returns a single string; ColdFusion uses this string as the field value that is
submitted to the action page. This field contains the name of the method that returns
this single string value.
✦ Height: The default height of the applet goes in this field.
✦ Width: The default width of the applet goes in this field.
✦ VSpace: The default amount of space above and below the applet when the applet is
rendered in a user’s browser goes in this field.
51546228 ch43.F 1/30/03 12:29 PM Page 964
965
Chapter 43 ✦ An Overview of ColdFusion MX Administrator
✦ HSpace: The default amount of space to the left and right of the applet when the applet
is rendered in a user’s browser goes in this field.
✦ Align: The default alignment of the applet goes in this field.
✦ Not Supported Message: If the user’s browser doesn’t support Java, he sees the mes-
sage that you enter in this instead of the applet itself.
✦ Applet Parameters: These fields are for any default parameters that should be passed
to the applet.
If your code calls
CFAPPLET by using one or more of the parameters in these last fields, the
parameters given in the
CFAPPLET tag take precedence over the configurations you setup in
ColdFusion Administrator.
CFX Tags
This page enables you to register CFX tags, which are custom tags written in Java or C++
instead of CFML. The setup parameters for each type of tag are different, so we discuss them
separately in the following sections.
C++ CFX Tags
C++ tags are easier to set up than their Java counterparts. After you click Register C++ CFX or
edit an existing one, you see the interface shown in Figure 43-26:
Figure 43-26: The C++ CFX Tags page.
The C++ CFX Tag registration page contains the following five parameters:
✦ Tag Name: Must begin with CFX_. This is the name of the tag referenced in your
ColdFusion code.
✦ Server Library (.dll): This is the full path and file name of the tag’s DLL.
✦ Procedure: This is the name of the function to call within the DLL after the CFX tag is
called. This is almost always
ProcessTagRequest unless the same DLL is used for mul-
tiple CFX tags.
✦ Keep Library Loaded: If this option is enabled, ColdFusion does not release the DLL
after calling the tag the first time so that ColdFusion doesn’t need to allocate memory
for the tag more than once. This has the side effect of locking the DLL until the
ColdFusion Server service is cycled, so disable this option during development but
enable it during production.
✦ Description: A short description of the tag.
51546228 ch43.F 1/30/03 12:29 PM Page 965
966
Part VIII ✦ ColdFusion MX Administration
Java CFX Tags
Java CFX Tags use fewer parameters than their C++ counterparts, but the setup process is
more extensive. The interface for creating a Java CFX tag is shown in Figure 43-27:
Figure 43-27: The Java CFX Tags page.
As for C++ CFX tags, the process begins on the CFX Tags page of Administrator. After you click
Register Java CFX or edit an existing one, you must supply the following three parameters:
✦ Tag Name: Must begin with
CFX_. This is the name of the tag referenced in your
ColdFusion code.
✦ Class Name: The name of the Java class to invoke. This class name must be accessible
from the Java
classpath defined in the Java and JVM settings.
✦ Description: A short description of the tag.
After you register the tag, you must ensure that the
.class file is accessible from
ColdFusion’s
classpath, as defined on the Java and JVM page of Administrator. Suppose, for
example, that if your
.class file is at the following location:
c:\classes\myTag.class
ColdFusion’s classpath must then include c:\classes\, and you would define the class
name on the registration page as
myTag. Suppose, on the other hand, that your .class file is
stored in the following location:
c:\classes\cf\customtags\myTag.class
If so, and if c:\classes is defined on the classpath, you would define the class name as
follows:
cf.customtags.myTag
A best practice is to create a single directory to contain all your Java class files and to place
this directory in your classpath.
Custom Tag Paths
The Custom Tag Paths page of ColdFusion Administrator (shown in Figure 43-28) is where you
tell ColdFusion how to find commonly-used custom tags.
By default, only one shared custom tag directory (located at
cf_root/CustomTags) is defined
for ColdFusion Server. You can use this page, however, to add additional shared tag paths.
For information on using custom tags and how these shared paths are used, see Chapter 18.
51546228 ch43.F 1/30/03 12:29 PM Page 966
967
Chapter 43 ✦ An Overview of ColdFusion MX Administrator
Figure 43-28: The Custom Tag Paths page.
CORBA Connectors
In this section, we’ll discuss CORBA Connectors. Figure 43-29 shows the CORBA Connectors
Page.
Figure 43-29: The CORBA Connectors page.
This page is where you set up CORBA connectors for use with Borland’s VisiBroker. To get to
this page in ColdFusion Administrator, click
CORBA Connectors in the Extensions section of
ColdFusion Administrator’s navigation bar. To set up the VisiBroker connector, follow these
steps:
1. Click Register CORBA Connector.
2. Enter a name for the connector in the ORB Name field. (We use VisiBroker.)
3. Enter
coldfusion.runtime.corba.VisibrokerConnector in the ORB Class Name
field.
4. Leave the Classpath field blank and enter
cf_root/lib/vbjorb.properties in
the ORB Property File field (replacing
cf_root with the root of your ColdFusion
installation).
5. Click Submit.
6. Open vbjorb.properties inside of C:\CFusionMX\lib and edit the
SVCnameroot property
so that ColdFusion can find the root. (This assumes that you are familiar with CORBA.)
Restart ColdFusion Server after adding the CORBA connection.
51546228 ch43.F 1/30/03 12:29 PM Page 967
968
Part VIII ✦ ColdFusion MX Administration
Security
Three pages are in this section: CF Admin Password, RDS Password, and Sandbox Security (or
Resource Security in ColdFusion MX Professional). The CF Admin Password and RDS Password
pages are rather simple, with only two settings on each page — the explanatory text in
ColdFusion Administrator should describe the settings in enough detail.
The heavyweight in this section is the Sandbox/Resource Security page, which enables you to
restrict your application or parts of it to access only some of what ColdFusion offers. This is
useful for shared hosts or other environments where you want to give developers access to
only “safe” tags and functions. Because this section of ColdFusion Administrator more
involves the issue of server configuration than administrative settings, it is discussed in
detail in the following chapter.
Summary
In this chapter you learn the basics of how to use ColdFusion Administrator. Every setting
is covered, and you learn some details about setting up ColdFusion Server for best
performance.
This chapter is intended only as a general overview of ColdFusion Administrator and to
describe some of its options. The following chapter focuses more on configuration details,
sandbox/resource security measures, and better performance.
✦✦✦
51546228 ch43.F 1/30/03 12:29 PM Page 968
Configuration Tips
and Tricks
T
he preceding chapter gave you an overview of the settings in
ColdFusion Administrator, but some things warrant more discus-
sion, such as caching settings and sandbox security. This chapter is
geared more toward configuration for performance and security and
is intended for someone already familiar with the basics of
ColdFusion Administration.
Choosing the Number of
Simultaneous Request Threads
How many simultaneous request threads should you choose? This
question is one of the most common that’s asked about ColdFusion
tuning and configuration. Unfortunately, we can give you no hard-and-
fast answer. Whether this number should be five, fifty, or something
in between (or even more) can be determined only by a formal load
test of your application using a commercial-grade testing suite. (Refer
to Chapter 43 for a discussion of what request threads are.)
To determine this optimum number of simultaneous requests, follow
these steps (This assumes you are already in the Settings page of
ColdFusion Administrator):
1. Start with five simultaneous requests (request threads) and run
a comprehensive test scenario at high load.
2. Double the number of request threads to 10 and rerun the
same test scenario at the same load.
3. Compare the full compliment of performance metrics recorded
in your test, but pay particular attention to minimum, maxi-
mum, and average response times and the standard deviation
for response times. Keep your eye on RAM and CPU usage to
determine whether you get a nonlinear jump in values.
4. Double the number of request threads to 20 and rerun every-
thing else exactly the same as before.
How do your metrics look now? Are they still responding in a
fairly linear fashion with a fast response time?
44
44
CHAPTER
✦✦✦✦
In This Chapter
Tuning for performance
Shoring up security
Exploring advanced
datasource-
configuration options
Tuning the JVM
✦✦✦✦
52546228 ch44.F 1/30/03 12:29 PM Page 969
970
Part VIII ✦ ColdFusion MX Administration
5. If so, keep this cycle up, doubling the number of threads with each retest and recheck
of your metrics. Keep the cycle up until response times become erratic (that is, the
standard deviation grows very large) or slow or your RAM and CPU usage jump
sharply. After this jump happens, you want to back off in the opposite direction, as
described in Step 6.
6. In ramping down, start by taking the difference between the first “failed” setting for
the number of simultaneous requests and the previous run, dividing that difference
by two and adding it to the previous run’s value. If the previous run used 20 threads
and the first failed run used 40, for example, the next run should use 30, calculated as
20 + ((40 - 20) / 2).
7. If this “ramped-down” test yields successful performance metrics, scale it back up by
half. In the example in the preceding step, this new value would be 35, calculated as
30 + ((40 - 30) / 2).
8. Continue ramping back and forth (aka hopscotching) until your test performance metrics
yield the best results.
But believe it or not, you’re not finished! The number of simultaneous request threads is only
one setting that affects and is affected by many other settings in ColdFusion MX, your Web
server, your database server, and even your operating system and hardware. In reality, all
these factors must be balanced like the old Chinese Spinning Plate Trick — not an easy thing
to do even with the best of training.
A general guideline, however, is that you don’t want to set this number too low or requests
queue up and negatively affect the performance of your site, and you don’t want to set this
number too high because that uses up too many resources on your server and causes mem-
ory to constantly page to disk, which also negatively affects performance.
Caching
Developers frequently ask how many templates they should set ColdFusion to cache in RAM.
The simple answer is “as many as possible.” The more templates that ColdFusion can store in
its cache, the less ColdFusion must access the hard drive to execute code. If memory is at a
premium on your server, however, you should probably scale this number back to give
ColdFusion room to breathe.
In an ideal environment, you would take the total number of ColdFusion templates in your
Web site, multiply that number by 1.25, and then use that as the size of your template cache.
This formula makes sure that you have room for all your templates in the cache and also
gives you a little breathing room in case you add more templates.
Cache size in ColdFusion MX is a different unit of measure from earlier versions of ColdFusion
Server, which measured cache size in kilobytes. ColdFusion MX measures the cache size in the
number of templates instead.
You can also speed up the cache even more by turning on the Trusted Cache feature. (Trusted
Cache is available in the Caching page of ColdFusion Administrator.) This option tells
ColdFusion to “trust” whatever is already cached and not to waste a single millisecond check-
ing to determine whether a file has been updated. We always turn on this option on our pro-
duction servers, and we always turn it off on our development servers. A side-effect of
enabling this option is that you must restart the ColdFusion service for ColdFusion to recog-
nize changes to the source code.
Note
52546228 ch44.F 1/30/03 12:29 PM Page 970
971
Chapter 44 ✦ Configuration Tips and Tricks
Chart caching
ColdFusion MX also adds options for caching charts (generated by calls to CFCHART). First,
you can specify whether the chart cache is stored in memory or on disk (with disk caching
the default). If you have the RAM to spare, use in-memory caching to speed your server’s per-
formance. If, on the other hand, you either don’t have much RAM or you do a lot of charting,
choose disk caching to save memory.
Choosing the maximum number of images in the cache differs depending on whether you’re
doing disk caching or memory caching. If using memory caching, keep this number relatively
low so that you don’t end up using all your memory for chart caching. If using disk caching,
make this number as high as feasible because you are limited only by the amount of free
space on your hard drive.
Query caching
Query caching is another one of those parameters that you can’t truly set until you load-test
your application by using a commercial-grade load-testing tool and production-scale test
data. (This parameter is set on the Caching page of ColdFusion Adminstrator.) You can’t tell
how large or varied your queries may be until you perform such a test, and these two factors
(variance and scale) completely dominate the number of queries that you should set
ColdFusion Server to cache in its memory.
You should set this parameter only after you set parameters for JVM memory usage, template
cache size, and simultaneous requests — in that order. Start with a very low number such as
five and run a high load-test scenario with the maximum number of virtual users that you
expect your system to handle (a very important test, especially if you exhaust a lot of your
memory through heavy use of the Session scope). Your watchpoints are response timings
(minimum, maximum, average, and standard deviation) and available physical memory.
If you adjust this parameter, but your application’s response time doesn’t improve signifi-
cantly, make sure that you are making effective use of query caching in your code.
If you do receive a significant benefit from increasing the number of cached queries, use the
hopscotching method that we describe in the section “Choosing the Number of Simultaneous
Request Threads,” earlier in this chapter, to balance available physical memory with
response times. If you do so, you eventually set the right number. Remember that a large
standard deviation on response times indicates erratic behavior, so back off if you see this
value jump sharply.
Using a UUID For CFTOKEN
Using a UUID for CFTOKEN is a security precaution. (You can find this option on the Settings
page of ColdFusion Administrator.) By default, ColdFusion uses an eight-digit random number
for the value of
CFTOKEN, making it relatively easy to guess. Enabling this option makes
ColdFusion use a UUID with a random 12-digit hexadecimal number prepended as
CFTOKEN.
This modified UUID is impossible to guess, removing any possibility of a user hacking into
another user’s session by manipulating the values of
CFID and CFTOKEN in URL.
It’s always a good idea to use a UUID for
CFTOKEN. It’s usually not a concern on development
servers (although it certainly won’t hurt), but on a production server, always consider
enabling this option.
52546228 ch44.F 1/30/03 12:29 PM Page 971
972
Part VIII ✦ ColdFusion MX Administration
Using J2EE Session Variables
By default, ColdFusion MX doesn’t use J2EE session management and opts instead to identify a
user’s Session variables through the combination of
CFID and CFTOKEN sent by each of his
browser requests. Enabling J2EE Session variables makes ColdFusion forego
CFID and CFTOKEN
for session management purposes and instead use J2EE’s native session-management mecha-
nism. (You can find this option in the Memory Variables page of ColdFusion Administrator.)
With J2EE Session variables enabled, your ColdFusion MX application can share Session,
Application, and Request variables with JSP pages and other J2EE applications running on the
same server.
For more information on J2EE session management, see Chapter 19. (You must restart
ColdFusion server for this setting to take effect.)
Datasources
If you’re using a database server rather than a file-based database such as Microsoft Access,
you want to use an IP address rather than a host name or computer name in specifying your
database server. Using the host name requires ColdFusion to perform a DNS lookup before
connecting to the database server, and using a computer name means doing a network
lookup. Using an IP address enables ColdFusion to connect to the database server directly.
After setting up and verifying your datasource with a correct username and password to
make sure that you can connect to your database, edit the datasource definition and remove
the username and password. (See the Data Sources section in Chapter 43 for information on
verifying and editing datasources.) Instead, store the username and password in Request
variables defined in
Application.cfm or a similar mechanism and pass them in every call to
CFQUERY and CFSTOREDPROC. Doing so takes the username and password out of ColdFusion
MX’s XML properties files and puts the connection information in
Application.cfm tem-
plates, which are easier to secure.
A datasource’s connection settings define how ColdFusion connects to the database server
and which database it uses. You also have advanced settings, however, that, if used correctly,
can really enhance your application’s performance. Table 44-1 describes these advanced
settings:
Table 44-1: Advanced Datasource Parameters
Parameter Name Description
Connection String If a database driver accepts connection strings, you can provide any
additional connection parameters in the form of a connection
string provided in this parameter.
Limit Connections If this option is enabled, ColdFusion limits the number of
simultaneous database requests according to the number provided
in the setting for Restrict Connections To.
Restrict Connections To See the description of the preceding parameter for information.
Maintain Connections If this parameter is enabled, ColdFusion connects to the datasource
once for a given client instead of reconnecting on every request.
See Timeout (min) and Interval (min) for more information.
52546228 ch44.F 1/30/03 12:29 PM Page 972
973
Chapter 44 ✦ Configuration Tips and Tricks
Parameter Name Description
Timeout (min) If you are maintaining connections and the time between a client’s
requests is greater than this number of minutes, ColdFusion
expires the cached connection.
Interval (min) If you are maintaining connections, ColdFusion checks every x
number of minutes for expired connections.
Disable Connections If this option is enabled, no application can use this datasource.
Login Timeout (sec) In connecting to a database, ColdFusion waits this number of
seconds before timing out the attempt and throwing an error.
CLOB Enabling this option enables ColdFusion to retrieve the entire
contents of a CLOB field (meaning a Memo field in Access or a Text
field in Microsoft SQL Server). Don’t enable this parameter unless
you are absolutely sure that you need it, as this option causes a
large performance hit.
BLOB Enabling this option enables ColdFusion to retrieve the entire
contents of a BLOB field (meaning an Image field in Microsoft SQL
Server). Don’t enable this parameter unless you are absolutely sure
that you need it, as this option causes a large performance hit.
Long Text Buffer If CLOB retrieval is disabled, ColdFusion retrieves a maximum of
this number of characters from a CLOB, Memo, or Text field and
truncates the rest. The default is 64,000 characters.
Blob Buffer If BLOB retrieval is disabled, ColdFusion retrieves a maximum of
this number of bytes from a BLOB or Image field and truncates the
rest. The default is 64,000 bytes.
Allowed SQL This set of check boxes enables you to choose the SQL statements
that can be executed through this datasource, enabling you to
restrict what applications can do.
Select Method This option exists only for SQL Server and Sybase datasources. The
value can be either Direct, meaning to use a standard client-side
retrieval (fine for nearly all users), or Cursor, meaning to use a
server-side cursor (only for advanced developers). Don’t change
this option unless you have a compelling reason to do so.
Trusted Connection This option exists only for ODBC socket datasources. A trusted
connection implies that, instead of using a username and
password to access a database, the connection uses the name of
the currently logged in user to connect. Using a Trusted Connection
implies a Windows network and currently works only for Microsoft
SQL Server.
Java and JVM Settings
The Java and JVM settings section of Administrator tells ColdFusion how to use the Java
Virtual Machine (JVM). Naturally, these settings are rather sensitive and the defaults should
be acceptable for most users. Modify these settings only if you have a compelling reason to
do so.
52546228 ch44.F 1/30/03 12:29 PM Page 973
974
Part VIII ✦ ColdFusion MX Administration
The Java Virtual Machine path tells ColdFusion where to find the Java Virtual Machine DLL
(
jvm.dll on Windows or jvm.so on Solaris). Don’t modify this parameter unless the JVM
location changes.
Adjusting the Initial Memory Size and Maximum Memory upward is probably a good idea if
you have the RAM to do so. The default maximum is 512MB, but don’t set the maximum any
lower than 32MB because ColdFusion may not be able to start up again. These settings con-
trol how much memory Java can allocate to ColdFusion.
Our suggestion is to leave the Initial Memory Size value blank so that the JVM is unrestricted
during ColdFusion startup, but explicitly specify a Maximum Memory value as large as your
hardware, operating system, and other software requirements enable. One good indicator for
how much you can safely increase the Maximum Memory value is the Available Physical
Memory value that you should be measuring during your load tests. Consider increasing your
JVM’s Maximum Memory value if you still have RAM to spare during your load tests.
The Classpath setting tells Java where to look for Java classes. This is a comma-delimited list
of directories, JAR files, and/or ZIP files where ColdFusion looks for Java
.class files. The
only reason that you would need to modify this parameter is if you are using a custom Java
extension such as a Java-based CFX custom tag or JSP tag library.
Sandbox and Resource Security
Sandbox/Resource Security is probably one of the best new features in the MX release of
ColdFusion Server. Before MX, ColdFusion Server used a tool called Advanced Security that
was notoriously unreliable and difficult to use — so much so that it is no longer supported in
ColdFusion MX. Because it is built on Java, MX can make use of J2EE Sandbox Security, which
is easy to use and configure and works remarkably well.
We should note the difference between Sandbox security and Resource security. The two are
often used interchangeably, but they really shouldn’t be. Sandbox Security is available only in
ColdFusion MX Enterprise and enables you to define different security settings for different
directories on your server. ColdFusion MX Professional offers a version known as Resource
Security, which enables you define similar security settings, but they apply for the entire server.
This chapter describes Enterprise’s Sandbox Security; Resource Security is virtually identical.
To access Sandbox Security, log in to ColdFusion Administrator and click the Sandbox
Security link at the bottom of the left bar. Before you can use Sandbox Security, you must
enable it by selecting the check box on the main Sandbox Security page. Restart the
ColdFusion Application Server service after enabling Sandbox Security.
To define a security sandbox, choose the directory containing the files that you want to
secure in the Add Security Sandbox section. You can either create a new sandbox or copy an
existing one by using the drop-down list. After you click Add, the new sandbox appears in the
list of active sandboxes. Click Edit to modify the security settings.
Five pages in the Sandbox Security editor correspond to the five resources that you can
restrict: Data Sources, CF Tags, CF Functions, Files and Directories, and Servers and Ports.
The following sections describe each of these pages.
Data Sources
The first page of the Sandbox Security editor enables you to choose the datasources that the
application that runs in a sandbox directory can access. The data sources are presented in a
familiar chooser interface, where you have a list of Enabled Data Sources, a list of Disabled Data
Sources, and buttons to move data sources between the two lists, as shown in Figure 44-1.
52546228 ch44.F 1/30/03 12:29 PM Page 974
975
Chapter 44 ✦ Configuration Tips and Tricks
Figure 44-1: The Data Sources page of the Sandbox
Security editor.
<<ALL DATASOURCES>> may seem rather confusing; after all, not all datasources must be on
the same side of the chooser interface. Think of
<<ALL DATASOURCES>> as a placeholder for
new datasources; if
<<ALL DATASOURCES>> is disabled, any new datasources created after
the sandbox is configured are also disabled.
CF Tags
The second page of the Sandbox Security editor enables you to disable access to ColdFusion
Tags that may be dangerous, such as
CFOBJECT or CFREGISTRY. As is the Data Sources page,
the CF Tags are presented in a chooser, as shown in Figure 44-2.
Figure 44-2: The CF Tags page of the Sandbox
Security editor.
Always disable tags that aren’t to be used in a particular application, because they tend to
present a security hole. Make sure that you don’t enable
CFOBJECT unless really necessary,
because
CFOBJECT can invoke destructive code through a COM or Java object on your server.
If you use CFCs, however, you may need to enable
CFOBJECT.
Part IV of this book describes CFCs, or ColdFusion Components, in detail.
CF Functions
The CF Functions page is similar to the CF Tags page, but it enables you to disable functions
rather than tags, as shown in Figure 44-3.
Cross-
Reference
52546228 ch44.F 1/30/03 12:29 PM Page 975
976
Part VIII ✦ ColdFusion MX Administration
Figure 44-3: The CF Functions page of the Sandbox
Security editor.
Disable CreateObject() unless you’re sure that it’s going to be used, such as to instantiate
ColdFusion components.
Files and Directories
The Files and Directories page enables you to granularly control who can access what files on
your system. By default, code in a sandbox can access files in the sandbox directory and its
subdirectories but cannot access any files outside the sandbox.
The Files and Directories page interface is shown in Figure 44-4.
Figure 44-4: The Files and Directories page of the Sandbox
Security editor.
To grant the sandbox permissions on a directory that isn’t already part of the current sand-
box, follow these steps:
1. Enter the path to the file or directory or choose the path by using the Browse Server
button. To grant permissions on a directory and all files and subfolders in that direc-
tory, put a
/* after the directory name. To grant permissions on a directory and recur-
sively apply those permissions to all files and subfolders of the directory, no matter
how deeply nested, put a
/- after the directory name.
52546228 ch44.F 1/30/03 12:29 PM Page 976