iOS App Programming Guide phần 6 doc
Bạn đang xem bản rút gọn của tài liệu. Xem và tải ngay bản đầy đủ của tài liệu tại đây (1.86 MB, 11 trang )
To configure a VoIP app, you must do the following:
1. Add the UIBackgroundModes key to your app’s Info.plist file. Set the value of this key to an array
that includes the voip value.
2. Configure one of the app’s sockets for VoIP usage.
3. Before moving to the background, call the setKeepAliveTimeout:handler: method to install a
handler to be executed periodically. Your app can use this handler to maintain its service connection.
4. Configure your audio session to handle transitions to and from active use.
Including the voip value in the UIBackgroundModes key lets the system know that it should allow the app
to run in the background as needed to manage its network sockets. An app with this key is also relaunched
in the background immediately after system boot to ensure that the VoIP services are always available.
Most VoIP apps also need to be configured as background audio apps to deliver audio while in the background.
Therefore, you should include both the audio and voip values to the UIBackgroundModes key. If you do
not do this, your app cannot play audio while it is in the background. For more information about the
UIBackgroundModes key, see Information Property List Key Reference.
For specific information about the steps you must take to implement a VoIP app, see “Tips for Developing a
VoIP App” (page 95).
Downloading Newsstand Content in the Background
A Newsstand app that downloads new magazine or newspaper issues can register to perform those downloads
in the background. When your server sends a push notification to indicate that a new issue is available, the
system checks to see whether your app has the UIBackgroundModes key with the newsstand-content
value. If it does, the system launches your app, if it is not already running, so that it can initiate the downloading
of the new issue.
When you use the Newsstand Kit framework to initiate a download, the system handles the download process
for your app. The system continues to download the file even if your app is suspended or terminated. When
the download operation is complete, the system transfers the file to your app sandbox and notifies your app.
If the app is not running, this notification wakes it up and gives it a chance to process the newly downloaded
file. If there are errors during the download process, your app is similarly woken up to handle them.
For information about how to download content using the Newsstand Kit framework, see Newsstand Kit
Framework Reference.
Communicating wWith an External Accessory
Apps that work with external accessories can ask to be woken up if the accessory delivers an update when
the app is suspended. This support is important for some types of accessories that deliver data at regular
intervals, such as heart-rate monitors. When an app includes the UIBackgroundModes key with the
external-accessory value in its Info.plist file, the external accessory framework keeps open any active
sessions for the corresponding accessories. (In iOS 4 and earlier, these sessions are closed automatically when
the app is suspended.) In addition, new data arriving from the accessory causes the system to wake up the
app to process that data. The system also wakes up the app to process accessory connection and disconnection
notifications.
Any app that supports the background processing of accessory updates must follow a few basic guidelines:
Background Execution and Multitasking 57
2011-10-12 | © 2011 Apple Inc. All Rights Reserved.
CHAPTER 3
App States and Multitasking
● Apps must provide an interface that allows the user to start and stop the delivery of accessory update
events. That interface should then open or close the accessory session as appropriate.
● Upon being woken up, the app has around 10 seconds to process the data. Ideally, it should process the
data as fast as possible and allow itself to be suspended again. However, if more time is needed, the app
can use the beginBackgroundTaskWithExpirationHandler: method to request additional time;
it should do so only when absolutely necessary, though.
Being a Responsible Background App
The foreground app always has precedence over background apps when it comes to the use of system
resources and hardware. Apps running in the background need to be prepared for this discrepancy and
adjust their behavior when running in the background. Specifically, apps moving to the background should
follow these guidelines:
● Do not make any OpenGL ES calls from your code. You must not create an EAGLContext object or
issue any OpenGL ES drawing commands of any kind while running in the background. Using these calls
causes your app to be killed immediately. Apps must also ensure that any previously submitted commands
have completed before moving to the background. For information about how to handle OpenGL ES
when moving to and from the background, see “Implementing a Multitasking-aware OpenGL ES
Application” in OpenGL ES Programming Guide for iOS.
● Cancel any Bonjour-related services before being suspended. When your app moves to the background,
and before it is suspended, it should unregister from Bonjour and close listening sockets associated with
any network services. A suspended app cannot respond to incoming service requests anyway. Closing
out those services prevents them from appearing to be available when they actually are not. If you do
not close out Bonjour services yourself, the system closes out those services automatically when your
app is suspended.
● Be prepared to handle connection failures in your network-based sockets. The system may tear down
socket connections while your app is suspended for any number of reasons. As long as your socket-based
code is prepared for other types of network failures, such as a lost signal or network transition, this should
not lead to any unusual problems. When your app resumes, if it encounters a failure upon using a socket,
simply reestablish the connection.
● Save your app state before moving to the background. During low-memory conditions, background
apps may be purged from memory to free up space. Suspended apps are purged first, and no notice is
given to the app before it is purged. As a result, before moving to the background, an app should always
save enough state information to reconstitute itself later if necessary. For tips on how to save the state
of your user interface, see “Preserving the State of Your App’s User Interface” (page 92).
● Release any unneeded memory when moving to the background. If your app maintains a large
in-memory cache of objects (especially images), remove references to those caches when moving to the
background. For more information, see “Memory Usage for Background Apps” (page 45).
● Stop using shared system resources before being suspended. Apps that interact with shared system
resources such as the Address Book or calendar databases should stop using those resources before
being suspended. Priority for such resources always goes to the foreground app. When your app is
suspended, if it is found to be using a shared resource, the app is killed.
58
Background Execution and Multitasking
2011-10-12 | © 2011 Apple Inc. All Rights Reserved.
CHAPTER 3
App States and Multitasking
● Avoid updating your windows and views. While in the background, your app’s windows and views are
not visible, so you should not try to update them. Although creating and manipulating window and
view objects in the background does not cause your app to be killed, consider postponing this work
until you return to the foreground.
● Respond to connect and disconnect notifications for external accessories. For apps that communicate
with external accessories, the system automatically sends a disconnection notification when the app
moves to the background. The app must register for this notification and use it to close out the current
accessory session. When the app moves back to the foreground, a matching connection notification is
sent, giving the app a chance to reconnect. For more information on handling accessory connection and
disconnection notifications, see External Accessory Programming Topics.
● Clean up resources for active alerts when moving to the background. In order to preserve context
when switching between apps, the system does not automatically dismiss action sheets (UIActionSheet)
or alert views (UIAlertView) when your app moves to the background. It is up to you to provide the
appropriate cleanup behavior prior to moving to the background. For example, you might want to cancel
the action sheet or alert view programmatically or save enough contextual information to restore the
view later (in cases where your app is terminated).
For apps linked against a version of iOS earlier than 4.0, action sheets and alerts are still dismissed at
quit time so that your app’s cancellation handler has a chance to run.
● Remove sensitive information from views before moving to the background. When an app transitions
to the background, the system takes a snapshot of the app’s main window, which it then presents briefly
when transitioning your app back to the foreground. Before returning from your
applicationDidEnterBackground: method, you should hide or obscure passwords and other
sensitive personal information that might be captured as part of the snapshot.
● Do minimal work while running in the background. The execution time given to background apps is
more constrained than the amount of time given to the foreground app. If your app plays background
audio or monitors location changes, you should focus on that task only and defer any nonessential tasks
until later. Apps that spend too much time executing in the background can be throttled back by the
system or killed.
If you are implementing a background audio app, or any other type of app that is allowed to run in the
background, your app responds to incoming messages in the usual way. In other words, the system may
notify your app of low-memory warnings when they occur. And in situations where the system needs to
terminate apps to free even more memory, the app calls its delegate’s applicationWillTerminate:
method to perform any final tasks before exiting.
Opting out of Background Execution
If you do not want your app to run in the background at all, you can explicitly opt out of background by
adding the UIApplicationExitsOnSuspend key (with the value YES) to your app’s Info.plist file. When
an app opts out, it cycles between the not-running, inactive, and active states and never enters the background
or suspended states. When the user presses the Home button to quit the app, the
applicationWillTerminate: method of the app delegate is called and the app has approximately 5
seconds to clean up and exit before it is terminated and moved back to the not-running state.
Even though opting out of background execution is strongly discouraged, it may be preferable under certain
conditions. Specifically, if coding for the background requires adding significant complexity to your app,
terminating the app may be a simpler solution. Also, if your app consumes a large amount of memory and
Background Execution and Multitasking 59
2011-10-12 | © 2011 Apple Inc. All Rights Reserved.
CHAPTER 3
App States and Multitasking
cannot easily release any of it, the system might need to kill your app quickly anyway to make room for other
apps. Thus, opting to terminate, instead of switching to the background, might yield the same results and
save you development time and effort.
Note: Explicitly opting out of background execution is necessary only if your app is linked against iOS SDK
4 and later. Apps linked against earlier versions of the SDK do not support background execution as a rule
and therefore do not need to opt out explicitly.
For more information about the keys you can include in your app’s Info.plist file, see Information Property
List Key Reference.
Concurrency and Secondary Threads
The system creates your app’s main thread but your app can create additional threads as needed to perform
other tasks. The preferred way to create threads is to let the system do it for you by using dispatch queues
and operation queues. Queues provide an asynchronous execution model for tasks that you define. When
you submit a task to a queue, the system spins up a thread and executes your task on that thread. Letting
the system manage the threads simplifies your code and allows the system to manage the threads in the
most efficient way available.
You should use queues whenever possible to move work off of your app’s main thread. Because the main
thread is responsible for processing touch and drawing events, you should never perform lengthy tasks on
it. For example, you should never wait for a network response on your app’s main thread. It is much better
to make the request asynchronously using a queue and process the results when they arrive.
Another good time to move tasks to secondary threads is launch time. Launched apps have a limited amount
of time (around 5 seconds) to do their initialization and start processing events. If you have launch-time tasks
that can be deferred or executed on a secondary thread, you should move them off the main thread right
away and use the main thread only to present your user interface and start handling events.
For more information about using dispatch and operation queues to execute tasks, see Concurrency
Programming Guide.
60
Concurrency and Secondary Threads
2011-10-12 | © 2011 Apple Inc. All Rights Reserved.
CHAPTER 3
App States and Multitasking
iCloud storage is a set of interfaces and services for sharing data among instances of your app running on
different devices. The idea behind iCloud is to provide a single place where your app can write its data.
Changes made by one instance of your app are propagated to the user’s other devices seamlessly so that
the other instances of your app see them too. This creates a more coherent user experience by eliminating
the need to synchronize data explicitly between devices or have a computer act as a hub for storing all of
the user’s files and data.
There are two ways to adopt iCloud storage in your app:
● iCloud document storage—Use this feature to store user documents and app data in the user’s iCloud
account.
● iCloud key-value data storage—Use this feature to share small amounts of noncritical configuration
data among instances of your app.
Most of the iCloud interfaces are aimed at helping you manage files, not your user interface. Adopting iCloud
storage requires some changes to your app’s data model and how it tracks and manages files. Depending
on your app, it might also require changes to your app’s user interface and overall configuration. And if you
want to share files between iOS and Mac OS X devices, it might require changing how you construct your
file formats too.
Important: Access to iCloud is controlled using entitlements, which your app configures through Xcode. If
these entitlements are not present, your app is prevented from accessing files and other data in iCloud. For
information about how to configure your app’s iCloud entitlements, see “Configuring Your App’s iCloud
Entitlements” (page 63).
Design Considerations for iCloud Apps
When adopting iCloud, the first decision you have to make is whether to use document storage or key-value
data storage. Document storage is intended for storing your app’s data, whether that data is created and
managed privately by your app or is created by the user and accessible by other means. Document storage
is definitely intended for apps that work with user-facing data, such as user-created documents, but it is also
useful for managing the data files your app creates internally too. Key-value storage is intended more for
noncritical configuration data that you want to share among the running instances of your app. For example,
you might use key-value storage to store preferences and other bits of configuration data that are secondary
to your app’s behavior. You should avoid using key-value storage to save user-facing data.
Design Considerations for iCloud Apps 61
2011-10-12 | © 2011 Apple Inc. All Rights Reserved.
CHAPTER 4
iCloud Storage
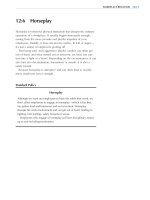
iCloud
Key Value
Data Storage
Document
Storage
Doc
Table 4-1 highlights some of the key usage patterns surrounding iCloud storage and how those patterns
differ for document storage and key-value storage. Use this table to help answer some of your basic questions.
Table 4-1 Differences between document and key-value storage
Key-value storageDocument storageAttribute
Property-list data types only (numbers, strings, dates, and so
on)
Files and directoriesWhat kind of
data can it
manage?
Use key-value storage for things like preferences and other
configuration data that you want to share between instances
of your app but that is not critical to your app’s behavior. The
amount of space in the key-value store is limited and the types
of data you can store are limited to property list data types.
Use document storage to manage data that is critical to your app.
You almost always use document storage to manage files and data
related directly to your app’s main data model. Thus, you would
use document storage for user documents, private app data files,
and any files containing app or user-generated data.
When would
you use it?
NoYesAre file
presenters and
file
coordinators
required?
Use the default NSUbiquitousKeyValueStore object to
retrieve the value for a known key.
Use a NSMetadataQuery object to search for files.How do you
locate data?
Set or get keys and values using the default
NSUbiquitousKeyValueStore object.
Manage files and directores using the NSFileManager class. Open,
close, read, and write files using standard file system routines.
How do you
manage the
data?
Limited to a maximum of 64 KB (with a separate per-key limit
of 64 KB).
Limited only by the amount of space in the user’s iCloud account.How much
data can it
store?
62
Design Considerations for iCloud Apps
2011-10-12 | © 2011 Apple Inc. All Rights Reserved.
CHAPTER 4
iCloud Storage
Key-value storageDocument storageAttribute
The last value set for the key is always the current value. The
timestamp provided by the device is used to determine the
newest value.
Your app’s file presenters must resolve conflicts manually.How are
conflicts
handled?
com.apple.developer.ubiquity-kvstore-identifiercom.apple.developer.ubiquity-container-identifiersWhat
entitlement is
required to
use it?
Keys and values are transferred to and from iCloud at periodic
intervals.
iCloud always pulls file metadata and data from a device when
changes occur. Devices always pull file metadata but usually do
not pull changed data until your app attempts to use the file.
When is data
synchronized?
Call the synchronize method of the NSUbiquitousKey-
ValueStore object. If that method returns YES, iCloud is
available and there are changes to synchronize with your local
user defaults database. If that method returns NO, iCloud is
either not available or there are no changes to synchronize.
Either way, use the values in your local user defaults database.
Call the URLForUbiquityContainerIdentifier: method for
one of your registered container directories. If the method returns
nil, document storage is not available.
How do you
detect if
iCloud is
available at
launch time?
None. In most cases, you should not need to convey whether
key-value data is stored locally or in iCloud.
None. Your app is responsible for deciding what information (if
any) to convey about iCloud support. In general, iCloud information
should be conveyed seamlessly and involve minimal changes to
your user interface.
What user
interface
support is
provided?
Another design consideration is how you plan to incorporate iCloud support into your app’s user interface.
Especially for documents, there may be times when you need to inform the user about the state of a document,
such as whether it is downloaded or has version conflicts that need to be resolved. In those situations, you
should consider adding some unobtrusive elements to your user interface to convey the appropriate
information to the user. For more information about updating your user interface, see “Updating Your User
Interface for iCloud” (page 70).
Configuring Your App’s iCloud Entitlements
Apps that use iCloud must be signed with iCloud-specific entitlements. These entitlements provide a level
of security for your app by ensuring that only your apps can access the documents they create. The system
also relies on the entitlement values you provide to differentiate your app’s documents from other documents
in the user’s iCloud account.
To enable iCloud entitlements for your iOS app in Xcode:
1. Select your app target in Xcode.
2. Select the Summary tab.
3. In the Entitlements section, enable the Enable Entitlements checkbox.
Configuring Your App’s iCloud Entitlements 63
2011-10-12 | © 2011 Apple Inc. All Rights Reserved.
CHAPTER 4
iCloud Storage
When you enable entitlements for your app target, Xcode automatically configures both the document
storage and and key-value data storage entitlements for your app. Each entitlement consists of an entitlement
key whose value is one or more container identifier strings. A container identifier string identifies one of
the iCloud container directories you use to store your app’s files. Xcode configures the entitlements in the
following way:
● The iCloud Containers field identifies the list of container directories that your app can access in the
user’s iCloud storage. (This field corresponds to the
com.apple.developer.ubiquity-container-identifiers entitlement.) The strings you add to
this list must correspond to bundle identifiers for apps created by your team. Xcode uses the current
app’s bundle identifier to specify the first string; you can change this to a different bundle identifier if
you want multiple apps to share a main container directory. You can also add additional bundle identifiers
for your team’s other apps. (The first string must not contain any wildcard characters but subsequent
strings may if you do not want to specify every bundle identifier separately.)
● The iCloud Key-Value Store field contains the single container identifier string corresponding to the
iCloud key-value data storage for your app. (This field corresponds to the
com.apple.developer.ubiquity-kvstore-identifier entitlement.)
The bundle identifiers you specify in Xcode do not represent the fully qualified container identifier strings
that are written to your entitlements file. A fully qualified container identifier is of the form
<TEAM_ID>.<BUNDLE_IDENTIFIER>, where <TEAM_ID> is the unique ten-character identifier associated with
your development team and <BUNDLE_IDENTIFIER> is is one of the bundle identifiers in the iCloud Containers
field. When retrieving a URL for a container directory in your code, you need to pass the fully qualified string
to the URLForUbiquityContainerIdentifier: method. However, you can also pass nil to this method
to retrieve the URL for the first container directory in the list.
Note: You can find the unique <TEAM_ID> value for your development team in the Member Center on the
Apple Developer website ( From the Member Center home page,
select the Your Account tab and then select Organization Profile from the column on the left of that tab.
Your team’s identifier is in the Company/Organization ID field.
Apps using iCloud document storage can read and write the contents of multiple container directories by
specifying multiple container identifiers in their entitlements file. The iCloud Containers field lets you specify
multiple strings. The first string in this field must always be the main container identifier for your app. Any
additional strings represent the container identifiers for your other apps. Searches return a merged set of
files from all of the available container directories.
For more information about how to configure entitlements for an iOS app, see “Configuring Applications”
in iOS App Development Workflow Guide.
Using iCloud Document Storage
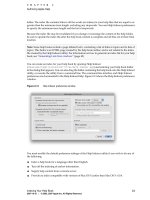
iCloud document storage lets you move files and directories to a user’s iCloud account and manage them
there. Changes made to the file or directory on one device are stored locally and then pushed to iCloud using
a local daemon, as shown in Figure 4-1. The transfer of files to and from each device is transparent to your
app. Thus, apps simply operate on the file as if it is always there.
64
Using iCloud Document Storage
2011-10-12 | © 2011 Apple Inc. All Rights Reserved.
CHAPTER 4
iCloud Storage
Figure 4-1 Pushing document changes to iCloud
iCloud
Daemon
iCloud
Daemon
iCloud
Daemon
iCloud
Daemon
Local storage Local storage
File
File
File
Designing your app to take advantage of iCloud document storage requires some significant changes. Here
are the main changes needed:
● Early in your app’s execution, call the URLForUbiquityContainerIdentifier: method to determine
if iCloud is enabled. Calling this method is also necessary to extend your app sandbox to include each
of your app’s requested container directories; see “Determining if iCloud Document Storage is
Available” (page 66).
● Explicitly incorporate file presenters (such as the UIDocument class) into your data layer; see “Incorporating
File Presenters into Your Workflow” (page 66).
● Explicitly move files to iCloud; see “Manipulating Files and Directories in iCloud” (page 66).
● Be prepared to handle version conflicts for a file; see “Choosing a Strategy to Respond to Version
Conflicts” (page 67).
● Make use of searches to locate files in iCloud; see “Incorporating Search into Your Infrastructure” (page
68).
● Be prepared to handle cases where files are in iCloud but not fully downloaded to the local device; this
might require providing the user with feedback; see “Determining the Transfer Status of a File or
Directory” (page 69).
● Use Core Data if you want to store live databases in iCloud; do not use SQLite.
● If you also have a Mac OS X version of your app, use a common document format for both apps.
Using iCloud Document Storage 65
2011-10-12 | © 2011 Apple Inc. All Rights Reserved.
CHAPTER 4
iCloud Storage
Most of the work you do to support iCloud happens in the data layer of your app. Interactions with iCloud
occur mostly through the files and directories that your app uses to store data. But you also need to consider
the implications that the underlying data changes have on your app’s user interface. Wherever possible, the
user should not have to care whether a file is stored locally or in iCloud. The exceptions are in cases where
the user experience might be degraded.
Determining if iCloud Document Storage is Available
Every user with an Apple ID receives a free iCloud account but some users might choose not to enable iCloud
for a given device. Before you try to use any other iCloud interfaces, you must call the
URLForUbiquityContainerIdentifier: method to determine if iCloud is enabled. This method returns
a valid URL when iCloud is enabled (and the specified container directory is available) or nil when iCloud
is disabled.
The first time you call the URLForUbiquityContainerIdentifier: method for a given container directory,
iOS extends your application sandbox to include that container directory. Thus, it is important that you call
this method at least once to ensure that iCloud is enabled and that your main container directory is accessible.
And if your application accesses multiple container directories, you should call the method once for each
directory.
Incorporating File Presenters into Your Workflow
All files and directories stored in iCloud must be managed by a file presenter object, and all changes you
make to those files and directories must occur through a file coordinator object. A file presenter is an object
that adopts the NSFilePresenter protocol. A file presenter’s job is to act as a responsible agent for a given
file or directory. Before an external source can change a file, the registered file presenters for that file are
notified and given an opportunity to perform any necessary bookkeeping tasks. When your app wants to
change a file, it must essentially lock the file by making its changes through an NSFileCoordinator object.
The file coordinator prevents external sources from modifying the file at the same time and delivers relevant
notifications to other file presenters.
The simplest way to incorporate file presenters into your app is to use the UIDocument class. This class
implements the methods of the NSFilePresenter protocol and handles all of the file-related management
for you. All your app has to do is read and write the document data when told to do so. You can use the
UIDocument class both for files that contain user-generated content (and thus are displayed directly to the
user) and for files that your app creates on behalf of the user and manages without user intervention.
For more information about how to incorporate the UIDocument class into your app’s data structures, see
Document-Based Application Programming Guide for iOS. For information on how to create custom file presenters
to manage files and directories, see File System Programming Guide.
Manipulating Files and Directories in iCloud
Apps use the same technologies to manage files and directories in iCloud that they do for local files and
directories. Files and directories in iCloud are still just files and directories. You can open them, create them,
move them, copy them, read and write from them, delete them, or any of the other operations you might
want to do. The only differences between local files and directories and iCloud files and directories is the
URL you use to access them. Instead of URLs being relative to your app’s sandbox, URLs for iCloud files and
directories are relative to the corresponding iCloud container directory.
66
Using iCloud Document Storage
2011-10-12 | © 2011 Apple Inc. All Rights Reserved.
CHAPTER 4
iCloud Storage
To move a file or directory to iCloud:
1. Create the file or directory locally in your app sandbox.
While in use, the file or directory must be managed by a file presenter, such as a UIDocument object.
2. Use the URLForUbiquityContainerIdentifier: method to retrieve a URL for the iCloud container
directory in which you want to store the item.
3. Use the container directory URL to build a new URL that specifies the item’s location in iCloud.
4. Call the setUbiquitous:itemAtURL:destinationURL:error: method of NSFileManager to move
the item to iCloud. Never call this method from your app’s main thread; doing so could block your main
thread for an extended period of time or cause a deadlock with one of your app’s own file presenters.
When you move a file or directory to iCloud, the system copies that item out of your app sandbox and into
a private local directory so that it can be monitored by the iCloud daemon. Even though the file is no longer
in your sandbox, your app still has full access to it. Although a copy of the file remains local to the current
device, the file is also sent to iCloud so that it can be distributed to other devices. The iCloud daemon handles
all of the work of making sure that the local copies are the same. So from the perspective of your app, the
file just is in iCloud.
All changes you make to a file or directory in iCloud must be made using a file coordinator object. These
changes include moving, deleting, copying, or renaming the item. The file coordinator ensures that the iCloud
daemon does not change the file or directory at the same time and ensures that other interested parties are
notified of the changes you make.
Note: When naming files and directories, use the alphanumeric character set as much as possible and avoid
special punctuation or other special characters. You should also assume that filenames are case insensitive.
Keeping your filenames simple helps ensure that those files can be handled correctly on different types of
file systems.
For more information about how to manipulate files and directories, see File System Programming Guide.
Choosing a Strategy to Respond to Version Conflicts
Version conflicts for files in iCloud are inevitable, and so your app needs to have a strategy for handling them.
Conflicts occur when two instances of an app change a file locally and both changes are then transferred to
iCloud. For example, this can happen when the changes are made while the device is in Airplane mode and
cannot transmit changes to iCloud right away. When it does happen, iCloud stores both versions of the file
and notifies the apps’ file presenters that a conflict has occurred and needs to be resolved.
Apps should always attempt to resolve conflict versions as soon as possible. When a conflict occurs, one file
is always designated as the current file and any other versions are marked as conflict versions. Both the
current file and any conflict versions are managed by instances of the NSFileVersion class and can be
retrieved using class methods of that class.
To resolve a conflict:
1. Get the current file version using the currentVersionOfItemAtURL: class method.
2. Get an array of conflict versions using the unresolvedConflictVersionsOfItemAtURL: class method.
Using iCloud Document Storage 67
2011-10-12 | © 2011 Apple Inc. All Rights Reserved.
CHAPTER 4
iCloud Storage