Beginning Visual Basic .NET Database Programming phần 9 pptx
Bạn đang xem bản rút gọn của tài liệu. Xem và tải ngay bản đầy đủ của tài liệu tại đây (1 MB, 69 trang )
Chapter 13
42
The response entry clearly shows us what was returned to the client:
<?xml version="1.0" encoding="utf-8"?>
<soap:Envelope xmlns:soap=" />xmlns:xsi=" />xmlns:xsd=" /> <soap:Body>
<GetShippingDetailsResponse xmlns=" /> <GetShippingDetailsResult>
<RequestOk>true</RequestOk>
<RequestProblem xsi:nil="true" />
<HasBeenShipped>true</HasBeenShipped>
<ShippedDate>1996-07-16T00:00:00.0000000+01:00</ShippedDate>
<ShippingMethod xsi:nil="true" />
<ShippedToName>Vins et alcools Chevalier</ShippedToName>
<ShippedToAddress>59 rue de l'Abbaye</ShippedToAddress>
<ShippedToCity>Reims</ShippedToCity>
<ShippedToRegion xsi:nil="true" />
<ShippedToPostalCode>51100</ShippedToPostalCode>
<ShippedToCountry>France</ShippedToCountry>
</GetShippingDetailsResult>
</GetShippingDetailsResponse>
</soap:Body>
</soap:Envelope>
Again, I've highlighted the important parts in gray. This XML will be used to populate our
ShippingDetailsResult object on the client.
One thing to watch when using proxyTrace is that, if you send another request, another entry might not
appear in the list on the left. Whenever a request is made, the connection remains open for a short time.
(This makes communication more efficient.)
If you don't see the new request, but connected is shown in the Status column, you'll have to select
another request in the list and then reselect the original one. Unfortunately, you can't just click on the
blank area of the list to select nothing and then flip back again so, if you only have one request, close
and restart proxyTrace.
How It Works
proxyTrace acts as a proxy server, intercepting and examining requests for web resources before
forwarding them on to the server. Most proxy servers let you examine the data that they handle and
that, of course, is the sole purpose of proxyTrace.
It is useful for situations when you're getting errors from a Web Service as you can determine whether
or not the service is returning the expected response. If the Web Service does appear to be working
properly, you know that the problem must lie in the client-side code.
In my experience, I've found the tool extremely useful for capturing errors returned from the Web
Service. .NET doesn't properly trap SOAP Fault messages from some Web Service implementations,
and comes up with some fairly cryptic messages, like this one:
Web Services
43
If you get an error similar to this when calling a web method, crack out proxyTrace and look at the
response packet. You might find something like this:
<SOAP-ENV:Fault>
<faultcode>SOAP-ENV:Client</faultcode>
<faultstring>Client Error</faultstring>
<faultactor>lcTk##SBA-CSOAPBusinessArea-SOAP</faultactor>
<detail>
<e:details xmlns:e=" /> <message>ERR: Schema for that business area and process
are missing</message>
<errorcode>57126</errorcode>
</e:details>
</detail>
</SOAP-ENV:Fault>
If you get an error like this and can't figure out how to fix it, try contacting the Web Service
owner for advice.
Directory Services
Although it's likely that, in time, you'll want to build your own Web Services, there are a growing
selection of Web Services supplied by third-party sources for us to use.
The question remains, however, of how to find these Web Services once companies have made
them available.
In the next two sections, we'll take a look at how to use two kinds of directory services to find Web
Services, namely UDDI and brokerages.
UDDI
UDDI, for Universal Description, Discovery, and Integration, is a type of directory geared towards
business process integration. They are mainly used if you are looking for a business partner that
provides some specific task, and who publishes a Web Service for that task.
Chapter 13
44
The UDDI initiative was jointly launched by Microsoft, IBM, and Ariba in May 2001. Although all
three organizations were to maintain sites that would allow searching and administration of a single
directory, after a little over a month Ariba announced that Microsoft and IBM would be responsible for
managing the directory. It's also expected that by the time this book is published, Hewlett-Packard will
have another site. All of these sites synchronize their data so that it won't matter which of the two or
more sites are used to query UDDI.
The ultimate goal of UDDI is to bring business partners together. Once they've done this, the
companies can either interact in the usual way, that is through e-mails and phone calls, or they can use
the directory to obtain the WSDL documents that describe the Web Service that each offers.
Let's take a look now at how a book distributor looking for potential new publishers might go about it.
We'll also see how that publisher could find the Web Service that will allows orders to be placed
automatically.
Although we're going to look at the case of a Web Service for distributors to place
orders, the service doesn't really exist. This is a hypothetical scenario for
demonstration purposes.
Remember, the WSDL document is all you need to consume a Web Service, by following the same
steps we took for the NorthwindWebService service.
Try It Out – Finding a Business Partner with UDDI
1. Microsoft and IBM each manage two directories. One is a live site that provides working
business information and the other is a test site for testing how UDDI actually works. I've
registered a sample set of services on the Microsoft UDDI test site. Open a web browser and
go to />2. To find a business partner, you must either know their name, or know something about their
business. In this hypothetical case, we're looking for book publishers. Standard Industry
Classifications (SIC) codes can do this and, as long as you know the SIC code, tools on the site can
find everyone in the specified category. Luckily, I happen to know that book publishing comes
under Manufacturing | Printing and Publishing | Books and that the code we want is 2730.
Click the Advanced Search link on the UDDI page, and enter the following:
3. Click the arrow button next to the drop down to bring up a list of businesses:
Web Services
45
4. Click on Wrox Press. This will bring up the company listing. Half way down the page you'll
find an entry marked Services. This is a list of the services that the company offers. These
aren't limited to Web Services, and can include traditional services offered by the company:
5. Click BookBuyer. This will bring up a list of bindings, which are particular to Web Services,
and you'll find a single binding on this page that points to a WSDL file:
6. Right-click on the URL of the WSDL file to bring up the context menu, and select Copy
Shortcut.
7. Open Visual Studio .NET and select New Visual Basic project | Windows Application. Call it
BookBuyer. The name doesn't matter too much because we'll throw it away after having used
it to demonstrate the principles here.
8. Right-click on the BookBuyer project in Solution Explorer and select Add Web Reference.
9. Right-click the URL box at the top and select Paste. Click the green arrow. This will
download the WSDL file from the Wrox site ready for use:
Chapter 13
46
As the Web Service described by the WSDL file doesn't in reality exist, we'll stop our discussion here.
Hopefully, though, you now understand how UDDI works. We use the tools supplied to find a business
partner in the directory and, ultimately, a URL (a "binding") for their Web Service.
Had this been a real, existing Web Service, we'd just need to click the Add Reference button to get
Visual Studio .NET to create the classes that consume the service. With those new classes in place, we
could then start using the service straight away.
Web Service Brokerages
With UDDI, we saw an example of a Web Service directory that can help us find commercial business
partners that expose Web Services as part of their line of business. This is just half the market. Over the
coming months, we can expect to see companies deploy Web Services that add useful functionality to
our applications. This is, after all, the central premise of Web Services – "software as services".
Microsoft's push into this area was initially dubbed Hailstorm, but is now known as ".NET My
Services". This describes a set of common, fundamental services that web sites and desktop applications
are likely to want to use. My Services will include the "Passport" concept and other central Internet-
based services such as a diary, a file storage facility, and so on. At the time of writing, however, My
Services is still very much hype, so we're not going to dwell on it here.
Another way to sift through the hundreds of Web Services coming on to the market is through a Web
Service brokerage, such as Salcentral ( or Grand Central
( />
Chapter 13
48
❑ The TextBox controls (from top to bottom) need to have their Name property set thus:
❑ txtPhoneNumber
❑ txtMessage – this control also needs its Multiline property set to True
❑ txtSenderId
❑ txtSendPasskey
The Label control marked (chars) needs to have its Name property set to lblChars. Call the
CheckBox chkUseProxy and set its Checked property to True. Also the button needs to be
called btnSendMessage.
3. There is a limit to the number of characters that can be sent through to the service, so we want
to keep the user informed of how much space is left for the message. The maximum length of
the message is 120 characters and this includes the length of the sender ID, the word "from", and
two spaces. Double-click on the txtMessage control and add the method call highlighted
below to the event handler, followed by the UpdateCharacterCount method itself:
Private Sub txtMessage_TextChanged(ByVal sender As System.Object, _
ByVal e As System.EventArgs) Handles txtMessage.TextChanged
UpdateCharacterCount()
End Sub
Private Sub UpdateCharacterCount()
' add the number of chars
Dim numChars As Integer = " from ".Length
numChars += txtMessage.Text.Length
numChars += txtSenderId.Text.Length
' report the length
lblChars.Text = numChars & " characters"
If numChars > 120 Then
Web Services
49
lblChars.ForeColor = Color.Red
Else
lblChars.ForeColor = SystemColors.ControlText
End If
End Sub
4. Flip back to the Form Designer and double-click on the txtSenderId box. Add this code to the
new event handler:
Private Sub txtSenderId_TextChanged(ByVal sender As System.Object, _
ByVal e As System.EventArgs) Handles txtSenderId.TextChanged
UpdateCharacterCount()
End Sub
Referencing the Web Service
Now that we've built the basic form, we are ready to add a reference to the SMS service on Salcentral's site.
Try It Out – Adding a Web Reference
1. Open your browser and go back to the page. On
this page you'll find a link to the WSDL file describing the Web Service. It will look
something like this:
:83/lucin/SMSMessaging/Process.xml
2. Select the entire URL with your mouse, and choose Edit | Copy from the menu.
3. Go back to Visual Studio . NET, right-click on the SMS project in Solution Explorer, and
select Add Web Reference.
4. In the Address bar at the top, paste in the URL copied from Salcentral. Click the green arrow
button. The WSDL file will be loaded and displayed in the left pane:
Chapter 13
50
5. Click the Add Reference button to add a reference to the service to our project.
6. The new reference will appear as com.salnetwork.sal006 or something similar. Right-click on
this and select Rename. Change the name to SMSService and press Return:
Sending Messages
With the reference added, Visual Studio .NET has automatically created a class to access the service,
and all we have to do is create an instance of the class and call the SendMessage method.
Web Services
51
Try It Out – Calling a Web Method
1. Open Form1 in Design view, and double-click on the Send Message button to create a new
Click handler. Add this code:
Private Sub btnSendMessage_Click(ByVal sender As System.Object, _
ByVal e As System.EventArgs) Handles btnSendMessage.Click
' create a new message box
Dim smsService As New SMSService.SMSMessagingprocessService()
' make sure the message goes through proxytrace
If chkUseProxy.Checked = True Then
smsService.Proxy = New System.Net.WebProxy("localhost", 8080)
End If
' send the message
Try
' did we do it?
Dim result As Boolean = smsService.SendMessage( _
txtPhoneNumber.Text, txtMessage.Text, _
txtSenderId.Text, txtSendPasskey.Text)
If result = True Then
MsgBox("The message was sent to " & txtPhoneNumber.Text & ".")
Else
MsgBox("The message could not be sent.")
End If
Catch ex As Exception
' we got an exception
MsgBox("An exception occured. " & ex.Message)
End Try
End Sub
2. Open proxyTrace and tell it to connect to port 8080. (We covered proxyTrace earlier, so if
you need a refresher go back a few pages.)
3. Run the project. Phone numbers have to be entered in international format. If necessary, this
means you must drop the first zero of the number, and add a plus sign followed by the
international dialing code for that country, for instance:
❑ For the US, numbers are prefixed with 1, so 06025551234 is +16025551234.
❑ For the UK, the dialing code is 44, so 07790123456 becomes +447790123456.
Enter any message you like, but remember to set the sender ID and passkey fields to whatever
you were given at the end of the registration process:
Chapter 13
52
4. Click the Send Message button. If you see a message confirming that everything went OK,
then great! If you didn't, you should get a message describing the problem.
How It Works
We've already seen how to create a connection to a Web Service just by creating a class, and here we
use the same technique again:
Private Sub btnSendMessage_Click(ByVal sender As System.Object, _
ByVal e As System.EventArgs) Handles btnSendMessage.Click
' Create a new message box
Dim smsService As New SMSService.SMSMessagingprocessService()
This time, however, we've added a check box to the form that allows us to control whether or not to use
proxyTrace:
' Send the message via proxyTrace
If chkUseProxy.Checked = True Then
smsService.Proxy = New System.Net.WebProxy("localhost", 8080)
End If
When we come to send the message, we simply extract the values from the four TextBoxes and pass
them through to SendMessage:
' Send the message
Try
' Did we do it?
Dim result As Boolean = smsService.SendMessage( _
txtPhoneNumber.Text, txtMessage.Text, _
txtSenderId.Text, txtSendPasskey.Text)
If result = True Then
Web Services
53
MsgBox("The message was sent to " & txtPhoneNumber.Text & ".")
Else
MsgBox("The message could not be sent.")
End If
Everything is wrapped in a Try Catch block, which helps us if something goes wrong. The "The
message could not be sent" call is really redundant as, if the message could not be sent, an exception
would be thrown so this will never actually be called.
If an exception is thrown, we need to tinker with it a little to get the actual exception that was raised by
the server. The layer of code between us and the Web Service will raise its own exception if something
goes wrong, so we need to iterate through the InnerException property up to the last one. This will
be the actual exception raised on the server. We didn't concern ourselves with this before as it was
unlikely to happen, but here it's very real possibility and must be catered for:
Catch ex As Exception
' We want the exception thrown by the service, not the .NET layer
Do While Not ex.InnerException Is Nothing
ex = ex.InnerException
Loop
When we have the exception, we report it to the user.
' Report the exception
MsgBox("An exception occured. " & ex.Message)
End Try
End Sub
I hope that this section has shown you just how easy it is to find new Web Services and add some pretty
cool functionality to your applications. All we had to do was use the Add Web Reference dialog, create
an object, and call a method. Kid's stuff!
Summary
We started off this chapter by taking a look at what a Web Service is, and we likened a Web Service to a
web site designed to be accessed by a computer rather than a person.
We then looked at how to build a Web Service, creating one as an example that would allow customers
to view their own orders placed with the Northwind system. We devised and implemented a basic
security system, and finally tested the service.
With our service created, we built a reference client implementation, using Visual Studio .NET's tools to
automatically generate classes to consume the Web Service. After illustrating how simple this is, we
looked at a debug tool to view the SOAP messages traveling between client and server and added
extended error reporting to the service itself. To finish off, we looked at a number of ways of finding
new Web Services.
Chapter 13
54
Exercises
1. What does SOAP stand for?
2. How much harder is it to use complex types with a Web Service, as opposed to the simple
types like Integer and String?
3. How can we find new Web Services that fulfill our business needs?
4. Why must we implement some form of security scheme on our services?
5. If you encounter unexpected problems when consuming a Web Service, what is a good first
step to resolve the problem?
6. How do we consume a Web Service from a .NET project?
Answers are available at />
Chapter 13
56
Disconnected Data
With.NET, Microsoft is trying to answer their critics and make deployment of Windows desktop
applications far easier. Eventually, we'll get to a point where we can build an application for the local
area network (LAN), deploy it "on demand" from a central Web server, and let .NET worry about
installation and security hassles. There is a natural extension to this paradigm – we can use .NET to
build an application that works identically whether it's running on the LAN or running from an
employee's DSL or cable modem connection.
This last line is specifically what we are going to look at in this chapter. Through this chapter, we are
going to build an application that accesses a database either locally or by using a Web Service.
Specifically, we are going to:
❑ Look at how and why we would want to use disconnected data
❑ Build a basic application to directly retrieve data
❑ Add functionality to our application to allow us to retrieve the data both directly and remotely
❑ Add the code to allow us to change any data and save the changes to the database
Disconnected Data Access
With the invention of the intranet, it finally became possible for an organization's computer systems to
be made available without installing complex applications at many remote locations. As most modern
organizations are powered by their applications, the intranet made it possible for employees to
"unchain" themselves from their desk and start working from home, or access the same rich productivity
tools from customer sites, hotel rooms, and Internet cafés.
However, there is a problem with intranet technologies – you're forced to use a Web browser in order
to use an intranet. Although Web browser technology has come along in leaps and bounds in recent
years, the user interface that you can build with a Web browser is harder to develop and use than a
traditional Visual Basic application.
Chapter 14
2
Without using an intranet, the only way to make your organization's applications available outside of
the LAN is to physically install it wherever you're working. This, in the world before .NET, was
difficult, mainly because the choices Microsoft made with the architecture of their component solutions
had the effect that installing applications was difficult. With DLL version conflicts and COM component
problems, deploying applications in this way has always been complex. This explains part of the
motivation for moving towards using intranet applications on the LAN rather than a standalone
application. The deployment problems go away because all the user needs to do is point his or her
browser at a URL to access the application.
Deploying applications with .NET is now so easy that, in theory, if you want to get your organization's
desktop applications working on your home machine, all you have to do is follow a link on the web
page and the application will be installed first time. Likewise, deployment and maintenance of
applications within the organization becomes far easier too.
There is, however, one small caveat with this. Companies that care about security will separate their
local network from the Internet by use of a firewall. This firewall lets employees send e-mail, browse the
Web, and so on, but will not let intruders gain access to private company resources. Typically, your
application's database will be "behind" the firewall, that is, accessible to employees but inaccessible to
anyone outside of the LAN.
But, what happens when we put our application outside of the firewall? We won't be able to get at our data!
What we need to do is provide an alternative way for our application to get its data. In effect, we want
to move away from the method of retrieving data whereby we are directly connected to the data. We
want to start using a technique that allows the same application to get its data from a variety of different
sources without changing the client code.
In this chapter, we'll build a client application that can automatically detect whether it has a direct
connection to the database or not. If a direct connection cannot be made, it will get its data by
connecting to a Web Service. If it can, it will connect directly and use the various classes in the
System.Data.SqlClient namespace as we've already seen.
A Data Access Layer
In this application, we're going to build a data "provider". Rather than going directly through classes in
the System.Data.SqlClient namespace, as we have been doing so far, we're going to access data
through this provider. This provider will have the intelligence to know whether it should be drawing
data directly from the database or through a Web Service.
We'll do this by inserting a layer between the application calls that require database access and the
database itself. This layer will either connect directly to the database (through the SqlClient objects
like we have been doing), or indirectly through a Web Service. This Web Service will then act as a
proxy for the application's instructions, passing them on to the database in the usual way.
Disconnected Data
3
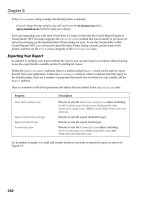
Database Server
Database Package
Inside LAN
The database package
provides the application
with the data it needs in
order to function properly.
The application uses an
“access layer” to connect
to the database package
when running on the LAN
Outside LAN
The Internet
Web Service
Web Server
If the same application
is running remotely, the
access layer connects
to the Web Service to
get the data it needs
Application
Access Layer
Application
Access Layer
User
Remote User
Firewall
Firewall
What this means is that we can build one application that works both inside and outside of the LAN. If the
layer can make a direct connection to the database of choice, then it will work in "direct" mode. If the
layer cannot connect directly, it will connect to a Web Service instead. We'll call this the "remote" mode.
Building the Application
In this chapter, we'll build a single desktop application for editing product information on the
NorthwindSQL database. This application will use a data provider class to determine whether a direct
or remote connection is required.
The first thing that we should do is to build the basic Product Editor application. This is a simple
application to demonstrate the principle behind an application that can consume data from the provider
that we'll build a little while later.
Try It Out – Building the Application
1. Open Visual Studio .NET and select File | New | Project from the menu. Create a new Visual
Basic Windows Application project and call it Product Editor.
Chapter 14
4
2.
The Form designer for Form1 will automatically open. Layout a DataGrid, Label, TextBox,
and Button control as shown here:
3. Change the properties of the controls like so:
❑ Form1 - Text property to Northwind Product Editor
❑ Label (Label1) - Text property to "Product ID:"
❑ DataGrid - Name property to dgdProducts, and Anchor property to Top, Bottom,
Left, Right
❑ TextBox - Name property to txtProductId and Text property to "1"
❑ Button - Name property to btnLoad, and Text property to "Load"
4. Using the Toolbox, paint on a StatusBar control. This kind of control automatically docks
itself to the bottom of the form, so you might have to increase its height (with the Size
property) to make it visible. Set its ShowPanels property to True.
5. Find the Panels property of the StatusBar control. Select it and an ellipsis ("…") button should
appear. Click this to open the Collection Editor.
6. Press the Add button to add a new panel. Change these properties:
❑ Name - change to pnlStatus
❑ Text - change to Ready
❑ AutoSize - change to Spring. This will cause the panel to adjust itself so that it is
constantly just a little bigger than the size of the text contained within.
7. Press the Add button again to add another panel. Change these properties:
❑ Name - change to pnlConnection
Disconnected Data
5
❑ Text - change this to Not connected
❑ AutoSize - change to Contents
8. After pressing OK, you should now see this:
We're using the StatusBar control to indicate to the users of the application whether or not they are
connected to the intranet and, if they are connected, whether they are connected directly or remotely.
9. Using Solution Explorer, open the code editor for Form1 by right-clicking on it and selecting
View Code.
10.Add this property (we haven't shown the Windows Form Designer generated code here –
don't delete it):
Public Class Form1
Inherits System.Windows.Forms.Form
' StatusText property
Public Property StatusText() As String
Get
Return pnlStatus.Text
End Get
Set(ByVal Value As String)
' Put something default if we use blank
If Value = "" Then
pnlStatus.Text = "Ready"
Else
pnlStatus.Text = Value
End If
End Set
End Property
End Class
Chapter 14
6
11.
Next, add these two methods:
' SetProcessText
Public Sub SetProcessText(ByVal message As String)
StatusText = message
Me.Cursor = Cursors.WaitCursor
End Sub
' ResetProcessText
Public Sub ResetProcessText()
StatusText = ""
Me.Cursor = Cursors.Default
End Sub
How It Works
In the last two steps, we've added code to control the way the status bar is updated. Firstly, we added a
property, StatusText, that abstracts the Text property of pnlStatus.
Get
Return pnlStatus.Text
End Get
If the Status property is set to a blank string, the text on the bar is set to Ready.
If Value = "" Then
pnlStatus.Text = "Ready"
Else
pnlStatus.Text = Value
End If
Secondly, we added two methods to our form, SetProcessText and ResetProcessText. When
the application is running, it periodically needs to "do something". If the task may take a while, the
application will call these methods in order to set the text on the panel and also change the mouse
cursor used by the form to an hourglass cursor and back to an arrow.
Public Sub SetProcessText(ByVal message As String)
StatusText = message
Me.Cursor = Cursors.WaitCursor
End Sub
Public Sub ResetProcessText()
StatusText = ""
Me.Cursor = Cursors.Default
End Sub
That will do for the basic form layout. Let's look now at how we can retrieve information from the
database.
Disconnected Data
7
Retrieving Products
We're going to encapsulate all of the database functionality in a separate class library. The first step
in achieving this goal is to put together a stored procedure that can return the product information to
the caller.
Try It Out – Creating the Stored Procedure
1. To build the stored procedure, we'll use the Server Explorer in the usual way. If it is not
already visible, open the Server Explorer by selecting View | Server Explorer from the menu.
2. We'll prefix the names of the stored procedures that we build as part of this exercise with the
word "Provider". This will help us keep them separate from other stored procedures that
may already be in the database.
3. Using the Server Explorer, drill down until you find the Stored Procedures node of the
NorthwindSQL database. (In this screenshot, my server is called chimaera. Your machine will
have a different name.)
4. Right-click on the Stored Procedures node and select New Stored Procedure. Add this code
in place of the existing code:
CREATE PROCEDURE dbo.ProviderGetProductDetails
(
@productId INT
)
AS
Chapter 14
8
SELECT ProductID, ProductName, SupplierID, CategoryID,
QuantityPerUnit, UnitPrice, UnitsInStock,
UnitsOnOrder, ReorderLevel, Discontinued
FROM Products WHERE ProductID=@productId
5. Press Ctrl+S to commit the stored procedure to the database.
6. To test the stored procedure, right-click on the code editor and select Run Stored Procedure.
When prompted, enter 1 for the product ID:
7. After pressing OK, the Output window should appear and the details of the product with a
ProductID of 1 should be displayed:
How It Works
What we've done here is put together a simple stored procedure that returns all rows from the
Products table when given a particular ProductID.
SELECT ProductID, ProductName, SupplierID, CategoryID,
QuantityPerUnit, UnitPrice, UnitsInStock,
UnitsOnOrder, ReorderLevel, Discontinued
FROM Products WHERE ProductID=@productId
Disconnected Data
9
In our application, the user will be expected to enter a Product ID and then click the Load button. We'll
build this functionality in a moment but, when this happens, the ProviderGetProductDetails
stored procedure that we've just built will be executed and the results returned.
The "Provider" Class
As we mentioned before, we're going to build a separate class library, called Northwind Provider, which
our application will use to get data from the database. This library will be accessed through shared
methods and properties on a class called Provider.
The Provider object will eventually have the intelligence to determine whether or not it needs to use
a direct or remote connection. However, in the next few sections, we're going to manually tell it what it
should be connecting to.
Architecturally speaking, we're going to build an abstract class that contains the various methods that
the application will need: GetProductDetails, GetAllSuppliers, SetProductDetails, and so
on. We'll then create two classes derived from this abstract class that actually know how to get the data
that they've been asked for – one for direct connections and one for remote connections.
An abstract class is one that objects cannot be instantiated from directly. Instead, we have to create
instances of a derived class, which inherits from the abstract class. Objects can then be instantiated
from these derived classes.
The first thing we need to do is create the new project that will contain the class library.
Try It Out – Creating the "Northwind Provider" Class Library
1. Using Solution Explorer, right-click on the Product Editor solution right at the top and select
Add | New Project.
2. Make sure that a Visual Basic Class Library is selected as the project type and enter the name
as Northwind Provider.
3. We want a better name for the class than Class1. Right-click on Class1 in the Solution
Explorer, select Rename, and call it Provider. Then click on the View Code button and add
this enumeration to Provider:
Public Class Provider
' Enumerations
Public Enum ConnectionModes As Integer
NotConnected = 0
Direct = 1
Remote = 2
End Enum
End Class
4. Now add these members:
Chapter 14
10
Public Class Provider
' Enumerations
Public Enum ConnectionModes As Integer
NotConnected = 0
Direct = 1
Remote = 2
End Enum
' Members
Private Shared _connectionMode As Provider.ConnectionModes = _
ConnectionModes.NotConnected
' Remember to change the data source to your server name!
Public Shared DbString As String = _
"Integrated Security=SSPI;Initial Catalog=NorthwindSQL;Data Source=CHIMAERA"
' Web Service
Public Shared ServiceUrl As String = _
"http://localhost/NorthwindProviderService/ProviderService.asmx"
Public Shared Proxy As System.NET.WebProxy
End Class
Remember! You'll need to change the Data Source member of the connection string
from CHIMAERA (my computer) to whatever your computer is called.
5. Right-click on Northwind Provider and select Add | Add Class. Call the class
ProviderConnection. Add this code, including the MustInherit keyword to the first line.
This means that we cannot create instances of ProviderConnection classes directly.
Instead, we have to derive from this class and create new instances of the derived classes.
Public MustInherit Class ProviderConnection
' Get the details for a product
Public MustOverride Function GetProductDetails(ByVal _
productId As Long) As DataSet
End Class
6. Create another new class to Northwind Provider called DirectConnection. Add this code:
Imports System.Data.SqlClient
Public Class DirectConnection
Inherits ProviderConnection
' Return the details for a product
Public Overrides Function GetProductDetails(ByVal productId As Long) _