Teach Yourself E-Commerce Programming with ASP in 21 Days phần 2 ppsx
Bạn đang xem bản rút gọn của tài liệu. Xem và tải ngay bản đầy đủ của tài liệu tại đây (391.15 KB, 62 trang )
04 0672318989 ch02 3/29/00 4:01 PM Page 46
DAY
3
WEEK 1
Using Application
and Session Objects in
E-Commerce Applications
In today’s lesson, we’ll continue our review of Active Server Pages program-
ming. The majority of this lesson focuses on methods of tracking the customers
who visit your Web site. You can use this ability to track customers to offer per-
sonalized content.
The ability to track customers and personalize content is important because you
can use it to increase sales. To take a simple example, you might want to dis-
play different advertisements to different customers depending on their inter-
ests. If you have recorded the fact that a certain customer likes looking at pages
in your Web site related to fishing rods, you can automatically show this cus-
tomer more advertisements related to fishing rods.
Today, you will learn the following:
• How to add cookies to customers’ browsers so that you can automatically
identify customers whenever they return to your Web site.
05 0672318989 ch03 3/30/00 8:23 AM Page 47
• How to use Session and Application variables to store persistent information.
• How to use the Global.asa file to detect when customers first arrive at your Web
site and when they leave.
Tracking Customers with Cookies
Cookies have gotten a lot of media attention lately because of fears that they pose a
threat to people’s privacy. You can use a cookie to store information on a customer’s
computer when the customer visits your Web site. You can then use this information to
identify the customer once again whenever the customer returns to your Web site.
Cookies were developed by Netscape to fix a perceived deficit in the way that Web
servers and Web browsers interact. Without cookies, the interaction between Web servers
and browsers is stateless. You cannot identify the same user of your Web site as the user
moves from page to page.
48 Day 3
Where did the term “cookie” come from? Lou Montulli, the person who
wrote the original cookie specification for Netscape, explains “A cookie is a
well-known computer science term that is used when describing an opaque
piece of data held by an intermediary. The term fits the usage precisely; it’s
just not a well-known term outside of computer science circles.”
Note
The stateless nature of Web server and browser interaction creates a number of problems
for Web site developers. For example, imagine you have created a special area of your
Web site that contains content which only registered members can view. Without using
cookies, it is difficult to track whether a particular user is a registered member. If the
user logs in on one page, it is difficult to detect whether it is the same user on another
page.
A good source of information on cookies is the Cookie Central Web site
located at
.
Note
There are two types of cookies: session cookies and persistent cookies. Session cookies
are stored in memory. They last on a customer’s computer only while the customer is vis-
iting your Web site.
05 0672318989 ch03 3/30/00 8:24 AM Page 48
Using Application and Session Objects in E-Commerce Applications 49
3
A persistent cookie, on the other hand, can last many months or even years. Persistent
cookies are stored in a text file on the customer’s computer. This text file is called the
Cookie file on Windows computers and the Magic Cookie file on Macintosh computers.
Netscape Navigator and Internet Explorer store persistent cookies a little differently.
Netscape stores all the cookies from every Web site in one file named “Cookies.txt”. You
can find this file under the /Netscape or /Netscape/User/Username folder. For example,
here are the contents of the Netscape Navigator cookie file on my computer:
# Netscape HTTP Cookie File
# /># This is a generated file! Do not edit.
.superexpert.com TRUE / FALSE 965026643 u steve
.superexpert.com TRUE / FALSE 965026643 p secret
www.webtrends.com FALSE / FALSE 1293753685 WEBTRENDS 4MNFP9Z98A
.flycast.com TRUE / FALSE 1293753600 atf 1_4880095465
.doubleclick.net TRUE / FALSE 1920499052 id d6685383
As you can see, my cookie file contains five cookies. The first two cookies were created
by the superexpert Web site. The first cookie is named “u” (which stands for username)
and has the value “steve”. The second cookie is named “p” (which stands for password)
and it contains my secret password at superexpert (well, not really). My cookie file also
contains cookies added by Webtrends (a company that produces a popular log analysis
tool for Internet Information Server) and the two advertising networks Flycast and
DoubleClick.
Microsoft Internet Explorer creates a separate cookie file for each Web site. All these
files are located in the /Windows/Cookies folder. For example, on my computer, I have a
cookies file named “” that was created by the Amazon Web
site.
It is important to understand that a Web site can read only the cookies it has set. For
example, if you visit both the Amazon and superexpert Web sites, and both sites add a
cookie to your computer, Amazon can read only its own cookies and not any cookies set
by superexpert. So, if you add a cookie to a customer’s computer, only you or the cus-
tomer can view the contents of the cookie.
05 0672318989 ch03 3/30/00 8:24 AM Page 49
It is also important to understand that not all browsers support cookies. There are a num-
ber of reasons why a browser might not support cookies. First, some people dislike cook-
ies because of privacy worries, and they have disabled cookies on their browser. Second,
cookie files have a tendency to become corrupted for one reason or another. Finally, even
though cookies have been around since Netscape Navigator 1.0, for some mysterious rea-
son, there are still some browsers that do not support cookies.
You should never assume that a customer has cookies enabled on their browser. For
example, a perfectly legitimate use of cookies is to automatically log in a user at your
Web site. If you do this, however, you should include a way for users who do not have
cookies enabled to log in.
Adding a Cookie to a Customer’s Browser
You can add a cookie to a customer’s browser by using the Cookies collection of the
Response object. For example, imagine that you want to add a cookie named
customerName that contains a customer name. To add this cookie, you would use the fol-
lowing statement:
Response.Cookies( “customerName” ) = “Ruth Johnson”
This statement adds a cookie named “customerName” that has the value “Ruth
Johnson”. The cookie that is created is a session cookie. It last only while the customer
is visiting your Web site.
To create a persistent cookie, you must include the date when the cookie will expire. You
do this by using the
Expires attribute of the Cookies collection. For example, the fol-
lowing two statements create a cookie that will last until July 4, 2002:
Response.Cookies( “customerName” ) = “Ruth Johnson”
Response.Cookies( “customerName” ).Expires = “July 4, 2002”
When creating cookies, you must create the cookie before any content is sent to the
browser. Otherwise you will receive the following error:
50 Day 3
Advertising networks, like Flycast and DoubleClick are able to work around
the rule that a cookie can only be read by the Web site that creates it. They
use a trick. When a Web site displays a banner advertisement from one of
these networks, the advertisement is actually retrieved from the advertising
network’s servers. Therefore, an advertising network can set and read a
cookie from any Web site that displays its advertisements. This means that
advertising networks can track users as they move from Web site to Web
site.
Note
05 0672318989 ch03 3/30/00 8:24 AM Page 50
Using Application and Session Objects in E-Commerce Applications 51
3
Header Error
The HTTP headers are already written to the client browser. Any HTTP header
modifications must be made before writing page content.
If you want to get around this limitation, you can buffer your ASP page. When you
buffer an ASP page, the page is not sent immediately to a browser. It is retained in mem-
ory until the whole page is processed. To buffer an ASP page, include the following
statement at the top of the page:
<% Response.Buffer = TRUE %>
Internet Information Server 5.0 buffers all pages by default. However, the
Personal Web Server and versions of Internet Information Server before
version 5.0, do not buffer page content unless the property is explicitly
enabled.
Note
You can place any content that you please in a cookie. However, you should be aware of
some of the limitations of cookies. According to the original cookie specification (see
a single computer can
hold a maximum of 300 cookies from all Web sites. Furthermore, a single Web site can-
not add more than 20 cookies to a customer’s computer. Finally, an individual cookie can
hold no more than 4KB of data. This limit applies to a combination of the size of the
cookie’s name and the size of the data contained in the cookie.
Reading Cookies from a Customer’s Browser
You can read a cookie you have placed on a customer’s computer by using the Cookies
collection of the Request object. For example, to retrieve a cookie named username and
assign it to a local variable named username, you would use the following statement:
username = Request.Cookies( “username” )
Because the Cookies collection is a collection of the Request object, you can also just
use:
username = Request( “username” )
However, if there is a query string variable or form variable named username, using the
previous statement would return the value of the query string or form variable instead of
the cookie variable. When you don’t explicitly specify a collection using the Request
object, the collections are searched in the following order:
05 0672318989 ch03 3/30/00 8:24 AM Page 51
1. QueryString
2. Form
3. Cookies
4. ClientCertificates
5. ServerVariables
You can display all the cookies that have been added by your Web site by iterating
through the contents of the
Cookies collection. For example, the ASP page in Listing 3.1
displays all the cookies that exist on the customer’s computer.
LISTING 3.1 Displaying All Cookies
1 <HTML>
2 <HEAD><TITLE>All Cookies</TITLE></HEAD>
3 <BODY>
4
5 <%
6 FOR EACH cookie IN Request.Cookies
7 Response.Write cookie & “=” & Request.Cookies( cookie ) & “<BR>”
8 NEXT
9 %>
10
11 </BODY>
12 </HTML>
A VBScript FOR EACH loop is used to loop through the contents of the Request
object’s Cookies collection. The name and value of each cookie is displayed.
Tracking Customers with Session Variables
You can use Session variables as another method of tracking customer information as a
customer moves from page to page on your Web site.
Session variables are closely relat-
ed to cookies. In fact,
Session variables rely on cookies.
When you use either the Personal Web Server or Microsoft Internet Information Server,
the Web server automatically adds a special cookie to every visitor’s browser. This cook-
ie is called the
ASPSessionID cookie (when it’s added to a customer’s computer, extra
randomly generated characters are added to the name of the cookie for security reasons).
The Web server uses the
ASPSessionID cookie to associate Session variables with a par-
ticular user.
Session variables are stored in the memory of the Web server. You can use a
Session variable to store any type of information including text, numbers, arrays and
even ActiveX components.
52 Day 3
ANALYSIS
05 0672318989 ch03 3/30/00 8:24 AM Page 52
Using Application and Session Objects in E-Commerce Applications 53
3
Before you use Session variables, however, you should be warned that they have some
of the same drawbacks as cookies. If a customer is using a browser that doesn’t support
cookies, the Web server cannot create the ASPSessionID cookie. Without the
ASPSessionID cookie, Session variables cannot be associated with a customer as the
customer moves between pages. So, it is a good idea to avoid using Session variables
whenever possible.
Using Session variables in your ASP application can also make your applica-
tion less scalable. Each Session variable uses server memory. Furthermore,
using Session variables makes it more difficult to use multiple Web servers
for a Web site (a Web farm) because Session variables are created on an
individual server.
Note
To create a Session variable, you use the Session object. For example, the ASP page in
Listing 3.2 creates a Session variable named “favoriteColor” that has the value
“blue”.
LISTING 3.2 Creating a Session Variable
1 <HTML>
2 <HEAD><BODY><TITLE>Session Variable</TITLE></HEAD>
3 <BODY>
4
5 <% Session( “favoriteColor” ) = “blue” %>
6
7 </BODY>
8 </HTML>
The Session variable is created in line 5. You should notice immediately that,
unlike a cookie, a Session variable can be created anywhere within an ASP
page. Unlike a cookie, you aren’t required to create Session variables before any content
is sent to the browser.
After the
favoriteColor Session variable has been created and assigned a value, it will
retain that value throughout the time that a user visits your Web site. The favoriteColor
Session variable will be associated with a particular user by using the ASPSessionID
cookie.
To retrieve a
Session variable after it has been created, you also use the Session object.
The ASP page in Listing 3.3 displays the value of the favoriteColor Session variable
created in Listing 3.2.
A
NALYSIS
05 0672318989 ch03 3/30/00 8:24 AM Page 53
LISTING 3.3 Displaying a Session Variable
1 <HTML>
2 <HEAD><BODY><TITLE>Session Variable</TITLE></HEAD>
3 <BODY>
4
5 Your favorite color is <%=Session( “favoriteColor” )%>
6
7 </BODY>
8 </HTML>
The Session variable is displayed in line 5. Notice that the Session variable
isn’t assigned a value in this page. As long as the ASP page in Listing 3.2 was
requested before the ASP page in Listing 3.3, the favoriteColor Session variable will
have a value.
It is important to understand that
Session variables are created relative to particular
users. For example, assume that Ruth visits your Web site and retrieves a page which
assigns the value blue to the Session variable named favoriteColor. Now assume that
Andrew visits your Web site and retrieves a page which assigns the value red to a
Session variable named favoriteColor. After Andrew retrieves his page, the value of
favoriteColor doesn’t change for Ruth. Each visitor has his own unique set of Session
variables assigned to him.
Session variables persist until a user leaves your Web site. How does the Web server
detect when this happens? By default, the Web server assumes that if a user doesn’t
request a page for more than 20 minutes, the user has left. You can change this default
behavior with the Timeout property of the Session object.
For example, if you have a Web site that includes long product descriptions which are
time-consuming to read, you might want to change the Timeout property to 60 minutes.
You can do this by adding the following statement at the top of a page:
Session.Timeout = 60
You specify the value of the Timeout property in minutes. The new value of Timeout will
apply to the user throughout the remainder of her user session.
Storing Arrays in Session Variables
One common use for Session variables is for storing a customer’s shopping cart. You
can create a shopping cart by assigning an array to the Session variable. The elements in
the array represent each of the products a customer has added to his shopping cart.
The script in Listing 3.4 illustrates how you can create an array, assign values to two of
its elements, and then create a
Session variable that contains the array.
54 Day 3
ANALYSIS
05 0672318989 ch03 3/30/00 8:24 AM Page 54
Using Application and Session Objects in E-Commerce Applications 55
3
LISTING 3.4 Creating a Session Array
1 <%
2 DIM ShoppingCart( 20 )
3 ShoppingCart( 0 ) = “toothpaste”
4 ShoppingCart( 1 ) = “comb”
5 Session( “ShoppingCart” ) = ShoppingCart
6 %>
The ShoppingCart array is created in line 2. The array has 20 elements. Next, in
lines 3 and 4, two of the array’s elements are assigned a value. Finally, in line 5,
the array is assigned to a Session variable named ShoppingCart.
After an array has been assigned to a
Session variable, you can display any element of
the array by referring to its index. For example, the following statement displays the ele-
ment of the Session array with an index of 1.
Response.Write Session( “ShoppingCart” )( 1 )
If the Session array were created with the script in Listing 3.4, the previous statement
would display the value “comb”.
However, you cannot change the value of an element in a Session array directly. To
change any of the values in a Session array, you must first assign the Session array to a
normal VBScript array, make the change, and then assign the array to the
Session vari-
able once again.
For example, the script in Listing 3.5 demonstrates how to change the value of the sec-
ond element of the ShoppingCart Session array from
comb to toothbrush.
LISTING 3.5 Changing the Value of a Session Array
1 <%
2 ShoppingCart = Session( “ShoppingCart” )
3 ShoppingCart( 1 ) = “toothbrush”
4 Session( “ShoppingCart” ) = ShoppingCart
5 %>
You might be tempted to try to change the value of a Session array directly. For example,
you might try to use the following statement:
Session( “ShoppingCart” )( 1 ) = “toothbrush”
This statement won’t generate an error. However, it will have absolutely no effect. You
cannot change a value of a Session array directly.ble once again.
ANALYSIS
05 0672318989 ch03 3/30/00 8:24 AM Page 55
Tracking a Session with a SessionID
The Session object has a valuable property for uniquely identifying users: the
SessionID property. Each visitor to your Web site is automatically assigned a unique
number. You can retrieve that unique number with the SessionID property.
For example, the ASP page in Listing 3.6 displays the value of
SessionID for the person
who requests the page.
LISTING 3.6 Displaying the SessionID Property
1 <HTML>
2 <HEAD><BODY><TITLE>Session ID</TITLE></HEAD>
3 <BODY>
4
5 Your unique Session ID is <%=Session.SessionID%>
6
7 </BODY>
8 </HTML>
A SessionID is guaranteed to be unique for each user who is currently at your Web site.
However, the same SessionID might be used again after your Web server has been
restarted. This means that you shouldn’t attempt to track the same user over time by
using her SessionID.
Ending a User Session
By default, a user session ends after the user hasn’t requested a page from your Web site
for more than 20 minutes. However, you can force a session to end earlier than this by
calling the Abandon method of the Session object. Calling the Abandon method removes
all the Session variables associated with the user who requested the page from memory.
After you call the
Abandon method, the user’s session doesn’t actually end until the cur-
rent page is completely processed. This means that all the user’s Session variables retain
their values until the page finishes processing. Furthermore, the user’s SessionID retains
its value throughout the page.
For example, consider the ASP page in Listing 3.7.
LISTING 3.7 Calling the Abandon Method
1 <HTML>
2 <HEAD><TITLE>Session Abandon</TITLE></HEAD>
3 <BODY>
4
5 <%
56 Day 3
05 0672318989 ch03 3/30/00 8:24 AM Page 56
Using Application and Session Objects in E-Commerce Applications 57
3
6 Session( “myVar” ) = “Hello World!”
7 %>
8 <p>The value of myVar is: <%=Session( “myVar” )%>
9 <%
10 Session.Abandon
11 %>
12 <p>The value of myVar is: <%=Session( “myVar” )%>
13
14 </BODY>
15 </HTML>
In line 6, a Session variable named “myVar” is assigned the value “Hello
World!”. This Session variable is displayed in line 8. Next, in line 10, the
Abandon method of the Session object is called. In line 12, the “myVar” Session vari-
able is displayed once again.
The ASP page in Listing 3.7 will display
“Hello World!” twice. Even though the
Abandon method is called before the Session variable is displayed in line 12, the variable
will retain its value. The Abandon method will not cause the Session to end until the
whole page finishes processing.
The
Abandon method is most often used when creating a Logoff page in a Web site. For
example, you can store a customer’s username and password in Session variables to
identify the customer on every page. When the customer is ready to leave your Web site,
she can link to a page that calls the Abandon method to end her user session and remove
her username and password from memory.
Using Application Variables
Like Session variables, Application variables can be used to store information over
multiple pages. Unlike Session variables, however, Application variables aren’t associ-
ated with a particular user. The values stored in an
Application variable can be assigned
and retrieved by every user of your Web site.
To create an
Application variable, you use the Application object. For example, to cre-
ate an Application variable named “myVar”, you would use the following statement:
Application( “myVar” ) = “Hello World”
To retrieve an Application variable, you also use the Application object. The following
statement displays the contents of the
Application variable named “myVar”:
Response.Write Application( “myVar” )
When the value of an Application variable is changed, it is changed for every user of your
Web site. For example, imagine that Ruth retrieves a page from your Web site which assigns
ANALYSIS
05 0672318989 ch03 3/30/00 8:24 AM Page 57
the value blue to the Application variable named favoriteColor. Now, suppose that
Andrew comes along and retrieves a page that assigns the value red to the Application
variable favoriteColor. After Andrew changes the value of the favoriteColor
Application variable, the value of this variable will be changed for everyone. After Andrew
retrieves the page, the favoriteColor variable also has the value red for Ruth.
Because the same
Application variable can be changed by different users of your Web
site, conflicts can occur. For example, a common use of Application variables is for
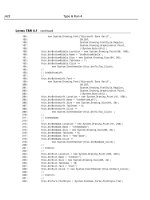
tracking the number of times a page has been viewed. The ASP page in Listing 3.8 dis-
plays a simple page counter (see Figure 3.1).
LISTING 3.8 Simple Page Counter
1 <%
2 Application( “counter” ) = Application( “counter” ) + 1
3 %>
4 <HTML>
5 <HEAD><TITLE>Page Counter</TITLE></HEAD>
6 <BODY>
7
8 This page has been viewed
9 <%=Application( “counter” )%> times.
10
11 </BODY>
12 </HTML>
58 Day 3
F
IGURE 3.1
A simple page counter.
05 0672318989 ch03 3/30/00 8:24 AM Page 58
Using Application and Session Objects in E-Commerce Applications 59
3
The ASP page in Listing 3.8 uses an Application variable named “counter”
to keep track of the number of times that the page has been viewed. The
Application variable is incremented in line 2. The current value of the Application
variable is displayed in line 9.
There is an important problem with the ASP page contained in Listing 3.8. Imagine that
two people request the page at the same time. Ruth requests the page and the counter
Application variable has the value 345. At the same time, Andrew requests the page,
and the application variable has the value 345. After both visitors retrieve the page, the
Application variable will have the value 346. However, because two people have
requested the page, it should have the value 347.
Fortunately, there is an easy way to fix this problem. The
Application object has two
methods named Lock and Unlock. The Lock method locks all the Application variables
and prevents anyone except the current user from reading or modifying them. The
Unlock method releases the Application variables once again.
The ASP page in Listing 3.9 contains an improved version of the page counter.
LISTING 3.9 Better Page Counter
1 <%
2 Application.Lock
3 Application( “counter” ) = Application( “counter” ) + 1
4 Application.Unlock
5 %>
6 <HTML>
7 <HEAD><TITLE>Page Counter</TITLE></HEAD>
8 <BODY>
9
10 This page has been viewed
11 <%=Application( “counter” )%> times.
12
13 </BODY>
14 </HTML>
The ASP page contained in Listing 3.9 is the same as the ASP page in Listing 3.10
except that both the
Lock and Unlock methods of the Application object are called.
The
Lock method is called in line 2. This prevents anyone else from reading or modifying
the counter Application variable. After the Application variable has been modified in line
3, the
Unlock method is called in line 4 to release the Application variables.
It is important to understand that calling the
Lock method locks all the Application vari-
ables in memory. You cannot selectively lock Application variables.
ANALYSIS
ANALYSIS
05 0672318989 ch03 3/30/00 8:24 AM Page 59
After you call the Lock method, all Application variables will continue to be locked
until either the Unlock method is called or the page finishes processing. This means that
you cannot accidentally lock all Application variables forever within an ASP script.
You should also be aware that locking
Application variables doesn’t prevent other users
from modifying an Application variable. If a number of users attempt to modify an
Application variable at the same time, and each user requests a page that calls the Lock
method, all the modifications will happen. However, the modifications will take place
serially rather than concurrently.
Storing Arrays in Application Variables
One common use of Application variables is to store frequently accessed but infre-
quently modified database records in memory. Retrieving database records can be a slow
process. If the records do not change often, I recommend that you retrieve the database
records only once and store them in an Application array. This way, the records can be
retrieved very quickly from the Application array the next time they are requested.
60 Day 3
You’ll learn how to retrieve database records in the lesson on Day 5,
“Building Your Product Catalog.”
Note
The script in Listing 3.10 demonstrates how you can assign an array to an Application
variable named myArray.
LISTING 3.10 Creating an Application Array
1 <%
2 DIM myArray( 10 )
3 myArray( 0 ) = “Hello World!”
4 Application( “myArray” ) = myArray
5 %>
The script in Listing 3.10 creates an array named myArray and assigns it to an
Application variable named myArray. The array is created in line 2. Next, a
value is assigned to an element of the array in line 3. Finally, in line 4, the local array is
assigned to an
Application variable.
You can retrieve and display a value from an Application array directly. For example, the
following statement displays the value of the element of the Application array with an
index of
0:
Response.Write Application( “myArray” )( 0 )
ANALYSIS
05 0672318989 ch03 3/30/00 8:24 AM Page 60
Using Application and Session Objects in E-Commerce Applications 61
3
Although you can directly read the value of an element contained in an Application
array, you can’t modify it. For example, the following statement will have no effect:
Application( “myArray” )(2) = “Goodbye!”
If you want to change the value of an element in an Application array, you must first
assign the Application array to a local array. For example, the script in Listing 3.11 prop-
erly changes the value of an element contained in an Application array.
LISTING 3.11 Modifying an Element in an Application Array
1 <%
2 Application.Lock
3 myArray = Application( “myArray” )
4 myArray( 0 ) = “Goodbye!”
5 Application( “myArray” ) = myArray
6 Application( “myArray” ).Unlock
7 %>
The script in Listing 3.11 modifies an element of an Application array. In line 3,
the Application array named myArray is assigned to a local array with the same
name. Next, in line 4, an element of the local array is modified. Finally, in line 5, the
local array is assigned to the Application array once again.
Removing Application Variables From Memory
You should be careful when creating Application variables. Application variables take
up memory. Unlike a Session variable, an Application variable is never automatically
removed from memory.
Prior to the version of Active Server Pages included with Windows 2000, there was no
way to remove an
Application variable from memory using an ASP script. Application
variables remained in memory until the Web service was stopped, the Global.asa file was
modified, or your ASP Application was unloaded.
The new version of Active Server Pages included with Windows 2000 includes two new
methods you can use to remove
Application variables from memory: the Remove() and
the
RemoveAll() methods. The Remove() method removes a particular Application vari-
able from memory. The
RemoveAll() method removes all Application variables from
memory.
For example, the script in Listing 3.12 creates two
Application variables and then
removes one of them.
ANALYSIS
05 0672318989 ch03 3/30/00 8:24 AM Page 61
LISTING 3.12 Using the Remove() Method
1 <%
2 Application( “myvar1” ) = “Red”
3 Application( “myvar2” ) = “Blue”
4 Application.Contents.Remove( “myvar1” )
5 %>
In lines 2 and 3, two Application variables are created. In line 4, the Remove()
method is used to remove the Application variable created in line 2.
To remove all
Application variables from memory, you can use the RemoveAll()
method. The script in Listing 3.13 demonstrates how this method can be used.
LISTING 3.13 Using the RemoveAll() Method
1 <%
2 Application( “myvar1” ) = “Red”
3 Application( “myvar2” ) = “Blue”
4 Application.Contents.RemoveAll()
5 %>
In lines 2 and 3, two Application variables are created. When the RemoveAll()
method is called in line 4, all Application variables are removed from memory
including the two Application variables created in this script.
Using the Global.asa File
In this section, you’ll learn how to use a special file named the Global.asa file. The
Global.asa file can contain ASP scripts. However, unlike a normal ASP page, the
Global.asa file isn’t used to display content. Instead, the Global.asa file is used to handle
global application events.
Before you can use the Global.asa file, you must first create an ASP application. To do
this with the Personal Web Server, follow these steps:
1. Launch the Personal Web Manager.
2. Click the button labeled Advanced.
3. Select your home directory and click Edit Properties.
4. Check the box labeled Execute.
5. Reboot your computer.
To create an ASP application with Internet Information Server, follow these steps:
62 Day 3
ANALYSIS
ANALYSIS
05 0672318989 ch03 3/30/00 8:24 AM Page 62
Using Application and Session Objects in E-Commerce Applications 63
3
1. Launch the Internet Service Manager.
2. Right-click on your Default Web Site and click properties. This opens a property
sheet.
3. Select the tab labeled Home Directory.
4. In the section labeled Application Settings, click the button labeled Create (If you
only see a button labeled Remove, the application has already been created).
After you create an ASP application, you can add the Global.asa file to the root directory
of your application. Typically, you add the Global.asa file to the wwwroot directory. You
can create the Global.asa file with a text editor just like a normal ASP page.
Within the Global.asa file, you can place subroutines that are triggered by four types of
events. Here is a list of these events:
• The Session_OnStart Event—This event is triggered when a customer first arrives
at your Web site. This event occurs immediately after a customer requests the first
page.
• The
Session_OnEnd Event—This event is triggered when a user session ends. This
event occurs when a user session times out or when the Abandon() method of the
Session object is called.
• The
Application_OnStart Event—This event is triggered when the first page is
retrieved from your Web site after your Web server has been started. This event
always occurs before the Session_OnStart event.
• The
Application_OnEnd Event—This event is triggered when the server shuts
down. It always occurs after any Session_OnEnd event.
For example, suppose that you want to display a count of the current visitors at your
store on the homepage of your store. You can do this by using the
Session_OnStart, the
Session_OnEnd, and the Application_OnStart events (see Listing 3.14).
LISTING 3.14 Counting Customers
1 <SCRIPT LANGUAGE=”VBScript” RUNAT=”Server”>
2
3 Sub Session_OnStart
4 Application.Lock
5 Application( “customerCount” ) = Application( “customerCount” ) + 1
6 Application.UnLock
7 End Sub
8
9 Sub Session_OnEnd
continues
05 0672318989 ch03 3/30/00 8:24 AM Page 63
10 Application.Lock
11 Application( “customerCount” ) = Application( “customerCount” ) - 1
12 Application.UnLock
13 End Sub
14
15 Sub Application_OnStart
16 Application( “customerCount” ) = 0
17 End Sub
18
19 Sub Application_OnEnd
20 End Sub
21
22 </SCRIPT>
The Global.asa file contained in Listing 3.14 uses three events. Lines 3–7 contain
a subroutine that handles the Session_OnStart event. Whenever a new customer
arrives at your Web site, this subroutine increments the current count of customers by 1.
Lines 9–13 contain a subroutine that handles the Session_OnEnd event. When a customer
session ends, the current customer count is decremented by 1. Finally, in lines 15–20, the
Application_OnStart event is used to initialize the customerCount variable.
You should notice that the script delimiters
<% and %> are not used in the Global.asa file.
Instead, the beginning and end of the script is marked with the HTML <SCRIPT> tag (see
lines 1 and 22). The RUNAT attribute of the <SCRIPT> tag is given the value SERVER to
indicate that this is a server-side script rather than a client-side script.
The Global.asa file in Listing 3.14 doesn’t display any content. To show the current
count of customers, you must display the
Application variable named customerCount
in a page. This is illustrated in the page included in Listing 3.15.
LISTING 3.15 Displaying a Count of Customers
1 <HTML>
2 <HEAD><TITLE>Welcome</TITLE></HEAD>
3 <BODY>
4
5 Welcome to our store!
6 <p>There are currently
7 <%=Application( “customerCount” )%>
8 customers actively browsing our store.
9
10 </BODY>
11 </HTML>
64 Day 3
LISTING 3.14 continued
ANALYSIS
05 0672318989 ch03 3/30/00 8:24 AM Page 64
This page displays the number of active customers. It simply displays the value
of the Application variable named “customerCount” (see Figure 3.2).
Using Application and Session Objects in E-Commerce Applications 65
3
You should be warned that you can’t use a number of the standard Active Server Pages
objects within the Global.asa file. In the Application_OnStart and Application_OnEnd
subroutines, you can use only the Server and Application objects. In the
Session_OnStart subroutine, you can use any of the built-in ASP objects. However, in
the Session_OnEnd event, you can only use the Application, Server, and Session
objects.
Summary
In today’s lesson, you learned several methods of tracking customer information as the
customer moves from page to page at your Web site. In the first section, you learned how
to add cookies to a customer’s computer. You learned how to create both session and per-
sistent cookies.
In the second section, you learned how to create and read
Session variables. You learned
how to use Session variables to store persistent information about a customer. You also
learned how to end a user session with the Abandon() method and track a customer using
the SessionID property. Finally, you learned how to create Session arrays.
ANALYSIS
FIGURE 3.2
Displaying active
customers.
05 0672318989 ch03 3/30/00 8:24 AM Page 65
In the third section, you learned how to use Application variables. You learned how to
create a simple page counter with an Application variable. You also learned how to
work with Application arrays.
Finally, in the last section of today’s lesson, you learned how to use the Global.asa file.
You learned how to create subroutines to handle the
Session_OnStart, Session_OnEnd,
Application_OnStart, and Application_OnEnd application events. You also learned
how to use the Global.asa file to display a count of the active customers at your Web site.
Q&A
Q Should I use cookies or Session variables when creating my commercial Web
site?
A There are many successful Web sites operating on the Internet that require users to
have cookies enabled. However, from painful personal experience, I can tell you
that cookies and
Session variables don’t work with a surprising number of
browsers. If you want to create a Web site that is accessible by the maximum num-
ber of customers, I suggest you don’t use cookies or Session variables. On the
other hand, if you need to develop a commercial Web site fast, using Session vari-
ables can dramatically decrease the amount of time it takes to develop the Web
site.
Q How can I avoid using cookies and
Session variables?
A If you need to track customer information as the customer moves from page to
page at your Web site, you can use query strings and hidden form fields instead of
cookies or
Session variables. For example, if you want to track a customer by a
customer ID number, you need to include the customer ID number within every
query string and HTML form. The following ASP page illustrates how to do this:
<%
‘ Get Customer ID
cid = Request( “cid” )
%>
<HTML>
<HEAD><TITLE>No Cookies</TITLE></HEAD>
<BODY>
<a href=”nextpage.asp?cid=<%=cid%>”>Next Page</a>
<p>
<FORM method=”post” ACTION=”nextpage.asp”>
<input name=”cid” type=”hidden” value=”<%=cid%>”>
<input type=”submit” value=”Next Page”>
</FORM>
</BODY>
</HTML>
66 Day 3
05 0672318989 ch03 3/30/00 8:24 AM Page 66
Using Application and Session Objects in E-Commerce Applications 67
3
The previous page retrieves the customer ID from the Request object and passes it
to the next page in both a query string and hidden form field. Notice that using
Request( “cid” ) retrieves the customer ID no matter if it is included in the
QueryString or Form collection of the Request object.
Workshop
The Quiz and Exercise questions are designed to test your knowledge of the material
covered in this chapter. The answers are in Appendix A, “Quiz Answers.”
Quiz
1. Suppose that you want to create a cookie which lasts longer than a particular user
session. What attribute of the Cookies collection must you set to cause the cookie
to persist until a certain date?
2. Suppose that Andrew requests an ASP page which assigns the value
red to a
Session variable named color. Now, suppose that Ruth requests an ASP page
which assigns the value blue to the Session variable named color. If Andrew
requests an ASP page that outputs the value of the color Session variable, what
value will be displayed?
3. How can you remove all the
Session variables associated with a particular user
from memory?
4. Suppose that Andrew requests an ASP page which assigns the value
red to an
Application variable named color. Now, suppose that Ruth requests an ASP page
which assigns the value blue to the Application variable named color. If Andrew
requests an ASP page that outputs the value of the color Application variable,
what value will be displayed?
5. What’s wrong with the following Global.asa file?
<%
Sub Session_OnStart
Application.Lock
Application( “customerCount” ) = Application( “customerCount” ) + 1
Application.UnLock
End Sub
Sub Session_OnEnd
Application.Lock
Application( “customerCount” ) = Application( “customerCount” ) - 1
Application.UnLock
End Sub
05 0672318989 ch03 3/30/00 8:24 AM Page 67
Sub Application_OnStart
Application( “customerCount” ) = 0
End Sub
%>
Exercise
Create an ASP page that lists the SessionID and the entry time of all the customers
who have visited your Web site. To do this, you will need to create a Global.asa
file to detect when the customer arrives and an ASP page to display the list of
SessionIDs and entry times.
68 Day 3
05 0672318989 ch03 3/30/00 8:24 AM Page 68
DAY
4
WEEK 1
Working with Files in
Your E-Commerce
Application
In today’s lesson, we will finish our review of Active Server Pages program-
ming. You will learn various methods of working with files in your E-
Commerce application. In today’s lesson, you will learn
• How to use the #INCLUDE directive to include files in an ASP page such
as a standard company logo
• How to automatically redirect a customer to a new ASP page file
• How to use the File Access component to store customer information in a
text file
Including Files in an ASP Page
You can include a file within an ASP page by using the server-side #INCLUDE
directive. You can use the #INCLUDE directive with both Active Server Pages and
standard HTML files.
06 0672318989 ch04 3/30/00 8:18 AM Page 69
Including files is useful in two situations. First, including files is useful when you need
to add the same content to a number of pages at your Web site.
For example, imagine that you have a standard corporate logo you want to include at the
top of every page of your Web site. You can place the logo in a header file and simply
include this file in each ASP page.
Displaying the company logo with a header file makes it easier to create a consistent
look for your Web site. It also makes it easier to change your pages at a future date if the
company logo is modified. Instead of changing all the pages at your Web site, you only
need to modify the header file.
Including files is also useful when you need to use a standard set of functions and proce-
dures within multiple Active Server Pages. You can create a library of functions and pro-
cedures in one file and include this file in other Active Server Pages. If you need a new
function that will be used on multiple Active Server Pages, you can simply add the new
function to the included file.
You include a file in an ASP page by using the server-side
#INCLUDE directive. The file
that you include can be contained in any directory accessible to your Web server. There
are two forms of the directive. If you want to include a file in an ASP page that is in the
same directory as the ASP page, you use the following syntax:
<! #INCLUDE FILE=”somefile.asp” >
You can also use the FILE attribute when including a file that is located in a subdirectory
of the current directory. However, when using the FILE attribute, the included file must
always be located in the current directory or a subdirectory of the current directory.
If the file you want to include is located in a different directory, you must use the
VIRTUAL attribute rather than the FILE attribute. The following #INCLUDE directive
includes a file that is located in the commonfiles directory:
<! #INCLUDE VIRTUAL=”/commonfiles/somefile.asp” >
For example, the ASP page in Listing 4.1 uses the #INCLUDE directive to include two
files named standardheader.asp and standardfooter.asp. The contents of the
standardheader.asp file is included in Listing 4.2. The contents of the
standardfooter.asp file is included in Listing 4.3.
LISTING 4.1 Including a Header File
1 <! #INCLUDE FILE=”standardheader.asp” >
2
3 Welcome to the home page of our Web site!
4
5 <! #INCLUDE FILE=”standardfooter.asp” >
70 Day 4
06 0672318989 ch04 3/30/00 8:18 AM Page 70