Beginning Red Hat Linux 9 phần 7 potx
Bạn đang xem bản rút gọn của tài liệu. Xem và tải ngay bản đầy đủ của tài liệu tại đây (1014.92 KB, 46 trang )
The TCP/IP networks can also be divided by public and private IP addresses:
Your public IP address is assigned to you by your Internet service provider (ISP). In fact, this IP
address is allocated to the ISP by the Internet Assigned Numbers Authority (IANA −
). It's your public IP address that identifies you on the Internet.
•
Private IP addresses are those (like the addresses used in the diagram above) that identify a device
within a private or non−Internet connected network. There are three TCP/IP network address ranges
reserved for use in private networks: 10.0.0.0−10.255.255.255, 172.16.0.0−172.31.255.255, and
192.168.0.0−192.168.255.255.
•
A netmask is a 32−bit string that hides the network part of an IP address, so that only the host (computer) part
of the address remains. For example, the netmask 255.255.255.0 looks like an IP address, but in fact hides the
first 24 bits of the IP address so that only the last 8 bits remain (recall that 255 is the decimal representation of
the binary 11111111). Hence, the netmask 255.255.255.0 is commonly used for Class C IP addresses to reveal
the specific host computer address publicly.
There are a few more definitions that will be useful here:
A gateway is a host that is connected to two or more physical networks, and hence allows messages
to switch between them.
•
The term hostname refers to the unique name of the machine, so that it can identify itself on the
network.
•
Finally, the domain name system (or DNS) is a distributed database that translates domain names
into IP addresses and vice versa. For example, DNS translates the domain name www.linux4biz.net to
the IP address 212.69.200.83.
•
With all that in mind, let's return to those two machines on our network − the Red Hat Linux 9 server machine
and the Windows 2000 client laptop machine. Here are the network configuration settings we used for those
two machines in this chapter.
The Red Hat Linux 9 server machine is set up as a firewall and router, and has Internet connectivity. Over the
course of the chapter we'll show how it can be configured as a file server, printer server, DHCP server, FTP
server, web server, or mail server:
Server Value
Operating system Red Hat Linux 9
IP address 192.168.0.99
Netmask 255.255.255.0
Hostname linux4biz
The laptop is a simple client machine, designed for an end−user and (potentially) sharing resources with other
similar machines on the network:
Setting Value
Purpose A Client laptop system to be used to share resources configured on Linux server
Operating system Windows 2000 Professional
IP address 192.168.0.132
Netmask 255.255.255.0
Assumptions for Network Setup
269
Hostname Win
As we've said, your network topology, and the network configuration of your machine(s), may be different;
but many of the principles in this chapter remain the same, and you should be able to get any of these services
going regardless of your own environment.
We will assume that you have root access to the Red Hat Linux server. Throughout the chapter, we'll use the
terms Linux server and client to refer to the Red Hat Linux 9 server machine and the Microsoft Windows
2000 client machine respectively.
Setting up a Web Server
When we want to publish web pages on the Internet (or on an intranet), we use a web server. In essence, a
web server is an application that does two things:
It listens for page requests.•
When it receives a page request, it examines the request and responds with the page that was
requested.
•
For example, when you use a web browser to browse , the browser turns this into a
request message and sends it across the Internet to Wrox's own web server. When the web server receives this
request, it processes it, works out what page you requested, puts that page together from whatever resources
are necessary, and sends the page back to your browser, in the form of a response message.
Of course, there are many different web browsers in existence (including Mozilla, Opera, Internet Explorer,
and others), and there are also a great many types of web server software. To enable a browser to request
pages from a web server, they communicate using Hypertext Transfer Protocol (HTTP) − this is the
standard protocol for the Internet. The request and response messages are composed using HTTP, and this is
what allows any browser to request web pages from any type of web server.
Note By default, all web servers listen for HTTP requests on port 80. Web servers also use port 443
to listen for requests made through secure HTTP connections, over SSL (secure sockets layer),
through a protocol called HTTPS.
So, if you want to publish your own web site, you'll need a machine with some web server software. However,
the chances are that if you build your own web site, you probably won't want to expose it to the Internet from
your own machine. There are security and maintenance issues to manage, and you'd need to buy enough
hardware and bandwidth to handle all the page requests. More likely, you'd choose an Internet service
provider (ISP), and use their web servers to host your web site for you.
So, why would you want to install a web server on your Red Hat Linux machine? Well, here are two
scenarios:
First, if you're building a web site, then you'll need a web server so that you can test your site as
you're developing it
•
Second, although you might not host an Internet site from your own machine, you might host an
intranet site − a private web site available only to other machines inside your private network. The
demand for intranet pages is much more predictable than for Internet pages, and the security risks are
not so significant.
•
Setting up a Web Server
270
So, in this section, we'll show you how to set up a web server on your machine, configure it, and publish
pages on it. From there, you'll soon be developing your own sites.
The Apache Web Server
As we've mentioned, there are a number of commercial and freely available web servers in existence. Among
the commercial web servers are offerings from Netscape, IPlanet, SunONE, Microsoft (the Internet
Information Server, or IIS), and Zeus. Among the open source web servers, we can list Apache, thttpd, and
Redhat TUX.
Of all these, Apache is most widely used. At the time of writing, 66% of all web sites are hosted on Apache
web servers (according to the Netcraft Web Server Survey, − the vast
majority of them running on Linux or Unix operating systems. Apache's popularity is due not only of its open
source pedigree, but also to its highly competitive levels of performance, functionality, stability, flexibility,
and security:
Apache's flexibility comes from the fact that it is a modular web server. That means that you can
meet your requirements by plugging any number of external modules into the core httpd daemon. Of
course, being open source software, you also have access to Apache's source code, which you can
customize to fit your needs.
Apache is also very scalable. You can run Apache on high−end hardware, and it's possible to increase
the capacity of Apache web servers by sharing the load across any number of servers. It's also very
portable, being available for a number of operating systems.
•
Apache's security is very good in comparison to other web servers. Moreover, the Apache Foundation
is extremely active in the continued defense of Apache from security problems − particularly in the
form of announcements and patches.
•
Apache performs very well − it boasts a highly optimized daemon for serving static content which
dramatically outperforms its nearest rivals. Moreover, it rarely crashes and achieves extremely long
up−times.
•
Apache comes with detailed documentation, which helps to make the setup and configuration easy.
And of course, because it's so popular there's a wide network of support for Apache, in the form of
mailing lists, newsgroups, and commercial vendors like Red Hat.
•
Apache development is active. The Apache Foundation is actively involved in development of new
modules; new versions of Apache to make it reliable stable and secure.
•
Since you've already got Red Hat Linux 9, there's another good reason for choosing Apache as your web
server software − it's included as part of the Red Hat Linux 9 distribution! At the time of writing, the latest
version of Apache is 2.0.44.
Installing Apache
As we've alredy noted, Apache is a modular server − the core server provides the basic functionality, with
extended features available in various modules. This makes it very flexible and easy to configure, becuase you
need to configure only the modules you need. So, it's worth looking at how to control the installation and
removal of these modules.
In fact, the different modules are contained in the different packages that we can install via the Red Hat
Package Manager (RPM). Recall that to start RPM's graphical interface, you can select Main Menu | System
Settings | Add/Remove Applications, or type the following command at the command line:
The Apache Web Server
271
$ redhat−config−packages
The Apache web server packages are listed in the Web Server package group, which is found under the
Applications category in the RPM. If you look at the details of this package group now, you'll see that there
are 17 packages listed:
Only one of these packages in the group is a Standard Package − that's the httpd package that contains the
base Apache web server functionality. The remaining 16 packages are all optional packages (the RPM calls
them Extra Packages). The important packages are explained below:
Package Description
httpd−manual Contains the documentation for the Apache web server. After installation, you can access this
documentation from the command line by typing man httpd
hwcrypto Provides support for hardware SSL acceleration cards. This package should be installed if you
have hardware SSL acceleration cards like Ncipher Nforce on your server
mod_ssl Provides an SSL interface to the HTTPS web server, and hence enables the Apache web server
to support SSL. This package should be installed if you want to provide secure connections to
your clients
php Provides the PHP module for Apache, which enables the web server to serve PHP web pages.
This package is required if you if you want to host web sites which contain pages written with
the PHP scripting language
webalizer Provides programs for web server log file analysis. This package enables you to generate
HTML usage reports for your website
Note You can find out more about other Apache modules at the Apache web site,
/>You can choose whichever extra packages fit your requirements; it's definitely worth installing the
httpd−manual package, and then you should choose whatever other packages fit your own requirements.
Remember that you can re−launch the RPM at any time, and add or remove packages, as you need them.
The Apache Web Server
272
When you've selected the packages you need, click the Close button to dismiss the Web Server Package
Details window, and then click the Update button on the on main Package Management window to begin the
installation. During the installation, you'll be prompted to insert the distribution discs, as they're required. The
RPM will also inform you of any conflict between package dependencies.
The Apache Configuration Files
Apache's configuration information is contained in a select bunch of configuration files:
The /etc/httpd/httpd.conf file is Apache's main configuration file.•
The /etc/httpd/conf.d directory contains configuration files for any installed modules (such as PHP,
SSL, and so on).
•
The /etc/httpd/logs directory is a symbolic link to /var/log/httpd directory, which contains all the
Apache log files.
•
The /etc/httpd/modules directory is a symbolic link to /usr/lib/httpd/modules directory, which contains
all the Apache modules configured as dynamic shared objects.
Note Dynamic shared objects (or DSOs) are modules that are compiled separately from the Apache
httpd binary. They are so−called because they can be loaded on demand. There's more
information on DSOs at />•
The /etc/httpd/run directory is a symbolic link to /var/run, which contains the process ID file
(httpd.pid) of the httpd process.
•
/etc/rc.d/init.d/httpd is a shell script, used for starting and stopping the Apache web server.•
Starting Apache for the First Time
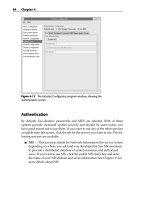
You can start Apache using the Red Hat Service Configuration GUI dialog, or via the command line. Here's
how to start Apache from the Service Configuration dialog:
First, you need to fire up the GUI. To do this, click on Main Menu | System Settings | Server Settings |
Services or type the following at the command line:
$ redhat−config−services
It will ask for root password if you started it as a normal user. When you do this, you get the Service
Configuration dialog:
1.
The Apache Web Server
273
This dialog contains a list of all the services that are supported on your computer. The checkboxes
indicate which of these services are started automatically when the machine boots up (as part of the
cron). There are also Start, Stop, and Restart buttons so that we can start and stop services manually.
Scroll down the list on the left of the dialog, and select the entry for httpd. As we said, the httpd
service is the Apache web server service. Check the status of the httpd service, in the bottom−right of
the dialog; if it is stopped (as above), then click the Start button to start it.
If you want it to start automatically next time you reboot your machine, check the checkbox too. Then
select File | Save Changes to save the new settings. That's it; you can close the Service Configuration
dialog by selecting File | Quit.
2.
To control the Apache web server from the command line, we can use the service command to fire the httpd
script. Here's how we use it to start the web server:
# service httpd start
Starting httpd: [ OK ]
If there are difficulties in starting the web server, then you'll find out about it here. For example, if you
attempt to do this without root privileges, then you'll get a message telling you that permission is denied. And
here's another example:
# service httpd start
Starting httpd: httpd: Could not determine the server's fully qualified
domain name, using 192.168.0.99 for ServerName
[ OK ]
Here, the message explains that the server's fully qualified domain name (FQDN) couldn't be determined, and
that it's using the IP address (192.168.0.99) instead. If you get this message, it's because you have neither
setup a FQDN for your Linux server, nor configured the ServerName configuration directive in the httpd.conf
configuration file.
Note An FQDN is a unique name, consisting of hostname and domain name, which can be
resolved to an IP address. For example, www.linux4biz.net is a fully qualified domain
name.
Returning to the httpd script itself, there are similar switches for stopping or restarting the service:
# service httpd restart
Stopping httpd: [ OK ]
Starting httpd: [ OK ]
# service httpd stop
Stopping httpd: [ OK ]
There are a few other options you can use with the httpd script. If you run the script without an option, the
resulting usage message reveals all the available options:
# service httpd
Usage: httpd
{start|stop|restart|condrestart|reload|status|fullstatus|graceful|
help|configtest}
The configtest option is a particularly useful one. The configuration file is quite complex, and so it's useful to
The Apache Web Server
274
check it for errors after you make changes to it. To do this, you use the configtest option:
# service httpd configtest
Syntax OK
Testing the Apache Web Server
Once you've started the Apache web server, you should test it to see if it's working properly. To do that, we'll
use a web browser to request a web page from our server! There's a page provided by default for this purpose,
and you can request it via the URL http://localhost. So, launch a web browser (Main Menu | Internet | Mozilla
Web Browser), and type this URL into the address box:
Configuring your Web Server
It's a good idea to configure your web server. Red Hat does provide a GUI tool, apacheconf, for configuring
Apache, but it does not format the configuration file very well. Webmin ( − see
Chapter 13) is an alternative web−based software that can be used to manage most of the Linux services,
including the Apache web server. However, in this section we'll show you how to do some basic configuration
by editing the httpd.conf Apache configuration file directly.
Try it Out: Configuring Your Web Server
We're going to configure the web server by adjusting a couple of the settings to suit our needs.
Launch the gedit text editor (by selecting Main Menu | Accessories | Text Editor), or your favorite
text editor. Use it to open the file /etc/httpd/conf/httpd.conf.
1.
Select Search | Find and use the resulting dialog to find the word ServerAdmin in the file. The first
occurrence should be the ServerAdmin directive, which looks like this:
# ServerAdmin: Your server address, where problems with the server should be
# e−mailed. This address appears on some server−generated pages, such
# as error documents. e.g. admin@your−domain.com
ServerAdmin root@localhost
2.
As you can see, the configuration file describes this directive very well. Change the email address to your own
email address, or an address that you may have set up for web site administration. For example:
The Apache Web Server
275
# ServerAdmin: Your server address, where problems with the server should be
# e−mailed. This address appears on some server−generated pages, such
# as error documents. e.g. admin@your−domain.com
ServerAdmin
Now use the same technique to find the ServerName directive (you'll probably find that it's right after
the ServerAdmin directive). Change this directive first by removing the leading # character. Then, if
you have a registered DNS name, add it here (in place of the DNS name test.linux4biz.net, which I'm
using here to demonstrate):
# ServerName gives the name and port that the server uses to identify itself.
#
ServerName test.linux4biz.net
The server name you specify should be a FQDN (because it will need to be resolved to an IP address
by DNS). If you haven't setup a DNS, then you can enter the IP address allocated to the Linux server
instead, like this:
ServerName 192.168.0.99
3.
Save the httpd.conf file, and close it.4.
Restart the httpd daemon to reflect the changes. To do this, use Red Hat Services Configuration GUI,
or the httpd command line script as described earlier in this chapter:
# service httpd restart
Stopping httpd: [ OK ]
Starting httpd: [ OK ]
Now browse to http://localhost again, to check that the web server is still serving web pages. You
should see the Apache Test Page that we saw earlier in this section.
5.
There are many configuration settings that you can control via the httpd.conf configuration file. For more
information, refer to the Apache web server documentation at />Setting up Your First Web Site
In the remainder of this section, we'll set up a simple web site, which will be accessible on the network. This
will involve creating a simple HTML web page, and saving it to a location on the hard disk that is used by the
web server to store published web pages. Then, when a user requests the page, the web server will be able to
respond by retrieving it from this location and sending it to the requestor.
Try it Out: Publishing Your First Web Page
Launch an editor (you can use a dedicated web page editor such as Mozilla Composer if you have it
installed; alternatively, gedit will do). Create a new file − call it index.html and save it in the directory
/var/www/html.
1.
Type some HTML into the file. For example:
<html>
2.
The Apache Web Server
276
<head>
<title>Beginning Red Hat Linux − Apache Test Page</title>
</head>
<body>
<center>
<h1>Beginning Red Hat Linux − Apache Test Page</h1>
This is the first page of your web site!
</center>
</body>
</html>
Now open a browser and browse to the page using your server's FQDN address or IP address. (For
example, I'm using the URL below to match my DNS name, but
you might use something like http://192.168.0.99/index.html.) Your browser will send this request to
the web server listening for connections on port 80 by default. Web server will serve the default web
site pages. The following screenshot shows the output you should see:
3.
How it works
In this example, we set up a simple web page under Apache web server's default root directory,
/var/www/html, and tested it on an internal network. You can add more pages and directories under the
/var/www/html directory as explained in the previous example.
If you want to make your web site available on the Internet, then you'd need to connect your web server to the
Internet and assign it a public IP address, so that external users send page requests to it. You can also register
a DNS so that your website as a memorable name (so users don't need to refer to your web site by its IP
address!).
By default, your Apache web server hosts just one web site (whose root is at /var/www/html). However, you
can configure your Apache web server to host as many web sites as you like, and specify the root directory of
each site to be whatever folder you wish.
If you want more information about acquiring and using Apache, try or Professional
Apache 2.0 and Professional Apache Security.
Setting up an FTP Server
If you want to enable other users to download files from a location on your server's hard disk, and/or to upload
files to that location, then one solution is to install an FTP server. You can think of an FTP server essentially
as an area of disk space that is used for storing files, plus the software and configuration required to allow
Setting up an FTP Server
277
other users to upload and download files. When users want to upload or download from your FTP server, they
use a program called an FTP client.
These communications between FTP server and FTP client take place using the File Transfer Protocol
(FTP). FTP is a TCP protocol that is designed specifically for the transfer of files over a network, and it's one
of the oldest Internet protocols still in widespread use. The availability of so many different FTP client
programs, and the fact that many operating systems come with FTP software pre−installed, are indications of
how relevant FTP still is today.
FTP is not considered a secure protocol, because communication between the FTP client and server are
unencrypted. Consequently, Secure FTP (SFTP) is also becoming popular (and, indeed, is part of the
openssh package that comes with Red Hat Linux 9), and it's also possible to configure your FTP server in
other ways, for example by forcing users to log in, or by using access control lists (ACLs) to allow different
rights to different groups of users.
Note You need to take careful security precautions if you plan to expose your
FTP server on the Internet. We'll talk about how to minimize the security
implications of supporting an FTP server in Chapter 12. There's also
information on this subject, and on the FTP protocol in general, at RFCs
959 and 2577 (−editor.org/in−notes/rfc959.txt and
−editor.org/in−notes/rfc2577.txt).
In fact, many FTP servers still allow anonymous FTP access, which means that the FTP server allows any
user to access its disk space and download its files. Anonymous FTP access is used mostly to enable users to
access freely available documents and files via the Internet without access control.
In spite of the security issues, FTP remains popular − it's fast and easy to use, and it is the Internet standard
protocol for file transfer.
FTP Servers in the Red Hat Linux Distribution
There are a number of FTP servers available for Red Hat Linux 9 For example:
vsftpd is a simplified FTP server implementation. It is designed to be a very secure FTP server, and
can also be configured to allow anonymous access. We'll explore vsftpd in this section.
•
TUX is a kernel−based, threaded, extremely high performance HTTP server, which also has FTP
capabilities. TUX is perhaps the best in terms of performance, but offers less functionality than other
FTP server software. TUX is installed by default with Red Hat Linux 9.
•
wu−ftpd is a highly configurable and full−featured FTP daemon, which was popular in earlier
versions of Red Hat Linux but has since given way to the more security−conscious vsftpd.
•
gssftpd is a kerberized FTP daemon, which means that it is suitable for use with the Kerberos
authentication system.
•
All of these FTP servers ship as part of the Red Hat Linux 9 distribution. However, we will consider only the
first of these, vsftpd, here.
FTP Servers in the Red Hat Linux Distribution
278
Installing the vsftpd FTP Server
The easiest way to install the vsftpd FTP Server package is via the RPM GUI tool. Once you've started the
tool (for example, by selecting Main Menu | System Settings | Add/Remove Applications), find the FTP
Server package group, which is listed under the Servers category. Check the checkbox for this package group.
Note If you want, you can click on Details to see the package details. You will see that the package group
contains only one package vsftpd− it's under the Standard Packages banner.
Click on Close when you've finished.
Back in the Package Management window, click on Update to start the installation. You'll be prompted to
insert the Red Hat Linux 9 installation disks as necessary.
Starting Your FTP Server
To start the FTP service (and hence enable users to upload and download files), we can use the Service
Configuration tool. To launch the tool, select Main Menu | System Settings | Server Settings | Services, or type
the following command at the command line:
$ redhat−config−services
Again, you'll be prompted for the root password, unless you're already logged on as root. To start the vsftpd
FTP Server, select the vsftpd entry in the list and then click the Start button:
Installing the vsftpd FTP Server
279
Again, if you want the FTP service to start automatically next time you reboot your machine, then check the
checkbox too. Then click on File | Save Changes to save your new settings.
Unsurprisingly, it's also possible to start and stop these FTP services from the command line, using the service
command to start and stop the vsftpd script:
# service vsftpd start
Starting vsftpd: [ OK ]
# service vsftpd stop
Stopping vsftpd: [ OK ]
Again, if you run the script without an option, the resulting usage message reveals all the available options:
# service vsftpd
Usage: vsftpd {start|stop|restart|condrestart|status}
Testing Your FTP Server
Now you've set up your FTP server and started the service, we'll adopt the role of the client to quickly test that
the service is working. From a command line, issue the ftp command to start an FTP session, naming your
FTP server as the server that you want to connect to:
$ ftp 192.168.0.99
Connected to 192.168.0.99 (192.168.0.99).
220 (vsFTPd 1.1.3)
Name (192.168.0.99:none):
In the above, recall that 192.168.0.99 is the IP address of the Linux server. You should get a Name login
prompt like the one shown above − this is enough to confirm to us that the vsftpd server is running. Press
Ctrl−C to terminate this FTP session and return to the command line.
Using Your FTP Server
Having installed and (briefly) tested our FTP server, we can begin to use it, and in this section we'll
demonstrate a few uses. As we go, there are a number of configurations issues to consider, and in this section
we'll take a look at five important configuration issues:
Configuring for anonymous FTP server file download•
Installing the vsftpd FTP Server
280
Configuring for anonymous FTP server file upload•
Creating a system account for per−user access to the FTP server•
Disabling local system user accounts•
Blocking FTP access for user accounts•
We'll also show you how to configure an FTP greeting banner.
Configuring an Anonymous FTP Server for File Download
Anonymous users cannot read from just any directory on your Linux server. By default, the vsftpd package
creates a directory tree starting at /var/ftp, and enables 'anonymous read access' to this directory and the
directory structure beneath it.
To demonstrate this, we'll start by placing a test file on the FTP server so that other users can download it.
Then, we'll adopt the role of one of these users, and run a client FTP session to access the FTP server,
examine the contents of the FTP site, and download a copy of the test file.
Setting up the FTP Server
All we need to do here is place some test content somewhere under the /var/ftp directory, so that other users
can access it. The owner of the /var/ftp is the root account, and by default is the only one with permission to
write to the directory (recall from Chapter 8 that the owner, group, and others can all have different privileges
on a directory or file).
So to start, use a command line to switch to the root user:
$ su −
Password:
Then you can place whatever content you want under the /var/ftp directory. For example, you can easily use a
command such as echo to create a simple test file:
# cd /var/ftp/pub
# echo "This is the contents of a test file!" > test.txt
Here, we've created the file test.txt and placed it in the /pub subdirectory.
Using an FTP Client to Test Anonymous Read Access
Now you can test for anonymous read access, by using an FTP client to try to grab a copy of this test file via
an FTP connection. You can use any FTP client, and you can test from a Windows or Linux machine −
provided the client machine can see the FTP server across a network. (You can even use your Linux server as
a client, if you have only one machine.)
For example, in both Windows and Linux you can use the ftp program at the command line. In the following,
we'll use the ftp program as FTP client to connect to the FTP server, examine the contents of the FTP site, and
then download the file test.txt:
Start by connecting to the FTP server. When you're prompted for a username, specify anonymous (as
shown below) or ftp to indicate that you want anonymous access:
1.
Using Your FTP Server
281
$ ftp 192.168.0.99
Connected to 192.168.0.99 (192.168.0.99).
220 (vsFTPd 1.1.3)
Name (192.168.0.99:none): anonymous
331 Please specify the password.
Password:
230 Login successful. Have fun.
Remote system type is UNIX.
Using binary mode to transfer files.
Now, we can start to examine the contents of the FTP site that are available to users with anonymous
access. For example, here we'll use the ls command to examine the contents of the FTP root directory
(which happens to be the directory /var/ftp on the server):
ftp>ls
227 Entering Passive Mode (192,168,0,99,69,34)
150 Here comes the directory listing.
drwxr−r−x 2 0 0 4096 Feb 28 13:40 pub
226 Directory send OK.
This shows that the root directory contains just one subdirectory, called pub. Now we'll use cd to
change to this directory, and we'll list its contents:
ftp> cd pub
250 Directory successfully changed.
ftp> ls −al
227 Entering Passive Mode (192, 168, 0, 99, 56, 125)
150 Here comes the directory listing.
drwxr−xr−−x 2 0 0 4096 Feb 28 13:40 .
drwxr−xr−x 3 0 0 4096 Feb 27 19:15
−rw−r−−r−− 1 0 0 22 Feb 28 13:30 test.txt
226 Directory send OK.
2.
Now, we'll attempt to download the test.txt file we've just located. To do this, we'll use the get
command:
ftp> get test.txt
local: test.txt remote: test.txt
227 Entering Passive Mode (192, 168, 0, 99, 98, 207)
150 Opening BINARY mode data connection for test.txt (22 bytes).
226 File send OK.
When the file is successfully downloaded, you should find it in your present working directory.
3.
Finally, we'll end the session:
ftp> bye
221 Goodbye.
$
4.
For more information about anonymous ftp, please refer to RFC 1635, which can be found at
−editor.org/in−notes/rfc1635.txt.
Configuring an Anonymous FTP Server for File Upload
In much the same way, anonymous FTP users can write only to the directories that we allow them to write to.
By default, vsftpd does not allow users to upload to the FTP server at all; we must first configure the server to
allow anonymous users write access to some directory.
Using Your FTP Server
282
So, we'll set up the FTP server for anonymous write access first; then we'll test it again using an FTP client.
Setting up the FTP Server for Anonymous Write Access
There are four steps here. We'll need to create the folder, set the appropriate permissions, and then enable
uploading in the FTP server configuration:
First, we need to create a writeable directory. Again, you'll need the root account for this. Let's create
a directory called /upload (in the /var/ftp/pub directory):
# cd /var/ftp/pub
# mkdir upload
1.
Next, we need to set the permission of the upload directory so that it allows write−only access to
anonymous FTP users (so that they can write to the directory but not to download from it − this
restricts file sharing among FTP users). To do this, we'll first use the chgrp command to change the
group associated with the upload directory:
# chgrp ftp upload
Now, the owner of the folder is still root, but the directory's group is ftp − the set of FTP users. Now
we'll use the chmod command to assign read/write/execute access to the owner, write/access only to
the group, and deny access to other users:
# chmod −R u=rwx, g=wx, o−rxw upload
2.
Finally, we must configure the vsftpd server to allow anonymous upload. To do this, we simply edit
the configuration file, /etc/vsftpd/vsftpd.conf. Open this file using gedit (or your favorite text editor),
and locate the following lines:
# Uncomment this to allow the anonymous FTP user to upload files. This only
# has an effect if the above global write enable is activated. Also, you will
# obviously need to create a directory writable by the FTP user.
#anon_upload_enable=YES
Just remove the leading # character in the last line, and save the file:
anon_upload_enable=YES
3.
Finally, restart the vsftpd service by using the Restart button in the Server Configuration dialog, or
typing the following at the command line:
# service vsftpd restart
4.
That's it. Now we're ready to test this configuration.
Using an FTP Client to Test Anonymous Write Access
So, let's test our configuration with another simple session on our FTP client:
Connect to the client and log in (using the username anonymous or ftp) as you did before:
$ ftp 192.168.0.99
Connected to 192.168.0.99 (192.168.0.99).
220 (vsFTPd 1.1.3)
Name (192.168.0.99:none): anonymous
1.
Using Your FTP Server
283
331 Please specify the password.
Password:
230 Login successful. Have fun.
Remote system type is UNIX.
Using binary mode to transfer files.
Change directory to the pub/upload directory. Try to list its contents − you'll find that you can't,
because that's the way we configured the permissions on the upload directory:
ftp> cd /pub/upload
250 Directory successfully changed.
ftp> ls
227 Entering Passive Mode (192, 168, 0, 99, 95, 148)
150 Here comes the directory listing.
226 Transfer done (but failed to open directory).
2.
However, you can upload a file. To prove it, use the put command to upload a simple file like this:
ftp> put uploadtest.txt
local: uploadtest.txt remote: uploadtest.txt
227 Entering Passive Mode (192,168,0,99,133,229)
150 Ok to send data.
226 File receive OK.
40 bytes send in 0.000101 secs (2.1e+02 Kbytes/sec)
3.
That's it. Now you can close the FTP session:
ftp> bye
221 Goodbye.
#
4.
Now you can go back to your FTP server and check the contents of the /var/ftp/pub/upload directory. You
should find the uploadtest.txt file that was just uploaded from the client.
FTP Authentication via System Accounts
We've seen some examples using anonymous access to the vsftpd FTP server (via the anonymous or ftp
username), but what happens if a user has a system account and tries to gain access? Well, by default, vsftpd
allows this, and gives the user access to their home directory this way. For example, suppose your system has
an account for the user called eziodm. This user can use an FTP client to log in and gain access to their home
directory, /home/eziodm, via vsftpd like this:
# ftp 192.168.0.99
Connected to 192.168.0.99 (192.168.0.99).
220 (vsFTPd 1.1.3)
Name (192.168.0.99:none): eziodm
331 Please specify the password.
Password:
230 Login successful. Have fun.
Remote system type is UNIX.
Using binary mode to transfer files.
ftp> ls
lists contents of /home/eziodm directory
This can be useful, if your situation demands it. For example, you could set a machine up as a dedicated FTP
server and create an account for each user that needs to perform FTP:
# useradd −m −d /home/eddiew
# passwd eddiew
Changing password for user eddiew.
Using Your FTP Server
284
New password:
Retype new password:
passwd: all authentication tokens updated successfully.
Thereby you assign each user their own individual FTP space.
Disabling Local System User Accounts for FTP
By default, these users would have the same permissions to read, write, and execute the contents of their home
directory via FTP that they would have if they were accessing the directory by sitting at the computer. More
importantly, authentication via FTP is not encrypted, so allowing FTP access via user accounts is actually not
a good way to allow access to your system if you've got anything sensitive to protect.
Therefore, in most situations it's recommended that you disable FTP access via user accounts. This is easy to
do − you just change the appropriate setting in the configuration file, /etc/vsftpd/vsftpd.conf. When you open
the file, locate the following lines:
# Uncomment this to allow local users to log in.
local_enable=YES
Change the directive to read as follows:
local_enable=NO
Then restart the vsftpd service using the Server Configuration dialog, or typing the following at the command
line:
# service vsftpd restart
Now, if you try using an FTP client to gain FTP access via a system user account, you'll be refused:
$ ftp 192.168.0.99
Connected to 192.168.0.99 (192.168.0.99).
220 (vsFTPd 1.1.3)
Name (192.168.0.99:none): eziodm
530 This FTP server is anonymous only.
Login failed.
Blocking FTP Access for User Accounts
Alternatively, we can deny FTP access to individual users (rather than to all users). We control this using the
file /etc/vsftpd.ftpusers file, which contains the list of users that are not allowed FTP access to the server.
To try this, first change the local_enable directive back from NO to YES, in /etc/vsftpd/vsftpd.conf, to enable
FTP access via system accounts:
# Uncomment this to allow local users to log in.
local_enable=YES
Then, open the /etc/vsftpd.ftpusers file (using root privileges), add an account name at the bottom, and save
the file. There's no need to restart the vsftpd service; changes to the /etc/vsftpd.ftpusers file take effect
immediately.
Using Your FTP Server
285
Then use the account to try to gain FTP access via an FTP client:
# ftp 192.168.0.99
Connected to 192.168.0.99 (192.168.0.99).
220 (vsFTPd 1.1.3)
Name (192.168.0.99:none): eziodm
331 Please specify the password.
Password:
530 Login incorrect.
Login failed.
Configuring an FTP Greeting Banner
Once you've installed the vsftpd FTP server, there are all sorts of ways you can configure it to behave as you
want. Here's a simple example. We can change the default greeting message that the FTP server issues to
clients on connection, simply by changing the value of the ftpd_banner directive in /etc/vsftpd/vsftpd.conf:
For example, try changing it to this:
# You may fully customize the login banner string:
ftpd_banner=Welcome to the Wrox Press FTP service.
Then restart the vsftpd service, so that the change takes effect. Now use your FTP client to log in to the FTP
server, and you'll be greeted with this new message:
$ ftp 192.168.0.99
Connected to 192.168.0.99 (192.168.0.99).
220 Welcome to the Wrox Press FTP service.
For more information about the vsftpd FTP server, and all the configuration possibilities, refer to the man
pages by typing man vsftpd and man vsftpd.conf. You can find also more information about the vsftpd FTP
server at />Setting up a Print Server
If you want to share a single printer (or group of printers) among a number of users, then what you need is a
print server. The print server manages the print requests and puts them into a queue for processing. It can
manage:
Sharing of printers between many users•
Authentication, so that only permitted users can print to a given printer•
Print queues•
Configuration of many printers in a single location•
In this section we will examine how to configure our Linux machine as a print server for managing print jobs.
Print Servers on Redhat Linux 9
Red Hat Linux 9 provides two different print server software packages: cups and LPRng. The LPRng package
relates the old line printer daemon, and while popular for many years is now being superseded by the more
recent Common UNIX Printing System (CUPS). CUPS is a printing service for Unix−based platforms,
capable of managing printer jobs and queues and supporting network printer browsing.
Using Your FTP Server
286
The Red Hat Linux 9 installation process should install the cups package by default. To check, launch the
RPM (for example, using Main Menu | System Settings | Add/Remove Applications), locate the Printing
Support package group, which is under the System category, click its Details button, and ensure that the
checkbox (next to the cups option) is checked:
Click Close to exit this dialog, and Update to update the installed packages. If necessary, you'll be prompted
to insert Red Hat Linux distribution CDs to complete the installation.
Installing a Printer
When you first install CUPS, you get a default set of sample configuration files at /etc/cups. However, it's
easier to manage your printers using Printer Configuration tool that is provided by Red Hat. Each printer has
its own print queue, so we configure the print server by using the Printer Configuration tool to add a print
queue for each printer.
To start the Printer Configuration tool, select Main Menu | System Settings | Printing or type the
following command at the command line:
$ redhat−config−printer
It will ask for the root password, unless you were already logged in with administrative privileges.
The Printer Configuration window will appear:
1.
To add a print queue for a new printer, click on New button. This will open the Add a new print queue
wizard. Click Forward to get past the splash screen.
2.
The first thing you're prompted for is the name of the print queue you want to add. Type a unique3.
Print Servers on Redhat Linux 9
287
name for the printer (for example, something like prntr_queue−1). If you want, you can also type a
description, which will help you to identify the printer. Click Forward.
The next screen allows you to choose the queue type from the following options:
Label Type Description
Locally−connected LOCAL For a printer attached directly to your computer through a
parallel or USB port
Networked CUPS IPP For a printer attached to a different CUPS system and
accessible through TCP/IP
Networked Unix LPD For a printer attached to a remote Unix system and
accessible through TCP/IP
Networked Windows SMB For a printer attached to a remote Windows system and
accessible through a Samba share
Networked Novell NCP For a printer attached to a remote Novell Netware system
Networked JetDirect JETDIRECT For a printer connected directly to the network with its
own IP address
In this demonstration, we'll demonstrate the LOCAL queue type. If you have a locally−connected
printer, select Locally−connected, and select a device from the list (such as /dev/lp0). Then click
Forward.
Note If you have a networked computer, select one of the other options and follow the
wizard to complete the configuration.
4.
Next, you'll be prompted to select the make and model of your printer. When you've done that, click
Forward, and the wizard will confirm the details you've selected.
5.
The new printer will now appear in the printer list in the main window. You'll also see the following
dialog:
6.
Print Servers on Redhat Linux 9
288
Clicking Yes will save the configuration changes to the /etc/printcap configuration file, restart the lpd
printer daemon, and print a test page:
Configuring Printers
The Printer Configuration provides a number of options for managing printers. For example, you can edit or
remove the properties of a printer queue by selecting the queue and clicking Edit or Delete. You can also
configure a particular printer to be the default by clicking on the Default button. Whenever you make any
changes, you must save them by clicking on the Apply button (which also restarts the cupsd printer daemon to
take account of your changes).
You can also test a printer from the Printer Configuration tool, by choosing a printer and selecting any of the
test configurations from the Test menu.
Starting (and Stopping) the Printer Daemon
To control the cupsd printer daemon, we can once again use the Service Configuration GUI. However, you
may never need to do this manually − the service is configured to start automatically on system start−up by
default, and restarts automatically if you change its configuration via the Printer Configuration tool.
If you do need to control the service manually, you can do it using the Service Configuration GUI (as we've
described in other sections of this chapter − the service in question is called cups), or by using the service
command at the command line to control the cups script:
# service cups
Usage: cupsd {start|stop|restart|condrestart|reload|status}
# service cups restart
Stopping cups: [OK]
Starting cups: [OK]
Printing from Applications
By default, all applications send printing requests to the default printer configured on the system; but of
course, if there are more printers available then the application's Print dialog allows you to choose which print
queue to send the job to.
For example, if you're printing a word−processed document from OpenOffice's OpenWriter application, then
you'd do so by selecting its File | Print option from the menu bar. When you do that, you get a Print dialog like
this:
Print Servers on Redhat Linux 9
289
As you can see, the application offers you a list of printers to choose from − the list shown above includes an
entry for the prntr_queue−1 printer that we configured earlier. It also includes a Generic Printer entry − if you
choose this, then the application will send the print job to your "default" printer (the one that your machine is
configured to use automatically).
You'll need to configure the "default" printer before you use if for the first time; you can do this through the
Openoffice Printer Setup tool. Select Main Menu | Office | Openoffice.org Printer Setup, select the Generic
Printer entry in that dialog, and click the Properties button:
In the resulting Properties of Generic Printer dialog, the default command in the Select Command section is
lpr − this will send printer jobs via the lpr command to /dev/lp0 as the default print queue. Change the
command to lpr −P printername, where printername is the name you gave to your printer. Then click OK to
save these settings.
Now you can return to your OpenWriter application, select File | Print, and select the Generic Printer option in
the Print dialog to send the job to that printer.
Creating Print Jobs at the Command Line
The lpr utility that we've just seen can also be used to create print requests from command line. For example,
if you want to print a text document called addreses.txt, contained in the present working directory, you can
do so by typing the following at the command line:
$ lpr addreses.txt
We can also examine and control existing print jobs via the lpq and lprm command line utilities of the CUPS
software suite. The lpq command allows us to view the contents of the print queue, and can be used as
follows:
$ lpq
ptntr queue−1 is ready and printing
Rank Owner Job File(s) Total Size
active root 1 testprint.ps 15630 bytes
Print Servers on Redhat Linux 9
290
1st kapils 2 (stdid) 5761024 bytes
2nd eziodm 3 (stdid) 193536 bytes
3rd eziodm 3 addresses.txt 1024 bytes
If we want to cancel a print job, we can use the lprm command. For example, to remove the job with ID 838
from the print queue, we can issue the following command:
# lprm 838
Of course, if you try to cancel another user's print job, and you don't have permission to do so, then CUPS will
prevent you from canceling it. For example, suppose the user eziodm tried to cancel job 2 in the list above:
# lprm 2
lprm: You don't own job ID 2!
Note You can learn more about the CUPS printing system at
http:// cups.org/.
Setting up a File Server
A file server is essentially a shared storage space. File servers are generally accessed across a network, and
provide its users with a central location for file storage. File systems are also helpful when you need to share
files with other users: you can simply place your file in a public directory on the file server, where other users
can access it.
Like FTP servers, there are essentially two fundamental components to a file server − the storage space itself
and the mechanism for accessing it. Whether you're working on a single machine at home, or as part of a large
network in a major organization, you'll be using a file system to store your files; what a file server adds to this
is the notion that the file system is a shared one, accessible by (possibly) many users.
There are a number of benefits to be gained by implementing a file server:
It reduces administration cost. Instead of having important data stored on many individual PCs (all of
which would require backing up), you can store all your important data in one place (on the file
server). Then, only the file server needs regular backing up.
•
It provides the opportunity to enforce a more controlled and focused security policy, because the
security policy needs only to be applied to the file server.
•
It enables you to provide a more stable and reliable storage solution. It enables you to implement your
storage solution on high−spec machines that provide high levels of uptime. Moreover,
implementation of RAID or of mirrored SCSI disks (which help ensure data reliability) is more
feasible on a central file server than on many PCs.
•
There's also something to be gained in terms of cost of file storage (although this is less pertinent in
these days of cheap storage). First, it makes best use of the available storage capacity by making it
accessible to all users. Second, it provides a central repository from which common resources can be
made available to all (eliminating the need for each user to store their own copy).
•
Once you've got a file system, what makes it a file server is the mechanism that enables the file system to be
shared. There is plenty of software around for this purpose − Samba, the Network File System (NFS), the
Andrew file system (AFS), and Coda are all examples. Some of these are shipped as part of the Red Hat Linux
9 distribution, and we're going to focus on one in particular − Samba.
Setting up a File Server
291
Note For more information on the others, see ,
and .
An Overview of Samba
Samba is an implementation of the Windows SMB and CIFS protocols on Unix. The Samba project was
started by Andrew Tridgell, who wanted to mount his Unix server disk space onto a DOS PC. When he'd
solved the problem, Tridgell discovered that what he'd built was an implementation of the SMB (server
message block) protocol − a protocol for sharing files and other resources. Tridgell named his implementation
Samba, and published version 1.0 in early 1992. Since that time, the Samba project has grown tremendously,
and today there is still Samba development going on in the open source community.
So, Samba is a collection of programs that make it possible to share files and printers between computers
equipped to use the SMB protocol − Windows by default, Linux/Unix with Samba, and (more recently) Mac
OS X. Samba is freely available under GNU General Public License, and is included as part of the Red Hat
Linux 9 distribution.
In this section we'll take a look at how to install Samba, perform some basic configuration, and set up a shared
file server on a Linux machine. We'll also see how to use Samba to access a Linux−hosted file server from a
Linux or Windows machine, and how to access a Windows−hosted file server from a Linux machine.
There should be enough in this section to get you started working with file servers in Linux. If you want to
explore further with SMB and Samba, try (and specifically
/>Installing SAMBA
Again, perhaps the easiest way to install the Samba software suite is via the RPM GUI tool. Once you've
started the RPM (for example, by selecting Main Menu | System Settings | Add/Remove Applications), use
the Package Management dialog to locate the Windows File Server package group (which you will find under
the Servers category). Ensure its checkbox is checked. If you like, click on its Details button to see the
package details:
An Overview of Samba
292
As you can see, there are two standard packages: samba and samba−client. Click on Close, and then click on
Update to start the installation. You'll need the disk from your Red Hat Linux 9 distribution to complete the
installation.
Starting and Stopping the Samba Service
As with other services we've seen, there are a number of ways to start and stop the Samba service. Once again,
we can do so via the Service Configuration GUI tool. To launch the tool, select Main Menu | System Settings |
Server Settings | Services or type the following command at the command line:
$ redhat−config−services
Then locate the smb service, as shown here:
If the service is stopped (as shown here), then start it by clicking the Start button. It's also a good idea to check
the checkbox, to configure the samba service to start automatically whenever you boot up the system. For
example, if you ever have to perform an emergency reboot on your file server, then the "automatic start"
configuration means that the file server is immediately available to users after the reboot. When you've done
this, select File | Save Changes to save your new setting.
Alternatively, you can also stop and start smb service at the command line, using the service command to run
the /etc/rc.d/init.d/smb script we mentioned earlier. Typing the script name at the command line like this
reveals the possible usages:
# service smb
Usage: /etc/rc.d/smb {start|stop|restart|reload]status|condrestart}
As you can see, it works in much the same way as the httpd and vsftpd scripts we've seen in earlier sections of
this chapter. So, to start the service we'd type this:
# service smb start
Starting SMB services: [ OK ]
Starting NMB services: [ OK ]
This command starts both SMB and NMB (NetBIOS name server), which are both services related to Samba.
To stop the service, we'd type this:
An Overview of Samba
293