Beginning Red Hat Linux 9 phần 4 pptx
Bạn đang xem bản rút gọn của tài liệu. Xem và tải ngay bản đầy đủ của tài liệu tại đây (1.26 MB, 46 trang )
"save") column indicate that the object should be converted to the specified Microsoft Object when the
document is saved to a Microsoft file format. (So, if you leave the [S] checkbox unchecked, the objects will
not be converted and will be absent from the resulting file.)
As you can see from the screenshot above, there are four object types supported, including Microsoft Word
(WinWord), Microsoft Excel, Microsoft PowerPoint, and MathType.
Note MathType is an application used for representing mathematical formulae. For more on this application,
see />HTML Compatibility Options
This dialog doesn't offer any features for converting between versions of Microsoft Office, but it does contain
the setting that indicates what browser is targeted when exporting a document from an OpenOffice application
in HTML format. OpenOffice supports a number of formats, including:
Netscape Navigator (version 3.0 and 4.0)•
Microsoft Internet Explorer (version 4.0)•
HTML 3.2 (most browsers support this)•
File Format Options
In addition to the settings within the Options dialog, OpenOffice's ability to load from (and save to) different
file formats is integral to the applications themselves. These options vary according to the context of the
application, and so they are covered within the OpenOffice applications themselves.
However, it's also worth noting the existence of a generic document conversion tool called AutoPilot, which is
accessible from all OpenOffice applications. If you select File | AutoPilot | Document Converter, you'll see a
dialog box like the one shown below:
Common Functionality
131
Note AutoPilot is actually a batch tool, for which OpenOffice provides a shortcut.
This dialog provides you with options to convert from StarOffice or Microsoft Office file formats to the new
OpenOffice XML (eXtended Markup Language) format. In the screenshot above, we're concentrating on
Microsoft Office file formats and a Word document we have to convert, so we've marked the Word
documents option.
After pressing Next, you'll see the dialog box shown below. It prompts us to say whether we wish to convert
templates, documents, or both, and whether we are to include sub−directories in our conversion process. In
this case, we're converting only Word documents from our working directory and placing the converted files
in the same directory:
When you click the Next button again, you'll see a confirmation dialog box. If you're happy that everything is
present and correct, select the Convert button and the conversion process will begin:
Common Functionality
132
When the conversion is complete, the Progress screen will display the results of the conversion process.
Note Note that this conversion process will render any VBA code invalid. If your documents contain VBA
code that you wish to preserve, you should avoid this method.
Conversion Quality and Considerations
It's worth mentioning that the conversion quality between different file formats (especially Microsoft Office)
is excellent. The only caveats are that the conversion process from OpenOffice to Microsoft Office can lead to
files larger that their original file sizes due to the lack of compression. However, this is likely to change in
future releases.
Note It's worth experimenting with the Rich Text Format or RTF file format − this will help to avoid potential
conversion errors, although at the expense of certain formatting capabilities. Another option is to link
your graphics to external files instead of embedding them within your documents.
Using OpenWriter for Word Processing
When you start OpenOffice's OpenWriter (or just Writer) word processing application (which you can do
using Main Menu | Office | OpenOffice.org Writer or the shortcut icon from the task bar), you are presented
with a window like the one below:
OpenWriter provides the wealth of features that one would normally expect to find in a commercial word
Conversion Quality and Considerations
133
processing application. We won't list them all here; like the other applications in the suite, it would warrant a
book in its own right. However, we will highlight some of the key features included and also describe how
interoperability with other applications such as Microsoft Office is achieved. Some of the key features present
are:
Styles and style galleries•
Thesaurus•
Spell checker•
Clipart•
Support for other file formats, such as Microsoft Word, StarWriter, and so on•
As we've seen, OpenWriter is compatible with Microsoft Word. In particular, it is capable of loading and
saving documents and templates in a number of Word file formats, including Microsoft Word 97/2000/XP
and Microsoft Word 6.0/95. You can load and save between OpenOffice's native version and any of the other
versions listed, simply by using the File | Open and File | Save dialogs. The File Type drop−down box allows
you to choose the appropriate format:
Using OpenCalc for Spreadsheets
OpenOffice's OpenCalc (or Calc) application again provides numerous features that you would expect of a
commercial application and is comparable with Microsoft Excel, the spreadsheet application within Microsoft
Office. Some of the key features present are:
Ability to handle multiple spreadsheets simultaneously•
Embedded graphics and charts•
Cell security•
External data sources•
Data Pilot (this is similar to PivotTables in Excel)•
OpenCalc also supports compatibility with Excel, in its ability to load and save spreadsheets and templates in
a number of Excel file formats, including Microsoft Excel 97/2000/XP and Microsoft Excel 4.x−5.0. Other
interoperability features include the handling of VBA code and embedded objects (as we mentioned earlier in
this chapter).
There are other, more specific options that mimic the behavior of MS Excel, and help to make users with an
MS Excel background feel more comfortable. One specific such option is the ability to indicate that
OpenCalc's searching capability should behave in the same manner as Excel's. This option can be found in the
Using OpenCalc for Spreadsheets
134
Tools | Options dialog box, in the Spreadsheet | Calculate tab:
Note the Search criteria = and <> must apply to whole cells option in this dialog. When this option is selected,
OpenCalc handles searches in the same way as Microsoft Excel, in that the search criteria entered are specific
and must match the whole cell. When the option is unselected, the search criteria are matched against any
position within the cell.
Using OpenImpress for Presentations
OpenOffice's OpenImpress (or Impress) application again provides many of the kind of features that you
would expect of a commercial application, and is comparable with Microsoft's PowerPoint, the presentation
management application within Microsoft Office. The key features of OpenImpress include:
Master templates•
Slide animation and transition effects•
Notes against slides•
Timing rehearsals•
OpenImpress supports compatibility with Microsoft's PowerPoint, in its ability to load and save presentations
and templates in PowerPoint's file format (namely PowerPoint 97/2000/XP).
There are a number of other applications installed within the OpenOffice suite that we haven't covered in this
chapter. It's worth experimenting with the applications installed, to learn more about what they're capable of
doing − here's a brief summary of each:
The diagramming tool, Dia, is launched through Main Menu | Office | Dia Diagrams. This application
is used for drawing diagrams based on a variety of templates − from simple boxes and lines to circuit
diagrams. It's very similar to a primitive version of Microsoft's Visio diagram application. See
for more information.
•
The Draw application, launched via Main Menu | Office | Openoffice.org Draw, can be used to
generate drawings that are of a more graphical nature. It allows you to insert clipart from its internal
library or external sources. It draws its influence from Microsoft's Draw application.
•
The Printer Setup application (Main Menu | Office | Openoffice.org Printer Setup) simply allows
you to confirm printer devices that may be available to you, and direct output from applications such
as OpenOffice to your printers. Its closest Windows cousin is the Printers option found within the
Windows Control Panel.
•
Using OpenImpress for Presentations
135
Internet Applications
The existence of the Internet is at the heart of many of Linux's most exciting applications. Therefore, as
promised, in this section we'll take a look at Linux's Internet−related applications.
The default installation of Red Hat Linux 9 includes a number of applications contained in the Graphical
Internet package. All these applications have a graphical user interface (GUI) to make the user's life easier.
The package group contains some 14 applications (of which eight are installed by default). In this section we
will concentrate on just two of them:
The Mozilla application − a web browser that provides similar functionality to Netscape's Navigator
or Microsoft's Internet Explorer browsers. Mozilla is a fully functional web browser, and also
supports extensions to add further functionality (such as mail).
•
The GAIM client − an Instant Messaging client similar to Microsoft's Instant Messenger and capable
of interfacing with a number of messaging protocols (such as AIM, ICQ, Yahoo!, MSN, IRC, and
others) used by various messaging clients.
•
We'll take a look at these applications in more detail, and discuss their history and interoperability features;
and then you'll be in a position to explore at your leisure.
The Mozilla Web Browser
The Netscape browser's core source code, known as mozilla, was released to the public under the Netscape
Public License (NPL) in 1998. The Mozilla project (a group set up to continue Netscape Communicator as an
Open Source application) used this code as the basis for its own commercial−level browser. The current
version of Mozilla is released under the NPL license for modifications of the core mozilla code and the
Mozilla Public License (MPL) for any new additions.
The Mozilla web browser is the primary browser for Red Hat Linux, and is an X Window System application
that provides a very similar look and feel to the Netscape Navigator and Internet Explorer applications. To
take a look, fire it up now by clicking the Web Browser icon on the bottom left of your desktop (next to the
Main Menu button), or by selecting Main Menu | Internet | Mozilla Web Browser:
Internet Applications
136
The layout of the application is likely familiar to you. The menu bar contains all the familiar menus, and the
navigation toolbar allows you to type in a URL, move back and forward between recently visited pages,
reload a page, and stop a page from loading. The above screenshot also shows a personal toolbar folder,
which contains shortcuts to your favorite websites − you can control the shortcuts on your personal toolbar
folder by using the Manage Bookmarks option (which you'll find under the Bookmarks menu):
The features provided by Mozilla (and the look and feel of those features) will be familiar if you've used
Internet Explorer, and more especially if you've used Netscape Navigator (because Mozilla and Navigator are
derived from the same original source code).
The Mozilla Mail Client
In addition to its core functionality as a web browser, we can extend Mozilla's base featureset by installing
additional functionality (known as plug−ins) such as the Mozilla−based mail client. In fact, the mail client
plug−in is installed as a default extension to Mozilla.
The mail client is accessible from the Mozilla application by selecting the Window | Mail & Newsgroups
option from the menu bar. When you first use this, you'll be prompted to create a default account using the
information provided by your ISP or network administrator. When you've successfully entered that
information, the main application will start with the following screen:
The Mozilla Web Browser
137
This has very similar functionality to that of Microsoft's Outlook Express − providing folders for your e−mail
and for any newsgroups that you're subscribed to. By default, Mozilla includes support for Internet Security
Standards such as SSL (Secure Sockets Layer), which provides encryption of information over the Internet.
Let's have a look at some of the specific interoperability features within Mozilla's mail.
Importing from Other Clients
If you have been using another mail client such as Netscape Communicator, Microsoft Outlook, or Microsoft
Outlook Express, you may import your mail messages into Mozilla mail by using the features provided from
the Tools | Import menu option. This option presents you with the following dialog:
This feature will guide you through the process of importing mail settings, and messages, or an address book
from another mail client − you simply select the appropriate option and follow the wizard.
It's also possible to export an address book to a variety of formats (including Outlook and Outlook Express).
To do this, select Window | Address Book, then the address book you want to export, and then click the Tools
| Export menu option.
The GAIM Instant Messenger Application
So you can browse the Internet and correspond using e−mail; what about chatting? This technology has
suffered from the number of different protocols used by different organizations for transmitting information.
However, in true Linux tradition, GAIM is flexible enough to cope with this and offers an elegant solution.
As we mentioned in Chapter 3, GAIM is a utility for supporting online chats; it's similar to things like the
AOL Instant Messenger application. It provides a single front−end for multiple protocols (including ICQ,
IRC, and Yahoo) and so can interoperate with other Instant Messenger applications.
The Mozilla Web Browser
138
The first thing to do (if you haven't done so already) is create an account with an Internet messaging service
(there are plenty around − MSN and Yahoo! are just two examples). Then, start GAIM (by selecting Main
Menu | Internet | Instant Messenger or type gaim at the command line):
By default, only two protocols are installed with GAIM − AIM/ICQ and TOC. It's quite possible that your
messaging service uses a different protocol − for example, MSN Messenger and Yahoo! both use their own
protocols. GAIM supports many such protocols; to install the protocol support you need, click the Plugins
button and use the Load option to load the plugins you require for each protocol:
When you've done that, you can tell GAIM about your account − to do that, you click the Accounts button,
and supply the information about your account and the protocol used.
The Mozilla Web Browser
139
When you've done that, you can sign in and start chatting:
The latest updates, documentation and additional plug−ins to extend the functionality of GAIM can be found
at its web site at .
Personal Information Management
As if the Mozilla plug−ins for tasks such as e−mail management weren't enough, an application to manage
e−mails, contacts and related things is available in the form of Ximian's Evolution. The Evolution application
is a groupware program, similar to Microsoft Outlook, that provides access to personal information such as
e−mail, a calendar, contacts, and so on. Management of this type of information is often known as personal
information management (or PIM). Programs like Evolution (and Outlook) allow you to manage all of this
personal information within a single application.
Installing Evolution
If you look in the RPM GUI, you'll find the Evolution package under the Graphical Internet package group
(which is within the Applications category). In fact, it is installed by default as part of the default installation
of Red Hat Linux 9 excluding the Server edition for obvious reasons.
Once installed, you can start the Evolution application by selecting Main Menu | Internet | Evolution Email, or
by clicking the Evolution Email shortcut that you'll find on the taskbar at the bottom left corner of the desktop
(near the Main Menu button).
Setting up Evolution
If you are starting Evolution for the first time, the setup wizard will guide you through completing the
information to establish a connection with your mail server through your Internet Service Provider (ISP). The
screen below shows one of the early screens in the Evolution Setup Assistant, which starts up the first time
you run the application:
Personal Information Management
140
Alternatively, you can set up your mailbox properties once the application has started properly. To do this,
select Tools | Settings (this is the starting point for changing most of Evolution's settings), and then select the
Mail Accounts tab, which allows you to add new accounts and edit the properties of your existing accounts:
The wizard guides you through process of entering the information that is provided by your ISP to gain access
to your Internet account and e−mail subscription: your name, e−mail address, and the name of the server and
username assigned by your ISP.
Using Evolution
Selecting this option will start the setup wizard, and when the wizard is complete you'll see the Summary
screen by default. You can move to other areas of the application by selecting the icons on the left hand side
of the window. For example, selecting the Inbox icon will display the following screen:
Using Evolution
141
The layout of the window consists of the usual menu bar and a context sensitive toolbar. The toolbar's icons
reflect the application's current mode (Summary, Inbox, Calendar, Tasks, or Contacts). These modes are
accessed via the shortcut toolbar that runs down the left hand side of the application:
The Summary feature provides a summary screen, similar to Outlook's Today screen. It provides a
summary of your Mail Box, indicating the number of e−mail messages in your Inbox and Outbox
with counters for each. A list of current Appointments and Tasks is shown along with the ability to
capture the current Weather forecast and News Feeds from the Internet.
•
The Inbox (shown above) provides access to your e−mail account, allowing you to send, receive, and
manage your e−mails using such features and folders.
•
The Calendar allows you to manage your schedule, adding forthcoming appointments between one or
more people and attaching reminders so you don't forget!
•
The Tasks feature provides a simple task database, allowing you to record tasks and assign Due Dates.
In addition, you can categorize your tasks for more flexibility when managing them.
•
The Contacts feature allows you to store your contacts in an address book, which may then be used
when sending e−mails. However, it allows you to store far more information than simply an e−mail
address such as their address, web pages, a variety of telephone numbers, company information, and
more!
•
Again, we'll avoid trying to provide a user guide here; that would take too much room, and the online
documentation is more than sufficient to take you through the details of individual tasks. Instead, we'll
concentrate on the key features of the application, we'll note some similarities with Microsoft Outlook, and
we'll also cover some of the features for interoperability with other applications (particularly Microsoft
Outlook).
The Summary Feature
As mentioned, this feature is very similar to the Today screen in Microsoft Outlook, or the Summary screen in
Microsoft Outlook Express. It summarizes the information held within the application, and includes useful
features for gathering information from various sources on the Internet.
To modify the settings that apply to this screen, you can use Tools | Settings to bring up the Evolution Settings
dialog, and then select the Summary Preferences tab:
Using Evolution
142
This dialog contains four tabs, which allow you to customize the contents of the Evolution Summary screen:
Tab Description
Mail Allows you to add shortcuts to each of your local mail folders (including subfolders) − including
the Inbox, Outbox, Sent, and Drafts folders, and any other folders you create using the Inbox
mode. If you add a shortcut to a folder, the Summary also shows you a count of the number of
items in that folder.
News
Feeds
Allows you to add links to news feeds. The News Feeds tab contains a number of predefined news
feeds to choose from − the Red Hat Linux Update Watch
( is displayed by default. You can also use the News
Feeds tab to create your own.
Weather Allows you to retrieve the current weather forecasts from a recognized source. For example, the
Met Office (in the UK) is used as the source for weather forecasts most of the main cities within
the UK.
Schedule Allows you to manage the display of calendar and task summaries in the Summary display. You
can choose how many days of your calendar to be displayed at once (choose from one day, five
days, one week, or one month). You can also choose to whether to display all tasks in the
Summary, or only those tasks that are "due today".
The Inbox Feature
The Inbox screen provides an interface not only to your Inbox folder, but to all your local mail folders. When
you first open the Inbox screen, you get to see the Inbox folder, with a list of messages shown in the top panel
and the content of the currently selected message shown underneath in the preview panel. The toolbar
contains shortcuts to the most popular features − creating, replying, and deleting messages, printing,
navigation, and so on.
The folder bar is a particularly useful feature that's not shown by default. To make it appear, select View |
Folder Bar:
Using Evolution
143
As you can see, the folder bar makes it much easier to find your way around your local mail folders. In
addition, you can use the folder bar to manage your folders − creating, deleting, moving, copying, renaming
folders and so on. For example, to create a new subfolder you simply select the parent folder in the folder bar
and either select File | New | Folder or right−click and select Create New Folder.
Evolution also provides the usual search facilities, which are very similar to those in Microsoft's Outlook. You
can apply search criteria against fields held in e−mails, such as the subject or body.
The Calendar Feature
The Calendar function provides you with a view that represents a certain time period. It can display a single
day, a week (including or excluding weekends), or a month. You can change this setting via the View |
Current View menu item. The example below shows the Working Week view:
It is within these views that you can create Appointments that holds information such as Summary, Location,
Start Date/Time, Classification, and so on. You can even add a Reminder to your appointment, and you can
create recurring reminders over a period of days, weeks, months, or years. In the screenshot above you can see
that I had a couple of appointments, including a visit to the dentist (oh joy!) and a meeting with the
publisher
Using Evolution
144
The Tasks Feature
The Tasks screen is a simple but effective list of jobs. To enter a task, you can use the New | Task button or
the Click to add a task textbox. If you want, you can also assign a Due Date, and when the task is complete,
you can mark it as finished.
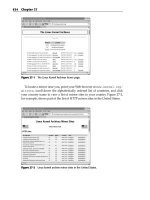
The screen below shows an example of the Tasks screen with some tasks entered to show you some of the
features described:
You can see three tasks in this screenshot. I cleaned the car last Friday, and afterwards I marked the task as
complete by clicking the checkbox next to that task. We're having a dinner party tomorrow (Tuesday), so I
have to buy some food − the application is showing that task in bold because I have to buy that food today!
The final task shows that I have until February 26 to submit this chapter to the Publisher.
Note Remember that these tasks can also be displayed on your Summary screen to act as a reminder for you.
The Contacts Feature
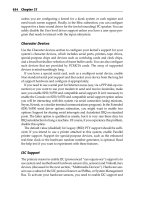
The Contacts screen acts as an address book. The screen presents columnar list of contacts that exist within
your address book. The screen below shows the contact screen with just a few contacts already entered:
You can see here that I have added a few contacts. I've added contact entries for all the coauthors of this book,
and for two companies (Wrox Press and Red Hat). I've also added a distribution list, which I've called Beg
Using Evolution
145
RHL9 Authors. This entry has a table icon to the right of it, to indicate that it's a distribution list; it contains a
list of the entries for the other authors.
To add a contact, you can use the New | Contact button or the File | New | Contact menu option. When you do
so, you get a dialog box in which to enter your information:
Creating distribution lists is equally simple − you use the New | Contact List button or the File | New | Contact
List menu option to bring up the dialog, supply a name, and then use your mouse to drag−and−drop contacts
into the list.
To the right of the window you'll notice a list of shortcut buttons. Each button acts as a filter on the contacts.
So if I selected the W button, only those contacts beginning with W would be shown − in this case only
Simon Whiting and Wrox Press.
Importing E−mail from other Systems
If you are familiar with Microsoft Outlook (or Outlook Express), then you will find Evolution very familiar
and comfortable. In fact, you can use Evolution either to import data from a recognized format in the form of
a data file or to connect to an e−mail account already held on Microsoft Exchange such as one within your
corporate environment or even at home.
Importing from Outlook and Other Formats
The File | Import option from the menu starts the Evolution Importer Assistant. Step 1 of the assistant invites
you to indicate whether you want to import from an older program, or from a file. If you're importing from a
file, Step looks like this:
Importing E−mail from other Systems
146
You can import from any of six formats listed in the drop−down list shown in the screenshot. When you've
selected the data file you wish to convert, move to Step 3 using the Next button, and select the Import button
to begin the import process.
Note You cannot use this technique when importing information from Microsoft Outlook or Outlook Express
version 4 (or later). However, you can convert these files into the standard mbox format that is
supported by the above method (you can perform this conversion using another mail application such as
Mozilla Mail). Alternatively you can use the Outport Tool. For more information, see
and
/>Connecting to a Microsoft Exchange Mail Server
Connecting your Evolution client to a Microsoft Exchange server is fairly simple, as long as you have
purchased the Ximian Connector for Microsoft Exchange. Instructions for setting up accounts using this
feature can be found within the online documentation, or at the Ximian support desk (try
/>Further information on the Ximian Connector can be found at />which describes in more detail the features within the product and the costs associated with it.
Multimedia Applications
The category of multimedia applications encompasses a wide variety of applications from playing CDs, to
creating your own music library using MP3 files, to creating your own videos! This section covers some of
these applications that tackle audio or graphical file formats.
Red Hat Linux 9 ships with no less than 19 packages packed full of multimedia applications. You'll find these
packages in the Sound and Video package group (under the Applications category) in the RPM. Aside from
the three standard package groups, there are 11 other package groups installed by default − these applications
cover a variety of audio and graphical functionality:
Package Group Description
cdda2wav Utility for copying . wav files from audio Cds
cdlabelgen CD case designer
Importing E−mail from other Systems
147
cdp Text application for playing audio Cds
cdparanoia Compact disc digital audio (CDDA) extraction tool (also known as a ripper)
cdrecord Command line based CD recording program
dvdrecord Command line based CD and DVD recording program
grip Graphical CD ripper and MP3 encoder
gtoaster CD Recording package for both sound and data
mikmod MOD file player
xawtv TV application for suitably compliant devices
xmms Multimedia player
We'll deal with these two types of applications in the following two subsections.
Audio Applications
As well as just allowing you to play CDs, Red Hat Linux provides a load of other utilities − from creating
special effects in XMMS to converting them into MP3 files and labeling them. We can't cover all of the audio
applications in the Sound and Video package group, so we'll concentrate on the most useful and user−friendly
applications, and some of which are included in other packages such as the GNOME desktop:
Playing audio CDs with Gnome−CD•
Playing multimedia files with Xmms•
Burning (writing) and ripping (extracting from) music CDs with cdparanoia, grip, and other utilities•
Playing Audio CDs
The default application for playing your audio CDs is Gnome−CD. You can run Gnome−CD by selecting
Main Menu | Sound & Video | CD Player or by typing gnome−cd at the command line, but you'll find that the
application starts automatically if you put an audio CD into your CD drive. It presents you with the following
screen:
This will automatically extract the track list and duration from the CD. From here you can play, skip forward,
skip backward, and adjust the volume, and so on, just as you would on a standard CD player.
The two buttons on the left (just below the words Unknown Album in the screenshot) lead to the Track Editor
and Preferences dialogs. The Preferences dialog is particularly useful, because it allows you to choose the CD
player device and to control the behavior of the application when you start it and close it:
Audio Applications
148
Playing Multimedia Files
Red Hat Linux 9 ships with a copy of Xmms (version 1.2.7), which is a cross−platform multimedia player
very similar to the popular WinAmp on the Windows platform. To start Xmms, you can select Main Menu |
Sound & Video | Audio Player, or run xmms from the command line. Either way, you are presented with the
following screen:
As you will notice, the interface is small and concise, relying on separate windows to encapsulate further
features that you may decide to switch on. You can access the xmms main menu by right−clicking on the title
bar of the window. This provides you with a menu that allows access to the following:
Play options (File, Directory, Location)•
Window displayed (Main Window, Playlist Editor, or Graphical Equalizer)•
An Options sub−menu•
A Playback sub−menu•
A Visualization sub−menu•
In the screenshot below, you can see the Main Window, Playlist Editor, and Graphical Equalizer all together.
The application has retrieved the tracks from a CD by using the Play Directory option, and selecting
/mnt/cdrom as the location. You can also see that Track 2 has been selected and is currently playing:
Audio Applications
149
Support for Various Audio and Video Formats
So, the xmms application can be used to play audio CDs in the same way as Gnome−CD. The real benefits
come from using the application to play other audio and video formats, such as MP3s, which may exist on
media other than a CD. For example, you may keep your MP3 collection on your hard disk, in which case you
may use the Play Directory feature of XMMS.
Note By default Red Hat has disabled the ability for XMMS to play MP3 files; however, this
capability can be reinstated and is discussed later on in this section.
You can extend the capabilities of the xmms application using plug−ins, which can be enabled and configured
using the Preferences dialog. To get to the Preferences dialog, right−click on the main xmms window and
select Options | Preferences:
You'll notice that the dialog contains a number of tabs − these tabs allow you to configure various plug−ins
and include Audio, Visualization, and General options. We'll concentrate on Audio plug−ins and allow you to
play with the others. There are a number of plug−ins already installed, and these plug−ins cover the following
audio sources:
Audio CD−ROMs (using libcaudio.so)•
.mod files (using libmikmod.so)•
.wav files (using libwav.so)•
.ogg files (using libvorbis.so)•
Audio Applications
150
Support for MP3s
You'll notice that MP3 is missing. Red Hat decided to disable MP3 support by default, in view of legal
concerns surrounding patents and licensing. However, you can reinstate such features by installing the XMMS
MP3 update from various Internet sites. You simply need to install the xmms−mp3 RPM, which consists of
the following two files:
/usr/lib/xmms/Input/libmpg123.la•
/usr/lib/xmms/Input/libmpg123.so•
Also provided is the source or SRPM from which the binary RPM was built. This is the same SRPM shipped
with Red Hat Linux 9 except that it uses the unrestricted XMMS source (i.e. has MP3 support), and has been
modified to create the xmms−mp3 sub package. The package can be downloaded from
/>You would then install the RPM using a command line similar to the following, depending on the package
name:
rpm −Uvh xmms−mp3−1.2.7−13.p.i386.rpm
Finally (although we won't discuss them here), it's worth noting that there are xmms extensions that provide a
number of other features, including visualization, skins, and effect plug−ins (for simulating echo, stereo, and
other effects).
CD Burning and Ripping Utilities
This section covers some of the utilities that Red Hat Linux provides for writing data to CDs and DVDs (a
process known as burning). We'll also cover the utilities for taking digital data from the audio tracks of a CD
(known as ripping) and turning them into MP3 files (known as encoding). The MP3 files can then be stored
on your hard disk and played through the XMMS application that we discussed earlier.
Extracting Audio Files from CD to MP3
First, let's consider the task of extracting audio files from CD into MP3 format. The utility of choice for this
task is cdparanoia, which is installed by default within Red Hat 9. It can be run only from the command line,
but it is very flexible and you can have a lot of fun learning what all the different parameters are for. To find
out about all the different parameters, just type the application name at the command line:
$ cdparanoia
USAGE:
cdparanoia [options] <span> [outfile]
OPTIONS:
−v −−verbose : extra verbose operation
−q −−quiet : quiet operation
−e −−stderr−progress : force output of progress information to
stderr (for wrapper scripts)
In its simplest form, the following command line will extract all the tracks on a CD and store them in separate
files in the current working directory:
Audio Applications
151
$ cdparanoia −B −w "l−"
Here's how to interpret the parameters in this command:
Parameter Meaning
−B Indicates that this is a batch and each track will be extracted to a separate file
−w Indicates that the output file is to be a Microsoft .wav file
"1−" Indicates that you wish to extract from the first track to the end of the disc
Note You can find out more about cdparanoia at />A GUI for CD Rippers and MP3 Encoders
To make your CD ripping and MP3 encoding activities easier, Red Hat Linux 9 includes the grip utility. You
can fire up this GUI by selecting Main Menu | Extras | Sound & Video | grip. By default, it's configured to use
cdparanoia for extracting the audio files (as .wav files) and the lame executable for encoding the files into
MP3 format.
As we've mentioned, the lame encoder is not included by default in Red Hat Linux 9, due to its decision to not
support MP3 out of the box. However, you can download the lame encoder from
and you can get the bladeenc encoder from
.
The interface of the grip utility is intuitive and fairly easy to use. The main screen is shown below:
More information can be found at the Grip's web site at />Recording Files onto CD
The cdrecord utility is a command line utility for recording files onto writable CDs using an appropriate
CD−Writer drive (CD−R or CD/RW). It is installed by default in Red Hat Linux 9, and its web site can be
found at />Audio Applications
152
Like cdparanoia, the cdrecord utility is a very flexible program and as such has a large number of parameters.
The parameters you need vary according to the type of CD format you are writing (for example, whether
you're creating an audio CD or a data CD). For a full list of parameters, you can check the website or type the
application's name at the command line:
$ cdrecord
Options:
−version print version information and exit
dev−target SCSI target to use as CD/DVD−Recorder
The example command below records an audio CD by writing the .wav files created by using the cdparanoia
utility:
$ cdrecord −v dev=2,0 −dao *.wav
This example assumes that the .wav files are located in the current directory, and that a blank CD−R or
CD−RW is in the drive. Here's how the parameters used here affect the application's behavior:
Parameter Meaning
−v Indicates that progress is displayed via the verbose switch
−dev Indicates the SCSI target for the device identified. Each SCSI device is assigned an ID; in this
case it's 2,0.
−dao Indicates that a single session is to be written to the CD and closed when finished
*.wav Indicates that all files matching this specification should be written to the CD
Note You can also use the dvdrecord utility to record information on writable DVD drives such as
DVD−RAM. There's more information on this at />tHE FEATURES PROVIDED BY mOZILLA (
GnomeToaster
If you find all this command line stuff too daunting, you could use the GnomeToaster application.
GnomeToaster is a graphical CD recording utility written for the GNOME environment. You can start this
application by selecting Main Menu | System Tools | More System Tools | CD Writer, or by typing gtoaster at
the command line:
Audio Applications
153
We won't dwell on this application, but we'll note that the user interface is again easy to use and provides a
simpler (if less flexible) alternative to the cdrecord option. You simply use the top part of the dialog to locate
the files you want to record, drag them across to the bottom part of the dialog (which represents the CD−ROM
drive), and select the Record option.
Graphics Applications
There are numerous graphical applications installed within Red Hat Linux; some exist as part of KDE or
GNOME. Others can be found within application suites such as OpenDraw (which is included within
OpenOffice), and yet others are standalone applications written for the sole purpose of manipulating images.
In this chapter, we'll concentrate on the applications that are installed by default with Red Hat Linux 9: The
GIMP, PDF Viewer, GQView, and OpenDraw. Most of these are contained within the Graphics package
group (which you'll find under the Applications category of the RPM), and can be found in the Main Menu |
Graphics menu.
The GIMP
The GNU Image Manipulation Program (or GIMP, as it's affectionately known) is a very powerful piece of
software used for graphic manipulation and is equally at home as a simple paint program as it is at retouching
photographic images you may have. It may be extended using the plug−in technology common to a number of
Linux applications but may also be enhanced by using the internal scripting interface that allows you to
automate tasks.
The GIMP has been released under the GNU General Public license and as such is freely distributed software.
It is installed by default within Red Hat Linux 9 and it has a web site at where you'll
find documentation, support, and downloads.
You can start the application by selecting Main Menu | Graphics | The GIMP, or by typing gimp at the
command line. A variety of configuration and control windows appear when you start the application, and you
can control which dialogs are open at any given time by using the File | Dialogs menu of the main GIMP
window (which is the top−left of the three windows shown below):
Graphics Applications
154
As you can see, the GIMP application is a discrete window containing a menu, an icon toolbar, and color
information. Each new image is seen in its own separate window (not shown here), which carries its own
menu (accessed by right−clicking on the image).
The application is considerably more powerful than Microsoft Paint, and its features are more closely aligned
with applications such as Photoshop or Paint Shop Pro. For example, it supports:
Numerous paint tools•
Support for layers and channels•
Advanced scripting and plug−in capabilities•
Gradient editor and blend tools•
Transformation support such as rotate and scale•
Multiple file formats•
The GIMP's features are too numerous to list in detail, and again we will leave you to play with the
application. The online documentation (found at is very thorough and this
can be supplemented by the documentation found at its main web site (at In addition,
a large collection of resources, available from the web site, covers patterns, palettes, brushes, gradients,
scripts, and fonts, and contains links to other important web sites for The GIMP (such as a plug−in registry at
and the very useful GIMP User Group − or GimpForce − at
/>GQView
GQView is a simple application that allows you to view a number of graphical images simultaneously. You
start by selecting the directory in which the graphic files exist, and then either selecting the file from the
left−hand pane with its image being displayed in the right hand pane or using the Slideshow feature available
on the View menu.
To start this application, select Main Menu | Graphics | More Graphical Applications | GQView Image Viewer
or run gqview from the command line. The screenshot below shows the utility being used to display
screenshots from the Red Hat Linux installation process that we covered back in Chapter 1:
Graphics Applications
155