Beginning Red Hat Linux 9 phần 3 ppt
Bạn đang xem bản rút gọn của tài liệu. Xem và tải ngay bản đầy đủ của tài liệu tại đây (1.27 MB, 46 trang )
Choose the Modem connection option, then press Forward to reach the following screen:2.
In this screen, we can either choose from the expandable list of ISPs on the left, or enter our own
dial−up information into the boxes provided on the right. You should do whichever is appropriate for
you.
Note If you wish to connect to the T−Online network, you'll need to press the T−Online Account
Setup button, and provide the additional information that you're asked for.
3.
To turn on your Internet connection, select your newly created device, and then click the Activate
button at the top of the panel. To turn it off, simply click the Deactivate button that's next to it:
4.
Analog Modem Connections
85
Finally, when you come to close the window, click on the Yes option in the dialog that asks you if
you want to save your changes.
5.
High−bandwidth Connections
While connecting to the Internet using a dial−up modem is sufficient for activities such as checking e−mail or
browsing the web, this technology is not exactly keeping pace with the content offered online. Web sites are
offering richer content by the day − and file downloads are getting bigger and bigger. This is where
high−bandwidth Internet connections come in. Even though ISDN (Integrated Services Digital Network), the
predecessor of today's high−bandwidth solutions, enjoyed only a lukewarm response, Cable and DSL (Digital
Subscriber Line) modem−based solutions are becoming very popular in many countries. Their large
bandwidth also means that several machines can now be connected to the Internet simultaneously. What this
means is that we connect our single machine to either a Cable or DSL modem using an Ethernet cable. In the
case of multiple machines, we connect these machines to a network router, which in turn is connected to the
Cable or DSL modem.
Technical Operation
High−bandwidth connections typically layer the TCP/IP protocol over one of the two hardware protocols:
Ethernet or PPPoE (PPP over Ethernet). In fact most of the Cable modem providers use Ethernet as the
hardware protocol while DSL providers use PPPoE:
High−bandwidth Connections
86
Connecting a High Bandwidth Connection to the Internet
Choose xDSL connection from the Internet Configuration Wizard.1.
Enter your account details such as the Provider Name (which is just an arbitrary name that you can
identify the connection by) together with your Login name and Password:
Note If you're connecting to T−Online you'll need to press the T−Online Account Setup button, and
supply the additional information that it asks for.
2.
Select Forward, then Apply, to finalize your configuration.3.
You can turn your connection on or off using the Activate and Deactivate buttons at the top of the panel.
Typically, high−bandwidth connections are 'always on', that is, unlike a dial−up connection, there is no need
to initialize the device every time a connection is to be made. In order that a device and the connection
associated with it be activated automatically at boot time, from the Network Configuration screen we need to
click on Edit and on the General tab enable the checkbox that says Activate device when computer starts.
Now that you've done this your connection will come online as soon as you turn your computer on.
Note Cable Modem Providers tend to use the Ethernet protocol. As such connections to their service can be
configured in the same manner as for a LAN. We'll discuss this in the next section.
High−bandwidth Connections
87
Connecting to a LAN
This section considers how to connect a Linux machine to a LAN, such as might be found in a home or
business office. In these circumstances your machine takes on the role of being a networked device. A
network device connected to a TCP/IP network (such as the Internet or an Intranet LAN) has an IP address
associated with it, such as 192.168.100.20. Using the IP address of a machine, other machines on the network
can address it uniquely. An IP address may be static or dynamic:
Static addresses are allotted to machines indefinitely and do not change. Typically static addresses are
allocated to servers.
•
Dynamic addresses are allotted to machines for a specific period with no guarantee that the same
address will be available next time the machine connects to the network.
•
Dynamic IP addresses are distributed and managed via dynamic address allocation protocols. In the case of a
machine connected to a LAN using a dynamic IP address (or in the case of an ISP providing TCP/IP over
Ethernet), the address is allocated either using the Dynamic Host Configuration Protocol (DHCP) or the
Bootstrap Protocol (BOOTP). In these cases we choose either dhcp or bootp from the drop−down list on our
Configure Settings menu. For ISPs that use PPPoE, the address is allotted by the PPPoE protocol, in which
case we need to choose dialup.
For a machine connected to a LAN or ISP using a static IP address, we need to obtain the network details such
as the IP Address, the Subnet Mask for the network, and the Default Gateway Address which is the IP address
of a router for the network. The local network administrator (or the ISP) should be able to provide these
details.
Choose Ethernet connection from the Internet Configuration Wizard. Pick the Ethernet card you wish to
configure, press Forward, and provide your addressing information in the next screen:
If you've performed a LAN−based network configuration during the installation, as detailed in Chapter 1, then
you can skip the rest of this section, because your LAN should already be up and running.
Connecting to a LAN
88
DNS
Rather than remember the IP address of the Wrox web site, it is easier for us to remember www.wrox.com.
Domain Name System (DNS) servers provide the mapping between human−readable addresses (such as
www.wrox.com) and the IP addresses of the machines acting as the web servers for the corresponding web
service. Applications such as web browsers and e−mail clients require the IP address to connect to a web site
or a mail server respectively. In order to get this from the human−readable input that we provide them with,
they query a DNS server for the corresponding IP address information. Obviously, this also means that the
browser and other clients on the machine need to know the IP address of the DNS server. For machines that
use DHCP, the information about the DNS server is automatically available when the machine is configured.
Other Connection Types
The Internet Connection Wizard also allows us to configure some of the less common types of connection
devices, such as ISDN and Token Ring adapters:
External ISDN terminal adapters (the ones that are connected to the serial port on a machine) can be
configured just like ordinary analog modems. This discussion deals with ISDN adapters that are internal
ISDN cards. In this case, we need to know the name of the adapter, its IRQ, the IO address and the
D−Channel protocol used, so as to configure it properly. This information should be available as part of the
vendor's documentation for your adapter (if you've not got it you could try calling them, or using Google if
you've a second machine). Similarly, for configuring a Token Ring adapter, we need to know the name of the
adapter we intend to use before we can configure it.
Wireless Connections
The Internet Configuration Wizard allows us to configure a couple of emerging device and connection types:
Wireless cards and VPN connections. Most of the popular wireless cards provide connectivity using the
802.11b protocol and are known as Wireless Ethernet devices.
Connecting to a LAN
89
Even though the wizard has a separate option for configuring a Wireless card, it is essentially the same as
configuring an Ethernet device (dealt with under LAN) with the added ability to specify some
wireless−specific parameters. These parameters are best left as set to Auto unless you're sure of what you're
doing and wish to alter them to address a performance issue, or similar.
Note These parameters may be specific to the vendor of the card and need to be set based on vendor
recommendation.
VPN (Virtual Private Network) connections allow us to securely connect to a corporate network via the
public Internet. In other words, typical VPN users connect to work over the Internet either from home or while
on the road by using a VPN connection which provides an encrypted channel of communication.
CIPE (Crypto IP Encapsulation) is a Linux implementation of VPN access software. However we need to
have connection information for the particular VPN network that we intend to connect to, before we can
configure a CIPE connection. As a reality check, we need to note that most corporations require that
users connect using company−supplied VPN clients that may not necessarily be available for Linux. In
such a situation, using the CIPE−based VPN solution may not work.
Managing Multiple ISPs and Connections
Often we may have a single machine with different characteristics when connecting to different networks. We
may use the machine to browse the Internet while connected to an ISP or use it to connect to work and even
perhaps take it to work to use on an Intranet. The thing to note is that even though it is the same machine, it
tends to have different connectivity requirements at different times since different service providers and
possibly different devices are involved.
Connection Profiles
Connection profiles help us manage not just multiple ISPs, but also devices that need to behave differently at
different times. For the latter, that is, physical devices that require different settings at different times, it is
possible to associate multiple logical devices with a single physical device. The logical devices can have a
variety of settings, the only restriction being that only one logical device associated with a physical device can
be used at a time. A connection profile is a collection of logical devices and their configurations representing
Managing Multiple ISPs and Connections
90
certain connection characteristics. Typical connection profiles could be Work, Home, On the road, etc.
We touched upon connection profiles when looking at the Internet Configuration Wizard at the start of this
chapter. Open the Network Configuration tool up again, and, at the bottom on the screen, on the Devices tab
you'll see Active Profile followed by details on the profile that's currently active. By default, we are provided
with a Common profile, which works well for machines that have fixed connection characteristics.
Before we get started with profiles, we need to configure all the physical network device types on the
machine. Available network device types are − Ethernet, ISDN, Modem, xDSL, Token Ring, CIPE, and
Wireless.
The steps below describe creating and managing profiles. These might seem a little unclear on first reading,
but hopefully the Try It Out example that comes afterward will serve to clarify things:
Create a new profile, by clicking New. A profile is typically associated with a location. Locations
have their distinct network configuration requirements. The new profile represents these configuration
settings.
•
Once the profile is created, we create all the logical devices necessary for the profile. The general rule
is that if a particular physical device will be used in the context of the new profile, it needs a logical
device for that profile.
•
Once the logical devices for the new profile are created, we need to associate the logical devices with
the profile.
•
We may choose to create more profiles by following Steps 1 to 3, again.•
Try it Out: Creating Multiple Profiles and Logical Devices
Let's try to configure connection profiles for a hypothetical Red Hat Linux 9 laptop that we use at work to
write articles, at home to browse the web, and while on the road to read e−mail. At work, the laptop is
connected to the company's Intranet via an Ethernet card. While on the road we use the laptop's internal
modem to dial an ISP and check our e−mail. At home, we use a Wireless Ethernet card so we can web browse
from the living−room couch. On occasions when pets monopolize the couch, we're forced to browse over a
Cable modem connection from the study, thereby using the same Ethernet card we used at work. To manage
all these connections, we'll create four profiles, namely Work, Home, Road, and Couch.
Before we begin, let's get our machine's hardware profile fresh in our minds. It looks like this (with what
you've learned so far, you should be able to create this with fictional information if you want to follow along −
you can always delete it when we're done):
Managing Multiple ISPs and Connections
91
Create the required profiles using the following steps:
Choose Profile from the drop−down menu, and select New.1.
Enter Work in the pop−up box that appears:2.
Now that we have our profile created (look at the bottom of the Network Configuration Tool, and
you'll see that it's changed from Common to Work), we need to create a logical device for it based on
the physical device eth0 − the Ethernet card.
3.
Highlight the physical device eth0 and click Copy.
Important We might be tempted to click the Add button to create a logical device, but this is
incorrect. We should use the Copy button after highlighting the physical device in
question.
4.
Select the copy, and click the Edit button and specify the nickname eth0_work along with other
properties such as the DNS server to be used and the IP address (you can make these up for the
purposes of the demonstration). Finally click OK.
5.
Finally, add the newly created logical device to the Work profile by marking the Profile checkbox on
the left−hand side for those logical devices that belong to the profile.
6.
To save our changes we need to click the Apply button. A logical device may belong to only one
profile. Here's the result:
7.
Managing Multiple ISPs and Connections
92
We can use the same routine to create profiles for our Home, Road, and Couch accounts:
Note A particular profile can be activated at any time from the Network Configuration tool
by choosing the profile from the drop−down list.
8.
Starting Connections
So how do we actually connect to a network using each of these devices? Some of them, such as the Ethernet
device, remain connected (or activated) as long as they are physically connected to the network. Others such
as a modem need to be activated on an as−needed basis.
Therefore, to connect using a configured connection, at any time, we could go to the Main Menu and choose
System Settings | Network, highlight the appropriate connection, and click on Activate.
Managing Multiple ISPs and Connections
93
Note In order to activate a connection as soon as the machine starts up, highlight the connection and
click on Edit and enable the radio button that says Activate device when computer starts.
It's also possible to configure Red Hat Linux 9 to automatically establish a modem connection when needed,
using a daemon called diald. However, using such a process can make your system considerably less secure
than it is at the moment (currently you have to manually 'OK' any modem network connections). We'd advise
that you read on a little further through the book and familiarize yourself with the command shell and security
issues before deciding if diald is right for you. If you decide to proceed, all the configuration information you
need can be found at:
/>Software and Configuration
So, now we've got our Internet connection set up, we're ready to fire up our browser and go places! Let's look
at the tools that Red Hat Linux 9 makes available for you to do this.
Web Browsers
Obviously, the most common and popular way of accessing the Internet is by using a web browser. Red Hat
Linux 9 comes with the highly functional Mozilla browser installed by default. You can start it from the Panel
at the bottom of your screen, by clicking on the 'globe and mouse' icon. Alternatively, you can type mozilla at
the command prompt. For those of us who connect directly to the Internet, that's it. Up pops Mozilla, helpfully
set to a Welcome to Red Hat page, and you're ready to go:
Note Notice it's actually browsing HTML pages on your local file system at the moment, rather than
the web − just type file:/// to explore your machine.
Mozilla Proxies
Those of us who connect through an HTTP Proxy, however, have a little bit more work to do. First, we need
to get hold of the following information from whoever supervises our network:
The DNS name of the proxy and the port number it listens at for HTTP connections.•
Most of the time the same proxy server handles other protocols such as SSL, FTP, Gopher, and
SOCKS. If we intend to use any of these protocols, we need to get the address of the proxy server for
•
Software and Configuration
94
each of these protocols and the port at which they listen for incoming requests.
Some intranets publish a URL that has JavaScript in it that can configure the proxy settings
automatically for the user. In this case, we need to provide that URL.
•
Once you've got your information, fire up Mozilla, and open Edit | Preferences | Advanced | Proxies:
Configuring Mozilla
The best thing about Mozilla is that it comes with a horde of functionality to make browsing much more fun.
Here's a list of a few of the settings that you might find useful.
Privacy and Security Settings
Mozilla comes with a host of privacy and security settings that allow us to browse the web without being
bothered by security concerns or prying eyes.
Pop−up ads: Most, if not all of us are annoyed by the often−distracting pop−up advertisements that appear
when we attempt to load a page. These pop−up windows can be blocked by choosing the menu item Edit |
Preferences | Advanced | Scripts & Plugins and unchecking Open unrequested windows.
Blocking ad images: Besides pop−up ads, the other annoying mode of online advertisement is banner
advertisements that are served up by online ad−banner companies that embed links to images in web pages.
These ads can be blocked by right−clicking the ad image and selecting Block images from this server. We
could reinstate permissions to allow a blocked server to display its images from the Tools | Image Manager |
Manage Image Permissions menu by highlighting the site in question and clicking on Remove.
Browsing and Appearance
Mozilla allows us to customize our browsing experience by providing a tabbed browsing interface and also
the ability to change the appearance of the browser itself. Further, several other convenient features exist that
make browsing as fast as it is fun.
Tabs rather than Windows: Using tabs to browse is faster and results in less clutter than using new windows
every time we needed to have multiple pages open at the same time (look at the top of the page, just below the
Bookmarks line):
Web Browsers
95
We can open a new tab with the Ctrl+T key combination, or open a link in a new tab by right−clicking the
link and choosing Open Link in New Tab. Further, if we enable the Middle−click or Control−click of links in
a web page option, we can open links in new tabs by clicking links using the middle mouse button or a Ctrl +
left−click of the mouse. These options are available from the Edit | Preferences | Navigator | Tabbed Browsing
menu. From the same menu, by enabling Ctrl+Enter in the location bar option, we can open a location in a
new tab by typing in the URL followed by Ctrl+Enter.
Themes: The appearance of the Mozilla browser can be changed by applying themes that change the look and
feel of the user interface. Mozilla has the classic theme and a modern theme available by default, and new
themes can be downloaded from .
We can have several themes available and switch between them by choosing the menu option View | Apply
Themes and selecting the name of the theme to be applied. Newly selected themes take effect only after
restarting Mozilla.
Auto−completion: Some users may prefer to have Mozilla automatically complete a URL that they are typing
in. This behavior can be enabled by ensuring that the Automatically complete text typed into Location bar
option from the Edit | Preferences | Navigator | Smart Browsing menu is checked.
Web Browsers
96
Installing Plug−ins
Plug−ins, from a generic standpoint, allow the browser to process non−HTML data. Mozilla by default does
not have plug−ins installed. Details about plug−ins for various software, some of them commercial, are
available at the Plugindoc page, Some of the more interesting
plug−ins worth considering include Java, Real Audio, and Macromedia Flash plug−ins.
E−mail and News Clients
Now that we have configured our web browser, it is time to look at the options Red Hat Linux 9 presents us
with for accessing e−mail and newsgroups. The default e−mail client is Ximian Evolution, but your Mozilla
installation also has excellent mail client facilities built in, and also functions as an Internet News client.
The Ximian Evolution Client
The Ximian Evolution client is similar in both look−and−feel and functionality to Microsoft Outlook minus
the virus issues commonly associated with Microsoft's e−mail clients. The similarity makes it a viable
alternative for users moving to Red Hat from a Microsoft environment. The Evolution client also integrates a
calendar and contacts management software. In fact, it is possible to access calendar information hosted on a
Microsoft Exchange server from your Evolution client (using a commercially licensed connector available
from www.ximian.com). On starting Evolution for the first time from the panel, a wizard will prompt us to
enter account information for our e−mail. Once this is done, the program starts, and we're able to start using it.
Note Additional accounts can be added from the Tools / Settings menu while in the Inbox screen by choosing
the Mail Accounts tab and clicking on Add.
As mentioned earlier, Ximian Evolution also comes with an integrated calendar, task manager, and address
book that makes mail and schedule management on Red Hat Linux 9 simple and intuitive.
Accessing Microsoft Exchange Mall from Ximian
Several corporations use Microsoft Exchange as a groupware server, that is, a server that allows users to
manage and share calendar events, contacts, e−mail, and even files. Unfortunately, the Exchange server is
designed to work primarily with Microsoft Outlook and quite often it is not configured to allow clients to
access e−mail using the POP or IMAP protocols. However, Ximian provides a commercially licensed
connector to access e−mail from an Exchange server. It should be noted that if POP access is enabled, the
Web Browsers
97
connector is not required if we use the Microsoft Exchange server only for e−mail. We definitely need the
connector if we rely on a Microsoft Exchange server for calendar and file−sharing features.
Note The Ximian connector can be downloaded from . To install the
connector, we need to also download Red Carpet, the Ximian installer, from the same
web site.
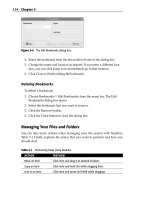
To configure Ximian to retrieve and send mail using an Exchange server, from the Tools Mail Settings menu
we set the Server Type as Microsoft Exchange and supply the following information:
The mail user's full name.1.
The login name for the Exchange server. This is usually the part of the e−mail ID preceding the @
symbol, also known as the mail user ID. It may also be a different name altogether, depending upon
how this is configured locally. Some installations have multiple NT domains, in which case the login
name is of the format domainname\login name.
2.
If the mail user ID is different from the login name, we need to provide that id as the mailbox name.
In any case, there is no need to prefix the domain name.
3.
The DNS name of the Exchange server, for example exchange.foobar.com.4.
If an LDAP−based corporate directory server such as the Netscape Directory Server is deployed
locally, the DNS name of the server can be entered to look up contacts using LDAP. LDAP stands for
Lightweight Directory Access Protocol.
5.
Note If you're unsure about any of this information, you should speak to whoever is responsible for
the running of your Exchange Server.
The Mozilla Mail Client
The Mozilla mail client is fast gaining popularity as a fully featured mail client. It has several features for
managing multiple e−mail accounts and most importantly news accounts. For users who subscribe to news
groups besides accessing e−mail, the Mozilla client is an excellent choice. The Mozilla client can be started
from Main Menu | Internet | More Internet Applications | Mozilla mail or by clicking the mail icon (bottom,
left) of the Mozilla browser:
When the Mozilla mail client is started for the first time, it prompts us to set up an account for sending and
receiving e−mail. Also, a new account can be set up from the Edit | Mail & Newsgroups settings menu by
clicking on the Add account button. In either case, the settings are similar to the settings for the Ximian
Evolution client that we saw in the previous section. The news reader client can be set up from the same menu
by specifying the new account as a Newsgroup account and entering the DNS name of the news server:
E−mail and News Clients
98
Switching Mall Transfer Agents
Mail transfer agents (MTAs) relay outgoing mail to its destination using the SMTP protocol. If you're using
either of the mail clients that we've mentioned in this chapter, then you don't need to worry about them too
much, as they're not involved in sending your mail. However, for completeness, you should know that they're
there, and what they do.
Red Hat Linux 9 comes with a choice of two mail transfer agents, Sendmail and Postfix. The Mail Transfer
Agent Switcher tool can be accessed from the Main Menu | System Settings | Mail Transfer Agent Switcher.
We can switch the MTA to be used, by clicking the appropriate radio button and then selecting Apply.
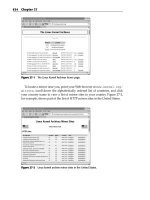
Sendmail (official site ) is the oldest and therefore the most time−tested of the
MTAs. It is easily the most popular mail transfer agent, delivering more than half of all the e−mail on the
Internet. However, Sendmail has numerous security and performance issues owing to its age. Several new
MTAs have emerged to take its place, improving upon the security aspects, performance, and ease of
configuration. Postfix (official site ) is an MTA focused on better security and easier
configuration. Exim (offical site ) and qmail (official site ) are other
popular MTAs. Most of the time Sendmail will work very well as the default MTA, but if we intend to do
some serious re−configuration, Postfix might make the task much easier.
Note The important thing to note is that if we are using using a mail client like Mozilla or Evolution,
then the outgoing mail is sent directly to a mail server using SMTP. In this case, an MTA is not
involved and it can be left alone with little impact. However, some older mail clients such as
UNIX mail and some programs that send notification e−mail may require the MTA to be
configured and enabled.
Other Software
In this section we shall look at the other software beside browsers and mail clients that we can use to access
the Internet.
FTP Clients
We often need to download software over the Internet or transfer files between machines. The most popular
protocol for this function is FTP or the File Transfer Protocol.
The gFTP tool (Graphical FTP) available with Red Hat Linux 9 installations is a graphical FTP tool that has
several power features lacking in the other clients. The gFTP client can be started from the Main Menu |
Internet | More Internet Applications | gFTP, or by typing gftp at the command line:
E−mail and News Clients
99
The gFTP client is multi−threaded, allowing transfer of multiple files simultaneously, and supports
transferring files between two remote servers over FTP (that is, not onto the machine you're working on). It
also supports downloading entire directories and subdirectories, as well as being able to bookmark FTP sites
allowing you to quickly reconnect to remote sites. gFTP also supports resuming interrupted file transfers.
Traditionally the most popular FTP client has been the command−line FTP tool, simply called ftp. The
command−line tool is interactive and suitable for quickly fetching a file or two.
Xchat
IRC or Internet Relay Chat is the predecessor of peer−to−peer and instant messaging systems of today. Owing
to its huge user base, it is still one of the major reasons people connect to the Internet. Red Hat Linux 9 comes
with an IRC client called Xchat that can be accessed from the Main Menu | Internet | More Internet
Applications | Xchat menu:
IRC consists of channels that are essentially topics of discussion, similar to the chat room of today's
messaging clients. To join a channel we need to connect to a server that hosts the channel. We can choose a
server from the list of servers available by default from the X−Chat | Server list menu or add some of our own
to the list from the same menu.
Other Software
100
Most IRC servers expect that we identify ourselves to the server. This is achieved by running the identd server
on our machine. The identd server listens on port 113 for connections using the identd protocol and processes
requests from remote machines asking for the identity of the user attempting to connect to the remote
machine. identd is available as an RPM that should be installed separately as it is not part of the default
installation. Chapter 4 has information on using the package manager for installing RPMs.
Note Note that Xchat cannot connect to an IRC server through a firewall, at the current time.
Instant Messaging
Instant messaging is fast emerging as the latest Internet application to connect people together. Most of
today's instant messaging applications allow users to chat one−on−one or in a group in real time as well as
allow them to share files. Unfortunately, all of the instant messaging applications are not based on a common
protocol, but on proprietary protocols that do not interact with each other. What this means is that a user on
AIM (AOL's instant messaging solution) cannot seamlessly connect with a user on a different messaging
network, say Yahoo! Messenger.
This is where Gaim comes in. Gaim is an instant messaging client that supports multiple protocols and also
allows a user to be logged on to different networks with different account names simultaneously. In fact Gaim
can even connect to IRC servers. Pretty clever, eh? Gaim can be invoked from Main Menu | Internet | Instant
Messenger:
Before we can use Gaim, we need to set up a couple of things. For Gaim to work with a certain instant
messaging network, it needs to have a plug−in for that network loaded. This is a one−time task that can be
accomplished by clicking on the Plugins button followed by the Load button and choosing the appropriate
plug−in, say libyahoo.so for Yahoo! Messenger or libicq.so for ICQ. Once the plug−ins are set up, we need to
fill in account information for each of the networks that we intend to connect to. Account information can be
Other Software
101
entered by clicking the Accounts button followed by the Add button. The official Gaim web site is
. Chapter 5 discusses Gaim configuration in detail, so we'll leave it at that for the
time being.
Summary
In this chapter we explored the issues associated with connecting our Red Hat Linux 9 installation to the
Internet. Hopefully you should now have a working Internet connection, and be able to surf web pages, check
your mail, transfer files by FTP, and use IRC with confidence.
In brief, we have:
Investigated the use of various wizards such as the Internet Configuration Wizard, and Network
Configuration Tool to configure devices and connections in the context of different connection
requirements.
•
Learned how to create logical devices and profiles in order to better manage our resources.•
Explored some of the important Internet access software available with the Red Hat Linux
installation.
•
Summary
102
Chapter 4: Installing Software
Overview
As you would expect from a Linux distribution, Red Hat Linux 9 comes bundled with a vast array of software
applications for your use. Major applications such as the Open Office productivity suite and Ximian Evolution
e−mail client are installed as part of the installation, but there are a great number of other applications that are
not. This software maybe stored on a CD, on the Internet, or somewhere else entirely. In this chapter we'll be
looking at how you can get hold of it, and install it on your system.
During the course of the chapter, we'll be looking at the following areas:
The RPM and its advantages•
The RPM Package Management Tool•
RPM console commands•
RPM security features•
A few examples of RPM package installation•
In the course of this chapter, we will be using the terms RPM Package Management Tool, Package
Management Tool, and Red Hat Package Manager interchangeably to refer to Package Management GUI
provided by Red Hat Linux 9 (based on which variant scans best in natural language). We will also use the
term rpm to refer to the RPM command line interface.
What Is RPM?
The RPM package manager is an open source packaging system distributed under the GNU GPL. It runs on
most Linux distributions and makes it easy for you to install, uninstall, and upgrade the software on your
machine. RPM files can be easily recognized by their .rpm file extension and the 'package' icon that appears in
your navigation window:
Important More information about the background of RPM can be found at: and
/>The benefits of using RPM can be summarized as follows:
103
Simplicity: RPM simplifies the task of installing software. RPM packages can be managed using the
RPM GUI interface, or via the command line.
•
Upgradeability: RPM gives us the flexibility to upgrade existing packages without having to reinstall
them. You can freshen and upgrade parts, or all, of your system automatically, with the minimum of
fuss.
•
Manageability: RPM makes it easy to manage software packages. It maintains a database of all the
packages installed on the system, so you know exactly what you've got installed, what version it is,
and when it was added.
•
Package queries: RPM provides options to query packages for more details in different ways. You
can search the package installed on the system. You can also find out what package a file belongs to.
It helps in keeping track of all packages installed on your system.
•
Uninstalling: RPM makes it easy to uninstall packages. This helps us to keep the system clean.•
System verification: RPM also provides a feature to verify packages. In case of any doubt about file
deletion, packages can be verified against the original package information using RPM. This checks
all the files on the system with the package information and verifies that the files on the system are
the same as those installed from the package originally.
•
Security: RPM provides commands for the user to check the integrity of packages. Packages can be
checked using md5sum to verify that they have not been corrupted or tampered with since they were
created. RPM also provides functionality to verify a package provider's identity and package integrity
using gnupg (very handy if you're downloading sensitive material from the Internet, as you want to be
sure that you're installing what you think you're installing).
•
Now that we've an understanding of what RPM is, and what it can be used for, let's move on to consider how
it works. In point of fact, RPM can be used in two different, yet complementary ways − from the desktop,
using the GUI interface, and from the command line. We'll look at the GUI first, because it's simpler, and will
give us a good grounding from which to proceed.
The RPM Package Management (GUI) Tool
Red Hat has added a lot of new features to its latest operating systems to make them easier to manage. One of
these new features is the Package Management Tool. This tool is a graphical user interface (GUI) designed
for the management of package installation and removal. The GUI allows us to add and remove packages at
the click of a mouse.
The package management tool, as accessed from the Main Menu, is able to manage only
packages provided as part of a Red Hat Linux 9 installation. To install other RPMs from disk,
or download, you need to navigate to the RPM in question and double−click on the file. This
will load the package management tool, and skip you straight to the 'Install' screen,
bypassing the system−specific install options.
Starting the RPM Package Management Tool
There are two ways to start RPM. To do it from the Main Menu, select Main Menu | System Settings |
Add/Remove Applications. Alternatively, from the command line you can type the following command:
$ redhat−config−packages
Either way, if you're logged in with privileges other than root privileges, you'll be prompted to enter the root
password.
The RPM Package Management (GUI) Tool
104
Once you've identified yourself as an administrator, you'll see the following window:
Package Management Tool Functions
Let's take a closer look at the GUI:
As you can see from the figure, the package manager presents packages divided up into different categories,
each containing different groups. The following table lists of all the available package categories and package
groups on a typical system. If you look through the entries on your machine you'll find an explanatory note
next to each one explaining what it does on your machine.
Package Category Package Groups
Desktops X Window System
GNOME Desktop Environment
KDE Desktop Environment
Applications Editors
Engineering and Scientific
Graphical Internet
The RPM Package Management (GUI) Tool
105
Text−based Internet
Office/Productivity
Sound and Video
Authoring and Publishing
Graphics
Games and Entertainment
Servers Server Configuration Tools
Web Server
Mail Server
Windows File Server
DNS Name Server
FTP Server
SQL Database Server
News Server
Network Servers
Development Development Tools
Kernel Development
X Software Development
GNOME Software Development
KDE Software Development
System Administration Tools
System Tools
Printing Support
You can view the details of any group of packages by clicking on the Details link. Details of each group look
like the following:
The RPM Package Management (GUI) Tool
106
Each group may have standard packages and extra packages, or just extra packages. Standard packages are
always available when a package group is installed − so you can't add or remove them explicitly unless the
entire group is removed. However, the extra packages are optional so they can be individually selected for
installation or removal at any time.
Adding and Removing Packages
The package management tool makes adding and removing packages very simple. In fact, it's just as easy as
using the Add/Remove Programs menu under Microsoft Windows.
Installing Packages
Installing new software from the package management tool is very simple. When we select any group using
the RPM package management tool interface, it automatically selects the standard packages (if any) that are
needed for the category as well as any dependent packages that it may have.
Dependent packages are packages needed in order for the main package to run properly.
RPM checks for these before installing any new package. If they're not present it adds them to
the list of files to be installed. There's nothing unusual in this − Windows software also
depends on other files (like DLLs), but it packages them all together for simplicity, while
Linux leaves them separate for ease of updating, and bug−fixing.
We can customize the packages to be installed by clicking on the Details button. Once you've made your
selections, click on the Update button on the main window. The package management tool will then calculate
the disk space required for installing packages, as well as any dependencies, before displaying the following
dialog:
The RPM Package Management (GUI) Tool
107
If you click on the Show Details button in the above dialog, you'll see a list of all the packages to be installed
− with the disk space needed for each individual package. If you click on the Continue button, the installation
procedure will start. When the installation is finished, an Update Complete dialog will appear.
Removing Packages
It's also very simple to remove a package. To remove all the packages installed within a package group,
uncheck the checkbox beside the package group. To remove individual packages, click the Details button
beside the package group and then uncheck the individual packages. After selecting all the required packages
to uninstall, it's just a case of clicking the Update button in the main window.
The package management tool will take care of finding and removing any dependent packages that might also
be installed, just as it did in the install routine. However, if the package you're trying to remove is required by
other installed packages, removal will stop, and you'll be shown the following warning:
If this happens, you'll have to leave the package where it is − unless you want to go and delete the program
that's using it first (in which case it will probably be removed anyway, as a dependent package).
However, if the package isn't dependent on the package management tool will calculate the disk space that
will be freed from removing selected packages (and any dependencies), and display a summary window. Once
again, more details of the packages to be removed can be seen by clicking on the Show Details button:
The RPM Package Management (GUI) Tool
108
It just remains to say that you can combine installation and removal, at the same time, by respectively
checking or un−checking package install options. If you do this you'll receive a combined summary window
like this:
Package Installation and Configuration Files
Before we leave the subject of package installation and removal, it's important that we consider the topic of
configuration files for a moment. What follows can seem a little daunting, so it's important to realize that this
happens only rarely. If you're installing a new version of older software, or upgrading your existing version,
there's a small chance that the installation will encounter preexisting configuration files as it installs. This
presents a dilemma, as those files may have been specially customized by you, so it doesn't want to just
overwrite them and lose your settings.
It therefore deals with the problem in the following ways:
The RPM Package Management (GUI) Tool
109