Ubuntu The Complete Reference phần 9 pptx
Bạn đang xem bản rút gọn của tài liệu. Xem và tải ngay bản đầy đủ của tài liệu tại đây (13.14 MB, 75 trang )
PART IPART IPART IPART IPART VII
Chapter 25: Devices and Modules
571
Once you have the device’s /sys path, you can use that path to display information
about it. Use the udevinfo command again with the -a option to display all information
about the device and the -p option to specify its path in the /sys file system. The listing can
be extensive, so you should pipe the output to less or redirect it to a file:
udevinfo -a -p /sys/class/usb/lp0 | less
Some of the key output to look for is the bus used and information such as the serial
number, product name, or manufacturer, as shown next. Look for information that uniquely
identifies the device, such as the serial number. Some devices will support different buses,
and the information may be different for each. Be sure to use the information for that bus
when setting up your keys in the udev rule.
BUS="usb"
ATTRS{serial}="300HCR"
ATTRS{manufacturer}="Canon"
ATTRS{idproduct}="1074"
ATTRS{product}="S330"
You can use much of this information in an ATTRS (attributes) key in an udev rule to
identify the device. The ATTRS key is used to obtain /sys information about a device. You
use the ATTRS key with the field you want referenced placed in braces. You can then match
that field to a value to reference the particular device you want. Use the = sign and a valid
field value to match against. Once you know the /sys serial number of a device, you can use
it in ATTRS keys in udev rules to reference the device uniquely. The following key checks
the serial number of the devices field for the Canon printer’s serial number:
ATTRS{serial}=="300HCR"
A user rule can now be created for the Canon printer.
In another rules file, you can add your own symbolic link using /sys information to
uniquely identify the printer and name the device with its official kernel name. The first two
keys, BUS and ATTRS, specify the particular printer. In this case the serial number of the
printer is used to uniquely identify it. The NAME key will name the printer using the official
kernel name, always referenced with the %k code. Since this is a USB printer, its device file
will be placed in the usb subdirectory, usb/%k. Then the SYMLINK key defines the unique
symbolic name to use, in this case canon-pr in the /dev/usb directory:
BUS=="usb", ATTRS{serial}=="300HCR", NAME="usb/%k", SYMLINK="usb/canon-pr"
The rules are applied dynamically in real time. To run a new rule, simply attach your
USB printer (or detach and reattach). You will see the device files automatically generated.
Permission Fields: MODE, GROUP, OWNER
Permissions that will be given to different device files are determined by the permission
fields in the udev rules. The permission rules are located in the 40-permissions.rules file.
The MODE field is a octal-bit permission setting, the same that is used for file permissions.
Usually this is set to 660, owner and group read/write permission. Pattern matching is
supported with the *, ?, and [] operators.
572
Part VII: System Administration
USB printer devices use the lp group with mode 660:
KERNEL=="usb/lp*", GROUP="lp", MODE="0660"
Tape devices use the disk group:
KERNEL=="npt*", GROUP="disk", MODE="0660"
The default settings set the OWNER and GROUP to root with owner read/write
permissions (600):
KERNEL=="*", OWNER="root" GROUP="root", MODE="0600"
Hardware Abstraction Layer
The purpose of HAL is to abstract the process of applications accessing devices. Applications
should not have to know anything about a device, even its symbolic name. The application
should just have to request a device of a certain type, and then a service, such as HAL, should
provide what is available. With HAL, device implementation is hidden from applications.
HAL makes devices easily available to desktops and applications using a D-BUS (device
bus) structure. Devices are managed as objects that applications can easily access. The D-BUS
service is provided by the HAL daemon, haldaemon. Interaction with the device object is
provided by the freedesktop.org HAL service, which is managed by the /org/freedesktop/
HAL/Manager.
HAL is an information service for devices. The HAL daemon maintains a dynamic
database of connected hardware devices. This information can be used by specialized
callout programs to maintain certain device configuration files. This is the case with
managing removable storage devices. HAL will invoke the specialized callout programs
that will use HAL information to manage devices dynamically. Removable devices such as
CD-ROM discs or USB card readers are managed by specialized callouts with HAL
information, detecting when such devices are attached. The situation can be confusing:
Callout programs perform the actual tasks, but HAL provides the device information. For
example, though the callout hal-system-storage-mount mounts a device, the options and
mountpoints used for CD-ROM entries are specified in HAL device information files that
set policies for storage management.
HAL has a key impact on the /etc/fstab file used to manage file systems. No longer are
entries maintained in the /etc/fstab file for removable devices such as CD-ROMs. These devices
are managed directly by HAL using its set of storage callouts such as hal-storage-mount to
mount a device or hal-storage-eject to remove one. In effect, you now have to use the HAL
device information files to manage your removable file systems.
HAL is a software project of freedesktop.org, which specializes in open source desktop
tools. Check the latest HAL specification documentation at www.freedesktop.org under
the software/HAL page for detailed explanations of how HAL works (see the specifications
link on the HAL page: Latest HAL Specification). The documentation is very detailed
and complete.
PART IPART IPART IPART IPART VII
Chapter 25: Devices and Modules
573
The HAL Daemon and hal-device-manager (hal-gnome)
The HAL daemon, hald, is run as the haldaemon process. Information provided by the
HAL daemon for all your devices can be displayed using the HAL device manager,
hal-device-manager, which is part of the hal-gnome package. You can access it, once installed,
by choosing System | Administration | Hardware.
When you run the manager, it displays an expandable tree of your devices arranged by
category in the left panel. The right panel displays information about the selected device. A
Device tab lists the basic device information such as the vendor and the bus type. The
Advanced tab lists the HAL device properties defined for this device, as described in later
sections, as well as /sys file system paths for this device. For device controllers, a USB or PCI
tab will appear. For example, a DVD writer could have an entry for the storage.cdrom.cdr
property that says it can write CD-R discs. You may find an IDE CD/DVD-ROM device
under IDE (some third-party IDE controllers may be labeled as SCSI devices). A typical
entry would look like the following; the bool is the type of entry, namely Boolean:
storage.cdrom.cdr bool true
Numerical values may use an int type or a strlist type. The following write_speed
property has a value 7056:
storage.cdrom.write_speed strlist 7056
The /sys file system path will also be a string. It will be preceded by a Linux property
category. Strings will use a strlist type for multiple values and string for single values.
The following entry locates the /sys file system path at /sys/block/hdc:
linux.sysfs_path strlist /sys/block/hdc
HAL Configuration: /etc/hal/fdi and /usr/share/hal/fdi
Information about devices and policies to manage devices are held in device information
files in the /etc/hal/fdi and /usr/share/hal/fdi directories. In these directories, you set
properties such as options that are to be used for CD-ROMs in /etc/fstab.
The implementation of HAL on Linux configures storage management by focusing on
storage methods for mountable volumes, instead of particular devices. Volume properties
define actions to take and valid options that can be used. Special callouts perform the
actions directly, such as hal-storage-mount to mount media or hal-storage-eject
to remove it.
Device Information Files: fdi
HAL properties for these devices are handled by device information files (fdi) in the /usr/share/
hal/fdi and /etc/hal/fdi directories. The /usr/share/hal/fdi directory is used for configurations
provided by the distribution, whereas /etc/hal/fdi is used for setting user administrative
configurations. In both are listed subdirectories for the different kinds of information that HAL
manages, such as policy, whose subdirectories have files with policies for how to manage
devices. The files, known as device information files, have rules for obtaining information about
devices, as well rules for detecting and assigning options for removable devices. The device
information files use the extension .fdi, as in storage-methods.fdi. For example, the policy
574
Part VII: System Administration
directory has two subdirectories: 10osvendor and 20thirdpary. The 10osvendor holds the fdi
files that have policy rules for managing removable devices on Linux (10osvendor replaces
90defaultpolicy in earlier HAL versions). This directory holds the 20-storage-methods.fdi
policy file used for storage devices. Here you will find the properties that specify options for
removable storage devices such as CD-ROMs. The directories begin with numbers, and lower
numbers are read first. Unlike with udev, the last property read will override any previous
property settings, so priority is given to higher-numbered directories and the fdi files they
hold. This is why the default policies are in 10osvendor, whereas the user policies, which
override the defaults, are in a higher-numbered directory such as 30user, as are third-party
policies in 20thirdpolicy.
Three device information file directories are set up in the device information file directories,
each for different kinds of information: information, policy, and preprobe:
• information Contains information about devices.
• policy Contains setting policies such as storage policies. The default policies for a
storage device are in a 20-storage-methods.fdi file in the policy/10osvendor directory.
• preprobe Handles difficult devices such as unusual drives or drive configurations—
for instance, those in preprobe/10osvendor/10-ide-drives.fdi. This contains
information needed even before the device is probed.
Within these subdirectories are still other subdirectories indicating where the device
information files come from, such as vendor, thirdparty, or user, and their priority. Certain
critical files are listed here:
• information/10freedesktop Information provided by freedesktop.org
• policy/10osvendor Default policies (set by system administrator and OS distribution)
• preprobe/10usevendor Preprobe policies for difficult devices
Properties
Information for a device is specified with a property entry. Such entries consist of a key/value
pair, where the key specifies the device and its attribute, and the value is for that attribute.
Many kinds of values can be used, such as Boolean true/false, string values such as those
used to specify directory mountpoints, or integer values.
Properties are classified according to metadata, physical connection, function, and
policies. Metadata provides general information about a device, such as the bus it uses, its
driver, or its HAL ID. Metadata properties begin with the key info, as in info.bus. Physical
properties describe physical connections, namely the buses used. The IDE, PCI, and SCSI
bus information is listed in ide, pci, and scsi keys. The usb_device properties are used
for the USB bus; an example is usb_device.number.
The functional properties apply to specific kinds of devices. Here you will find properties
for storage devices, such as the storage.cdrom keys that specify whether an optical device
has writable capabilities. For example, the storage.cdrom.cdr key set to true will specify
that an optical drive can write to CD-R discs.
The policies are not properties as such. Policies indicate how devices are to be handled
and are, in effect, the directives that callout programs use to carry out tasks. Policies for
storage media are handled using Volume properties, specifying methods (callouts) to use
PART IPART IPART IPART IPART VII
Chapter 25: Devices and Modules
575
and valid options such as mount options. HAL uses scripts in the /usr/share/hal/scripts
directory to manage media. The following abbreviated entries come from the 20-storage-
methods.fdi policy file. The first specifies the action to take and the second the callout script
to execute, hal-storage-mount:
<append key="Volume.method_names" type="strlist">Mount</append>
<append key="Volume.method_execpaths" type="strlist">hal-storage-mount</append>
Mount options are designated using volume.mount.valid_options as shown here
for ro (read only). Options that will be used will be determined when the mount callout is
executed.
<append key="volume.mount.valid_options"type="strlist">ro</append>
Several of the commonly used volume policy properties are listed in Table 25-6.
Device Information File Directives
Properties are defined in directives listed in device information files. As noted, device
information files have .fdi extensions. A directive is encased in greater-than (>) and
less-than (<) symbols. There are three directives:
• merge Merges a new property into a device’s information database
• append Appends or modifies a property for that device already in the database
• match Tests device information values
A directive includes a type attribute designating the type of value to be stored, such as
string, bool, int, and double. The copy_property type copies a property. The
following discussion of the storage-methods.fdi file shows several examples of merge and
match directives.
Property Description
volume.method.execpath
Callout script to be run for a device
volume.policy.desired_mount_point (string)
The preferred mountpoint for the
storage device
volume.mount.valid_options.*
(bool)
Mount options to use for specific
device, where * can be any mount
option, such as noauto or exec
volume.method_names
Action to be taken
volume.policy.mount_filesystem (string) File system to use when mounting
a volume
volume.mount.valid.mount_options.* (bool) Default mount options for volumes,
where
* can be any mount option,
such as noauto or exec
T
ABLE 25-6 HAL Storage Policies
576
Part VII: System Administration
storage.fdi
The 20-storage-methods.fdi file in the /usr/share/hal/fdi/policy/10osvendor directory lists
the policies for your removable storage devices. This is where your options for storage
volumes (for example, CD-ROM) entries are actually specified. The file is organized in
sections beginning with particular types of devices to standard defaults. Keys are used to
define options, such as volume.mount.valid_options, which will specify a mount
option for a storage device such as a CD-ROM. Keys are also used to specify exceptions
such as hotplugged devices.
The 20-storage-methods.fdi file begins with default properties and then lists those
properties for specific kinds of devices. Unless redefined in a later key, the default will
remain in effect. The options you see listed for the default storage volumes will apply to
CD-ROMs. For example, the noexec option is set as a valid default. The following sets
noexec as a default mount option for a storage device. There are also entries for ro and
quiet. The append operation adds the policy option.
<append key="volume.mount.valid_options"type="strlist">noexec</append>
The default mountpoint root directory for storage devices is now set by the mount
callout script, hal-storage-mount. Currently this is /media. The default mountpoint is disk.
HAL will try to use the Volume property information to generate a mountpoint.
The following example manages blank disks. Instead of being mounted, such disks
can only be ejected. To determine possible actions, HAL uses method_names, method_
signatures, and method_execpaths for the Volume properties. (The org.freedesktop.Hal
prefix for the keys has been removed from this example to make it more readable, as in
org.freedesktop.Hal.Volume.method_names.)
<match key="volume.disc.is_blank" bool="true">
<append key="info.interfaces"type="strlist">Volume</append>
<append key="Volume.method_names" type="strlist">Eject</append>
<append key="Volume.method_signatures" type="strlist">as</append>
<append key="Device.Volume.method_execpaths" type="strlist">
hal-storage-eject</append>
</match>
After dealing with special cases, the file system devices are matched, as shown here:
<match key="volume.fsusage" string="filesystem">
Storage devices to ignore, such as recovery partitions, are specified:
<merge key="volume.ignore" type="bool">false</merge>
Then the actions to take and the callout script to use are specified, such as the action for
unmount that uses hal-storage-mount:
<append key="Device.Volume.method_names" type="strlist">Mount</append>
<append key="Device.Volume.method_signatures" type="strlist">ssas</append>
<append key="Device.Volume.method_execpaths" type="strlist">
hal-storage-mount</append>
PART IPART IPART IPART IPART VII
Chapter 25: Devices and Modules
577
Options are then specified with volume.mount.valid_options, starting with
defaults and continuing with special cases, such as ext3 shown here for access control lists
(acl) and extended attributes (xattr):
<! allow these mount options for ext3 >
<match key="volume.fstype" string="ext3">
<append key="volume.mount.valid_options"type="strlist">acl=</append>
<append key="volume.mount.valid_options"type="strlist">user_xattr=</append>
<append key="volume.mount.valid_options"type="strlist">data=</append>
</match>
HAL Callouts
Callouts are programs invoked when the device object list is modified or when a device
changes. As such, callouts can be used to maintain systemwide policy (that may be specific
to the particular OS) such as changing permissions on device nodes, managing removable
devices, or configuring the networking subsystem. Three different kinds of callouts are used
for devices, capabilities, and properties. Device callouts are run when a device is added or
removed. Capability callouts add or remove device capabilities, and property callouts add or
remove a device’s property. Callouts are implemented using info.callout property
rules, such as that which invokes the hal-storage-mount callout when CD/DVD-ROMs are
inserted or removed, as shown here:
<append key="org.freedesktop.Hal.Device.Volume.method_execpaths"
type="strlist">hal-storage-mount</append>
Callouts are placed in the /usr/lib/hal directory with the HAL callouts prefixed with hal
Here you will find many of storage callouts used by HAL, such as hal-storage-eject and
hal-storage-mount. HAL uses these callouts to manage removable devices such as DVD/
CD-ROMs directly instead of editing entries in the /etc/fstab file (fstab-sync is no longer used).
The gnome-mount tool used for mounting CD/DVD disk on the GNOME desktop uses the
HAL callouts. Other supporting scripts can be found in the /usr/lib/hal/scripts directory.
Manual Devices
You can, if you wish, create device file interfaces manually using the MAKEDEV or mknod
command. MAKEDEV is a script that can create device files for known fixed devices such as
attached hard disks. Check the MAKEDEV man page for details. Ubuntu relies on aliases in
the /etc/modprobe.d directory to manage most fixed devices: /etc/modprobe.d/aliases.
Linux implements several types of devices, the most common of which are block and
character. A block device, such as a hard disk, transmits data a block at a time. A character
device, such as a printer or modem, transmits data one character at a time, or rather as a
continuous stream of data, not as separate blocks. Device driver files for character devices
have a c as the first character in the permissions segment displayed by the ls command.
Device driver files for block devices have a b. In the next example, lp0 (the printer) is a
character device and sda1 (the hard disk) is a block device:
# ls -l sda1 lp0
brw-rw 1 root disk 3, 1 Jan 30 02:04 sda1
crw-rw 1 root lp 6, 0 Jan 30 02:04 lp0
578
Part VII: System Administration
The device type can be either b, c, p, or u. The b indicates a block device, and c is for a
character device. The u is for an unbuffered character device, and the p is for a FIFO (first in,
first out) device. Devices of the same type often have the same name; for example, serial
interfaces all have the name ttyS. Devices of the same type are then uniquely identified by a
number attached to the name. This number has two components: the major number and the
minor number. Devices may have the same major number, but if so, the minor number is
always different. This major and minor number structure is designed to deal with situations
in which several devices may be dependent on one larger device, such as several modems
connected to the same I/O card. All the modems will have the same major number that
references the card, but each modem will have a unique minor number. Both the minor and
major numbers are required for block and character devices (b, c, and u). They are not used
for FIFO devices, however.
Valid device names along with their major and minor numbers are listed in the devices.txt
file located in the /Documentation directory for the kernel source code, /usr/src/linux-ver/
Documentation. When you create a device, you use the major and minor numbers as well
as the device name prefix for the particular kind of device you are creating. Most of these
devices are already created for you and are listed in the /etc/dev directory.
Though the MAKEDEV command is preferable for creating device files, it can create only
files for which it is configured. For devices not configured for use by MAKEDEV, you will
have to use the mknod command. This is a lower level command that requires manual
configuration of all its settings. With the mknod command you can create a device file in the
traditional manner without any of the configuration support that MAKEDEV provides.
The mknod command can create either a character or block-type device. The mknod
command has the following syntax:
mknod options device device-type major-num minor-num
As a simple example, creating a device file with mknod for a printer port is discussed
here. Linux systems usually provide device files for printer ports (lp0–2). As an example,
you can see how an additional port could be created manually with the mknod command.
Printer devices are character devices and must be owned by the root and daemon. The
permissions for printer devices are read and write for the owner and the group, 660. The
major device number is set to 6, while the minor device number is set to the port number of
the printer, such as 0 for LPT1 and 1 for LPT2. Once the device is created, you use chown to
change its ownership to the root user, since only the administrator should control it. Change
the group to lp with the chgrp command.
Most devices belong to their own groups, such as disks for hard disk partitions, lp for
printers, floppy for floppy disks, and tty for terminals. In the next example, a printer device
is made on a fourth parallel port, lp3. The -m option specifies the permissions—in this case,
660. The device is a character device, as indicated by the c argument following the device
name. The major number is 6, and the minor number is 3. If you were making a device at
lp4, the major number would still be 6, but the minor number would be 4. Once the device
is made, the chown command then changes the ownership of the parallel printer device to
root. For printers, be sure that a spool directory has been created for your device. If not, you
need to make one. Spool directories contain files for data that varies according to the device
PART IPART IPART IPART IPART VII
Chapter 25: Devices and Modules
579
output or input, like that for printers or scanners. As with all manual devices, the device file
has to be placed in the /etc/udev/devices directory; udev will later put it in /dev.
# mknod -m 660 /etc/udev/devices/lp3 c 6 3
# chown root /etc/udev/devices/lp3
# chgrp lp /etc/udev/devices/lp3
Installing and Managing Terminals and Modems
In Linux, several users may be logged in at the same time. Each user needs his or her own
terminal through which to access the Linux system, of course. The monitor on your PC acts as
a special terminal, called the console, but you can add other terminals through either the serial
ports on your PC or a special multiport card installed on your PC. The other terminals can be
standalone terminals or PCs using terminal emulation programs. For a detailed explanation of
terminal installation, see the Term-HOWTO file in /usr/share/doc/HOWTO or at the Linux
Documentation Project site (). A brief explanation is provided here.
Serial Ports
The serial ports on your PC are referred to as COM1, COM2, COM3, and COM4. These
serial ports correspond to the terminal devices /dev/ttyS0 through /dev/ttyS3. Note that
several of these serial devices may already be used for other input devices such as your
mouse and for communications devices such as your modem. If you have a serial printer,
one of these serial devices is already used for that. If you installed a multiport card, you
have many more ports from which to choose. For each terminal you add, udev will create
the appropriate character device on your Linux system. The permissions for a terminal
device are normally 660. Terminal devices are character devices with a major number of 4 and
minor numbers usually beginning at 64.
TIP
TIP The /dev/pts entry in the /etc/fstab file mount a devpts file system at /dev/pts for Unix98
Pseudo-TTYs. These pseudoterminals are identified by devices named by number.
mingetty, mgetty, and getty
Terminal devices are managed by your system using the getty program and a set of
configuration files. When your system starts, it reads the files of connected terminals in the
Upstart /etc/events.d directory. Terminal files are prefixed with tty and have the terminal
device number attached, such as tty2. The files executes an appropriate getty program for
each terminal. These getty programs set up the communication between your Linux system
and a specified terminal. You can install other getty applications to use instead, such as
mgetty and mingetty. mingetty provides minimal support for virtual consoles. mgetty is
designed for fax/modem connections, letting you configure dialing, login, and fax
parameters. All getty programs can read an initial message placed in the /etc/issue file,
which can contain special codes to provide the system name and current date and time.
Input Devices
Input devices, such as mice and keyboards, are displayed on several levels. Initial detection
is performed during installation when you select the mouse and keyboard types. Keyboards
and mice will automatically be detected by HAL. You can perform detailed configuration
580
Part VII: System Administration
with your desktop configuration tools, such as the GNOME or KDE mouse configuration
tools. On GNOME, choose System | Preferences | Mouse to configure your mouse. A
Keyboard entry on that same menu is used for keyboards.
Installing Other Cards
To install a new card, your kernel must first be configured to support it. Support for most
cards is provided in the form of modules that can be dynamically loaded into the kernel.
Installing support for a card is usually a simple matter of loading a module that includes
the drivers. For example, drivers for the Sound Blaster sound card are in the module sb.o.
Loading this module makes your sound card accessible to Linux. Ubuntu automatically
detects the cards installed on your system and loads the needed modules. If you change
sound cards, the new card is automatically detected. You can also load modules you need
manually, removing an older conflicting one. The section “Modules” later in this chapter
describes this process.
Sound Devices
Most sound cards are now detected and managed by udev and HAL. A list of various sound
devices is provided in Table 25-7. Some sound cards may require more specialized support.
You can determine your current sound configuration by listing the contents of the /proc/
asound/oss/sndstat file. You can test your card by simply redirecting a sound file to it, as
shown here:
cat sample.au > /dev/audio
Older sound devices are supported as part of the Open Sound System (OSS) and are
freely distributed as OSS/Free. These are installed as part of Linux distributions. The OSS
device drivers are intended to provide a uniform API for all Unix platforms, including
Linux. They support Sound Blaster– and Windows Sound System–compatible sound cards
(ISA and PCI).
Device Description
/dev/sndstat Sound driver status
/dev/audio Audio output device
/dev/dsp Sound sampling device
/dev/mixer Control mixer on sound card
/dev/music High-level sequencer
/dev/sequencer Low-level sequencer
/dev/midi Direct MIDI port
T
ABLE 25-7 Sound Devices
PART IPART IPART IPART IPART VII
Chapter 25: Devices and Modules
581
The Advanced Linux Sound Architecture (ALSA) replaced OSS in the 2.6 Linux kernel;
it aims to be a better alternative to OSS, while maintaining compatibility with it. ALSA
provides a modular sound driver, an API, and a configuration manager. ALSA is a GNU
project and is entirely free; its Web site at contains extensive
documentation, applications, and drivers. Currently available are the ALSA sound driver,
the ALSA Kernel API, the ALSA library to support application development, and the ALSA
manager to provide a configuration interface for the driver. ALSA evolved from the Linux
Ultra Sound Project. The ALSA project currently supports most Creative sound cards.
Video and TV Devices
Device names used for TV, video, and DVD devices are listed in Table 25-8. Drivers for DVD
and TV decoders have been developed, and mga4linux () is
developing video support for the Matrox Multimedia cards. The General ATI TV and Overlay
Software (GATOS) () has developed drivers for the currently
unsupported features of ATI video cards, specifically TV features. The BTTV Driver Project
has developed drivers for the Booktree video chip. Creative Labs sponsors Linux drivers for
the Creative line of DVD DXR2 decoders ().
PCMCIA Devices
PCMCIA devices are card readers commonly found on laptops to connect devices such as
modems or wireless cards, though they are becoming standard on many desktop systems as
well. The same PCMCIA device can support many different kinds of devices, including
network cards, modems, hard disks, and Bluetooth devices.
PCMCIA support and PCMCIA devices are now considered hotplugged devices
managed by HAL and udev directly; you can no longer use the cardmgr/pcmcia service.
Card information and control is now managed by pccardctl. The PCMCIA udev rules
are listed in 60-pcmcia.rules, which automatically probes and installs cards. Check
for more information.
You can obtain information about a PCMCIA device by using the pccardctl command,
or you can manually eject and insert a device. The status, config, and ident options will
display the device’s socket status, configuration, and identification, respectively. The insert
Device Name Type of Device
/dev/video Video capture interface
/dev/vfx Video effects interface
/dev/codec Video codec interface
/dev/vout Video output interface
/dev/radio AM/FM radio devices
/dev/vtx Teletext interface chips
/dev/vbi Data services interface
T
ABLE 25-8 Video and TV Device Drivers
582
Part VII: System Administration
and eject options will let you add and remove a device. The cardinfo command also
provides device information.
It is not advisable to hot-swap IDE or SCSI devices. For these, you should first manually
shut down the device using the pccardctl command:
pccardctl eject
pccardctl scheme home
Modules
The Linux kernel employs the use of modules to support different operating system
features, including support for various devices such as sound and network cards. In many
cases, you do have the option of implementing support for a device either as a module or by
directly compiling it as a built-in kernel feature, which requires you to rebuild the kernel. A
safer and more robust solution is to use modules. Modules are components of the Linux
kernel that can be loaded as needed. To add support for a new device, you can simply
instruct a kernel to load the module for that device. In some cases, you may have to
recompile only that module to provide support for your device. The use of modules has the
added advantage of reducing the size of the kernel program as well as making your system
more stable. The kernel can load modules in memory only as they are needed. Should a
module fail, only the module stops running, and it will not affect the entire system.
Kernel Module Tools
The modules needed by your system are determined during installation, according to the
kind of configuration information you provided and the automatic detection performed by
your Linux distribution. For example, if your system uses an Ethernet card whose type you
specified during installation, the system loads the module for that card. You can, however,
manually control what modules are to be loaded for your system. In effect, this enables you
to customize your kernel whatever way you want. The 2.6 Linux kernel includes the Kernel
Module Loader (Kmod), which can load modules automatically as they are needed. Kernel
module loading support must also be enabled in the kernel, though this is usually
considered part of a standard configuration. In addition, several tools enable you to load
and unload modules manually. The Kernel Module Loader uses certain kernel commands to
perform the task of loading or unloading modules. The modprobe command is a general-
purpose command that calls insmod to load modules and rmmod to unload them. These
commands are listed in Table 25-9. Options for particular modules, general configuration,
and even specific module loading can be specified in the /etc/modprobe.conf file. You can
use this file to load and configure modules automatically. You can also specify modules to
be loaded at the boot prompt or in grub.conf.
Module Files and Directories: /lib/modules
The filename for a module has the extension .o. Kernel modules reside in the /lib/modules/
version directory, where version is the version number for your current kernel with the extension
generic. The directory for the 2.6.24-10-generic kernel is /lib/modules/2.6.24-10-generic. As
you install new kernels on your system, new module directories are generated for them.
PART IPART IPART IPART IPART VII
Chapter 25: Devices and Modules
583
One method for accessing the directory for the current kernel is to use the uname -r
command to generate the kernel version number. This command uses back quotes:
cd /lib/modules/`uname -r`
In this directory, modules for the kernel reside in the kernel directory. Within the kernel
directory are several subdirectories, including the drivers directory that holds subdirectories
for modules such as network drivers and video drivers. These subdirectories serve to
categorize your modules, making them easier to locate. For example, the kernel/drivers/net
directory holds modules for your Ethernet cards, and the kernel/drivers/video directory
contains video card modules. Specialized modules are placed in the ubuntu directory
instead of the kernel directory. These include the sound drivers. The ALSA sound driver are
located at /lib/modules/2.6.24-17/ubuntu/sound/alsa-drivers.
Managing Modules with modprobe and /etc/modules
As noted, you can use several commands to manage modules. The lsmod command lists the
modules currently loaded into your kernel, and modinfo provides information about
particular modules. Though you can use the insmod and rmmod commands to load or
unload modules directly, you should use only modprobe for these tasks. Often, however, a
given module requires other modules to be loaded.
To have a module loaded automatically at boot, you simply place the module name in
the /etc/modules file. Here you will also find entries for fuse and lp. You can use this file to
force loading a needed module that may not be detected by udev or HAL. This can be
particularly true for specialized vendor kernel modules you may need to download,
compile, and install.
The depmod Command
Instead of manually trying to determine module dependencies, you can use the depmod
command to detect the dependencies for you. The depmod command generates a file that
lists all the modules on which a given module depends. The depmod command generates a
Command Description
lsmod
Lists modules currently loaded.
insmod
Loads a module into the kernel. Does not check for dependencies.
rmmod
Unloads a module currently loaded. Does not check for dependencies.
modinfo
Displays information about a module: -a (author),-d (description),
-p (module parameters), -f (module filename), -v (module version).
depmod
Creates a dependency file listing all other modules on which the specified
module may rely.
modprobe
Loads a module with any dependent modules it may also need. Uses the
file of dependency listings generated by depmod: -r (unload a module)
and -l (list modules).
T
ABLE 25-9 Kernel Module Commands
584
Part VII: System Administration
hierarchical listing, noting what modules should be loaded first and in what order they
will load. Then, to load the module, you use the modprobe command using that file.
modprobe reads the file generated by depmod and loads any dependent modules in the
correct order, along with the module you want. You need to execute depmod with the -a
option once, before you ever use modprobe. Entering depmod -a creates a complete
listing of all module dependencies. This command creates a file called modules.dep in
the module directory for your current kernel version, /lib/modules/version.
depmod -a
The modprobe Command
To install a module manually, you use the modprobe command and the module name. You
can add any parameters the module might require. The following command installs the
Intel high-definition sound module. modprobe also supports the use of the * character to
enable you to use a pattern to select several modules. This example uses several values
commonly used for sound cards:
modprobe snd-hda-intel
Use the values recommended for your sound card on your system. Most sound card
drivers are supported by the ALSA project. Check the driver’s Web site to learn what driver
module is used for your card.
To discover what parameters a module takes, you can use the modinfo command with
the -p option.
You can use the -l option to list modules and the -t option to look for modules in a
specified subdirectory. Sound modules are located in the /lib/modules/2.6.version-generic/
ubuntu directory, where version is the kernel version like 2.6.24-17. Sound modules are
arranged in different subdirectories according to the driver and device interface they use,
such as pci, isa, or usb. Most internal sound cards use pci. Within the interface directory
may be further directories such as emu10k1 used for the Creative Audigy cards and hda for
high definition drivers. In the next example, the user lists all modules in the sound/alsa-
driver/pci/hda directory:
# modprobe -l -t sound/pci/hda
/lib/modules/2.6.24-17-generic/ubuntu/sound/alsa-driver/sound/pci/hda/
snd-hda-intel.ko
Options for the modprobe command are placed in the /etc/modprobe.d directory.
The insmod Command
The insmod command performs the actual loading of modules. Both modprobe and the
Kernel Module Loader make use of the insmod command to load modules. Though
modprobe is preferred because it checks for dependencies, you can load or unload particular
modules individually with insmod and rmmod commands. The insmod command takes as
its argument the name of the module, as does rmmod. The name can be the simple base
name, such as snd-ac97-codec for the snd-ac97-codec.ko module. You can specify the
PART IPART IPART IPART IPART VII
Chapter 25: Devices and Modules
585
complete module filename using the -o option. Other helpful options are the -p option,
which lets you probe your system first to see if the module can be successfully loaded, and
the -n option, which performs all tasks except actually loading the module (a dummy run).
The -v option (verbose) lists all actions taken as they occur. In those rare cases where you
may have to force a module to load, you can use the -f option. In the next example, insmod
loads the snd-ac97-codec.ko sound module:
# insmod -v snd-ac97-codec
The rmmod Command
The rmmod command performs the actual unloading of modules. It is the command used by
modprobe and the Kernel Module Loader to unload modules. You can use the rmmod
command to remove a particular module as long as it is not being used or required by other
modules. You can remove a module and all its dependent modules by using the -r option.
The -a option removes all unused modules. With the -e option, when rmmod unloads a
module, it saves any persistent data (parameters) in the persistent data directory, usually
/var/lib/modules/persist.
modprobe Configuration
Module loading can require system renaming as well as specifying options to use when
loading specific modules. Even when removing or installing a module, certain additional
programs may have to be run or other options specified. These parameters can be set in files
located in an /etc/modprobe.d directory. Configuration for modprobe supports the
following actions:
• alias module name Provides another name for the module, used for network and
sound devices.
• options module options Specifies any options a particular module may need.
• install module commands Uses the specified commands to install a module,
letting you control module loading.
• remove module commands Specifies commands to be run when a module is unloaded.
• include config-file Includes additional configuration files.
• blacklist module Ignores any internal aliases that a given module may define
for itself. This allows you to use only aliases defined by modprobe. It also avoids
conflicting modules where two different modules may have the same alias defined
internally. Default blacklist entries are held in one or more blacklist files in the /etd/
modprobe.d directory. Their names begin with the term blacklist. Use the modinfo
command to list a module’s internal aliases.
Among the more common entries are aliases used for network protocols in the aliases
file. Actual network devices are now managed by udev in the 70-persistent-net.rules file,
not by modprobe aliases.
586
Part VII: System Administration
Installing New Modules from Vendors: Driver Packages
You may find that your hardware device is not supported by current Linux modules. In this
case, you can download drivers from the hardware vendor or open source development
group to create your own driver and install it for use by your kernel. The drivers could be in
DEB or compressed archives. The process for installing drivers differs, depending on how
a vendor supports the driver. Different kinds of packages are listed here:
• DEB packages Some support sites will provide drivers already packaged in DEB
files for direct installation.
• Drivers compiled in archives Some sites will provide drivers already compiled
for your distribution but packaged in compressed archives. In this case, a simple
install operation will place the supporting module in the modules directory and
make if available for use by the kernel.
• Source code Other sites provide just the source code, which, when compiled, will
detect your system configuration and compile the module accordingly.
• Scripts with source code Some sites will provide customized scripts that may
prompt you for basic questions about your system and then both compile and
install the module.
For drivers that come in the form of compressed archives (tar.gz or tar.bz2), the compile
and install operations normally make use a makefile script operated by the make command.
Be sure the kernel headers are installed first. These are normally installed by default with
the linux-headers package. A simple install usually requires running the following command
in the driver’s software directory:
make install
In the case of sites that supply only the source code, you may have to perform both
configure and compile operations as you would for any software:
./configure
make
make install
For packages that have no install option, compiled or source, you will have to move the
module manually to the kernel module directory, /lib/modules/version, and use depmod
and modprobe to load it (see the preceding section).
If a site gives you a customized script, you can run that script. For example, the Marvel
gigabit LAN network interfaces found on many motherboards use the SysKonnect Linux
drivers held in the skge.ko module. The standard kernel configuration will generate and
install this module. But if you are using a newer motherboard, you may need to download
and install the latest Linux driver. For example, some vendors may provide a script, install.sh,
that you run to configure, compile, and install the module:
./install.sh
PART IPART IPART IPART IPART VII
Chapter 25: Devices and Modules
587
NOTE
NOTE You can create your own kernel using the linux-source package from the Ubuntu repository.
It is advisable to use the Ubuntu kernel package, as it includes Ubuntu patches. Alternatively,
you can use the original Linux kernel from kernel.org, but incompatibilities can occur, especially
with updates expecting the Ubuntu version. For third party kernel modules, you only need the
kernel headers in the linux-headers package which is already installed.
This page intentionally left blank
26
Backup Management
B
ackup operations have become an important part of administrative duties. Several
backup tools are provided on Linux systems, including Anaconda and the traditional
dump/restore tools, as well as the rsync command used for making individual
copies. Anaconda provides server-based backups, letting different systems on a network
back up to a central server. BackupPC provides network and local backup using configured
rsync and tar tools. The dump tools let you refine your backup process, detecting data
changed since the last backup. Table 26-1 lists Web sites for Linux backup tools.
Individual Backups: archive and rsync
You can back up and restore particular files and directories with archive tools such as tar,
restoring the archives later. For backups, tar is usually used with a tape device. To schedule
automatic backups, you can schedule appropriate tar commands with the cron utility. The
archives can be also compressed for storage savings. You can then copy the compressed
archives to any medium, such as a DVD, floppy disk, or tape. On GNOME, you can use File
Roller to create archives easily (Archive Manager under System Tools). The KDAT tool on KDE,
a front end to tar, will back up to tapes. See Chapter 12 for a discussion of compressed archives.
If you want to remote-copy a directory or files from one host to another, making a
particular backup, you can use rsync, which is designed for network backups of particular
directories or files, intelligently copying only those files that have been changed, rather than
the contents of an entire directory. In archive mode, it can preserve the original ownership
and permissions, providing corresponding users exist on the host system. The following
example copies the /home/george/myproject directory to the /backup directory on the host
rabbit, creating a corresponding myproject subdirectory. The -t specifies that this is a
transfer. The remote host is referenced with an attached colon, rabbit:.
rsync -t /home/george/myproject rabbit:/backup
If, instead, you want to preserve the ownership and permissions of the files as well as
include all subdirectories, you use the -a (archive) option. Adding a -z option will compress
the file. The -v option provides a verbose mode (you can leave this out if you wish):
rsync -avz /home/george/myproject rabbit:/backup
589
CHAPTER
Copyright © 2009 by The McGraw-Hill Companies. Click here for terms of use.
590
Part VII: System Administration
A trailing slash on the source will copy the contents of the directory, rather than
generating a subdirectory of that name. Here the contents of the myproject directory are
copied to the george-project directory:
rsync -avz /home/george/myproject/ rabbit:/backup/george-project
The -a option is the equivalent to the following options: r (recursive), l (preserve
symbolic links), p (permissions), g (groups), o (owner), t (times), and D (preserve device and
special files). The -a option does not preserve hard links, as this can be time consuming.
If you want hard links preserved, you need to add the -H option:
rsync -avzH /home/george/myproject rabbit:/backup
The rsync command is configured to use Secure Shell (SSH) remote shell by default. You
can specify it or an alternate remote shell to use with the -e option. For secure transmission,
you can encrypt the copy operation with ssh. Either use the -e ssh option or set the
RSYNC_RSH variable to ssh:
rsync -avz -e ssh /home/george/myproject rabbit:/backup/myproject
You can also copy from a remote host to the host you are on:
rsync -avz lizard:/home/mark/mypics/ /pic-archive/markpics
You can also run rsync as a server daemon. This will allow remote users to sync copies of
files on your system with versions on their own, transferring only changed files rather than
entire directories. Many mirror and software FTP sites operate as rsync servers, letting you
update files without having to download the full versions again. Configuration information
for rsync as a server is kept in the /etc/rsyncd.conf file. Check the man page documentation
for rsyncd.conf for details on how to configure the rsync server. You can start, restart, and
shut down the rsync server using the /etc/init.d/rsync script:
sudo /etc/init.d/rsync restart
TIP
TIP Though it is designed for copying between hosts, you can also use rsync to make copies within
your own system, usually to a directory in another partition or hard drive. In fact, you can use
rsync in eight different ways. Check the rsync man page for detailed descriptions of each.
TABLE 26-1 Backup Resources
Web Site Tools
rsync remote copy backup
BackupPC network or local backup using configured
rsync and tar tools
www.amanda.org Amanda open source network backup and recovery
Dump and restore tools
PART IPART IPART IPART IPART VII
Chapter 26: Backup Management
591
BackupPC
BackupPC provides an easily managed local or network backup of your system or hosts on
a system using configured rsync or tar tools. There is no client application to install, just
configuration files. BackupPC can back up hosts on a network, including servers, or just a
single system. Data can be backed up to local hard disks or to network storage such as
shared partitions or storage servers. BackupPC is included as part of the main Ubuntu
repository. You can find out more about BackupPC at .
You can configure BackupPC using your Web page configuration interface. This is the host
name of your computer with the /backuppc name attached, like so: http://rabbit/backuppc.
Detailed documentation is installed at /usr/share/doc/backuppc. Configuration files are
located at /etc/backuppc. The config.pl file holds BackupPC configuration options and the
hosts file lists hosts to be backed up. You can use services-admin to have BackupPC start
automatically—check the Remote Backup Server (backuppc) entry. BackupPC has its own
service script with which you start, stop, and restart the BackupPC service manually,
at /etc/init.d/backuppc:
sudo /etc/init.d/backuppc
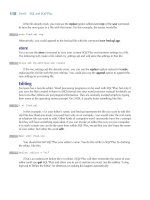
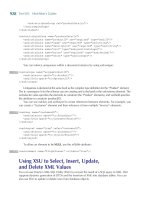
When you first install BackupPC, an install screen will display information you will
need to access your BackupPC tool (see Figure 26-1). This includes the URL to use, the
username, and a password. Be sure to write down the username and password. The URL is
simply your computer name with /backuppc attached. The username is backuppc. You can
change the password with the htpassword command, as shown next. The password is
kept in the /etc/backuppc/htpasswd file in an encrypted format.
sudo htpassword /etc/backuppc/htpasswd backuppc
FIGURE 26-1 BackupPC user and password
592
Part VII: System Administration
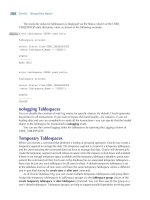
To access BackupPC, start your browser and enter your URL (computer name with
/backuppc) and then the backuppc username with the password when prompted for
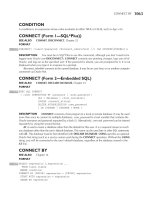
authorization. The general status screen is displayed. The left sidebar displays three
sections: localhost, Hosts, and Server. The Server section has links for BackupPC server
configuration. Host Summary will display host backup status (see Figure 26-2).
BackupPC Server Configuration
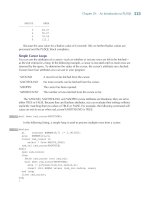
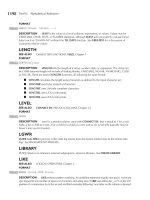
To add other hosts, click the Server section’s Edit Hosts link on the left sidebar to open a
page where you add or modify hosts (Figure 26-3). Here you can add new hosts, change
users, and add new users. Host entries are saved to the /etc/backuppc/hosts file. Click the
Save button to finish.
The Server Edit Config link opens a page with tabbed panels for all your server
configuration options. The page opens to the Server tab, but you can also access the Hosts
tab to add new users, Xfer to specify the backup method, and the Backup Settings to set
backup options. The Server tab will control features such as the hostname of the server and
the username to provide access. On the Xfer tab you can configure different backup methods:
archive (gzip), rsync, rsycnd, smb (Samba), and tar. The Schedule tab sets the periods for full
and incremental backups.
FIGURE 26-2 BackupPC Host Summary screen
PART IPART IPART IPART IPART VII
Chapter 26: Backup Management
593
BackupPC Host Backup and Configuration
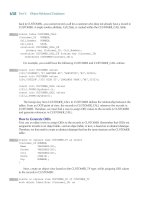
The Hosts pop-up menu is located on the side panel in the Hosts section. Here you choose
the host on which to perform backups and restores. The localhost entry will access your
own computer. When you select a host, a new section will appear on the side panel above
the Hosts section, labeled with that hostname, such as localhost. In this section will be links
for the host home page, Browse Backups, Logs, and an Edit Config link to configure the
backup for that host.
The host home page will list backups and display buttons for full and incremental
backups (see Figure 26-4). Click Start Full Backup to perform a full backup or Start Incre
Backup for an incremental backup (changed data only). You will be prompted for
confirmation before the backup begins.
To select files to restore, click the Browse Backups link to display a tree of possible files
and directories to restore. Select the files or directories you want, or click the Select All check
box to choose the entire backup. Then click Restore Backup. A Restore page lets you choose
from three kinds of backup: a direct restore, Zip archive, or tar archive. For a direct restore,
you can have BackupPC either overwrite your current files with the restored ones or save
the files to a specified directory, where you can later choose which ones to use. The Zip and
tar restore options create archive files that hold your backup. You can later extract and
restore files from the archive.
FIGURE 26-3 BackupPC Confi guration Editor
594
Part VII: System Administration
The Edit Config link under Server in the side panel opens a page of tabbed panels for
your host backup configuration. On the Xfer tab you can decide on the type of backup you
want to perform. You can choose from archive (zip), tar, rsync, rsyncd, and smb (Samba).
Here you can set specific settings such as the destination directory for a Zip archive or the
Samba share to access for an SMB backup. The Schedule tab is where you specify the
backup intervals for full and incremental backups.
BackupPC uses both compression and detection of identical files to reduce the size of
the backup, allowing several hosts to be backed up in limited space. Once an initial backup
is performed, BackupPC will back up only changed files using incremental backups,
reducing the time of the backup significantly.
FIGURE 26-4 BackupPC host page
PART IPART IPART IPART IPART VII
Chapter 26: Backup Management
595
Amanda
To back up hosts connected to a network to a central backup server, you can use the
Advanced Maryland Automatic Network Disk Archiver (Amanda) to archive hosts
(universe repository). Amanda uses tar tools to back up all hosts to a single host operating
as a backup server. Backup data is sent by each host to the host operating as the Amanda
server, where they are written out to a backup medium such as tape. With an Amanda
server, the backup operations for all hosts become centralized in one server, instead of each
host having to perform its own backup. Any host that needs to restore data simply requests
it from the Amanda server, specifying the file system, date, and filenames. Backup data is
copied to the server’s holding disk and from there to tapes.
Detailed documentation and updates are provided at www.amanda.org. For the server,
be sure to install the amanda-server package, and for clients you use the amanda-clients
package. Ubuntu also provides an Amanda-common package for documentation, shared
libraries, and Amanda tools.
Amanda is designed for automatic backups of hosts that may have very different
configurations as well as operating systems. You can back up any host that supports GNU
tools, including Mac OS X and Windows systems connected through Samba.
Amanda Commands
Amanda has its own commands that correspond to the common backup tasks, beginning
with am, such as amdump, amrestore, and amrecover, as listed in Table 26-2. The amdump
command is the primary backup operation.
The amdump command performs requested backups; it is not designed for interactive use.
For an interactive backup, you use an archive tool such as tar directly. The amdump is placed
within a cron instruction to be run at a specified time. If, for some reason amdump cannot
save all its data to the backup medium (tape or disk), it will retain the data on the holding
disk. The data can then later be directly written with the amflush command.
You can restore particular files as well as complete systems with the amrestore
command. With the amrecover command, you can select from a list of backups.
Amanda Configuration
Configuration files are placed in /etc/amanda, and log and database files are in /var/lib/
amanda. These are created automatically when you install Amanda. You will need to create
a directory to use as a holding disk where backups are kept before being written to the tape.
This should be located on a file system with a large amount of available space, enough to
hold the backup of your largest entire host.
/etc/amanda
Within the /etc/amanda directory are subdirectories for the different kind of backups you
want to perform. Each directory will contain its own amanda.conf and disklist files. By
default a daily backup directory is created called DailySet1, with a default amanda.conf
and a sample disklist file. To use them, you will have to edit them to enter your system’s
own settings. For a different backup configuration, you can create a new directory and copy
the DailySet1 amanda.conf and disklist files to it, editing them as appropriate. When you