Java 2 Bible Enterprise Edition phần 4 pptx
Bạn đang xem bản rút gọn của tài liệu. Xem và tải ngay bản đầy đủ của tài liệu tại đây (319.46 KB, 71 trang )
Here is a line. I think I'll insert a break. <br/>
Here is a line separated from the previous one by a break.
An element can contain text, or one or more other elements or both. You can see this in the resume and
JavaBeans examples. If you keep in mind the idea that elements are nodes on a tree and can be moved and
manipulated, then it will make sense to you that elements must be properly nested. For example, the following
is not allowed:
<outer>
<inner>
</outer>
</inner>
If you want to pick up the entire <inner> element and place it before the <outer> element, you would be
taking the end tag for <outer> with you. Instead, you have to properly nest, as follows:
<outer>
<inner>
</inner>
</outer>
In these last two snippets we've omitted the indentation that we usually include for readability. There was no
way to properly indent the first snippet, and we didn't want to imply in the second one that the indentation was
why the second one properly parsed.
Another of the rules is that XML is case−sensitive. Again, many of us have gotten sloppy in HTML and
written something like the following:
<html>
<Body>
</body>
</HTML>
As Java developers, this restriction shouldn't bother us. We often use different cases to indicate a class and an
instance of the class. To declare an object of type Dog named dog, we might write something like the
following:
Dog dog = new Dog();
The point isn't whether or not you like this naming convention, but that you aren't in need of case−sensitivity
training.
As you choose an element name, you should make sure that it starts with a letter or underscore and that it
doesn't contain any spaces. Following your Java naming conventions, you should choose names that are
descriptive and that help you or other developers understand what you are describing.
Namespaces
You need namespaces in XML for the same reasons that you use packages in Java. You may have constructed
your own version of a resume, wherein your concept of an address is different from mine. To distinguish your
address element from mine, prefix the element name with the name of a namespace. My <address> consists of
Chapter 10: Building an XML Foundation
205
<street>, <city>, <state>, <zip>, and <phone>. Just as you would tend to package these together in Java, you
should put them in the same namespace. Again, this way your <address> will use your <street>, and so on.
Let's say that our namespace will be called J2EEBible, and that yours will be called reader. Then we will refer
to our <address> with the qualified name <J2EEBible:address>, and to yours as <reader:address>. In each
case, the part before the colon is the prefix, and the part after is the local part. Really J2EEBible is not the
namespace; it is the prefix that we will bind to a particular namespace using the following syntax:
xlmns:prefix="URI"
Here's how the use of namespaces might change the earlier resume document:
<?xml version="1.0"?>
<J2EEBible:resume
xmlns:J2EEBible=" /> <J2EEBible:name> A. Employee </name>
<J2EEBible:address>
<J2EEBible:street> 1234 My Street </J2EEBible:street>
<J2EEBible:city> My City</J2EEBible:city>
<J2EEBible:state> OH </J2EEBible:state>
<J2EEBible:zip> 44120 </J2EEBible:zip>
<J2EEBible:phone> (555) 555−5555 </J2EEBible:phone>
</J2EEBible:address>
<J2EEBible:education>
<J2EEBible:school> Whatsamatta U.</J2EEBible:school>
<J2EEBible:degree> B.S. </J2EEBible:degree>
<J2EEBible:yeargraduated> 1920 </J2EEBible:yeargraduated>
</J2EEBible:education>
</J2EEBible:resume>
The portion in boldface shows where the namespace is declared. It is an attribute placed inside the start tag for
the <resume> element. (We'll say more about attributes in the next subsection.) First we prefixed the tag with
the name of the namespace, and then we bound the name J2EEBible to the URI
The URI that you choose is not necessarily a URL that can actually
be typed into a browser; it is a way of uniquely identifying your namespace, just as you might use
com.hungryminds.j2eebible to name a Java package.
You can use more than one namespace in a document. You can also use a default namespace, that any element
without a prefix is associated with. You denote the default namespace using the following syntax:
xmlns=" />Note that there is no colon after xmlns, nor any prefix name. If you add the default namespace to your
modified resume file, then <J2EEBible:address> refers to the element defined in our namespace, whereas
<address> refers to the element defined in the default namespace.
Attributes
In addition to specifying the content between the start and end tags of an element, you can include attributes in
an element start tag itself. Inside the element's start tag you include an attribute as a name−value pair using the
following syntax:
name="value"
Chapter 10: Building an XML Foundation
206
The attribute value is enclosed in quotation marks: We've used double quotes here, but you can also use single
quotes. The name of an attribute follows the same rules and guidelines as the name of an element.
Consider how namespaces affect attributes. When we specified the default namespace, the name of the
attribute was xmlns, and the value was When we
specified the namespace J2EEBible, the name of the attribute was xmlns:J2EEBible, and the value was
/>The biggest question is, "when should you use an attribute?" The issue is that for the most part, any attribute
could also have been created as a sub−element of the current element. The general rule of thumb for using
attributes is that attributes should contain metadata or system information. Elements should contain data that
you may be presenting or working with. These guidelines are not always cut and dry, however. Take a look at
a snippet from the JavaBeans example earlier in this chapter:
<java version="1.4.0−beta" class="java.beans.XMLDecoder">
<object class="javax.swing.JFrame">
<void property="bounds">
<object class="java.awt.Rectangle">
<int>0</int>
<int>0</int>
<int>200</int>
<int>300</int>
</object>
</void>
<void property="defaultCloseOperation">
<int>3</int>
</void>
The attributes associated with the java and the first object elements aren't too controversial. In the java
element, attributes are being used to specify the version and the class that can interpret this element. The first
object element has the attribute class, which points to the class that you are instantiating. You could have
viewed the bounds of the JFrame as an attribute. Similarly, you could have written the defaultCloseOperation
in many ways, including the following:
<void property="defaultCloseOperation" value="3" />
<void defaultCloseOperation="3" />
<defaultCloseOperation value="3" />
If you were just inventing the tags you'd use in an application, none of these choices would be wrong. The
actual code given in the example above was chosen over these alternatives to conform with the specification
outlined in JSR−57, and this solution is best for bean persistence across IDEs. When you are designing your
own XML documents, you will have to make your own decisions about what is an attribute and what is an
element. Follow the rough rule of thumb about usage and rest assured that whichever choice you make for the
remaining cases, lots of people will feel that you're wrong.
One limitation may influence your decision about whether something should be represented as an element or
as an attribute. The following version of setting the bounds of the JFrame would not be legal:
<void property="bounds">
<object class="java.awt.Rectangle"
int="0"
int="0"
int="200"
int="300" />
Chapter 10: Building an XML Foundation
207
</void>
This code is illegal because you can't use the same name for two different attributes. This wasn't a problem
with elements. In the original version you had four ints: Each was a different element contained between the
object start and end tags. It would be legal to code this example as follows:
<void property="bounds">
<object class="java.awt.Rectangle"
xTopLeft="0"
yTopLeft="0"
xBottomRight="200"
yBottomRight="300" />
</void>
This code may seem more descriptive than the original, but you have to remember what this XML document
is being used for. You want to define the bounds of your JFrame by passing in a Rectangle. The Rectangle is
constructed from four int primitives. The original code clearly conveyed this information to a Java developer.
It was also generated automatically from the Java code that specified the bounds of the JFrame.
Summary
In this chapter you've been introduced to XML from the perspective of a Java developer. So far you have
learned the following:
Fundamentally, XML is a format that represents data along with tags that describe that data. This
"self−describing" document is both human− and machine−readable. Binary files that use proprietary
formats are not easily read by people or by other applications, and HTML produces content that
humans can read, but that means little to machines. XML provides a robust format for both humans
and machines.
•
To display XML in a user−friendly form you have to use some companion technology. You can
convert XML to HTML or another format using XSLT, or you can treat it as you do HTML and use it
with Cascading Style Sheets. We'll further explore the first option in Chapter 14.
•
When documents are represented using XML instead of HTML, the different parts become more
accessible. You can more easily manipulate the document and pull out the content you are looking
for.
•
To standardize configuration files, a movement has sprung up in favor of using XML. You've already
seen this use of XML in the web.xml configuration files for Tomcat and Enterprise JavaBeans.
•
XML is used to persist data about JavaBeans and to aid development across many IDEs. The file is
generated and read by the XMLEncoder and XMLDecoder classes along with helper classes that were
added to the java.beans package in JDK 1.4.
•
Elements must have properly nested start and end tags. An element may have an empty tag that is
basically both a start and an end tag. When choosing names for elements, remember that XML is
case−sensitive.
•
Attributes are useful for including meta−information. Data that won't be rendered for the client, and
that are system information, are often better represented as attributes than as elements. You can't,
however, repeat an attribute name the way you can repeat an element name.
•
Chapter 10: Building an XML Foundation
208
Chapter 11: Describing Documents with DTDs and
Schemas
Overview
Good programming practices in Java stress separating the interface from the implementation. If you know the
interface for a class, then you know how to write applications that use the methods in that class. You don't
care about the implementation. Similarly, in an XML document, if you know how the data are structured, you
can write Java applications that extract, create, and manipulate the document. Currently, the most popular way
to specify the structure of an XML file is to use a Document Type Definition (DTD). XML Schema is an
XML technology that enables you to constrain an XML document using an XML document.
In this chapter you'll begin by reading through a DTD to get a feel for the syntax. You'll then be able to use a
Web resource to validate an XML document against that DTD. After that, you'll be ready to write your own
DTD — one that enforces the rules you need to enforce in our running résumé example. Finally, you'll see
how you can constrain the same document using XML Schema. We won't show you every aspect of
constructing a DTD or a schema, but you'll learn enough that you'll be able to consult the specs for the rest of
the details.
DTDs and XML Schema are not the only systems for constraining XML. The Schematron is a Structural
Schema Language for constraining XML using patterns in trees. You can find out more at the Academia
Sinica Computing Centre's Web site, The
Regular Language description for XML (RELAX) is currently working its way through the ISO. You can find
a tutorial in English or Japanese, examples, and links to software at the RELAX homepage at
/>Producing Valid XML Documents
In Chapter 10, we began to show you what XML documents are. We considered some examples and showed
you some of the basic rules of producing well−formed XML. These were basically grammatical rules. As long
as the syntax was OK, we were satisfied that the XML document could be parsed by an XML parser so that
you could process the information using a Java application. Consider, for example, the following sentence:
My ele dri brok phantenves ice 7cream.
It's hard to make sense of it. Perhaps the silent 7 at the beginning of cream doesn't help. It's also difficult
because the words elephant, drives, and broken are not properly nested. The following sentence is easier to
read, although it doesn't make much more sense:
My elephant drives broken ice cream.
Now the sentence is well formed. You can parse it and locate the subject, the verb and the object. Depending
on where and when you went to school, you may even be able to diagram it. You can alter the sentence in
many ways so that it makes sense:
My elephant eats delicious ice cream.
209
My elephant drives large trucks.
My elephant likes broken ice cream cones.
If your task were to make sense out of "My elephant drives broken ice cream" then, even though it is well
formed, you still would be out of luck. But what if you had to follow a rule like the following:
If verb="drives" the object must describe one or more vehicles.
Now you can go to town. Maybe you need to restrict the subject to being a human being, but you can see the
improvement. The sentence begins to make some sort of sense.
That is what you get when you provide a DTD or a schema for an XML document to follow. You are defining
the structure of the document. If a document conforms to the specified DTD, it is said to be valid. Once you
know that a document is valid according to a specific DTD, you know where to find the elements you're
looking for. That's why it's a good idea to understand DTDs and schema before you start parsing and working
with XML documents.
Reading a DTD
Before we show you how to create a DTD, take a look at one that corresponds to the resume document we
looked at in Chapter 10. To remind you, here's the XML version of the résumé document:
<?xml version="1.0"?>
<resume>
<name> A. Employee </name>
<address>
<street> 1234 My Street </street>
<city> My City</city>
<state> OH </state>
<zip> 44120 </zip>
<phone> (555) 555−5555 </phone>
</address>
<education>
<school> Whatsamatta U.</school>
<degree> B.S. </degree>
<yeargraduated> 1920 </yeargraduated>
</education>
</resume>
It was pretty easy to determine the structure of this document just by looking at it. Now the goal is to go in the
other direction. Having a DTD enables you to specify the structure so that anyone who wants to create a
résumé that conforms to our DTD knows which elements he or she can or must use, and the order in which
those elements should go.
<!ELEMENT resume (name, address, education)>
<!ELEMENT address (street, city, state, zip, phone)>
<!ELEMENT education (school, degree, yeargraduated)>
<!ELEMENT name (#PCDATA)>
<!ELEMENT street (#PCDATA)>
<!ELEMENT city (#PCDATA)>
<!ELEMENT state (#PCDATA)>
<!ELEMENT zip (#PCDATA)>
<!ELEMENT phone (#PCDATA)>
<!ELEMENT school (#PCDATA)>
<!ELEMENT degree (#PCDATA)>
<!ELEMENT yeargraduated (#PCDATA)>
Chapter 11: Describing Documents with DTDs and Schemas
210
Without knowing the DTD syntax, you can figure out that the first element is called resume and consists of
the elements name, address, and education. You might even assume, correctly, that there can be only one of
each of those elements and that they appear in the given order. Similarly, the address element is also made up
of one of each of the elements street, city, state, zip, and phone, and the education element consists of one
each of the elements school, degree, and yeargraduated. The remaining elements are somehow different. Each
consists of #PCDATA. This indicates that you can think of these elements as being the fundamental building
blocks of the other elements. In other words, address and education are both made up of these fundamental
building blocks, which in turn consist of nothing more than parsed character data.
Connecting the document and the DTD
At this point you have an XML file and a DTD but nothing that ties them to each other. You follow the same
basic rules you would follow in tying a CSS (Cascading Style Sheet) to an HTML document. For example, to
indicate that this XML file references that particular DTD, you can just include the DTD in the XML file, as
shown in the following example:
<?xml version="1.0"?>
<!DOCTYPE resume [
<!ELEMENT resume (name, address, education)>
<!ELEMENT address (street, city, state, zip, phone)>
<!ELEMENT education (school, degree, yeargraduated)>
<!ELEMENT name (#PCDATA)>
<!ELEMENT street (#PCDATA)>
<!ELEMENT city (#PCDATA)>
<!ELEMENT state (#PCDATA)>
<!ELEMENT zip (#PCDATA)>
<!ELEMENT phone (#PCDATA)>
<!ELEMENT school (#PCDATA)>
<!ELEMENT degree (#PCDATA)>
<!ELEMENT yeargraduated (#PCDATA)>
]>
<resume>
<name> A. Employee </name>
<address>
<street> 1234 My Street </street>
<city> My City</city>
<state> OH </state>
<zip> 44120 </zip>
<phone> (555) 555−5555 </phone>
</address>
<education>
<school> Whassamatta U.</school>
<degree> B.S. </degree>
<yeargraduated> 1920 </yeargraduated>
</education>
</resume>
The portion in bold, <!DOCTYPE resume [ ]>, is the document type declaration. It specifies that the root
element is of type resume and then includes the DTD between square brackets. The processing instruction
<?xml version=1.0?> and the DOCTYPE tag are not elements and so do not need to have matching closing
tags.
It would be inefficient and overly restrictive for every XML file to include the DTD (or DTDs) it uses.
Instead, suppose that you save this particular DTD in a file called resume.dtd in the same directory that
contains your XML file. Then you can reference the DTD using the following document type declaration
instead:
Chapter 11: Describing Documents with DTDs and Schemas
211
<!DOCTYPE resume SYSTEM "resume.dtd">
Here you don't include the DTD in the document type declaration but rather point to it. You can place it in
another directory and use a relative URL, or you can provide an absolute URI that points to the document on
your machine or another machine. Take a look at the /lib/dtds directory in your J2EE distribution. It contains
various DTDs for use in enterprise applications. By storing your DTDs in this location, you can reference
them from any XML document that needs to be validated against them.
The web.xml document that you used as a config file for Tomcat had the following document type
declaration:
<!DOCTYPE web−app PUBLIC
"−//Sun Microsystems, Inc.//DTD Web Application 2.3//EN"
" />Here the DTD is declared to be PUBLIC instead of SYSTEM. The idea is that you aren't just using a DTD for
your own idea of what a résumé should look like; this DTD will be used by tons of people customizing the
web.xml file to configure their servlet containers. The validator will first try to use the first address that
follows the word PUBLIC. In this case that address signifies that no standards body has approved this DTD,
that it is owned by Sun, and that it describes Web Applications version 2.3 in English. The second address
indicates the URI where the DTD can be found.
Note Sun has moved the address for all its J2EE DTDs to the URL The document
type declaration in the current Tomcat config will most likely have been updated by the time you read
this. You should install the latest version so that the changes are reflected. You will also have a local
copy of these files in your J2EE SDK distribution version 1.3 or higher, in the directory /lib/dtds/.
Take a look at the web−app DTD. It includes a lot of documentation to help you understand what each
element is designed to handle. Here's the specification for the web−app element.
<!ELEMENT web−app (icon?, display−name?, description?,
distributable?, context−param*, filter*, filter−mapping*,
listener*, servlet*, servlet−mapping*, session−config?,
mime−mapping*, welcome−file−list?, error−page*, taglib*,
resource−env−ref*, resource−ref*, security−constraint*, login−
config?, security−role*, env−entry*, ejb−ref*)>
From your experience so far you can figure out that the list in parentheses is an ordered list of elements the
web−app contains. But now each name is followed by a ? or a *. As you'll see in the following section, the ?
indicates that the element may or may not be included, and the * indicates that if it's included, there may be
more than one.
Writing Document Type Definitions (DTDs)
In the previous section you saw a couple of examples of DTDs and got a feel for the basic syntax. In this
section we'll run through the most common constructs used to specify elements and attributes. For more
information on DTDs you should consult a book devoted to XML, such as the second edition of Elliotte Rusty
Harold's XML Bible (Hungry Minds, 2001).
Chapter 11: Describing Documents with DTDs and Schemas
212
Declaring elements
From our examples, you've probably figured out that the syntax for declaring an element is the following:
<!ELEMENT element−name (what it contains )>
In Chapter 10, we covered restrictions on the name of the element. Now take a look at what an element can
contain.
Nothing at all
In the resume example, let's say that the employer belongs to a secret club and wishes to give preferential
treatment to others in the same club. This club membership indicator may appear in an element that contains
information but doesn't appear on the page. For example, the resume may be adjusted as follows:
<resume>
<name> A. Employee </name>
<knowsSecretHandshake />
<address>
You should adjust the DTD to indicate that there is now an empty element called knowsSecretHandshake. Of
course, you have to adjust the resume element declaration in the DTD as well, in addition to adding the
following entry:
<!ELEMENT knowsSecretHandshake EMPTY>
Nothing but text
The fundamental building blocks of the resume contain nothing but #PCDATA. This parsed character data is
just text. You could have declared street as consisting of a streetNumber and a streetName. You didn't. It is
declared as follows:
<!ELEMENT street (#PCDATA)>
So the contents of street can't meaningfully be further parsed by an XML parser.
Other elements
Now the fun begins. An element can contain one or more other elements. It may seem a bit silly to have it
contain only one — but you can. If the parent element contains nothing but what is in the child, and only a
single child element exists, then there should be a good reason for this additional layer. In any case, here's
how you would declare it:
<!ELEMENT parent (child)>
You've already seen the case of a parent containing more than one child. For example, you declared the
education element in the resume example as follows:
<!ELEMENT education (school, degree, yeargraduated)>
Chapter 11: Describing Documents with DTDs and Schemas
213
It is possible that your candidate never went to school. You can indicate that the resume element may contain
one or no education elements by using a ? after the word education:
<!ELEMENT resume (name, address, education?)>
You'll notice that no symbols follow name or address. This indicates that these elements must occur exactly
once each.
On second thought, your candidate may never have graduated from school, or may have graduated from one
or more schools. You can indicate that an element may occur zero or more times by using a *. In this example,
the resume element would be declared as follows:
<!ELEMENT resume (name, address, education*)>
Your candidate may have more than one address, and you don't want to allow the candidate to have no
address or you won't be able to contact him or her. You can't, therefore, just use the * and hope that it is used
correctly. You use the symbol + to indicate that an element will appear one or more times. The following
example shows what this symbol looks like applied to the address element:
<!ELEMENT resume (name, address+, education)>
It is possible that your candidate has more than one degree from the same school. You can group elements to
expand your options in specifying the number of degrees. Here's how you'd specify that a candidate can have
one or more degrees from the same school:
<!ELEMENT education (school, (degree, yeargraduated)+)>
The element yeargraduated is grouped with the element degree so you know the year associated with each
degree earned.
Finally, you may want to present options. You may want to indicate that an element can contain either a
certain element (or group of elements) or another one. You can do this with the | symbol. Here's how you
indicate that an address consists either of a street, city, state, and zip or of a phone:
<!ELEMENT address ((street, city, state, zip)| phone)>
Mixed content
Sometimes you want to include text without having to create a whole new element that represents this text.
For example, this is an XML version of the nonsense example from the beginning of the chapter:
<nonsense>
My <animal> Elephant </animal>
drives <vehicles> large trucks </vehicles>.
</nonsense>
The corresponding DTD entry is the following:
<!ENTITY nonsense (#PCDATA,animal,#PCDATA,vehicles,#PCDATA)>
Really, the format of the entry isn't different from the format of those you saw when including other elements.
The difference is that #PCDATA is an allowable entry.
Chapter 11: Describing Documents with DTDs and Schemas
214
Anything at all
You should have a really good reason for choosing this option. You may want to use it while developing a
DTD, but by the time you're finished, you should be able to convince three other people (at least one of whom
doesn't like you very much) that this option is a good idea. In the event that you do choose this option, you are
saying that you have some element but that it can contain whatever the person using your DTD wants. The
syntax is the following:
<!ELEMENT looselyDefinedThing ANY>
Declaring entities
An entity specifies a name that will be replaced by either text or a given file. You declare an entity in a DTD
as follows:
<!ENTITY entityName "what it is replaced by">
Some entities are defined for you in XML. These entities enable you to use characters that would give the
parser problems. For example, if you use < or >, the parser tries to interpret these symbols as tag delimiters.
Instead, you can use the entities < and > for these less−than and greater−than signs. The other three
predefined entities are & for &, " for ", and &apos for '.
You can define your own constants in the same way. You can create a form letter for rejecting candidates, and
personalize it by assigning the candidate's name to the entity candidate, as shown in the following example:
<!ENTITY candidate "A. Applicant">
You can now use this element in a document as follows:
Dear &candidate,
In the final document, this letter would begin, "Dear A. Applicant, "
Suppose that you write a lot of letters, and you want each one to have your return address at the top. You may,
in addition, use some set of form letters over a long period of time. Rather than type in your return address to
each letter, you can define it in the DTD for those form letters. You can hard−code it for each form letter, as
shown in this example:
<!ENTITY returnAddress "My Name, 1234 MyStreet, My Town, OH
44120">
You probably already recognize this as bad programming practice. If you move, you have to replace your
address in many locations. It's a better idea to have each of these DTDs refer to a single file that contains your
current address.
The reference looks similar to the syntax you used for namespaces. In this case, it looks like this:
<!ENTITY returnAddress SYSTEM
" />Chapter 11: Describing Documents with DTDs and Schemas
215
This code refers to an XML file that you keep at the specified URI. You don't have to refer to an XML file;
your target file can be a text file or even binary data. For example, you can have a picture of your house stored
in an entity, pass in the link to the file and a reference to its type, and if the client application can handle the
MIME type, the page will be rendered correctly.
Declaring attributes
You can think of an attribute as a modifier for an element. Here's the syntax for an attribute declaration:
<!ATTLIST elementName attributeName attributeType rules >
The element name and attribute name are self−explanatory. You have three choices for rules: An attribute is
either #FIXED, #IMPLIED, or #REQUIRED.
If it is #FIXED, the attribute will have the value specified. For example, in the following declaration the
phone element has an attribute, acceptCollectCalls, which is set to the value false:
<!ATTLIST phone acceptCollectCalls #FIXED "false">
The other two choices don't provide a default value. In the following case, #IMPLIED tells you that the
attribute acceptCollectCalls may or may not be set in the phone element in an XML document:
<!ATTLIST phone acceptCollectCalls #IMPLIED>
If, as in the following declaration, you use #REQUIRED instead of #IMPLIED, then acceptCollectCalls must
be set in each phone element in an XML document validated against this DTD:
<!ATTLIST phone acceptCollectCalls #REQUIRED>
Although other types of attributes exist, you will most often use CDATA and enumeration. The CDATA type
means that the attribute can contain text of any sort. (You can think of CDATA as being opposed to the
PCDATA we covered for elements.) Whereas PCDATA is parsed character data, CDATA is not parsed and
can contain any values you like. They will not be interpreted by the parser.
The enumeration is a list of the possible values that the attribute can take on. For example, you may want to
imply that acceptCollectCalls is a Boolean. You can do this by specifying the allowable values as being true
or false, as shown in the following example:
<!ATTLIST phone acceptCollectCalls (true | false) #REQUIRED>
Validating XML
You now have all of the pieces you need to create a valid XML document. You know how to write a DTD and
an XML document that conforms to it. You know how to use DOCTYPE to tie the two together. Your XML
document has a single root element that corresponds to the element declared in the document type declaration.
Now it is time to check that your document is valid. Note that you should do this before you go to production.
You shouldn't continue to validate the document, or the output of a document−producing application, once
you have entered production, as this will slow down your process.
Chapter 11: Describing Documents with DTDs and Schemas
216
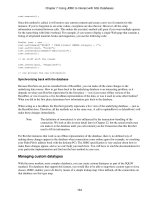
As an exercise, try validating the resume document using Brown University's Scholarly Technology Group's
XML Validation form. You'll see a welcome page, similar to the one shown in Figure 11−1, at
/>Figure 11−1: Brown University's online validator
The interface is very straightforward with helpful instructions. You can validate a local file on your machine,
either by browsing to it or by typing or cutting and pasting it into the provided area. You have one version of a
resume document that includes the required DTD: Type that into the text area and click the Validate button to
see the result shown in Figure 11−2.
Figure 11−2: Results for a valid document
The document is valid, and that's all that the validator reports. Now delete a line, such as the degree element,
from inside the education element. You will now see a report that the document is no longer valid (see Figure
11−3).
Figure 11−3: Results for a document that isn't valid
Chapter 11: Describing Documents with DTDs and Schemas
217
Finally, take a look at a document that isn't even well formed. Move the </zip> end tag inside the phone tag.
The validator will give you a report much like the one shown in Figure 11−4.
Figure 11−4: Results for a document that isn't well formed
Describing Documents with XML Schemas
A DTD may be sufficient for many of your needs. It is fairly easy to write a DTD and an XML document that
validates against it. One downside is that the datatypes aren't specific enough to really constrain your
document enough. For example, both the phone number (phone) and the candidate's name (name) are
described as #PCDATA. You know that you want an integer for the phone number. More specifically, in the
United States, you want a ten−digit integer. On the other hand, a name probably won't include many numbers.
A second drawback of DTDs is that you are describing XML documents with non−XML documents. An
XML Schema is a well−formed XML document. In fact, it conforms to a DTD itself and so can be (but
doesn't need to be) validated. It may seem as if you're cheating here, because a DTD still exists in this
scenario. The point is that you will be creating or using a document that describes the structure of your XML
documents. This descriptor will itself be written in XML, so you can use your favorite XML tools to parse and
manipulate the schema.
Caution The XML Schema specification is still evolving. For final syntax and
details about the namespace, check out
/>As a Java developer, you'll find it easy to get excited about XML Schema. You can use it to create complex
XML types, much as you've created Java objects. The schema is to the XML document what an interface is to
an instance of a class. Although the J2EE JDK currently ships with DTDs and is likely to continue to do so for
a while, you can expect to see the adoption of schemas as well. (You should consider moving in that direction
as well, although you might want to wait until the specification is more stable.) The other issue is that working
with schemas is harder than working with DTDs. You should make sure that you get a real benefit from taking
these extra steps. For example, if you aren't viewing XML as data, you may not need the extras that XML
Schema provides.
Chapter 11: Describing Documents with DTDs and Schemas
218
You can use a standard text editor to write XML Schemas or investigate the growing selection of GUI tools.
One of the earliest tools is Xeena. It is available for free from the IBM alphaWorks site at
XML Spy is a commercial IDE for XML available from
/>The shell of a schema
A schema will begin with the XML declaration and has schema as the root element. Follow the syntax we
discussed in Chapter 10, to specify the namespace. [The particular value of the namespace has changed in the
two years prior to this writing, and is likely to have changed again before you read this. Check out the W3C
Web site ( Here's what the shell of a schema looks like:
<?xml version="1.0">
<xsd:schema xmlns:xsd=" />
</xsd:schema>
You can also use the default namespace, but this format forces you to be clear about which elements are part
of the schema. If you were to use the default namespace, your document would look like this:
<?xml version="1.0">
<schema xmlns=" />
</schema>
For the remainder of the chapter, we'll use the first version, which gives the namespace the name xsd.
Recall that you used the DOCTYPE tag to point to a DTD. In the case of the preceding schema shell, place
the noNamespaceSchemaLocation attribute in an XML file in the root element to point to a schema. (Assume
you've saved your shell document as shell.xsd.) The process of adding the noNamespaceSchemaLocation
looks like this fragment from the resume example:
<?xml version="1.0">
<resume xsi:noNameSpaceSchemaLocation="shell.xsd"
xmlns:xsi=" />
Again, the actual URI for the namespace may change. This example is in the format you use when your XML
document doesn't have a namespace. If it does, then you have to specify the namespace for the schema as well
as the target namespace. In this example, assign the namespace J2EEBible to the resume elements. Now the
XML document looks like this:
<?xml version="1.0"?>
<J2EEBible:resume
xmlns:J2EEBible=" /> <J2EEBible:name>
Nothing from the XML file is pointing at the schema, so you have to alter the schema to point to the XML
file. You do this in the schema opening tag, as follows:
<?xml version="1.0">
<xsd:schema xmlns:xsd=" /> xmlns:J2EEBible=" />Chapter 11: Describing Documents with DTDs and Schemas
219
targetNamespace=" />
</xsd:schema>
You've had to add the same URI twice. Once you were specifying the prefix J2EEBible, and the other time
you were specifying the target namespace of the schema.
Elements and attributes
The syntax for specifying an element is fairly straightforward. Because you are using a namespace for the
schema, you declare an element like this:
<xsd:element name="elementName" type="elementType" />
Remember that schemas are XML documents, and that as a result this tag has to be both a start and end tag for
the empty element xsd:element. If you just use the default namespace, you can drop the prefix xsd. Note that
other options that follow the declaration of the name and type may exist.
As before, the element name is the name you're using in the XML document, such as address, phone, or
education. The element type will enable you to refer to many built−in types as well as to user−defined types.
The way you interact with types is much more in line with your Java experience than with your experience in
designing DTDs.
Now here's the syntax for declaring an attribute:
<xsd:element name="elementName" type="elementType" />
Already you can see that XML Schemas are more consistent than DTDs. However, because you can't use the
specialized DTD format, you'll see as we go along that you are required to do a great deal more typing to use
schemas.
One of the options that can follow the name and type in the declaration of an element or attribute is an
occurrence constraint. Instead of the cryptic ?,*, and + from DTDs, you use the attributes minOccurs and
maxOccurs. In the resume example, you can use the following syntax to specify that an applicant may include
one or two phone numbers:
<xsd:element name="phone" type="elementType"
minOccurs="1" maxOccurs="2" />
We've left out the element type because we haven't discussed it yet. What is available to you using schemas is
a lot more powerful than what you used with DTDs. Sure, you can accomplish the same thing in a DTD using
an enumeration, but what if the range is much wider?
Simple types
The building blocks for DTDs are fairly non−specific. XML Schema specifies more than 40 built−in types
that you can use. Most of the types are pretty self−explanatory. For more details on these types, check out the
online documentation at />The numeric types include 13 integral types and three types to describe decimals. The types float, double, and
decimal describe floating−point numbers. The integers include byte, short, int, long, integer,
Chapter 11: Describing Documents with DTDs and Schemas
220
nonPositiveInteger, nonNegativeInteger, positiveInteger, negativeInteger, unsignedByte, unsignedShort,
unsignedInt, and unsignedLong.
You can specify that phone is an int like this:
<xsd:element name="phone" type="xsd:int" />
A phone number can't be any old integer. You can assign a nonNegativeInteger as the type. You can even
define your own simple type. Try designing a U.S. phone number as a ten−digit integer. The first digit of a
U.S. phone number cannot be a 1 or a 0. You can apply many other restrictions, but for the moment just use
those two. They specify that a U.S. phone number is some 10−digit integer greater than 2,000,000,000: In
other words, a U.S. phone number is an integer between 2,000,000,000 and 9,999,999,999. Here's how you
can define a simple type based on this observation:
<xsd:simpleType name="USPhoneNumber">
<xsd:restriction base="integer">
<xsd:minInclusive value="2000000000"/>
<xsd:maxInclusive value="9999999999"/>
</xsd:restriction>
</xsd:simpleType>
Now you can use this newly defined type in your element declaration for phone:
<xsd:element name="phone" type="USPhoneNumber" />
Allowing user−defined types is a very powerful feature that is available in schemas but not in DTDs.
You can allow the entry of more than one phone number by defining a list type, as shown in this example:
<xsd:simpleType name="phoneList">
<xsd:list itemType="USPhoneNumber" />
</xsd:simpleType>
This means that phoneList can consist of a list of USPhoneNumbers. You probably want to make sure that at
least one phone number is listed in the element phone. At this point you can restrict phoneList by specifying
the minimum number of elements, as shown in this example:
<xsd:simpleType name="phone">
<xsd:restriction base="phoneList">
<xsd:minLength="1"/>
</xsd:restriction>
</xsd:simpleType>
In Java, a boolean is considered an integral type that can only take the values true and false. XML Schema
declares boolean to have the four possible values 0, 1, false, and true.
The three string types are string, normalizedString, and token. The normalizedString is just a string without
tabs, carriage returns, or linefeeds. The token is just a normalizedString with no extraneous whitespace. The
type anyURI is a string that is meant to hold the value of any relative or absolute URI.
The XML Schema provides nine time types. You can specify dates with any of the different degrees of
precision allowed in the ISO standard 8601. The types allowed to specify time are time, dateTime, duration,
date, gMonth, gYear, gYearMonth, gDay, and gMonthDay. These time specifications are always given so that
Chapter 11: Describing Documents with DTDs and Schemas
221
the units go from largest to smallest as you read from left to right. An example of date is 1776−07−04. The
corresponding gMonth is –07−−, the corresponding gYear is 1776, and the corresponding gDay is −−−04.
Details of the time formats can be found in the ISO 8601 document at />In the resume example, yeargraduated should be a year. You can specify this in the schema, as follows:
<xsd:element name="yeargraduate" type="xsd:gYear" />
You can also assign the type int or a string type to the element yeargraduated. As in Java, the type of an
element should help you understand what the element is and how to use it properly. If you can be more
specific, you should be.
Other built−in simple types include ID, IDREF, ENTITY, and others taken from types of the same name in
DTDs. These types are beyond the scope of this book, but you can find descriptions at the W3C Web site,
/>Complex types
In the previous section you saw how to create simple types based on existing simple types. The example
showed you how to restrict the allowable range of an integer. You can think of that restriction as
corresponding to inheritance in Java. Now you are going to look at the DTD analog to composition: building
complex types out of simple types. You can then build up XML datatypes that map well to Java objects.
In the DTD version of the resume example, you declared the address element like this:
<!ELEMENT address (street, city, state, zip, phone)>
In that case you also needed individual entries for street, city, state, zip, and phone. Here's how you can
declare the complex type address using XML Schema:
<xsd:complexType name="address">
<xsd:sequence>
<xsd:element name="street" type="xsd:string" />
<xsd:element name="city" type="xsd:string" />
<xsd:element name="state" type="xsd:string" />
<xsd:element name="zip" type="xsd:string" />
<xsd:element name="phone" type="xsd:string" />
</xsd:sequence>
</xsd:complexType>
You have already defined a special simple type called USPhoneNumber and declared phone to be of this type.
You can refer to this previous reference using the following code:
<xsd:complexType name="address">
<xsd:sequence>
<xsd:element name="street" type="xsd:string" />
<xsd:element name="city" type="xsd:string" />
<xsd:element name="state" type="xsd:string" />
<xsd:element name="zip" type="xsd:string" />
<xsd:element ref="phone" />
</xsd:sequence>
</xsd:complexType>
Chapter 11: Describing Documents with DTDs and Schemas
222
This highlighted portion refers to the global element phone. You can similarly group attributes together into
an attribute group that you reference using ref.
To return to the element example, when you create an address element in your XML document you are forced
to include street, city, state, zip, and phone in that order because of the sequence element. It makes sense to
keep the street, city, state, and zip in that order because that is how that data is organized in an address. There
is no standard, however, that determines whether the phone number comes before or after the rest of these
items. You could collect street, city, state, and zip into a complex type called mailingAddress. If you are going
to need this information by itself throughout your document, this is a good idea. Then you can collect
mailingAddress and phone together into an unordered collection called address.
Since you've already seen how to create a complex type such as mailingAddress, we will just collect the
elements together without naming them:
<xsd:complexType name="address">
<xsd:group>
<xsd:sequence>
<xsd:element name="street" type="xsd:string" />
<xsd:element name="city" type="xsd:string" />
<xsd:element name="state" type="xsd:string" />
<xsd:element name="zip" type="xsd:string" />
</xsd:sequence>
<xsd:element ref="phone" />
</xsd:group>
</xsd:complexType>
Now if you enter an address, you can enter the phone either before or after the remainder of the information
that must be presented in order. If instead of group you use choice, only one of the options can appear. In this
case you are looking for some way to contact candidates. You don't care whether they want to be contacted by
mail or by phone, but they can only give you one way to contact them. This choice is specified as follows:
<xsd:complexType name="address">
<xsd:choice>
<xsd:sequence>
<xsd:element name="street" type="xsd:string" />
<xsd:element name="city" type="xsd:string" />
<xsd:element name="state" type="xsd:string" />
<xsd:element name="zip" type="xsd:string" />
</xsd:sequence>
<xsd:element ref="phone" />
</xsd:choice>
</xsd:complexType>
A third option is to use all instead of group or choice. In this case you are allowing the applicant to include
either the mailing−address information, the phone number, both, or neither. The user can include each element
surrounded by all either zero or one times.
Now suppose that you really don't want to define a separate USPhoneNumber type and then declare a phone
to be of this type. If you are only using one phone number in the entire document, you may prefer to define
this type locally. This type of definition is similar to an anonymous inner class in Java and is called an
anonymous type definition. In the case of the phone example, it looks like this:
<xsd:complexType name="address">
<xsd:group>
<xsd:sequence>
Chapter 11: Describing Documents with DTDs and Schemas
223
<xsd:element name="street" type="xsd:string" />
<xsd:element name="city" type="xsd:string" />
<xsd:element name="state" type="xsd:string" />
<xsd:element name="zip" type="xsd:string" />
</xsd:sequence>
<xsd:element name="phone">
<xsd:simpleType>
<xsd:restriction base="integer">
<xsd:minInclusive value="2000000000"/>
<xsd:maxInclusive value="9999999999"/>
</xsd:restriction>
</xsd:simpleType>
</xsd:element>
</xsd:group>
</xsd:complexType>
There is no name following xsd:simpleType as it did in the previous example. Also, because you are defining
this type in place you can't use the empty tag <xsd:element name="phone"/>. You can use a start tag and an
end tag for this element. Aside from these modifications, you are basically inserting the definition of
USPhoneNumber into the declaration of phone.
Finally, take a look at using one type in place of another. As an example, you can declare the education
element as follows:
<xsd:complexType name="education">
<xsd:sequence>
<xsd:element name="school" type="xsd:string" />
<xsd:element name="year" type="xsd:gYear" />
<xsd:element name="degree" type="xsd:string" />
</xsd:sequence>
</xsd:complexType>
You can extend education by including information about the major subject studied:
<xsd:complexType name="detailedEducation">
<xsd:complexContent>
<xsd:extension base="education">
<xsd:element name="majorSubject" type=xsd:string" />
</xsd:extension>
</xcd:complexContent>
</xsd:complexType>
You can now use the element detailedEducation wherever an element of the type education is called for. As a
Java developer, you should find this very comfortable. Substituting a class that is "at least" some given type is
something you do all the time.
Summary
You understand the importance of defining interfaces in your Java applications. In this chapter, we showed
you the XML equivalents of this concept. Now that you are able to impose this structure and work within it,
you're ready for the next chapter's look at parsing XML documents. In your quick travel through DTDs and
schema, you learned the following:
Chapter 11: Describing Documents with DTDs and Schemas
224
The basic syntax of a DTD enables you to very simply specify the elements and attributes in an XML
document. You can pretty much create a DTD from an existing XML file and then modify it as your
needs change. Start from your root element and work in by adding the biggest blocks first and then
refining them.
•
Once you have a DTD, you add the DOCTYPE document type declaration to tie the XML document
to the DTD against which you are validating. You will see how to use JAXP to validate your
document in Chapter 12, but here you used a validator that is available for free online.
•
XML Schema provides you with another method of describing your document. A schema is an XML
document itself, and so you will be able to use XML tools to parse and understand it. After the
introduction to XML in the Chapter 10, you should be familiar with the syntax and able to read
through a schema easily. A schema is generally more complicated than a DTD.
•
In addition to using the 40−some built−in simple types, you can create your own simple types and
complex types. This makes working with schemas feel more like working with Java. You learned how
to extend, restrict, and group types together in creating your complex types.
•
Chapter 11: Describing Documents with DTDs and Schemas
225
Chapter 12: Parsing Documents with JAXP
Overview
The previous two chapters gave you an introduction to XML syntax and to the various ways of constraining
XML documents. In this chapter, you'll learn the various ways in which you can use Java programs to parse,
navigate an XML document using the tree structure, and to create XML. You'll learn two basic methods of
working with an XML document. Either you will listen for events that the parser generates while moving
through a document, or you will want to work with hierarchical view of the document.
There are various APIs for working with XML. There are the Simple APIs for XML (SAX), the APIs that
support the Document Object Model (DOM), and a more Java−friendly set of APIs called JDOM. In this
chapter, you'll use Sun Microsystem's Java APIs for XML Parsing, better known as JAXP. JAXP supports
both SAX and DOM. JAXP allows you to use its default parser or to plug in your favorite parser. Depending
on how you configure the parser and what your needs are, you can then respond to events using a SAX based
parser or use the DOM to be able to manipulate and alter an XML document.
Introducing JAXP
Java technology is still evolving pretty quickly as the changes to the core have begun to slow. XML is in a
rapid growth stage. Sun has slowed its Java releases to once about every 18 months; from release to release,
the related XML technologies change dramatically. In order to maintain Java as an attractive platform for
working with XML, Sun will release quarterly updates to the JAX Pack, Sun's collection of Java/XML
offerings.
The JAX Pack
The JAX Pack is a single download from Sun that includes Java API for XML Processing (JAXP), Java
Architecture for XML Binding (JAXB), Java API for XML Messaging (JAXM), Java API for XML−based
RPC (JAX−RPC), and Java API for XML Registries (JAXR). You can find the JAX Pack Web page at
It announces that the download will support SAX, DOM, XSLT,
SOAP, UDDI, ebXML, and WSDL. The versions of the technology released in the JAX Pack may not be final
customer ship versions of the various APIs, but Sun's goal is to get this evolving technology out faster.
You can find the latest version of JAXP at It will be included in the
1.4 release of J2SE and the 1.3 release of J2EE, and in the JAX Pack. With the JAXP 1.1 download, you'll
find a number of examples and samples that will help you learn the technology.
JAXP is not a parser. What JAXP provides is an abstraction layer that enables you to use your favorite parser
without worrying too much about the details of that parser. This means that you make calls using the JAXP
APIs and let JAXP worry about issues such as backwards compatibility. JAXP supports both the DOM and
SAX APIs. In this chapter, we'll cover each API in turn and show you their strengths and weaknesses. As you
examine the needs of your particular applications, you'll find situations in which you reach for SAX and those
in which you prefer to use the DOM.
226
Installing JAXP and the examples
Once you download and unzip the distribution, you will end up with a directory named jaxp−1.1. To complete
the installation, you can either make additions to your CLASSPATH or you can copy three jar files to a
directory that is already in the CLASSPATH. Because JAXP will eventually be part of the Java 2 distribution,
if the jar files crimson.jar, jaxp.jar, and xalan.jar aren't in your CLASSPATH, you should copy them to
jre/lib/ext. You can test your installation by running one of the sample applications that comes with the
distribution.
Next set up your directory for the running example. Inside the jaxp1−1/examples directory create a J2EEBible
subdirectory. Inside J2EEBible, create the further subdirectory cue. For this example, let's use the XML
version of Shakespeare's Richard III that is distributed with JAXP. For simplicity's sake, copy the files
rich_iii.xml and play.dtd into the J2EEBible directory. (By the way, you can find a complete distribution of
Shakespeare's plays as well as other treasures at />Testing the installation
Now that you've installed JAXP, try taking it out for a quick spin. You'll learn more about SAX in the section
"Reaching for SAX" later in this chapter, but you can still create a SAX−based parser and have it parse the
rich_iii.xml file. You may find it helpful to direct your browser to the JavaDocs for the javax.xml.parsers
package.
The javax.xml.parsers package consists of four classes, together with one exception and one error class. (The
DocumentBuilder and DocumentBuilderFactory classes are used for working with the DOM objects and
documents, and will be covered later in this chapter in the section "Using the DOM.") The SAXParser is the
wrapper for implementations of XMLReader. If you used previous versions of JAXP, you'll notice that this is
a change. In the past, JAXP only supported SAX 1.0, and so SAXParser wrapped the Parser interface; now
JAXP supports SAX 2.0 using the XMLReader interface instead, and so SAXParser has been changed
accordingly. The final class in the javax.xml.parsers package is SAXParserFactory. This class is a factory for
creating instances of SAX 2.0 parsers and configuring them.
The SAXParserFactory has three get−set pairs of methods. The setNamespaceAware() and
isNamespaceAware() methods enable you to specify and determine (respectively) whether or not the factory
will produce a parser that supports XML namespaces. The setValidating() and isValidating() methods enable
you to specify and determine (respectively) whether or not the factory will produce a parser that validates
documents while parsing them. The setFeature() and getFeature() methods enable you to set and get
(respectively) a specified feature in the underlying implementation of the XMLReader. With these six
methods you can configure and view the details of the SAX−based parser you will create using the
SAXParserFactory.
Once you have an instance of SAXParserFactory, you create a new instance of SAXParser using the
newSAXParser() method. This will create a SAX−based parser with the setting you configured using the
methods in the previous paragraph. Creating a SAXParserFactory is a little different from what you might
expect. The constructor is declared to be protected. However, a static method named newInstance() creates a
new instance of a SAXParserFactory, which means that you can create your SAXParser as follows:
SAXParserFactory spFactory = SAXParserFactory.newInstance();
SAXParser parser = spFactory.newSAXParser();
The fact that newInstance() is a static method means that, unless you need to configure it, you don't actually
have to create an instance of SAXParserFactory. You can create a SAXParser more simply using the
Chapter 12: Parsing Documents with JAXP
227
following code:
SAXParser parser =
SAXParserFactory.newInstance().newSAXParser();
Ten of the 16 methods in the SAXParser class are parse() methods with different signatures. You also have
the getProperty() and setProperty() methods, which are similar to the getFeature() and setFeature() methods
you saw in the SAXParserFactory. You also have the getter methods getParser(), getXMLReader(),
isNamespaceAware(), and isValidating(), which you can use to see the properties that have been set in the
XMLReader and in the parser.
But, for the most part, the job of a parser is to parse, and so that's what the bulk of the methods enable you to
do.
Let's put all of this together to create a SAX 2.0–based parser and instruct it to parse Richard III. Create the
following code and save it as CueMyLine.java in the cue directory:
package cue;
import org.xml.sax.helpers.DefaultHandler;
import java.io.File;
import javax.xml.parsers.SAXParser;
import javax.xml.parsers.SAXParserFactory;
public class CueMyLine extends DefaultHandler{
public static void main(String[] args) throws Exception {
SAXParser parser =
SAXParserFactory.newInstance().newSAXParser();
parser.parse(new File("rich_iii.xml"), new CueMyLine());
}
}
You can see that the version of parse() you use takes a File as its first argument and a DefaultHandler as its
second argument. We'll take a closer look at DefaultHandler in the section "Reaching for SAX"; basically, it
is just an adapter class for the XMLReader interface.
Compile and run this example. It should run for a little bit and then finish, and you should get the next
command prompt. Big deal. Well, despite there being no evidence that anything happened, a parser was
created that then parsed the file rich_iii.xml.
We're going to work with this example for a while, so let's fix up the handling of exceptions before moving
on. If nothing else, this will emphasize how much is going on in the two−line body of the main() method. You
might run into trouble configuring the parser, so you need to catch a ParserConfigurationException. You need
an IOException to handle exceptions when using your parser to read from the file rich_iii.xml. You also need
to catch SAXExceptions in case anything goes wrong during the parsing of the file. The changes are
highlighted in the following snippet:
package cue;
import org.xml.sax.helpers.DefaultHandler;
import java.io.File;
import javax.xml.parsers.SAXParser;
import javax.xml.parsers.SAXParserFactory;
import org.xml.sax.SAXException;
import javax.xml.parsers.ParserConfigurationException;
Chapter 12: Parsing Documents with JAXP
228
import java.io.IOException;
public class CueMyLine extends DefaultHandler{
public static void main(String[] args) {
try{
SAXParser parser =
SAXParserFactory.newInstance().newSAXParser();
parser.parse(new File("rich_iii.xml"), new CueMyLine());
} catch (SAXException e){
System.out.println("This is a SAX Exception.");
} catch (ParserConfigurationException e) {
System.out.println("This is a Parser Config Exception.");
} catch (IOException e){
System.out.println("This is an IO Exception.");
}
}
}
You can see that more lines of code are dedicated to exceptions than to actually doing anything. Before
adding more functionality, take a closer look at the file rich_iii.xml.
The play's the thing
For this example, you'll work with the copy of Shakespeare's Richard III that you placed in the J2EEBible
directory. You can structure the information contained in a play's script in many ways; John Bosak made
choices that resulted in the following DTD:
<!−− DTD for Shakespeare J. Bosak 1994.03.01, 1997.01.02
−−>
<!−− Revised for case sensitivity 1997.09.10 −−>
<!−− Revised for XML 1.0 conformity 1998.01.27 (thanks to Eve
Maler) −−>
<!−− <!ENTITY amp "&#38;"> −−>
<!ELEMENT PLAY (TITLE, FM, PERSONAE, SCNDESCR, PLAYSUBT,
INDUCT?, PROLOGUE?, ACT+, EPILOGUE?)>
<!ELEMENT TITLE (#PCDATA)>
<!ELEMENT FM (P+)>
<!ELEMENT P (#PCDATA)>
<!ELEMENT PERSONAE (TITLE, (PERSONA | PGROUP)+)>
<!ELEMENT PGROUP (PERSONA+, GRPDESCR)>
<!ELEMENT PERSONA (#PCDATA)>
<!ELEMENT GRPDESCR (#PCDATA)>
<!ELEMENT SCNDESCR (#PCDATA)>
<!ELEMENT PLAYSUBT (#PCDATA)>
<!ELEMENT INDUCT (TITLE, SUBTITLE*,(SCENE+|
(SPEECH|STAGEDIR|SUBHEAD)+))>
<!ELEMENT ACT (TITLE, SUBTITLE*, PROLOGUE?, SCENE+,EPILOGUE?)>
<!ELEMENT SCENE(TITLE, SUBTITLE*,
(SPEECH | STAGEDIR | SUBHEAD)+)>
<!ELEMENT PROLOGUE (TITLE, SUBTITLE*, (STAGEDIR | SPEECH)+)>
<!ELEMENT EPILOGUE (TITLE, SUBTITLE*, (STAGEDIR | SPEECH)+)>
<!ELEMENT SPEECH (SPEAKER+, (LINE | STAGEDIR | SUBHEAD)+)>
<!ELEMENT SPEAKER (#PCDATA)>
<!ELEMENT LINE (#PCDATA | STAGEDIR)*>
<!ELEMENT STAGEDIR (#PCDATA)>
<!ELEMENT SUBTITLE (#PCDATA)>
<!ELEMENT SUBHEAD (#PCDATA)>
Chapter 12: Parsing Documents with JAXP
229