Expert VB 2005 Business Objects Second Edition phần 10 potx
Bạn đang xem bản rút gọn của tài liệu. Xem và tải ngay bản đầy đủ của tài liệu tại đây (1.32 MB, 74 trang )
With simple web methods, this display includes the ability to invoke the method from within
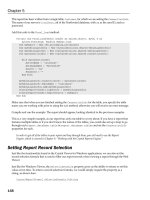
the browser. For example, Figure 11-10 shows the result of clicking the Invoke button to execute the
GetResourceList() w
eb method.
CHAPTER 11 ■ WEB SERVICES INTERFACE598
Figure 11-9. WSDL for the GetResourceList web method
6315_c11_final.qxd 4/7/06 2:25 PM Page 598
Your results may vary, of course, depending on the data in your database.
A Simple S
mart Client
To further illustrate how to call PTWebService, and in particular to show how to deal with the custom
SO
AP header for authentication, the
ProjectTracker solution contains a PTServiceClient pr
oject.
This is a bare-bones smart client application that acts as a consumer for
PTWebService. Figure 11-11
shows what the application looks like when running.
CHAPTER 11 ■ WEB SERVICES INTERFACE 599
Figure 11-10. Results of invoking the GetResourceList method
6315_c11_final.qxd 4/7/06 2:25 PM Page 599
My goal with this application isn’t to create a complete consumer. I want to use this application
to show how to consume a basic web service, and how to set up and pass credentials through the
custom SOAP header.
As shown in Figure 11-12,
PTServiceClient has a web reference to PTService.
CHAPTER 11 ■ WEB SERVICES INTERFACE600
Figure 11-11. The PT
WebService client application
Figure 11-12. Web reference to PTService
6315_c11_final.qxd 4/7/06 2:25 PM Page 600
The URL behavior for this reference is set to Dynamic in the Properties window. This means that
the URL for the web service is maintained in the
app.config file:
<applicationSettings>
<PTServiceClient.My.MySettings>
<setting name="PTServiceClient_PTService_PTService"
serializeAs="String">
<
value>http://localhost/PTWebService/PTService.asmx</value>
</setting>
</PTServiceClient.My.MySettings>
</applicationSettings>
The <applicationSettings> element is part of the configuration functionality provided by
System.Configuration in .NET 2.0, and it is automatically used by Visual Studio when you set the
URL behavior property to
Dynamic for a web reference.
When you add a web reference to your project, Visual Studio uses the WSDL description for
the web service to determine all the types it exposes, including
CslaCredentials, ProjectData, and
the other types accepted as parameters or returned as results from the web methods. Visual Studio
uses this information to create proxy classes for all these types, so they can be used in the con-
sumer code as though they were local classes.
Calling a Web Method
The data binding support in Windows Forms works against the proxy classes generated for a web
service. This means you can add a type like
ProjectData to the Data Sources window much like
Project was added in Chapter 9. Figure 11-13 sho
ws the D
ata Source Configuration Wizard listing
all the types from the
PTService web reference.
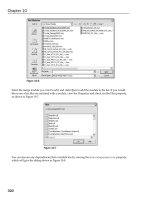
When you go to add a data source to the Data Sources window, the first step in the wizard
includes the option to add a web service as a data source, as shown in Figure 11-14.
CHAPTER 11 ■ WEB SERVICES INTERFACE 601
6315_c11_final.qxd 4/7/06 2:25 PM Page 601
CHAPTER 11 ■ WEB SERVICES INTERFACE602
Figure 11-13. Types available from the PTService web reference
Figure 11-14. Adding a web service as a data source
6315_c11_final.qxd 4/7/06 2:25 PM Page 602
While you can use this option, it gets you exactly the same result as if you manually add the
web reference and then add the proxy objects as object data sources. In other words, web service
proxy objects are always object data sources, regardless of whether you add them using the web
service or object options in the Data Source Configuration Wizard.
Once the proxy types are in the Data Sources window, you can drag and drop them onto a form
just like you would with any business object. This is how the
PTServiceClient UI was built.
For each type you drag onto the form, Visual Studio creates a corresponding
BindingSource
o
bject in the form’s component tray. The UI controls are bound to the
B
indingSource
c
ontrol, and
that
BindingSource control is bound to your data.
Just like in Chapter 9, you need to write a bit of code to set the
DataSource property of each
BindingSource object. For instance, when the client’s form loads, the following code is run:
Private Sub MainForm_Load( _
ByVal sender As System.Object, ByVal e As System.EventArgs) _
Handles MyBase.Load
Using svc As New PTService.PTService
Me.ProjectInfoBindingSource.DataSource = svc.GetProjectList
Me.ResourceInfoBindingSource.DataSource = svc.GetResourceList
Me.RoleInfoBindingSource.DataSource = svc.GetRoles
End Using
End Sub
First, an instance of PTService is created:
Using svc As New PTService.PTService
Notice that it is within a Using block, so the object is pr
operly disposed when the code is
through with it. Then the project, resource, and role data is retrieved from the web service. Each
resulting object is used to set a
DataSource pr
operty, ultimately populating the three
DataGridView
controls across the top of the form shown in Figure 11-11.
Of course, this is the simple case, since these three web methods don’t require authentication.
Let’s look at the case in which a method
does require authentication using the custom SOAP header.
Providing Credentials for Authentication
To supply a SOAP header, the consumer needs to create an instance of the SoapHeader class; in this
case, that means
CslaCredentials. This object has its properties loaded with appropriate username
and password values, and it is then attached to the consumer-side proxy for the web service.
To streamline this process throughout the client application, the code is centralized in a
SetCredentials() helper method:
Private Sub SetCredentials(ByVal svc As PTService.PTService)
Dim credentials As New PTService.CslaCredentials
credentials.Username = UsernameTextBox.Text
credentials.Password = PasswordTextBox.Text
svc.CslaCredentialsValue = credentials
End Sub
First, a CslaCredentials object is created and loaded with values:
Dim credentials As New PTService.CslaCredentials
credentials.Username = UsernameTextBox.Text
credentials.Password = PasswordTextBox.Text
B
ecause the
CslaCredentials class was exposed b
y the w
eb ser
vice, Visual Studio automatically
created a consumer-side proxy class for it, used here.
CHAPTER 11 ■ WEB SERVICES INTERFACE 603
6315_c11_final.qxd 4/7/06 2:25 PM Page 603
The WSDL definition for the web service also indicated that there are web methods that require
this as a SOAP header, so Visual Studio automatically added a
CslaCredentialsValue property to the
consumer-side proxy. To pass a
CslaCredentials object to the server as a SOAP header, all you need
to do is set this
CslaCredentialsValue property!
svc.CslaCredentialsValue = credentials
With that done, it becomes relatively easy to call a web method that requires authentication.
For instance, the following code is called to assign a resource to a project:
Using svc As New PTService.PTService
SetCredentials(svc)
Try
' do the assignment
svc.AssignResource( _
CInt(Me.ResourceIdLabel.Text), New Guid(Me.ProjectIdLabel.Text))
' refresh the detail view
Dim request As New PTService.ProjectRequest
request.Id = New Guid(Me.ProjectIdLabel.Text)
Me.ProjectDetailBindingSource.DataSource = svc.GetProject(request)
Catch ex As Exception
MessageBox.Show(ex.Message, "Assign resource", _
MessageBoxButtons.OK, MessageBoxIcon.Exclamation)
End Try
End Using
As before, an instance of the web service proxy is created:
Using svc As New PTService.PTService
Before doing anything else, however, the credentials are attached to this object:
SetCredentials(svc)
Now all web method calls within this Using block will automatically have the custom SO
AP
header with the credentials passed to the server. So when
AssignResource() is called, it can authen-
ticate the credentials, and the business objects can authorize the action based on the roles for the
supplied username:
svc.AssignResource( _
CInt(Me.ResourceIdLabel.Text), New Guid(Me.ProjectIdLabel.Text))
Interestingly, the custom SOAP header is also passed to the subsequent GetProject() call:
Me.ProjectDetailBindingSource.DataSource = svc.GetProject(request)
This doesn’t cause any problem. The GetProject() web method doesn’t have a <SoapHeader()>
attribute, so the custom SOAP header is simply ignored by the server-side code.
You can look through the rest of the client code in the code download for the book. At this
point, ho
w
ev
er
, y
ou should understand how to set up web service proxy objects as data sources
for Windows Forms, how to call simple web methods, and how to call web methods that require
a custom SOAP header.
CHAPTER 11 ■ WEB SERVICES INTERFACE604
6315_c11_final.qxd 4/7/06 2:25 PM Page 604
Conclusion
W
eb services enable the creation of another type of interface to business objects. Rather than
exposing an interface directly to users, as with Windows forms or web forms, web services expose
an interface for use by other, external applications. Those applications can call your web methods
to leverage the business functionality and data provided by your application and its business
o
bjects.
You can design your web services along the lines of MTS or COM+ components, effectively
creating a public API for your application. In such a case, most people tend to think of the web
service as implementing a tier in an n-tier or a client/server model.
In many cases, it is better to follow service-oriented thinking, which specifies that a service
(web service or otherwise) is an autonomous entity—an independent application,
not a tier within
a larger application. Service orientation also specifies that your web methods should communicate
using a message-based appr
oach, for which a web method accepts a complex type as a message,
and returns a complex type as a resulting message.
In this chapter, I demonstrated how to create web methods using both approaches, so you can
decide which works best in your application.
The example web service and client illustrate how you can expose all the functionality of your
business objects without duplicating business logic in the web service interface itself. The valida-
tion, authentication, and other business logic is all encapsulated entirely in the business objects.
Chapter 12 will close
the book b
y showing how to create remote data portal hosts for remoting,
Web Services, and Enterprise Services. These remote hosts can be used by the Windows Forms, Web
Forms, and Web Services interfaces you’ve seen in the last three chapters.
CHAPTER 11 ■ WEB SERVICES INTERFACE 605
6315_c11_final.qxd 4/7/06 2:25 PM Page 605
6315_c11_final.qxd 4/7/06 2:25 PM Page 606
Implementing Remote Data
Portal Hosts
In Chapters 9 through 11, you saw how to implement Windows Forms, Web Forms, and Web
Services interfaces to a common set of business objects. In each chapter, I briefly discussed the
configur
ation options av
ailable in terms of running the server-side data portal components on
the client or on an application server.
What I hav
en’t discussed yet in detail is how to set up application servers to host the server-
side data portal components and your business objects. As discussed in Chapter 4, the data portal
implements a channel adapter pattern, allowing you to communicate from the client to the appli-
cation server using .NET Remoting, Web Services, or Enterprise Services. It is also possible for you
to create your own custom channel proxy and host if these standard technologies aren’t sufficient
for your needs.
It is my intent to provide a WCF (Windows Communication Foundation, or Indigo) channel
proxy and host when that technology becomes available. You’ll be able to find further information
at
www.lhotka.net/cslanet.
I want to be ver
y clear
, however, that I believe you should only use a remote data portal to
achieve scalability, security, or fault tolerance objectives. As I discussed in Chapter 1, adding physi-
cal tiers to an application is a double-edged sword. You lose performance and increase complexity
by adding tiers, so you should have a strong reason for doing so
.
In this chapter, I will walk through the process of setting up and using three data portal
application server hosts:
• .NET Remoting
• Web Services
• Enterprise Services
Though no code changes are required in your UI or business objects, each application server
will require a slightly different set of steps to work.
I
n general terms, though, the process for each is similar:
1. Set up the host on the server.
2. Make your business object assembly available to that host.
3. Configure the client to use the new host.
To a large degree, the implementation of the data portal in Chapter 4 already took care of the
hard parts, so these steps are relatively straightforward in each case.
Before creating each host, I want to spend a short time discussing why you might choose each
of the channel technologies.
607
CHAPTER 12
■ ■ ■
6315_c12_final.qxd 4/7/06 2:23 PM Page 607
Data Portal Channel Comparison
T
hanks to the way the data portal channel adapter functionality was implemented in Chapter 4,
there is no functional difference between using .NET Remoting, Web Services, or Enterprise Services
as used by your UI or business objects. In other words, you can switch between any of these chan-
nels and your application will continue to function in exactly the same manner.
S
o how do you decide which to use?
Factors for Comparison
As it turns out, there are some differences in performance and other behaviors, which you can use
to decide between the channels. Table 12-1 lists the key differences.
Table 12-1. Functional Comparison of Channel Technologies (1 = worst, 4 = best)
Factor Remoting Web Services Enterprise Services
Performance 3 2 4
Security 2 2 4
Host technology IIS or custom IIS COM+
Firewall-friendliness 2 2 1
Ease of deployment 2 2 1
Ease of implementation 2 2 1
Notice that neither open standards nor interop are listed here. This is because the data portal
is serializing
your business objects across the network, so the only way that the data on the other end
of the wire can be understood is if the data is deserialized back into
your business classes. The data
portal is an n-tier client/server concept, and neither interop nor XML standards on the network
matter within this context.
■Tip If interop and readable XML are requirements for your application, you should use the concepts discussed
in Chapter 11 to create a web service interface on top of your business objects.
Ho
wever, for n-tier client/server applications, the factors listed in Table 12-1 are typically very
important. Let’s discuss each factor in turn.
Perfor
mance
When it comes to performance, you can find a wealth of opinions and a number of conflicting
studies on the
W
eb telling y
ou what
’s faster and slower.
In general terms, though, you’ll find that both remoting and Web Services are of relatively
comparable performance. This makes sense because they are both web-based technologies and
share a lot of common underpinnings within .NET. The reason I give remoting slightly higher
marks than Web Services is because remoting transfers the serialized object data in a binary for-
mat that is substantially smaller than the B
ase64 encoded format used by Web Services.
■Tip You may be able to employ compression technologies when using Web Services to get similar or even
smaller chunks of data on the network. Of course, that would mean an increase in CPU use on both client and
ser
ver
,
so you need to test to see if this makes sense for you.
608 CHAPTER 12 ■ IMPLEMENTING REMOTE DATA PORTAL HOSTS
6315_c12_final.qxd 4/7/06 2:23 PM Page 608
Perhaps more importantly, you’ll find that Enterprise Services is substantially faster than either
remoting or Web Services.
Of course, when it comes to performance, environmental factors make a big difference. What
is your network topology? Your network load? Your server load? Due to these variables, you should
do your own testing to determine which channel technology provides you with the best perform-
ance overall.
Security
The term “security” spans a wide area. In this case, I am talking about security in terms of knowing
that the data came from the client, and whether the data is encrypted as it moves across the net-
work between the client and server.
Both remoting and Web Services can use SSL (Secure Sockets Layer) communication over
HTTP, which is typically the easiest and best way to provide a secure communication channel for
these technologies.
If you are using the TCP channel and implement a custom host application, remoting also
offers the ability to do its own encryption. This option is not available with the HTTP channel, so
in that case you should use SSL.
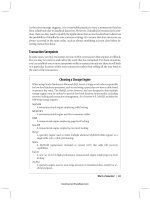
Enterprise Services offers various levels of data encryption on the wire, and so has the most
flexibility and capabilities in this area. Additionally, enabling secure communication using Enter-
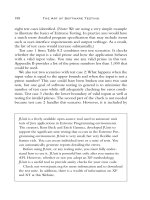
prise Services is often easier than configuring SSL on a web server. If you are running in a Windows
domain, just set your C
OM+ application properties as shown in Figure 12-1.
This is often far easier than the process required to enable SSL on a web server.
CHAPTER 12 ■ IMPLEMENTING REMOTE DATA PORTAL HOSTS 609
Figure 12-1. U
sing packet priv
acy in E
nterprise Services
6315_c12_final.qxd 4/7/06 2:23 PM Page 609
Host Technology
The host technology used by an application server can weigh heavily in some server environments.
Some organizations disallow the use of IIS on certain types of servers.
Both remoting and Web Services can be hosted in IIS; technically within ASP.NET on IIS.
This is an ideal configuration for remoting, since it gains all the benefits of running within IIS
and ASP.NET. And it is the only real option for Web Services.
Remoting can also be hosted in a custom application of your design. Typically this would be
a
Windows service. I don’t recommend this course of action, because you would need to duplicate
a large percentage of IIS to achieve comparable levels of manageability, security, runtime monitor-
ing, and so forth. In most cases, it is far preferable to use remoting within the context of IIS and
ASP.NET.
Enterprise Services can only be hosted in COM+, because Enterprise Services is really just a
wrapper around the existing COM+ services. This means that your server does
not need IIS to host
the data portal in Enterprise Services.
Firewall-Friendliness
Some organizations use internal firewall technology that makes the use of DCOM, and thus the
Enterprise Services channel, problematic. The Enterprise Services channel uses DCOM as its net-
work transport—and while it is technically possible to make DCOM work through a firewall, most
organizations opt for a more firewall-friendly technology.
Both remoting and Web Services can use HTTP over port 80, and thus they are firewall-friendly
by default. Even when using SSL, most firewalls allow that traffic as well.
When hosted in a custom host like a Windo
ws S
ervice, remoting can be configured to use raw
TCP sockets over arbitrary ports. In that case, remoting would require extra firewall configuration
to allow that traffic to flow. Again, I recommend hosting remoting in IIS, in which case this is not
an issue.
Ease of Deplo
yment
There are two aspects to deployment: client and server. Simple client deployment typically means
that there is no need to r
egister components, thus providing support for XCOPY deployment and
ClickOnce. Server deployment is never “simple,” but the goal is for deployment to be as easy and
straightforward as possible.
When it comes to client deployment, both remoting and Web Services are trivial. Neither
r
equir
e special components or r
egistr
ation of any sor
t. They merely require that the client’s con-
figuration specify the data portal channel to be used, including the URL of the application server.
Enterprise Services is a bit more complex because the COM+ server application must be regis-
tered on the client. While this merely means running an extra
msi installer on the client workstation
or client w
eb ser
v
er
, this extra step definitely complicates deployment of client applications.
O
n the ser
ver, all three technologies are relatively comparable. In the case of remoting
(hosted in IIS) and Web Services, you need to set up and configure a virtual root in IIS. With
Enterprise Services, you need to set up and configure a COM+ application using the server’s
Component Services tool.
Of course
, if you choose to implement a custom host for remoting, it is up to you to ensure that
server deployment and management is straightforward.
CHAPTER 12 ■ IMPLEMENTING REMOTE DATA PORTAL HOSTS610
6315_c12_final.qxd 4/7/06 2:23 PM Page 610
Ease of Implementation
Finally, there’s the ease of implementation. As I mentioned earlier, neither your UI nor business
object code varies depending on the data portal channel, so what I’m talking about here is the ease
with which you implement the data portal host to run on the application server.
Remoting and Web Services have the edge here, because virtually all their implementation was
done in Chapter 4. With remoting, all you need to do is add some lines to
web.config on the server;
while with Web Services, you need to create a one-line
asmx file. Either approach is trivial.
E
nterprise Services requires more work because COM+ has no concept of virtual roots. If you
want to set up a COM+ application on the server with a unique name, you need a specific Enter-
prise Services component to put into that COM+ application. In other words, you can’t put
Csla.dll
into COM+ multiple times and be able to configure each instance separately—something that you
can do with virtual roots in IIS.
Due to this, you’ll need to do some simple coding to create a unique Enterprise Services assem-
bly for your particular application. Again, most of the work was done in Chapter 4, but this is an
extra bit of work you need to do once for each business application you create (if you want to create
an Enterprise Services data portal host).
In the final analysis, it is up to you which data portal channel technology to choose. The
important thing to remember is that you can switch from one to the other without breaking your
UI or business object code. This means you can try one channel and switch to another later if you
determine it would better fit your needs
. This flexibility will become particularly important once
Microsoft releases WCF, since it should provide you with a largely transparent migration path to
that technology.
.NET Remoting
The .NET Remoting technology provides good performance with easy deployment and configura-
tion. This is typically my first choice when implementing a remote data portal. The easiest and best
way to set up an application server to host your business objects through remoting is to use IIS and
ASP.NET.
■Note As I mentioned earlier, I recommend hosting .NET Remoting within IIS and ASP.NET. While you can create
your own custom remoting host, I won’t discuss that option here.
To set up an application server for your application, follow these steps:
1. C
reate an empty web project in Visual Studio.
2. Add a reference to your business assembly or assemblies.
3. Ensure Csla.dll is in the Bin directory.
4. Add a web.config file.
5. Add a <system.runtime.remoting> element to expose the data portal.
6. Configure the client.
Let’s walk through each step to set up a remoting host for the
ProjectTracker sample
application.
CHAPTER 12 ■ IMPLEMENTING REMOTE DATA PORTAL HOSTS 611
6315_c12_final.qxd 4/7/06 2:23 PM Page 611
Implementation
The ProjectTracker solution in the code download for this book (available at www.apress.com)
includes the virtual root and
web.config file discussed in the following sections.
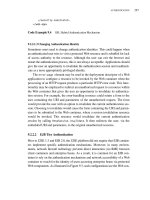
Creating the Virtual Root
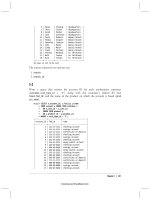
The RemotingHost project in the ProjectTracker solution started out as an empty web project, cre-
ated as shown in Figure 12-2.
This allows Visual Studio to properly set up the directory as needed for ASP.NET.
■Note You can use the ASP.NET Development Server during development if you choose. While hosting Web
Forms and Web Services interfaces is problematic due to assembly load issues, I typically do my development
for remoting using this host ra
ther than IIS.
T
o this empty w
ebsite I added the appr
opriate references, and a
web.config file to configur
e
remoting to expose the
Csla.Server.Hosts.RemotingProxy class.
Referencing Assemblies
When r
unning, the
remoting host needs access to your business classes from your business assem-
bly or assemblies. What this means in practice is that your business assemblies must be in the
Bin
subdirectory of the virtual root.
You can copy them there manually, but an easy way to get them into the
Bin directory is to have
the pr
oject r
efer
ence them in
V
isual Studio. This way, any time you change your business objects
CHAPTER 12 ■ IMPLEMENTING REMOTE DATA PORTAL HOSTS612
Figure 12-2. Creating an empty website
6315_c12_final.qxd 4/7/06 2:23 PM Page 612
and rebuild the solution, the updated assemblies are automatically copied into the Bin directory by
Visual Studio.
The
Csla.dll assembly must also be in the Bin directory. Since ProjectTracker.Library refer-
ences
Csla.dll, Visual Studio automatically copies it into the Bin directory because ProjectTracker.
Library
is referenced. If you opt to copy your business assemblies manually into the Bin directory,
you’ll need to either explicitly reference
Csla.dll or manually copy it into the Bin directory as well.
Configuring web.config
With the virtual root set up and the required assemblies in the Bin directory, all that remains is to
configure ASP.NET to use remoting. This is done by adding a <
system.runtime.remoting> element to
web.config. Of course, when starting with an empty website, you need to add a web.config file first.
The required
<system.runtime.remoting> section looks like this:
<system.runtime.remoting>
<application>
<service>
<wellknown mode="SingleCall" objectUri="RemotingPortal.rem"
type="Csla.Server.Hosts.RemotingPortal, Csla"/>
</service>
<channels>
<channel ref="http">
<serverProviders>
<provider ref="wsdl"/>
<formatter ref="soap" typeFilterLevel="Full"/>
<formatter ref="binary" typeFilterLevel="Full"/>
</serverProviders>
</channel>
</channels>
</application>
</system.runtime.remoting>
This configures ASP.NET to expose the Csla.Server.Hosts.RemotingPortal class such that
clients can create instances of the class through remoting over HTTP.
■Note There are many different options for configuring remoting. I won’t cover them all here, but instead I’ll
focus only on those used in the previous configuration code. For more information on remoting, I recommend you
look a
t Ingo Rammer’
s book,
Advanced .NET Remoting in
VB .NET
(A
press,
2002).
When configuring remoting, the <wellknown> element identifies a server-side (anchored) class
that can be used by clients. When using this element, you must decide between the two different
oper
ation modes:
•
I
f the
mode attr
ibute is set to
SingleCall, each method call fr
om any client will cause the
ser
ver to create a new object that will handle just that one method call. The object isn’t
reused in any way after that, and is destroyed automatically via the .NET garbage-collection
mechanism.
• If the
mode attribute is set to Singleton, all method calls from all clients will be handled by a
single object running on the server. Many method calls may be handled on different threads
at the same time, meaning that the application’s code would have to be entirely safe for mul-
tithr
eading.
CHAPTER 12 ■ IMPLEMENTING REMOTE DATA PORTAL HOSTS 613
6315_c12_final.qxd 4/7/06 2:23 PM Page 613
Implementing an object for the Singleton mode can be very complex, because you have to
deal with multithreading issues. Typically, this means using thread-synchronization objects, which
will almost always reduce performance and increase complexity.
For most server-side behavior,
SingleCall is ideal because each method call is handled by
a newly created object that has its own thread. You don’t need to worry about threading issues, or
about one client interfering with another in some way.
H
aving selected a
m
ode
,
you need to define the URI that will be used to access the server-side
object. This URI is combined with the server name and virtual root to construct a URL that clients
can use to call the server. The URL is in the form
http://yourserver/yourvroot/testserver.rem,
where
yourserver is the name of your server and yourvroot is the name of your virtual root.
■Note The .rem extension is important. When ASP.NET is installed on a server, it configures IIS to route .rem
and .soap extensions to the remoting subsystem. Either extension will work, as they’re both configured to do the
same thing.
Finally, you need to tell the remoting subsystem which specific class and DLL this URL refers
to. The
type attribute is somewhat cryptic because it accepts a str
ing that contains the full name
(including namespaces) of the class, a comma, and then the name of the assembly (DLL) that con-
tains the class. Note that the assembly name doesn
’t include the
.dll extension.
With the well-known endpoint defined, clients can call the server. However, to allow for full
serialization of complex object graphs, remoting must be told to allow any type to be serialized.
This is the purpose behind the XML in the
<channels> element. This XML sets the typeFilterLevel
attribute to Full for both the SoapFormatter and BinaryFormatter in the .NET Framework. As these
are the two formatters supported by remoting, this ensures that all serializable objects can flow
thr
ough to the data por
tal.
Configuring the Client
At this point, the application server is configured and is ready for use by clients. The same applica-
tion server can be used by Windows Forms, Web Forms, and Web Services clients—even all at once,
if y
ou choose. The only requirement is that both the application server and clients have the same
version of your business assemblies installed.
To configure a Windows Forms client, you need to edit the
app.config file. To configure either
a Web Forms or Web Service client, you need to edit the
web.config file.
In either case, the configuration file should contain the following bold lines:
<?xml version="1.0" encoding="utf-8" ?>
<configuration>
<appSettings>
<add key="CslaAuthentication" value="Csla" />
<add key="CslaDataPortalProxy"
value="Csla.DataPortalClient.RemotingProxy, Csla"/>
<add key="CslaDataPortalUrl"
value="http://localhost/RemotingHost/RemotingPortal.rem"/>
</appSettings>
<connectionStrings>
</connectionStrings>
</configuration>
The CslaDataPortalProxy element specifies that the data portal should use the remoting
channel, and the
CslaDataPortalUrl element specifies the URL of the server. You’ll need to
replace
localhost with the name (and possibly the TCP port) of your server, and RemotingHost
CHAPTER 12 ■ IMPLEMENTING REMOTE DATA PORTAL HOSTS614
6315_c12_final.qxd 4/7/06 2:23 PM Page 614
with the name of your virtual root. Also remember that XML is case sensitive, so double-check
to make sure you enter the text
exactly as shown here.
Of course,
web.config should also include the connection strings for the database in the
<connectionStrings> element. You can see an example in the code download for the book.
Encrypting Data on a TCP Channel
If you do implement a custom remoting host and opt to use the TCP channel rather than the HTTP
channel, you can optionally also include the following element within the
<appSettings> block:
<add key="CslaEncryptRemoting"
value="true"/>
Adding this element tells the RemotingProxy class to automatically encrypt data sent across the
network. This option is not available when using the HTTP channel, so in that case, you should use
SSL to secure the channel.
At this point, you should understand how to set up an application server to use remoting, and
how to configure a client to use that server.
Web Services
Web Services is often preferred over remoting because it provides interoperability with external
systems
. That use of Web Services was discussed in Chapter 11, and really has no bearing on the
data portal.
The data portal is designed to be an n-tier client/server technology that allows you to add
a physical tier so your logical business layer can run on both the client and application server as
needed. Because of this, the data portal isn’t designed with interop in mind, but rather with high-
level functionality to clone object graphs across the network. Thus, at first glance, the data portal
and Web Services appear to be entirely incompatible.
Yet I am frequently asked to provide Web Services support for the data portal, primarily by
architects and developers forced to use Web Services by management that doesn’t understand its
intended purpose. In other words, Web Services is sometimes mandated as a network transport
even when the technology really make no sense. That is the primary reason CSLA .NET provides
data portal support for Web Services.
As discussed in Chapter 4, the
WebServicesProxy directly uses the BinaryFormatter to serialize
the object graph for transmission. Although it does use Web Services to transport the data, the data
itself is a b
yte arr
ay cr
eated and consumed by the
BinaryFormatter on either end of the connection.
By using this technique, the
WebServicesProxy is able to provide all the high-level functionality of
remoting or Enterprise Services while still technically using the Web Services network transport.
T
o set up an application ser
ver for your application, follow these steps:
1. C
r
eate a Web Services project in Visual Studio.
2. Add a reference to your business assembly or assemblies.
3. E
nsur
e
Csla.dll is in the Bin dir
ector
y
.
4. E
dit the
asmx file to r
efer to
WebServicesProxy.
5. Configure the client.
Of course,
web.config will also include the connection strings for the database in the
<connectionStrings> element. You can see an example in the code download for the book.
CHAPTER 12 ■ IMPLEMENTING REMOTE DATA PORTAL HOSTS 615
6315_c12_final.qxd 4/7/06 2:23 PM Page 615
■Note You can put the asmx file discussed here into almost any ASP.NET website. There’s nothing special about
web service projects or sites, so it is technically possible to even host the data portal web service through a web-
s
ite like
PTWeb f
rom Chapter 10 if you wanted. However, most people prefer to keep the data portal physically
separate from their UI code.
Let’s walk through each step to set up a Web Services host for the ProjectTracker sample
application.
Implementation
The ProjectTracker solution in the code download for this book includes the Web Services project
discussed here.
Creating the Web Service Project
The WebServicesHost project in the ProjectTracker solution was created as a web service project,
as shown in Figure 12-3.
This allows Visual Studio to properly set up the directory as needed for ASP.NET.
■Note You can use ASP.NET Development Server during development if you choose. While hosting Web Forms
and Web Services
interfaces is problematic due to assembly load issues, it is not a problem when hosting the data
portal. I typically do my development using this host rather than IIS.
CHAPTER 12 ■ IMPLEMENTING REMOTE DATA PORTAL HOSTS616
Figure 12-3. Creating a web service project
6315_c12_final.qxd 4/7/06 2:23 PM Page 616
I altered this basic web service website by adding the appropriate references and changing the
asmx file to expose the Csla.Server.Hosts.WebServicesProxy class.
Referencing Assemblies
As when using remoting, the web service host needs access to your business classes from your
business assembly or assemblies. What this means in practice is that your business assemblies
must be in the
Bin subdirectory of the virtual root.
Again, you can copy them manually, but an easy way to get them into the
Bin directory is to
have the project reference them in Visual Studio. That way, any time you change your business
objects and rebuild the solution, the updated assemblies are automatically copied into the
Bin
directory by Visual Studio.
The
Csla.dll assembly must also be in the Bin directory. Since ProjectTracker.Library refer-
ences
Csla.dll, Visual Studio automatically copies it into the Bin directory because ProjectTracker.
Library
is referenced. If you opt to copy your business assemblies manually into the Bin directory,
you’ll need to either explicitly reference
Csla.dll or manually copy it into the Bin directory as well.
The asmx File
By default, a new w
eb ser
vice project has a
Service1.asmx file, and an associated Service1.vb file
in the
App_Code directory.
CSLA .NET already includes the
WebServicesProxy class discussed in Chapter 4. It provides the
full web service functionality required by the data portal, so all the website really needs is an
asmx
file referring to that code. To get such a file, you can either edit Service1.asmx or add a new asmx file
to the project. In any case, the code-behind file (
Service1.vb) can be deleted, as it won’t be used.
In the
WebServicesHost pr
oject, you’ll find a
WebServicePortal.asmx file with the follo
wing
code:
<%@ WebService Language="VB" Class="Csla.Server.Hosts.WebServicePortal" %>
This points the WebServicePortal web service to use the code from Chapter 4, thus providing
access to the data portal functionality
.
Configuring the Client
At this point, the application server is configured and is ready for use by clients. The same applica-
tion server can be used by Windows Forms, Web Forms, and Web Services clients—even all at once
if you choose. The only requirement is that both the application server and clients have the same
version of your business assemblies installed.
As with the previous options, to configure a Windows Forms client, you need to edit the app.
config
file. To configure either a Web Forms or Web Services client, you need to edit the web.config
file.
In either case, the configuration file should contain the following bold lines:
<?xml version="1.0" encoding="utf-8" ?>
<configuration>
<appSettings>
<add key="CslaAuthentication" value="Csla" />
<add key="CslaDataPortalProxy"
value="Csla.DataPortalClient.WebServicesProxy, Csla"/>
<add key="CslaDataPortalUrl"
value="http://localhost/WebServicesHost/WebServicePortal.asmx"/>
</appSettings>
CHAPTER 12 ■ IMPLEMENTING REMOTE DATA PORTAL HOSTS 617
6315_c12_final.qxd 4/7/06 2:23 PM Page 617
<connectionStrings>
</connectionStrings>
</configuration>
The CslaDataPortalProxy element specifies that the data portal should use the Web Services
channel, and the
CslaDataPortalUrl element specifies the URL of the server. You’ll need to replace
localhost with the name of your server, and WebServicesHost with the name of your virtual root.
Also remember that XML is case sensitive, so double-check to make sure you enter the text
exactly
as shown here.
At this point, you should understand how to set up an application server to use Web Services,
and how to configure a client to use that server.
Enterprise Services
The Enterprise Services channel uses DCOM as its network transport. The primary advantage of
DCOM is that it offers superior performance over Web Services and remoting. It is sometimes also
easier to encrypt data on the wire using Enterprise Services than it is to set up SSL on web servers,
which is how you would encrypt the data for remoting (using the IIS host) or Web Services.
Of the three technologies supported by CSLA .NET, Enterprise S
ervices is the most complex to
use, since it requires that you create a custom assembly for your application, and that you install
that assembly into COM+ on the server. You must also register that COM+ application on each
client before it can be used.
To set up an application server for your application, follow these steps:
1. Create an Enterprise Services proxy/host assembly for your application.
2. Refer
ence
Csla.dll and y
our business assemblies
.
3. Install your proxy/host assembly into COM+ on the server.
4. Create a configuration directory for the code on the server.
5. Configure the COM+ application on the server.
6. Export the COM+ application to create and install msi.
7. Configure the client.
Let’s walk through each step to set up an Enterprise Services host for the
ProjectTracker
sample application.
Creating the Proxy/Host Assembly
The ProjectTracker solution in the code download for this book includes the Enterprise Services
proxy/host assembly and its related files as discussed here. Once I’ve walked through the steps to
create the proxy/host assembly, I’ll show how to install it in COM+ and how to export a client setup
msi fr
om C
OM+.
The pr
oxy/host assembly is used by the client to call the server, so it contains a proxy object.
The client calls that proxy object, which in turn calls the host object on the server. The assembly
also contains the host object, which is actually installed in COM+ on the application server. This is
illustrated in Figure 12-4.
CHAPTER 12 ■ IMPLEMENTING REMOTE DATA PORTAL HOSTS618
6315_c12_final.qxd 4/7/06 2:23 PM Page 618
There are a number of steps to create the proxy/host assembly. Let’s walk through each step.
Configuring the Class Library Project
The EnterpriseServicesHostvb project in the ProjectTracker solution is a normal Class Library
project. It is designed so that it can be hosted in Enterprise Services, which means following these
steps after creating a Class Library:
1. Reference System.EnterpriseServices.dll.
2. Sign the assembly.
3. Add an EnterpriseServicesSettings.vb file with special attributes.
In order to use the features of Enterprise Services, your assembly must reference
System.
EnterpriseServices.dll
. Additionally, to be installed in COM+, the assembly must have a strong
name, which really means that it must be signed with a key file by setting the project’s properties
as shown in Figure 12-5.
CHAPTER 12 ■ IMPLEMENTING REMOTE DATA PORTAL HOSTS 619
Figure 12-4. Client calling the server through a proxy and host
Figure 12-5. Signing the assembly
6315_c12_final.qxd 4/7/06 2:23 PM Page 619
You can either create a key file directly within the project properties window or use a preexist-
ing key file. Typically, an organization will have a common key file that is used to sign all assemblies
created by that organization.
This allows the assembly to be installed in COM+ so that it is available through Enterprise
Services.
The project also includes an
EnterpriseServicesSettings.vb file. I added this file to the proj-
ect as a class and simply replaced the class code with the special attributes required by Enterprise
S
ervices to define how the assembly should be treated by COM+. Here are the settings in that file:
<Assembly: ApplicationActivation(ActivationOption.Server)>
<Assembly: ApplicationName("ProjectTracker20vb Portal")>
<Assembly: Description("Project Tracker DataPortal host")>
<Assembly: ApplicationAccessControl(False)>
The ApplicationActivation() setting indicates that the assembly should run in a server process,
not within the process that called the assembly. This is important, since the proxy/host assembly is
to be hosted by COM+ on the server.
The
ApplicationName() and Description() settings are optional, but are used to descr
ibe the
COM+ component. Finally, the
ApplicationAccessControl() setting indicates that COM+ shouldn’t
apply its own method-level security when clients try to call the data portal.
Refer
encing Assemblies
When running, the Enterprise Services data portal host needs access to your business classes from
your business assembly or assemblies. To make them available, the proxy/host assembly references
ProjectTracker.Library.
It also references
Csla.dll so that the CSLA .NET framework is available both to the proxy/host
code and for the business code in
ProjectTracker.Library.
EnterpriseServicesProxy Class
The proxy class is used by the client-side DataPortal to communicate with the server. Chapter 4
covered the implementation of a base class,
EnterpriseServicesProxy, that is designed to simplify
the creation of a proxy class for your application. In fact, all
your code needs to do is override a sin-
gle method. Here’s the proxy class from the
ProjectTracker solution:
Public Class EnterpriseServicesProxy
Inherits Csla.DataPortalClient.EnterpriseServicesProxy
Protected Overrides Function GetServerObject() As _
Csla.Server.Hosts.EnterpriseServicesPortal
Return New EnterpriseServicesPortal
End Function
End Class
The code from Chapter 4 can do all the work, but the one bit of information it doesn’t have auto-
matically is a r
eference to the server-side host object. That is the purpose of the
GetServerObject()
method: to return a reference to the server-side object.
Notice that the code here simply uses the
New keyword. That is possible because the installation
of the COM+ application’s
msi on the client will automatically redirect any attempt to create an
EnterpriseServicesPortal object to the application server. This leverages the same location trans-
parency capability provided by DCOM for the past decade or more.
CHAPTER 12 ■ IMPLEMENTING REMOTE DATA PORTAL HOSTS620
6315_c12_final.qxd 4/7/06 2:23 PM Page 620
As you’ll see shortly, the client application’s configuration file will reference this
EnterpriseServicesProxy type, telling the data portal to use this custom class as a proxy for com-
munication with the server. First, though, let’s finish creating the proxy/host assembly itself.
EnterpriseServicesPortal Class
The host class runs within COM+ on the application server. Again, Chapter 4 discussed a base
class,
EnterpriseServicesPortal, that is designed to do all the actual work. That base class makes
creation of a server-side host trivial, since all you need to do is create an empty class that inherits
from the base:
<EventTrackingEnabled(True)> _
<ComVisible(True)> _
Public Class EnterpriseServicesPortal
Inherits Csla.Server.Hosts.EnterpriseServicesPortal
' no code needed - implementation is in the base class
End Class
It may seem odd to create an empty class like this, but it is the class name and its containing
assembly that are really important. Remember that COM+ has no concept of a virtual root, so
there’s no way to directly host
Csla.dll multiple times in COM+. The EnterpriseServicesHostvb
assembly and this EnterpriseServicesPortal class exist specifically to act as wrappers around
Csla.dll to provide a unique name for COM+.
All the
functionality is already written in CSLA .NET as discussed in Chapter 4.
Notice that this class is decorated with a couple of attributes. The
<EventTrackingEnabled()>
attribute tells COM+ to monitor the object and display tracking information in the component serv-
ices console. In short, this attribute turns on the “spinning balls” in COM+. The
<ComVisible()>
attribute is required for making the class available to COM+. Remember that at its core, COM+ is
still a COM-based technology.
That’s all you need to do with this class. The fact that the assembly is signed, combined with
the settings in the
EnterpriseServicesSettings.vb file, means that the assembly can be built and
installed into COM+. First, though, let’s discuss how to configure the assembly—providing database
connection strings, for instance.
COM+ Configuration Files
COM+ 1.5 and higher allows you to provide separate configuration files (essentially like app.config
or web.config) for each COM+ application. This is an important feature available on Windows XP
and Windows Server 2003 (and higher), because without it you could only provide one configura-
tion file for
all COM+-hosted .NET code.
T
o use this featur
e
, y
ou need to cr
eate two files for y
our Enterprise Services assembly:
•
application.config
• application.manifest
The application.config file is actually named “application.config.” It is a standard .NET con-
fig file that contains the normal .NET configuration that you would put into any
app.config file,
including the CSL
A .NET configur
ation settings
. F
or instance
, it might look like this:
<?xml version="1.0" encoding="utf-8" ?>
<configuration>
<appSettings>
<add key="CslaAuthentication" value="Csla"/>
</appSettings>
</configuration>
CHAPTER 12 ■ IMPLEMENTING REMOTE DATA PORTAL HOSTS 621
6315_c12_final.qxd 4/7/06 2:23 PM Page 621
Most likely, you’ll need to add a <connectionStrings> element with the connection strings for
your database. You can see an example in the code download for this book.
The
application.manifest file is required by Enterprise Services and looks like this:
<?xml version="1.0" encoding="UTF-8" standalone="yes"?>
<assembly xmlns="urn:schemas-microsoft-com:asm.v1" manifestVersion="1.0">
</assembly>
T
hese two files are part of the
E
nterpriseServicesHostvb
p
roject in the
P
rojectTracker
s
olu-
tion. However, when you deploy the assembly to the application server, these files need to go in
a directory so that they can be referenced from COM+.
Installing the Proxy/Host into COM+
At this point, you’ve seen how to create the proxy/host assembly, including all the references and
extra steps required to make it work with COM+. The final step is to register the assembly with
COM+ on your application server, and then to configure the COM+ application.
Registering a .NET assembly into COM+ is done using the
regsvcs.exe command line utility.
In a Visual Studio 2005 command prompt window, navigate to the directory containing
EnterpriseServicesHostvb.dll and type the following command:
> regsvcs EnterpriseServicesHostvb.dll
This will install the assembly into COM+. It will put the assembly into a COM+ application
with the name based on the
ApplicationName attribute in EnterpriseServicesSettings.vb:
ProjectTracker20vb Portal. Figure 12-6 shows the result in the Component Services management
console.
CHAPTER 12 ■ IMPLEMENTING REMOTE DATA PORTAL HOSTS622
Figure 12-6. Proxy/host component installed in COM+
6315_c12_final.qxd 4/7/06 2:23 PM Page 622