sybex mcitp microsoft windows vista desktop support consumer study guide exam 70 623 phần 6 pptx
Bạn đang xem bản rút gọn của tài liệu. Xem và tải ngay bản đầy đủ của tài liệu tại đây (1.95 MB, 56 trang )
242
Chapter 4
Configuring Windows Media Center and Media Player
11. Advanced compression codecs and copy protection are advantages of using which of the
following music formats?
A. MP3
B. WMA
C. WAV
D. None of the above
12. You want to access media that others are sharing but you cannot see any shared media. You
have confirmed that the computer is allowed from the source of the shared media. What should
you do?
A. Highlight the computer in the Media Sharing dialog box and click Allow.
B. Open the Media Sharing dialog box and enable the option Find Media That Others Are
Sharing.
C. Open the Media Sharing dialog box, highlight the computer sharing the media, click
Customize, and select Use Default Settings.
D. Go to the computer sharing the media and enable File Sharing.
13. Which of the following are options you can set to view pictures in Media Center? (Choose all
that apply.)
A. Show Caption
B. Show Pictures in Random Order
C. Show Pictures in Sequential Order
D. Show Background Color
14. Which window in Media Player will provide you with details about the song that you are
currently listening to?
A. What You Hear
B. Library
C. Now Playing
D. Mobile Devices
15. What type of account must you create to implement Parental Controls in Media Player?
A. Restricted Account
B. Administrator Account
C. Basic Account
D. Media Limited Account
65348.book Page 242 Monday, October 22, 2007 4:27 PM
Review Questions
243
16. Which ripping format offers the best audio quality?
A. MP3
B. WMA Lossless
C. WMA
D. MP3 Lossless
17. What modes can Windows Media Center run in? (Choose all that apply.)
A. Media Only
B. Basic
C. Normal
D. Library
18. When adding Watch Folders in Windows Media Center, what options do you have for the
folder locations? (Choose all that apply.)
A. Folders from the local hard drive
B. Folders from removable disks
C. Remote Media Folders
D. Folders from another computer
19. Which are included playlists in Windows Media Center?
A. Music Played the Most
B. Favorite Music
C. All Music
D. Music Rated at 1, 2, or 3 Stars
E. Music Played in the Last Month
F. Music I Enjoy
G. Music Rated at 4 or 5 Stars
H. Purchased Music
20. By default, where will Windows Media Center look for picture files to display its picture
library?
A. C:\Documents and Settings\User\My Pictures
B. Any folder on the hard drive that has picture files
C. The user’s Pictures folder and the Public share’s Pictures folder
D. The picture library from Windows Media Player
65348.book Page 243 Monday, October 22, 2007 4:27 PM
244
Chapter 4
Configuring Windows Media Center and Media Player
Answers to Review Questions
1. B. The left pane, called the navigation pane, will give you quick links to your playlists, your over-
all media library, and any other libraries on other computers or connected portable devices.
2. B. A Media Center extender is a device that allows you to share media content from a Windows
Vista machine with a television.
3. B, C. Third-party set-top devices and Xbox 360 gaming consoles have the ability to act as
Media Center extenders.
4. C. When the player is set to sync automatically, if the device’s capacity is larger than 4GB, and
the media library will fit on the device, the player will sync the entire library.
5. D. Auto playlists are created automatically based on your media library. The auto playlist will
continue to change based on its filter in your media library.
6. C. You should enable media sharing in Windows Media Player as well as in the Network and
Sharing Center.
7. B, C, D. In order to share media over the network, you must enable Media Sharing in the Net-
work and Sharing Center and then enable it in Windows Media Player. Then you must specify
the devices you want to access your shared media.
8. C. You must sync from Windows Media Center to access recorded TV shows.
9. A. The option you select from the Settings menu is Extender. From there you have the option
to add a new Media Center extender.
10. B. Go to the arrow below the Now Playing button and click More Options. Click the Player
tab and find the check box Stop Playback When Switching to a Different User and clear it.
11. B. The Windows Media Audio (WMA) format has certain advantages, such as more advanced
compression codecs and copy protection.
12. B. To browse for other media, you must first enable the option Find Media That Others Are
Sharing.
13. A, B, D. All of these are options except C. You cannot show pictures in sequential order.
14. C. The Now Playing screen will provide you with details, such as song name, artist, and album,
about the song that is currently being played.
15. A. In order to configure Parental Controls, you first must set up a limited account.
16. B. The WMA lossless format provides an exact copy of the music file without adding compres-
sion. Since nothing is lost in this format, the audio quality is the highest.
17. A, C. Windows Media Center offers you two modes, Normal and Media Only mode.
65348.book Page 244 Monday, October 22, 2007 4:27 PM
Answers to Review Questions
245
18. A, D. You can choose from folders from the local hard drive or shared folders on another
computer.
19. A, C, E, G. Windows Media Center includes several playlists by default; among them are
Music Played the Most, All Music, Music Played in the Last Month, and Music Rated at 4
or 5 Stars.
20. C. Although you can add additional folders, the default Windows Media Center will use to dis-
play pictures is the user’s Pictures folder and the Public share’s Pictures folder.
65348.book Page 245 Monday, October 22, 2007 4:27 PM
65348.book Page 246 Monday, October 22, 2007 4:27 PM
Chapter
5
Configuring Windows
Vista Security
MICROSOFT EXAM OBJECTIVES COVERED
IN THIS CHAPTER:
Configure Windows Vista Security
Configure Windows Security Center.
Configure Windows Updates.
Configure Parental Controls.
Configure Internet Explorer 7+.
Configure User Account Control.
Protect data.
65348c05.fm Page 247 Monday, October 22, 2007 9:45 PM
One of the most important aspects of Windows Vista is its nearly
complete overhaul of security compared to previous versions of
Windows. The architecture behind user management, resource
management, operating system updates, and web browsing is completely new. In this chapter,
we’ll review each of these areas, focusing on how to configure various security settings, and we’ll
review all of the new processes and applications. You will also learn how to keep computers in
top shape by applying the latest security and software updates using Windows Update with a
new look for Windows Vista. Finally, we will describe how EFS and BitLocker can help you fur-
ther lock down your system’s files.
Understanding Windows
Security Center
Security Center
is the hub for all the security utilities and settings inside Windows Vista. This
applet, found in Control Panel, provides the user with the status on the current state of security
in Windows Vista and, where needed, allows the user to make changes to settings. The goal
is to provide a single view of vulnerabilities that may exist and allow these vulnerabilities to
be remedied. The goal in Security Center is to have everything be green. This indicates that
your system is reasonably well protected against security threats. You will find Security Center
in Control Panel under Security. In the classic view, it is in the root of Control Panel. Launch-
ing it opens the window shown in Figure 5.1.
As you can see, Security Center is broken down into four major sections covering each of
the security areas in Windows Vista. Next, we will take a closer look at each of these sections
and what options are available in each.
Firewall
This section provides status on whether there is a firewall running on the machine. The firewall
can be the Windows Firewall program, which we’ll talk about in more detail in Chapter 6, or a
third-party firewall program such as Norton Internet Security. As you can see in Figure 5.2, the
firewall status is green and it states the firewall is on. If you read the text, however, you will see
that Norton Internet Security is reporting a firewall that is on. On this system Windows Firewall
is actually off, but since a third-party firewall software is running, Security Center is happy and
the firewall status is green.
65348c05.fm Page 248 Monday, October 22, 2007 9:45 PM
Understanding Windows Security Center
249
FIGURE 5.1
Windows Security Center
FIGURE 5.2
Security Center Firewall status
65348c05.fm Page 249 Monday, October 22, 2007 9:45 PM
250
Chapter 5
Configuring Windows Vista Security
If Security Center detects a problem with the firewall, the status will change to red and off.
Expanding the Firewall section will provide more detail, as shown in Figure 5.3. In this case,
neither Windows Firewall nor the Norton Internet Security firewall is running on the local sys-
tem. When this is the case, you can click the Turn On button to remedy the situation. Security
Center will prompt you, as shown in Figure 5.4, if different options are available to fix the
problem.
FIGURE 5.3
Security Center with red firewall status
FIGURE 5.4
The Security Center prompt to fix a firewall problem
65348c05.fm Page 250 Monday, October 22, 2007 9:45 PM
Understanding Windows Security Center
251
When Security Center prompts you to select an option, you will notice that you have the
option I Have a Firewall Program That I’ll Monitor Myself. If you choose this option, Security
Center will stop prompting you when there is a firewall problem and you will be on your own
to make sure the firewall is up and running. You will select this option if the firewall program
you are running is not built to communicate with Security Center. This allows you to stop
Security Center from bugging you about not having a firewall when you actually do.
Last but not least, on the left side of Security Center, you have an access to Windows Fire-
wall, as shown in Figure 5.5.
Clicking this will launch the Windows Firewall program and allow you to make changes.
Keep in mind that this will only open Windows Firewall—you are on your own if you are using
a third-party firewall utility.
FIGURE 5.5
Security Center provides access to Windows Firewall settings.
Automatic Updating
The Automatic Updating section of Security Center provides status on Windows Update. As
you can see in Figure 5.6, this system is configured to download and install updates as they
become available. Automatic Updates, the recommended setting, provides a green status for
Automatic Updating.
Depending on how Windows Update is configured, you may see a yellow or even a red sta-
tus in Security Center. Changing Windows Update to do anything less than install updates
automatically will cause the status in Security Center to change from green in order to indi-
cate a possible problem. In Figure 5.7, Windows Update has been set to download updates
but not install them automatically, and in Figure 5.8, Windows Update has been disabled
altogether.
65348c05.fm Page 251 Monday, October 22, 2007 9:45 PM
252
Chapter 5
Configuring Windows Vista Security
FIGURE 5.6
Security Center Automatic Update status
FIGURE 5.7
Security Center Automatic Updates with a yellow status
In either case, when the Automatic Updates status is lower than the green level, you can
click Change Settings to fix the problem. This will prompt you with two options, as shown in
Figure 5.9.
Install Updates Automatically (Recommended)
This option will return Windows Update to
the recommended setting, which will cause Security Center to go back to a green status.
Let Me Choose
This option will open the Windows Update Settings dialog box and allow
you to choose any available setting. Remember, anything less than automatic updates will
cause a yellow status in Security Center.
65348c05.fm Page 252 Monday, October 22, 2007 9:45 PM
Understanding Windows Security Center
253
FIGURE 5.8
Security Center Automatic Updates status when Windows Update is
disabled
FIGURE 5.9
The Security Center prompt to fix automatic updating
Malware Protection
With the vast number of computers in the world today, many storing some sort of sensitive infor-
mation, people are always trying to come up with new ways to access and steal this information.
In addition to data theft, people enjoy creating programs that are meant to cause damage to com-
puters or annoy the computer’s user. Programs that steal information, cause damage, annoy users,
or are otherwise malicious as know as
malware
. In Security Center, malware is divided into two
flavors: Virus Protection and Spyware and Other Malware Protection, as shown in Figure 5.10.
65348c05.fm Page 253 Monday, October 22, 2007 9:45 PM
254
Chapter 5
Configuring Windows Vista Security
FIGURE 5.10
Security Center Malware Protection status
Spyware Protection
Malware protection is provided in Windows Vista by Windows Defender, which will be dis-
cussed in detail in Chapter 8. As with firewalls, you can also install third-party tools for spyware
protection, as is the case with the system shown in Figure 5.10. As before, if your spyware pro-
tection software is off, you will be able to click Turn On and remedy the situation.
Configuring Antivirus in Windows Security Center
Antivirus protection is a bit more complicated when it comes to Windows Vista and Security
Center. There is no antivirus software included with Windows Vista, so you must purchase
and install one. If the antivirus software you install is built to communicate with Security Cen-
ter, you should get a green status; otherwise, you will need to choose the option that you have
an antivirus program that you will monitor yourself. This will prevent you from being nagged
by Security Center. You can also choose to have Security Center not monitor the antivirus soft-
ware state, although this is not recommended. Not having antivirus software can be a huge
risk to not only the local system, but to other systems on the network as well. These options
are available by selecting Show Me My Available Options under Virus Protection, as shown
in Figure 5.11.
65348c05.fm Page 254 Monday, October 22, 2007 9:45 PM
Understanding Windows Security Center
255
FIGURE 5.11
Antivirus options in Security Center
Remember: There is no antivirus protection available in Windows Vista by default—we
recommend that this be the first piece of software you install after Windows Vista.
Other Security Settings
The last section you will see in Security Center is titled Other Security Settings. This section
will alert you to problems with your Internet security settings and problems with User Account
Control (UAC). Just as before, problems in these two areas can be fixed by clicking the Turn
On button and then modifying the settings to recommended configurations. We will look at
the available settings for both of these categories later in this chapter. For now, just know that
this is where you can get a quick status on these settings.
Security Center Notification
Security Center will notify you when there is a problem on your system that has caused any
of the various statuses to drop below a green state. You can control how Security Center noti-
fies you by selecting Change the Way Security Center Notifies Me on the left side of the win-
dow, as shown in Figure 5.12.
65348c05.fm Page 255 Monday, October 22, 2007 9:45 PM
256
Chapter 5
Configuring Windows Vista Security
FIGURE 5.12
Security Center notification options
Selecting this option will open the dialog box shown in Figure 5.13, which presents you
with three options:
Yes, Notify Me and Display the Icon (Recommended)
This is the default and recommended
setting. When you choose this option, Security Center will display an icon in the system tray
and prompt the user with a message warning them of a potential security problem.
Don’t Notify Me, but Display the Icon
This option will suppress the notification but an icon
will still be displayed in the system tray. This setting is for the user who hates pop-up messages
but still wants to know about potential problems.
Don’t Notify Me and Don’t Display the Icon (Not Recommended)
This setting suppresses any
and all notifications that Security Center would have provided. This, as the option indicates, is not
the recommended setting as you will be unaware of security problems unless you check manually.
FIGURE 5.13
Security Center notification settings
65348c05.fm Page 256 Monday, October 22, 2007 9:45 PM
Configuring Parental Controls
257
Configuring Parental Controls
Parental Controls
, available in Windows Vista Home Basic and Windows Vista Home Pre-
mium, is a feature that allows parents to control access to the computer and elements that may
exist on the computer. Using Parental Controls, you can control when other users have access
to the computer as well as what they can do once they log on. You can manage users’ access to
the Internet, games, and specific applications that may be installed on the system.
Parental Controls are configured with the Parental Controls applet, shown in Figure 5.14,
which can be found in Control Panel under User Accounts and Family Safety.
FIGURE 5.14
The Parental Controls applet
When you first open Parental Controls, you are asked to identify which user you want to
configure Parental Controls for. Choose the user from the list and you will get see the setup
as it exists for that user. Parental Controls are set up on a per-user basis, so you will need to
edit each user you want to restrict.
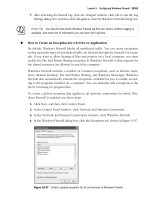
The User Controls screen, shown in Figure 5.15, provides you with access to all the Parental
Controls for that user’s account. You can also see the settings currently applied in each of the
four main areas of Parental Controls.
65348c05.fm Page 257 Monday, October 22, 2007 9:45 PM
258
Chapter 5
Configuring Windows Vista Security
FIGURE 5.15
The User Controls screen for a user’s Parental Control settings
On this screen, the first option you will want to set up is under the Parental Controls sec-
tion. By default, these options will be set to Off, which means no controls will be in effect. By
selecting On, Enforce Current Settings, you will enable Parental Controls for this user with the
default settings. In the next few sections, we will delve into each area of Parental Controls and
look at what you can do to restrict access in each.
Managing Access to the Internet
Once Parental Controls are enabled for a user, you can start restricting access to resources.
The first setting in the list is the Windows Vista Web Filter, or Internet restrictions. To access
the web filters, select Windows Vista Web Filter in the Windows Settings section. This will
open the Web Restrictions window, shown in Figure 5.16.
The Web Restrictions settings allow for a great deal of granularity when it comes to man-
aging access to the Internet. When you first enable Parental Controls, the Web Restrictions are
turned on and set to a restriction level of Medium. You can control Web Restrictions with the
two options at the top of the screen:
Block Some Websites or Content
This option will enable Web Restrictions based on the settings.
Allow All Websites and Content
Selecting this option will disable Web Restrictions and
allow the user to visit any website on the Internet.
65348c05.fm Page 258 Monday, October 22, 2007 9:45 PM
Configuring Parental Controls
259
FIGURE 5.16
The Web Restrictions settings in Parental Controls
Once you have enable Web Restrictions, you need to decide if you are going to manage access
manually or have Windows Vista manage it automatically.
Configuring Manually Restrictions
If you want to manually manage all the websites that a user can and cannot browse, Parental
Controls gives you that ability with the Allow and Block lists. To turn on complete manual con-
trol, select the option Only Allow Websites Which Are on the Allow List from the Web Restric-
tions settings. This will disable all of the automatic Web Restriction options, and you will need
to enter all the sites the user will be permitted to see. Next you will need to edit the Allow and
Block lists by clicking Edit Allow and Block List to open the window shown in Figure 5.17.
To edit the Allow and Block lists, you simply type the address of the site you want to add
and then click Allow or Block to add the site to the Allow or Block list, respectively. This can
be a tedious process, especially if you intend to block or allow a lot of sites. Keep in mind that,
since we earlier chose to only allow sites in the Allow list, everything else not on the list will
be blocked by default. At the bottom of the windows, you will notice three other options. First
is the Only Allow Websites Which Are on the Allow List option, which will do the same thing
as the option we set earlier on the main Web Restrictions page. Next, you will see two buttons:
one for Import and one for Export. This allows you to export your Allow and Block lists for
a different user or on a different machine. This saves you from having to retype the Allow list
for each user for which you are configuring Parental Controls. When you’re done, click OK.
65348c05.fm Page 259 Monday, October 22, 2007 9:45 PM
260
Chapter 5
Configuring Windows Vista Security
FIGURE 5.17
The Allow and Block lists in Web Restrictions
Once you configure the Allow list, you have one other option if you choose to go the manual
route. You can also choose whether to block file downloads from the sites the user is allowed
to browse. This option, set by selecting Block File Downloads on the Web Restrictions window,
is an all-or-nothing option. If it’s selected, the user will be unable to download any files from
any website.
Configuring Automatic Restrictions
If you want to let the Parental Controls restrict access to sites automatically, you do so by
defining the type of content that you want the user to be allowed to see. Do this by selecting
from one of the four Web Restriction levels. You can only select a level if you do not select the
Only Allow Websites Which Are on the Allow List option. Additionally, you can still choose
to block file downloads when using the automatic filters. Keep in mind that the website filters
are subjective, meaning that what one person calls mature content another person may not.
You can always use the Allow and Block lists to override the restrictions provided by or missed
by the filter. The Web Restriction levels are as follows.
High
When you select the High level, the user will only be able to browse websites that are
approved for children and are not on the Block list. These are websites aimed at 8- to 12-year-olds
65348c05.fm Page 260 Monday, October 22, 2007 9:45 PM
Configuring Parental Controls
261
with material understandable by that age group. All other websites will be blocked except for
those explicitly added to the Allow list.
Medium
The Medium level will block all unrated content and any web content that falls into
one of the following categories:
Mature Content
Pornography
Drugs
Hate Speech
Weapons
Again, in addition to these categories, sites on the Block list will also be blocked for the user.
None
If you select None, the user will be permitted to browse all sites except those on the
Block list. This is the opposite setting to the one we looked at earlier when the user could only
browse sites on the Allow list.
Custom
If none of the other three categories does exactly what you need, you can set up a
custom restriction level. When you select Custom, you will be presented with a complete list
of all the categories of websites that Parental Controls is aware of. To prevent access, you
select which website categories you wish to block. All websites not containing a blocked cat-
egory are allowed. Again, you can still add sites to the Allow and Block lists if the filter is miss-
ing a site. The categories you can choose to block in the custom level are as follows:
Pornography
Mature Content
Sex Education
Hate Speech
Bomb Making
Weapons
Drugs
Alcohol
Tobacco
Gambling
Unrateable Content
Managing Access to the Computer
The next available settings in Parental Controls are called Time Limits and are accessible by
clicking the Time Limits option under Windows Settings in the User Controls window. This
will open the Time Restrictions window, shown in Figure 5.18.
65348c05.fm Page 261 Monday, October 22, 2007 9:45 PM
262
Chapter 5
Configuring Windows Vista Security
FIGURE 5.18 The Time Restrictions settings in Parental Control
The settings in Time Restrictions are simple. Using your mouse, you use the grid to select
which hours the user can and cannot use the computer. Time is divided into hourly blocks for
each of the seven days of a week. A blue block indicates an hour that the computer cannot be
used, and a white block indicates an hour that it can. In Figure 5.18, the user can only log on
between noon and 5:00
PM on weekends and between 6:00 PM and 7:00 PM on weekdays.
When you are satisfied with the settings, click OK.
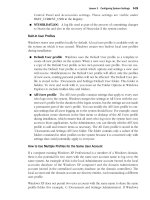
Managing Access to Games
When managing access to games with Parental Controls, you are presented with a few options.
You can either block specific games or you can block games based on the game ratings. By
default, the game-rating system in use is ESRB, which also happens to be the system in use on
most games sold in the United States. If you are in a country that uses a different system, you
can change the ratings used by Parental Controls. Before we get too far into restricting games,
we are going to cover the basics of ESRB so that you will understand how to apply ESRB rat-
ings to game restrictions.
65348c05.fm Page 262 Monday, October 22, 2007 9:45 PM
Configuring Parental Controls
263
ESRB Ratings
The Entertainment Software Rating Board (ESRB) is a nonprofit body that provides ratings
for interactive entertainment software. Ratings are intended to give parents an idea of a game’s
content and the age for which the ESRB considers the game to be appropriate. These ratings
are assigned to computer games and console-based video games alike. Ratings are made up of
two parts: the rating symbol and the content descriptor. The rating symbol, usually shown on
the front of a game’s packaging, describes the rating and age range for which a game is appro-
priate. The rating symbols are usually a mix of numbers and letters, along with the name of
the rating at the top of the symbol. The ratings in use by the ESRB are as follows:
The following information comes from the ESRB website at www.esrb.org.
Early Childhood Titles rated EC (Early Childhood) have content that may be suitable for
ages 3 and older. Contains no material that parents would find inappropriate.
Everyone Titles rated E (Everyone) have content that may be suitable for ages 6 and older.
Titles in this category may contain minimal cartoon, fantasy, or mild violence and/or infre-
quent use of mild language.
Everyone10+ Titles rated E10+ (Everyone 10 and older) have content that may be suitable
for ages 10 and older. Titles in this category may contain more cartoon, fantasy, or mild vio-
lence; mild language; and/or minimal suggestive themes.
Teen Titles rated T (Teen) have content that may be suitable for ages 13 and older. Titles in
this category may contain violence, suggestive themes, crude humor, minimal blood, simu-
lated gambling, and/or infrequent use of strong language.
Mature Titles rated M (Mature) have content that may be suitable for persons ages 17 and
older. Titles in this category may contain intense violence, blood and gore, sexual content,
and/or strong language.
Adults Only Titles rated AO (Adults Only) have content that should only be played by per-
sons 18 years and older. Titles in this category may include prolonged scenes of intense vio-
lence and/or graphic sexual content and nudity.
The second part of the rating, the content descriptor, is usually on the back of the games
packaging next to the same rating symbol as seen on the front of the packaging. Content
descriptors are just a text-based list of the content that can be found in the game. This infor-
mation provides details explaining why the game received the rating that it did. The content
descriptors in use by the ESRB are as follows:
The following information comes from the ESRB website at www.esrb.org.
65348c05.fm Page 263 Monday, October 22, 2007 9:45 PM
264
Chapter 5
Configuring Windows Vista Security
Alcohol Reference Reference to and/or images of alcoholic beverages.
Animated Blood Discolored and/or unrealistic depictions of blood.
Blood Depictions of blood.
Blood and Gore Depictions of blood or the mutilation of body parts.
Cartoon Violence Violent actions involving cartoon-like situations and characters. May
include violence where a character is unharmed after the action has been inflicted.
Comic Mischief Depictions or dialogue involving slapstick or suggestive humor.
Crude Humor Depictions or dialogue involving vulgar antics, including “bathroom” humor.
Drug Reference Reference to and/or images of illegal drugs.
Edutainment The content of the product provides the user with specific skills development
or reinforcement learning within an entertainment setting. Skill development is an integral
part of the product.
Fantasy Violence Violent actions of a fantasy nature, involving human or non-human char-
acters in situations easily distinguishable from real life.
Informational Overall content of product contains data, facts, resource information, refer-
ence materials, or instructional text.
Intense Violence Graphic and realistic-looking depictions of physical conflict. May involve
extreme and/or realistic blood, gore, weapons, and depictions of human injury and death.
Language Mild to moderate use of profanity.
Lyrics Mild references to profanity, sexuality, violence, alcohol or drug use in music.
Mature Humor Depictions or dialogue involving “adult” humor, including sexual references.
Mild Violence Mild scenes depicting characters in unsafe and/or violent situations.
Nudity Graphic or prolonged depictions of nudity.
Partial Nudity Brief and/or mild depictions of nudity.
Real Gambling Player can gamble, including betting or wagering real cash or currency.
Sexual Themes Mild to moderate sexual references and/or depictions. May include partial
nudity.
Sexual Violence Depictions of rape or other violent sexual acts.
Simulated Gambling Player can gamble without betting or wagering real cash or currency.
Some Adult Assistance May Be Needed Intended for very young ages.
Strong Language Explicit and/or frequent use of profanity.
Strong Lyrics Explicit and/or frequent references to profanity, sex, violence, alcohol or drug
use in music.
65348c05.fm Page 264 Monday, October 22, 2007 9:45 PM
Configuring Parental Controls
265
Strong Sexual Content Graphic references to and/or depictions of sexual behavior, possibly
including nudity.
Suggestive Themes Mild provocative references or materials.
Tobacco Reference Reference to and/or images of tobacco products.
Use of Drugs The consumption or use of illegal drugs.
Use of Alcohol The consumption of alcoholic beverages.
Use of Tobacco The consumption of tobacco products.
Violence Scenes involving aggressive conflict.
Now that you understand the ESRB ratings, let’s look at how you can use them to block
access to games using Parental Controls in Windows Vista.
Restricting Access to Games
When restricting access to games, you have two choices: using ratings, or blocking or allowing
a specific game. To access the Game Controls settings, shown in Figure 5.19, select Games
under Windows Settings on the User Controls screen.
FIGURE 5.19 Game Controls in Parental Controls
65348c05.fm Page 265 Monday, October 22, 2007 9:45 PM
266
Chapter 5
Configuring Windows Vista Security
This screen provides you with three sections of options: you can choose whether the user
can play games or not, you can block or allow games by rating and content, or you can block
or allow specific games. If you select No for the option Can User Play Games?, then the user
will be unable to play any games. If you select Yes, you will need to further define the games
a user can play, which by default is all of them. First let’s look at controlling games by rating
or content.
Controlling Access to Games by Rating and Content
By selecting Set Game Ratings on the Games Control screen, you will be provided with a list
of Game Restriction options, as shown in Figure 5.20.
In the first section, you can select whether the user can play games with no ratings. You
have two choices: Allow Games with No Rating or Block Games with No Rating. Since you
have no idea what a game without a rating may contain, it is suggested that you block these
games if you are trying to limit a user’s access to more adult-oriented titles.
FIGURE 5.20 Game Restriction options
65348c05.fm Page 266 Monday, October 22, 2007 9:45 PM