Unix for mac your visual blueprint to maximizing the foundation of mac osx phần 8 pptx
Bạn đang xem bản rút gọn của tài liệu. Xem và tải ngay bản đầy đủ của tài liệu tại đây (2.95 MB, 36 trang )
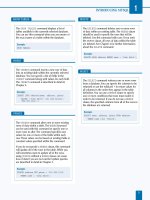
‡ Type <body> and press
Return.
° Position your cursor at the
end of the text on the line
starting with <img and
press Return.
· Type </body>.
‚ Save your text, and exit
Pico.
■ Pico saves your HTML file
with your changes.
— Open Internet Explorer
from the Dock.
± Type http://localhost/
index.html in your URL field,
and press Return.
■ The browser displays your
home page with your page
title in the title bar.
SERVE WEB PAGES WITH APACHE
14
239
The structure of an HTML table follows a pattern that resembles the
structure of an HTML document. That is, it begins with an opening
<table> tag and ends with a closing </table> tag. Between these
two tags, your browser identifies rows between <tr> and </tr> and
cells between <td> and </td>. The tags <th> and </th> are used
for column headings.
Example:
<table>
<tr>
<th>Item</th>
<th>Price</th>
</tr>
<tr>
<td>pizza</td>
<td>$11</td>
</tr>
<tr>
<td>salad</td>
<td>$4.50</td>
</tr>
</table>
14 53730X Ch14.qxd 3/25/03 8:59 AM Page 239
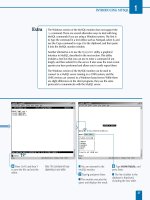
USE AN INTERNAL STYLE SHEET
⁄ Type sudo pico followed
by the name of an existing
Web page, press Return.
¤ Press Return and type
<style type="text/css">, and
press Return again.
‹ Type <! and press Return,
then type
/* H2 headings are
bold and blue */ and press
Return again. Then type
h2{font-weight: bold; color:
blue;} and press Return.
› Type > and press Return,
then type
</style>.
ˇ Save your text, and exit
Pico.
Á Open Internet Explorer
from the Dock.
‡ Type file://localhost/
mystory.html in your URL
field, and press Return.
■ The browser displays your
home page with the first
heading in a bold, blue font.
ADD SIMPLE STYLES TO YOUR WEB SITE
UNIX FOR MAC
240
ADD SIMPLE STYLES TO YOUR WEB SITE
Y
ou can add simple styles to give your Web pages a
more interesting and uniform look. The Cascading
Style Sheets (CSS) model allows you to define styles
within or independent of your Web pages, and to apply
these styles to your Web pages in conjunction with HTML
formatting.
A style is simply a rule that associates display properties —
such as bold and blue — with a particular HTML tag. The
simplest way to define an internal style is to insert the style
definition into your document. For example, to specify that
a single heading is to be both bold and blue, you can type.
<h2 style="color: blue; font-style=bold">From Birth Until
Now</h2>.
This style only applies to the text between the <h2> and
</h2> tags.
To force all of your <h2> level headings to be bold and
blue, you can type the command h2{font-weight: bold;
color: blue;} within the head of your document.
You can also define in one centralized file, or external style
sheet, the formatting and layout for multiple Web pages.
This approach allows you to apply consistent styles without
having to recreate them in every page. In addition, if you
need to make a change in the overall style of your Web site,
you only need to change one file.
To create a separate style sheet, you must create a file that
contains the style definitions that you want to use. You
identify this file with the extension .css. A CSS file contains
style definitions such as the following:
h1{font-weight: bold; color: black;}
h2{font-weight: bold; color: blue;}
You can then use a link or an @import command to use
your cascading style sheet in your Web pages.
14 53730X Ch14.qxd 3/25/03 8:59 AM Page 240
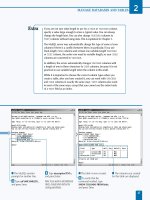
USE AN EXTERNAL STYLE SHEET
⁄ Type echo "h1{font-weight:
bold; color: black;}" >
styles.css and press Return.
¤ Type echo "h2{font-weight:
bold; color: blue;}" >>
styles.css and press Return.
‹ Type sudo mv styles.css
/sw/apache/htdocs and press
Return.
› Enter your password if
prompted.
ˇ Start Pico using sudo to
edit an existing Web page.
Á Press Return and
type
<link rel=stylesheet
type="text/css" and press
Return again.
‡ Press the Spacebar
four times, then type
href="styles.css">.
° Save your text, and exit
Pico.
■ Your document now uses
styles that you defined in
your styles.css file.
SERVE WEB PAGES WITH APACHE
14
When you use an external style sheet, it is far
easier to maintain a collection of pages in the
same format. To use the link command with an
external style sheet called styles.css, you can
enter similiar text after the opening HTML tag in
each Web page:
Example:
<head>
<title>life story</title>
<link rel=stylesheet type="text/css"
href="styles.css">
</head>
To access the same external style sheet using the
@import command, you can enter text similar to
the following:
Example:
<head>
<title>life story</title>
<style>
<!—
@import url(styles.css);
—>
</style>
</head>
While using an internal style sheet may seem to be
the easiest approach, you must define the style in
every document you create, and you save little time
and effort if you only use the style once. You place
an internal style sheet in the head section of a
document.
Example:
<head>
<title>My life story in 50 words or
less</title>
<style type="text/css">
<! —
/* H2 headings are bold and blue */
h2{font-weight: bold; color: blue;}
—>
</style>
</head>
241
14 53730X Ch14.qxd 3/25/03 8:59 AM Page 241
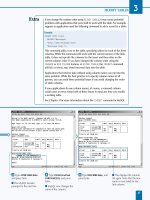
⁄ Type grep followed by a
space.
¤ Type ^ScriptAlias followed
by a space.
‹ Type
/sw/apache/conf/httpd.conf and
press Return.
■ The output should display
a line showing you where
CGI scripts should reside.
› Type sudo pico
/sw/apache/cgi-bin/mycgi.pl
and press Return.
ˇ Type #!/usr/bin/perl –w
and press Return twice.
Á Type use CGI
qw(:standard); and press
Return, then type
header; and press Return
again.
‡ Type print start_html("this
is a CGI"); and press Return,
then type
$greet="Thanks for
visiting"; and press Return
twice.
° Type print h1("$greet");
and press Return, type
hr; and press Return twice,
and then type
end_html;.
Y
ou can install Common Gateway Interface, or CGI,
scripts to make your Web site interactive. CGIs
enable your Web pages to exchange information with
other programs running on your system. Many CGI
programs collect information from visitors to your Web site,
usually through a form, and pass that information to a
program that processes the data. Other CGI programs
simply collect data and display it.
You can find many CGI programs on the Web and install
them on your system. These programs can include counters
that increment each time a new client visits your site, and
forms that allow your visitors to sign a guest book.
To use CGIs on your Web site, you must enable them in
your httpd.conf file, and you must store them in the proper
directory. CGIs normally reside in the cgi-bin directory,
most likely /sw/apache/cgi-bin on your system.
You must set CGI programs to be executable before you
can run them from your Web site. This means that they
must have execute permission enabled so that anyone can
execute them. You can add Execute permission using the
chmod a+x command.
Programmers usually write CGIs in Perl, because Perl is one
of the most versatile and popular programming languages.
You can, however, write CGIs using many different
languages.
There are many Web sites from which you can download
pre-existing CGI scripts. You can also create your own CGI
scripts; there are many books and Web sites that can teach
you what you need to know to code in Perl and to build
effective CGIs. An excellent book is Perl: Your visual
blueprint for building Perl scripts, by Paul Whitehead,
Wiley Publishing. You can also find a Web tutorial at
www.cgi101.com/class/.
INSTALL CGI SCRIPTS
UNIX FOR MAC
242
INSTALL CGI SCRIPTS
14 53730X Ch14.qxd 3/25/03 8:59 AM Page 242
· Save your file, and exit
Pico.
■ Pico saves your CGI.
‚ Type sudo chmod a+x
/sw/apache/cgi-bin/mycgi.pl
and press Return.
— If a prompt appears, type
your password.
± Open Internet Explorer in
the Dock.
¡ Type http://localhost/cgi-
bin/mycgi2.pl into the URL
field, and press Return.
■ Your new CGI runs and
displays the output.
SERVE WEB PAGES WITH APACHE
14
243
To make use of the Perl CGI module, add the command
line use CGI. In the following CGI example, this
command is included with standard options.
Example:
#!/usr/bin/perl -w
use CGI qw(:standard);
print header;
print start_html("this is a CGI");
$greet="Thanks for visiting";
print h1("$greet");
print hr;
print end_html;
Most of the print lines in this simple CGI script are
actually calls to the CGI module. When you type print
header, for example, a routine in the module composes
a proper HTML header. When you type print h1 and
include a text message or a string variable inside
parentheses, another module composes HTML code
for a level-1 HTML heading.
14 53730X Ch14.qxd 3/25/03 8:59 AM Page 243
⁄ Open Internet Explorer
from the Dock.
¤ Type http://modules.
apache.org/ in your URL
field, and press Return.
■ The browser takes you to
the Apache site to search for
modules.
‹ Click search for modules. › Type your search term.
Y
ou can download and install additional Apache
modules to expand the capabilities of your Apache
server. While the default Apache installation sets up a
very adequate and responsive Web server, the default set of
modules that are included may not meet all of your needs.
You can obtain a list of the modules that your installation of
Apache already supports by typing httpd –l.
To upgrade your Apache server to include additional
modules, you must download the new modules. If your
Apache installation includes the mod_so module, you can
install additional modules without having to recompile
Apache. This is normal with recent installations of Apache.
The mod_so module provides Apache with support for
dynamic shared objects (DSO). This means that you can use
an external module without changing Apache itself — that
is, without having to recompile. DSO modules load when
Apache starts up.
After you compile a module into a DSO, you can use the
LoadModule command that is part of the mod_so module
in your httpd.conf file. This causes the module to load when
you start or restart Apache. The exact line that you enter
depends on the module that you are installing. The
instructions that you obtain with the module, often found in
a file called README or INSTALL, tell you which line to enter.
To build a module into your Apache binary, you need to
download the module, install the files into the modules
directory for your Apache distribution, and recompile.
Again, the exact process depends on the module that you
are installing. Read the README and INSTALL files for
Apache and the module that you are installing.
Fortunately, the Apache Web site offers a list of modules
along with a description of each one. This information helps
you to find a module that can add the functionality that you
require.
INSTALL APACHE MODULES
UNIX FOR MAC
244
INSTALL APACHE MODULES
14 53730X Ch14.qxd 3/25/03 8:59 AM Page 244
ˇ Scroll through the list of
modules containing your
search string.
Á Click the module you
want to download.
■ The download page
appears.
‡ Click the link provided to
download your module.
SERVE WEB PAGES WITH APACHE
14
Most, if not all, Apache modules arrive as
gzipped TAR files. This means that you must use
the gunzip and tar –xf commands to extract
your source files. You must then type cd into the
target directory and look for a README or
INSTALL file, which should contain detailed
instructions for installing the module.
To install a module using DSO, you follow
directions similar to these:
Example:
$ ./configure —with-apxs
$ make
$ make install
Most Apache modules contain fairly detailed
instructions that tell you the commands you must
type to install your new module.
If you install modules using the dynamic method,
you must confirm that your Apache daemon
supports mod_so; to do this, type the command
httpd –l and look for mod_so in the output. If you
prefer the static method, whereby the new module
is built into your apache binary, or if your Apache
daemon does not support DSO, you must first
compile the new module, then follow instructions
to move the compiled files into your Apache source
tree, and then recompile Apache.
245
14 53730X Ch14.qxd 3/25/03 8:59 AM Page 245
TEST PHP
⁄ Type sudo pico followed
by a space.
¤ Type /sw/apache/htdocs
/testme.php and press Return.
‹ Type <html> and
press Return, then type
<title>testing</title> and
press Return again.
› Type <body> and press
Return, then type
<?php
phpinfo(); ?> and press
Return again.
ˇ Type </body> and press
Return, then type
</html>.
Á Save your text, and exit
Pico.
WRITE PHP APPLICATIONS
UNIX FOR MAC
246
WRITE PHP APPLICATIONS
Y
ou can develop PHP applications for use in your Web
site. PHP is a relatively new language that integrates
easily with the Apache Web server. When you can
code in PHP, you can dramatically reduce the time that it
takes for you to develop Web applications. In order to use
PHP, your Apache binary must support it.
To understand the similarities between PHP and HTML, you
have only to look at some sample code. For example, to
print a variable on a Web page, PHP mimics the style of
HTML commands while using special tags that only belong
to PHP:
<html>
<head><title>Latest Counts</title></head>
<body><?php echo $grp1cnt<br>; ?></body>
</html>
PHP files do not need to be executable, and the output
appears indistinguishable from HTML.
You must always enclose PHP scripts between two PHP
tags. The tag pairs can be in one of several forms, such as
<? and ?> or <?php and php?>, although some
programmers use <?php and ?>.
PHP uses many commands, including printing, looping, if
commands, arrays, and forms, but if you are already familiar
with HTML, you should grasp the fundamentals of PHP
quite easily.
PHP is a server-side scripting language. This means that the
interpreter has to be installed and configured on the server
before it can be used. No special client-side setup is
required. The language combines features from Perl, Java,
and C, so most people who have programmed in any of
these languages will feel at home with PHP.
All text to be written to the screen must be enclosed in
double-quotes and almost all commands will end in a
semicolon. Pages containing PHP commands should be
saved with the extension .php.
14 53730X Ch14.qxd 3/25/03 8:59 AM Page 246
‡ Open Internet Explorer in
the Dock.
° Type http://localhost/
testme.php in your URL
field, and press Return.
■ The browser displays a
page of information about
PHP if your PHP installation
is active.
CREATE A PHP
⁄ Start Pico to create a file
name hello.php.
¤ Type <? php and press
Return, type
$times=11; and
press Return again, and then
type
$x=0; and press Return
twice.
‹ Type while ($x < $times) {
and press Return, type
echo
"Hello, World"; and press
Return again, and then type
++$x; and press Return.
› Type } and press Return,
then type
?>.
ˇ Save your file.
SERVE WEB PAGES WITH APACHE
14
247
You can mix PHP and HTML easily in a single file.
When you do so, you enclose each of your PHP
statements in a pair of PHP tags, as in the sample
below:
Example:
<?php $season="summer"; ?>
We are now accepting reservations for our
<?php print $season season; ?>
Call 1-800-FUN-VACS today.
This code segment assigns a value to $season
and then uses this value to customize the
content of the remainder of the display. In a
similar manner to Perl, PHP allows you to create
simple data types, like $season, and arrays in
which you can use both a variable name and an
index, such as $season[1].
Basic comparison operators include all
those listed in the table below.
OPERATOR DESCRIPTION
== Equal
!= Not equal
= Assignment
* Multiplication
/ Division
+ Addition
- Subtraction
. Concatenation
&& Logical AND
|| Logical OR
14 53730X Ch14.qxd 3/25/03 8:59 AM Page 247
CHECK IF ANALOG IS INSTALLED
⁄ Type fink list | followed by
a space.
¤ Type grep analog and
press Return.
■ Fink tells you whether you
have installed analog.
■ A lowercase letter i in the
leftmost column indicates
that Fink is installed.
CONFIGURE ANALOG
⁄ Start Pico with sudo to edit
/sw/etc/analog/analog.cfg.
¤ Change the LOGFILE line
to include the pathname of
your access_log, and press
Return.
‹ Type OUTPUT HTML and
press Return.
› Type OUTFILE /sw/apache/
htdocs/analog0.html and press
Return.
Y
ou can analyze your Web traffic using a tool called
Analog. Analog is a free, open source program that
you can use to analyze Web traffic based on records
stored in your log files. Analog can produce as many as 32
different reports. For example, it can provide you with
charts that highlight heavy traffic times — for instance,
times of the day or days of the week. It can also show you
which of your files visitors access most frequently, which
files are not found, or where visitors are coming from when
they follow links to your Web site.
Analog has a configuration file, called analog.cfg. Fink
installs this file into the /sw/etc/analog directory. Like most
configuration files, analog.cfg is full of helpful comments,
and has a number of configuration options. The most
important of these options is the line that identifies where
you store your Web log files. If you store your Web logs in
/sw/apache/logs, you must change the line that starts with
LOGFILE to read LOGFILE /sw/apache/logs/access_log. If
you do not have the correct log file location, Analog cannot
analyze your Web traffic.
Analog analyzes Web traffic by individual file requests, as
this is the manner in which your system records Web traffic
in your log files. Traffic can be reported hourly, daily,
weekly, or monthly by turning report options on and off.
For example, to turn monthly reports off, you can add
MONTHLY OFF to your configuration file. To turn weekly
reports on, you can add WEEKLY ON. To produce one of
the many types of reports available from Analog, you can
scan a list of the available reports and insert commands
such as REFERRER ON in your configuration file.
ANALYZE WEB TRAFFIC
UNIX FOR MAC
248
ANALYZE WEB TRAFFIC
14 53730X Ch14.qxd 3/25/03 8:59 AM Page 248
ˇ Type HOSTNAME
"Dragonfly Ditch".
Á Save your text, and exit
Pico.
■ Pico saves your changes to
the analog.conf file.
RUN ANALOG
⁄ Type /sw/bin/analog and
press Return.
¤ Type open followed by a
space.
‹ Type /sw/apache/htdocs/
analog0.html and press
Return.
■ Your Analog report
displays in a browser
window.
SERVE WEB PAGES WITH APACHE
14
249
Until you start to use the reports that Analog produces, you may not know which
reports are the most useful to you in analyzing your log files. In addition, your
requirements may change over time. The following table describes some of the
reports available to you. To include any of these reports in your Analog output,
insert the keyword, then the word ON, into your analog.cfg file.
REPORT DESCRIPTION
MONTHLY One line for each month
WEEKLY One line for each week
DAILYREP One line for each day
HOURLYREP One line for each hour of the day
GENERAL A general summary
REQUEST Files that are requested
FAILURE Files that are not found
REFERRER Where visitors come from using links
FAILREF Sites from which visitors follow broken links
SEARCHWORD Phrases and words visitors use to find your site
STATUS Count of each type of success and failure
14 53730X Ch14.qxd 3/25/03 8:59 AM Page 249
⁄ Type pico followed by a
space.
¤ Type sam.pl and press
Return.
■ A blank Pico screen
appears.
‹ Type print followed by a
space.
› Type "Hello, World ";
and press Return.
Y
ou can use Perl to write a simple script that does not
require compiling. Perl is an interpreted language.
However, Perl looks like a compiled language in a
number of ways. For example, each statement in Perl ends
in a semicolon, and a $ symbol precedes variable names,
even when you first declare them and assign them a value.
More importantly, Perl allows you to build subroutines, pass
variables, and return values like most compiled languages.
Perl also has sophisticated array handling.
However, the feature that most distinguishes Perl from
other languages is the versatile use of regular expressions. If
your only experience with regular expressions comes from
working in one of the Unix shells, you may be amazed at
the versatility of the Perl language. For example, you can
use regular expressions in Perl to do fuzzy matching. With
fuzzy matching, instead of asking whether one number is
greater than another, or looking for a number in a string,
you can ask if a line of text contains an e-mail address or a
date/time stamp by describing these items as patterns.
Although the use of regular expressions can make Perl code
difficult to interpret at first, when you become more
familiar with each of the symbols, you can begin to
appreciate the succinct form of the language.
The elements of a Perl pattern are referred to as
metacharacters. For example, \s represents a single
whitespace character – a blank or a tab — and \S
represents any non-whitespace character. You can also
amend these patterns to match some or none or a string of
any size. Where \d represents a digit, \d+ represents any
number of digits and \d* represents any number of digits,
but will also match no digits at all.
WRITE A SIMPLE PERL SCRIPT
UNIX FOR MAC
250
WRITE A SIMPLE PERL SCRIPT
15 53730X Ch15.qxd 3/25/03 8:59 AM Page 250
ˇ Type print followed by a
space.
Á Type "I am $0"; and press
Return.
‡ Type print followed by a
space.
° Type "\n"; and press
Return.
· Save your file, and exit
Pico.
■ Pico saves your new Perl
script.
WORK WITH PERL
15
As with most Unix scripting languages and
configuration files, you create a comment in Perl
by placing a # symbol at the beginning of the
line. You can place a comment on a line by itself
or append it to the end of a line of code. Either
of these forms is correct:
Example:
# say hello
print "Hello, World – "; # say hello
When you create a complex script, you should
include some comments that explain what your
script is doing, but avoid superfluous comments
that may annoy someone who reads your code.
In Perl, comments are often used to explain
complex regular expressions.
The "\n" shown in the screens below indicates a
newline character. If this character were omitted
from our print statement, the script would print the
output without moving to the new line, and the next
system prompt would be on the same line. You
usually include newline characters in the print
statements along with text that you want to print.
For example, you can type the line print "Hello,
World\n"; in a Perl script to print the message and
move to the next line.
251
15 53730X Ch15.qxd 3/25/03 8:59 AM Page 251
⁄ Type perl followed by a
space.
¤ Type sam.pl and press
Return.
■ Perl runs your script.
‹ Type chmod a+x followed
by a space.
› Type sam.pl and press
Return.
ˇ Type ./sam.pl and press
Return.
■ The shell cannot run your
print command.
Á Type pico sam.pl and
press Return.
Y
ou can run a Perl script by using it as an argument to
the Perl interpreter, or by making it executable. After
you create a Perl script, you can instruct Perl to
interpret and execute the script, for example, by typing perl
myscript.pl. This is the simplest way to run a script, but not
the most convenient. Most users prefer to run scripts as
though they are new commands, and without having to
know anything about the language in which they are
written. Thus, they may not want to type perl before the
name of the script.
For the convenience of users, and to avoid errors that may
generate if they type the name of the script on a line by
itself, you can insert a line at the top of the script that
identifies your file to the shell as a Perl script, and you can
make the script executable. You refer to this line as the
shebang line, and the syntax for this line is #! followed by
the name of the interpreter. For a Perl script, you can type
#!/usr/bin/perl.
If you make your Perl script executable without the shebang
line, the system cannot determine what tool to use to run
the script, and it attempts to run the commands using your
shell. This action generates a number of errors, as tcsh does
not include a print command. If you mistype your
shebang line, your system cannot find the interpreter and
issues an error such as "not found: myscript.pl".
You can force yourself to use rules that are more restrictive
in your Perl coding by adding use strict; to the top of
your scripts. While adding this to your scripts may generate
warning messages, these messages may help you avoid
many potential errors in your code.
RUN A PERL SCRIPT
UNIX FOR MAC
252
RUN A PERL SCRIPT
15 53730X Ch15.qxd 3/25/03 8:59 AM Page 252
■ Pico opens with your file.
‡ Type the line
#!/usr/bin/perl at the top of
your script, and press Return.
° Save your file, and exit
Pico.
■ Pico saves your modified
script.
· Type ./sam.pl and press
Return.
■ Perl runs your script.
WORK WITH PERL
15
You can use the command line option -w on the
shebang line — by typing #!/usr/bin/perl -w —
to instruct Perl to issue warnings regarding your
syntax. For example, if you define a variable,
such as $counter, and then never use it, Perl
warns you that this variable appears only once in
your code. By doing this, Perl is telling you that
you have made a mistake or, at least, strayed
from your original intent in writing the script.
Perl warnings are very useful when you are first
learning the language, as they can help you to
spot problems that prevent your script from
running, or represent poor scripting style.
The shebang line tells the shell which language you
used to write the script and, consequently, what
tool the shell can use to run the commands. For the
script to run, the shebang line must contain the full
path to the Perl interpreter. This is the case whether
or not the Perl binary is on your search path. Also,
this line must be the first line in the script and must
start with #!.
253
15 53730X Ch15.qxd 3/25/03 8:59 AM Page 253
SEARCH A FILE FOR DATES
⁄ Type pico finddates.pl and
press Return.
■ Pico opens so that you can
edit your file.
¤ Type #!/usr/bin/perl –w
and press Return twice.
‹ Type while ( <> ) { and
press Return, then type
if (
/\d{2}\/\d{2}\/\d{2}/ ) { and
press Return.
› Type print $_; and press
Return, type
} and press
Return, and then type
}
and press Return.
Y
ou can use the ability of Perl to recognize patterns to
help you manipulate text. If you are able to describe
a pattern that you are looking for in a stream of text,
then you can represent it as a Perl regular expression with
which you can easily extract and manipulate it.
For example, if you are looking for dates that look like
05/01/03, you can tell Perl that you want strings that match
the pattern \d{2}\/\d{2}\/\d{2}. While this expression
may look complicated, a quick breakdown makes it easier
to understand. The string \d matches a digit, and when
changed to \d{2}, it matches a two-digit number. The date
above includes three of these strings. The two extra forward
slashes in the search pattern indicate that the strings you
are searching for contain slashes. Because slashes are a part
of the Perl syntax, you must precede any slashes that you
include as characters you want to match with an escape
character. The escape character tells Perl to take the
following character literally and not to interpret it as part of
the Perl syntax. Thus, \/ represents / in your search pattern.
Perl has many special character sequences, such as \d,
to help you to locate and manipulate text. Users refer to
these character sequences as metacharacters or escape
sequences. Many metacharacters have both a positive and
negative form. For example, while \d represents a digit, \D
represents a non-digit — any character that is not a digit.
While \s+ represents any amount of whitespace, \S+
represents any string of characters that does not contain any
whitespace. The biggest challenge to most Perl beginners is
to remember what each of the metacharacters represents.
MANIPULATE TEXT WITH PERL
UNIX FOR MAC
254
MANIPULATE TEXT WITH PERL
15 53730X Ch15.qxd 3/25/03 8:59 AM Page 254
ˇ Save your file, and exit
Pico.
Á Type chmod a+x
finddates.pl and press Return.
‡ Type ./finddates.pl
followed by a space.
° Type the name of a file
containing dates, and press
Return.
■ Your Perl script displays all
lines that contain dates in the
specified form.
WORK WITH PERL
15
255
Perl recognizes many different metacharacters,
allowing you to closely describe text that you are
looking for and to manipulate it. The table below
shows some of the most common metacharacters
and what they represent. You can use the + and *
qualifiers with any of the metacharacters.
METACHARACTER MATCHES
\d A digit.
\d+ One or more digits.
\d* Zero or more digits.
\D A non-digit.
\e The escape character.
\f A form feed.
\l A lowercase letter.
\n A newline.
\r A carriage return.
\s A whitespace character.
METACHARACTER MATCHES
\s+ Any amount of whitespace.
\S* Some whitespace or no
whitespace.
\t A tab.
\u An uppercase character.
\w A word character — a letter,
digit, or underscore.
\W A non-word character.
\O? An octal character.
\x? A hexadecimal character.
15 53730X Ch15.qxd 3/25/03 8:59 AM Page 255
⁄ Type pico favnum.pl and
press Return.
¤ Type #!/usr/bin/perl –w
and press Return twice, then
type
print "Enter your favorite
number> "; and press Return.
‹ Type $favnum = <STDIN>;
and press Return.
› Type print "What a
coincidence! $favnum is my
favorite number too.\n"; and
press Return.
ˇ Type print "Maybe we
should go out.\n";.
Y
ou can build Perl scripts that read data from the
command line. Like other scripting languages, Perl
allows you to prompt the user to enter information.
Perl does this by issuing a print statement containing the
prompt and then reading the answer from standard input.
For example, you can include a prompt in the script with
the line print "Enter your favorite number> ";
and then collect the answer with $favnum=<STDIN>;.
When the script runs, Perl prompts you for the number
and stores it in $favnum.
You can also place your prompt-and-read statement into
a loop. A while statement continues looping until the
specified conditions are met. A foreach loop is good to use
if you want to collect a specific number of answers from the
user. For example, you can enter the following commands:
$tothrs=0;
foreach day ( Mon,Tue,Wed,Thu,Fri ) {
print "hours worked on $day> ";
$hrs = <STDIN>;
$tothrs = $tothrs + $hrs;
}
print "You only worked $tothrs hours!";
This script prompts the user to enter the number of
hours that they work each weekday, and computes a total.
However, this script generates an error message if the user
enters anything other than a number, because the addition
fails. You can insert a while statement inside the foreach
statement to repeat the prompt until the user enters a
number.
READ THE COMMAND LINE
UNIX FOR MAC
256
READ THE COMMAND LINE
15 53730X Ch15.qxd 3/25/03 8:59 AM Page 256
Á Save your script, and exit
Pico.
‡ Type chmod a+x followed
by a space.
° Type favnum.pl and press
Return.
· Type ./favnum.pl and press
Return.
■ The script runs, asking you
for your favorite number.
WORK WITH PERL
15
257
There are times when you do not want to use data exactly as a user
enters it. For example, when you tell the user that their favorite number
just happens to be your favorite number, too, as in the favnum.pl script,
your message displays on two lines instead of three. This unintended line
break results when Perl reads the input line, including the linefeed, and
retains the linefeed. As a result, when the output displays to the user, the
linefeed is still present in the $favnum variable.
You can remove these unwanted linefeeds by using the chomp command.
The chomp command simply removes the linefeed from the end of the
line. The format for the chomp command is chomp($variable). Thus,
you can add the line chomp($favnum); to the script immediately after
the line that reads the response from the user. When the chomp
command removes the linefeed, the output changes to reflect this.
BEFORE:
What a coincidence! 111
is my favorite number too.
Maybe we should go out.
AFTER:
What a coincidence!
111 is my favorite
number too.
Maybe we should go
out.
15 53730X Ch15.qxd 3/25/03 9:00 AM Page 257
⁄ Type pico read1 and press
Return.
¤ Type #!/usr/bin/perl –w
and press Return twice.
‹ Type open(INFILE,
"<myfile.txt");, replacing
myfile.txt with the name of
your file, and press Return
twice.
› Type while (<INFILE>) {
and press Return.
ˇ Press the Spacebar four
times, type
print $_; and
press Return, and then type
}.
Y
ou can read any number of files from within a Perl
script. There are also a number of ways to read files in
Perl, the most straightforward being to use the open
command with the name of the file as an argument. For
example, to open the file myfile.txt, you can use the
command open(INFILE,"myfile.txt");. This command
opens the file and associates it with the file handle INFILE.
You can also assign the name of the file to a variable
using a command such as $myfile="/Users/user/
myfile.txt"; and then open the file with an open
command such as open(INFILE,$myfile);. If you assign
the filename at the beginning of the script, your script is
easier to modify later.
You can also open a file explicitly for reading by using a <
symbol within your open command. For example, you can
use the command open(INFILE,"<myfile.txt");. This
is good practice if you want to ensure that the files that you
read are preserved, as it opens the file only for reading, and
disallows any write operations.
Just as the < symbol indicates that a command is opening a
file for reading, the > symbol indicates that a command is
opening a file for writing. Using the > symbol indicates that
a command is opening a file for appending. In other words,
you write from the end of the file, preserving the current
contents of the file.
To be sure that your scripts do not malfunction when input
files do not exist or are unreadable, you can add an or
die clause to your open command. The command
open(INFILE,"<myfile.txt") or die "Cannot
open myfile.txt for reading"; displays the
cautionary message if the input file is unreadable, and exits
the script.
READ FILES WITH PERL
UNIX FOR MAC
258
READ FILES WITH PERL
15 53730X Ch15.qxd 3/25/03 9:00 AM Page 258
Á Save your script, and exit
Pico.
‡ Type chmod a+x followed
by a space.
° Type read1 and press
Return.
· Type ./read1 and press
Return.
■ Your script runs,
displaying each line in
the file to your screen.
WORK WITH PERL
15
Another way to read files in Perl is to use backticks. For example,
if you want to read the contents of a file into an array, you can
use a command such as @lines=`cat myfile.txt`;. This
command runs the cat command, collects the output, and stores
each line in that output as an element in the array @lines. While
this operation is as simple as the more formal open commands, it
also involves more overhead — especially for very large files — as
it stores the data it reads into memory. When the operation reads
a file one record at a time, it stores one record at a time.
Backticks are a good way to get information from your system.
For example, if your script needs to use the current date, you can
assign the date to a variable using a line such as $date=`date
+%m%d%y`;. This command stores a date of the form 05/01/03 to
the $date variable. You can then use this variable to name output
files or to add records with a date stamp to a file you are creating.
For example, you can open an output file with a command such
as open(OUTFILE,">myfile.$date");.
259
15 53730X Ch15.qxd 3/25/03 9:00 AM Page 259
⁄ Type pico write1 and press
Return.
¤ Type #!/usr/bin/perl –w
and press Return twice.
‹ Type open(INFILE, "<my
file.txt"); and press Return,
then type
open(OUTFILE,
">myfile.out"); and press
Return twice, then type
$counter=0; and press
Return twice.
› Type while (<INFILE>) {
and press Return, type
$counter++; and press
Return again, then type
OUTFILE "$counter: $_"; and
press Return, and then type
}.
ˇ Save your script, and exit
Pico.
Á Type chmod a+x followed
by a space.
‡ Type write1 and press
Return.
° Type ./write1 and press
Return.
■ Your script runs, creating
the output file.
Y
ou can write files with Perl as easily as you can
read files with Perl. In fact, the command for opening
a file for writing is almost the same as that for
opening a file for reading. The command open(OUTFILE,
">myfile.out") or die "Cannot open myfile.out
for writing"; attempts to open the specified file for
writing and exits the script if this cannot be done. Changing
the > symbol to the >> symbol appends any subsequent
output to the file instead of overwriting it.
After a file is open for writing, you can use the print
command to write to it. While a command such as print
"Maybe we should go out\n"; prints to the screen,
the same line with an additional argument — print
OUTFILE "Maybe we should go out\n"; — writes
the line to the output file.
If you write text that does not contain linefeeds, you will
not have separate lines in your output file. The print
operation does not add linefeeds whether it is writing to
the screen or to a file.
When you are finished writing to a file or reading from a file,
you can close the file. The close command is very similar
to the open command except that you only need to use the
file handle, and you do not need to specify the filename. For
example, if you want to close the file associated with the file
handle OUTFILE, you type the command close OUTFILE;
and the file closes and is no longer available for reading.
If you are creating a temporary file and you want to remove
it when you finish with it, you can use the unlink
command in place of the close command. The unlink
command removes the file from the file system.
WRITE FILES WITH PERL
UNIX FOR MAC
260
USE A WHILE LOOP
15 53730X Ch15.qxd 3/25/03 9:00 AM Page 260
⁄ Type pico hrs2 and press
Return.
¤ Type $log="time.log";
and press Return, then type
$date=`date +%y%m%d`;
chomp($date); and press
Return, and then type
$tothrs=0; and press
Return twice.
‹ Type foreach $day (
Mon,Tue,Wed,Thu,Fri ) { and
press Return, and then type
print "hours worked on $day>
"; and press Return again.
› Type $hrs = <STDIN>;
and press Return, then type
$tothrs = $tothrs + $hrs; and
press Return again, and then
type
} and press Return again.
ˇ Type open(LOG,">>$log);
and press Return, then type
print LOG "$date: $tothrs
hours\n"; and press Return
again, and then type
close
LOG; and save your file.
Á Type perl hrs2 and press
Return.
‡ Type a number, and press
Return for each prompt.
° Type cat time.log and
press Return.
■ Your script runs, appending
the output to the output file.
■ Your log file appears.
WORK WITH PERL
15
One of the advantages of using Perl
over other scripting languages is that
it allows you to read and write any
number of files at the same time.
For each file that you want to use,
you type an open command, specify
the filename, indicate whether you
are opening the file for reading,
writing, appending, or both reading
and writing, assign a file handle, and
write records to the file. When you
are done, you type a close or an
unlink command.
For readability, your file handles should be
meaningful. If you use a temporary file, calling it
TMP or TMP1 makes it clear to anyone reading
your code that you do not intend to preserve the
file. If you use temporary files, you must always
remember to unlink them when you are done;
otherwise, your script may not run the next time
you try to use it because it may not be able to
open a file that already exists. In addition, scripts
that leave unnecessary files behind when they
finish running create clutter in your file system.
Giving temporary files random names, such as
myfile$$, reduces conflict over filenames.
261
USE A FOREACH LOOP
15 53730X Ch15.qxd 3/25/03 9:00 AM Page 261
⁄ In a browser Address
window, enter
search.cpan.org
and press Return.
¤ Enter the name of a Perl
module, such as
Net::Telnet,
in the search window and
click CPAN Search.
P
erl modules are collections of reusable code that can
make your Perl programs more powerful and easier
to maintain by downloading and installing Perl
modules. Perl modules are meant to be used in other
programs using statements such as use Net::Telnet; that
make these procedures accessible in your own Perl scripts.
Perl modules are well designed and well documented and
can save you a lot of programming effort.
The best place to begin your search for a Perl module that
meets your needs is search.cpan.org. When you go to this
site, you can enter a name into the search field if you know
the name of the module that you want or you can search by
category.
In the process of downloading your module, you should
take advantage of the online documentation available for
your module. This documentation will provide instructions
and examples of how the module can be used. After you
click on the link that takes you to the page describing the
module you want, you can scroll down the page to find a
description of the module along with information on usage,
debugging, parameters, and more.
There are many Perl libraries and modules already installed
on your system. You can list the installed modules with the
command find/System/LibraryPerl –name "*.pm"
–print. This directory even includes a module for making
the process of downloading other Perl modules from CPAN
even easier. You can look at CPAM.pm or read about this on
the CPAN Web site to find out more.
INSTALL PERL MODULES
UNIX FOR MAC
262
INSTALL PERL MODULES
15 53730X Ch15.qxd 3/25/03 9:00 AM Page 262
■
Your search results appear.
‹
Click the module name if
more than one matches your
request.
Note: You may have to scroll down to
find your match.
›
Scroll down the page to
read about the module, or
print this page for later
reference.
ˇ
Right-click the Source link
in the page.
WORK WITH PERL
15
Before you can use a Perl module in your script,
you must load it with the use command. The
command use diagnostics; loads the module
diagnostics.pm from your /System/Library/Perl
directory. The command use Net::Telnet;
loads /System/Library/Perl/Net/Telnet.pm.
You can also build your own Perl modules. If you
develop Perl code that may be used in many
scripts or by many users, you may want to turn
the reusable code into a module and install it
into the /System/Library/Perl directory.
You must use the package command to
create Perl modules, and you must organize
them as subroutines, and name them with the
file extension .pm. Construction of a module
also requires the use of commands to export
items that you create in the module. For more
information about creating Perl modules, you
can consult Perl: Your visual blueprint for
building Perl scripts, by Paul Whitehead.
263
CONTINUED
15 53730X Ch15.qxd 3/25/03 9:00 AM Page 263