A Guide to MATLAB for Beginners and Experienced Users phần 3 docx
Bạn đang xem bản rút gọn của tài liệu. Xem và tải ngay bản đầy đủ của tài liệu tại đây (328.33 KB, 32 trang )
Functions and Expressions
49
In MATLAB, an expression can belong to either the string or the symbolic class
of data. Consider the following example.
>> f = ’xˆ3 - 1’;
>> f(7)
ans =
1
This result may be puzzling if you are expecting f to act like a function. Since f is a
string, f(7) denotes the seventh character in f, which is 1 (the spaces count). Recall
that, like symbolic output, string output is not indented from the left-hand margin.
This is a clue that the answer above is a string (consisting of one character), not a
floating-point number. Typing f(5) would yield - and f(-1) would produce an
error message.
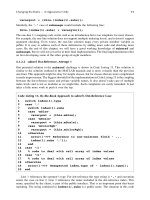
You have learned three ways to define your own functions, using @ to create an
anonymous function, using inline (see Chapter 2 for these), or using an M-file (see
Chapter 3). Anonymous or inline functions are most useful for defining simple func-
tions that can be expressed in one line and for turning the output of a symbolic com-
mand into a function. Function M-files are useful for defining functions that require
several intermediate commands to compute the output. Most MATLAB commands
are actually M-files, and you can peruse them for ideas to use in your own M-files –
to see the M-file for, say, the command mean you can enter type mean. See also
More about M-files below.
Some commands, such as ode45 (a numerical ordinary differential equation
(ODE) solver, which we use later in Chapter 10), require their first argument to be
a function – to be precise, either an inline function (as in ode45(f, [0 2], 1))
or a function handle, that is, the name of a built-in function or a function M-file pre-
ceded by the special symbol @ (as in ode45(@func, [0 2], 1)). The @ syntax
was introduced in MATLAB 6; in earlier versions of MATLAB, the substitute was to
enclose the name of the function in single quotes to make it a string. But with or with-
out quotes, typing a symbolic expression as the first input to ode45 gives an error
message. On the other hand, most symbolic commands require their first argument to
be either a string or a symbolic expression, not a function.
An important difference between strings and symbolic expressions is that MAT-
LAB automatically substitutes user-defined functions and variables into symbolic ex-
pressions, but not into strings. (This is another sense in which the single quotes you
type around a string suppress evaluation.) For example, if you type
>> h = @(t) tˆ3; int(’h(t)’, ’t’)
Warning: Explicit integral could not be found.
> In sym.int at 58
In char.int at 9
ans =
int(h(t),t)
then the integral cannot be evaluated because within a string h is regarded as an un-
known function. But if you type
50
Chapter 4. Beyond the Basics
>> syms t, int(h(t), t)
ans =
1/4*tˆ4
then the previous definition of h is substituted into the symbolic expression h(t)
before the integration is performed.
Substitution
In Chapter 2 we described how to create an anonymous or inline function from an
expression. You can then plug numbers into that function, to make a graph or table
of values for instance. But you can also substitute numerical values directly into an
expression with subs. See the subsection Substituting in Symbolic Expressions in
Chapter 2 for instructions.
More about M-Files
Files containing MATLAB statements are called M-files. There are two kinds of
M-files: function M-files, which accept arguments and produce output, and script M-
files, which execute a series of MATLAB statements. In Chapter 3 we created and
used both types. In this section we present additional information on M-files.
Variables in Script M-Files
When you execute a script M-file, the variables you use and define belong to your
Workspace; i.e., they take on any values you assigned earlier in your MATLAB ses-
sion, and they persist after the script has finished executing. Consider the following
one-line script M-file, called scriptex1.m:
u = [1 2 3 4];
Typing scriptex1 assigns the given vector to u but displays no output. Now con-
sider another script M-file, called scriptex2.m:
n = length(u)
If you have not previously defined u, then typing scriptex2 will produce an error
message. However, if you type scriptex2 after running scriptex1, then the
definition of u from the first script will be used in the second script and the proper
output n=4will be displayed.
If you don’t want the output of a script M-file to depend on any earlier computa-
tions in your MATLAB session, put the line clear all near the beginning of the
M-file, as we suggested in Structuring Script M-files in Chapter 3.
Variables in Function M-Files
The variables used in a function M-file are local, meaning that they are unaffected
by, and have no effect on, the variables in your Workspace. Consider the following
Complex Arithmetic
51
function M-file, called sq.m:
function z = sq(x)
% sq(x) returns the square of x.
z = x.ˆ2;
Typing sq(3) produces the answer 9, whether or not x or z is already defined in your
Workspace. Running the M-file neither defines them, nor changes their definitions if
they have been previously defined.
Structure of Function M-Files
The first line in a function M-file is called the function definition line; it specifies
the function name, as well as the number and order of input and output arguments.
Following the function definition line, there can be several comment lines that begin
with a percent sign %. These lines are called help text and are displayed in response
to the command help. In the M-file sq.m above, there is only one line of help text;
it is displayed when you type help sq. The remaining lines constitute the function
body; they contain the MATLAB statements that calculate the function values. In
addition, there can be comment lines (lines beginning with %) anywhere in an M-file.
All statements in a function M-file that normally produce output should end with a
semicolon to suppress the output.
Function M-files can have multiple input and output arguments. Here is an exam-
ple, called polarcoordinates.m, with two input and two output arguments.
function [r, theta] = polarcoordinates(x, y)
% polarcoordinates(x, y) returns the polar coordinates
% of the point with rectangular coordinates (x, y).
r = sqrt(xˆ2 + yˆ2);
theta = atan2(y,x);
If you type polarcoordinates(3,4), only the first output argument is returned
and stored in ans; in this case, the answer is 5. To see both outputs, you must assign
them to variables enclosed in square brackets:
>> [r, theta] = polarcoordinates(3,4)
r=
5
theta =
0.9273
By typing r = polarcoordinates(3,4) you can assign the first output argu-
ment to the variable r, but you cannot get only the second output argument; in fact,
typing theta = polarcoordinates(3,4) will still assign the first output, 5,
to theta.
Complex Arithmetic
MATLAB does most of its computations using complex numbers; i.e., numbers of
the form a + bi, where i =
√
−1, and a and b are real numbers. The complex
52
Chapter 4. Beyond the Basics
number i is represented as i in MATLAB. Although you may never have occasion to
enter a complex number in a MATLAB session, MATLAB often produces an answer
involving complex numbers. For example, many polynomials with real coefficients
have complex roots.
>> solve(’xˆ2 + 2*x + 2 = 0’)
ans =
-1+i
-1-i
Both roots of this quadratic equation are complex numbers, expressed in terms of
the number i. Some common functions also return complex values for certain values
of the argument.
>> log(-1)
ans =
0 + 3.1416i
You can use MATLAB to do computations involving complex numbers by entering
numbers in the form a + b*i.
>> (2 + 3*i)*(4 - i)
ans =
11.0000 + 10.0000i
Complex arithmetic is a powerful and valuable feature. Even if you don’t intend
to use complex numbers, you should be alert to the possibility of complex-valued
answers when evaluating MATLAB expressions.
More on Matrices
In addition to the usual algebraic methods of combining matrices (e.g., matrix multi-
plication), we can also combine them element-wise. Specifically, if A and B are the
same size, then A.*B is the element-by-element product of A and B, i.e., the matrix
whose i, j element is the product of the i, j elements of A and B. Likewise, A./B
is the element-by-element quotient of A and B, and A.ˆc is the matrix formed by
raising each of the elements of A to the power c. More generally, if f is one of the
built-in mathematical functions in MATLAB, or is a user-defined vectorized function,
then f(A) is the matrix obtained by applying f element-by-element to A. See what
happens when you type sqrt(A), where A is the matrix defined at the beginning of
the Matrices section of Chapter 2.
Recall that x(3) is the third element of a vector x. Likewise, A(2,3) represents
the 2, 3 element of A, i.e., the element in the second row and third column. You
can specify submatrices in a similar way. Typing A(2,[2 4]) yields the second
and fourth elements of the second row of A. To select the second, third, and fourth
elements of this row, type A(2,2:4). The submatrix consisting of the elements in
rows 2 and 3 and in columns 2, 3, and 4 is generated by A(2:3,2:4). A colon
More on Matrices
53
by itself denotes an entire row or column. For example, A(:,2) denotes the second
column of A,andA(3,:) yields the third row of A.
MATLAB has several commands that generate special matrices. The commands
zeros(n,m) and ones(n,m) produce n ×m matrices of zeros and ones, respec-
tively. Also, eye(n) represents the n × n identity matrix.
Solving Linear Systems
Suppose that A is a non-singular n × n matrix and b is a column vector of length
n. Then typing x = A\b numerically computes the unique solution to A*x=b.
Type help mldivide for more information.
If either A or b is symbolic rather than numerical, then x = A\b computes the
solution to A*x = b symbolically. To calculate a symbolic solution when both in-
puts are numerical, type x = sym(A)\b.
Calculating Eigenvalues and Eigenvectors
The eigenvalues of a square matrix A are calculated with eig(A). The command
[U, R] = eig(A) calculates both the eigenvalues and eigenvectors. The eigen-
values are the diagonal elements of the diagonal matrix R, and the columns of U are
the eigenvectors. Here is an example illustrating the use of eig.
>> A = [3 -2 0; 2 -2 0; 0 1 1];
>> eig(A)
ans =
1
-1
2
>> [U, R] = eig(A)
U=
0 -0.4082 -0.8165
0 -0.8165 -0.4082
1.0000 0.4082 -0.4082
R=
100
0-1 0
002
The eigenvector in the first column of U corresponds to the eigenvalue in the first
column of R, and so on. These are numerical values for the eigenpairs. To get sym-
bolically calculated eigenpairs, type [U, R] = eig(sym(A)).
54
Chapter 4. Beyond the Basics
Doing Calculus with MATLAB
Symbolic
MATLAB has in its Symbolic Math Toolbox built-in commands for most of
the computations of basic calculus.
Differentiation
You can use diff to differentiate symbolic expressions, and also to approximate the
derivative of a function given numerically (say by an M-file).
>> syms x, diff(xˆ3)
ans =
3*xˆ2
Here MATLAB has figured out that the variable is x. (See Default Variables at the
end of the chapter.) Alternatively,
>> f = @(x) xˆ3; diff(f(x))
ans =
3*xˆ2
The syntax for second derivatives is diff(f(x), 2), and for nth derivatives,
diff(f(x), n). The command diff can also compute partial derivatives of
expressions involving several variables, as in diff(xˆ2*y, y), but to do mul-
tiple partials with respect to mixed variables you must use diff repeatedly, as in
diff(diff(sin(x*y/z), x), y)). (Remember to declare y and z to be
symbolic.)
There is one instance where differentiation must be represented by the letter D,
namely when you need to specify a differential equation as input to a command. For
example, to use the symbolic ODE solver on the differential equation xy
+1=y,
you enter
>> dsolve(’x*Dy + 1 = y’, ’x’)
ans =
1+x*C1
Integration
MATLAB can compute definite and indefinite integrals. Here is an indefinite integral:
>> int(’xˆ2’, ’x’)
ans =
1/3*xˆ3
As with diff, you can declare x to be symbolic and dispense with the character
string quotes. Note that MATLAB does not include a constant of integration; the
output is a single antiderivative of the integrand. Now here is a definite integral:
Doing Calculus with MATLAB
55
>> syms x, int(asin(x), 0, 1)
ans =
1/2*pi-1
You are undoubtedly aware that not every function that appears in calculus can be
symbolically integrated, and so numerical integration is sometimes necessary. MAT-
LAB has two commands for numerical integration of a function f(x): quad and
quadl. We recommend quadl.
>> hardintegral = int(log(1 + xˆ2)*exp(-xˆ2), x, 0, 1)
Warning: Explicit integral could not be found.
> In sym.int at 58
hardintegral =
int(log(1+xˆ2)*exp(-xˆ2)),x = 0 1)
>> quadl(@(x) log(1 + x.ˆ2).*exp(-x.ˆ2), 0, 1)
ans =
0.1539
➯ The commands quad and quadl will not accept Inf or -Inf as a limit
of integration (though int will). The best way to handle a numerical
improper integral over an infinite interval is to evaluate it over intervals
of increasing length until the result stabilizes.
✓ You have another option. If you type double(int(hardintegral)),
MATLAB uses the Symbolic Math Toolbox to evaluate the integral – even
over an infinite range.
MATLAB can also do multiple integrals. The following command computes the
double integral
π
0
sin x
0
(x
2
+ y
2
) dy dx.
>> syms x y; int(int(xˆ2 + yˆ2, y, 0, sin(x)), 0, pi)
ans =
piˆ2-32/9
Note that MATLAB presumes that the variable of integration in int is x unless you
prescribe otherwise. Note also that the order of integration is as in calculus, from the
“inside out.” Finally, we observe that there is a numerical double-integral command
dblquad, whose properties and use we will allow you to discover from the online
help.
Limits
You can use limit to compute right- and left-handed limits and limits at infinity.
For example, here is lim
x→0
sin(x)/x.
56
Chapter 4. Beyond the Basics
>> syms x; limit(sin(x)/x, x, 0)
ans =
1
To compute one-sided limits, use the ’right’ and ’left’ options. For example:
>> limit(abs(x)/x, x, 0, ’left’)
ans =
-1
Limits at infinity can be computed using the symbol Inf.
>> limit((xˆ4 + xˆ2 - 3)/(3*xˆ4 - log(x)), x, Inf)
ans =
1/3
Sums and Products
Finite numerical sums and products can be computed easily using the vector capabil-
ities of MATLAB and the commands sum and prod. For example,
>> X = 1:7;
>> sum(X)
ans =
28
>> prod(X)
ans =
5040
You can do finite and infinite symbolic sums using the command symsum.To
illustrate, here is the telescoping sum
n
k=1
1
k
−
1
1+k
.
>> syms k n; symsum(1/k - 1/(k + 1)), 1, n)
ans =
-1/(n+1)+1
Here is the well-known infinite sum
∞
n=1
1
n
2
.
>> symsum(1/nˆ2, 1, Inf)
ans =
1/6*piˆ2
Default Variables
57
Another familiar example is the sum of the infinite geometric series:
>> syms a k; symsum(aˆk, 0, Inf)
ans =
-1/(a-1)
Note, however, that the answer is valid only for −1 <a<1.
☞ The command symsum uses the variable
k
as its default variable. See the
section below, Default Variables, for more information.
Taylor Series
You can use taylor to generate Taylor polynomial expansions of a specified degree
at a specified point. For example, to generate the Taylor polynomial up to degree 9 at
x =0of the function sin x,weenter
>> syms x; taylor(sin(x), x, 10)
ans =
x-1/6*xˆ3+1/120*xˆ5-1/5040*xˆ7+1/362880*xˆ9
Note that the command taylor(sin(x), x, 11) would give the same result,
since there is no term of degree 10 in the Taylor expansion of sin x. You can also
compute a Taylor polynomial at a point other than the origin. For example:
>> taylor(exp(x), 4, 2)
ans =
exp(2)+exp(2)*(x-2)+1/2*exp(2)*(x-2)ˆ2+1/6*exp(2)*(x-2)ˆ3
computes a Taylor polynomial of e
x
centered at the point x =2.
The command taylor can also compute Taylor expansions at infinity.
>> taylor(exp(1/xˆ2), 6, Inf)
ans =
1+1/xˆ2+1/2/xˆ4
Default Variables
You can use any letters to denote variables in functions – either MATLAB’s or the
ones you define. For example, there is nothing special about the use of t in the
following, any letter will do as well:
>> syms t; diff(sin(tˆ2))
ans =
2*cos(tˆ2)*t
However, if there are multiple variables in an expression and you employ a MATLAB
command that does not make explicit reference to one of them, then either you must
make the reference explicit or MATLAB will use a built-in hierarchy to decide which
variable is the “one in play.” For example: solve(’x + y = 3’) solves for x,
58
Chapter 4. Beyond the Basics
not y. If you want to solve for y in this example, you need to enter solve(’x
+ y = 3’, ’y’). MATLAB’s default variable for solve is x. If there is no
x in the equation(s) to solve, MATLAB looks for the nearest letter to x (where y
takes precedence over w,butw takes precedence over z, etc.). Similarly for diff,
int, and many other symbolic commands. Thus syms w z; diff w*z yields z
as an answer. On occasion MATLAB assigns a different primary default variable –
for example, the default independent variable for MATLAB’s symbolic ODE solver
dsolve is t, and, as we have noted earlier, the default variable for symsum is k.
This is mentioned clearly in the online help for these commands. If you have doubt
about the default variables for any MATLAB command, you should check the online
help.
✓ Calculations with the Symbolic Math Toolbox are in fact sent by MATLAB
to another program called Maple for processing. The Maple kernel, as it is
called, performs the symbolic calculation and sends the result back to MAT-
LAB. On rare occasions, you may want to access the Maple kernel directly.
In the Professional Version of MATLAB, this can be done with the maple
and mhelp commands. On similarly infrequent occasions, the output of a
symbolic computation may involve functions that either do not exist in MAT-
LAB, or are not properly converted into MATLAB functions. This may cause
problems when you attempt to use the output in other MATLAB commands.
For help in specific situations consult MATLAB help in the Help Browser
and/or Maple help via mhelp.
Chapter 5
MATLAB Graphics
In this chapter we describe more of MATLAB’s graphics commands and the most
common ways of manipulating and customizing graphics. For an overview of com-
mands, type help graphics (for general graphics commands), help graph2d
(for two-dimensional graphics commands), help graph3d (for three-dimensional
graphics commands), and help specgraph (for specialized graphing commands).
We have already discussed the commands plot and ezplot in Chapter 2. We
will begin this chapter by discussing more uses of these commands, as well as some of
the other most commonly used plotting commands. Then we will discuss methods for
customizing and manipulating graphics. Finally, we will introduce some commands
and techniques for creating and modifying images and sounds.
✓ For most types of graphs we describe below, there is a command like plot
that draws the graph from numerical data, and a command like ezplot that
graphs functions specified by string or symbolic input. The latter commands
may be easier to use at first, but are more limited in their capabilities and
less amenable to customization. Thus, we emphasize the commands that plot
data, which are likely to be more useful to you in the long run.
Two-Dimensional Plots
Often one wants to draw a curve in the x-y plane, but with y not given explicitly as
a function of x. There are two main techniques for plotting such curves: parametric
plotting and contour or implicit plotting.
Parametric Plots
Sometimes x and y are both given as functions of some parameter. For example,
the circle of radius 1 centered at (0, 0) can be expressed in parametric form as x =
cos(2πt), y = sin(2πt), where t runs from 0 to 1. Though y is not expressed as a
function of x, you can easily graph this curve with plot, as follows (see Figure 5.1):
>> T = 0:0.01:1;
>> plot(cos(2*pi*T), sin(2*pi*T))
>> axis square
If we had used an increment of only 0.1 in the T vector, the result would have been
a polygon with clearly visible corners. When your graph has corners that shouldn’t
be there, you should repeat the process with a smaller increment until you get a graph
59
60
Chapter 5. MATLAB Graphics
−1 −
0
.
5 0 0
.
5
1
−1
−0.8
−0.6
−0.4
−0.2
0
0.2
0.4
0.6
0.8
1
Figure 5.1. The Unit Circle x
2
+ y
2
=1.
that looks smooth. Here also axis square forces the same scale on both axes;
without it the circle would look like an ellipse.
Parametric plotting is also possible with ezplot. You can obtain almost the
same picture as Figure 5.1 with the command:
>> ezplot(’cos(t)’, ’sin(t)’, [0 2*pi]); axis square
Notice that we used a semicolon after the ezplot command, but it did not prevent
the graph from appearing. In general, the semicolon suppresses only text output.
Contour Plots and Implicit Plots
A contour plot of a function of two variables is a plot of the level curves of the
function, i.e., sets of points in the x-y plane where the function assumes a constant
value. For example, the level curves of x
2
+ y
2
are circles centered at the origin, and
the levels are the squares of the radii of the circles. Contour plots are produced in
MATLAB with meshgrid and contour. The command meshgrid produces a
grid of points in a rectangular region, with a specified spacing. This grid is used by
contour to produce a contour plot in the specified region.
You can make a contour plot of x
2
+ y
2
as follows (see Figure 5.2):
>> [X Y] = meshgrid(-3:0.1:3, -3:0.1:3);
>> contour(X, Y, X.ˆ2 + Y.ˆ2); axis square
You can specify particular level sets by including an additional vector argument
to contour. For example, to plot the circles of radius 1,
√
2,and
√
3, type
>> contour(X, Y, X.ˆ2 + Y.ˆ2, [1 2 3])
The vector argument must contain at least two elements, so, if you want to plot a
Two-Dimensional Plots
61
−
3
−2 −1
0
1 2
3
−3
−2
−1
0
1
2
3
Figure 5.2. Contour Plot of x
2
+ y
2
.
single level set, you must specify the same level twice. This is quite useful for implicit
plotting of a curve given by an equation in x and y. For example, to plot the circle of
radius 1 about the origin, type
>> contour(X, Y, X.ˆ2 + Y.ˆ2, [1 1])
Or to plot the lemniscate x
2
− y
2
=(x
2
+ y
2
)
2
, rewrite the equation as
(x
2
+ y
2
)
2
− x
2
+ y
2
=0
and type (see Figure 5.3)
>> [X Y] = meshgrid(-1.1:0.01:1.1, -1.1:0.01:1.1);
>> contour(X, Y, (X.ˆ2 + Y.ˆ2).ˆ2 - X.ˆ2 + Y.ˆ2, [0 0])
>> axis square
>> title(’The lemniscate xˆ2-yˆ2=(xˆ2+yˆ2)ˆ2’)
☞ In this case, we used ˆ to produce exponents in the title. You can also use _
for subscripts, and to produce a Greek letter, precede its name with a back-
slash – for example, \theta. Type doc title and look under “Exam-
ples” for other tricks with titles; these features also apply to labeling com-
mands like xlabel and ylabel. For more on annotating graphs, see the
section Customizing Graphics later in this chapter.
You can also do contour plotting with the command ezcontour, and implicit
plotting of a curve f (x, y)=0with ezplot. In particular, you can obtain almost
the same picture as Figure 5.2 with the command:
>> ezcontour(’xˆ2 + yˆ2’, [-3, 3], [-3, 3]); axis square
and almost the same picture as Figure 5.3 with the command:
62
Chapter 5. MATLAB Graphics
The lemniscate x
2
−y
2
=(x
2
+y
2
)
2
−1 −
0
.
5 0 0
.
5
1
−1
−0.8
−0.6
−0.4
−0.2
0
0.2
0.4
0.6
0.8
1
Figure 5.3. A Lemniscate.
>> ezplot(’(xˆ2 + yˆ2)ˆ2 - xˆ2 + yˆ2’,
[-1.1, 1.1], [-1.1, 1.1]); axis square
Field Plots
The MATLAB routine quiver is used to plot vector fields or arrays of arrows.
The arrows can either be located at equally spaced points in the plane (if x-and
y-coordinates are not given explicitly), or they can be placed at specified locations.
Sometimes some fiddling is required to scale the arrows so that they don’t come out
looking too big or too small. For this purpose, quiver takes an optional scale-factor
argument. The following code, for example, plots a vector field with a “saddle point,”
corresponding to a combination of an attractive force pointing toward the x-axis and
a repulsive force pointing away from the y-axis. The output is shown in Figure 5.4.
>> [x, y] = meshgrid(-1.1:0.2:1.1, -1.1:0.2:1.1);
>> quiver(x, -y); axis equal; axis off
Three-Dimensional Plots
MATLAB has several routines for producing three-dimensional plots.
Curves in Three-Dimensional Space
For plotting curves in 3-space, the basic command is plot3. It works like plot,
except that it takes three vectors instead of two, one for the x-coordinates, one for the
Three-Dimensional Plots
63
Figure 5.4. A Vector-Field Plot of (x, −y).
y-coordinates, and one for the z-coordinates. For example, we can plot a helix with
>> T = -2:0.01:2;
>> plot3(cos(2*pi*T), sin(2*pi*T), T)
−1
−0.5
0
0.5
1
−1
−0.5
0
0.5
1
−2
−1
0
1
2
Figure 5.5. The Helix x = cos(2πz), y = sin(2πz).
There is also a three-dimensional analog to ezplot called ezplot3; you can
instead plot the helix in Figure 5.5 with
>> ezplot3(’cos(2*pi*t)’, ’sin(2*pi*t)’, ’t’, [-2, 2])
64
Chapter 5. MATLAB Graphics
Surfaces in Three-Dimensional Space
There are two basic commands for plotting surfaces in 3-space: mesh and surf.The
former produces a transparent “mesh” surface, the latter an opaque shaded one. There
are two different ways of using each command, one for plotting surfaces in which the
z-coordinate is given as a function of x and y, and one for parametric surfaces in
which x, y,andz are all given as functions of two other parameters. Let us illustrate
the former with mesh and the latter with surf.
To plot z = f(x, y), one begins with a meshgrid command as in the case of
contour. For example, the “saddle surface” z = x
2
− y
2
can be plotted with
>> [X,Y] = meshgrid(-2:0.1:2, -2:0.1:2);
>> Z = X.ˆ2 - Y.ˆ2; mesh(X, Y, Z)
−2
−1
0
1
2
−2
−1
0
1
2
−4
−2
0
2
4
Figure 5.6. The Surface z = x
2
− y
2
.
The resulting graph looks better on the computer screen since MATLAB shades the
surface with a color scheme depending on the z-coordinate. We could have produced
an opaque surface instead by replacing mesh with surf.
There are also shortcut commands ezmesh and ezsurf; you can obtain a result
very similar to Figure 5.6 with
>> ezmesh(’xˆ2 - yˆ2’, [-2, 2, -2, 2])
If one wants to plot a surface that cannot be represented by an equation of the
form z = f(x, y), for example the sphere x
2
+ y
2
+ z
2
=1, then it is better to
parameterize the surface using a suitable coordinate system, in this case cylindrical or
spherical coordinates. For example, we can take as parameters the vertical coordinate
z and the polar coordinate θ in the x-y plane. If r denotes the distance to the z-
axis, then the equation of the sphere becomes r
2
+ z
2
=1,orr =
√
1 − z
2
,andso
Figure Windows
65
x =
√
1 − z
2
cos θ, y =
√
1 − z
2
sin θ. Thus we can produce our plot with
>> [Z, Theta] = meshgrid(-1:0.1:1, (0:0.1:2)*pi);
>> X = sqrt(1 - Z.ˆ2).*cos(Theta);
>> Y = sqrt(1 - Z.ˆ2).*sin(Theta);
>> surf(X, Y, Z); axis square
−1
0
1
−1
−0.5
0
0.5
1
−1
−0.5
0
0.5
1
Figure 5.7. The Unit Sphere x
2
+ y
2
+ z
2
=1.
You can also plot a surface parametrically with ezmesh or ezsurf; you can
obtain a result very similar to Figure 5.7 with
>> ezsurf(’sqrt(1-zˆ2)*cos(t)’,
’sqrt(1-zˆ2)*sin(t)’, ’z’, [0, 2*pi, -1, 1]); axis equal
Notice that we had to specify the t range first because it is alphabetically before z,
even though z occurs before t in the strings we entered. Rather than remember such a
rule, in MATLAB 7 you can enter functions of more than one variable as anonymous
functions, for example @(z,t) sqrt(1-z.ˆ2).*cos(t); then, since you used
z as the first input variable, you would specify its range first.
Figure Windows
So far we have discussed only graphics commands that produce or modify a single
plot. But MATLAB is also capable of opening multiple figure windows or combining
several plots in one figure window. Here we discuss some basic methods for managing
and manipulating figure windows.
66
Chapter 5. MATLAB Graphics
Multiple Figure Windows
When you execute the first plotting command in a given MATLAB session, the graph
appears in a new window labeled “Figure 1”. Subsequent graphics commands either
modify or replace the graph in this window. You have seen that hold on directs
that new plotting commands should add to, rather than replace, the current graph. If
instead you want to create a new graph in a separate window while keeping the old
graph on your screen, type figure to open a new window, labeled “Figure 2”. Al-
ternatively, you can select a New Figure from the File menu in either your main MAT-
LAB window or the first figure window. Subsequent graphics commands will affect
only this window, until you change your current figure again with another figure
command (e.g., type figure(1) to switch the current figure back to “Figure 1”), or
by bringing another figure to the foreground with the mouse. When multiple figure
windows are open, you can find out which is the current one by typing gcf, short for
“get current figure.” Finally, you can delete figure windows in the usual manner with
the mouse, or with the command close; see the online help for details.
The Figure Toolbar
Each figure window has a tool bar underneath its menu bar with shortcuts for several
menu items, including on the left icons for opening, saving, and printing figures. Near
the middle, there are several icons that correspond to items in the Tools menu.
The two icons with plus and minus signs control zooming in and out. Click on
the icon with a plus sign, and then click on a point in your graph to zoom in near that
point. You can click and zoom multiple times; each zoom changes the scale on both
axes by a factor of roughly 2. However, don’t click too fast, because double-clicking
resets the graph to its original state. Clicking on the icon with the minus sign allows
you to zoom out gradually. MATLAB 7 also has an icon in the shape of a hand that
allows you to click and drag the graph to pan both horizontally and vertically within
the current axes. More zooming options are available by right-clicking in the figure
window while zooming, by using the Options submenu of the Tools menu, or by
using the command zoom (see its online help).
Clicking the next icon to the right with the circular arrow allows you to rotate
three-dimensional (3D) graphics. For more 3D effects, select the Camera Toolbar
from the View menu (in MATLAB 6 and higher). You can also change the view-
point with the command view. In particular, the command view(2) projects a
figure into the x-y plane (by looking down on it from the positive z-axis), and the
command view(3) views it from the default direction in 3-space, which is in the
direction looking toward the origin from a point far out on the ray x = −0.5272t,
y = −0.6871t, z =0.5t, t>0.
✓ In MATLAB, any two-dimensional plot can be “viewed in 3D,” and any three-
dimensional plot can be projected into the plane. Thus Figure 5.5 above (the
helix), if followed by the command view(2), produces a circle.
In MATLAB 7, clicking the next icon to the right of the rotate icon enables the
Data Cursor, which allows you to display the coordinates of a point on a curve by
Customizing Graphics
67
clicking on or near the curve. Right-clicking in the figure window gives several op-
tions; changing Selection Style to Mouse Position will allow you to click on an ar-
bitrary point on the curve rather than just a data point. (Remember that the curves
plotted by MATLAB are piecewise-linear curves connecting a finite number of data
points.) This can be useful especially after zooming, because data points may then be
spaced far apart. Another way to get coordinates of a point (in earlier versions as well
as MATLAB 7) is by typing ginput(1) in the Command Window; this allows you
to click on any point in the figure window, not just on a curve. While this gives you
more flexibility, if you want the precise coordinates of a point on a curve, it is best to
use the Data Cursor, because it will always highlight a point on the curve even if you
don’t click exactly on the curve.
Also in MATLAB 7 only, the rightmost icon on the Figure Toolbar opens three
windows surrounding the figure; these are collectively known as Plot Tools, and you
can also open them with the command plottools. You can also control the display
of these three windows – the Figure Palette, the Plot Browser, and the Property Editor
– individually from the View menu. These windows enable various means of editing
figures. Many of these capabilities are also available in the Insert and Tools menus,
and from the Plot Edit Toolbar in the View menu. We will briefly discuss some
editing options in the Customizing Graphics section below, but there are many more
possibilities and we encourage you to experiment with these tools.
✓ In earlier versions of MATLAB, as well as MATLAB 7, more limited editing
capabilities are available by clicking the arrow icon to the right of the print
icon on the Figure Toolbar and then right-clicking in the figure.
Combining Plots in One Window
The command subplot divides the figure window into an array of smaller plots. The
first two arguments give the dimensions of the array of subplots, and the last argument
gives the number of the subplot (counting from left to right across the first row, then
from left to right across the next row, and so on) in which to put the output of the next
graphing command. The following example, whose output appears in Figure 5.8,
produces a 2 × 2 array of plots of the first four Bessel functions J
n
, 0 ≤ n ≤ 3.
>> X = 0:0.05:40;
>> for n = 1:4
subplot(2,2,n)
plot(X, besselj(n - 1, X))
end
✓ In MATLAB you can also create subplots using the Figure Palette, which you
can enable from the View menu or as part of the Plot Tools described above.
✰ Customizing Graphics
☞
This is a more advanced topic; if you wish you can skip it on a first reading.
68
Chapter 5. MATLAB Graphics
0 20 40
−0.5
0
0.5
1
0 20 40
−0.5
0
0.5
1
0
2
0
4
0
−0.5
0
0.5
0
2
0
4
0
−0.5
0
0.5
Figure 5.8. Bessel Functions J
0
(x) (upper left), J
1
(x) (upper right), J
2
(x) (lower
left), and J
3
(x) (lower right).
So far in this chapter, we have discussed some commonly used MATLAB routines for
generating and manipulating plots. But often, to get a more precise result, you need to
customize or edit the graphics these commands produce. In order to do this, you must
understand a few basic principles concerning the way MATLAB stores and displays
graphics. For most purposes, the discussion here will be sufficient. But if you need
more information, you may want to consult one of the books devoted exclusively to
MATLAB graphics, such as Using MATLAB Graphics, which comes free (in PDF
format) with the software and can be accessed in the “Printable Documentation” sec-
tion in the Help Browser (or under “Full Documentation Set” from the helpdesk
in MATLAB 5.3), or P. Marchand & O. Holland, Graphics and GUIs with MATLAB,
3rd ed., Chapman & Hall/CRC, London, 2002.
Once you have created a figure, there are two basic ways to manipulate it. The cur-
rent figure can be modified by typing MATLAB commands in the Command Window,
such as the commands title and axis square that we have already encountered.
Or you can modify the figure with the mouse, using the menus and icons in the figure
window itself. Almost all of the text commands have counterparts that can be exe-
cuted directly in the figure window. So why bother learning both techniques? The
reason is that editing in the figure window is often more convenient, especially when
one wishes to “experiment” with multiple changes, while editing a figure with MAT-
LAB commands in an M-file makes your customizations reproducible. So the true
MATLAB expert uses both techniques. While the text commands generally remain
the same from one version of MATLAB to the next, the figure-window menus and
tools are significantly different in MATLAB 5.3, 6, and 7. All of these versions have
a Property Editor, but it is accessed in different ways. In MATLAB 7, you can open
it with Plot Tools as described above, or from the View menu. In MATLAB 6, select
Customizing Graphics
69
Edit:Current Object Properties In MATLAB 5.3, select File:Property Editor
To modify objects in the figure window with the mouse, editing must be enabled in
that window. In MATLAB 6 and later, you can enable or disable editing by selecting
Tools:Edit Plot or by clicking the arrow icon to the right of the print icon. When
editing is enabled, this arrow icon is highlighted, and there is a check mark next to
Edit Plot in the Tools menu. In several places below we will tell you to click on
an object in the figure window in order to edit it. When you click on the object, it
should be highlighted with small black squares. If this doesn’t happen, then you need
to enable editing.
Annotation
In order to insert labels or text into a plot, you can use the commands text, xlabel,
ylabel, zlabel, and legend, in addition to title. As the names suggest,
xlabel, ylabel,andzlabel add text next to the coordinate axes, legend puts
a “legend” on the plot, and text adds text at a specific point. These commands take
various optional arguments that can be used to change the font family and font size
of the text. As an example, let’s illustrate how to modify our plot of the lemniscate
(Figure 5.3) by adding and modifying text:
>> title(’The lemniscate xˆ2-yˆ2=(xˆ2+yˆ2)ˆ2’, ’FontSize’,
20, ’FontName’, ’Helvetica’, ’FontWeight’, ’bold’)
>> text(0, 0, ’ \leftarrow a node, also an inflection’,
’FontSize’, 12)
>> text(0.2, -0.1, ’point for each branch’, ’FontSize’, 12)
>> xlabel x, ylabel y
The lemniscate x
2
−y
2
=(x
2
+y
2
)
2
← a node, also an inflection
point for each branch
x
y
−1 −0.5 0 0.5 1
−1
−0.8
−0.6
−0.4
−0.2
0
0.2
0.4
0.6
0.8
1
Figure 5.9. The Lemniscate from Figure 5.3 with Annotation and a Larger Title.
70
Chapter 5. MATLAB Graphics
Notice that many symbols (such as the arrow pointing to the left in Figure 5.9) can
be inserted into a text string by calling them with names starting with \. (If you’ve
used the scientific typesetting program T
E
X, you’ll recognize the convention here.) In
most cases the names are self-explanatory. For example, you get a Greek π by typing
\pi, a summation sign
by typing either \Sigma (for a capital ‘sigma’) or \sum,
and arrows pointing in various directions with \leftarrow, \uparrow,andso
on. For more details and a complete list of available symbols, see the listing for “Text
Properties” in the Help Browser (you can find this listing from the “Search” tab in the
Help Browser, or type doc text and click on “Text Properties” at the bottom of its
page).
✓ In MATLAB 6 and later, you can insert the same types of annotation using the
Insert menu in the Figure Window. In MATLAB 7, many more annotations
are available by enabling the Plot Edit Toolbar, the Figure Palette, and/or the
Property Editor. You can also use the Property Editor to change the font of a
text label; click on the text you want to change, then go to the Property Editor.
Change of Plot Style
Another important way to change the style of graphics is to modify the color or line
style in a plot or to change the tick marks and labeling on the axes. Within a plot
command, you can change the color of a graph, or plot with a dashed or dotted line, or
mark the plotted points with special symbols, simply by adding a string third argument
for every x-y pair. Symbols for colors are ’y’ for yellow, ’m’ for magenta, ’c’ for
cyan, ’r’ for red, ’g’ for green, ’b’ for blue, ’w’ for white, and ’k’ for black.
Symbols for point markers include ’o’ for a circle, ’x’ for a cross, ’+’ for a plus
sign, and ’*’ for a star. Symbols for line styles include ’-’ for a solid line, ’:’ for
a dotted line, ’ ’ for a dashed line. If a point style is given but no line style, then
the points are plotted but no curve is drawn connecting them. (The same methods
work with plot3 in place of plot.) For example, you can produce a solid red sine
curve together with a dotted blue cosine curve, marking all the local maximum points
on each curve with a distinctive symbol of the same color as the plot, as follows:
>> X = (-2:0.02:2)*pi; Y1 = sin(X); Y2 = cos(X);
>> plot(X, Y1, ’r-’, X, Y2, ’b:’); hold on
>> X1 = [-3*pi/2 pi/2]; Y3 = [1 1]; plot(X1, Y3, ’r*’)
>> X2 = [-2*pi 0 2*pi]; Y4 = [1 1 1]; plot(X2, Y4, ’b+’)
>> axis([-7 7 -1.1 1.1])
Here you may want the tick marks on the x-axis located at multiples of π. This can be
done with the command set, which is used to change various properties of graphics.
To apply it to the axes, it has to be combined with the command gca, which stands
for “get current axes.” The code
>> set(gca, ’XTick’, (-2:2)*pi, ’XTickLabel’,
’-2pi|-pi|0|pi|2pi’, ’FontSize’, 16)
in combination with the code above gets the current axes, sets the ticks on the x-axis
to go from −2π to 2π in multiples of π, and then labels these ticks symbolically
Customizing Graphics
71
(rather than in decimal notation, which is ugly here). It also increases the size of the
labels to a 16-point font. The result is shown in Figure 5.10.
−2pi −pi 0 pi 2pi
−1
−0.8
−0.6
−0.4
−0.2
0
0.2
0.4
0.6
0.8
1
Figure 5.10. Two Periods of sin x and cos x.
Incidentally, you might wonder how to label the ticks as −2π, −π, etc., instead of
-2pi, -pi, and so on. This is trickier but you can do it by typing
>> set(gca, ’FontName’, ’Symbol’)
>> set(gca, ’XTickLabel’, ’-2p|-p|0|p|2p’)
since in the Symbol font, π occupies the slot held by p in text fonts.
✓ In MATLAB 7, you can again use the Property Editor to make the same
types of stylistic changes. Click on a curve and go to the Property Editor to
change its style, color, width, etc. In a 3D plot, you can click on a surface
and see options for changing its coloring and other properties. To change the
tick marks, labeling, etc., click on the axes or a blank area inside them to
focus the Property Editor on the axes. In MATLAB 6, click on a curve and
select Edit:Current Object Properties to modify its properties, or select
Edit:Axes Properties to change the font for the tick labels.
Full-Fledged Customization
What about changes to other aspects of a plot? The commands get and set can
be used to obtain a complete list of the properties of the objects in a figure window
and then to modify them. These objects and properties are arranged in a hierarchical
structure, with each object identified by a floating-point number called a handle.If
you type get(gcf), you will “get” a (rather long) list of properties of the current
figure (whose handle is returned by the function gcf). Some of these might read
72
Chapter 5. MATLAB Graphics
Color = [0.8 0.8 0.8]
CurrentAxes = [151.001]
Children = [151.001]
Here Color gives the background color of the plot in red-green-blue (RGB) coordi-
nates, where [0 0 0] is black and [1 1 1] is white; [0.8 0.8 0.8] is light gray. Notice
that CurrentAxes and Children in this example have the same value, the one-
element vector containing the funny-looking number 151.001. This number is the
handle of the current axes, which would also be returned by the command gca (“get
current axes”). The fact that this handle also shows up under Children indicates
that the axes are “children” of the figure, i.e., they lie one level down in the hierar-
chical structure. Typing get(gca) would then give you a list of axis properties,
including the handles of further Children such as Line objects, within which you
would find the XData and YData encoding the actual plot.
➯ In the example above, 151.001 is not the exact value of the axes handle,
just its first few decimal places. So, typing get(151.001) would yield
an error message. To retrieve the exact value of Children in the exam-
ple above, type get(gcf, ’Children’). In many cases, a figure will
have multiple children, in which case this command will return a vector
of handles.
Once you have located the properties you’re interested in, they can be changed
with set. For example,
>> set(gcf, ’Color’, [1 0 0])
changes the background color of the border of the figure window to red, and
>> set(gca, ’Color’, [1 1 0])
changes the background color of the plot itself (a child of the figure window) to yellow
(which in the RGB scheme is half red, half green).
This “one at a time” method for locating and modifying figure properties can be
speeded up using the command findobj to locate the handles of all the descendents
(the main figure window, its children, children of children, etc.) of the current fig-
ure. One can also limit the search to handles containing elements of a specific type.
For example, findobj(’type’, ’line’) hunts for all handles of objects con-
taining a Line element. Once you have located these, you can use set to change
the LineStyle from solid to dashed, etc. In addition, the low-level graphics com-
mands line, rectangle, fill, surface, and image can be used to create new
graphics elements within a figure window.
✓ In MATLAB 7, you can also see and modify a full list of properties for the
figure, axes, or other object using the Property Editor. Click on the object
and then click on the “Inspector ” button in the Property Editor. To select
the figure itself, click on the border of the figure, outside the axes.
As an example of these techniques, the following code creates a chessboard on a
white background, as shown in Figure 5.11.
Images, Animations, and Sound
73
>> white = [1 1 1]; gray = 0.7*white;
>>a=[0110];b=[0011];c=[1111];
>> figure; hold on
>> for k = 0:1, for j = 0:2:6
fill(a’*c + c’*(0:2:6) + k, b’*c + j + k, gray)
end, end
>> plot(8*a’, 8*b’, ’k’)
>> set(gca, ’XTickLabel’, [], ’YTickLabel’, [])
>> set(gcf, ’Color’, white); axis square
Figure 5.11. A Chessboard.
Here white and gray are the RGB codings for white and gray. The double for
loop draws the 32 dark squares on the chessboard, using fill, with j indexing the
dark squares in a single vertical column, with k=0giving the odd-numbered rows,
and with k=1giving the even-numbered rows. Notice that fill here takes three
arguments: a matrix, each of whose columns gives the x-coordinates of the vertices
of a polygon to be filled (in this case a square), a second matrix whose corresponding
columns give the y-coordinates of the vertices, and a color. We’ve constructed the
matrices with four columns, one for each of the solid squares in a single horizontal
row. The plot command draws the solid black line around the outside of the board.
Finally, the first set command removes the printed labels on the axes, and the second
set command resets the background color to white.
✰ Images, Animations, and Sound
MATLAB is also able to create and manipulate full-color images, animations, and
sound files. In addition to the command-line methods described below, you can open