SketchUp 7.1 for Architectural Visualization Beginner''''s Guide phần 8 pps
Bạn đang xem bản rút gọn của tài liệu. Xem và tải ngay bản đầy đủ của tài liệu tại đây (2.11 MB, 42 trang )
Chapter 8
[ 267 ]
3. Now go to the materials pallet and click the In Model tab.
4. Select the thumbnail that corresponds to the 2D tree.
5. Right-click and select Export Texture Image and save it in the same place as your
Kerkythea scene.
6. Now export your scene to Kerkythea as usual.
7. In Kerkythea, right-click the tree material and select Edit Material.
8. This opens the material editor (see the following screenshot).
9. Click Diuse.
10. Click the texture thumbnail under texture editor.
11. Under Clip Mapping, right-click Texture.
Photo-Realisc Rendering
[ 268 ]
12. Select the second icon (Add Bitmap).
13. Select Browse, and nd the image you saved from SketchUp.
14. Click on the thumbnail in texture editor again.
15. Then under Bitmap Opons, ck Alpha Channel. (This opon will only appear when
you click the thumbnail).
16. The large thumbnail (boom le) will now have changed to a black and white image
showing the alpha channel (clip map).
17. Click Apply Changes.
18. Re-render.
19. You should now have xed the problem as you can see here:
Chapter 8
[ 269 ]
What just happened?
2D trees and people are oen created as PNG les with transparency. The transparency
informaon is saved in the form of a channel, called the Alpha channel. Normal images
have just three channels, red, green, and blue. This is just an extra one. All you've done
here is to tell Kerkythea where to nd that Alpha channel, and that you want it to be used
to clip the image. If you want to you can create clip maps manually in GIMP for your
materials. For example, to create holes in a fence.
Have a go hero
Have a go at making a clip map. To do this just make a copy of the texture image and open it
in GIMP. Then create a new black layer and paint white on it wherever you want a hole to be.
Hide the original layer and save it as an image. Then just load the black and white image into
the Clip Map slot in Kerkythea.
Creating bump map materials
Some materials need a bumpy surface to render accurately. You can do this with wood grain,
leather upholstery, and even water. It's the same principle as clip maps, but this me the black
and white image refers to how far the surface is raised. Try these steps to see it in acon.
Time for action
1. In SketchUp draw a cube and apply a le material to each face.
2. Set up shadows and rotate the view so that the shadows are facing towards you.
3. Go to View | Animaon | Add Scene.
4. Export to Kerkythea.
5. In Kerkythea go to Insert | Omnilight. This places an omni-direconal light
at the locaon of the camera (like a headlamp) to light the scene head on.
6. Select the le material and add a high amount specular in the material editor
(say 65%) and set Shininess to 125.
Photo-Realisc Rendering
[ 270 ]
7. Perform a render using Raytracing Low, and you'll get an image like this one:
Noce that whilst the two sides look ne, the top surface with sunlight reecng o it looks
wrong because the specular highlight is uniform (see top right of the box). This is why for
outdoor scenes, where very few materials have specularity, plain at photo textures look
ne without bump. But when you have a shiny, bumpy oor indoors, we need some help!
8. In SketchUp go to the materials pallet and click In Model.
9. Right-click on the le and select Export Texture Image.
10. Save it where you exported your Kerkythea scene.
11. In GIMP, open the image you just saved.
12. In the Layer pallet, select New Layer (boom le).
13. Use the Magic Wand to select the les. Change the Threshold if you need
to. Finding the right value for this is a maer of trial and error unl you
select the whole le as you can see here:
Chapter 8
[ 271 ]
14. Hold down Shi and select the other les too.
15. Select the Paintbucket tool from the main tool pallet.
16. Click the double arrow under the pallet to change the foreground color to white.
17. Click on one of the les to ll the whole selecon with white.
18. Now go to Select | Invert.
19. Click the double arrow again to select black foreground color and use the
Paintbucket again in the selecon.
20. Go to Select | All then Filters | Blur | Gaussian Blur to create a less sudden
gradient from black to white (a less harsh bump eect in Kerkythea).
21. Set Radius to 2 then hit OK.
22. Save the image as a JPG or PNG le. You should have something like this:
23. In Kerkythea add the image to the Bump channel of the oor le material just like
you did for the clip map.
24. Re-render using 02. Raytracing - High +AA and see the dierence!
Photo-Realisc Rendering
[ 272 ]
What just happened?
You just added a black and white image to the bump channel of the oor le material.
This image tells Kerkythea that wherever there is black there should be depressions in
the surface, and white should be raised. Noce how this eect is only noceable on the
surface where highlights exist. The omni light was used as a ll-in light for the sides of the
box which were in shadow. When you insert an omnilight it appears at the posion you're
viewing from.
Pop Quiz
1. Which render seng is a good "one size ts all" seng for quick renders?
2. What does a depth render show?
3. Is it possible to import and update selected parts of a SketchUp model into a
Kerkythea scene without changing the rest?
4. What's the best render preset for a sunlit scene?
5. What seng would you use if a scene has lots of lights and reecve surfaces?
Summary
In this chapter, you've learned how to take the scene you've set up in SketchUp and give
it photo-realisc lighng. This is as easy as exporng the le and clicking Start Render in
Kerkythea because SketchUp exports both Sky and Sun lighng informaon. You learned
a me-saving method of using the right render presets in Kerkythea to preview and change
materials and lighng. You then learned how to tweak SketchUp materials in Kerkythea to
add a lile Specular and Reecon here and there.
You also learned a few more advanced techniques which you can build on:
How to replace or edit SketchUp materials within Kerkythea
How to check and recfy common texturing import problems
How to set up and modify lights in SketchUp and import to Kerkythea
How to quickly check light levels in the scene with Clay Renders
The most eecve render presets for various lighng setups
How to create bump materials in GIMP
How to assign Alpha maps for clip mapping
Chapter 8
[ 273 ]
Now's the me to go away and experiment with your own renders to put these techniques
into pracce. Why not make some great renders of your previous SketchUp projects so you
can show them o and put them in a porolio? Keep this book to hand and dip into it as
and when you need it and don't forget the great help forums at www.kerkythea.net and
www.cgarchitect.com, where you'll be lent a hand.
If you want to look into other rendering soware, I've listed the
ones most commonly used with SketchUp in Appendix A, Rendering
Soware
, along with their main features based on this book's
suggested workow. Many of these have oered discounts to readers;
details can be found at www.provelo.co.uk/renderoffers/
In the next chapter, you'll learn how to further enhance your render by post-processing
with GIMP.
9
Important Compositing and After
Effects in GIMP
In Chapter 8, Photo-Realisc Rendering, you created a photo-real rendering
of your interior or exterior architectural model in Kerkythea. That's a big
achievement! But whatever you do, don't stop there! There are some important
things you need to do to your image before it's truly worthy of your porolio.
Your grandma might think it's lovely as it is, but Sanago Calatrava is not going
to employ you on the strength of unnished work.
In this chapter, you're going to learn the tricks in GIMP which the pro 3D visualizers use.
They probably have Photoshop with all the bells and whistles aached, but we can do it
just as well in GIMP. You'll nd out how GIMP can help you to:
Modify levels to give ultra-realisc lighng
Produce a vignee to draw the eye into your scene
Add bloom to give glow to highlights
Blur foreground or background to simulate camera depth of eld
Add lighng eects in GIMP
Composite several images together to insert your model into real life scenes
It's a lot to cover, so let's get going. You can use some of the scenes you've already created in
earlier chapters.
Important Composing and Aer Eects in GIMP
[ 276 ]
Part 1: Tweaks and lighting levels
Rendered output from Kerkythea is superb. There's no doubt about it. And that's because it's
a physically accurate light simulator. When you click Start Render it res light beams at the
scene and recaptures them in the camera. So, it's really just a digital camera with simulated
digital light. What that means to you and me, apart from the superb results, is that light
levels (saturaon, white balance, and so on) aren't always right, straight out of the box. And
that's where GIMP comes in.
Here's the piano scene you saw in the last chapter, which went on to become the front cover
image. Note the imperfecons which detract from the realism:
Light shades are dull and washed out
No clear contrast between light and dark areas
Daylight quality is somehow unrealisc
Oen when you've done a render you will not be enrely pleased with the result, and won't
know why. This is usually down to something called Levels. Let's have a go at adjusng levels
in GIMP so you can see what they are, and what are their results.
Chapter 9
[ 277 ]
Have a go hero – adjusting levels automatically
There are a lot of ways to x the levels in a rendered image. Some of them are easy, and
these are the ones you should try rst. Aer that you'll look at the more involved way of
doing it, which will usually yield beer results.
1. Open your render in GIMP.
2. For a quick levels x, rst go to Colours | Auto | Equalize.
You can see ve other Auto levels opons on the menu. If Equalize doesn't do it for
your image, hit Edit | Undo and try some of the others on the menu:
White Balance: Corrects photos that have impure white or
black colors
Color Enhance: Colors should come out more vivid without
changing brightness
Normalize: Scans the image and stretches the brightness values
across the full spectrum to make the darkest black, and the
lightest white
Important Composing and Aer Eects in GIMP
[ 278 ]
Stretch Contrast: Same as Normalize but does this for each color
channel independently, so you may nd that colors change
Stretch HSV: Not usually used as the eects can be a bit random
3. Alternavely, if you have access to other image eding soware that's designed
for quick digital photo correcon, try some of the auto-x sengs on those (for
example, Photoshop Elements or Picasa). They tend to be very good and hassle free.
4. The last, and possibly best, way of automacally tweaking levels is to open the
Levels dialogue and click the Auto buon. Do this by going to Colour | Levels.
What just happened?
You found the color sengs in GIMP and tried out a few automac levels tools to see what
they did to your image. A lot of these sengs are to individual taste, but they're all there on
the color menu for you to try out and see what you think. Oen they won't work because
the image has more than one problem. Remember to make use of the Undo History on
the Layers, Channels, Paths, Undo pallet, which can be accessed in the Windows menu,
as you experiment.
Adjusting levels manually
You're now going to learn one of the most powerful and versale image eding techniques
available. Once you get into this method you will not need any one-click presets and you'll be
able to tweak light exactly how you want it. This is worth learning as it will give your images
that extra edge.
Time for action – the levels dialogue
1. Once you have your image open in GIMP, go to Colors | Levels.
2. The levels dialogue box opens. You should see something like this:
Download from Wow! eBook <www.wowebook.com>
Chapter 9
[ 279 ]
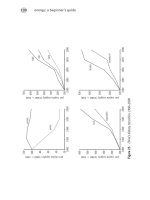
The graph, called a histogram, shows the light values in the image (or layer) from
lightest (to the le) to darkest (on the right). So, as you can see from this histogram,
all the detail in the image is happening in the middle of the graph. The very light and
very dark areas of the graph aren't being used at all. This makes for a very washed
out, low contrast image as you can see from part of the image here:
Important Composing and Aer Eects in GIMP
[ 280 ]
3. Click on the black arrow on the le of the histogram and drag it to the right unl
you hit the base of what looks like a mountain range.
4. Do the same with the white arrow to the right. You can see where I've placed
mine in the histogram shown.
5. Click OK. You will now have corrected the contrast in the image.
Can you see how much clearer this image is?
6. Go to the levels dialogue again and noce the change in the histogram.
It might look a bit like this one:
Chapter 9
[ 281 ]
What just happened?
You took the lighng level informaon contained in the image and stretched the most used
part to t over the enre light range. Noce how the mountain range now ts the enre
area? Each pixel in your image can now have a value of between 0 and 255, whereas before
the image was conned to something like between 14 and 188 (see the rst histogram). By
dragging the white and black arrows you told GIMP to forget the at areas before and aer
the mountain range, enhancing the contrast.
Time for action – adjusting light quantity
1. While you're sll in the levels dialogue, click on the middle arrow and drag it
to the le. The image preview becomes lighter.
2. Now drag it to the right. The preview image becomes darker.
3. Move it where you're happiest and click OK.
What just happened?
The middle arrow controls the Gamma value. This tells GIMP whether to favor the le (light)
or right (dark) side of the histogram. This is the correct way to brighten the image because
none of the actual image informaon is lost. If you close and open the levels dialogue again,
you will see that the histogram has not changed in any way.
Correcting individual color channels
Now comes the really good bit; I hope you're up for a challenge. Did you know that most
digital images are split up into red, green, and blue channels? Using levels you can edit
each of these separately in exactly the same way as before. This will allow you to balance
the light levels out perfectly and get rid of unrealisc color nts, or even introduce some
for your own purposes:
Red: Warmer lighng for interiors
Green: Increase this for leafy outdoor scenes, but it makes interiors look ill
Blue: Increase this for realisc natural light
Important Composing and Aer Eects in GIMP
[ 282 ]
Have a go hero
Noce above the histogram, is a box saying Channel: Value. This means the histogram is
taking the combined value of all the red, green, and blue channels together. If you click in
that box you can select any of the three color channels to edit separately. Do this now and
edit the three arrows for each color separately. Once you've done all three colors, go over
them again unl you're happy with the result. Then before you nish, go back to Value and
give the whole ensemble a nal tweak.
Removing unwanted image noise
Now let's look at the nal render from Chapter 8. If you look carefully, or zoom in to a small
area of the image, you can see a speckled eect.
Chapter 9
[ 283 ]
Grainy images like the one above are the hallmark of progressive render techniques such as
Metropolis Light Transport (MLT) or Path Tracing Progressive, which you will have used for
your nal render in Chapter 8. It can add an appealing lm grain eect a bit like the crackle
on an old vinyl record. But too much crackle and we don't enjoy the performance. If you
master the noise removal technique you will be shown here, you will save bags of render
me, because you don't need to wait for so many render passes.
Time for action – nd a way of removing noise
1. Take your nal render and open it in GIMP.
2. Duplicate the layer by clicking on the buon at the boom of the Layers pallet.
3. Select this duplicate layer.
4. Use Filter | Blur | Gaussian Blur. Try a small radius of say 2-4 pixels.
Important Composing and Aer Eects in GIMP
[ 284 ]
5. Use the Opacity slider (shown in the previous screenshot) to adjust the eect
of this layer on the original image beneath. It's a trade-o between less noise
and more detail.
6. Here's the same area again with Gaussian Blur radius 3, and layer opacity set to 75%.
7. Create a layer mask if you want to block out areas you don't wish to apply the
eect to (go ahead and check back to Chapter 7 if you can't remember how to
do this, though it's not an essenal step here).
8. When you're done, select the upper layer and go to Layers | Merge Down.
9. This makes the change permanent and puts everything back to
one layer ready for you to carry out other image edits.
What just happened?
You created a slightly blurred copy of the image and overlaid it on the original. You then
adjusted the opacity of the blurred layer so that the eect of the layer would reduce or
increase. This way you can ne tune the eect. Geng rid of noise is never perfect. Either
you will lose detail, or you will have a lot of detail but lots of noise. Of course, the alternave
is to go back to Kerkythea and render for longer. Finally, you can also try the Depth of Field
eect which you'll be covering in a few pages. An addional benet of this is also to reduce
image noise.
Chapter 9
[ 285 ]
Do you noce it when you print?
When prinng out your image, oen the noise/grain doesn't
show in the print. So, give it a test print and see, you may be
worrying about nothing!
Have a go hero
A more involved alternave to the quick x you've just learned is to try downloading and
installing the G'MIC plugin for GIMP. You can nd it at />gimp.shtml
. The dialog box within GIMP is shown here:
Important Composing and Aer Eects in GIMP
[ 286 ]
Here's the G'MIC version of our image aer applying the PhotoComiX smoothing lter with
the sengs shown in the previous screenshot.
If you're up for it, download and install the plugin now using the instrucons on the website.
Open your image in GIMP and try some of the lters and sengs unl you get a great result.
If you have some money to spend, Neat Image by ABSo is hard to beat, with
exceponal quality output, speed, and ease of use. You can get a free trail of this
soware at
Light bloom
On bright days the sun puts a halo of light round objects in direct sunlight. You can achieve
this eect easily in GIMP. This is a good way to soen an image, making it more dreamlike.
Time for action
To add some so glow to the edge of lights, take your nal render and just follow these
steps. Let's start with this small area of the nal render:
Chapter 9
[ 287 ]
1. Open it up and create a copy of the image layer in GIMP.
2. Use Gaussian Blur of radius 5-10 depending on how big the image is.
3. Now increase the brightness and contrast of this layer using Colors | Brightness.
Contrast so you have something like this image:
Important Composing and Aer Eects in GIMP
[ 288 ]
4. Set the layer to Hard Light or Lighten Only and adjust the Opacity to
get the eect you want.
5. Go to Layer | Merge Down to x the eect and allow further work on the image.
6. Here's the doctored image. You can see the light "blooms" out rather than having
a sharp edge like before.
7. To see the eect more pronounced take a look at this image rendered in Modo
(there are details of Modo and other renderers in the appendix). Rendering
and texturing is by Ahmed Alireza and modding by Branko Jovanovic.
Chapter 9
[ 289 ]
8. Now that you've spent some me learning that lile trick, why not go back to your
original image and try Filters | Arsc | Soglow and see which version you prefer?
What just happened?
You created a copy of the image over the top of the original one. You blurred and increased
brightness to get a halo eect. Seng the upper layer to Hard Light meant it only changed
the contrast of the layer below. Aer you've nished, use Layer | Merge Down to reduce it
back to a single layer again. This allows us to do some of the other eects more easily. Then
you found out the whole thing can be done automacally with the Soglow lter; such is life.
But you now have two methods—a quick x for the whole image, and a manual one so you
can exactly control the eect in dierent parts of the image using masks.
Simulating depth of eld
This is a technique you'll use all the me. It adds a photographic realism to your image like
nothing else can. Depth of Field is an eect created by the aperture sengs in your camera.
If you have a digital "point and shoot" you probably won't even be aware of it. It basically
means that what you're focused on is sharp, while the foreground and background are
blurred. The reason you might want to see this eect in your renders is because that's the
way we see things through our own eyes. Most things are blurred apart from what we're
focusing on, therefore the focus is a way of drawing aenon to a parcular area or element.
So, let's give it a go. The following three images illustrate this concept:
Important Composing and Aer Eects in GIMP
[ 290 ]
First the render itself. Noce all of it is in focus; you can see the brick paern clearly
on each box.
Here's the depth render. You learned how to produce this in the previous chapter.
And here's the nal image aer the eect was applied in GIMP. You can tell the focus is on
the box in the foreground, because the other two boxes are progressively more blurred.