Manga Studio For Dummies phần 2 potx
Bạn đang xem bản rút gọn của tài liệu. Xem và tải ngay bản đầy đủ của tài liệu tại đây (1.52 MB, 39 trang )
Icon Name Shortcut Description
Marker P Used for inking a drawing.
Eraser E Used to erase a drawing.
Fill G Fills an enclosed area of a drawing
with foreground or background color.
Airbrush B Used to add spattering/noise to a
drawing.
Gradation * G Adds a color gradient to the page.
Pattern Brush B Paints a design pattern onto the page.
Panel Maker F Creates a new panel layer on the page.
Panel Ruler Cutter F Divides a panel into two (used on a
Panel Ruler only).
Text T Adds text to a page.
Join Line J Joins two lines.
Eyedropper * I Samples a screentone for use
elsewhere.
Smooth * ; Smooths/blurs an image.
Dust Cleaner * ; Removes excess particles from a
scanned image.
Width Correction * @ Adjusts the width of a vector line.
Line Lever * @ Adjusts the position of a vector line.
Line Smoother * : Smoothes out a shaky vector line.
* Available in Manga Studio EX only.
21
Chapter 1: Getting to Know Manga Studio
05_129869 ch01.qxp 11/29/07 11:34 AM Page 21
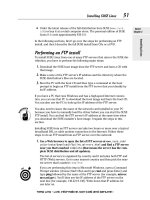
Exploring various palettes
While the Tools palette is probably the one you’ll use the most in Manga
Studio, it isn’t the only one available. When you opened the program for the
first time, you were bombarded with palettes and windows, as shown in Figure
1-5. It’s a lot to weed through at first, but as you get to understand each of
the palettes in the program, you may find them as indispensable as the
Tools palette.
If at any time you’d like to remove some of the clutter from too many palettes
open at once, press the Tab key on your keyboard to hide them all at once.
Press the Tab key again to make them all visible again.
Tool Options
Each tool in Manga Studio is customizable in one way or another. The Tool
Options palette shows you all the options available with the currently selected
tool. This allows you to tweak the tools to your heart’s content, until they’re
set in such a way that they feel as comfortable to use as their real-world
counterparts.
Figure 1-5:
That’s a lot
of palettes
on the
screen.
22
Part I: Welcome to Manga Studio!
05_129869 ch01.qxp 11/29/07 11:34 AM Page 22
Layers
Looking at the Layers palette, you can see a whole slew of layer types that
you can (and probably will) use as you create your pages. The Layers palette
helps to keep all the various layer types organized. This way, you not only
know what layer you’re currently working on, but also keep track of the other
layers and layer types you create. I go over layers in much more detail in
Chapter 6.
Navigator
The Navigator palette works much like the functions available on the Page
toolbar; you can zoom in and out, as well as rotate the page (or enter manual
values for each).
You’ll also notice a miniature representation of your page, as well as a red
rectangle. This allows you to move around the page, much like using the Grab
tool from the Tools palette. All you need to do is click within the rectangle
with your mouse or stylus and drag it around the preview pane. As you can
see, manipulating the preview pane also moves the main page as well. This
is a good way to maneuver around the page without having to switch to the
Grab tool every time you need to adjust its placement.
Tones
The Tones palette is your repository for all the tones that come installed
with your program, as well as any customized tones you create. Each type of
tone available is filed into its own folder. All you need to do is dig into those
folders and find the tone you need! For more information on using tones on
your page, be sure to check out Chapter 11.
Layer Properties
Each layer type in Manga Studio has its own set of properties to go along
with it. The Layer Properties palette shows you all the options available for
that particular type. (Options you can’t adjust are grayed out.) Adjusting
the properties can range from simply renaming the layer, to setting the layer-
specific ruler properties. Chapter 6 covers the various layer properties
available to you, depending on the layer type.
History
The Undo function in Manga Studio is a great way to quickly erase a mistake
you may have just made. But what happens if you need to go back several
steps? You could always undo a few extra times — or if you happen to own
Manga Studio EX, you can take advantage of the History palette.
23
Chapter 1: Getting to Know Manga Studio
05_129869 ch01.qxp 11/29/07 11:34 AM Page 23
The History palette keeps track of a set number of previous actions (which
you can set in the System Preferences of the program) in a list. You just look
through the list to the action you’d like to go back to and click it with your
mouse or stylus. Instantly, you travel back in time to the point you want to
start over from. And you don’t even need a DeLorean to do it!
(Just a quick note to you Manga Studio Debut users out there — the rest of
the palettes are exclusive to the EX version of the program.)
Gray (EX only)
The Gray palette gives you a bit more fine-tuning for the color of your ink
as you’re working on a layer. Much like the opacity setting determines how
opaque or transparent a layer can be, the Gray palette adjusts how dark or
light a shade of gray you’d like to work in.
This is useful for those who like to work loosely and lightly with their pencils
and then go back and refine the work with a darker pencil. If you don’t want
to create a brand-new layer for the tight pencils, you can just adjust the grays
as you go along. You can try setting the gray color to a lighter shade for your
loose roughs. Then, when you’re ready to tighten the pencils up, darken the
grays and start refining! It’s a great alternative to those who feel some “life”
from their work is lost when traced on a separate layer.
Materials (EX only)
The Materials palette is your repository for all the various tools and samples
that you can use in your drawing. These include:
ߜ Two-dimensional images that you can use with the 2DLT importing
function (which I explain in Bonus Chapter 2 on the CD).
ߜ Three-dimensional objects that you can use with the 3DLT importing
function (which I explain in Bonus Chapter 2 on the CD).
ߜ Custom Ruler shapes, such as French Curves, Elliptical and Circular
rulers, and others.
ߜ Preset Layer Types, such as a Black Only Raster pen layer.
ߜ Word balloons.
You can place each of these materials on the page by clicking and dragging
it using your mouse or stylus. In addition, you can save your own custom
images, rulers, and layer types in the User folder. I discuss the Materials
palette in a bit more detail in Chapter 15.
24
Part I: Welcome to Manga Studio!
05_129869 ch01.qxp 11/29/07 11:34 AM Page 24
Custom Tools (EX only)
While the Tools palette provides all your important drawing tools, EX users
can take that idea a bit further. The Custom Tools palette allows you to cus-
tomize exactly which tools you want to have at the ready. Don’t want to have
to hold down the Pencil tool in order to switch them? Add all the pencils you
want right onto the palette. Want to quickly access functions without having
to go through a series of nested menus? You can add those as well. There’s
no limit to what you can add!
To help you organize things a bit further, you can switch between custom
sets. If you’d like to have a custom palette of rough work tools and one with
nothing but vector tools, it’s easy to set up and switch. This palette is yet one
more way you can streamline the way you work digitally by quickly accessing
to the tools and functions you use most frequently.
Actions (EX only)
Have you ever run into instances where you find yourself repeating the same
series of functions over and over? It can prove to be quite tedious and boring if
you have to export a series of pages one at a time, for example. If you’re an EX
user, you may find the Actions palette can help relieve you of these doldrums.
Actions (or macros, as they’re often called in other programs) are a series of
recorded commands and functions. What’s special about these actions is that
instead of repeatedly going through a series of steps manually, you can use
actions to quickly perform those steps automatically.
The preinstalled actions can range from automatically setting up the proper-
ties of an imported image to adding an outline to exporting your page for the
Internet. What’s more, you can always record your own actions to use at a
later time. When using the preinstalled actions — or creating your own —
you may find these to be another way to shave a few seconds or minutes off
of your production — time you can then use to focus on more creative things.
25
Chapter 1: Getting to Know Manga Studio
05_129869 ch01.qxp 11/29/07 11:34 AM Page 25
26
Part I: Welcome to Manga Studio!
05_129869 ch01.qxp 11/29/07 11:34 AM Page 26
Chapter 2
Help for the Beginning
(Manga Studio) Artist
In This Chapter
ᮣ Purchasing additional RAM to help your computer while running Manga Studio
ᮣ Purchasing a drawing tablet and/or scanner to help create your art in the program
ᮣ Defining basic comic page terminology
ᮣ Suggesting some storytelling tips
ᮣ Offering additional suggestions for when you feel frustrated with the creative process
T
his chapter is aimed squarely at the new wave of digital artists out there
who pick up this book. Maybe you’re the person who always dreamed
about drawing comics but didn’t know where to begin. Or you could be the
person who received this book and a copy of Manga Studio as a gift (if that’s
the case, Happy birthday/Christmas/Kwanzaa/Chanukah/Festivus/or what-
ever) and aren’t sure where to go from here.
The chapter’s broken down into, I’d say, one-third useful computer hardware
information to help you use Manga Studio and two-thirds (hopefully) useful
suggestions on comics and manga creation and storytelling in general.
Acquiring Useful Tools
I’ll take the leap of faith and assume that you already have a computer run-
ning some flavor of Windows or Mac OS X (sorry, Linux users! You can always
see if the program will run though Wine), or else you probably wouldn’t be
reading this book.
06_129869 ch02.qxp 11/29/07 11:35 AM Page 27
However, there are a few pieces of hardware, both internal to your computer
as well as external, that you may find useful to have. What’s more, you don’t
need to go on a massive spending spree to get them.
You can never have too much RAM!
Appendix A to this book contains the absolute minimum requirements you
need to run Manga Studio on your PC or Mac. It may run a bit
sluggishly, but
it’ll run. So here’s what I suggest you do to make your Manga Studio experience
that much better:
ߜ Buy a new computer! (Just kidding.) The truth is, you don’t need the
latest and greatest machine on the market in order to use Manga Studio.
ߜ Buy more RAM. This is the one piece of equipment that I consider to
be the most vital upgrade for your machine. You can have the fastest
processor possible in your machine, but it doesn’t mean much if you
don’t have enough RAM. And because you’re working primarily in two
dimensions (unless you have Manga Studio EX and are planning on using
the 3DLT import function — see Bonus Chapter 2 on the CD), you really
don’t need an expensive graphics card.
The system requirements suggest a minimum of 256 to 512MB of RAM in your
machine. Some users also suggest that you have at least 1GB. Considering
how relatively inexpensive RAM is nowadays, I suggest maxing your machine
out with as much RAM as it can use. At the
very least, I suggest boosting
your memory up to about 2GB of RAM (if your computer can handle that
much RAM).
You can purchase relatively inexpensive RAM at several Web sites. I happen to
like Newegg (
www.newegg.com) for my computer purchases, but you can also
purchase from RAM manufacturers such as Crucial (
www.crucial.com).
Time to create some art — But with what?
The most important tool to have when working with Manga Studio is your
computer. The
second most important tool is what you use to create the art-
work in the program. If you’re thinking of drawing with the computer itself,
you’re going to need something other than your mouse (unless you’re really
really good). If you’re thinking of finishing up the work you started on paper,
you’re going to need something to get the drawing to the computer, and then
when you’re done, back out of it.
A drawing tablet, scanner, and printer are three tools that I think are just
as important to your Manga Studio experience as the program itself. The
following sections explain why.
28
Part I: Welcome to Manga Studio!
06_129869 ch02.qxp 11/29/07 11:35 AM Page 28
29
Chapter 2: Help for the Beginning (Manga Studio) Artist
A drawing tablet
Drawing with a tablet is much easier than drawing with a mouse. However,
whether you need a drawing tablet depends on what you plan on doing with
Manga Studio. If you’re going to scan your pencil or ink work into the com-
puter and you’re using the program solely to add screentones and do some
touch-up work, you can get by with just your mouse. But unless you’re adept
at drawing with a brick, I wouldn’t suggest trying to use a mouse for
drawing
anything. You’ll find it much easier and you’ll get better results if you draw
with a tablet.
If you’ve never used (or even heard of) one before, a
drawing tablet is a
means of reproducing natural drawing on the computer. It actually works
like a mouse, except that you use a special pen on a drawing surface that’s
connected to your computer. Unlike a mouse, the pen has
pressure sensitivity.
(That is, the line size and/or opacity of the line you’re drawing increase and
decrease, depending on how lightly or heavily you press the pen tip on the
tablet.) So when you draw with a tablet in Manga Studio, the pen and pencil
lines should look like what you’d draw with a normal pencil and paper.
A scanner
If you aren’t planning on doing any digital drawing (or are planning on scan-
ning in one stage of the process and finishing the rest with a drawing tablet),
a scanner is
the piece of equipment (outside of the computer itself) that you
need to own. It’s the only way you’re going to get your pencil or pen work
into Manga Studio.
A printer
I think that if you’re looking to create a physical comic book for your family
and friends to read, the easiest and simplest method is to print it, fold it in
half, and staple it together. In one of the more obvious statements you’ll read
in this book, in order to do that, you’re going to need a decent printer.
Odds are that you probably already have a printer. If you don’t, you can
get a relatively inexpensive one from your local office supply or electronics
supply stores. Because Manga Studio produces black-and-white art, you
don’t necessarily need to worry about the most photorealistic color printer
on the market. But you should look into a printer that prints at a
high resolu-
tion
. (That is, the more dots that can fit in an inch, the sharper the line art
looks.) You can purchase good quality laser or inkjet printers without putting
a large dent in your wallet at your local office supply store.
You also need to look into paper that doesn’t cause the ink to bleed together,
resulting in a messy looking page. Fortunately, most regular typing paper
should work just fine.
06_129869 ch02.qxp 11/29/07 11:35 AM Page 29
Understanding the Essentials
of Comic Creation
While the following subsections can apply to Manga Studio, they cover the
art of manga and comic creation in a more general (and abbreviated) sense. I
guess you could call this section Sequential Art 101.
Basic terminology
Over the course of the book, I throw around a lot of comic terminology. Some
terms you may be familiar with, others may be new. I even try to throw in a
few terms that I think you should be familiar with in general, as you’re going
to encounter them as you go along on your artistic career. (And you’ll defi-
nitely encounter them as you work in Manga Studio.)
ߜ Panel: Where the magic takes place. These tiny (and not so tiny) boxes
of various shapes and sizes contain all the action and dialogue of a
scene. (See Figure 2-1.)
ߜ Gutter: The white (or black) space between panels, columns, and the
inner margins between two facing pages. (See Figure 2-1.)
ߜ Bleed: A panel that extends all the way to the edge of a page. (See
Figure 2-2.) When the pages are cut after being printed on, any art
extending into the bleed is cut off. This makes the panel extend to
the edges of the finished pages.
Panels
Gutters
Figure 2-1:
Manga and
comic
pages are
comprised
of panels
and gutters.
30
Part I: Welcome to Manga Studio!
06_129869 ch02.qxp 11/29/07 11:35 AM Page 30
ߜ Trim: When you work on pages that will be printed by a professional
printer, consider a small area around each page disposable. The
trim
is the area that is cut after the pages are printed — anything past the
trim is lost.
ߜ Safe area: The area of the page that’s in no danger of getting trimmed
by the printer. It’s suggested that you keep all of the dialogue and most
important artwork inside this area.
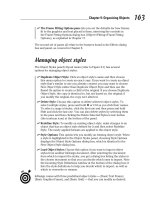
ߜ Spreads: Art that spans over two pages in a book. (See Figure 2-3.)
ߜ Layout: Usually a very rudimentary sketch placing what you want on the
page, including the number of panels and the basic action you want to
show in each. (See Figure 2-4.)
Figure 2-3:
You can
really get
your
reader’s
attention
with a two-
page
spread.
Bleed panel
Figure 2-2:
A bleed
panel
extends all
the way to
the edge of
a page.
31
Chapter 2: Help for the Beginning (Manga Studio) Artist
06_129869 ch02.qxp 11/29/07 11:35 AM Page 31
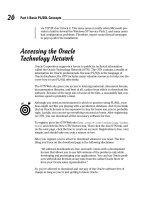
ߜ Roughs: A term for the unrefined pencil or pen sketches that you use to
get a “rough” idea of how you want the page to look. Roughs tend to be
more detailed than layouts but can still be pretty messy, compared to
the final work. (See Figure 2-5.)
ߜ Loose pencils: Very rough pencil sketches. You aren’t worried about
the sketch being clean — you’re more focused on getting the general
“feel” of what you want to draw on the page. (See the leftmost image in
Figure 2-6.)
ߜ Tightened pencils: Cleaner, more refined pencil work. These tend to
look more refined than loose pencil work. (See the middle image in
Figure 2-6.)
ߜ Screentones: Tiny dots that are used in black-and-white artwork to
depict shades of gray. (See Figure 2-7.) Screentones are featured quite
heavily in manga and some independent comics.
ߜ Breaking the border: This refers to panels where a figure or object
“breaks” beyond its borders. This causes the illusion that the figure is
“popping” out of the confines of the page. (See Figure 2-8.)
Figure 2-4:
You use
layouts to
get a basic
idea of the
page down
on paper.
And I mean
basic
.
32
Part I: Welcome to Manga Studio!
06_129869 ch02.qxp 11/29/07 11:35 AM Page 32
ߜ Establishing shot: A panel that depicts where the scene you’re drawing
is taking place. It gives the reader an anchor of sorts. This can be a city
skyline, a country meadow, or the exterior of a futuristic spaceship
flying through space. (See Figure 2-9.)
Figure 2-6:
The
difference
between
loose
pencils
(left), tight
pencils
(middle),
and line
work (right).
Figure 2-5:
Roughs add
some detail
to the
layouts but
can still be
pretty
messy.
33
Chapter 2: Help for the Beginning (Manga Studio) Artist
06_129869 ch02.qxp 11/29/07 11:35 AM Page 33
Artwork courtesy Jason Masters (character
©Brandon Thomas and Jason Masters)
Figure 2-8:
A character
popping out
of a panel is
“breaking
the border.”
Figure 2-7:
Screentones
are heavily
featured in
manga.
34
Part I: Welcome to Manga Studio!
06_129869 ch02.qxp 11/29/07 11:35 AM Page 34
Storytelling basics: It’s
harder than it looks
Drawing comics can be hard. Telling a story can also be hard. Telling a story
in comic book form is extremely difficult. You might be thinking, “What’s he
talking about? I draw panels of people fighting or talking and I’m good to go!”
Actually (while I do love a good fight scene) there’s a bit more to storytelling
than just a series of boxes on a page.
I’m certainly not going to pretend I’m an expert in the field of storytelling. (In
Chapter 16, I mention a few books that you can check out that offer a
much
better and thorough explanation on the subject.) But, I thought I’d mention a
couple of tips that I’ve picked up over the years that you may find useful as
you start working on your first pages.
ߜ Panels aren’t just images in boxes. When I draw (what passes for)
comics or manga, I tend to not think that I’m drawing comics. Instead,
it’s more like I’m storyboarding the scene of a movie. So, as I lay a page
out, I try to think about how the camera would capture what’s going on
in the page.
When working on my own comic, I’ve found that this helps me visualize
how the page should be laid out. (Actually, this helps when I’m working
from someone else’s script as well — just in a more structured “this is
how many panels you’re to draw” way.) By thinking this way, I get a
better feel for how I want to pace the story, where the characters should
be in the scene, how the scene should be lit, and so on. I also know not
to confuse the reader by suddenly switching character positions or
drawing from crazy angles just because I think it looks cool. If it wouldn’t
work in a movie, it probably wouldn’t work in a comic.
Figure 2-9:
An
establishing
shot can
help set up
the scene
on a page.
35
Chapter 2: Help for the Beginning (Manga Studio) Artist
06_129869 ch02.qxp 11/29/07 11:35 AM Page 35
As you start laying out your first pages, try to think about why you
want the page to look a certain way as much as
how you plan on
drawing it. That way, if it makes sense to you, it will make sense to
the reader.
ߜ You’re going to have to draw backgrounds to help the reader under-
stand the scene.
Backgrounds aren’t the easiest things in the world
to draw. They can be downright maddening to work on, especially if
you’re working on something that’s incredibly detailed. It’s much more
fun to draw figures — after all, that’s what the readers will be focusing
on, right?
To a degree, yes — the characters you draw on the page are what entice
the readers to read the comic. But if you don’t give the readers a basis
for where the characters
are, they aren’t going to know the context of
what the characters are doing.
In
Making Comics: Storytelling Secrets of Comics, Manga and Graphic
Novels
(published by Harper Paperbacks), Scott McCloud suggests that
you shouldn’t look at backgrounds as backdrops to a scene. Rather
they’re environments that you’re creating for your characters to live
within. So try not be afraid to draw them, as difficult as they may be.
You don’t want your characters to exist in limbo, do you?
ߜ Take as many pages as you need to tell your story. If you plan on being
the artist for someone else’s book, odds are you’ll get a pretty tight script
telling you exactly how many pages will be in the book and how many
panels per page. If you work on your
own book or webcomic, you get a
bit more freedom.
One of the ways that I feel manga differs from the DC or Marvel comics
of the world is the impression that there is more freedom in the way the
artist tells the story. What an American creator may tell in one or two
pages, a manga artist may tell in ten or twelve. I always felt when reading
certain manga that there was more of a “cinematic” pacing, almost like I
was reading a movie (if that makes any sense).
If you’re planning on creating your own book or webcomic, try not to
feel as though you
have to tell your story within a set number of pages.
It’s your story to tell — tell it however you’d like, with as many (or few)
pages as you want to.
If you decide to become an independent creator, keep in mind that you
have the freedom to use as many panels and pages you want as you work
on your story and eventual layouts. It goes back to the first suggestion I
make in this section: Try treating the comic as though it’s a movie and
you’re the director. You get the chance to tell your story exactly as you
want it to be told.
36
Part I: Welcome to Manga Studio!
06_129869 ch02.qxp 11/29/07 11:35 AM Page 36
A few other odds and ends
you might find useful
These suggestions don’t really have anything to do with Manga Studio. You
don’t need a computer program, or even a
computer, for these tips. For the
beginning artists out there reading this, I can only guess how excited you
must be about hunkering down and getting to work drawing everything that
you have going on in your imagination. As you go along though, you may find
times where this isn’t quite as fun as you thought it would be. I hate to say
it, but it may even feel like
work. You may get frustrated that things aren’t
coming out quite as you want them to. You may, after a while, just decide
to throw your hands up in the air and walk away.
It’s natural. Every artist goes through that at one point or another. I know
I do
on a regular basis. But I try to keep at it, even when I feel like I don’t want to
anymore, and I’m sure you can do the same thing, too. So, in the following
subsections, I compiled a few suggestions and tips you may find useful if you
start to feel frustrated or stressed that things aren’t going quite as well as
you hoped.
Practice!
I used to hate that word, if only because I really hated to actually do it. I found
it extremely mundane and boring, going over something again and again and
again. I just figured that if I drew a figure once, that’s all I needed to do. As
I grew older, I finally started to realize why practice can be a good thing.
The only way to get better is through repetition and practice. Whether it’s
drawing hands, eyes, heads, or buildings, as you repeat the process again
and again, it becomes second nature. Eventually you may get to the point
where you can draw a cityscape or large group of characters without
breaking a sweat.
But you aren’t going to get there unless you keep working away at improving
those skills, and the only way to do it is to go over the process again and
again and again and again and again.
Find your voice
Take a look through some various comics and manga. What’s the one thing
you notice? I’ll bet the major observation is the difference between how
artists draw and/or pace their work. If you look at Ken Akamatsu’s style
(
Love Hina), his work looks nothing at all like Yasuhiro Nightow’s (Trigun),
who’s work in turn is completely different from Jim Lee’s (
All-Star Batman
37
Chapter 2: Help for the Beginning (Manga Studio) Artist
06_129869 ch02.qxp 11/29/07 11:35 AM Page 37
and Robin), who’s art doesn’t look at all like John Romita Jr.’s (World War
Hulk
), who’s style looks absolutely nothing like Joe Madureira’s (Battle
Chasers
).
That’s because each of those artists has found what I call his “voice.” This is
the artistic style that each artist has developed and nurtured over the years.
They took what they learned or admired and built upon it, creating some-
thing uniquely their own, this fueling the next generation of artists to do the
same thing.
There’s nothing wrong with emulating the style of your favorite artist at first.
(Heck, I started out as a Jim Lee clone when I first started drawing comics in
high school.) But if you want to really stand out from the hundreds and thou-
sands of other artists out there (and not be constantly called a “so-and-so
clone”), you’ll eventually need to find the style of drawing manga and comics
that you can truly call your own.
Above all else, as you find your voice, don’t be afraid to take chances. If
you really want to create a unique style, you may have to push your artistic
boundaries in ways you never thought of doing before. Who knows? Maybe
as you grow and mature as an artist, you too will influence someone else to
get into the business. And how cool would it be to say someone is a “clone”
of you?
Look for inspiration
For those times when you feel artistically drained or you feel like you’re
out of ideas, try flipping through some comics, art magazines, or even the
Internet. See what others are doing. You may feel yourself getting jazzed up
just by looking at new and different kinds of comic or non-comic-related art
styles and techniques.
Getting a fresh perspective on how others do their work may help you to look
at your own work in a new light, allowing you to tackle things in a way you
never thought of before. Besides, you may even find you can do a
better job
than what they’ve done, and a little artistic competition is never a bad thing.
Don’t be afraid to use references
When you get stuck on how to draw a particular figure, background, or object
correctly, use a reference image! It could be a photo of your friends acting out
the scene or an image you’ve taken off of the Internet of a cityscape, tank, or
airline jet. Whatever the case may be, using some kind of reference material
as you draw gives your art that much more realism and believability, which
may help your readers become more engrossed in the world you’ve created.
38
Part I: Welcome to Manga Studio!
06_129869 ch02.qxp 11/29/07 11:35 AM Page 38
Accept and learn from criticism
I believe the old saying goes, there are no wrong answers. Well, that’s wrong.
Of
course there are wrong answers! It’s the yang to the yin: You aren’t going
to know or understand what the right answer is if you don’t stumble upon the
wrong answer. It’s probably odd to suggest that there is a wrong way to draw a
manga or comic, when it’s such a subjective genre in and of itself. But as you go
along your artistic journey, you’re going to encounter times when you work on
a piece of art, take a step back, and you (or someone else will) say, “Well,
that
didn’t work at all!”
It happens. Not everything you create can be a touchdown. There will always
be instances when you throw an incomplete pass or worse yet, fumble the
ball. (You can probably tell that football season started at the time of this writ-
ing.) I think, more than anything else in this book, that ground rule needs to be
established because (hopefully) that will help you as you try to push your
artistic boundaries.
Criticism is one of the things that you face when you create art for public view.
For every one person that likes what you make, there’s someone that hates it
and dissects every little nuance that’s “wrong” with what you’ve done. It comes
with the territory. Some are going to be harsher than others, and it can be very
easy to get discouraged when you get a scathing e-mail or message board post
stating that you “stink.”
When that happens, you just pick yourself up, dust yourself off, and decide if
there are any nuggets of information within the criticism that you can use to
learn and improve from. Of course, I could be completely wrong about this.
It’s a marathon, not a sprint
The longer you work on a comic, the more you may become bored and tired
of it. That’s understandable; it’s a grueling and daunting task to crank out
page after page after page. I think that’s why many independent comics out
there don’t seem to go past three or four issues — eventually the creator just
gets bored and decides to stop.
My only suggestion when you feel like you don’t want to do this anymore
is to try to focus on one page or issue at a time. It’s a long, arduous process,
to be sure. But if you can mentally prepare yourself for what could be a very
long road ahead, you may find yourself at the end looking back at all you’ve
accomplished before you know it.
39
Chapter 2: Help for the Beginning (Manga Studio) Artist
06_129869 ch02.qxp 11/29/07 11:35 AM Page 39
Always remember why you’re doing this
I’d say that if you purchased this book and the Manga Studio program (at the
very least if you purchased the program) that you want to be a comic/manga
artist. You want that chance to live out your dream — and hopefully at some
point, you’ll get to do that. Always remember that feeling because there will
be times when you wonder why you’re doing this to yourself.
Being a comic artist is, I believe, one of the luckiest jobs in the world, even if
you don’t get paid for it. (Although, making some money is nice.) You get to
create brand-new worlds and characters. If you’re fortunate, people will get to
read and enjoy what you’ve put your heart and soul into. If you get the chance
to create something that will make people laugh and/or cry, I feel that’s what
makes all the sleepless nights and marathon drawing sessions worth it. Never
forget that.
40
Part I: Welcome to Manga Studio!
06_129869 ch02.qxp 11/29/07 11:35 AM Page 40
Chapter 3
Creating Your First Manga
Page: A Quick-Start Guide
In This Chapter
ᮣ Creating a new page
ᮣ Using the Pencil tool to create the roughs
ᮣ Using the Pen tool to ink the page
ᮣ Adding tones to the drawing
ᮣ Saving and reopening the new page
ᮣ Exporting the page to a file
ᮣ Printing the page
W
hile the rest of this book is devoted to a detailed look at the ins and
outs of Manga Studio, sometimes a person just wants to know the
absolute basic things needed to create a comic from start to finish.
Ask and ye shall receive — this chapter is just for you. This chapter is all
about starting down your path to manga creation quickly and easily. I go
through only the vital information you need to know about Manga Studio,
as well as the basic tools you need to get the job done. If you need more
detailed information . . . well, that’s what the rest of the book is for!
As I go through the basic steps to create a page, I make sure to point out
which chapters in the book you can turn to in order to get a closer look at
how certain tools and functions work within Manga Studio.
For the purpose of this quick-start guide, I’m using Manga Studio Debut. This
is for simplicity’s sake, as the goal here is to show a means of creating a page
that both versions of the program (Manga Studio EX and Manga Studio
Debut) can do easily.
07_129869 ch03.qxp 11/29/07 11:35 AM Page 41
Opening a New Page
After you install the program and enter your serial number, you should see
Manga Studio’s workspace. The next order of business is to create a new
page to start drawing on by following these steps:
1. From the main menu, choose File➪New➪Page.
A New Page dialog box appears, as shown in Figure 3-1. You’re presented
with a lot of choices for page types, as well as an option to create your
own page. I go over pages and page templates in Chapter 4, but for now,
you can just pick a basic page template to work from.
2. If it isn’t already selected, click the Page Templates tab located at
the top of the dialog box.
Off the bat, you see various types of page templates, separated into
folders. You also see two standalone pages above the folders, one of
which you use for this exercise.
3. Select the Size A4 Paper Finish B5 5mm template and click the OK
button.
Now you have a page to start drawing on, as shown in Figure 3-2. The
blue lines you see on the page are the print guide. These help you know
what area of the page is safe to draw on and what art will be cut off by
the printer. I break down the print guide in further detail in Chapter 4.
Figure 3-1:
Select the
template
you want to
use from the
New Page
dialog box.
42
Part I: Welcome to Manga Studio!
07_129869 ch03.qxp 11/29/07 11:35 AM Page 42
Roughing the Page Out
After you have a new page created, the next order of business is to draw! The
rest of the figures you see in this chapter demonstrate the type of work you
can do in Manga Studio, but this is as good an opportunity as any for you to
have fun and let your imagination go crazy.
Before you start laying out your page, you should set up the image layer
you’ll be drawing on as your Roughs layer. This is a good practice to get into
with not only this roughs layer, but later on as you add new layers for inks
and other effects.
1. Using your mouse or stylus, make sure that the image layer is high-
lighted. (It’s marked Layer on the palette.)
If the Layers palette isn’t visible, press F4 on your keyboard.
2. Double-click the image layer on the Layers palette.
When you do that, the Layer Properties palette opens, if it isn’t
already visible.
Figure 3-2:
Your new
page, all
ready for
you to
unleash
your
creativity.
43
Chapter 3: Creating Your First Manga Page: A Quick-Start Guide
07_129869 ch03.qxp 11/29/07 11:35 AM Page 43
What you want to do now is set the layer up so that you will know later
that this is your roughs layer. Changing its name and drawing color will
help you when you start inking.
3. When the Layer Properties palette opens, click on the Advanced View
button to bring up the additional layer options.
4. Type
Roughs in the Layer Name text box.
5. To change the drawing color, select Color from the Display Color
radio buttons.
Now when you start drawing on this layer, all the work is the default
color. You can always change the color later by clicking the Alternative
Color to Black color box and selecting your preferred color.
6. Select Sketch from the Output Attribute radio buttons.
Changing the Output Attribute is useful when you’re going to print or
export your work. Besides, it’s a good habit to get into when it comes to
setting up which layers you want to use for sketching and which layers
you’ll use for your finish work.
The properties should now look like the settings in Figure 3-3. At this
stage, you don’t need the Layer Properties palette anymore, so feel free
to close it, if you’d like the extra screen space.
7. On the Tools palette, select the Pencil tool.
For the purpose of roughing your page out, the default pencil should
suffice. If you’d like to change it, however, just hold down the Pencil
tool button for a couple of seconds and a selection of pencils pops up,
as shown in Figure 3-4. Select the pencil you’d like to use from that
drop-down list.
Figure 3-3:
The
properties
for your
rough
sketch layer
should look
something
like this.
44
Part I: Welcome to Manga Studio!
07_129869 ch03.qxp 11/29/07 11:35 AM Page 44
8. Start drawing!
I’m sure I don’t need to go into too much detail in this step. All you need
to do is use your drawing tablet or mouse to start roughing out your
layout. Figure 3-5 shows what I came up with.
Figure 3-5:
Time to start
roughing out
the page.
Figure 3-4:
Additional
pencils to
choose
from.
45
Chapter 3: Creating Your First Manga Page: A Quick-Start Guide
07_129869 ch03.qxp 11/29/07 11:35 AM Page 45