How to Make Animated Films phần 9 pdf
Bạn đang xem bản rút gọn của tài liệu. Xem và tải ngay bản đầy đủ của tài liệu tại đây (4.31 MB, 52 trang )
How to Make Animated Films
380
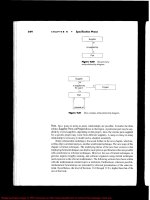
Interiors are often dominated by a major light source, especially if a single
light is on to illumine the scene. However, depending on surfaces and
secondary light sources that are there too, there could be a great deal of
bounced light and shade that will modify this initial scenario.
Starkly sketched shadows suggest
moonlight ooding into a darkened
room through a window. (Source:
DigiPen student art by Brian Kent.)
The same shot, but this time light by
a softer, interior illumination. (Source:
DigiPen student art by Brian Kent.)
Backgrounds and Environments
381
Perspective and Lines of Focus
Pretty much all backgrounds will involve some kind of perspective. This is true
both for exteriors and interiors.
A starkly lit, bleached scene invoking a strong, unforgiving, sunlit e ect. Note how the acute perspective draws
us into the center of the shot where the character is. (Source: DigiPen student art by Nick Wiley.)
Panning background layout illustrating interior perspective. (Source: Endangered Species . )
The most powerful compositions of all, however, are where the lines of
perspective or any other directional lines within the background layout
converge to a speci c location in the shot. This location is ideally the point
where the animated action is going on, fully exploiting these graphic
dynamics.
How to Make Animated Films
382
See how the perspective on the feet draws us toward the distant desk. (Source: Early animatic color sketch,
Endangered Species . )
Verticals in Panning Shots
If you need to create a long, horizontal background for a panning shot, avoid
too many verticals, especially closely spaced verticals! This is because there
will be the risk of a signi cant amount of strobing (jittery ickering). This is
especially likely if the distance the vertical lines are apart corresponds very
closely to the panning distance the artwork is moved frame by frame.
Excellent environment work but could cause strobing problems with poor camerawork decisions due to so many
vertical elements (including shadows) in the location. (Source: DigiPen student art by John Hall.)
Backgrounds and Environments
383
Strobing can be avoided, however, if:
1. The vertical lines are set further far apart and are randomly spaced.
If the trees were predictably vertical
(as they usually are with most
background art), then there might be
problems with panning in this scene.
However, based on observations from
real life, this scene is much more
photographically acceptable. (Source:
DigiPen student art by Je Weber.)
2. The lines of the artwork are not perfectly vertical but angled, in varying
directions if possible.
Beautiful illustrative design, and
additionally attractive from a camera
pan point of view with all the angled
verticals. (Source: 2008 2D Or Not 2D
Animation Festival poster art by Peter
Moehrle.)
How to Make Animated Films
384
Light Against Dark, Dark Against Light
Often poor backgrounds are painted so that the color values behind the
character(s) are very similar to the color values selected for the character(s).
This makes it very di cult for the audience to di erentiate one from the other.
A deliberately underlit scene,
illustrating the di culty of seeing a
character with similar color values
to that of the background. (Source:
DigiPen student art by Greg Attick.)
Therefore, when painting your background always keep in mind this golden
rule in terms of clarity: Light objects show up against darker backgrounds, and
dark objects show up against lighter backgrounds. Always bear this in mind
when selecting background colors and textures that are to go behind the
foreground characters.
Similar to the previous gure, but these color/lighting tests show how a well-lit character can stand out well
against a low-lit background. (Source: DigiPen student art by Greg Attick.)
Backgrounds and Environments
385
Early color sketches illustrate how the use of a strategically positioned light beam can draw the audiences ’ eyes
to the center of the action. (Note, incidentally, that the frame to the left uses dark gray values instead of pure
black to suggest darkness. The frame to the right uses pure black, which is not nearly as elegant or natural to
look at.) (Source: First-pass animatic frames, Endangered Species . )
Area of Greatest Contrast
When coloring your background, remember the eyes are instinctively
drawn to the area of the greater contrast in the scene. Therefore, it might
be necessary to implement this fact with your background color work,
depending on the particular requirements of the scene in question, of course.
Haunting 3D environment that illustrates how the eyes are indeed drawn to the most intensely lit area. (Source:
DigiPen student art by Ryan Miller.)
How to Make Animated Films
386
Use Your Eyes
There are many other rules of painting and/or design that can be found in
other books or online tutorials. However, the best teacher of all is through
the images you capture with your own eyes! Train yourself to really see what
happens to light and color values in the world around you, whether that
world is indoors or out.
Deep and moody, but note that the
eyes are again drawn to the point of
greatest illumination. (Source: DigiPen
student art by John Hall.)
Also, note how light and shade de ne form and shape. See, too, how various
color values and textures play o one another to de ne space and dimension.
The secrets are constantly all around you, waiting for discovery. You just need
to train your eyes, and your consciousness, to see and appreciate them.
Contrasting signi cantly from the
previous illustration, here the eyes are
drawn to the darkest shadow area.
(Source: DigiPen student art by Eric
Wiley.)
Backgrounds and Environments
387
Re ective and di ering surfaces de ne shapes skillfully here. (Source: DigiPen student art by David Vandevord.)
Assignment
Paint all the backgrounds for your lm. But as you do so, work with a nal
colored version of the character(s) required in each scene, so you know
exactly what will work and what is not in the nal analysis.
This page intentionally left blank
389
C
oloring animation once it has been scanned is a relatively easy operation.
Of course, a lot depends on the approach and software selected, but by
and large, digital coloring is more of a process of tedium than technique. In the
old “ cell ” days, animation drawings used to be hand traced or (later) Xeroxed
onto clear acetate sheets called cells . These were then painted on the back with
opaque paints so that the paint didn’t go over the trace lines. The sheets were
then turned over again for frame-by-frame shooting over a colored background.
Film Production 19
Coloring
In predigital times, animated images
were combined entirely on lm using
several passes in exposure. In a case
where this clown is to be seen on a
separately shot background, there
would need to be a “ male ” matte in the
shape of the clown’s silhouette and
a “ female ” matte in the shape of the
background minus the clown’s matte.
Each one of these, for every frame of
lm, would need to be hand traced and
colored! (Source: Endangered Species . )
How to Make Animated Films
390
Nowadays, everything can be handled digitally in one program and ultimately
exported as a nal movie le. A lot will depend on what software you are
using, of course, but a program like Digicel’s Flipbook Pro can handle the
pencil testing, line tracing, and the coloring aspect of your animation artwork.
Similarly, if you are looking to work in a vector environment, then programs
like Macromedia’s Flash, Cambridge Animation’s Animo, or ToonBoom
Technology’s ToonBoom Studio will give you a similar capability.
Essentially, once you have inked and scanned your artwork you can import it
into whatever program you are able to use. With ToonBoom Studio there is an
For ease of operation, I tend to use ToonBoom Studio, but often work with
Adobe Photoshop (combined with Adobe Premiere and sometimes Adobe
After E ects) to get a more sophisticated illustrative look.
ToonBoom Studio, an answer to every
vector animator’s prayers!
Adobe Photoshop, also an answer to
every artist’s dreams!
Coloring
391
ToonBoom Studio o ers a very versatile menu for preparing your work in any way you like for the program’s
vector environment.
Remember that with Toon Boom Studio you can choose whether you want
your drawings imported as one’s or two’s or even four’s or eight’s.
Frame changes can be made individually or as a batch. (Source: Student art by Saille Schumacher.)
easy setting on the exposure sheet that lets you import and vectorize all your
drawings at once.
How to Make Animated Films
392
Once your drawings are imported, it is really a simple process of coloring
the areas of these drawings with the colors you previously chose for your
character model and color design work. You can even choose colors by giving
them a numerical RGB (red, green, blue) value if you want.
The color palette is easy to use and
makes coloring vector animation
versatile and very easy. (Source:
Student art by Saille Schumacher.)
Choose colors by values instead of a
regular palette if you like. (Source:
Student art by Saille Schumacher.)
Digital coloring is simply a process of selecting the color you want to work
with and touching the screen in the area you want the color applied. The color
oods out to the boundaries of the drawing area selected.
Coloring
393
Just touch the screen with the
“ Paintbox ” tool and the color
immediate oods out to ll the
area. (Source: Student art by Saille
Schumacher.)
Some digital programs allow you to automatically color a sequence of frames
in a particular color, as long as the area you want to color is contained in the
same area of the screen where the cursor is located on the rst touch. More
often, you have to manually apply the color on a frame-by-frame basis as the
drawings progressively move across the screen. Once you have completed
one color you can move onto another color and complete that throughout
the sequence. This is repeated until all the colors for all the drawings are
completed within the scene.
Unlike the predigital days when cells needed to be colored with paint and brushes, and then left in racks to
slowly dry, modern coloring can be done in seconds. (Source: Student art by Saille Schumacher.)
How to Make Animated Films
394
Whether it is 6 drawings or 600, digital coloring makes the big studio opportunities happen on your own
desktop. (Source: Student art by Saille Schumacher.)
The only drawback with digital coloring is if your original artwork has gaps
in the containing lines, the color being applied will tend to ood out to the
surrounding areas, possibly the whole screen in some circumstances!
With a hole in the line of the leg,
the color oods out and lls the
screen. (Source: Student art by Saille
Schumacher.)
That said, it is a relatively simple operation to hand join the gaps before
applying color. However, this is a nuisance if you merely want to work quickly
through the scene with one color selection after another. Remember, it is
much wiser to ensure that you don’t have any gaps in your artwork at the
clean-up and inking stage. (See chapter FP16 – “ Clean — up ” ).
Coloring
395
Be sure to ll in all the gaps before
you scan, otherwise you’ll waste time
trying to do it digitally after the color
oods. (Source: Student art by Saille
Schumacher.)
When dealing with backgrounds, there are two options in terms of coloring;
three, if you consider not coloring at all, with perhaps a pure white screen
or just black line drawings on white. Most lms have colored backgrounds,
however, and so the two choices are at-colored artwork from within the
program or importing artwork into the program.
It’s rare that animation is seen on blank
white screens these days, as clients
and investors insist on getting every
cent’s worth of color in every shot!
However, it can happen, and it can be
quite refreshing.
How to Make Animated Films
396
Flat-Colored Backgrounds
Flat-colored artwork is treated in exactly the same way as animated drawings
are. The line artwork is imported into the program on the lowest layer and
colored digitally. It is very di cult to get subtlety with the coloring, but it
can be visually exciting, and in keeping with the at-coloring style of the
animation.
Most Web and TV animation strongly relies on at-colored backgrounds in the digital age.
(Source: Art by Katy McAllister.)
Imported Background Artwork
Imported artwork can give you the opportunity of using a traditional, painted
background look. As previously discussed, digitally created backgrounds can
be as e ective as traditionally colored ones, created in any of the speci c
paint programs that allow for this. With the artwork nished (to the nal size
of the animation artwork), it is imported, usually in a bitmap format, into the
program on the lowest layer.
Coloring
397
Moody nighttime atmosphere created in a Macromedia Flash environment. (Source: Fire Gods . )
The only drawback with having traditionally styled artwork behind at-
colored animation drawings is that there could be a diversity of style that
doesn’t t together comfortably. Too often at-colored animation drawings
on highly painted backgrounds feel out of place, so lmmakers should always
adjust their coloring and painting styles to accommodate this to some extent.
This highly original scene is uniquely created using a textured background beneath with at-colored animation
overlaid with transparency to give it a subtle see-through look that echoes an early cave painting style. (Source:
Fire Gods , by Saille Schumacher.)
How to Make Animated Films
398
Ultimately, whatever kind of visual e ect and style of software you choose,
the coloring of animation artwork is a vastly less-challenging process than
it was in the good-old cell coloring days, where drying of wet paint, the
problems of color opacity, and going over line edges were always a challenge.
Consequently, animated lmmakers today should be extremely grateful to the
pioneers of digital technology for making the painstaking and messy process
simple and pain free!
Assignment
Color all your animation drawings from scene to scene and double-check that
you haven’t missed any colors or colored any particular areas incorrectly.
399
W
ith most digital programs today, compositing is taken for granted. With
animation placed and colored on di erently layers, the background on
the bottom layer, and a title or even animated e ects on a top layer, it is now
comparatively easy to render the whole thing out into a movie format without
realizing that you are indeed compositing the scene.
Film Production 20
Compositing
The opening title sequence for Fire Gods , where various animation and special e ects layers were created in
Adobe Photoshop and then rendered out in Adobe Premiere.
How to Make Animated Films
400
Indeed, 99 percent of the time that is probably all you’ll ever need to nish
your lm. However, there are occasions when you’ll want to go further than
this, and so I would like to just mention a few key compositing approaches
you might want to consider.
Layers
Often it is necessary to combine layers of action to create a speci c e ect. For
example, for a recent Fire Gods project, I needed to create a long panning scene that
required speci c levels of the background scenery to move at di erent speeds from
each other. I ended up using three di erent background layers, two layers of chimney
smoke, two layers for machine animation, and one layer of character animation.
N o t e
The three separate layers of this are discussed and illustrated in MC6
on page 131.
The end of the Industrial Revolution scene in Fire Gods , where multiple layers were created to have a multiplane
pan to this position; the moving bottles, the seated character, and the slightly transparent smoke were all
combined together in Adobe After E ects.
To achieve this speci c parallax-layered e ect, I used Adobe After E ects, although
other programs such as Autodesk’s Combustion work equally well. As most people
know these days, After E ects is something of a mix between Adobe Photoshop and
Adobe Premiere — that is, image-manipulation software combined with movie-
editing software. As with Photoshop, After E ects enabled me to remove matted
areas of each layer that I didn’t want the audience to see via alpha channels. However,
in the following gure, I chose blue as my selection color.
Compositing
401
The inset shows the initial 3D model of the glassmaker, Dale Chihuly, before he was added into the larger,
multilayered scene, including glass hair and a panning composite of a typical Chiluly outdoor exhibition
The blue background surrounding the model in the inset was removed, allowing it to be composited
into the scene with a minimum of e ort. (Source: Fire Gods , 3D Model and Animation, Royal
Winchester.)
It would be equally possible to use another solid color for these areas. The
green-screen approach for live-action and special e ects lming is the
one you’ll probably have heard of most. In this approach, a background
environment is shot separately to the actor’s action.
As an experiment to indicate the process of green-screen matting, I took a portrait image (left) with an
environment design (right) and proceeded to combine them using a green-screen version of the portrait
(center). (Source: DigiPen student art by D. Macdonald [portrait] and J. Ngyuen [environment].)
In conventional lmmaking, the actor is shot against a green-screen
background. Everything that is green in that layer can be digitally removed
when combined with the required background environment “ plate, ”
giving the illusion that the character was actually lmed within it in the
rst place.
How to Make Animated Films
402
The nal composited green-screen
piece. (Source: DigiPen student art
by D. Macdonald [portrait] and
J. Ngyuen [environment].)
Transparency
Another exciting possibility of compositing your work in separate layers
is the fact that you can create things like a transparent visual e ect. This is
essentially something that is easy to create, whether the object of attention
is moving or static. I used the e ect in the following gure for an image in
my book Animation from Pencils to Pixels .
Multiple photographic images
composited with transparency
over a static background.
I also used transparency for a short sequence in my lm Endangered Species ,
where I produced a ghost e ect in homage to Richard William’s Academy
Award – winning TV special, A Christmas Carol . The original more e ectively
created the transparent ghost e ect by skillfully compositing the layers on
lm instead of using digital technology.
Compositing
403
Although looking complex and
hand-crafted, this entire scene
(showing the character walking from
the far right of the screen to the far left)
was actually used creating a simple
walk cycle, a background, and a tree
overlay! (Source: Fire Gods , by Saille
Schumacher.)
The ghost e ect, created by making
the distant character transparent.
(Source: Endangered Species . )
However, if you don’t have After E ects or a program like it, you can achieve
the same e ect in something like Adobe Photoshop, then composite
everything in a lm-editing program like Adobe Premiere.
Cycle Animation
A good way of getting good mileage from your animation is to composite
a repeat walk (or run) cycle with a long-panning background action. This is
something that digital technology is especially good at. Indeed, I once ran
a course that speci cally demonstrated how you could do this using Adobe
Photoshop.
How to Make Animated Films
404
As scenes are created in layers, it is possible to place the walk action on the
upper layer and pan the background artwork past it on the lower layer. For
example, I took the last example, and kept the background static and had the
animation cycle pan across the shot, frame by frame (see the following gure).
Here, the three individual layers of the previous scene are presented as the tree overlay (covering up the panning
walk cycle beneath it), the walk cycle level itself, and the static background. (Source: Fire Gods , by Saille
Schumacher.)
Here the background is blurred with the character sharp. (Source: Fire Gods , by Monte Michaelis.)
This gives the very e ective illusion of the character walking while the
panning background suggests that he is covering a signi cant amount of
ground (i.e., as if the camera is tracking along a scene with the character).
Depth of Field
Lastly, the ultimate sense of depth in a scene can be achieved by
manipulating its depth of eld. This e ectively means changing its focus
throughout its various layers. Returning again to our foreground/ background
layering approach, it can be very e ective if we throw the background out of
focus while keeping the foreground action sharp. Occasionally, the opposite is
e ective too, with the foreground blurred and the background sharp.