How to Make Animated Films phần 3 pdf
Bạn đang xem bản rút gọn của tài liệu. Xem và tải ngay bản đầy đủ của tài liệu tại đây (3.12 MB, 52 trang )
How to Make Animated Films
68
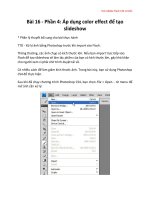
Now you have completed the drawings of the rst stride and the second
stride in an identical manner (except for the fact that this time the legs are
reversed, of course).
Note that the leg positioning within the second (bottom) set of frames is identical to that of the rst (upper) set.
It is just the legs that are reversed, made clear by the shaded back leg.
Note that when doing pro le walks like this, the far foot should be on a
slightly higher path of action for the contact slide than the near foot, due to
the perspective involved from this viewpoint.
You can make this easier for yourself by adding two lines (paths of action) to an underlying background sheet.
Make sure that the far foot always locates to the upper line at all times and the nearer foot to the lower line. This
will ensure that you get a correct sense of perspective at all times.
The second stride can be numbered exactly as indicated earlier, except that
for the walk cycle you can reuse drawing 1 for drawing 17 (as both these
drawings are identical and you don’t want to draw it twice). Consequently, if
we were drawing the in-between charts for both strides here, they would look
like the following gure.
Generic Walks
69
Note that these are even charts with no slowing-in or slowing-out indications suggested.
Shooting a Walk Cycle
Apart from testing the walk cycle by rst ipping it, you should shoot it as
well. This way you can see how fast it moves in real time on the screen. To
get the best e ect of the cycle action, shoot the drawings for a minimum of
three repeats. This means that you need to shoot them in this order: 1, 3, 5, 7,
9, 11, 13, 15, 1, 3, 5, 7, 9, 11, 13, 15, 1, 3, 5, 7, 9, 11, 13, 15, 1. When animation
is numbered with odd numbers, it usually means that it was shot on two’s,
as opposed to one’s. However, to get a sense of the speed of the walk cycle,
I would suggest that you shoot these drawings twice, one set on one’s and
the other on two’s. That way, when you play the action back you will be
able to better appreciate the di erence between the two speed and timing
approaches. The rst thing you’ll immediately notice is that despite all the
drawings you will feel you have created, both versions will appear to have the
walk moving extremely fast, although the two’s version should seem a little
more acceptably slow than the one’s !
In-Betweening on One’s
Having seen how fast (and perhaps a little “ jittery ” ) the action can look on
one’s and two’s, you should next do a little experiment to show you what
animation animated on one’s but shot on two’s looks like. So go back to
your existing drawings and in-between all the odd-number drawings
by including even-number drawings as well — that is, draw 2 between
1 and 3, draw 4 between 3 and 5, draw 6 between 5 and 7, etc.). When
you get to drawing 16, however, draw it between 15 and 1 to complete the
cycle.
How to Make Animated Films
70
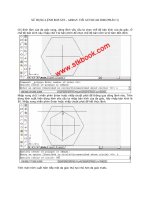
Two important things you need to know about when you do this. First, for
drawing 10 make sure you keep the toe down on the back foot before it lifts
up and begins to come forward on drawing 11. This will give you a little extra
push on the back leg. However, on walk cycles all the slide distances have to
be even for every contact foot position on the ground, so you will need to
calculate the average foot slide distance back throughout the preceding stride
and add it to the drawing 9 position for drawing 10 (see the following gure).
I am superimposing one foot over
another to keep size consistency,
although on this occasion I am
choosing to keep the foot planted
rmly down on the ground for the
in-between.
Note how the back leg on the in-
between remains in contact with the
ground until the last possible moment,
with the toe sliding back the same
distance as all the other in-between
foot slides.
Also, for drawing 16, which links up to drawing 1 again on the cycle, place the
heel of the foot just a little higher and forward of the heel on drawing 1. This
will give you a forward and back action on the free foot before the heel hits
the ground, which is a more natural way of walking that echoes real life.
Generic Walks
71
See how the heel of the foot always swings forward and up on the in-between just before it comes down and
makes contact with the ground!
T I P
With most characters, and certainly heavy characters, it always helps the
walk to put a de nite bend on the knee with the drawing after the key
contact position. In the following gure you can see the normal lead leg
position for drawing 3 and the alternative bent-leg version. This action
very much echoes the kind of shock-absorber a ect in most cars and
bicycles. Very light characters, however, will barely need this, just those
with some kind of weight to handle.
Showing the before and after versions plus the lightbox version of one over the other, which clearly shows the
amount of change there is in the lead leg position and the extra dip forward and down there is in the hip area.
How to Make Animated Films
72
Testing the Walk
Now that you have all the in-betweens in, you are ready to test the action
again. This time, apart from ipping the action manually, shoot the three cycles
of drawings on both one’s and two’s, so you can see what the speed looks
like with this number of drawings being used. Just as animation drawings
numbered with odd numbers usually means that the animation is supposed
to be shot on two’s, even numbers usually symbolize positions for one’s.
Consequently, the correct way to shoot the new set of drawings would be to
shoot the entire cycle on one’s. However, by also shooting these drawings on
two’s, you will see how much slower the action will be if they are shot on two’s
instead of one’s. Therefore, this time shoot your animation cycle a minimum of
three times using this new order of drawings: 1, 2, 3, 4, 5, 6, 7, 8, 9, 10, 11, 12, 13,
14, 15, 16, 1, 2, 3, 4, 5, 6, 7, 8, 9, 10, 11, 12, 13, 14, 15, 16, 1, 2, 3, 4, 5, 6, 7, 8, 9, 10,
11, 12, 13, 14, 15, 16, 1. This order will de nitely show you how much smoother
the new one’s sequence of walking will be compared to the original two’s
version of odd numbers, and it will also show you what the walk will look like
when shot twice as slow as before by shooting the one’s drawings on two’s.
The Upper Body
Now that you have successfully completed the walk action for the bottom half
of the body, you can move forward and complete the top half throughout the
walk. So, go back to your original stride key positions, 1 and 9, and add the
upper body to them.
This shows how the body can be built on the existing lower-body version we have been working with.
N o t e
I have chosen to use the cleaned-up and inked-in version of the full walking
character from this point on, as this will illustrate the actions more clearly.)
Generic Walks
73
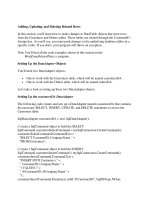
Note how the torso leans a little forward. This is because for any walk action
to look realistic and plausible, a character needs to angle forward somewhat
to get momentum. Note how most people in the street walk like that. We take
this for granted when we try to walk ourselves, but notice what happens in our
own body when we try to walk and don’t lean forward or push o from our
contact leg rst. We just don’t move at all. However, if we lean forward slightly
we will nd that we have to put our free foot forward and down to create the
rst stride, or we will fall at on our face! (This is e ectively what babies do
when learning to walk — they forward lean but don’t know yet that they have
to quickly put their free leg forward to stop themselves from falling over.)
Anyway, because of this, all walks should have a slight forward lean when
we draw our key positions, as should all the walk positions we subsequently
create (unless we are animating a drunk person destined not to move, or to
fall at on his or her face).
Imagine this character moving forward
without having the front leg there
to stop his forward momentum.
This is what we do when we walk
ourselves — we use the contact leg to
counteract the forward lean that we
use to get ourselves going.
Clearly a gure so far o balance does
suggest that he is losing control of
his movement. In this particular case,
we can imagine the character falling
backward unless he throws a leg or an
arm out to stop himself!
How to Make Animated Films
74
Again, this is just another reminder that with a generically walking character,
the forward and backward arm positions oppose themselves on each key.
With the key stride positions in, take the original lower-body passing positions
and put the upper body, arms, and head in on those too. Don’t forget
to keep the slight forward lean to the body here also. You can do this by
superimposing one key over the other, and adding the rst passing position
over the top of that, making sure to line up the pelvic area one with the
other and making sure the upward sides of the paper are all parallel with one
another. (If they are not, then you will tend to put an unwanted additional
angle to the body lean, forward or backward, when you are tracing the
character’s position.)
Right arm forward/left leg forward,
and vice versa.
Superimposition, an animator’s best
friend!
Generic Walks
75
Note that the arms in the passing positions are now down by the sides of the
body. This is because they are moving from forward to backward at this point,
or backward to the forward, depending on what arm you are considering.
With all the keys and passing positions in place and working as you roll the
drawings, you can now go ahead and put in the upper bodies on all the other
drawings. I would actually only work on the odd-number drawings at rst,
then test them by ipping and shooting before you put in the in-betweens for
the one’s drawings.
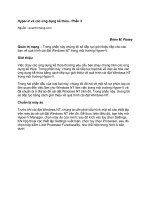
The complete, full-body walk cycle. Note that the position of the arms and the legs are identical on both stride
actions, except that they are reversed from one another.
If the two’s (odd numbers) work ne, then you can add in the one’s (even
numbers) in-betweens. Flip and test these. If all is well, you should now have
the basic, generic character walking nicely, with a descent up and down
movement on the body, and the arms swinging in time with the legs.
Not only does the free leg pass through
on the passing position, but so do the
arms. (I will explain why the hands are
bent in relation to the arms later.)
How to Make Animated Films
76
One nal reminder that ipping allows you to see a great deal of how your animation is working long before
you actually shoot it!
Suggested Reading
W h i t e , T . The Animator’s Workbook . New York : Watson-Guptill , 1988 , pp. 46 – 56.
W h i t e , T . Animation from Pencils to Pixels: Classical Techniques for Digital
Animators . Boston : Focal Press , 2006 , pp. 234 – 244 .
Assignment 3
Create a generic walk cycle on one’s, as indicated in this chapter lesson.
77
Class objective: To evolve the generic walk principles to create more
individual character and personality in the walking action.
Equipment required: Lightbox, pencil, and paper.
N
ow that you have created your rst successful generic walk it is time to
add a little more subtly and personality to the action — that is, to loosen it
up a bit! Although you are probably very happy with your walk already, there
are a few things that you now need to do to make it look more natural and
give it more character. The rst is to give it a more exible body action.
Hip and Shoulder Rotation
You will notice that when people walk it is not just their arms and legs that move
forward from stride to stride, but their hips and shoulders rotate forward and
backward too. Carefully watch an arm as it swings forward and you’ll notice the
shoulder rotating forward too. At the same time, the other arm that is moving
backward will cause that shoulder to rotate backward also. Similarly, when the
legs move forward and backward, so do the hips. Adding all this together we
get a body action on both the strides that looks like the following gures.
Masterclass 4
Personality Walks
How to Make Animated Films
78
Rotations are things that are often
forgotten by novice animators, but
it is fundamentally important to
incorporate them in any convincing
action.
Make an extra study of the up and
down action of the hips. This is a factor
that can signi cantly in uence the
convincing movement of a natural,
uid-looking walk.
This natural twisting of the torso both
ways will bring a more natural uidity
to the entire action.
Personality Walks
79
Now you can see that by just putting this rotation into your generic walk
alone will make it look that much more uid and natural. Try it!
Overlapping Action on the Hands
Remember that the human body is not a machine and therefore nothing it does
is rigid or mechanical. The arms and hands, for instance, o er an opportunity for
demonstrating this. When observing people walking, notice that as their arms
move backward and forward, their hands are not entirely moving at quite the
same angle. This is not to say they are vastly di erent, but more that as the arm
moves forward, the hand tends to drag back a little, hinged at the wrist. The
same can be said for the hand as the arm moves backward. It tends to delay, or
drag a little, before it catches up with the arm on its return swing. This is known
as overlapping action and it should be incorporated in all animation wherever
possible, as we’ll refer to later in other sections of the course.
Always add overlapping action to any secondary parts of the body such as hands, hair, or clothing, as this, as
well as everything else we have discussed, will o er more ow to the entire action.
A little tip when in-betweening the actual changeover in the hand, from dragging
back in one direction to the other: The natural tendency is to in-between the
hand’s direction in relation to the arm from one angle to the other perfectly,
e ectively having the hand align in a straight line with the lower part of the arm.
However, you’ll nd that you’ll get more snap in the changeover action if you
favor one angle or the other for this in-between. For example, the following gure
shows what happens when you favor the hand position to the former angle.
How to Make Animated Films
80
Moving from right to left, the advancing arm creates a drag on the hand until it begins to move back again (far left),
where the hand immediately ips over the center line to the other side for the entire arm sweep back.
Alternatively, the next gure shows what it looks like when the swinging
arm moves back and then begins to move forward. Either way, it will give
you a nice snappy changeover, which a perfectly straight natural in-between
position will not.
Again reading from right to left, the arm swings back (right), reaches the high point of the back swing (middle),
and then accelerates, causing the hand to ip to the other side of the center line (left).
Personality Walks
81
Overlapping Action on the Head
While we’re looking at taking our generic walk to the next level, we should
look at the head action and see what can be done. Just as the hand overlaps
with the arm’s action, the head can overlap with the body. This means that as
the body rises up on the stride that is the passing position, the head can drag
back a little, hinged at the neck or jaw line. Then, as the body drops down
toward the key stride position, the head can rise up slightly.
But, when attempting this, please don’t overexaggerate the action like this.
Otherwise, it will give the head a oppy, rubber look that can detract from the
overall walk appearance. (Unless that is what you’re after, of course!)
Rotation on the Head
While we’re talking about the head, don’t forget that it is not perfectly aligned
with the body from stride to stride. Consequently, as the shoulders rotate in one
direction with one arm coming forward, the head can slightly rotate against
it to increase the uidity and exibility of the entire action. It can do the same
thing too in the opposite direction as the shoulders rotate the other way for the
next stride. But again, don’t overexaggerate this or else it will look unnatural.
Keeping Good Balance Throughout
Lastly with walks, let me talk here to the 3D-driven animators among you,
who need to consider the essential balance in their walks beyond the
conventional-pro le 2D viewpoint we’ve been using. Remember that we
talked about the body leaning to gain momentum and the legs having to
move to stop the character falling at on his or her face? Well, this is an issue
of balance, and this has to be respected at all times in all facets of character
animation if the look of the action is to appear plausible. Consequently, when
We are talking exaggerated generic
principles here, but if you even add
something of this countering up and
down action on the head, you will
bring more exibility to your walk
drawings.
How to Make Animated Films
82
looking at the pro le action we have just animated, remember that unless all
of our drawn characters respect the natural balance we need, the audience
will not feel comfortable with the action they are watching, albeit they may
not be consciously aware of it. Therefore, when moving the weight from one
leg to another during the stride, the body’s center of gravity must always
remain in balance over the one or two points of contact the feet provide. So,
with both feet on the ground, the bulk of the torso will need to be placed
somewhere between the two points of contact.
Red indicates the area that the body’s
center of gravity can be between the
two contact feet.
However, once one foot leaves the ground, the center of gravity needs to
move above the point of contact the grounded foot makes. Not to do this
creates an ugly and uncomfortable pose that implies that the character is
falling over, one way or the other.
Here the body’s center of gravity
needs to be adjusted above the much
narrower red area. Keep the lean in the
body, however, to maintain a sense of
forward momentum.
Personality Walks
83
This pose is grossly exaggerated, but it
does underline the fact that if a body
is outside of the red contact area it will
appear to be falling over!
Similarly, when we consider a walk from the front or back view, we have
to also shift the center of gravity over whatever foot is in contact with the
ground at any particular point in time. Not to do so gives a stilted, false
impression of the walk. This is a common error with many animated walks,
especially with poorly animated 3D walks where the character’s center of
gravity tends to be positioned somewhere in between the feet, whether they
are both on the ground or not.
Remember that the contact area is
all important, so that any view of
the action will require the body to
appear over it, unless the character is
deliberately out of balance or falling
o v e r .
How to Make Animated Films
84
In-Between Placement and Timing
Now that we have covered all the essential elements of walks, it is time
to discuss the way we can give them more individuality and personality.
This can be additionally done through both pose and chart modi cation.
As we have seen, the key to a basic generic walk is to place the key stride
positions correctly, make sure the passing position is well balanced,
and then place the in-between drawings in the correct place. However,
by modifying any of these elements, we can give the walk a de nite
personality.
Dynamic Key Pose Modi cation
“ It is all in the pose. ” So say all the great old animators who once graced the
golden age of traditional animation. For example, in the next gure, look at
the two passing position modi cations beside our generic one, and you can
immediately see that the personality of the walk varies quite considerably
from one to the other.
It is clear that if the body is not over the contact area, then the character will most certainly appear o
balance.
Personality Walks
85
Clearly, apart from the generic walk pose, in the gure we have one that is
very predictable and quite eccentric. All this is communicated through the
pose alone, which is why the pose is everything!
At the same time, you should remember that if you mess around with any of
the generic pose positions, you have to keep the character in perfect balance
at all times to make him or her perform fully. That is, in a key stride position
the center of gravity has to be positioned above the two points of contact
at all times. However, the following gure shows the kind of pose I often see
students produce, which is incorrect and gives the sense that the character
would fall backward if a pu of wind came along.
Passing positions can be in nite in
their pose arrangement, but even
an extremely exaggerated, eccentric
one like this should still nevertheless
appear plausible and in balance.
Another example of a clearly
unbalanced character’s center of
gravity being away from the foot’s
actual contact point on the ground.
How to Make Animated Films
86
Modifying the Passing Position
Any position can be changed to imply emotion or personality. Just remember
to keep the body weight over the contact foot at all times and anything is
possible. The next gure is an example of the kind of stride position that
you might nd with a tired or burdened character. Note how the bent back
signi es a huge weight on the shoulders.
Poses can appear awkward when the
action is frozen, but work perfectly
within the unfolding movement of
the action.
In-Between Modi cations
Finally, we can consider adjusting the in-betweens to enhance the attitude and
personality of the walking character. The following gure is an example of
in-betweening follow-through that we might expect for an eccentric, gangly walk.
I put a continuing reversal of the foot’s direction on the lead leg, giving a hesitant, shaky feel to the action.
Personality Walks
87
Double-Bounce Walk
Even by changing the elementary positions of the generic walk we can give
an entirely di erent attitude to the character’s movement. For example,
the old-fashioned Mickey Mouse double-bounce walk is simply created by
changing the heights on the relevant stride positions. For example, whereas
the standard generic walk poses are as shown in the next gure, the double-
bounce action has the body on the key stride positions and the passing
position down, whereas on the in-betweens the body is pushed up. This gives
a perky, bouncy attitude.
N o t e
We do this by bending the legs or placing the character’s legs at a full
extension on the toes. If there is no shortening or lengthening of the
lower limbs, this would be an error.
Reminder: With a generic walk the body always rises to and from the passing position.
Clearly illustrating the down, up, down, up, down nature of a double-bounce walk.
How to Make Animated Films
88
Chart Timing and Variation
So far we have charted our action with even in-betweens. In other words, our
generic walk was created with two keys, one passing position in the middle
and one in-between in the middle of these when working on two’s. However,
to give emphasis to any part of the walk’s action and modify its timing, it is
possible to add in-betweens to slow it down at certain points. For example, by
adding a slow-in to the passing position and to the end of the stride action,
you can give an entirely di erent e ect to the walk’s attitude, even using the
standard, generic walk drawings.
With the breakdown drawings lightened, it is clear to see how the other in-betweens are bunched toward the
passing position and then the subsequent hit position, giving a slowing-in e ect in both situations.
The charting for this action would look like the following gure.
In terms of in-betweening, you would create the breakdown drawings rst, then do the in-betweens linking
them to the next key drawing.
Alternatively, if you give the character slow-out drawings from the start of the
stride, and out of the passing position, you get an entirely di erent sense of
timing for the walk.
This time, with the breakdown drawings lightened again, it is clear that the extra drawings are slowing-out from
the beginning of the action in both instances. The charting on this occasion would look like the next gure.
Personality Walks
89
Here the in-betweens are created from the rst key drawings via the breakdown drawing to the next key.
Observation and Reference Footage
The reality is that walk action is in nite in its expression. Although every able-
bodied person on this planet walks the same way (i.e., by placing one foot in
front of the other to gain momentum and direction), there is an in nite range of
attitude and personality in the way people walk. Physiological factors play a role
too. For example, a big fat, roly-poly person will walk in an entirely di erent way
than a short, skinny, birdlike individual. It is important, therefore, that animators
de ne the basic personality and emotional attitude of their characters before
they tackle their walk actions, and adjust characters ’ pose positions and in-
between placement accordingly. There is no better teacher than life itself. So go
out into the world and study all the walk actions around you. You’ll be amazed
at the amazing variations that people o er to instruct and inform you! Take a
video camera with you and lm the most extreme examples of walking you
nd. Then study, analyze, and attempt to reproduce the walks you see through
your animation keys, passing positions, and in-betweens. Alternatively, if you are
trying to create a funny attitude with a generic-style walk, lm yourself or a friend
performing an extreme, eccentric walk and use that as your point of reference.
The Animator’s Survival Kit
No self-respecting animator should be without the ultimate “ bible ” on all
animated walks and runs: The Animator’s Survival Kit by Richard Williams. Many
of the exercises are advanced for this stage of study in your course, but having
this book at your disposal, even now, will be an investment for throughout
your future career.
Suggested Reading
W h i t e , T . The Animator’s Workbook . New York : Watson-Guptill , 1988 , pp. 57 – 62.
W h i t e , T . Animation from Pencils to Pixels: Classical Techniques for Digital
Animators . Boston : Focal Press , 2006 , pp . 234 – 244.
Williams , R. The Animator’s Survival Kit . London : Faber and Faber , 2001 ,
pp. 102 – 175.
DVD lecture: Walking Limp Pencil Test.
How to Make Animated Films
90
Assignment 4
Create a “ personality ” walk cycle on two’s that either expresses pain (perhaps
a limp) or excitement (perhaps a skip). Alternatively, your second walk could
show a heavy, slow character trying to walk fast or a small, nervous character
trying to look big or strong. Actually, as long as your second walk cycle is
vastly di erent from the generic one created for Assignment 3 and your
character displays a clear quality, attitude, personality, or emotion in his or her
action, you can do pretty much anything you like here to demonstrate your
command of the walking action.
91
Class objective: To learn and replicate the action of a bipedal running action.
Equipment required: Lightbox, pencil, and paper.
M
any people think that a run is just a faster action than a walk. But this is
not the case. If you look carefully at a running action in a slow-motion
action replay you’ll see that whereas a walking character always has
one contact foot on the ground at any moment in time, a running gure
does actually have both feet o the ground during one point in
each stride.
Masterclass 5
Generic Runs
How to Make Animated Films
92
Key Generic Run Stages
Consequently, a run is more of a controlled leap than a speeded-up walk. Let’s
look at the key stages of a generic run, which can be identi ed in ve key
poses.
The Drive-O
Here we start a run stride with the character pushing o from the ground.
Note in the following gure the straight contact leg pushing the body up
and forward, while the opposite leg bends dramatically upward, with the
knee high.
When running, it is necessary that the
character is o the ground at some
stage during the stride.
The drive-o position should always
be strong and dynamic. Note the
strong line throughout the leg and
body in this pose, communicating
these things.