How to Make Animated Films phần 2 docx
Bạn đang xem bản rút gọn của tài liệu. Xem và tải ngay bản đầy đủ của tài liệu tại đây (2.51 MB, 52 trang )
How to Make Animated Films
16
I m p o r t a n t !
Please get into the habit of putting a circle around every key drawing
number and a parenthesis around every breakdown drawing number.
In-between drawing numbers are written with nothing around them.
I’ll explain the numbering choices soon, but su ce it to say you can number
the drawings anything you like in practice, as long as you leave enough spare
numbers between the rst key drawing and the breakdown drawing, and
then the breakdown drawing and the second key drawing, so that three in-
betweens can go between each key drawing.
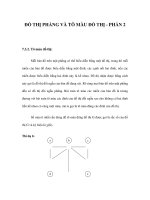
Now, with our drawings numbered correctly we need to create an action chart
from drawing 1 to drawing 17. On the basis that the in-between movement
from key to key is even in its movement, we can draw a chart on the rst key
that looks like the following gure.
Being a top pegs animator, I always write my chart clearly between the peg holes at the top of my lowest-
numbered key animation drawing. The chart indicates just how many in-betweens are needed and how they
will be spaced between this rst and the next key drawing.
Animation Basics
17
Top Pegs/Bottom Pegs
You will see that I put my numbers to the right of the pegs and the chart between
the peg holes at the top of the sheet. This is because I am a top pegs animator.
With top pegs animation the drawing number is always found in the top-right corner.
Bottom pegs animators prefer to have their peg holes at the bottom of the
sheet. In all honesty, most animators these days tend to use bottom pegs, but
I argue extensively in my book Pencils to Pixels (pp. 361 – 365) why I believe
top pegs are preferable. However, if you choose to use bottom pegs for your
animation, you should place the drawing numbers to the right of the bottom
peg holes and charts between the peg holes.
Bottom pegs animators place the drawing number in the bottom-right corner.
How to Make Animated Films
18
Charting Explained
Now that you have the rst chart drawn, let’s talk about what it represents.
Taking the numbers from the rst key drawing (1) and the breakdown
drawing (9), you will see the numbers 3, 5, and 7 evenly spaced between
them. This shows the way that you need to draw the in-betweens. Similarly,
the numbers from the breakdown drawing (9) to the second key drawing (17)
are also equally spaced.
This clearly indicates that the drawings
from 1 to 9 need to have even
in-betweens.
The same evenly spaced in-betweens
are required between drawings 9
and 17.
Now let’s get down to creating the in-between drawings that are indicated on
the chart.
Animation Basics
19
In-Betweening
Looking at the rst half of the chart (i.e., 1 – 9), we can see that drawing 5 is
exactly in the middle. This means that we have to create this in-between rst.
So, place only drawings 1 and 9 on the pegs with the lightbox on, then place
a new sheet of paper on the pegs, and trace both the pivotal position and
lightly draw in a straight line that dissects the two arm lines of the previous
drawings.
The rst in-between drawing to tackle
in this case is drawing 5.
Once you have ascertained the
midposition for the shaft of the
pendulum, you should draw a light,
straight line from the pivot point to use
as a superimposition guide.
How to Make Animated Films
20
Now, as before, superimpose all three sheets of paper over one another,
making sure the pivotal points and the arm lines are in perfect alignment
before tracing the full pendulum onto the new in-between drawing sheet (5).
Next, put all these three sheets back onto the pegs in their numerical order,
with the lowest number on the bottom, and ip them backward and forward
as before.
It is important to have accurate
guidelines when superimposing
drawings, as well as to make sure that
you line up everything very carefully.
Make sure that the paper doesn’t slip
out of position as you’re working too!
Teach yourself the art of good
ipping (rolling) — it will reward
you handsomely as you get further
and further into the principles of
animation!
Animation Basics
21
Always refer to the chart before you start each in-between, and make sure you correctly number the drawing
before you start!
Place all ve of these drawings back onto the pegs and roll them in order, with
the lowest-number drawing on the bottom and the highest-number drawing
on the top. This should give you a much smoother, slower action to the
midway point on the pendulum swing.
If this works ne (which it should if you have followed these instructions
carefully), you can now do in-between drawings 11 – 15. This time, however,
you have to produce drawing 13 rst, accurately drawing it between drawings
9 and 17, followed by in-between drawing 11 between drawings 9 and 13,
and then in-between drawing 17 between drawings 13 and 19. Remember to
make sure that all the pivotal points are precisely on the same spot each time,
and that all the arms of the pendulum are exactly in the middle of the two
containing drawings around the pivotal point when you create it. If you don’t,
the pivotal point of the pendulum will wriggle around, or the swing will not
be smooth and even.
Now you will see that the pendulum swings to the halfway (breakdown)
position and back more evenly and clearly. If this works ne, you now need
to put in the remaining in-between drawings using the same technique.
However, to create in-between 3, you need to accurately place it midway
between drawings 1 and 5; then, to create in-between 7, you need to
accurately place it between drawings 5 and 9.
How to Make Animated Films
22
Always check the drawings on the
pegs when you’ve completed each
set of in-betweens, just in case there
is something out of place or poorly
d r a w n .
Flipping as Opposed to Rolling
Now you should have more drawings in the sequence than you have ngers
to roll them. So, next you need to learn how to “ ip ” the drawings in order
so that you can see them move. As before, place the drawings together in
reverse order, the lowest number on the bottom and the highest number on
the top. Now, fan them a little so that the lower drawings are more inward
at the bottom and the uppermost drawings are more forward. Grip the top
of the paper pile rmly with one hand and then “ ip ” them from the bottom
up, as if you are ipping through the pages of a book. You should see the
pendulum swing from one side to another more clearly and smoothly.
Repeat the process several times and get used to seeing movement in this
way. Flipping is a major tool in testing and correcting your animation, so a skill
in this department goes hand in hand with being a good animator.
Arcs and Paths of Action
Now that you have seen the pendulum successfully swing from side to side,
let us cover a very important thing that you must remember when animating
any action. Nothing in life moves in a perfectly straight line, unless of course
it is a machine that is made up of xed-length elements. Everything moves in
curves or arcs, whether it is a leaf falling from a tree, a ball ying through the
air, or the torso and limbs of a walking character.
Animation Basics
23
Consequently, you have to remember this whenever you are animating
anything. You can see the principle best if you mark the center of the
pendulum ball on every one of the drawings, and then on a separate sheet of
paper trace them out, one by one. You will end up with a series of positions
that are in an arc, which perfectly describes the swing of the pendulum.
The original animation drawings for
the nal pendulum frames can have
the centers marked to show the arc
that the head of the pendulum makes
as it swings from side to side.
Our completed and colored pendulum
swing indicates a clear arc as it moves
from one side to the other.
This arc can also be described as the path of action of the swinging pendulum
ball, a term that animators use to describe the central, core movement in any
animated action gure.
How to Make Animated Films
24
The arc that is described by the center of the pendulum’s head as it swings backward and forward.
The path of action or the arc of any movement is something that should never
be forgotten by any animator, whether they are creating key poses or simply
putting in in-betweens for any extended movement. We will refer to arcs and
paths of action as we move through the class curriculum detailed in this book.
Timing and the Spacing of Drawings
It will take students and animation beginners some time to appreciate just
how many and how far each charted in-between needs to be. That is where
the hard-won experience of a master animator comes in. However, there are a
couple of pointers that the learner should know.
More Means Slower
The main thing to remember about all animated action is that the more
drawings there are, the slower the action will appear on the screen when the
nal action is seen.
It will still be a process of trial and error for beginners to appreciate it, but, by
rule of thumb, it should be remembered that if an action needs to be slow, the
animator will have to put many more drawings between the key drawings of
the action than if the action needs to appear fast. Fewer in-betweens mean a
faster action between the key drawings.
Animation Basics
25
Here are silhouettes of all the drawings required for a character walking with a limp. Because the time spent on
the strong leg (upper animation) is much slower and longer in screen time than that of the weaker leg (lower
animation), there are clearly more drawings required.
Speed Varies in Any Action
The next thing to remember with any action is that its speed is not constant.
An arrow red from a bow will be fast at rst but it will slow down as wind
resistance works on it. It will also arc upward then downward as the loss of
velocity, as well as gravity, exert an e ect on it.
Just like an arrow ying through the
air, a bouncing ball will slow down
at the top of each bounce apex,
meaning that there will have to be
more drawings positioned there than
elsewhere.
Alternatively, a big heavy train starts slowly at rst, increases speed as it builds
up momentum, and then slowly decelerates before it comes to its next stop.
Consequently, the animator has to take this into consideration when charting
out the in-between action from key drawing to key drawing. This brings us to
the most valuable technique of all for the positioning of drawings — slowing-
in and slowing-out.
How to Make Animated Films
26
With this animation, I had to add more
drawings at the top of the paper drop
than at the bottom, meaning that,
following the bouncing ball principle,
the paper will accelerate as it drops.
Slowing In and Slowing Out
If you really look at a real pendulum action in life, you will note that the speed
of the action is never constant. Watch a child on a playground swing and you
will notice that as he or she reaches the high spot of the arc — front swing or
back swing — there is a de nite slowing of movement. Then, as the swing
returns from one high point to the next, it will accelerate downward before
hitting the low spot and begin to decelerate as it goes up to the next high spot.
You can imagine that to slow the child
down at the top part of the swing in
each direction there needs to be more
drawings closer to the key positions
than the breakdown position.
Consequently, the speed of the swinging action is never constant — it is either
in a process of speeding up or slowing down. How might we better show this
in our previously drawn pendulum sequence? The rst thing is to go back and
look at our chart positioning.
Animation Basics
27
A reminder of what our even positions chart looks like.
On the basis that if we put more drawings in the action it will slow down, and
if we take more drawings out the action will speed up, we can rethink the
way we chart our in-betweens. As we know, the nearer to the high spots of
the pendulum swing (the key positions in our case), the more the swing will
decelerate, and then the farther we move away from the high-spot positions,
the more it will accelerate. Therefore, if we place more drawings nearer to
the key positions and less around the breakdown position, the more we will
replicate this slowing-down and speeding-up action.
Note the drawing placement di erences between this and our even positions chart from earlier. I have also
added an indication of the additional in-betweens in red, which when shot on ‘ones’ will give the entire action a
much smoother action.
So, if we rechart our numbers as shown in the gure, we will achieve the
desired result. Note that there are now more and closer-positioned drawings
to the high points of the swing and less at the low point. On the principle that
more means slower and less means faster, we will achieve the acceleration
and deceleration that we are looking for. This process of charting is known as
slowing-out (accelerating) and slowing-in (decelerating).
How to Make Animated Films
28
In-Betweening Slow-Ins and Slow-Outs
In-betweening slow-ins and slow-outs needs a little more focus when placing
and approaching the sequence of in-betweens to be attempted. With our new
slow-in/slow-out chart in the following gure, notice that the rst in-between
drawing between 1 and 9 is now drawing 7.
Clearly, drawing 7 in this slowing-out
part of the chart is midway between
drawing 1 and drawing 9.
Consequently, this is the rst in-between drawing you will need to do when
attempting this slowing-out section of the chart.
See how the positions of a pendulum
swing with a slowing-out action are
closer together at the beginning, then
widen as gravity causes the pendulum
to accelerate.
Once drawing 7 is successfully complete, you will see that drawing 5 is
the next in-between position, so it should be completed next, positioned
between drawings 1 and 7. Finally, with drawing 5 done, drawing 3 has to
be completed between 1 and 5.
Animation Basics
29
When approaching the slowing-in part of the chart, from drawing 9 to key
drawing 17, you will see that the rst drawing to be completed this time is
in-between drawing 11. Consequently, drawing 11 is placed accurately
between drawings 9 and 17.
The more slowing-out or slowing-in
there is with an action, the more
accurately you will need to be when
plotting in the guideline positions
before superimposition.
After drawing 11 comes in-between drawing 13, which is created by
positioning it precisely between drawings 11 and 17. Finally, drawing 15
needs to complete the action by drawing it precisely between drawings 13
and 17. This should give you a complete accelerating/decelerating swing to
the pendulum, which you should be able to see by ipping all the drawings
as previously described.
With a good number of nished
drawings to work with, it is much
easier to ip a long sequence of
animation drawings using a handheld
ipbook approach.
How to Make Animated Films
30
Suggested Reading
W h i t e , T . The Animator’s Workbook . New York : Watson-Guptill , 1988 , pp. 24 – 34,
38 – 43 and 112 – 117.
W h i t e , T . Animation from Pencils to Pixels: Classical Techniques for Digital
Animators . Boston : Focal Press , 2006 , pp. 210 – 226, 332 – 357 and 360 – 365.
DVD lecture: “Introduction to Inbetweening”.
Assignment 1
Divide the animation paper into two halves and create a pendulum swing on
either side.
Your two key drawings, 1 and 17, will need to look something like this.
However, you are required to produce two versions of the swing. In version
A, use even in-betweens, and in version B, use slowing-in and slowing-out
techniques. Note that the key numbers remain the same but the in-between
positioning and timing is di erent in both cases.
Animation Basics
31
Here are the two di erent charts that you have to work with for assignments A and B.
When you have completed your assignments, shoot them both as separate
pencil tests, repeating the action forward and backward three times without
any break. (Shoot your drawings: 0 1 , 03, 05, 07, 09, 11, 13, 15, 17, 15, 13, 11,
09, 07, 05, 03, 01, 03, 05, 07, 09, 11, 13, 15, 17, 15, 13, 11, 09, 07, 05, 03, 01, 03,
05, 07, 09, 11, 13, 15, 17, 15, 13, 11, 09, 07, 05, 03, 01 to create three repeats
on each.) Also, shoot one set of each on two’s , meaning that you hold each
drawing for two frames each. Then shoot them both on one’s , meaning that
you shoot each drawing for one frame each. This means that you should
ultimately end up with four pencil tests — two repeating for three complete
return swings on two’s and then two others for three complete return swings
on one’s.
Film Projection Rates
In general, lm is either projected at 24 frames per second (fps) in the
cinema or at 30 fps on TV or the Web. (Actually, British [PAL] TV projects lm
at 25 fps, but that is another story, too long to explain right now — see the
Animation from Pencils to Pixels book for further clari cation!) Therefore, if our
pendulum animation is shot on one’s in the rst test, one swing forward and
back will appear half as fast on the screen as the drawings shot on two’s. The
25 drawings shot on one’s for three swings on the pendulum will last a tiny
fraction over one second, whereas if these same drawings are shot on two’s,
they will appear on the screen for just over two seconds.
This page intentionally left blank
33
Class objective : To get a sense of spacing, timing, weight, and exibility in motion.
Equipment required: Lightbox, pencil, and paper.
N
ow that we have established the principles of key, breakdown, and
in-between positions in an action, it is now possible to go further and
tackle something a little more advanced. The principle of the bouncing ball
has been around since animation began, and it’s very tempting to think it
clich é to work with it here.
Masterclass 2
The Bouncing Ball
The core frames that comprise a
bouncing ball action.
How to Make Animated Films
34
However, there is no better exercise for the beginner to attempt, as it
covers all the major principles of animation — namely, the importance of
key, breakdown, and in-between positions; as well as arcs, paths of action,
slowing-in and slowing-out, weight, gravity, and timing. But, rst things rst.
Weight, Mass, and Flexibility
Before we can discuss the actual bouncing of the ball, we have to rst
ascertain the weight and density of the ball to be bounced. For example, a
soft, rubber bouncy ball will move in a far di erent way than a heavy, solid
rubber ball. A ping-pong ball will bounce in a far di erent way than a soccer
ball. It is all about weight, mass, and exibility, and this always has to be
borne in mind with any animated object or character, quite aside from the
rubber ball challenge. You will nd in my other books adequate descriptions
of the varying types of bouncing ball e ects, so I won’t go over them again
here. Su ce it to say, let us assume that we are going to work with a standard
bouncy, rubber ball, the kind that any kid will kick around in their house
or yard.
A basic rubber ball.
Gravity and the Path of Action
First let’s consider the path of action the ball is to take. Gravity will always
exert an e ect with all things. With the bouncing ball, gravity will merely
ensure that each bounce will get less and less, as the kinetic energy within
the ball is unable to ght against the constant pull of gravity. Therefore, as the
ball moves forward with a certain amount of velocity, the bounces of that ball
will increasingly diminish and be less and less apart. This will give us a path of
action for our bounce.
The Bouncing Ball
35
Key Positions
Next we need to establish our key positions along the designated path of
action. In the illustration below they are numbers ‘ 1 ’ , ‘ 11 ’ , ‘ 19 ’ , ‘ 27 ’ and ‘ 31 ’ . With
any bouncing action, the main key positions will be at the contact point with
the ground and at the apex of the upward arc. However, if we leave our key
ball positions in the air and on the ground perfectly round, there would be no
life or rubbery feel to the ball — it would merely appear like a cut-out shape
moving up and down across the screen, with no life at all. Consequently we
need to apply the age-old principles of squash and stretch.
Note that a ball will require increasingly
diminishing bounces that become
lower and lower before it comes to a
halt, possibly preceded by it rolling.
I always like to sketch my key positions
rst. I may modify them as I begin to
animate, but this does at least give me a
reliable ground plan to work with. Here I
have added the linking positions too, just
to indicate the nature of the transitions
from one key position to the next.
Squash
Remember that the ball we are dealing with is rubber, and therefore it
is subject to shape changes. Rubber is exible. If the ball were a metal
cannonball, it would not be subject to shape shifting and that gives the
animator the means to de ne the nature of the ball’s mass. When a exible,
How to Make Animated Films
36
rubber ball hits the solid ground it will distort in shape. In other words, it will
“ squash. ” The harder the ground and the faster the velocity the ball contains
before it hits the ground will de ne the amount of squash exerted on it.
Therefore, the higher the bounce and the further the ball travels from bounce
to bounce, the more the squash distortion will appear. In considering the
path of action we have already de ned for ourselves, I would suggest the key
squash position in the following gure would be reasonable.
This does have su cient squash to
suggest that it is a standard rubber
ball. Other balls, such as a soccer
ball or a cannonball, would behave
di erently, of course.
Note, however, that the apex positions of the ball in the gure do not squash,
as they are not subject to any contact with a hard surface like the ground, or
are even being distorted by velocity.
The beginning and end, up, (north)
positions of our bounce.
What is meant by this is that at the apex of a bouncing arc the ball is
momentarily at a zero point of movement and impact. Here, the ball has
slowly ground to a halt, as the kinetic energy from the previous bounce
The Bouncing Ball
37
has run out, and yet the forces of gravity have not taken hold quite yet.
Consequently, our rubber ball returns to its natural, circular shape. This is not
true, however, of its shape on the way up or the way down.
S t r e t c h
If you freeze a movie sequence of a moving shape you will notice that it will
actually appear as a blur. This is because at the regular lm speed of 24 fps the
shutter is not fast enough to capture a sharp image of the moving object, thus
the motion blur it presents. In animation, speci cally drawn 2D animation, it is
not easy to emulate the blur look. Consequently, the animator has to distort, or
“ stretch, ” the object to give the illusion of this fast-action blur. This is especially
so with the action of our ball when it is on the way up and on the way down.
A simulated-motion blur e ect to
emulate the real-world appearance of
a ball moving fast through space.
The dropping-down and rising-up
stretch e ects on the ball, which are
separated by the moment when it
actually hits the ground.
How to Make Animated Films
38
The amount of stretch is dependent on the degree of exibility within the
object being animated and the speed or velocity it is moving at. For example,
our rubber ball will distort signi cantly as it moves at speed, whereas a metal
cannon ball will not stretch very much. Also, the degree of stretch will vary
in accordance to the amount of distance covered and the speed the ball is
moving. In our reducing-bounce path of action, the distortion of the bounce
will therefore look like the following gure as we block-in the breakdown
positions.
The stretched ball on the left is longer
because the gravity-assisted, downward
velocity gives it greater speed. The
stretched distortion of the ball on the
right is not quite as extended, as it has
just hit the ground and therefore has
lost a great deal of its earlier velocity.
Note how the amount of distortion is increased with the higher bounces and
diminished with the lower ones.
Timing
Another factor that gives our bouncing ball action credibility is its timing.
Remember that as a ball reaches its uppermost apex position in an arced path
of action it will slow down to an almost stopped position, then it will begin to
accelerate as gravity begins to pull it earthward again. This will require that we
apply slowing-in and slowing-out principles to the in-betweens and we chart
them out. That means that more drawings need to be added to and from the
uppermost key position, as we have already established that more drawings
mean less speed.
The Bouncing Ball
39
If we assume that our two up key positions on the ball are 1 and 21, and the down (squash) position is 11, then
these charts clearly show that the ball will accelerate downward at the beginning and decelerate to the next up
position at the end.
The actual impact moment on the ground is pretty instantaneous when
the high-velocity ball hits, and the bounce back upward again is fast too,
depending on the height and speed of the bounce before it. Therefore, the
in-betweens at this point need to be minimal (i.e., less drawings mean more
speed).
Note that no in-betweens are required
during the “ hit ” positions — the
stretched ball e ectively squashes on
the next frame then stretches up again
on the frame immediately after that.
Consequently, we might now suggest the numbering and in-between
charting of our bouncing ball. See the following gures.
How to Make Animated Films
40
Based on our slowing-out/slowing-in
charting, the two frames in and out
of the hit position (11) are e ectively
breakdown drawings.
Note that these drawings are separated
out to the right to make the action
clearer to see. In reality, they would be
closer together and overlapping, with
the second ball position on the left
e ectively located directly on top of
the rst squash position.
The key thing to remember is that a exible ball will slow down and reshape
itself back to its perfectly round form at the top of a bounce, whereas it will
stretch more dramatically at the bottom of a bounce. This is why the bouncing
ball is such a good exercise for demonstrating the principles of timing,
slowing-in and slowing-out, and squash and stretch.
Weight
Of course, if our ball was not rubber and bouncing, but was heavy and
in exible or light and much more exible, the actions would look far di erent.
Following are three di erent examples of balls with varying weights and mass.