Microsoft introducing windows server 2008 Resource Kit phần 6 ppt
Bạn đang xem bản rút gọn của tài liệu. Xem và tải ngay bản đầy đủ của tài liệu tại đây (879.82 KB, 49 trang )
234 Introducing Windows Server 2008
through TS Gateway—it simply blocks them from accessing your internal terminal servers. In
addition, device redirection is blocked for remote clients connecting via TS Gateway (though
best practice is actually to block such redirection on your terminal servers and not on your
TS Gateway).
An alternative to placing your TS Gateway on the perimeter network is to put it on your corp-
net—that is, behind your internal firewall. Then place an SSL terminator in your perimeter net-
work to forward incoming RDP traffic securely to your TS Gateway. Either way you implement
this, however, one advantage of this new feature is that you don’t need to worry about using
an SSL VPN any longer and all the headaches associated with getting this working properly.
This integration with Network Access Protection (NAP) is an important aspect of TS Gateway
because many mid- and large-sized organizations that will deploy Windows Server 2008
will probably do so because of NAP (and also, of course, because of the many enhancements
in Terminal Services on the new platform). (We’ll be covering NAP in Chapter 10,
“Implementing Network Access Protection.”)
Before we go any further, let’s hear from one more of our experts:
From the Experts: Better Together: TS Gateway, ISA Server,
and NAP
Terminal Services–based remote access has long been used as a simpler, lower-risk
alternative to classical layer 2 VPN technologies. Whereas the layer 2 VPN has often
provided “all ports, all protocols” access to an organization’s internal network, the
Terminal Services approach restricts connectivity to a single well-defined port and pro-
tocol. However, as more and more capability has ascended the stack into RDP (such as
copy/paste and drive redirection), the potential attack vectors have risen as well. For
example, a remote drive made available over RDP can present the same kinds of security
risks as one mapped over native CIFS/SMB transports.
With the advent of TS Gateway, allowing workers to be productive from anywhere has
never been easier. TS Gateway also includes several powerful security capabilities to
make this access secure. In addition to its default encryption and authentication capa-
bilities, TS Gateway can be combined with ISA Server and Network Access Protection to
provide a secure, manageable access method all the way from the client, through the
perimeter network, to the endpoint terminal server. Combining these technologies
allows an organization to reap the benefits of rich RDP-based remote access, while
mitigating the potential exposure this access can bring.
ISA Server adds two primary security capabilities to the TS Gateway solution. First,
because it can act as an SSL terminator, it allows for more secure placement of TS
Gateway servers. Because ISA can be the Internet-facing endpoint for SSL traffic, the
TS Gateway itself does not need to be placed within the perimeter network. Instead,
Chapter 8 Terminal Services Enhancements 235
the TS Gateway can be kept on the internal network and the ISA Server can forward traf-
fic to it. However, if ISA were simply performing traffic forwarding, it would be of little
real security benefit. Thus, the second main security value ISA brings to the solution is
pre-authentication capabilities. Rather than simply terminating SSL traffic and forward-
ing frames on to the TS Gateway, ISA authenticates users before they ever contact the
TS Gateway, ensuring that only valid users are able to communicate with it. Using ISA as
the SSL endpoint and traffic inspection device allows for better placement of TS Gateway
resources and ensures that they receive only inspected, clean traffic from the Internet.
Although ISA Server provides important network protection abilities to a TS Gateway
solution, it does not address client-side threats. For example, users connecting to a TS
Gateway session might have malicious software running on their machines or be non-
compliant with the organization’s security policy. To mitigate against these threats, TS
Gateway can be integrated with Network Access Protection to provide enforcement of
security and healthy policies on these remote machines.
NAP is included in Windows Server 2008 and can be run on the same machine as
TS Gateway, or TS Gateway can be configured to use an existing NAP infrastructure run-
ning elsewhere. When combined with TS Gateway, NAP provides the same policy-based
approach to client health and enforcement as it does on normal (not RDP-based) net-
work connections. Specifically, NAP can control access to a TS Gateway based on a cli-
ent’s security update, antivirus, and firewall status. For example, if you choose to enable
redirected drives on your terminal servers, you might require that clients have antivirus
software running and up to date. NAP allows organizations to ensure that computers
connecting to a TS Gateway are healthy and compliant with its security policies.
–John Morello
Senior Program Manager, Windows Server Division
One other thing about ISA is that it does inspect the underlying HTTP stream when being
accessed over port 80, and although this is not RDP/HTTP inspection, it does afford addi-
tional protection from anything that might try to piggyback on the HTTP connection itself.
Implementing TS Gateway
Implementing TS Gateway on a server running Windows Server 2008 requires that you add
the TS Gateway role service for the Terminal Services role. When you do this using Server
Manager, you are prompted to add the following roles and features as well (if they are not
already installed):
■ Network Policy and Access Server role (specifically, the Network Policy Server role
services)
■ Web Server (IIS) role (plus various role services and components)
■ RPC Over HTTP Proxy feature
236 Introducing Windows Server 2008
Note that for smaller environments, it’s all right to install TS Gateway and the Network Policy
Server (NPS) on the same Windows Server 2008 machine. Larger enterprises, however, will
probably want to separate these two different role services for greater isolation and
manageability.
Adding the TS Gateway role service also requires that you specify a server certificate for your
server so that it can use SSL to encrypt network traffic with Terminal Services clients. A valid
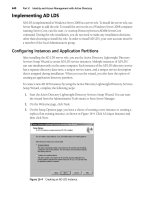
digital certificate is required for TS Gateway to work, and you have the choice during installa-
tion of this role to import a certificate (for example, a certificate from VeriSign if you want cli-
ents to be able to access terminal servers running on your corpnet from anywhere in the world
via the Internet), create a self-signed certificate (good for testing purposes), or delay installing
a certificate until later:
After importing a certificate for your server, you’re given the option of creating authorization
policies now or doing so later using the TS Gateway Management console. There are two
kinds of authorization policies you need to create:
■ Connection authorization policies These are policies that enable remote users to
access your network based on conditions you have specified.
■ Resource authorization policies These are policies that grant access to your terminal
servers only to users whom you have specified.
Chapter 8 Terminal Services Enhancements 237
Finally, the Add Role Services Wizard indicates which additional roles and role services will be
installed for the Network Policy and Access Server and Web Server (IIS) roles (if these roles
and role services are not installed already). And finally you’re done.
Once your TS Gateway is set up, you can configure it by creating additional connections and
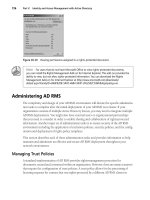
resource authorization policies. For example, you could create a resource authorization policy
(RAP) to specify a group of terminal servers on your internal corpnet that you want the
TS Gateway to allow access to by authorized remote clients:
When you create and configure connection authorization policies, you specify which security
groups of users they apply to and, optionally, which groups of computers as well. You also
specify whether authorization will use smart cards, passwords, or both. When you create and
configure resource groups, you define a collection of resources (for example, terminal servers)
that remote users will be allowed to access. You can specify these resources either by selecting
a security group that contains the computer accounts of these computers, by specifying indi-
vidual computers using their names (hostname or FQDN) or IP addresses, or by allowing
remote users to access any computer (client or server) on your internal network that has
Remote Desktop enabled on it. You need to create both connection and resource
authorization policies for TS Gateway to do its job.
Finally, the Monitoring node in the TS Gateway Management console lets you monitor
connections happening through your TS Gateway and disconnect them if needed.
Benefits of TS Gateway
Why is TS Gateway a great feature? It gives your users remote access to fully firewalled termi-
nal servers on your corpnet, and it does so without any of the headache of having to configure
a VPN connection to those servers. That’s not to say that VPNs aren’t still useful, but if users
don’t need a local copy of data, network bandwidth is limited, or the amount of application
data that needs to be transferred is large, you’ll likely get better performance out of using TS
Gateway than trying to let your users VPN into your corpnet to access your terminal servers.
238 Introducing Windows Server 2008
Best practices for deploying this feature? Use a dedicated TS Gateway (it can coexist with
Outlook RPC/HTTP), and consider placing it behind Microsoft Internet and Acceleration
Server (ISA) rather than using a simple port-based firewall.
Terminal Services Licensing
Let’s move on and talk briefly about Terminal Services Licensing (or TS Licensing) and also
hear from more of our experts on the Terminal Services team at Microsoft. The job of TS
Licensing is to simplify the task of managing Terminal Services Client Access Licenses
(TS CALs). In other words, TS Licensing helps you ensure your TS clients are properly
licensed and that you aren’t purchasing too many (or too few) licenses. TS Licensing manages
clients that are unlicensed, temporarily licensed, and client-access (that is, permanent)
licensed clients, and it manages licenses for both devices and users that are connecting to
your terminal servers. The TS Licensing role service in Windows Server 2008 supports
terminal servers that run both Windows Server 2008 and Windows Server 2003.
Device-based TS Licensing basically works like this: When a client tries to connect to a
terminal server, the terminal server first determines whether the client requires a license (a
TS CAL). If the client requires a license, the terminal server contacts your TS Licensing server
(usually a separate machine, but for small environments this could also be the terminal
server) and requests a license token, which it then forwards to the client. Meanwhile, the
TS Licensing server keeps track of all the license tokens you’ve installed on it to ensure your
environment complies with licensing requirements. Note that if a client requires a permanent
license token, your TS Licensing server must be activated. (Nonactivated TS Licensing servers
can issue only temporary tokens.)
A new feature of TS Licensing in Windows Server 2008 is its ability to track issuance of TS Per-
User CALs. If your terminal server is configured to use Per-User licensing mode, any user
attempting to connect to it must have a TS Per-User CAL. If the user doesn’t, the terminal
server will contact the license server to obtain a CAL for her, and administrators can track the
issuance of these CALs by using the TS Licensing management tool. Note that TS Per-User
CAL tracking and reporting requires an Active Directory infrastructure.
To learn more about managing licensing servers, let’s hear now from our experts. First let’s
learn how to configure TS Licensing after this role service has been installed:
From the Experts: Configuring Terminal Server License Server
After Installation
TS Licensing Manager, the admin console for Terminal Server License Server, can now
find configuration-related issues with a Terminal Server License Server. It displays the
License Server configuration status under a new column, Configuration, in the list view.
If there are some issues with the License Server configuration, the configuration status
will be set to Review.
Chapter 8 Terminal Services Enhancements 239
TS Licensing Manager also allows the admin to view the current License Server
configuration settings in detail. The admin can choose Review Configuration from the
right-click menu for a License Server, which opens the configuration dialog. The License
Server configuration dialog displays the following information:
■ TS License Server Database Path
■ Current scope for the license server
■ Membership of the Terminal Server License Server group at the Active Directory
Domain Controller. During installation of the TS Licensing role on a domain
machine, the setup tries to add the License Server in the Terminal Server License
Server group at the Active Directory Domain controller, for which it requires
domain administrator privileges. Membership to this group enables the License
Server to track Per-User license usage.
■ Status of the global policy License Server Security Group (TSLS). If this policy
is enabled and the Terminal Server Computers group is not created, a warning
message will be displayed. If the policy is disabled, no message/status will be
displayed.
Admins can take corrective actions if some License Server configuration issues are
found. The License Server configuration dialog allows an administrator to take the
following actions:
■ Change the License Server scope.
■ If the License Server scope is set to Forest and the License Server is not published
in Active Directory, the License Server configuration dialog shows a warning mes-
sage to the administrator and allows the administrator to publish the License
Server in Active Directory.
■ Add to the TSLS group in AD.
■ If the License Server Security Group Group Policy is enabled and the Terminal
Server Computers local group is not created, the License Server configuration
dialog displays the warning message and allows the administrator to create the
Terminal Server Computers local group on the License Server.
–Ajay Kumar
Software Design Engineer, Terminal Services
240 Introducing Windows Server 2008
Next, let’s learn how revocation of TS CALs works in Windows Server 2008. CAL revocation
can be done only with Per-Device CALs, not Per-User ones, and there are some things you
need to know about how this works before you begin doing it. Here’s what our next expert
has to say concerning this:
From the Experts: CAL Revocation on Terminal Services License
Server
CAL Revocation is supported only for Windows Server 2008 TS Per-Device CALs.
Terminal Services License Server’s automatic CAL reclamation mentioned later in this
sidebar applies only to Per Device CALs.
Per-Device CALs are issued to clients for a certain validity period, after which the CAL
expires. If the client accesses the terminal server often, the validity of the CAL is renewed
accordingly before its expiration. If the client does not access the terminal server for a
long time, the CAL eventually expires. The Terminal Services License Server reclaims all
the expired CALs periodically with its automatic CAL reclamation mechanism.
Occasionally, an administrator might need to transfer a Per-Device CAL from the client
back into the free license pool on the License Server (a process referred to as reclaiming
or revoking) when the original client has been permanently removed from the environ-
ment and one needs to reallocate the CAL to a different client. Historically, there was no
way to do it. An administrator would have had to wait until the CAL expired or lost its
validity and was automatically reclaimed by its mechanism. So it was desired to have the
License Server support a mechanism to reclaim or revoke CALs.
Using the new Revoke CAL option in TS Licensing Manager, administrators can now
reclaim issued CALs and place them back into a free license pool on the License Server.
An administrator has to also select the specific client whose CAL needs to be revoked.
But there are certain restrictions on the number of CALs that can be revoked at a given
time. This is a restriction imposed by the License Server to prevent misuse. The restric-
tion can be stated as follows: At any given point in time, the number of LH PD CALs in
a revoked state cannot exceed 20 percent of the total number of LH PD CALs installed
on the License Server. A CAL goes into a revoked state right after revocation, and its state
is cleared when it goes past its original expiration date. One can see the list of CALs in
the revoked state in the TS Licensing Manager tool by observing the Status column in
the client list view. When the administrator has exceeded this limit, he is given a date
when further revocation is possible.
Chapter 8 Terminal Services Enhancements 241
Note that TS CALs should not be revoked to affect concurrent licensing. TS CALs can
only be revoked when it is reasonable to assume that the machine they were issued to
will no longer participate in the environment, for example, when the machine failed.
Client machines, no matter how infrequently they may connect, are required to have a
TS CAL at all times. This also applies for per user licensing.
–Harish Kumar Poongan Shanmugam
Software Design Engineer in Test, Terminal Services
Finally, let’s dig into some troubleshooting stuff and learn how we can diagnose licensing
problems for terminal servers. Our expert will look at four different troubleshooting scenarios
in this next sidebar:
From the Experts: Running Licensing Diagnosis on a Terminal
Server
The Licensing Diagnosis tool is now integrated into the Terminal Services Configuration
MMC snap-in (TSConfig.msc). This tool on the terminal server, in conjunction with the
TS Licensing Manager’s Review Configuration option on the License Server, can be use-
ful in finding problems arising because of a misconfigured TS Licensing setup. The
Diagnostic tool does not report all possible problems in all possible scenarios during
diagnosis. However, it collates the entire TS Licensing information of Terminal Services
and the License Servers at a single place and identifies common licensing configuration
errors.
Upon launch of the Licensing Diagnosis tool, it first makes up a list of License Servers
that the terminal server can discover via auto-discovery and also those that can be dis-
covered via manual specification by using either the Use The Specified License Servers
option in TSConfig.msc (registry-by-pass) or the Use The Specified Terminal Services
License Servers Group Policy. It then contacts each License Server in turn to gather its
configuration details, such as the activation state, License Key Pack information, relevant
Group Policies, and so on. For this to work properly, we need to make sure that the
Licensing Diagnosis tool has been launched with credentials that have administrator
privileges on the License Servers. If needed, use the Provide Credentials option to specify
appropriate credentials for each License Server individually at run time. Then the termi-
nal server’s licensing settings—such as the licensing mode, Group Policies, and so on—
are analyzed and compared, together with the License Servers information, to summa-
rize common TS Licensing problems. A summary of diagnostic messages, with the
possible resolution steps, is provided by this tool at the end of diagnosis.
We can understand how the tool can be used by considering some sample scenarios.
242 Introducing Windows Server 2008
Case 1: Basic Diagnosis
The terminal server has just been set up, and the licensing mode of the server has
remained in Not Yet Configured mode. No other Licensing settings have been done on
the TS, and a License Server has not been set up. Within the grace period of 120 days,
TS has allowed connection to clients.
Past the grace period, the administrator observes that the clients are no longer able to
connect. The administrator launches the diagnostic tool and finds that two diagnostic
messages are reported. One message is that the TS mode needs to be configured to either
Per-User or Per-Device mode, and the other is that no License Servers have been discov-
ered on the terminal server. The administrator now sets the TS licensing mode to Per-
Device mode using TSConfig.msc. (If the TS licensing mode is set up using the Set The
Terminal Services Licensing Mode Group Policy, the Licensing tab in TSConfig.msc is
disabled.) A License Server is also set up by the administrator in the domain. When
rerunning the tool, it now reports that the License Server needs to be activated and
License Key Packs of the required TS mode need to be installed on the License Server.
And so on.
Case 2: Advanced Diagnosis Cases
The Terminal Services License Server Security Group Policy has been enforced on the
domain. The administrator has not added the TS computer name into the Terminal
Server Computers local group on the License Server. When the Licensing Diagnosis tool
is launched, it displays a diagnostic message indicating that licenses cannot be issued to
the given terminal server because of the Group Policy setting. This can be corrected by
using the Review Configuration option in TS Licensing Manager to create the TSC
group, and TS can be added to the group using the Local Users And Groups MMC
snap-in.
If the License Server computer name is not a member of the Terminal Server License
Servers local group in the Active Directory Domain Controller of the TS’s domain, per-
user licensing and per-user license reporting will not work. In such case, when the
Licensing Diagnosis tool is opened on TS, the Per-User Reporting And Tracking field in
the License Server Configuration Details panel indicates that per-user tracking is not
available. This can be corrected by using the Review Configuration option in TS
Licensing Manager to add the License Server computer name into the Terminal Server
License Servers group.
Case 3: License Server Discovery Diagnosis on the Terminal Server
During License Server setup, the administrator selected to install the License Server in
the Forest Discovery Scope. But as the administrator ran the installation without the
required Active Directory privileges, the License Server did not get published in the
Active Directory licensing object. When the Licensing Diagnosis tool is launched on the
TS, it is unable to discover the License Server. For diagnosing discovery problems, the
administrator can initially specify the License Server by manually configuring it in the
Chapter 8 Terminal Services Enhancements 243
Use The Specified License Servers option in TSConfig.msc so that the License Server
shows up in the diagnostic tool. When rerunning the Licensing Diagnosis tool, the
administrator notices that the License Server’s discovery scope is visible in the License
Server Configuration Details section. The discovery scope shows up as Domain Scope,
instead of Forest Scope. This can be corrected by using the Review Configuration option
in TS Licensing Manager and exercising the Change Scope option to set the License
Server discovery scope to Forest Scope.
Case 4: Licensing Mode Mismatch Diagnosis
The terminal server is configured in Per-Device licensing mode, but the administrator
has installed Per-User licenses on the License Server. On launching the Licensing Diag-
nosis tool, a diagnostic message shows that the appropriate type of licenses are not
installed on the License Server, indicating a potential mode mismatch problem.
–Harish Kumar Poongan Shanmugam
Software Design Engineer in Test, Terminal Services
For a look at how one can use WMI to manage licensing for terminal servers, see the
“Terminal Services WMI Provider” section upcoming.
Other Terminal Services Enhancements
Finally, let’s briefly talk about three other features of Terminal Services in Windows
Server 2008:
■ WMI Provider for scripted management of Terminal Services features
■ Integrating Windows System Resource Manager with Terminal Services
■ Terminal Services Session Broker
Terminal Services WMI Provider
Windows Server 2008 and Windows Vista have many enhancements to WMI compared with
previous versions of Microsoft Windows, and we’ve already covered these enhancements ear-
lier in Chapter 4. Let’s hear from our experts on the Terminal Services team concerning these
WMI enhancements, including some tips on how to use WMI for managing Terminal Services:
244 Introducing Windows Server 2008
From the Experts: Using the TS WMI Provider
The TS WMI (tscfgwmi) provider offers a rich set of class templates that allows a
TS server to be configured remotely or locally. For it to work properly, however, several
things need to happen:
1. By default, only user accounts that are part of the administrators group are allowed
to read and write WMI properties and methods.
2. There is a User Account Control (UAC) consideration if you use the TS WMI
provider locally. Run the script or application that uses TS WMI as an elevated
process. If you receive a message that says, “Access Denied (0x80041003), Unspec-
ified Error (0x80004005),” most likely you’re using the TS WMI provider with a
protected administrator and the process or application is not being elevated.
If you are using the TS WMI provider remotely, the user account needs to be a
domain user that is part of the local administrators group on the remote machine.
3. If you are using the TS WMI provider remotely, make sure the following firewall
exceptions are selected:
❑ If the remote machine is in TS Remote Administration mode: File And Printer
Sharing, Windows Management Instrumentation (WMI)
❑ If the remote machine is in TS Application mode: Terminal Services
If firewall exceptions are not properly configured, the return error code HRESULT
can be WBEM_E_ACCESS_DENIED (0x80041003), RPC Server Is Unavailable
(Win32 0x800706ba).
4. 4. Note that in Win2k3/XP, the TS WMI provider is grouped in the root/cimv2
namespace. In Windows Vista/Windows Server 2008, it is grouped in the
root/cimv2/TerminalServices namespace. WMI security impersonation level
wbemImpersonationLevelImpersonate and security authentication level
wbemAuthenticationLevelPktPrivacy settings are also required for Windows Vista/
Windows Server 2008. If an incorrect namespace is specified, the return error
code HRESULT is WBEM_E_INVALID_NAMESPACE (0x8004100E).
TS WMI is also the abstraction layer of the Terminal Services Configuration UI tool
(TSConfig.msc). Essentially, TSConfig is a UI tool that uses TS WMI to do the actual
work. This also means that TS WMI can be used to troubleshoot errors when using
TSConfig. For example, if you get an “Unspecified error” message when using TSConfig,
you need to set the Remote Control Setting by writing a small script with TS WMI that
uses the Win32_TSRemoteControlSetting class template. If you get the same error with the
script, most likely it is a UAC issue.
Chapter 8 Terminal Services Enhancements 245
Other Tips
Wbemtest.exe (which comes with Windows Vista/Windows Server 2008 at
%windir%\System32\Wbem) is a great tool to use if you want to find out more
information about a particular WMI class template and which WMI class templates are
available. It can be used to query all class templates within a namespace. It is also able to
show a brief description of what a particular property or method does. For example, to
list all available class templates for the namespace TerminalServices, follow these steps:
1. Open a cmd shell running as administrator.
2. Type wbemtest.
3. Click the Connect button, connect to the namespace root\cimv2\TerminalServices,
select Packet Privacy under Authenticationlevel, and click the Connect button.
4. Under Method Invocation Options, select the Use Amended Qualifiers check box.
5. Click the Enum Classes button, leave the Enter Superclass Name edit box empty,
select the Recursive option, and then click the OK button. A Query Result dialog
will show up with all the class templates under the TerminalServices namespace.
Now if you want to know more about remote control settings, all you need to do is
double-click on the Win32_TSRemotecontrolSetting within the Query Result list, and a
new Object Editor dialog will show up. Clicking on the Show MOF button will give you
a brief description concerning each of the Win32_TSRemotecontrolSetting properties and
methods.
For more info on Wbemtest, see />library/28209472-b3ed-4b96-a6dd-c43ffdd913691033.mspx?mfr=true. And please visit
/>Remote-Configuration-Primer-Part-1.aspx for a quick primer on the TS WMI provider.
–Soo Kuan Teo
Software Development Engineer in Test, Terminal Services
And here’s a sidebar from another expert concerning another new feature of Windows
Server 2008—the ability to use WMI to track Terminal Services licensing:
From the Experts: Monitoring TS Licensing Using WMI
Up until Windows Server 2003, TS Licensing did not have a way to dynamically monitor
the usage of licenses. With the WMI providers introduced in Windows Server 2008, you
can write scripts that track the number of licenses issued to devices or users. No more
worrying about being caught unaware—write a script, put it in as a scheduled task for
whatever interval you want the monitoring to happen, and track license usage.
246 Introducing Windows Server 2008
Here are the WMI providers that you can use for tracking Per-Device and Per-User CAL
usage:
■ For tracking Per-Device license usage, you need to query all the instances of key
packs installed on the License Server. To do this, query all instances of
Win32_TSLicenseKeyPack. Within each instance, you can get the count of issued vs.
available licenses using the properties TotalLicenses and AvailableLicenses.
■ For tracking Per-User license count, you can query the most recent report gener-
ated or create one if it does not exist. To generate a report, call the static method
GenerateReport on the class Win32_TSLicenseReport. This method returns a file
name that you can use to go through the details. You can also enumerate existing
reports by enumerating instances of the Win32_TSLicenseReport class. The report
names are generated based on the date and time. Choose the latest from the set,
and then look at the properties InstalledLicenses and LicenseUsageCount to get a
number for how many licenses were used up for Per-User licensing.
–Aruna Somendra
Program Manager, Terminal Services
Windows System Resource Manager
Windows System Resource Manager (WSRM) is an optional feature of Windows Server 2008
that can be used to control how CPU and memory resources are allocated to applications, ser-
vices, and processes running on a computer. WSRM is not a feature of Terminal Services, but
if you install it on a terminal server you can control allocation of such resources for Terminal
Services users and sessions.
WSRM works by using resource allocation policies to manage how computer resources
(memory and CPU) are allocated to processes running on the machine. When you install the
WSRM feature on a terminal server, you have a choice of two policies you can use:
■ Equal_Per_User This means that CPU allocation is divided on an equal-shares basis
among all users, and any processes created by the user are able to use as much of the
user’s total CPU allocation as might be necessary.
■ Equal_Per_Session This policy is new to Windows Server 2008 and means that each
user session with its associated processes gets an equal share of the CPU resources of
the system.
The usefulness of the new Equal_Per_User resource allocation policy in a Terminal Services
environment where WSRM is being used is when you have multiple sessions running for the
same user. For example, say you have two sessions running for the same user, and another ses-
sion running for a second user. In this case, the first two sessions will get same amount of CPU
resources allocated as the third session. By contrast, if the Equal_Per_Session policy is being
Chapter 8 Terminal Services Enhancements 247
used, the first user will get twice the CPU resources as the second user. Note, however, that the
default setting in Windows Server 2008 is for Terminal Services users to be restricted to run-
ning only a single session. (You can configure this restriction from the main page of the
Terminal Services Configuration snap-in in Server Manager.)
Terminal Services Session Broker
Terminal Services Session Broker (TS Session Broker) is the new Windows Server 2008 name
for what used to be called Terminal Services Session Directory, a feature that allows users to
automatically reconnect to a disconnected session in a load-balanced Windows Server 2003
terminal server farm. The session directory maintains a list of sessions indexed by user name
and terminal server name. It enables the user, after disconnecting a session, to reconnect to
the same terminal server where the disconnected session resides so that she can resume work-
ing in that session. Furthermore, this reconnection process will work even if the user connects
from a different client computer than the one used to initiate the session.
In Windows Server 2003, load balancing for terminal servers can be provided by using either
the built-in Network Load Balancing (NLB) component or a third-party load balancing solu-
tion. As terminal servers become more and more mission-critical for hosting business applica-
tions, doing this becomes more and more important. By combining NLB with Terminal
Services Session Directory, Windows Server 2003 terminal server farms can thus provide
scale-out capability and also help ensure business continuity.
In Windows Server 2008, Terminal Services Session Directory is now called TS Session Broker
and includes out-of-the-box load-balancing capability designed to replace Microsoft NLB;
however, Session Broker will continue to work with both NLB and third-party solutions. In
addition, while Session Directory required the Enterprise or higher SKU of Windows Server
2003, TS Session Broker is available even in the Standard Edition of Windows Server 2008.
Enabling TS Session Broker is done using the Terminal Services Configuration snap-in.
Double-click the Member Of Farm In TS Session Broker link at the bottom of the center
Details pane to open a Properties sheet. Then, on the TS Session Broker tab, select the check
box labeled Join A Farm In TS Session Broker and fill in the remaining details (you need to do
this on all terminal servers in your farm).
248 Introducing Windows Server 2008
With Windows Server 2008, there are two key deployment scenarios for Session Broker:
■ Session Broker Load Balancing Session Broker provides a simple-to-deploy load
balancing solution for small scale deployments. Create a DNS record for the farm that
contains the IP address of the terminal servers in the farm. DNS (or DNS round robin)
will direct the initial connection to a server in the farm; however, Session Broker will per-
form the actual load balancing and direct the user to the least loaded terminal server in
the farm (based on number of Windows sessions). The TS Client provides basic failover
support for the initial connection, and in the case of a server failure, will automatically
try the next entry in the DNS record after a 20 second time-out. Session Broker is capable
of detecting server failures and not direct users to a server that is down. Alternatively,
NLB or another connection routing mechanism can be used in place of DNS.
■ Third-party Load Balancing (or MS NLB) Session Broker can be deployed in the same
configuration as Windows Server 2003 Session Directory, using any third-party hard-
ware load balancers.
Finally, with the regular stream of patches and application updates admins are faced with
these days, it can be difficult to find a time when a terminal server can be brought offline
without interrupting user experience. Starting with Beta 3 of Windows Server 2008, the new
Server Draining feature enables planned maintenance for TS Session Broker load balancing
farms without interruption of user experience. The following sidebar explains more.
Chapter 8 Terminal Services Enhancements 249
From the Experts: Terminal Server Draining
Administrators typically would like to drain their servers to apply security update
patches and keep the machine up to date. In this scenario, they would try to prevent new
users from logging on to the server; at the same time, they would want to get current
users actively using the machine to save their work and log off in a phased manner.
In Windows Server 2003, a very primitive form of server draining is supported by using
a command-line tool called chglogon.exe. The chglogon.exe /disable switch prevents
any new logons from occurring in the machine. However, it also prevents users who
already have disconnected sessions from reconnecting to their disconnected sessions
enabling them to log off gracefully and save their work.
In Windows Server 2008, server draining is introduced. This can be enabled by using a
command-line tool (new flags to chglogon.exe), using the Terminal Services Configura-
tion tool, and also via WMI. When a server is put in drain mode, new logons are not
allowed, but users who already have a disconnected session are allowed to reconnect.
In addition, for remote administration purposes, administrators who connect with the
/admin switch are allowed to log on, even if drain mode is set. This mode is supported
only when the TS role is installed.
We expect that this enhanced drain support will enable IT administrators to patch their
servers in a way that causes minimal trouble to all the remote users. Before taking the
server down for patching and installing updates, administrators can enable drain mode
and then send a message that prompts users to save their work and log off in a day or
two!
Also, we have relevant events logged in the Windows event log when somebody is not
allowed to log on because the server is in drain mode. We recommend that administra-
tors check the event log for relevant events to determine whether drain mode was indeed
the cause for someone to be denied logon from a remote site.
–Sriram Sampath
Development Lead, Terminal Services
Conclusion
As we’ve seen in this chapter, Terminal Services has been greatly enhanced in Windows Server
2008 with new features such as TS RemoteApp, TS Web Access, and TS Gateway—plus lots of
security, manageability, and user experience improvements too numerous to list here and
many of which we’ve described. In my mind, Windows Server 2008 has changed the whole
meaning of Terminal Services from a platform for providing remote access to different types of
250 Introducing Windows Server 2008
clients (thin/fat, Windows/non) to a powerful and secure application-deployment platform
that enterprises can use to provide remote users with access anywhere and anytime. The evo-
lution of this platform is remarkable—I can’t wait to see what there will be in future versions!
Additional Resources
You’ll find a brief overview of Terminal Services features in Windows Server 2008 at
By the time you
read this chapter, this site will probably redirect you to something with a lot more content.
If you have access to the Windows Server 2008 beta program on Microsoft Connect
(), you can get some great Terminal Services documents from
there, including:
■ Windows Server 2008 Terminal Services RemoteApp Step-by-Step Guide
■ Windows Server 2008 Terminal Services TS Gateway Server Step-by-Step Setup Guide
■ Windows Server 2008 Terminal Services TS Licensing Step-by-Step Setup Guide
Plus you’ll also find chats there, saved Live Meeting presentations, and lots of other useful
stuff, with more being added all the time.
There’s also a TechNet Forum where you can ask questions and help others trying out the
Terminal Services features; see
ForumID=580&SiteID=17 for this forum. (Windows Live registration is required.)
The Terminal Services Team Blog is definitely something you won’t want to miss. See
Finally, be sure to turn to Chapter 14, “Additional Resources,” for more sources of information
concerning new Terminal Services features, and also for links to webcasts, whitepapers, blogs,
newsgroups, and other sources of information about all aspects of Windows Server 2008.
251
Chapter 9
Clustering Enhancements
In this chapter:
Failover Clustering Enhancements . . . . . . . . . . . . . . . . . . . . . . . . . . . . . . . . . . . . . . .252
Network Load Balancing Enhancements . . . . . . . . . . . . . . . . . . . . . . . . . . . . . . . . . .278
Conclusion . . . . . . . . . . . . . . . . . . . . . . . . . . . . . . . . . . . . . . . . . . . . . . . . . . . . . . . . . . .283
Additional Resources. . . . . . . . . . . . . . . . . . . . . . . . . . . . . . . . . . . . . . . . . . . . . . . . . . .283
Don’t tell my local bookstore, but I don’t shop there anymore—even though I’m frequently
seen browsing the shelves. Instead, I browse the latest titles while sitting in one of the comfort-
able chairs the bookstore generously provides its customers (big mistake on their part) and
when I find a book that interests me, I make a note of the title, author, and ISBN.
Then, when I get home, I order the book from an online bookstore. Shhh—don’t tell my local
bookstore I do this, otherwise they might bar me from using their comfy chairs next time I
visit them.
Online bookstores and similar sites have changed the way I do much of my shopping.
But what if an online bookstore ran their entire Web site on a single server and that server
died? Chaos! Frustration!! Lost business!!! I might even go back to my local bookstore
and buy from there!
What keeps sites like these always available is clustering. A single server is a single point of
failure for your business, and when that server goes down so does your revenue. The same
goes for a single source of storage, a single network link, or even having all your computing
resources located at a single geographical site. Fault-tolerant technologies such as RAID can
mitigate the risk of storage failures, while redundant network links can reduce the impact of a
network failure. And data backup and archival solutions are essential if you want to ensure
continuity of your business after a catastrophe. But it’s also important to implement clustering
technologies if you want to fully protect your business against downtime and ensure high
availability to customers.
A cluster is simply a collection of nodes (servers) that work together in some fashion to
ensure high availability for your applications. Clusters also provide scalability for applications
because they enable you to bring additional nodes into your cluster when needed to support
increased demand. And since the days of Microsoft Windows NT 4.0, there have been two
types of clustering technologies supported by Microsoft Windows: server clusters and
Network Load Balancing (NLB).
252 Introducing Windows Server 2008
First, let’s look at server clusters. Originally code-named “Wolfpack” when the technology was
first developed, server clusters provide failover support for long-running applications and
other network services, such as file, print, database, or messaging services. Server clusters
ensure high availability for these services because when one node in your cluster dies, other
nodes take over and assume the workload of the failed node and continue servicing client
requests to keep your applications running. In Windows NT 4.0, server clusters were known
as the Microsoft Cluster Services (MSCS); in Windows 2000 Server, this feature was renamed
Server Clusters. Now in Windows Server 2008, we call this technology Windows Server
Failover Clustering (WSFC) or simply Failover Clustering, which communicates clearly the
purpose of this form of clustering and how it works.
Then there’s Network Load Balancing, which was originally called Windows Load
Balancing Service (WLBS) in Windows NT 4.0. This form of clustering technology was
renamed Network Load Balancing (NLB) in Windows Server 2003, which is still the name for
this technology in Windows Server 2008. NLB provides a highly available and scalable envi-
ronment for TCP/IP services and applications by distributing client connections across multi-
ple servers. Another way of saying this is that NLB is a network driver that balances the load
for networked client/server applications by distributing client connections across a set of serv-
ers. NLB is especially great for scaling out stateless applications running on Web servers when
the number of clients is growing, but you can also use it to ensure the availability of terminal
servers, media servers, and even VPN servers.
Let’s look at the improvements the Windows Server team has made to these two clustering
technologies in Windows Server 2008. As with everything in this book, the new features and
enhancements I’m going to describe here are subject to change before RTM. And who knows?
Maybe after you read this you’ll want to go out, buy Windows Server 2008, and start your own
online bookstore! Well, maybe not—the competition is already pretty stiff in that market.
Failover Clustering Enhancements
Let’s start with improvements to Failover Clustering, as the most significant changes have
occurred with this technology. Here’s a quick list of enhancements, which we’ll unpack
further in a moment:
■ A new quorum model that lets clusters survive the loss of the quorum disk.
■ Enhanced support for storage area networks and other storage technologies.
■ Networking and security enhancements that make clusters more secure and easier to
maintain.
■ An improved tool for validating your hardware configuration before you try to deploy
your cluster on it.
■ A new server paradigm that sees clustering as a feature rather than as a role.
■ A new management console that makes setting up and managing clusters a snap.
Chapter 9 Clustering Enhancements 253
■ Improvements to other management tools, including the cluster.exe command and
WMI provider.
■ Simplified troubleshooting using the Event logs instead of the old cluster.log.
But before we look at these enhancements in detail, let me give you some insight into why
Microsoft has implemented them in Windows Server 2008.
Goals of Clustering Improvements
Why is Microsoft making all these clustering improvements in Windows Server 2008?
For their customers.
I know, you’re IT pros and you want to read the technical stuff. And you probably wish the
Marketing Police would step in and put me in jail for making a statement like that. But think
about it for a moment—it’s you who are the customer! At least, you are if you are an admin for
some company. So what have been your complaints with regard to Microsoft’s current
(Windows Server 2003 R2 Enterprise and Datacenter Edition) version of server clustering
technology?
Well, perhaps you’ve said (or thought) things similar to the following:
“Why do I have to assign one of my 26 available drive letters to the quorum resource just for
cluster use? This limits how many instances of SQL I can put on my cluster! And why does the
quorum in the Shared Disk model have to be a single point of failure? I thought the whole
purpose of server clusters was to eliminate a single point of failure for my applications.”
“Why do we as customers have to be locked in to a single vendor of clustering hardware
whose products are certified on the Hardware Compatibility List (HCL) or Windows Server
Catalog? I found out I couldn’t upgrade the firmware driver on my HBA because it’s not listed
on the HCL so it’s unsupported, argh. So I called my vendor and he says I’ll have to wait
months for the testing to be completed and their Web site to be updated. Maintaining clusters
shouldn’t be this hard!”
“Why is it so darned hard to set up a cluster in the first place? I was on the phone with
Microsoft Premier Support for hours until the support engineer finally helped me discover
I had a cable connected wrong—plus I forgot to select the third check box on the second
property sheet of the first node’s configuration settings on the left side of the right pane of the
cluster admin console.”
“We had to hire a high-priced clustering specialist to implement and configure a cluster
solution for our IT department because our existing IT pros just couldn’t figure this clustering
stuff out. They kept asking me questions like, “What’s the difference between IsAlive and
LooksAlive?”, and I kept telling them, “I don’t understand it either!” Why can’t they make it
so simple that an ordinary IT pro like me can figure it out?”
254 Introducing Windows Server 2008
“I want to create a cluster that has one node in London and another in New York. Is that
possible? Why do you say, ‘Maybe’?”
And here’s my favorite:
“All I want to do is set up a cluster that will make my file share highly available. I’m an
experienced admin who’s got 100 file servers and I’ve set up thousands of file shares in the
past, so why are clusters completely different? Why do I have to read a 50-page whitepaper
just to figure out how to make this work?”
OK, I think I’ve probably got your attention by now, so let’s look at the enhancements. I’m
assuming that as an experienced IT pro you already have some familiarity with how server
clustering works in Windows Server 2003, but if not you can find an overview of this topic
on the Microsoft Windows Server TechCenter. See the “Server Clusters Technical Reference”
found at />7a9a073c95ee1033.mspx?mfr=true.
Understanding the New Quorum Model
For Windows Server 2003 clusters, the entire cluster depends on the quorum disk being alive.
Despite the best efforts of SAN vendors to provide highly available RAID storage, sometimes
even they fail. On Windows Server 2003, you can implement two different quorum models:
the shared disk quorum model (also sometimes called the standard quorum model or the
shared quorum device model), where you have a set of nodes sharing a storage array that
includes the quorum resource; and the majority node set model, where each node has its own
local storage device with a replicated copy of the quorum resource. The shared disk model is
far more common mainly because a very high percentage of clusters are 2-node clusters.
In Windows Server 2008, however, these two models have been merged into a single hybrid or
mixed-mode quorum model called the majority quorum model, which combines the best of
both these earlier approaches. The quorum disk (which now is referred to as a witness disk) is
now no longer a single point of failure for your cluster as it was in the shared disk quorum
model of previous versions of Windows server clustering. Instead, you can now assign a vote
to each node in your cluster and also to a shared storage device itself, and the cluster can now
survive any event that involves the loss of a single vote. In other words—drum roll, please—a
two-node cluster with shared storage can now survive the loss of the quorum. Or the loss of
either node. This is because each node counts as one vote and the shared storage device also
gets a vote, so losing a node or losing the quorum amounts to the same thing—the loss of one
vote. (Actually, technically the voting thing works like this: Each node gets one vote for the
internal disk where the cluster registry hive resides and the “witness disk” gets one vote
because a copy of the cluster registry is also kept there. So not every disk a node brings online
equates to a vote. Finally, the file share witness gets one vote even though a copy of the cluster
registry hive is not kept there.)
Chapter 9 Clustering Enhancements 255
Or you can configure your cluster a different way by assigning a vote only to your witness disk
(the shared quorum storage device) and no votes for your nodes. In this type of clustering
configuration, your cluster will still be operational even if only one node is still online and
talking to the witness. In other words, this type of cluster configuration works the same way
as the shared disk quorum model worked in Windows Server 2003.
Or if you aren’t using shared storage but are using local (replicated) storage for each node
instead, you can assign one vote to each node so that as long as a majority of nodes are still
online, the cluster is still up and any applications or services running on it continue to be
available. In other words, this type of configuration achieves the same behavior as the majority
node set model worked on the previous platform and it requires at least three nodes in your
cluster.
In summary, the voting model for Failover Clustering in Windows Server 2008 puts you in
control by letting you design your cluster to work the same as either of the two cluster models
on previous platforms or as a hybrid of them. By assigning or not assigning votes to your
nodes and shared storage, you create the cluster that meets your needs. In other words, in
Windows Server 2008 there is only one quorum model and it’s configurable by assigning
votes the way you choose.
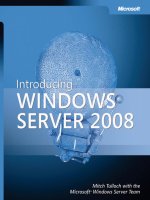
There’s more. If you want to use shared storage for your witness, it doesn’t have to be a
separate disk. (The file share witness can’t be a DFS share, however.) It can now simply be a
file share on any file server on your network (as shown in Figure 9-1) and one file server can
even function as a witness for multiple clusters. (Each cluster requires its own share, but you
can have a single file server with a number of different shares, one for each cluster.) This
approach is a good choice if you’re implementing GeoClusters (geographically dispersed
clusters), something we’ll talk about in a few moments.
Figure 9-1 Majority quorum model using a file share witness
File server with shared folder
Node 1 Node 2
256 Introducing Windows Server 2008
A few quick technical points need to be made:
■ If you create a cluster of at least two nodes that includes a shared disk witness, a \Cluster
folder that contains the cluster registry hive will be created on the witness.
■ There are no longer any checkpoint files or quorum logs, so you don’t need to run
clussvc –resetquorumlog on startup any longer. (In fact, this switch doesn’t even exist
anymore in Windows Server 2008.)
■ You can use the Configure Quorum Settings wizard to change the quorum model after
your cluster has been created, but you generally shouldn’t. Plan your clusters before you
create them so that you won’t need to change the quorum model afterwards.
Understanding Storage Enhancements
Now let’s look at the storage technology enhancements in Windows Server 2008, many of
which result from the fact that Microsoft has completely rewritten the cluster disk driver
(clusdisk.sys) and Physical Disk resource for the new platform. First, clustering in Windows
Server 2008 can now be called “SAN friendly.” This is because Failover Clustering no longer
uses SCSI bus resets, which can be very disruptive to storage area network operations. A SCSI
reset is a SCSI command that breaks the reservation on the target device, and a bus reset
affects the entire bus, causing all devices on the bus to become disconnected. Clustering in
Windows 2000 Server used bus resets as a matter of course; Windows Server 2003 improved
on that by using them only as a last resort. Windows Server 2008, however, doesn’t use them
at all—good riddance. Another improvement this provides is that Failover Clustering never
leaves your cluster disks (disks that are visible to all nodes in your cluster) in an unprotected
state that can affect the integrity of your data.
Second, Windows Server 2008 now supports only storage technologies that support
persistent reservations. This basically means that Fibre Channel, iSCSI, and Serial Attached
SCSI (SAS) shared bus types are allowed. Parallel-SCSI is now deprecated.
Third—and this might seem like a minor point—the quorum disk no longer needs a drive letter
because Failover Clustering now supports direct disk access for your quorum resource. This is
actually a good thing because drive letters are a valuable commodity for large clusters. You
can, however, still assign the quorum a drive letter if you need to do so for some reason.
Fourth, Windows Server 2008 supports GUID Partition Table (GPT) disks. These
disks support partitions larger than 2 terabytes (TB) and provide improved redundancy
and recoverability, so they’re ideal for enterprise-level clusters. GPT disks are supported by
Failover Clustering on all Windows Server 2008 hardware platforms (x86, x64, and IA64) for
both Enterprise and Datacenter Editions.
Chapter 9 Clustering Enhancements 257
Fifth, new self-healing logic helps identify disks based on multiple attributes and self-heals the
disk if found by any attribute. There’s a sidebar coming up in a moment where an expert from
the product team will describe this feature in more detail. And in addition, new validation
logic helps preserve mount point relationships and prevent them from breaking.
Sixth, there is now a built-in mechanism that helps re-establish relationships between physical
disk resources and logical unit numbers (LUNs). The operation of this mechanism is similar
to that of the Server Cluster Recovery Utility tool (ClusterRecovery.exe) found in the
Windows Server 2003 Resource Kit.
Seventh (and probably not finally) there are revamped chkdsk.exe options and an enhanced
DiskPart.exe command.
Did I mention the improved Maintenance Mode that lets you give temporary exclusive access
to online clustered disks to other applications? Or the Volume Shadow Copy Services (VSS)
support for hardware snapshot restores of clustered disks? Or the fact that the cluster disk
driver no longer provides direct disk fencing functionality (disk fencing is the process of
allowing/disallowing access to a disk), and that this change reduces the chances of disk
corruption occurring?
Oh yes, and concerning dynamic disks, I know there has been customer demand that
Microsoft include built-in support for dynamic disks for cluster storage. However, this is not
included in Windows Server 2008. Why? I would guess for two reasons: first, there are already
third-party products available, such as Symantec Storage Foundation for Windows, that can
provide this type of functionality; and second, there’s really no need for this functionality in
Failover Clusters. Why? Because GPT disks can give you partitions large enough that you’ll
probably never need to worry about resizing them—plus if you do need to resize a partition on
a basic disk, you can do so in Windows Server 2008 using the enhanced DiskPart.exe tool
included with the platform, which now allows you to shrink volumes in addition to being able
to extend them.
The bottom line for IT pros? You might need to upgrade your storage gear if you plan on
migrating your existing Windows server clusters to Windows Server 2008. That’s because
some hardware will simply not be upgradable and you can’t assume that what worked with
Windows Server 2003 will work with Windows Server 2008. In other words, there won’t be
any grandfathering of storage hardware support for qualified Windows server clustering
solutions that are currently listed in the Windows Server Catalog. But I’ll get to the topic of
qualifying your clustering hardware in a few moments.