Microsoft introducing windows server 2008 Resource Kit phần 5 pdf
Bạn đang xem bản rút gọn của tài liệu. Xem và tải ngay bản đầy đủ của tài liệu tại đây (1.05 MB, 49 trang )
Chapter 7 Active Directory Enhancements 185
From the Experts: Troubleshooting Certificate Revocation Issues
Certificate issues are among the top five AD FS troubleshooting hot spots for the product
support team here at Microsoft. One particular AD FS-related certificate issue centers on
a known routine process that checks for the validity of a certificate by comparing it to a
CA-issued list of revoked certificates. This process, in the world of PKI, is known as
certificate revocation list (CRL) checking.
The revocation verification setting configured for an account partner on a federation
server is used by the federation server to determine how revocation verification will be
performed for tokens sent by that account partner. The revocation verification setting of
the federation server itself, configured on the Trust Policy node of the AD FS snap-in, is
used by the federation server and by any AD FS Web agent bound to the federation
server to determine how the revocation verification process will be performed for the
federation server’s own token signing certificate. The verification process will make use
of CRLs imported on the local machine or that are available through the CRL
Distribution Point.
When troubleshooting certificate issues, it is important to be able to quickly disable
revocation checking to help you locate the source of the problem. For example, this can
be helpful in deployment scenarios where there are no CRLs available for the token-
signing certificates.
To help troubleshoot CRL-checking issues, the AD FS product team has provided a
method within the AD FS snap-in in Windows Server 2008 where you can adjust or
disable how revocation checking behaves within the scope of a federation service. For
example, you can set revocation checking to check for the validity of all the certificates in
a certificate chain or only the end certificate in the certificate chain.
–Nick Pierson
Technical Writer of CSD (Connected System Division) UA team
–Lu Zhao
Program Manager, Active Directory Federation Service
–Aurash Behbahani
Software Design Engineer, Active Directory Federation Service
–Marcelo Mas
Software Design Engineer in Testing, Active Directory Federation Service
186 Introducing Windows Server 2008
Active Directory Rights Management Services
The last (but certainly not least) IDA component in Windows Server 2008 that we’ll look at is
Active Directory Rights Management Service (AD RMS). As we mentioned at the beginning of
this chapter, AD RMS is the follow-up to Windows RMS. Windows RMS is an optional compo-
nent for the Windows Server 2003 platform that can be used to protect sensitive information
stored in documents, in e-mail messages, and on Web sites from unauthorized viewing, mod-
ification, or use. AD RMS is designed to work together with RMS-enabled applications such as
the Microsoft Office 2007 System and Internet Explorer 7.0, and it also includes a set of core
APIs that developers can use to code their own RMS-enabled apps or add RMS functionality to
existing apps.
AD RMS works as a client/server system in which an AD RMS server issues rights account
certificates that identify trusted entities such as users and services that are permitted to pub-
lish rights-protected content. Once a user has been issued such a certificate, the user can
assign usage rights and conditions to any content that needs to be protected. For example, the
user could assign a condition to an e-mail message that prevents users who read the message
from forwarding it to other users. The way this works is that a publishing license is created for
the protected content and this license binds the specified usage rights to the piece of content.
When the content is distributed, the usage rights are distributed together with it, and users
both inside and outside the organization are constrained by the usage rights defined for the
content.
Users who receive rights-protected content also require a rights account certificate to access
this content. When the recipient of rights-protected content attempts to view or work with
this content, the user’s RMS-enabled application sends a request to the AD RMS server to
request permission to consume this content. The AD RMS licensing service then issues a
unique use license that reads, interprets, and applies the usage rights and conditions specified
in the publishing licenses. These usage rights and conditions then persist and are automati-
cally applied wherever the content goes. AD RMS relies upon AD DS to verify that a user
attempting to consume rights-protected content has the authorization to do so.
AD RMS has been enhanced in several ways in Windows Server 2008 compared with its
implementation in Windows Server 2003. These enhancements include an improved
installation experience whereby AD RMS can be added as a role using Server Manager; an
MMC snap-in for managing AD RMS servers rather than the Web-based interface used in the
previous platform; self-enrollment of the AD RMS cluster without the need of Internet connec-
tivity; integration with AD FS to facilitate leveraging existing federated relationships between
partners; and the ability to use different AD RMS roles to more effectively delegate the
administration of AD RMS servers, policies and settings, rights policy templates, and log
files and reports.
Chapter 7 Active Directory Enhancements 187
Conclusion
Identity and access is key to how businesses communicate in today’s connected world. Active
Directory in Windows Server 2008 is a significant advance in the evolution of a single, unified,
and integrated IDA solution for businesses running Windows-based networks that need to
connect to other businesses that are running either Windows or non-Windows networks.
Keeping the big picture for IDA in mind helps us to see how all these various improvements to
Active Directory work together to provide a powerful platform that can unleash the power of
identity for your enterprise.
I know, the Marketing Police are knocking at my door after that last sentence and they want to
get me for that one. But whether it sounds like marketing gobbledygook or not, it’s true!
Additional Resources
The starting point for finding information about all things IDA on Microsoft platforms
is Although this link currently redirects you to
I have a
feeling this will change as Windows Server 2008 approaches RTM.
The Windows Server 2008 main site on Microsoft.com also has a general overview
called “Identity and Access in Windows Server Longhorn” that you can read at
By the time you read it,
there probably will be more details on the site than there are at the time of writing this.
You can also find a developer-side overview of the directory, identity, and access
services included in Windows platforms (including Windows Server 2008) on MSDN at
If you have access to the Windows Server 2008 beta program on Microsoft Connect
(), you can get a lot of detailed information about AD DS, AD CS,
AD FS, and so on. First, you’ll find the following Step-By-Step guides (and probably others
will be there by the time you read this):
■ Installing, Configuring, and Troubleshooting OCSP
■ Auditing Active Directory Domain Services Changes
■ Active Directory Domain Services Backup and Recovery
■ Planning, Deploying, and Using a Read-Only Domain Controller
■ Restartable Active Directory
188 Introducing Windows Server 2008
■ Certificate Settings
■ Active Directory Rights Management Services
■ Identity Federation with Active Directory Rights Management Services
■ Active Directory Domain Services Installation and Removal
■ Active Directory Federation Services
Be sure also to turn to Chapter 14, “Additional Resources,” for more sources of information
concerning the Windows server core installation option, and also for links to webcasts,
whitepapers, blogs, newsgroups, and other sources of information about all aspects of
Windows Server 2008.
189
Chapter 8
Terminal Services Enhancements
In this chapter:
Core Enhancements to Terminal Services. . . . . . . . . . . . . . . . . . . . . . . . . . . . . . . . . .190
Terminal Services RemoteApp . . . . . . . . . . . . . . . . . . . . . . . . . . . . . . . . . . . . . . . . . . .216
Terminal Services Web Access . . . . . . . . . . . . . . . . . . . . . . . . . . . . . . . . . . . . . . . . . . .226
Terminal Services Gateway . . . . . . . . . . . . . . . . . . . . . . . . . . . . . . . . . . . . . . . . . . . . . .232
Terminal Services Licensing . . . . . . . . . . . . . . . . . . . . . . . . . . . . . . . . . . . . . . . . . . . . .238
Other Terminal Services Enhancements . . . . . . . . . . . . . . . . . . . . . . . . . . . . . . . . . . .243
Conclusion . . . . . . . . . . . . . . . . . . . . . . . . . . . . . . . . . . . . . . . . . . . . . . . . . . . . . . . . . . .249
Additional Resources. . . . . . . . . . . . . . . . . . . . . . . . . . . . . . . . . . . . . . . . . . . . . . . . . . .250
Terminal Services has been available on the Microsoft Windows platform since the days of
Windows NT 4.0. So most readers of this book (all seasoned IT pros, I’ll bet) have some famil-
iarity with it as a group of technologies that provides access to the full Windows desktop from
almost any computing device, including other Windows computers, Mobile PC devices, thin
clients, and so on. When you access a terminal server from one of these devices, the server is
doing all the hard work of running your applications, while a protocol named Remote Desk-
top Protocol (RDP) sends keyboard and mouse input from client to server and displays infor-
mation in return. In addition to enabling administrators to run programs remotely like this,
Terminal Services also lets administrators remotely control Windows computers that have
Remote Desktop (a Terminal Services feature) enabled on them.
Anyway, if you work in a medium-sized organization, you likely have at least one Windows
terminal server running either Windows 2000 Server or Windows Server 2003. And larger
enterprises likely have a whole farm of them load-balanced together. Either way, you need to
take a good hard look at what improvements are coming to Terminal Services in Windows
Server 2008, and that’s what this chapter is about.
Because this book is brief and covers so many different new features and enhancements
found in Windows Server 2008, I’m going to assume you’re already familiar with basic
Terminal Services concepts and terminology, including Remote Desktop Protocol (RDP),
the two Terminal Services clients (Remote Desktop Connection and the Remote Desktop
Web Connection ActiveX control), the two Terminal Service modes (Remote Desktop for
Administration and the Terminal Server role), and Terminal Services Session Broker—plus
190 Introducing Windows Server 2008
various other things, such as console session, client resource redirection, and the different
tools (MMC snap-ins, Group Policy, WMI scripts) you can use to configure and manage
Terminal servers and their clients. If you’re not up to speed on any of these topics, you can
find a good overview a whitepaper titled “Technical Overview of Windows Server 2003 Termi-
nal Services,” which is available from Another good
general source of information concerning Terminal Services is the Windows Server 2003
Terminal Services Technology Center found at />technologies/terminalservices/default.mspx. Or you can just buy a mainframe if you find your
server room too quiet for your liking. (See Chapter 3, “Windows Server Virtualization,” for
why we need to bring back the mainframe—remember those days? You can probably get one
at a bargain on eBay.)
Because there have been so many enhancements to Terminal Services in Windows Server
2008, we’ll need a roadmap to navigate this chapter. So here’s a quick list of the new and
enhanced features we’re going to cover:
■ Core Enhancements to Terminal Services
■ Terminal Services RemoteApp
■ Terminal Services Web Access
■ Terminal Services Gateway
■ Terminal Services Easy Print
■ Terminal Services Session Broker
■ Terminal Services Licensing
■ Terminal Services WMI Provider
■ Deploying Terminal Services
■ Other Terminal Services Enhancements
Before we start looking at these enhancements, however, be warned—I’m not just going
describe their features. I’ll also provide you with tons of valuable insights, recommendations,
and troubleshooting tips from the people who are bringing you Terminal Services in Windows
Server 2008. In other words, you’ll hear from members of the Terminal Services product team
themselves! Well, that’s not a warning, is it? Do you warn your kids at the end of June by
saying, “Warning, summer vacation ahead?”
Core Enhancements to Terminal Services
Windows Server 2008 has a number of core improvements in how Terminal Service works.
Most of the improvements we’ll look at were first introduced in Windows Vista, but for some
Chapter 8 Terminal Services Enhancements 191
of these enhancements to work in Windows Vista you need Windows Server 2008 running on
the back end as your terminal server. Many of these improvements center around changes to
the Remote Desktop Connection client that comes with Windows Vista and Windows
Server 2008, so let’s begin there. After that, we’ll look at some core changes on the server side
that change some of the ways Terminal Services operates and that terminal server admins
need to know about. Finally, we’ll briefly look at how to install Terminal Services, and then
move on to other new features such as TS Gateway, TS Web Access, and TS RemoteApp.
Remote Desktop Connection 6.0
On previous versions of Windows, there were effectively two Terminal Services clients:
■ Remote Desktop Connection, a Win32 client application that is the “full” Terminal
Services client and is included in Windows XP and Windows Server 2003. You could
also download a version of this client (msrdpcli.exe) that could be installed on earlier
Windows versions to provide similar functionality.
■ Remote Desktop Web Connection, an ActiveX control you could download from a Web
page running on IIS and then use to connect over the Internet to a terminal server.
Remote Desktop Web Connection has slightly less functionality than the full Terminal
Services client but is easy to deploy—just download it using a Web browser and you can
open a Terminal Services session within your Web browser.
Starting with Windows Vista, however (and in Windows Server 2008 too), this ActiveX
control has been integrated into the Remote Desktop Connection client, so there is only one
client now and users don’t have to download anything to access terminal servers over the
Internet. This is good because some organizations might have security policies in place that
prevent users from downloading ActiveX controls onto their client machines.
This new version 6.0 client (which is also available for Windows XP Service Pack 2—see article
925876 in the Microsoft Knowledge Base for more info) provides a number of significant
improvements in the areas of user experience and security. Let’s look at security first.
Network Level Authentication and Server Authentication
Remote Desktop Connection 6.0 (let’s shorten this to RDC 6.0) supports Network Level
Authentication (NLA), a new authentication method that authenticates the user, the client
machine, and server credentials against each other. This means client authentication is now
performed before a Terminal Services session is even spun up and the user is presented with
a logon screen. With previous RDC clients, the Terminal Services session is started as soon as
the user clicks Connect, and this can create a window of opportunity for malicious users to
perform denial of services attacks or steal credentials via man-in-the-middle attacks.
192 Introducing Windows Server 2008
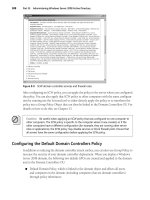
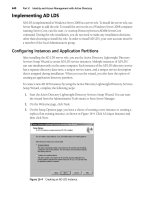
To configure NLA, open the System item from Control Panel, click Remote Settings, and select
the third option as shown here:
The other security enhancement in RDP 6.0 is Server Authentication, which uses Transport
Layer Security (TLS) and enables clients to be sure that they are connecting to the legitimate
terminal server and not some rogue server masquerading as the legitimate one. To ensure
Server Authentication is used on the client side, open RDC and on the Advanced tab select the
Don’t Connect If Authentication Fails (Most Secure) setting from the drop-down list box
(the default setting is Warn Me If Authentication Fails).
Chapter 8 Terminal Services Enhancements 193
You can also configure Server Authentication using the Terminal Services Configuration snap-
in. Using Network Level Authentication together with Server Authentication can help reduce
the threat of denial of service attacks and man-in-the-middle attacks.
Display Improvements
RDC 6.0 also provides users with a considerably enhanced user experience in the area
of display improvements. For one thing, Terminal Services sessions now support a maximum
display resolution of 4096 × 2048. (Boy, I wish I had a monitor that supported that!) And
although before only 4:3 display resolution ratios were supported, now you can define custom
resolutions like 16:9 or 16:10 to get the more cinematic experience supported by today’s wide-
screen monitors. Setting a custom resolution can be done from the RDC UI or by editing a
saved .rdp file using Notepad or by starting RDC from a command line using switches—that is,
typing mstsc /w:width /h:height at a command prompt.
Another display improvement is support for spanned monitors—that is, spreading the display
across multiple monitors. Note that to do this you have to make sure that all your monitors
have the same resolution configured and their total resolution doesn’t exceed 4096 × 2048.
Additionally, you can span monitors only horizontally, not vertically (better for the neck,
actually) using the /span switch.
A third display improvement is that RDC now supports full 32-bit color depth, which means
that users can now experience maximum color quality when running applications in Termi-
nal Services sessions. Personally, I can’t tell the difference between True Color (24-bit) and
Highest Quality (32-bit), but I suppose someone who works with Photoshop can quickly
notice the difference. To get 32-bit color, you need to configure it both on the client (on the
Display tab of the RDC properties) and on the terminal server, which must be running
Windows Server 2008. Or you can configure 32-bit color from the server by opening the
Terminal Services Configuration snap-in and double-clicking on the RDP connection you
want to configure (like the default RDP-Tcp connection). Then switch to the Client Settings
tab of the connection’s properties dialog box and change the color depth to 32 bits per pixel.
In fact, 32-bit color is now the default; this is because for typical higher-color applications,
such as IE and PowerPoint, the new compression engine in RDP6 typically sends less data
over the network in 32-bit color mode rather than in 24-bit color mode. If you need high color
you should consider 15-bit, 16-bit, and 32-bit color before you consider 24-bit.
Yet another display enhancement is support for ClearType in Terminal Services sessions. This
feature of RDC 6.0 is known as font smoothing because it makes the fonts of displayed text a lot
easier to read. You can enable this on RDC by selecting the Font Smoothing check box on the
Experience tab.
194 Introducing Windows Server 2008
To ensure font smoothing is enabled on the server side of your Windows Server 2008 terminal
server, open Appearance And Personalization from Control Panel, click Personalization, click
Windows Color And Appearance, click Effects, and make sure ClearType is selected.
Let’s now hear from one of our experts at Microsoft concerning the new font-smoothing
feature of Terminal Services in Windows Server 2008.
From the Experts: Pros and Cons of Font Smoothing
ClearType is a Microsoft font smoothing technique that improves the readability of text
on LCD screens. With the proliferation of LCD screens and the release of Windows Vista
and Microsoft Office 12, ClearType has become very important. Most of the fonts avail-
able in Vista and Office 12 are tuned for ClearType and look ugly when it is turned off.
For these reasons, the Terminal Services team decided to give the end user the option to
turn on ClearType. You can get ClearType in RDP 6.0 by going to the Experience tab and
selecting Enable Font Smoothing.
But the high fidelity of ClearType comes at a cost. Normally (with font smoothing
disabled), fonts are remoted (sent across the wire) as glyphs. Remote Desktop Protocol
remotes glyphs efficiently and caches them to reduce bandwidth consumption. With
ClearType enabled, fonts are remoted as bitmaps and not as glyphs. Remote Desktop
Protocol does not remote these bitmaps efficiently, resulting in increased bandwidth
consumption. From our initial internal testing, we found that the impact of enabling
ClearType for text editing/scrolling scenarios could range from 4 to 10 times the
bandwidth consumed when the scenario was run with ClearType disabled.
–Somesh Goel
Software Development Engineer in Test, Terminal Services
Chapter 8 Terminal Services Enhancements 195
Display Data Prioritization
I’m separating out this feature from the other display-related improvements because it’s
related both to display experience and to network utilization. In previous versions of RDC,
you could be doing stuff on your remoted desktop when you decided to print a long docu-
ment or transfer a large file, and then suddenly your keyboard/mouse responded sluggishly
and your display became jerky and slow to update. What was happening? The file or print
operation was consuming most of the available bandwidth between your client machine and
the terminal server, and as a result, the RDP stuff (keyboard, mouse, display info) was having
trouble getting through.
RDC 6.0 solves this problem by using a new feature called display data prioritization, which
automatically controls virtual channel traffic so that your keyboard, mouse, and display data
is given a higher priority than other virtual channel traffic (such as the file and print data). The
result of this prioritization is that your mouse and keyboard won’t become sluggish and your
display won’t be adversely affected when you perform bandwidth-intensive actions like this.
The default setting for display data prioritization in Windows Vista and Windows Server 2008
is 70% allocated for display/input data and 30% for everything else. This ratio can be
adjusted by modifying certain DWORD registry values located under the HKLM\SYSTEM\
CurrentControlSet\Services\TermDD registry key on your terminal server. The values you
can tweak are these:
■ Setting FlowControlDisable to 1 disables display data prioritization, and all requests are
then handled on a first-in-first-out (FIFO) basis.
■ FlowControlDisplayBandwidth specifies the relative priority for display/input data; its
default value is 70, and its maximum value is 255.
■ FlowControlChannelBandwidth specifies the relative priority for all other data; its default
value is 30, and its maximum value is 255.
■ Setting FlowControlChargePostCompression to 0 means that flow control calculates
bandwidth allocation based on precompression bytes, although setting it to 1 uses
postcompression bytes. (The default is 0.)
The key values you probably want to tweak are FlowControlDisplayBandwidth and
FlowControlChannelBandwidth, as it’s the ratio between these two values (not their absolute
values) that defines the display data prioritization ratio for your server.
Desktop Experience
RDC 6.0 also enhances the user’s desktop experience by offering the option to provide
users with desktop themes, photo management, Windows Media Player, and other desktop
experiences provided by Windows PCs. Previous versions of Terminal Services didn’t
provide this. Instead, users who use RDP to connect to terminal servers were presented with
a Windows Server 2008 desktop look and feel that couldn’t be customized using themes,
196 Introducing Windows Server 2008
while popular applications such as Windows Media Player were also unavailable for them to
use.
To get the full desktop experience in a Terminal Services session, however, you need both
RDC 6.0 on the client plus Windows Server 2008 as your terminal server. To enable desktop
experience on the server, log on to your terminal server as administrator, start Server Manager,
right-click the Features node, and select Add Feature from the context menu. When the Add
Feature Wizard appears, select the check box beside Desktop Experience and continue
through the wizard. After that, you need to start the Themes service on your server and con-
figure the theme you want users to have in their sessions. Note that you don’t have to do any-
thing on the client side, as support for the full desktop experience is built into the RDC 6.0
client.
Desktop Composition
This enables the full Windows Aero desktop experience with its translucent windows, thumb-
nail-sized taskbar button window previews, and Flip 3D to be remoted. Desktop composition
requires that client computers be running Windows Vista and that they have hardware that
can support the full Aero experience. Remote desktop composition is supported only in two
instances:
■ Remote Desktop to a Windows Server running terminal services in single user mode
■ Remote Desktop to a Windows Vista host machine
To enable desktop composition, first configure desktop experience on the terminal server,
and then configure the server to use the Windows Vista theme. Then on the client, open the
RDP properties, switch to the Experience tab, and select the Desktop Composition check box.
Plug and Play Device Redirection Framework
RDC 6.0 also supports redirection of specific Plug and Play (PnP) devices in Terminal Services
sessions, and it includes inbox support for redirection of Windows Portable Devices—that is,
media players based on the Media Transfer Protocol (MTP) and digital cameras based on the
Picture Transfer Protocol (PTP). PnP device redirection is designed to allow applications to
access PnP devices seamlessly, regardless of whether they run locally or remotely, and it works
with both full Terminal Services remote desktop sessions and with TS Remote App.
When you launch your Terminal Services session, the redirected PnP device is automatically
installed in the remote session, and PnP notifications and AutoPlay popups will appear in the
remote session. The redirected device is scoped to that particular remote session only and is
not accessible from any other session, either remote or console, on the remote computer. To
enable PnP device redirection on the client, open the RDP properties, select the Local
Resources tab, click More, and select the appropriate check boxes.
Chapter 8 Terminal Services Enhancements 197
Selecting the Devices That I Plug In Later check box lets you see PnP devices get installed on
the remote machine when you plug the PnP device into your local machine while the Terminal
Services session to is active. Or you can enable PnP device redirection from the server by open-
ing the Terminal Services Configuration snap-in, double-clicking on the RDP connection you
want to configure, switching to the Client Settings tab, and selecting the Supported Plug And
Play Devices check box.
Once the redirected PnP device is installed on the remote machine, the device is available
for use within your Terminal Services session and can be accessed directly from applications
running on the server, such as RemoteApp programs you have launched from your client
machine. Note that PnP device redirection doesn’t work over cascaded terminal server
connections.
How does PnP device redirection work under the hood? Let’s gain some insight by listening to
another one of our Microsoft experts who works on the Terminal Services team:
From the Experts: Inside the PnP Device Redirection Framework
One new feature in Microsoft Windows Vista was support for redirecting certain Plug
and Play devices over a Remote Desktop Connection. Windows Server 2008 now adds
this functionality to server scenarios. Although Windows Server 2008 includes only in-
box support for Windows Portable Devices and Point of Service for .NET 1.11 devices,
the PnP Device Redirection Framework is generic enough to support a variety of devices.
PnP device redirection works by redirecting I/O request packets (IRPs). This approach
provides several advantages. The server needs only a generic redirected device driver,
rather than requiring a function driver for each device a client could possibly redirect.
198 Introducing Windows Server 2008
This also protects the server from possible instability caused by problematic third-party
device drivers. On the client, IRP redirection allows local applications to continue to use
a device while it is being redirected, and the same device can also be redirected to several
simultaneous remote sessions.
When a new connection is established with device redirection enabled, terminal server
creates a proxy device node on the server for each device being redirected. Windows
then starts WUDFhost.exe, which then loads usbdr.dll to act as the driver for each
redirected device. One instance of WUDFhost.exe can support multiple devices, which
improves terminal server’s scalability. When a server-side application calls NtCreateFile
on a redirected device, usbdr.dll forwards this call over the RDP connection. On the
client, Remote Desktop Connection then calls NtCreateFile on the real device and
returns the result to the server. Additional I/O operations are handled in a similar
manner.
A generic redirected device driver is included, but special handling is needed for certain
types of devices. For example, a digital camera needs to be identified as such so that the
Windows Shell can provide the appropriate user interface. Likewise, additional informa-
tion is needed about portable media players so that Windows Media Player will recog-
nize that it can synchronize with the device. If the redirected device is a Point of Service
for .NET device, additional steps are taken to enable it with Microsoft Point of Service
for .NET 1.11.
Third parties can add support for redirecting their devices as well, provided several
requirements are met. It is recommended that redirected device drivers be based on the
User-Mode Device Framework, although this is not strictly required. The driver’s INF
file needs several additional sections to support the redirected version of the device.
Windows Server 2008 includes the file ts_generic.inf, which can be included in driver
INF files to easily add specific support for redirection. Including ts_generic.inf instructs
Windows Server 2008 to use usbdr.dll as the device driver during a Terminal Services
session, and usbdr.dll will automatically forward all operations to the client-side device
driver. The relevant sections can be referenced using Include= and Needs= directives in
the driver’s new sections describing the device in redirected scenarios. These added sec-
tions might also provide additional hints to optimize the driver under redirection, as was
done for Windows Portable Devices and Point of Service for .NET devices.
–Eric Holk
Software Design Engineer, Terminal Services
Chapter 8 Terminal Services Enhancements 199
Microsoft POS for .NET Device Redirection
RDC 6.0 also supports redirection of Microsoft Point of Service (POS) for .NET 1.1 devices.
Microsoft POS for .NET 1.1 is a class library that provides an interface for .NET applications
to allow them to communicate with and run POS peripheral devices—for example, bar-code
scanners, biometrics devices, and magnetic card readers. Note that Microsoft POS for
.NET 1.1 device redirection is supported only for x86-based terminal servers running
Windows Server 2008.
Terminal Services Easy Print
Another enhanced device redirection feature of Windows Server 2008 is Terminal Services
(TS) Easy Print. This enhancement greatly improves printer redirection by eliminating the
need for administrators to install any printer drivers on the terminal server while guaranteeing
client printer redirection and the availability of printer properties for use in remote sessions.
TS Easy Print leverages the new XPS print path used in Windows Vista and Windows
Server 2008, and here’s another of our product team experts to tell us more about it:
From the Experts: Inside TS Easy Print
In the past, to successfully redirect a given printer, the proper driver needed to be
installed on both the TS client machine and TS server machine. As many customers have
experienced, the requirement of having the TS server host a matching printer driver
caused configuration problems on the server. Simply put, this requirement had to go. As
a result, TS Easy Print presents a printing redirection solution that is “driverless.” The
only driver required is the TS Easy Print system that comes installed by default.
The implementation of this solution comes in two pieces.
The first piece is presenting the user with printing preferences through the UI so that he
can configure the print job on any arbitrary printer. Instead of creating some server-side
UI that shows the bare minimum of preferences users need (such as number of copies,
landscape vs. portrait, and so on) and applying this UI to all printers, the TS Easy Print
driver acts as a proxy and redirects all calls for the UI to the actual driver on the client
side. When the user goes to edit preferences for a print job on a redirected printer, the TS
client launches this UI from the local machine on top of the remote session. As a result,
the user sees the same detailed printer-specific UI (ensuring that all printer options are
available to the user) he would see if he were printing something locally. This is what cre-
ates the more “consistent printing experience.” The user’s selected preferences are then
redirected to the server for use when printing.
200 Introducing Windows Server 2008
The second piece is the ability to send a print job from the server to the client and
reliably print the job. To do so, we take advantage of Microsoft’s new document format,
XPS. When redirecting print jobs, on the server, we create an XPS file using the prefer-
ences the user has selected, send the XPS file to the client, and, with the help of other
printing components, print the job on the appropriate printer. The biggest advantage to
using the XPS format is that it provides a high-quality print rendering system that is
agnostic to the printer the job will actually be printed on.
–Zardosht Kasheff
Software Design Engineer, Terminal Services
Single Sign-On for Domain-joined Clients
A key enhancement of Terminal Services in Windows Server 2008 is the ability to allow users
with domain accounts to log on once and gain access to the terminal server without being
asked to enter their credentials again. This new feature is called single sign-on (SSO), and it
can work with both password-based logons and smart card logons. It’s designed to make it
easier for enterprises to run business applications using terminal servers—users can use SSO
when running either the full Remote Desktop or individual RemoteApp programs. I don’t
know about you, but I hate having to enter my password twice—I hate passwords, too, because
I have so many of them to remember. Smart cards are great because all you need to remember
is your PIN, but I have several smart cards, which means several PINs, which means I hate
PINs too. What a world we live in!
Anyway, to implement Terminal Services SSO, you need both Windows Vista on the client
side and Windows Server 2008 running on the back end for your terminal server. Plus you
need an Active Directory domain environment. Enabling SSO is a two-step process that
requires configuring authentication on the Terminal Server and then configuring the client to
allow default credentials to be used for logging on to your terminal servers.
To enable SSO on the terminal server, open the Terminal Services Configuration snap-in, dou-
ble-click on the RDP connection you want to configure, switch to the General tab, and make
sure either Negotiate or SSL (TLS 1.0) is selected for Security Layer. (The default is Negotiate.)
Configuring SSO on the client can be done using Group Policy by enabling the Computer
Configuration\Administrative Templates\System\Credentials Delegation\Allow Delegating
Default Credentials policy setting and adding your terminal servers to the list of servers
for this policy.
Chapter 8 Terminal Services Enhancements 201
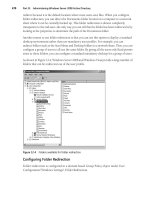
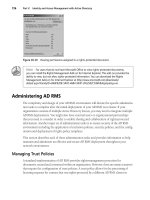
To configure clients for SSO to a TS Gateway server, you need to enable the User
Configuration\Administrative Templates\Windows Components\Terminal
Services\TS Gateway\Set TS Gateway Server Authentication Method policy setting and set
it to Use Locally Logged-On Credentials. And, if you do this, you should also select the
Allow Users To Change This Setting check box as shown here:
The reason behind this check box is that TS Gateway supports Group Policy settings slightly
differently than other Windows components. Normally, Group Policy settings are enforced so
that end users can’t change them. But when Group Policy is enabled for TS Gateway and this
check box is selected, end users can change the way they authenticate with the TS Gateway
server, for example, by using another user account to authenticate with the TS Gateway server.
So enabling this setting as described above while also selecting this check box means that the
TS Gateway admin is only suggesting the setting instead of enforcing it.
Other Core Enhancements
There are other core enhancements to how Terminal Services works in Windows Server 2008,
and to hear an explanation of these changes let’s listen to another of our experts from the Ter-
minal Server team at Microsoft. First, here’s a description of an under-the-hood change in how
the core Terminal Services engine works in Windows Server 2008.
202 Introducing Windows Server 2008
From the Experts: Terminal Services Core Engine Improvements
In Windows Vista and Windows Server 2008, we did a bunch of improvements to the
core TS engine. The core engine (termsrv.dll) was split into two components: lsm.exe
(the core session manager component), and the termsrv.dll (which takes care of remote
connectivity).
LSM stands for Local Session Manager. It’s one of the core system processes started
during boot, and it does session management. LSM also interacts with other key system
components—such as smss.exe, winlogon.exe, logonui.exe, csrss.exe, and win32k.sys—
to make sure that the rest of the OS is in sync with session management operations, load-
ing the appropriate graphics driver, unloading the driver during session disconnect, and
so on. The LSM manages all connections and provides Vista with features such as Fast
User Switching (FUS) even if Remote Desktop isn’t enabled.
The Termsrv service (termsrv.dll running inside svchost.exe) hosts the listener, which
talks to a kernel-mode TDI driver to listen for incoming connection requests. It also does
a bunch of session arbitration, interacts with License Server, supports Media Center
extender sessions, talks to RDP layers in the protocol stack, and also communicates
with LSM.
Because of this, when someone needs to turn off remote connections, it can be done
without turning off Fast User Switching (FUS), which enables multiple users to use the
machine locally without a user ever having to log off! This is because LSM takes care of
all the session management functionality needed by FUS.
The other significant benefit here is security—only LSM runs with system privilege, and
all the termsrv.dll code runs with network service privilege, which is at a much lesser
privilege level. Only one-third of the old Termsrv code runs in LSM; hence, this is
significant attack surface reduction when compared to Windows XP and Windows
Server 2003.
–Sriram Sampath
Development Lead, Terminal Services
The next sidebar deals with the impact that session 0 isolation has for those developing
Terminal Services applications. Session 0 isolation is a new feature of Windows Vista and
Windows Server 2008 that is designed to enhance the security of the platform. In previous
versions of Windows, all services run in Session 0 together with user applications, and this
poses a security risk because services run with elevated privileges and are therefore targets
for malware trying to elevate privilege level. In Windows Vista and Windows Server 2008,
however, services are now isolated in session 0 while user applications run in other sessions,
which means that services are protected from attacks caused by exploiting faulty application
code. This design change affects how applications should be developed to run on terminal
servers. Let’s listen to our expert explain this issue:
Chapter 8 Terminal Services Enhancements 203
From the Experts: Session 0 Isolation and App Development Tips
In Windows Vista and Windows Server 2008, session 0 is reserved for running System
services—no interactive user logon is permitted in session 0 (called the console session in
Windows Server 2003—that is, the session at the physical keyboard and mouse). One of
the primary reasons for sandboxing services in their own session is for security—services,
such as LocalSystem, usually run under very high privilege, and user apps run with far
lesser privilege. However, if both of these run in the same interactive session, the lower-
privilege apps can easily attack the higher-privilege services. The most common way to
do this is by using something called shatter attacks, which exploit the UI thrown by some
services—for example, an error message UI or a status message UI.
Because services run in their own session, service writers and app developers should
follow these guidelines:
■ Don’t assume in your code that apps will run in session 0, and don’t assume that
apps and services will run in the same session. For example, if your service created
an event (which was not prefixed with the Global\ flag), don’t assume that your
app will be able to see the event (or wait on it) automatically. Explicitly create
named objects with the Global\ flag if you plan to use this model.
■ To determine whether the app is running in a physical console session, some apps
these days check whether they are running in session ID 0. This is plain wrong to
do, even in Windows XP and Windows Server 2003, but the fact of the matter is
that some apps still do this. The correct way to do this check is to find the current
session ID of the application using the ProcessIdToSessionId API. Then use the
WTSGetActiveConsoleSessionId API to find the session ID of the physical console
session; then check whether both of them are the same.
■ If the services want to display a UI (say, a status message), the best way to do it is
to use the CreateProcessAsUser API and create a process in the target user’s session.
This process should run with the same privileges of the logged-on user.
■ If the services need to interact with the app, the best way to design it is through a
regular client-server mechanism—for example, the service and the app in a different
session could communicate through a protocol such as RPC or COM, and the app
could do the work in the user session on behalf of the service.
–Sriram Sampath
Development Lead, Terminal Services
Actually, this whole concept of Terminal Services sessions is worth digging into further, as
there are some additional significant changes in how Terminal Services works in Windows
Server 2008 compared with Windows Server 2003. What is a Terminal Services session,
anyway? What possible states can a session have? What happens when a session disconnects
204 Introducing Windows Server 2008
and you try to reconnect to your terminal server? How does licensing work with Terminal
Services sessions? (We’ll also look at Terminal Services licensing in more detail later in this
chapter.) What’s the difference between a user session and an administrative session? What
happens when contention occurs—that is, when your session limit is exceeded and you try
to connect to another session? And how has the effect of the /console switch changed in
Windows Server 2008 for Terminal Services sessions given the session 0 isolation feature
described in the previous sidebar? These are all fascinating questions that have been bugging
me for a while—and here comes another expert from the Terminal Services team to explain!
Let’s listen and learn:
From the Experts: Understanding the Console Session
This sidebar describes in detail the changes to the console session in Windows Server
2008.
Sessions and Their States
Whenever a user logs on to a machine (locally or remotely), he gets an interactive
session. A session is a defined space which contains a collection of running processes
representing the system or the user and his desktop and applications.
Each session is identified by an ID. In Windows Server 2008, the first interactive user
session is session 1, whether the user is logged on to the local terminal or connected
remotely. The session IDs then increment as more users log on to the server. The session
IDs are reused as users log off and previous sessions are terminated.
The session, during its lifetime, transits through various states. The most interesting
states are active and disconnected. If a user is actively working in the session, the session
is in an active state. And if the user is not connected to the session while his application
is still running, the session is in a disconnected state.
Terminals—Local and Remote
Whenever a session is in an active state, the session is attached to a set of input and
output devices (keyboard, mouse, monitor, and so on). This set of devices will be
referred to as the terminal for the purposes of this discussion.
The terminal can be a local terminal—that is, the keyboard, mouse, and monitor, are
physically connected to the server.
The terminal can be a remote terminal—that is, the session on the server is bound to a
keyboard, mouse, and monitor on the client machine. The remote terminal is also asso-
ciated with a connection. The connection is an object that contains information about
the remote connection—the protocol, stack drivers, listener, session extension drivers,
and so on.
Chapter 8 Terminal Services Enhancements 205
When the session is disconnected, it is not attached to any terminal. When the remote
session (or rather, connection) is disconnected, the remote terminal and connection
objects are destroyed. The local terminal, on the other hand, is never destroyed perma-
nently. When the session at the local terminal gets disconnected, a new “console ses-
sion” is created and a new local terminal is attached to that session. In this case, although
the session is not in active state, it is attached to a terminal. Such a session is said to be
in a connected state. For example, if you list the sessions that occur while no one is logged
on to a local terminal, you will notice the session state of “console” session is reported as
connected (this is displaying the CTRL+ALT+DEL screen).
Session Reconnection
The disconnected sessions might get reattached to different terminals, local or remote,
when reconnect happens. The following example illustrates the sequence of events that
takes place during a disconnect and reconnect scenario that involves logon at a local
terminal:
1. When a user logs on to the local terminal, a session (session 1) is attached to the
local terminal and is in the active state. The session local terminal is displayed on
the local terminal; the name of the session is “console.”
2. When the user disconnects (or locks) the session, the session gets disconnected.
At this point, session 1 is not attached to any terminal. When the local terminal is
terminated, it creates a new session (session 2) that represents the local terminal
(displaying the CTRL+ALT+DEL screen). A new local terminal is created and is
attached to session 2. Session 2 is now in connected state. The session 1 remains
in disconnected state. The name “console” is now assigned to session 2.
3. When the same user connects remotely to the server, a new remote terminal is
created. By default, each user is restricted to single session. Because this user
already had a disconnected session, his new remote terminal gets attached to the
already existing session (session 1). Session 1 state changes to the active state with
a remote terminal attached to it.
4. When the user disconnects the session, the remote terminal is destroyed and
session 1 remains in the disconnected state.
5. Session 1 terminates only when the user initiates logoff or the administrator
forcefully logs off that session using admin tools.
Meaning and Purpose of /console and /admin
In Windows Server 2003, the “console” is a special session with ID 0. This session is
always bound to the local terminal. When a user logs on to the local terminal, he or she
gets logged on to session 0. This session is never terminated unless the machine is shut
down. There are certain things that could be done only in session 0. For example, several
applications ran well only in console session. Several services ran only in session 0 and
popped up UI, which could be viewed only by logging on to the local terminal (or
session 0).
206 Introducing Windows Server 2008
The purpose of the /console switch in Windows Server 2003 is to connect remotely to
the local terminal, specifically session 0. This is needed by administrators to install and
execute those applications or view pop-ups given by services or simply to get back to the
session on the local terminal. Also, it is the only way to administer the server remotely
without consuming a TS CAL when Terminal Server is installed.
In Windows Server 2008, session 0 is not an interactive session anymore; it hosts only
services. The “console” session is the one that is bound to the local terminal. However,
there is no single session that acts as “console” at all times. The session bound to a local
terminal may be logged off or disconnected and a new session will be created and asso-
ciated with the local terminal. At any point, whatever session is associated with the local
terminal is named as “console” session.
In Windows Server 2008, there is no need to connect remotely to this session called
“console” because all sessions with remote terminals have the same capabilities as the
session that is on the local terminal. For the applications that used to run only in session
0 before, fixes will be provided through shims by the OS App Compat component. The
UI popped up in the services session (session 0) by legacy services will be available for
viewing by a separate feature called “session 0 viewer.”
In addition, the /console switch has been repurposed in Windows Server 2008 to
administer the server without consuming a TS CAL, and because there is no longer a
need to connect to the “console” session, this switch has been changed in Windows
Server 2008 to /admin.
In Windows Server 2003, when the /console switch is used to connect to the server, the
user is connected to session 0. This behavior is applicable to both Remote Administra-
tion mode and Terminal Server mode. In Windows Server 2008, when the TS role is
installed, the /admin switch either results in the creation of a new session or it recon-
nects to any existing session. In Remote Administration mode, /admin has no effect.
In Windows Server 2003, when /console is not used, the user gets a new session even if
he or she already has a session on the local terminal—no matter what the “Restrict user
to single session” policy says. In Windows Server 2008, whether or not /admin is
specified, the user will be reconnected to the existing session if the “Restrict user to
single session” policy is set (this is the default).
Remote Administration Sessions Using /admin
When the TS role is installed, remote connections initiated using mstsc.exe consume a
TS CAL. To administer the machine remotely without consuming a TS CAL, you can use
the /admin switch (for example, mstsc /admin). By using /admin, you can have a maxi-
mum of two administrative sessions—just as the remote administration mode works—
including the one on the local terminal. The /admin switch has no effect in remote
administration mode.
Chapter 8 Terminal Services Enhancements 207
There is a difference in the permissions needed to obtain an administrative session at the
local terminal vs. at the remote terminal using /admin. To obtain administrative sessions
remotely using /admin, the user must be part of the Remote Desktop Users group and
should be listed in SD_CONSOLE. By default, only administrators are part of this ACL
as well as the Remote Desktop Users group. The SD_CONSOLE ACL can be modified by
administrators using WMI to provide more users with privileges to have administrative
sessions using /admin. There is no UI to do this because, normally, there should be no
need to change this.
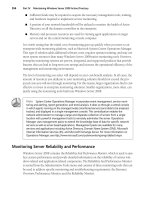
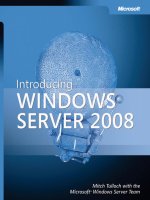
To obtain the administrative session at the local terminal the user needs to have the
interactive user logon right (which is the highlighted policy below in secpol.msc):
Differences between Administrative Sessions and User Sessions
There are a few behavioral differences between administrative sessions and user
sessions:
■ For administrative sessions, the time zone is not redirected, even if it is enabled,
whereas for the user sessions it is. This essentially means time-zone redirection is
not available in Remote Administration mode because there are no CAL sessions.
■ The administrative sessions are exempted from the “Deny User Permissions To
Log On To Terminal Server” policy in the Terminal Services profile of the user.
For example, if this check box is selected for any user, he cannot connect remotely
by using mstsc without /admin. However, if the same user is listed in the
SD_CONSOLE or is part of the administrators group, he can connect remotely
using /admin.
208 Introducing Windows Server 2008
■ The administrative sessions are exempted from the drain mode. If the server is in
drain mode, you will not be able to connect remotely without /admin, unless you
have an existing session on the server. However, you can connect by using /admin
regardless of whether you have the required permissions.
■ The administrative sessions are exempted from the maximum session limit
configured on the server (note that there still can be only two active /admin
sessions at one time).
■ When the limit on number of administrative sessions is exceeded, the contention
is handled by allowing the new user to negotiate with existing users (described
below). There is no contention handling for CAL sessions. You can connect
remotely as long as you have a valid CAL.
Changing an Administrative Session to a User Session (or Vice Versa)
When a user connects to a server remotely using /admin, a remote terminal is created
that consumes no TS CAL. When the user disconnects the session, the terminal is
destroyed; however, the session is still an administrative session consuming no TS CAL.
Now, when the same user connects to the server remotely again without using /admin,
a new remote terminal is created. This remote terminal is connected to the existing ses-
sion and consumes a TS CAL. This means, for example, that the session will no longer
be listed in session contention UI when the maximum number of active administrative
type sessions is exceeded.
Contention Handling
In Windows Server 2003, in Remote Administration mode, you can have a total of three
sessions, regardless of their state. This can be one session at the local terminal and two
remote sessions, or two remote sessions without /console and one with /console.
In Windows Server 2003, in Remote Administration mode, when the number of
sessions exceeds three, the fourth session gets an error message saying “Maximum
number of sessions exceeded.”
In Windows Server 2003, in Terminal Server mode, you can have a maximum of one
remote connection for administration purposes that does not consume a CAL. If anyone
is already logged on to the console, that user must be logged off.
In Windows Server 2008, you can have a maximum of two active sessions (local or
remote) for administration purposes. When a third user attempts to logon to an admin-
istrative session (for example, when a user initiates a remote connection using /admin or
logs on to the local terminal) while two administrators are active, the user gets a dialog
Chapter 8 Terminal Services Enhancements 209
in which she can request that existing users disconnect. The dialog looks like this (in
this example, Admin1 and Admin2 are the active users using administrative sessions):
The check box for forcibly disconnecting an existing user does not exist if the new user
is not a member of the administrators group.
When you select a user in this dialog, the selected user gets a disconnect request similar
to the one in Windows XP or Windows Vista clients; if the user does not respond, they
will be disconnected after 30 seconds (the session is not logged off).
The list of users contained in this contention UI does not include users who are using
normal user sessions. Only those sessions that are created at the local terminal or at the
remote terminal using /admin are listed in this UI.
Note that while there can be maximum of 2 active sessions (local or remote), there can
be multiple disconnected sessions coexisting on the server.
–Mahesh Lotlikar
Software Development Engineer, Terminal Services
Installing and Managing Terminal Services
Before we end our discussion of core Terminal Services enhancements in Windows Server
2008 and move on to talk about other new Terminal Services features in this platform, let’s
talk briefly about installing and managing the Terminal Services role. For small and mid-sized
organizations, your friend here is Server Manager, which we introduced previously in Chapter
4, “Managing Windows Server 2008.” When you use the Add Roles Wizard to add the
Terminal Services role, you’re presented with the following five role services:
■ Te r m i n a l S e r ve r Installs core Terminal Server functionality, and lets you share either
the full desktop as in previous versions of Terminal Server or individual applications
using the new TS RemoteApp feature. See the upcoming “Terminal Services RemoteApp”
section for more information.